1
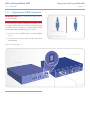
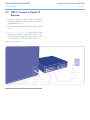
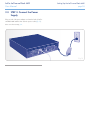
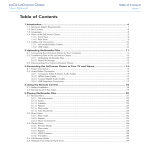
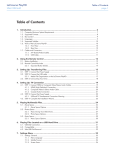
LaCie LaCinema Black MAX User Manual Table of Contents page 1 Table of Contents 1.Introduction............................................................................................................... 6 1.1.Minimum System Requirements...................................................................................................... 7 1.2.Supported Formats........................................................................................................................ 7 1.3.Box Content................................................................................................................................. 8 1.4.Languages................................................................................................................................... 8 1.5.Views of the LaCinema Black MAX.................................................................................................. 9 1.5.1. Front View.......................................................................................................................... 9 1.5.2. Status Light Behavior........................................................................................................... 9 1.5.3. Rear View......................................................................................................................... 10 2.Using the Remote Control........................................................................................ 11 2.1.Battery Installation....................................................................................................................... 11 2.2.Remote Control Key Index............................................................................................................ 12 2.2.1. Important Button Details.................................................................................................... 13 3.Setting Up the LaCinema Black MAX........................................................................ 14 3.1.STEP 1: Connect to TV ............................................................................................................... 14 3.1.1. HDMI (High-Definition) Connection.................................................................................... 15 3.1.2. SCART (Standard Definition) Connection............................................................................ 16 3.1.3. Component & Analog Stereo Audio (High Definition) Connection......................................... 17 3.1.4. Optical Audio (S/PDIF) Connection.................................................................................... 18 3.2.STEP 2: Connect to Digital TV Antenna......................................................................................... 19 3.3.STEP 3: Connect the Power Supply............................................................................................... 20 3.4.STEP 4: Turning on the TV........................................................................................................... 21 3.5.STEP 5: Complete the Installation Wizard...................................................................................... 21 3.6.STEP 6: Connect to Your Network................................................................................................ 26 3.6.1. Wireless Network Connection............................................................................................ 26 3.6.2. Ethernet Network Connection............................................................................................ 27 4.Playing Multimedia Files.......................................................................................... 28 4.1.Movie Space.............................................................................................................................. 28 4.1.1. Display format.................................................................................................................. 29 4.1.2. Subtitle............................................................................................................................ 29 4.1.3. Audio Languages.............................................................................................................. 29 4.1.4. Play mode........................................................................................................................ 30 4.1.5. Repeat............................................................................................................................. 30 4.2.Photos Menu.............................................................................................................................. 31 4.2.1. Transition......................................................................................................................... 31 4.2.2. Rotate Left / Rotate right.................................................................................................... 31 4.3.Music Menu............................................................................................................................... 32 4.3.1. Repeat............................................................................................................................. 32 4.3.2. Random........................................................................................................................... 32 4.4.Playlist Management................................................................................................................... 33 4.4.1. To Create a New Playlist................................................................................................... 33 4.4.2. Change Playlist Track Order.............................................................................................. 33 4.4.3. To Remove an Item from the Playlist................................................................................... 33 5.Playing & Copying Files from External Sources........................................................ 34 5.1.Playing Files from an External USB Hard Drive............................................................................... 34 5.1.1. Connection...................................................................................................................... 34 LaCie LaCinema Black MAX User Manual Table of Contents page 2 5.1.2. Compatibility.................................................................................................................... 34 5.1.3. Playing & Copying Files..................................................................................................... 34 5.2.Playing Files from a Networked Media Server................................................................................ 35 5.2.1. Network-Attached Hard Disk (NAS).................................................................................... 35 5.2.2. Host Computer................................................................................................................. 36 5.3.Playing Files From a Host Computer Connected Via USB................................................................ 37 5.4.Copying Files From an External Source to the LaCinema Black MAX................................................ 38 5.4.1. Copying Files from a NAS to the LaCinema Black MAX........................................................ 38 5.4.2. Copying Files from a USB-Connected Computer to the LaCinema Black MAX........................ 39 5.5.Recording from Analog Video Sources (Including Camcorders).............................................................. 40 5.5.1. Recording Videos.............................................................................................................. 40 5.5.2. Accessing Recorded Video from Camcorders...................................................................... 40 6.Watching and Recording Television......................................................................... 41 6.1.Searching for Channels............................................................................................................... 41 6.2.Watching TV............................................................................................................................... 41 6.2.1. TV Control Board............................................................................................................. 42 6.2.2. TV Guide......................................................................................................................... 42 6.2.3. Timeshifting: Taking Control of Live TV............................................................................... 42 6.2.4. About the TV Screen......................................................................................................... 43 6.2.5. Creating a Favorite Channel List........................................................................................ 43 6.2.6. Managing Favorite Channel Lists....................................................................................... 43 6.3.TV Space Icon Details.................................................................................................................. 44 6.4.Recording TV.............................................................................................................................. 45 6.4.1. Instant Recording.............................................................................................................. 45 6.4.2. Scheduled Recording........................................................................................................ 46 6.5.Accessing Recorded Shows.......................................................................................................... 46 7.Settings Menu.......................................................................................................... 47 7.1.Settings Menu Overview.............................................................................................................. 47 7.1.1. Settings: General.............................................................................................................. 47 7.1.2. Settings: Television............................................................................................................ 48 7.1.3. Settings: Video/Photo........................................................................................................ 48 7.1.4. Settings: Connection......................................................................................................... 49 7.1.5. Settings: Network.............................................................................................................. 49 7.1.6. Settings: Advanced........................................................................................................... 49 7.1.7. Settings: Version............................................................................................................... 49 7.2.Firmware Update........................................................................................................................ 50 8.Contacting Customer Support.................................................................................. 51 8.1.LaCie Technical Support Contacts................................................................................................ 52 9.Warranty Information.............................................................................................. 53 LaCie LaCinema Black MAX User Manual Copyrights Copyright © 2009 LaCie. All rights reserved. No part of this publication may be reproduced, stored in a retrieval system, or transmitted in any form or by any means, electronic, mechanical, photocopying, recording or otherwise, without the prior written consent of LaCie. Trademarks Apple, Mac, and Macintosh are registered trademarks of Apple Inc. Microsoft, Windows 98, Windows 98 SE, Windows 2000, Windows Millennium Edition, Windows XP and Windows Vista are registered trademarks of Microsoft Corporation. Other trademarks mentioned in this manual are the property of their respective owners. Changes The material in this document is for information only and subject to change without notice. While reasonable efforts have been made in the preparation of this document to assure its accuracy, LaCie assumes no liability resulting from errors or omissions in this document, or from the use of the information contained herein. LaCie reserves the right to make changes or revisions in the product design or the product manual without reservation and without obligation to notify any person of such revisions and changes. Canada Compliance Statement This Class B digital apparatus meets all requirements of the Canadian Interference-Causing Equipment Regulations. Forward page 3 FCC Statement LaCinema Black MAX Tested to comply with FCC standards for home or office use This device complies with Part 15 of the FCC Rules. Operation is subject to the following conditions: 1. The devices may not cause harmful interference 2. The devices must accept any interference received, including interference that may cause undesired operation. NOTE: This equipment has been tested and found to comply with the limits for a Class B digital device, pursuant to Part 15 of the FCC Rules. These limits are designed to provide reasonable protection against harmful interference in a residential installation. This equipment generates, uses and can radiate radio frequency energy and, if not installed and used in accordance with the instructions, may cause harmful interference to radio communications. However, there is no guarantee that interference will not occur in a particular installation. If this equipment does cause harmful interference to radio or television reception, which can be determined by turning the equipment off and on, the user is encouraged to try and correct the interference by one or more of the following measures: ✦✦ Reorient or relocate the receiving antenna. ✦✦ Increase the separation between the equipment and receiver. ✦✦ Connect the equipment into an outlet on a circuit different from that to which the receiver is connected. ✦✦ Consult the dealer or an experienced radio/TV technician for help. Modifications to this product not authorized by LaCie could void the FCC & Industry Canada regulations and negate your authority to operate the product. Manufacturer’s Declaration for CE Certification We, LaCie, solemnly declare that this product conforms to the following European standards: Class B EN60950, EN55022, EN55024, EN61000-3-2: 2000, EN61000-3-3: 2001 With reference to the following conditions: 73/23/EEC Low Voltage Directive; 89/336/EEC EMC Directive CAUTION: Modifications not authorized by the manufacturer may void the user’s authority to operate this device. CAUTION: The LaCie LaCinema Black MAX’s warranty may be void as a result of the failure to respect the precautions listed above. LaCie LaCinema Black MAX User Manual This symbol on the product or on its packaging indicates that this product must not be disposed of with your other household waste. Instead, it is your responsibility to dispose of your waste equipment by handing it over to a designed collection point for the recycling of waste electrical and electronic equipment. The separate collection and recycling of your waste equipment at the time of disposal will help to conserve natural resources and ensure that it is recycled in a manner that protects human health and the environment. For more information about where you can drop off your waste equipment for recycling, please contact your local city office, your household waste disposal service, or the shop where you purchased the product. Health and Safety Precautions ✦✦ Only qualified persons are authorized to carry out maintenance on this device. ✦✦ Read this User Manual carefully and follow the correct procedure when setting up the device. ✦✦ Do not open a disk drive or attempt to disassemble or modify it. Never insert any metallic object into the drive to avoid any risk of electrical shock, fire, short-circuiting or dangerous emissions. The disk drives shipped with your LaCie LaCinema Black MAX contain no user-serviceable parts. If it appears to be malfunctioning, have it inspected by a qualified LaCie Technical Support representative. ✦✦ Never expose your device to rain, or use it near water, or in damp or wet conditions. Never place objects containing liquids on the LaCie LaCinema Black MAX, as they may spill into its openings. Doing so increases the risk of electrical shock, short-circuiting, fire or personal injury. ✦✦ Make sure that the computer and LaCie LaCinema Black MAX are elec- Forward page 4 trically grounded. If the devices are not grounded, there is an increased risk of electrical shock. Power requirements 100-240 V~, 4A, 60-50 Hz, (Supply voltage fluctuations not exceeding ± 10% of the nominal, transient over-voltages according to over-voltage category II). General Use Precautions ✦✦ Do not expose the LaCie LaCinema Black MAX to temperatures outside the range of 5° C to 30° C (41° F to 86° F); or to operational humidity beyond 5-80%, non-condensing, or non-operating humidity beyond 10-90%, non-condensing. Doing so may damage the LaCie LaCinema Black MAX or disfigure its casing. Avoid placing your LaCie LaCinema Black MAX near a source of heat or exposing it to sunlight (even through a window). Inversely, placing your LaCie LaCinema Black MAX in an environment that is too cold or humid may damage the unit. ✦✦ Always unplug the LaCie LaCinema Black MAX from the electrical outlet if there is a risk of lightning or if it will be unused for an extended period of time. Otherwise, there is an increased risk of electrical shock, short-circuiting or fire. ✦✦ Use only the power supply shipped with the device. ✦✦ Do not place objects on top of the LaCie LaCinema Black MAX or use excessive force on it. ✦✦ Never use excessive force on your LaCie LaCinema Black MAX. If you detect a problem, see the Troubleshooting section in this manual. CAUTION: A shielded-type power cord is required in order to meet FCC emission limits and also to prevent interference to the nearby radio and television reception. It is essential that only the supplied power cord be used. LaCie LaCinema Black MAX User Manual Forward page 5 Operating Environment Temperatures ✦✦ Do not expose the LaCie LaCinema Black MAX to temperatures outside the range of 5° C to 30° C (41° F to 86° F). As high end audio/video appliance, the LaCie LaCinema Black MAX has been designed with an efficient ventilation system. Allow 5 cm of clearance for airflow on all sides of the LaCinema Black MAX to prevent overheating. See Fig. 01. 5 cm 5 cm Fig. 01 ✦✦ Do not stack objects on top of the LaCie LaCinema Black MAX, as they may interfere with the built-in WiFi antenna. See Fig. 02. IMPORTANT INFO: Any loss, corruption or destruction of data while using a LaCie drive is the sole responsibility of the user, and under no circumstances will LaCie be held liable for the recovery or restoration of this data. To help prevent the loss of your data, LaCie highly recommends that you keep TWO copies of your data; one copy on your external hard disk, for instance, and a second copy either on your internal hard disk, another external hard disk or some other form of removable storage media. LaCie offers a complete line of CD and DVD drives. If you would like more information on backup, please refer to our website. IMPORTANT INFO: 1GB = 1,000,000,000 bytes. 1TB = 1,000,000,000,000 bytes. Once formatted, the actual available storage capacity varies depending on operating environment (typically 5-10% less). Fig. 02 5 cm LaCie LaCinema Black MAX User Manual Introduction page 6 1.Introduction Congratulations on the purchase of your new LaCie LaCinema Black MAX! A premium media center, LaCie LaCinema Black MAX plugs directly into a wide array of audio/visual equipment for instant playback of digital TV, home movies, music or photos. Featuring the most advanced technologies, the LaCinema Black MAX brings HD Digital TV, Live TV recording, Audio Video encoding and a UPnP network media player together in an elegant glossy black design. To get started, simply connect the LaCie LaCinema Black MAX to your TV and use the included remote to easily navigate through the menus, called Spaces, to watch and record TV, listen to music, view photos or watch High definition movies. LaCinema Black MAX has been design to offer a new media experience providing ease of use in combination with the latest available technologies. Quick Links Click a topic: ✦✦ Setting Up the LaCinema Black MAX ✦✦ Watching and Recording Television ✦✦ Playing Multimedia Files Features ✦✦ Connect directly to your TV for instant playback of Digital TV, High Definition movies, music or photos ✦✦ Benefits of a full featured and network-attached Personal Video Recorder ✦✦ Digitalize your old VHS, camcorder tape or other analogue Audio Video source LaCie LaCinema Black MAX User Manual Introduction page 7 1.1. Minimum System Requirements Mac Users Windows Users ✦✦ 500 MHz Intel Pentium II or later ✦✦ Windows 2000, XP or Vista ✦✦ 256 MB RAM ✦✦ Intel Core Duo ✦✦ Mac OS 10.3.9 ✦✦ 1GB RAM ✦✦ USB interface port ✦✦ Internet connection (for downloading updates) ✦✦ UPnP Media Server to stream content to your LaCinema Black MAX ✦✦ Internet connection (for downloading updates) 1.2. Supported Formats Video Codecs MPEG-1, MPEG-2 / HD, MPEG-4, DIVX, XVID, H.264 HD, WMV9 HD Video Format AVI, DIVX, MPG, MP4, MKV, WMV, MOV, ISO, VOB, IFO, ASF, TS, TP, TRP, M2TS Max Resolution 1920 x 1080p Upscaling 1080i for standard definition movies Audio MP3, WMA, AAC, OGG, AC3, MP4, WAV/LPCM Playlist M3U DTS Pass-through to compatible audio amplifier Photo Lossless JPEG (excluding progressive JPEG), PNG, GIF, BMP, TIF Output ✦✦ Video: HDMI, Component (YUV), Composite (CVBS) ✦✦ Audio: Optical Audio, Audio Stereo Input ✦✦ Video: Analog composite video or S-Video ✦✦ Audio: Analog stereo audio Network ✦✦ Ethernet 10/100 Mbps ✦✦ WiFi (802.11n) TV Systems PAL / NTSC TV Digital Terrestrial Television (DVB-T); High definition supported LaCie LaCinema Black MAX User Manual Introduction page 8 1.3. Box Content Your LaCie LaCinema Black MAX package contains the system tower and an accessories box containing the items listed below. 1. LaCie LaCinema Black MAX 2. Remote control 3. 2 x AAA batteries 4. SCART to Video RGB / Stereo Audio cable (Video out) 5. SCART to Composite / S-Video & Stereo Audio cable (Video in) 6. HDMI cable 7. USB cable 8. External power supply 9. Quick Install Guide 10. Utilities CD-ROM IMPORTANT INFO: Please save your packaging. In the event that the drive should need to be repaired or serviced, it must be returned in its original packaging. 1.4. Languages Supported Languages ❖ English ❖ French ❖ Italian ❖ German ❖ Spanish LaCinema B L A C LaCinema Black K LaCie ‘1-Click’ Backup Software for Mac & Windows 7118 Quick Install Guide 97 070 913 LaCie LaCinema Black MAX User Manual Introduction page 9 1.5. Views of the LaCinema Black MAX 1.5.1. Front View 1. USB expansion port – Connect a USB flash disk, hard disk or card reader to access its multimedia files directly from your TV. 2. Status light (Red) – Indicates recording and product default resetting. 3. Infrared receiver – Receives the infrared signal from the remote control. Make sure the receiver is not obstructed. 1.5.2. Status Light Behavior LaCinema Black MAX behavior Blue status light Red status light On On Off Off or in Stand by Off Off Starting up On Flashes Playing content Off Off Resetting to default On On Receiving a command from the remote Flashes once Off Recording Depends on other actions On LaCie LaCinema Black MAX User Manual Introduction page 10 1.5.3. Rear View 1. Digital TV Antenna IN connector – Plug in the antenna cord coming from your wall or rooftop antenna connector 9. USB 2.0 connector (for PC connection) – Connects to a computer in order to transfer multimedia files 2. Digital TV Antenna OUT connector – Plug in a cable to this connector to pass the cable signal through to your TV (optional) TECHNICAL NOTE: Mac OS X users cannot directly connect the LaCinema Black to their computers via USB. 3. Digital Optical Audio OUT connector – Use an optical digital audio cable (not included) to connect to your home theater system for digital sound 10. Ethernet connector – Connects to a network in order to transfer multimedia files 4. Composite Video (CVBS) OUT connector – Composite video provides good video quality for non-high definition TV. Connect a separate cable for audio output. 5. Composite (Analog) Audio left (white) and right (red) OUT connectors – Stereo audio provides good analog sound output 6. Component Video OUT connector – Component Video provides high-definition picture up to 1080i using a Component Video cable (not included). Connect a separate cable for audio (stereo cable or digital optical cable). 7. HDMI connector – Connects to a TV, A/V receiver, or home theater system. HDMI provides a pure digital connection for high definition video and digital audio all in one cable. If your TV has a DVI (Digital Video Interface) jack, you can use an HDMI-to-DVI adapter (sold separately) for a digital video connection to your TV. You will need to connect a separate cable for audio. 8. USB 2.0 connector (for external disk connection) – Connect USB external storage devices (such as hard disks or flash keys) or memory card readers to browse, play and manage content directly from your TV. 11. S-Video IN connector – connects to an analogue video source for video capture 12. Composite Video (CVBS) IN connector – connects to an analogue video source for video capture 13. Stereo Audio left (white) and right (red) IN connectors – Connects to analog camcorders and projectors 14. Reset to Factory Settings button – Press this button if your LaCinema Black MAX does not respond. All the settings will be reset and the installation wizard will run. 15. External power supply connector – Plug in the power supply WiFi connection – Antenna is inside the product. Connect the LaCinema Black MAX through WiFi to a network in order to transfer multimedia files IMPORTANT INFO: Do not stack objects on top of the LaCie LaCinema Black MAX, as they may interfere with the WiFi antenna. LaCie LaCinema Black MAX User Manual 2.Using the Remote Control Some of the buttons of the remote control have different functions or no function at all depending on the type of file you are viewing. This chapter discusses the button functions for each type of file (movies, photos and music) and battery installation. 2.1. Battery Installation The remote control uses two AAA batteries. The batteries are not pre-installed, so you will need to install them before you can use the remote control. To install the batteries: 1. Remove the battery compartment cover. 2. Load the batteries onto the battery compartment. Position the batteries so that the “+” symbols on the batteries face the same direction as the “+” symbols on the battery compartment. 3. Slide the battery compartment cover back into the remote. IMPORTANT INFO: If you will not be using the remote control for an extended period of time, LaCie recommends that you remove the batteries. IMPORTANT NOTE: Make sure there is a clear path between the remote control and the LaCinema Black MAX. Using the Remote Control page 11 LaCie LaCinema Black MAX User Manual Using the Remote Control page 12 2.2. Remote Control Key Index The LaCie LaCinema Black MAX’s remote control allows you to control the LaCie LaCinema Black MAX while its connected to your TV or home theatre center. Button Function 1. Infra-red emitter Sends signals to the LaCinema Black MAX 2. Stand-by Power on/off 3. Volume down Adjust volume down 4. Volume up Adjust volume up 5. Mark Mark items for various actions; create playlist 6. Options/Settings Action menu, Setup 7. Stop/Cancel Stop the current file playback 8. Play/Pause/OK Selects, plays, or pauses 9. Up/Down Scroll through lists or TV channels 10.Left/Right Scroll through menus or fast forward/ rewind 11.List Show TV channel or file list 12.Record Instant record 13.Information File properties or TV program information 14.Mute Mute sound 15.Home Go to home menu continued on the next page >> 1 2 3 4 5 6 7 8 9 10 11 12 13 14 15 LaCie LaCinema Black MAX User Manual Using the Remote Control page 13 2.2.1. Important Button Details Mark button: This button is used to mark or unmark a file or folder for future action, such as copy/paste or to create a playlist in the different media spaces. Options/Settings button: This button is used to display the available settings or actions in the different media spaces. Once the item is marked, the selected item’s summary is displayed with the number of files and total size. From the Home menu, this button will direct you to the LaCinema’s main Settings menu. In other media spaces or during playback, a contextual menu will be displayed with available actions. You can display the list of marked items by pressing the Options/Settings button and selecting Show Marked Item List from the contextual menu. The item’s list should then be cleared by selecting Unmark Marker List from the contextual menu. Play/Pause/OK button: This button has two main functions, OK and Play/Pause. It allows you to confirm a selection and to start/pause playback in the different media spaces. LaCie LaCinema Black MAX User Manual Setting Up the LaCinema Black MAX page 14 3.Setting Up the LaCinema Black MAX Setup consists of six steps: ✦✦ STEP 1: Connect to TV (section 3.1) ✦✦ STEP 2: Connect to Digital TV Antenna (section 3.2) ✦✦ STEP 3: Connect the Power Supply (section 3.3) ✦✦ STEP 4: Turning on the TV (section 3.4) ✦✦ STEP 5: Complete the Installation Wizard (section 3.5) ✦✦ STEP 6: Connect to Your Network (section 3.6) 3.1. STEP 1: Connect to TV The LaCinema Black MAX supports different ways of connecting to televisions. From the following methods, choose the setup that matches the ports on your television or receiver: Definition ✦✦ HDMI (section 3.1.1) ✦✦ SCART (via included SCART to RCA converter cable) (section 3.1.2) High Definition In each of the above connection methods, it is possible to connect the LaCinema Black MAX to home theater systems by plugging the S/PDIF cable (not included) to your digital amplifier via the digital optical audio connector (see section 3.1.3. Component & Analog Stereo Audio (High Definition) Connection for details. The chart at right illustrates the qualities made possible by the different connection methods. IMPORTANT INFO: The connection diagrams shown below represent typical installations. These diagrams may not work with certain in-house cable systems, master antenna installations, or situations where TV programming is delivered using methods that differ from industry accepted practices. TECHNICAL NOTE: The connectors on the rear of your TV may not appear exactly the same as shown below. Please read the labels next to the connectors carefully to ensure correct connections. continued on the next page >> Standard Definition Connection Maximum Resolution HDMI 1080i Component 1080i SCART RGB 576p Composite 576p LaCie LaCinema Black MAX User Manual Setting Up the LaCinema Black MAX page 15 3.1.1. HDMI (High-Definition) Connection IMPORTANT INFO: Before connecting the cable, power off your TV. 1. Connect one end of the HDMI cable to your television’s HDMI port (Fig. 04). Fig. 03 - HDMI Cable end and profile 2. Connect the other end to the HDMI port on the back of the LaCinema Black MAX. Move on to the next step, 3.2. TECHNICAL NOTE: If your TV’s HDMI port is being used by another device, or if your TV doesn’t have an HDMI port, you can connect to the TV using SCART (see section 3.1.2 for details). Fig. 04 LaCie LaCinema Black MAX User Manual Setting Up the LaCinema Black MAX page 16 3.1.2. SCART (Standard Definition) Connection IMPORTANT INFO: Before connecting the cables, power off your TV. 1. Connect one end of the SCART connector to the SCART port on your TV (Fig. 06). 2. Connect the other end of the SCART connector to the six RCA ports (green, blue, red, yellow, white and red connectors) on the back of the LaCinema Black MAX. Move on to the next step, 3.2. To the LaCinema Black MAX To the TV Fig. 05 - SCART cable ends Fig. 06 LaCie LaCinema Black MAX User Manual Setting Up the LaCinema Black MAX page 17 3.1.3. Component & Analog Stereo Audio (High Definition) Connection IMPORTANT INFO: Before connecting the cables, power off your TV. 1. Connect one end of the component (red, green, and blue) video cable to the component ports on your TV. For Audio output, connect the stereo audio cable (with red and white ends) to the stereo audio port on your TV. The stereo audio connectors you should use are usually located close to the TV’s component ports. 2. Connect the other end of the component connectors to the five RCA ports (red, green, blue, white, and red connectors) on the back of the LaCinema Black MAX. To the LaCinema Black MAX To the TV Fig. 07 - Component cable ends 3. If you choose to use this connection method you will have to change the Component mode using the remote control. After turning on the television (see section 3.4 for details), press the Options/Settings button to navigate to the Settings Space, and set the Component mode to YUV in the Video or Photo section. Move on to the next step, 3.2. Fig. 08 LaCie LaCinema Black MAX User Manual Setting Up the LaCinema Black MAX page 18 3.1.4. Optical Audio (S/PDIF) Connection IMPORTANT INFO: Before connecting the cable, power off your digital amplifier. In each of the above connection methods, it is possible to connect the LaCinema Black MAX to home theater systems by plugging the S/PDIF cable (not included) into your digital amplifier via the LaCinema Black MAX’s digital optical audio connector. 1. Connect one end of a S/PDIF cable to your digital amplifier (Fig. 10). To the LaCinema Black To the stereo Fig. 09 - S/PDIF cable ends 2. Connect the other end of the cable to the back of the LaCinema Black MAX. Move on to the next step, 3.2. LaCinema Black MAX Home Stereo Fig. 10 LaCie LaCinema Black MAX User Manual Setting Up the LaCinema Black MAX page 19 3.2. STEP 2: Connect to Digital TV Antenna 1. Connect one end of your coaxial TV cable (not included) to the digital TV antenna IN connector on the back of the LaCinema Black MAX (a, Fig. 11). 2. Connect the other end of the cable to the wall TV antenna outlet. 3. Pass through connection (optional): Connect another coaxial TV cable to the digital TV antenna OUT connector on the back of the LaCinema Black MAX. Then Connect the other end of the cable to your TV’s cable connector (b, Fig. 11). Move on to the next step, 3.3. TV antenna (a) Pass through (b) Fig. 11 LaCie LaCinema Black MAX User Manual Setting Up the LaCinema Black MAX page 20 3.3. STEP 3: Connect the Power Supply Plug one end of the power adapter cord into the back of LaCinema Black MAX and the other end into a power outlet (Fig. 12). Move on to the next step, 3.4. Fig. 12 LaCie LaCinema Black MAX User Manual Setting Up the LaCinema Black MAX page 21 3.4. STEP 4: Turning on the TV Turn on the television. If you don’t see the loading screen, adjust the video input on your TV to match the type of video cable you connected above (Fig. 13). Move on to the next step, 3.5. Fig. 13 3.5. STEP 5: Complete the Installation Wizard The first time you turn on the LaCinema Black MAX, a wizard appears to help you configure your settings. The wizard appears only the first time you turn on the LaCinema Black MAX unless you have pressed the reset button on the back of the drive. 1. Connect the LaCinema Black MAX to the TV, cable, and power supply as described in sections 3.1, 3.2, and 3.3, and 3.4. 2. A startup screen will appear during product initialization (Fig. 14). This may make take several minutes. continued on the next page >> Fig. 14 LaCie LaCinema Black MAX User Manual Setting Up the LaCinema Black MAX page 22 1. Setup Wizard: Remote The first screen shows you the main functions of the remote control (Fig. 15). For details on the remote control, see 2. Using the Remote Control. Fig. 15 2. Setup Wizard: Select your language Use the Up and Down to confirm (Fig. 16). keys to select and Play/Pause/OK Fig. 16 3. Setup Wizard: Select your country Use the Up and Down to confirm (Fig. 17). keys to select and Play/Pause/OK Fig. 17 LaCie LaCinema Black MAX User Manual Setting Up the LaCinema Black MAX page 23 4. Setup Wizard: Time zone Defines the time zone applicable for your country to allow automatic updates for daylight savings time. Use the Up and Down keys to select and Play/Pause/OK to confirm (Fig. 18). Fig. 18 5. Setup Wizard: Date and Time Use the Up and Down to confirm (Fig. 19). keys to select and Play/Pause/OK Fig. 19 6. Setup Wizard: TV Aspect Ratio Use the Up and Down keys to select either “4:3 TV” or “16:9 Widescreen TV” and Play/Pause/OK to confirm (Fig. 20). Fig. 20 LaCie LaCinema Black MAX User Manual Setting Up the LaCinema Black MAX page 24 7. Setup Wizard: Parental Control Use the Up and Down to confirm (Fig. 21). keys to select and Play/Pause/OK 8. Setup Wizard: Parental Rating Use the Up and Down keys and Play/Pause/OK to confirm to control access to programs according to the TV Parental Guidelines system. 9. Setup Wizard: Parental Control Code Use the Up and Down code and Play/Pause/OK Fig. 21 keys to enter the parental control to confirm. 10.Setup Wizard: Channel Scan Use the Up Pause/OK and Down keys to select Yes or No and Play/ to confirm (Fig. 22 and Fig. 23). Fig. 22 Fig. 23 LaCie LaCinema Black MAX User Manual Setting Up the LaCinema Black MAX page 25 You have now completed the main LaCinema Black MAX configuration. From the Home menu that appears when the wizard has completed, press the Options/Settings button to access the Settings menu to finish product installation and to define advanced parameters (Fig. 24). Move on to the next step, STEP 6: Connect to Your Network. The following section explains how to connect your LaCinema Black MAX to your home network in order to transfer files. Fig. 24 LaCie LaCinema Black MAX User Manual Setting Up the LaCinema Black MAX page 26 3.6. STEP 6: Connect to Your Network The LaCinema Black MAX helps you select and configure your home network connection. Choose to connect with an Ethernet or wireless network and follow the steps below depending on your choice. 3.6.1. Wireless Network Connection The LaCinema Black MAX has a built-in WiFi antenna. When connecting to your network via wireless, the LaCinema Black MAX helps you select, connect with, and configure your network connection. NOTE: Have your network password (if you use one) and your LaCinema Black MAX remote control handy. IMPORTANT NOTE: Wired (Ethernet) and Wireless (WiFi) connections cannot be active at the same time. Use the remote control to: 1. Go to Home menu and enter the Settings Space by pressing the Options/Settings button (Fig. 25). 2. Select the Network menu, press the Down lect Configure Network. button and se- 3. Select Wireless Connection Mode. 4. Select your wireless network from the list. 5. Enter the password if required. 6. Select the connection method, Automatic or Manual. ✦✦ In automatic, network parameters will be defined automatically. ✦✦ If you choose manual, you will asked to enter the LaCinema Black MAX’s IP address. TECHNICAL NOTE: If network is not managed by DHCP, you may have to enter your IP address, subnet mask, router, and DNS addresses. 7. Once done, you will go to redirected to the Settings Space menu. 8. You can check the network by selecting Connection in the Network menu. For details on how to transfer files from your computer to your LaCinema Black MAX, see section 5.2.1. Network-Attached Hard Disk (NAS). Fig. 25 LaCie LaCinema Black MAX User Manual Setting Up the LaCinema Black MAX page 27 3.6.2. Ethernet Network Connection When connecting to your network via Ethernet, the LaCinema Black MAX automatically detects your network. Connect the Ethernet cable (not included) to the back of the LaCinema Black MAX and to an Ethernet port on your router (Fig. 26). 1. Go to Home menu and enter the Settings Space by pressing the Options/Settings button. 2. Select the Network menu, press the Down lect Configure Network. button and se- 3. Select Ethernet Connection Mode. Fig. 26 4. Select the connection method, Automatic or Manual. ✦✦ In automatic, network parameters will be defined automatically. ✦✦ If you choose manual, you will asked to enter the LaCinema Black MAX’s IP address. TECHNICAL NOTE: If network is not managed by DHCP, you may have to enter your IP address, subnet mask, router, and DNS addresses. 5. Once done, you will go to redirected to the Settings Space menu. 6. You can check the network by selecting Connection in the Network menu (Fig. 27). For details on how to transfer files from your computer to your LaCinema Black MAX, see section 5.2.1. Network-Attached Hard Disk (NAS). Fig. 27 LaCie LaCinema Black MAX User Manual Playing Multimedia Files page 28 4.Playing Multimedia Files Thanks to the LaCinema Black MAX’s ability to connect to UPnP media servers, host computers, and external USB drives, you can access both files saved on the LaCinema as well as files located on these external sources on your television using the remote control. From the Home menu, select one of the media spaces – Movie, Photo, Music and Browser – to access multimedia files. Files located on connected external sources can be accessed in the appropriate space. Fig. 28 The following section outlines how to play files for each media space. For details on connecting external sources to the LaCinema Black MAX, such as a UPnP media server, a host computer, and/or an external USB drive, refer to chapter 5. Playing & Copying Files from External Sources. 4.1. Movie Space Scroll through the menu using the navigation buttons. To confirm your choice and enter the Movie Space, press the Play/Pause/OK button (Fig. 28). This menu will display all of the supported video files that you have uploaded to your LaCie LaCinema Black or located on an external source. Fig. 29 Only files recognized as video files will be displayed. Music and Photo files will not be displayed. To view all file types, select the Browser Space. You can scroll through the list of video files and folders using the Up and Down buttons, Right button to open a folder and Left to move to upper folder level (Fig. 29). To confirm your choice, press the Play/Pause/OK button. In the file list, you can retrieve file information by pressing the Information button (Fig. 30). To exit the info screen, press the Information button again. During the file playback, you can adjust several playback pa rameters. Press the Options/Settings button to display or exit the on-screen menu. Fig. 30 LaCie LaCinema Black MAX User Manual Playing Multimedia Files page 29 4.1.1. Display format Select from these choices (Fig. 31): ✦✦ Original ✦✦ Full Screen ✦✦ Cinema Fig. 31 4.1.2. Subtitle ✦✦ List of available subtitles (Fig. 32) ✦✦ Off Fig. 32 4.1.3. Audio Languages Select from the list of available languages (Fig. 33). Fig. 33 LaCie LaCinema Black MAX User Manual Playing Multimedia Files page 30 4.1.4. Play mode ✦✦ One > Play selected file (Fig. 34) ✦✦ List > play all files from the directory Fig. 34 4.1.5. Repeat ✦✦ Off > play once the select file or list of files (Fig. 35) ✦✦ On> play selected file or list of files in loop Fig. 35 LaCie LaCinema Black MAX User Manual Playing Multimedia Files page 31 4.2. Photos Menu You can scroll through the menu using the navigation buttons (Fig. 36). To confirm your choice and enter a menu, press the Play/Pause/OK button. This menu will display all of the image files that you have uploaded to your LaCie LaCinema Black MAX. Only files recognized as image files will be displayed. Movies and music files will not be displayed. To view all file types, select the Browser Space. You can scroll through the list of photos and folders using the Up and Down Left buttons, Right Fig. 36 button to open a folder, and to move to a higher folder level (Fig. 37). To confirm your choice, press the Play/Pause/OK button. During the file playback, you can adjust several playback parameters. Press the Options/Settings button to display or exit the on-screen menu. 4.2.1. Transition This function allows you to define the transition effect between photos (Fig. 38). Fig. 37 4.2.2. Rotate Left / Rotate right This function allows you to turn on automatic photo rotation to be displayed correctly on your TV (Fig. 39). Fig. 38 Fig. 39 LaCie LaCinema Black MAX User Manual Playing Multimedia Files page 32 4.3. Music Menu You can scroll through the menu using the navigation buttons (Fig. 40). To confirm your choice and enter a menu, press the button. Play/Pause/OK This menu will display all of the audio files that you have uploaded to your LaCie LaCinema Black MAX. Only files recognized as music files will be displayed. Movies and photo files will not be displayed. To view all file types, select the Browser Space. You can scroll through the list of music tracks and folders using the Up and Left Fig. 40 and Down buttons, Right button to open a folder to move to the upper folder level (Fig. 41). To confirm your choice, press the Play/Pause/OK button. When the music player is started, you can pause or stop the current song. You can also change the track by scrolling through the list using the Up Pause/OK and Down buttons and pressing the Play/ button. During the file playback, you can adjust several playback parameters by pressing the Options/Settings button (Fig. 42). You will then enter the Music player where playlists can be edited on the fly and play mode adjusted. 4.3.1. Repeat Set the repeat mode. Select Track to repeat the current song continually, List to repeat the songs in the folder continuously, and Off to stop playback at the end when all song in the folder have been played. Fig. 41 4.3.2. Random Choose whether the tracks in a list should be played in a random order. Select On or Off. Fig. 42 LaCie LaCinema Black MAX User Manual Playing Multimedia Files page 33 4.4. Playlist Management Once the music player has started, you can create and edit playlkey to enter ists to arrange songs as you want. Press the Right the playlist management and Left key to close it and return to the player. 4.4.1. To Create a New Playlist 1. From the Music Space, mark the item you want to add to your list by selecting a track and pressing the Mark button. You can select files from different folders (Fig. 43). 2. Press the Options/Settings list with the Marked Items. button and select Create Play- Fig. 43 3. Give the playlist a name and press the Play/Pause/OK button. 4.4.2. Change Playlist Track Order To move a track in the list, press Up Press Right to move it and then Up its position in the list. and Down and Down to select it. to change 4.4.3. To Remove an Item from the Playlist To remove an item from the playlist, press the Stop button. This action does not delete the file but only removes it from the current playlist. NOTE: The currently playing song cannot be removed from the list. LaCie LaCinema Black MAX User Manual External Sources page 34 5.Playing & Copying Files from External Sources 5.1. Playing Files from an External USB Hard Drive Simply turn on and plug in external hard disks to the LaCinema Black MAX’s front (Fig. 44) or rear (Fig. 45) USB ports to be able to play multimedia files on your television. See below for more details. 5.1.1. Connection Power on the external hard disk and plug its USB cable into either the LaCinema Black MAX’s front or rear USB expansion slot. Once connected, a pop up message will notify you and show the storage volumes on the selected Space. You will be able to browse through the list of files. Fig. 44 - Front USB port NOTE: Only files supported in the current media space will be displayed (i.e., music files in the Music Space). Fig. 45 - Rear USB ports 5.1.2. Compatibility In addition to hard disks, you can also connect card readers, digital cameras, or digital camcorders with USB Mass storage support. Hard drives with the following file system formats are supported: FAT32, NTFS, HFS+, and Linux file systems. 5.1.3. Playing & Copying Files Files located on the external volume will be listed alongside the locally stored files in the various Spaces. To play files, simply navigate to the proper Space, select the file, and press the Play/ Pause/OK button (Fig. 46). For details on copying files, refer to section 5.4.1. Copying Files from a NAS to the LaCinema Black MAX. Fig. 46 LaCie LaCinema Black MAX User Manual External Sources page 35 5.2. Playing Files from a Networked Media Server Television You can stream content to your LaCinema Black MAX from a networked UPnP server located on a host computer (Mac or PC) or a network-attached hard disk (NAS). For details, see below. Network Router It is also possible to copy files from an external source to the LaCinema Black MAX. For more information, refer to section 5.4.1. Copying Files from a NAS to the LaCinema Black MAX. NAS Media Server LaCinema Black MAX 5.2.1. Network-Attached Hard Disk (NAS) If you have a NAS running a media server, it is possible to stream this content to the LaCinema Black MAX. In order to view your NAS content on LaCinema Black MAX, first make sure that both devices are connected to the network (see Fig. 47). Once connected, files located on the NAS will appear in the various Spaces on the LaCinema Black MAX. For details on copying files from a NAS to the LaCinema Black MAX, see section 5.4.1. Copying Files from a NAS to the LaCinema Black MAX. Fig. 47 LaCie LaCinema Black MAX User Manual External Sources page 36 5.2.2. Host Computer You can install software which will enable your PC or Mac to act as a UPnP media server. Once the software has been installed and configured, files located on the host computer will appear in the various Spaces on the LaCinema Black MAX (see Fig. 48). Television Network Router 1. From the Utilities CD-ROM, install the Packet Video TwonkyVision software. NAS Media Server 2. Once installed, launch the server from the Start Menu (Windows users) or the Applications folder (Mac users). 3. In the configuration page that opens in your web browser, click on the Sharing link and then select the folders on your computer that contain the multimedia content you wish to access from the LaCinema Black MAX (Fig. 49). Make sure to click the Save Changes button when you finish. LaCinema Black MAX PC or Mac with Twonky Media Server Installed Fig. 48 4. It may be necessary to restart the server. To do so, select the First Steps link and click Restart server. 5. You will now be able to access your computer’s multimedia content using the LaCinema Black MAX remote control. Files will appear in the various Spaces on the LaCinema Black MAX. For details on copying files from a host computer to the LaCinema Black MAX via the Twonky UPnP software, see section 5.4.1. Copying Files from a NAS to the LaCinema Black MAX. Fig. 49 LaCie LaCinema Black MAX User Manual External Sources page 37 5.3. Playing Files From a Host Computer Connected Via USB IMPORTANT INFO: Connecting your LaCinema Black MAX directly to a host computer via USB is not supported for Mac OS X users. Install Windows Media Player (WMP) 11 to stream content to the LaCinema Black MAX and to enable your LaCinema Black MAX to mount on your computer in the manner of an external hard drive. Follow these steps to configure the connection: Fig. 50 1. Make sure that the software is installed on your computer. TECHNICAL NOTE: WMP is preinstalled on Vista, but XP users may have to download and install the software. 2. Connect the USB cable from the LaCinema Black MAX to your Windows computer (Fig. 50). 3. In WMP, turn on Media Sharing by clicking on Library > Media Sharing... (Fig. 51). 4. In the Media Sharing dialogue box, select Share My Media to... You must then tell WMP to share content with the LaCinema Black. Below the Share My Media check box, select the LaCinema Black MAX and click Allow (Fig. 52). 5. Multimedia content imported into WMP will now be accessible in the various Spaces on the LaCinema Black MAX. Fig. 51 For details on copying files from a host computer to the LaCinema Black MAX via USB, see section 5.4.2. Copying Files from a USBConnected Computer to the LaCinema Black MAX. Fig. 52 LaCie LaCinema Black MAX User Manual External Sources page 38 5.4. Copying Files From an External Source to the LaCinema Black MAX It is possible to copy files from an external USB hard disk, NAS, or media server to the LaCinema Black MAX for playback on your television. Note that the process for copying files from a networkattached device or USB hard drive is different than for copying files from/to a USB-connected host computer. 5.4.1. Copying Files from a NAS to the LaCinema Black MAX To copy files to the LaCinema Black MAX: Fig. 53 1. Verify the source device is connected (see sections 5.1, 5.2, or 5.3) and is recognized by the LaCinema Black MAX. 2. Select the file or folder to be copied and press the Mark button (Fig. 53). 3. Then, navigate to the directory where you’d like to copy the file and the press the Options/Settings marked items to [Current Directory]. button and select Paste 4. The file copy window will appear and show the copying progress. LaCie LaCinema Black MAX User Manual External Sources page 39 5.4.2. Copying Files from a USBConnected Computer to the LaCinema Black MAX After you install Windows Media Player, the LaCinema Black MAX can be connected to your computer via USB and will mount similarly to an external hard drive. You will see its icon in My Computer (XP users) or Computer (Vista users). You can then transfer files from your computer to the LaCinema Black and vice versa in the same way as you would with an external hard drive. 1. Make sure that the software is installed on your computer. Fig. 54 TECHNICAL NOTE: WMP is preinstalled on Vista, but XP users may have to download and install the software. See section 5.3. Playing Files From a Host Computer Connected Via USB for details. 2. In My Computer or Computer, open the volume entitled LaCinema Black (Fig. 54). 3. Next, open the volume named Local HDD (Fig. 55). 4. Drag files from your local hard drive into one of the three folders according to the type of file (for instance, mp3 files go in My Music, while jpg files go in My Pictures) (Fig. 56). IMPORTANT INFO: Make sure to correctly categorize the files according to type, as files in the wrong folder will not be visible on your TV. Fig. 55 Fig. 56 LaCie LaCinema Black MAX User Manual External Sources page 40 5.5. Recording from Analog Video Sources (Including Camcorders) 5.5.1. Recording Videos 1. Connect the analog video source to the LaCinema Black MAX’s video IN port via a CVBS video or S-Video and stereo audio cables. 2. Play the video on your video source device (i.e. camcorder). 3. Using the remote control, navigate to the TV Space, select Channel > Video in or S-video in (choose one based on the connection method). You should see the video on your TV (Fig. 57). 4. Press Record on your remote control to start capturing the video. The video will recorded as standard TV show. 5. You can then stop the recording when you wish to create the video file. TECHNICAL NOTE: The device cannot record protected content sources such as commercial DVD-Video. TECHNICAL NOTE: Pressing pause pauses the video on-screen, but doesn’t stop the recording. 5.5.2. Accessing Recorded Video from Camcorders Refer to section 6.5. Accessing Recorded Shows. NOTE: Recordings can be exported to a PC or Mac by copying them to a USB hard disk for further editing or to be archived to a DVD. Fig. 57 LaCie LaCinema Black MAX User Manual Watching and Recording Television page 41 6.Watching and Recording Television The LaCinema Black MAX allows you to watch high quality digital television, pause live TV, and record TV shows immediately or according to a schedule. To access the television functions from the Home menu, select the TV Space using the Left and Right buttons and Play/Pause/ OK to select (Fig. 58). From the TV space you will be able to create list of your favorite channels and sort them the way you want. Fig. 58 6.1. Searching for Channels When you enter the TV Space for the first time and if you did not scan TV channels during the Setup Wizard, the LaCinema Black MAX will prompt you to do so at this point. Once the search has ended, the save channels window appears. Press the Play/Pause/OK button to save the channels which have been found (Fig. 59). You are now ready to start watching and managing channels by entering the TV Space. TECHNICAL NOTE: Video IN sources, such as connected camcorders, are also displayed in the channel list. For details on Video IN sources, refer to section 5. Playing & Copying Files from External Sources. Fig. 59 6.2. Watching TV Once you have scanned for channels, access the TV Space by clicking its image from the main menu (Fig. 60). Browse channels by pressing the Up and Down keys. To watch video acquired through non-cable connections, such as through a camcorder, select the “Video IN” channel (Fig. 60) (for details, refer to section 5. Playing & Copying Files from External Sources. By pressing the List button, “All channel” or “Favorite Channel” lists will be displayed. Fig. 60 LaCie LaCinema Black MAX User Manual Watching and Recording Television page 42 6.2.1. TV Control Board By pressing the List button, the TV Space control will be displayed, showing a list of available channels and functions to manage TV recording and schedules (Fig. 61). 6.2.2. TV Guide The Electronic Program Guide (EPG) or TV Guide is an on-screen guide to scheduled broadcast television programs that allows users to navigate and select content. The EPG provides such information as program scheduling, content rating, and show description. To access the full TV guide grid with all channels while watching TV, press the Options/Settings Fig. 61 button and select Show TV Guide (Fig. 62). You can also access the TV guide for each channel while not watching TV. Press the List button, select a channel list, select a channel, and press the Right button to enter the Now and Next program information. Now refers to the current program details and Next means the following program details on the same channel. 6.2.3. Timeshifting: Taking Control of Live TV One of the LaCinema Black MAX’s key benefits is the ability to pause and rewind live TV. The LaCinema Black MAX automatically records TV as you are watching it, keeping the last three hours of recorded television. This buffer allows you to rewind up to three hours. If you rewind while watching live television, you can then fast-forward until you reach the live television time. Fig. 62 This icon in the information banner shows you that you are watching TV in timeshifting mode (Fig. 63). Additionally, a progress bar shows you how far you are from the live television point. TECHNICAL NOTE: Changing channels restarts the buffer, so you can only rewind until you reach the point where you last changed the channel. Fig. 63 LaCie LaCinema Black MAX User Manual Watching and Recording Television page 43 6.2.4. About the TV Screen 1. Info Bar – When you switch to a TV channel or press the Information button, a banner will be displayed showing information on the current show such as the title and duration. 2. Top bar – A second banner at the top of the screen will appear showing channel number and name. 6.2.5. Creating a Favorite Channel List 1. Press the List displayed. button and the list of all channels will be 2. To add channel(s) to your favorite channel list, select the channel(s) and press the Mark button (Fig. 64). 3. Press the Options/Settings menu. Fig. 64 button to display the options 4. Select Create Favorite Channels List, confirm your selection and give your list a name using the virtual keyboard. 6.2.6. Managing Favorite Channel Lists Select the channel list you want to manage and press the Left button to enter the List Management menu. From this menu, you can change the order or channels in your list (Fig. 65). To remove a channel from the list, mark it by pressing the Mark button and then press the Options/Settings button. The deleted channel has been removed from your list but will remain in the “All Channels” list. Fig. 65 NOTE: Channels from the “All channels” list cannot be deleted. LaCie LaCinema Black MAX User Manual Watching and Recording Television page 44 6.3. TV Space Icon Details Icon Live Meaning Icon Meaning You are watching live TV Audiovision (soundtrack for the blind and partially sighted) available You are timeshifting and watching recorded television Subtitles adapted for the deaf and hard of hearing available You are recording -10 Fast return/Forward during a program -12 Indicates a content rating deemed appropriate for the listed age Program broadcast in High Definition 16/9 -16 Program broadcast in 16/9 format Encoded Channel (a subscription is necessary) Several soundtrack languages are available. Press the Options/Settings button to select. Several subtitle languages are available. Press the Options/Settings button to select. The program has Deaf and Hard of Hearing subtitles 5.1 The soundtrack is in Dolby Home Cinema format LaCie LaCinema Black MAX User Manual Watching and Recording Television page 45 6.4. Recording TV The LaCinema Black MAX can record TV programs in two different ways: ✦✦ Instant recording ✦✦ Scheduled recording TECHNICAL NOTE: Channel changing is not possible while recording because it is impossible to make two recordings at the same time. Fig. 66 6.4.1. Instant Recording While watching TV, you can instantly start a recording by pressbutton (Fig. 66). The recording automatically ing the Record starts from current position. The default recording length is for three hours and can be modified by using the Up and Down keys with 30 minute intervals. During the recording, you can increase or reduce the recording length by pressing the Record button again and then the Up and Down buttons. LaCie LaCinema Black MAX User Manual Watching and Recording Television page 46 6.4.2. Scheduled Recording Scheduled recording is very useful for recording repeating programs, such as a daily or weekly show. To record a program, open the task window by pressing the Options/Settings button and selecting Manual Recording and defining the following parameters (Fig. 67): ✦✦ Channel list containing the TV channel and then the channel itself ✦✦ Recording date Fig. 67 ✦✦ Start and finish times ✦✦ Frequency: daily, weekly, monthly ✦✦ Number of repetitions: the recording can be repeated several times If you have scheduled a repeated recording, you can deactivate the next automatic recording. Go to the TV Space home page and select the My Programmed Recordings folder (Fig. 68), press the Right choose 1. button to edit the record, select Frequency and then Fig. 68 6.5. Accessing Recorded Shows Recorded shows are saved in a predefined location that can be accessed from the TV Space or Movie Space. From the Movie Space: Go to the Home menu, select the Movie Space, and open the My Recordings folder (Fig. 69). This folder contains all recordings made with from the TV tuner or via Video IN capture (see section 6. External Sources for details). Press the Play/Pause/OK ton to start watching your video. but- Fig. 69 From the TV Space: Go to the Home menu, select the TV Space, press the List button to enter the TV Control Panel. Press the Left key on the remote to access the My recordings folder (Fig. 70). This folder contains all recordings made with from the TV tuner or via Video IN capture (see section 5. Playing & Copying Files from External Sources for details). Press the Play/Pause/OK watching your video. button to start Fig. 70 LaCie LaCinema Black MAX User Manual Settings Menu page 47 7.Settings Menu From the Home menu, access LaCinema Black MAX settings by pressing the Options/Settings button on the remote control. 7.1. Settings Menu Overview Navigate through the settings categories using the Left Right button. Fig. 71 and buttons and confirming using the Play/Pause/OK An info bar at the bottom of the screen provides the following information (Fig. 71): ✦✦ Current time and date ✦✦ Free space on the hard disk ✦✦ Network connection ✦✦ TV connection and resolution A description of the settings categories follows. 7.1.1. Settings: General Allows you to specify general parameters (Fig. 72): ✦✦ Country – Select your country for time and broadcasting preferences ✦✦ Language – Select the language for the on-screen menu ✦✦ Date and Time – • Update mode – defines how time is updated –– Manual – User inputs time and date –– Automatic – time and date updated from TV signal • Date format – Defines how time is displayed –– Year/Month/Day –– Day/Month/Year –– Month/Day/Year • Time format – –– 12 Hours –– 24 Hours • Time Set – Set current Time and date (only available when Update mode is set to Manual) • Time zone – Define the time zone per Country / City ✦✦ Access and Protections – Fig. 72 LaCie LaCinema Black MAX User Manual Settings Menu page 48 • Parental control – Enable or Disable parental control • Set to child mode – Turns Parental control on requiring secret code to enter some menus and some hidden files • Modify secret code – Enter current code and new code • Modify answer/question – Change the question that helps to remember the secret code • Parental rating – Defines age restriction for broadcasted shows ✦✦ Help banner – Enable or Disable Help banner during device use 7.1.2. Settings: Television Allows you to specify television parameters (Fig. 73): Fig. 73 ✦✦ Time recording margins – Defines extra recording time margins for scheduled recording • 00 (None) / 05 min / 10 min ✦✦ Channels search – Change channel settings • All / Free only) – Scan only free channels or both the free and pay channels ✦✦ External Antenna – Enable or disable the LaCinema Black MAX to power a compatible external antenna (5V output) 7.1.3. Settings: Video/Photo Allows you to specify video and photo parameters (Fig. 74): ✦✦ Video parameters – • Default audio track – –– French / English / Spanish ✦✦ Slide Show Parameters – • Transitions – –– –– –– –– Without transition Fade to black Cross fading Top to bottom Fig. 74 LaCie LaCinema Black MAX User Manual Settings Menu page 49 7.1.4. Settings: Connection Allows you to specify video connection parameters (Fig. 75): ✦✦ HDMI/YUV output resolution ✦✦ Composite output ✦✦ Component output ✦✦ HDMI sound ✦✦ Automatic frame rate ✦✦ S/PDIF sound ✦✦ Aspect ratio Fig. 75 7.1.5. Settings: Network For basic network setup, refer to 3.6. STEP 6: Connect to Your Network. 7.1.6. Settings: Advanced LaCinema Black reset – Pressing this button will cause all the settings to be reset and the installation wizard launched after automatic restart has concluded (Fig. 76). Fig. 76 7.1.7. Settings: Version Allows you to view (Fig. 77): ✦✦ Software version ✦✦ Serial number ✦✦ Copyright Fig. 77 LaCie LaCinema Black MAX User Manual Settings Menu page 50 7.2. Firmware Update The LaCie LaCinema Black MAX allows you to update its firmware by loading downloaded firmware updates located on a connected USB external hard drive. To update the firmware: 1. Go to www.lacie.com/support and click on the Downloads link. 2. Select and download the most recent LaCinema Black MAX firmware. 3. Save the downloaded file to the top-most directory on an external hard drive volume (i.e. not within a folder on the volume). Fig. 78 4. Connect the external hard drive to the LaCinema Black MAX. 5. Start the LaCinema Black MAX. IMPORTANT INFO: No other process should be running at the same time as the firmware update, such as recording or copying files. 6. The system will detect the new firmware file and offer to conduct an update (Fig. 78). 7. Accept the offer, and the update will begin (Fig. 79). Do not disconnect the USB external hard disk during the update. 8. Once the update is completed, the LaCinema Black MAX will restart and confirm that the update was successful (Fig. 80). Fig. 79 9. Firmware information can be accessed from the Settings menu. From the Home menu, press the Options/Settings button to access the Settings Space. Go to the Information tab to display the current firmware version. CAUTION: Never turn off the LaCie LaCinema Black MAX during the Firmware Update process! Doing so may damage your device. If, for any reason, the procedure fails (e.g. a power failure occurs during the update), you may not be able to use your LaCie LaCinema Black MAX. Please contact your reseller or LaCie Customer Support for more information. Fig. 80 LaCie LaCinema Black MAX User Manual Contacting Customer Support page 51 8.Contacting Customer Support Before You Contact Technical Support 1. Read the manuals. 2. Try to isolate the problem. If possible, make the drive the only external device on the CPU, and make sure that all of the cables are correctly and firmly attached. If you have asked yourself all of the pertinent questions in the troubleshooting checklist, and you still can’t get your LaCie drive to work properly, contact us at www.lacie.com. Before contacting us, make sure that you are in front of your computer and that you have the following information on hand: Information Where to Find Information 1. LaCie hard drive serial number Located on a sticker at the back of drive or on the original packaging 3. Macintosh/PC model 4. Operating system version 5. Processor speed 6. Computer memory 7. The brands and models of other internal and external peripherals installed on your computer Mac users: Click on the Apple icon in the menu bar and select About This Mac. Windows users: Right click My Computer and select Properties > General. Mac users: Click on the Apple icon in the finder bar and select About This Mac. Select More Info... The Apple System Profiler will launch and will list your internal and external peripherals. Windows users: Right click My Computer and select Properties > Hardware. LaCie LaCinema Black MAX User Manual Contacting Customer Support page 52 8.1. LaCie Technical Support Contacts LaCie Asia, Singapore, and Hong Kong Contact us at: http://www.lacie.com/asia/contact/ LaCie Australia Contact us at: http://www.lacie.com/au/contact/ LaCie Belgium Contact us at: http://www.lacie.com/be/contact/ (Français) LaCie Canada Contact us at: http://www.lacie.com/caen/contact/ (English) LaCie Denmark Contact us at: http://www.lacie.com/dk/contact LaCie Finland Contact us at: http://www.lacie.com/fi/contact/ LaCie France Contact us at: http://www.lacie.com/fr/contact/ LaCie Germany Contact us at: http://www.lacie.com/de/contact/ LaCie Italy Contact us at: http://www.lacie.com/it/contact/ LaCie Japan Contact us at: http://www.lacie.com/jp/contact/ LaCie Netherlands Contact us at: http://www.lacie.com/nl/contact/ LaCie Norway Contact us at: http://www.lacie.com/no/contact/ LaCie Spain Contact us at: http://www.lacie.com/es/contact/ LaCie Sweden Contact us at: http://www.lacie.com/se/contact LaCie Switzerland Contact us at: http://www.lacie.com/chfr/contact/ (Français) LaCie United Kingdom Contact us at: http://www.lacie.com/uk/contact LaCie Ireland Contact us at: http://www.lacie.com/ie/contact/ LaCie USA Contact us at: http://www.lacie.com/contact/ LaCie International Contact us at: http://www.lacie.com/intl/contact/ LaCie LaCinema Black MAX User Manual Warranty Information page 53 9.Warranty Information LaCie warrants your drive against any defect in material and workmanship, under normal use, for the period designated on your warranty certificate. In the event this product is found to be defective within the warranty period, LaCie will, at its option, repair or replace the defective drive. LaCie will not, under any circumstances, be liable for direct, special or consequential damages such as, but not limited to, damage or loss of property or equipment, loss of profits or revenues, cost of replacement goods, or expense or inconvenience caused by service interruptions. This warranty is void if: Any loss, corruption or destruction of data while using a LaCie drive is the sole responsibility of the user, and under no circumstances will LaCie be held liable for the recovery or restoration of this data. ✦✦ The drive was operated/stored in abnormal use or maintenance conditions; ✦✦ The drive is repaired, modified or altered, unless such repair, modification or alteration is expressly authorized in writing by LaCie; ✦✦ The drive was subjected to abuse, neglect, lightning strike, electrical fault, improper packaging or accident; Under no circumstances will any person be entitled to any sum greater than the purchase price paid for the drive. ✦✦ The serial number of the drive is defaced or missing; To obtain warranty service, call LaCie Technical Support. You will be asked to provide your LaCie product’s serial number, and you may be asked to furnish proof of purchase to confirm that the drive is still under warranty. ✦✦ The broken part is a replacement part such as a pickup tray, etc. All drives returned to LaCie must be securely packaged in their original box and shipped with postage prepaid. ✦✦ The drive was installed improperly; ✦✦ The tamper seal on the drive casing is broken. LaCie and its suppliers accept no liability for any loss of data during the use of this device, or for any of the problems caused as a result. IMPORTANT INFO: Register online for free technical support: www.lacie.com/register