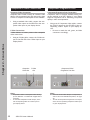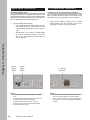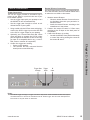
1
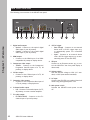
GDV-870 High Definition DVD-Audio/Video Player User’s Manual Congratulations on your purchase of the Adcom GDV-870 You have made a wise choice that will reward you with exceptionally accurate video and audio reproduction for years to come. To realize the full potential of your new DVD player, please read these operating and installation instructions thoroughly before attempting to make any connections to it. The GDV-870 is not only designed to reproduce the highest quality sound and picture but also to deliver the greatest possible value. It is our engineers’ passion for perfection that has enabled our components to be judged the equivalent of others costing two, three, or even five times as much. Our engineering team consistently strives to develop and design products that will exceed your expectations. Our goal at Adcom is to let more consumers hear high-end quality sound and see high-end video without paying high-end prices. All Adcom components are the result of a long-standing dedication to innovation, quality, simplicity, and value. Adcom: We have the power — and now, so do you! Copyrights/Trademarks Published by Adcom Copyright © 2006 Adcom, LLC All rights reserved Adcom and the Adcom logo are registered trademarks of Adcom, LLC. This symbol is intended to alert the user to the presence of uninsulated dangerous voltage within the product’s enclosure that may be of sufficient magnitude to constitute risk of fire or electric shock. This symbol is intended to alert the user to the presence of important operating and maintenance instructions in the literature accompanying this product. Do not place this unit on an unstable cart, stand, tripod, bracket, or table. The unit may fall, causing serious injury to a child or adult, and serious damage to the unit. Use only with a cart, stand, tripod, bracket, or table recommended by the manufacturer or sold with the unit. Any mounting of the device should follow the manufacturer’s instructions, and should use a mounting accessory recommended by the manufacturer. This unit is manufactured under license from Dolby Laboratories Licensing Corporation. It is additionally licensed under one or more of the following patents: U.S. number 3,959,GTP880, Canadian numbers 1,004,603 and 1,037,877. Dolby® Pro Logic®, Dolby ProLogic II®, Dolby Digital EX®, and Dolby Digital® are registered trademarks of Dolby Laboratories Licensing Corporation. Manufactured under license from Digital Theater Systems, Inc. US Patent Number 5,451,942 and other world-wide patents issued and pending. “DTS®,” “dts®,” “DTS Digital Surround®,” “DTS-ES®,” “DTS NEO:6®” are trademarks of Digital Theater Systems, Inc. Copyright 2003 Digital Theater Systems, Inc. All rights reserved. HDMI, the HDMI logo and High-Definition Multimedia Interface are trademarks or registered trademarks of HDMI Licensing LLC. No part of this manual may be reproduced or electronically transmitted without the express written consent of Adcom, LLC. Chapter 1 - Welcome Introduction ………………………………………………… 5 Unpacking the GDV-870 ……………………………… 5 Key Features………………………………………………… 5 Placing the GDV-870 …………………………………… 6 About the Remote Control ………………………… 6 Front Panel Overview ………………………………… 7 Remote Control Overview …………………………… 8 Rear Panel Overview ……………………………………10 Chapter 2 - Connections Operations Overview ………………………………… 25 Basic DVD Playback ………………………………………26 Special Playback Features A to Z …………………27 Audio CD Playback ………………………………………29 MP3 Playback ………………………………………………29 JPEG/Picture CD Playback……………………………29 DivX/MPEG4 Playback …………………………………29 Program Playback……………………………………… 30 Screen Saver……………………………………………… 30 Chapter 5 - Help Customer Support ………………………………………31 Adcom Protection Plan ………………………………31 Product Care & Maintenance ………………………31 System Reset ………………………………………………31 Troubleshooting ……………………………………………32 Technical Specifications ………………………………33 Index ………………………………………………………… 34 Table of Contents Connections Overview …………………………………11 Before You Begin …………………………………………11 Composite/S-Video Connections …………………12 Component/Progressive Scan ………………………12 HDMI Connections ………………………………………13 2-Channel Audio Connections ………………………13 Digital Audio Connections ……………………………14 5.1-Channel Audio Connections ……………………14 Control Connections ……………………………………15 Power Connections ………………………………………16 Chapter 4 - Operations Chapter 3 - Setup Setup Overview ……………………………………………17 Setup Menu Navigation ………………………………18 Language Settings ………………………………………19 Video Settings ………………………………………………20 Audio Settings ………………………………………………21 Rating Settings ………………………………………… 23 Miscellaneous Settings …………………………………24 www.adcom.com GDV-870 Owner’s Manual 3 Important Safety Instructions • • • • • • • • Important Safety Instructions • • • • • • • Read all the safety and operating instructions before connecting or using this unit. Retain this notice and the owner’s manual for future reference. All warnings on the unit and in its operating instructions should be adhered to. All operating and use instructions should be followed. Do not use this unit near water. For example, near a bathtub, washbowl, kitchen sink, laundry tub, in a wet basement, or near a swimming pool. The unit should be installed so that its location or position does not interfere with its proper ventilation. For example, it should not be situated on a bed, sofa, rug, or similar surface that may block the ventilation openings; or placed in a builtin installation, such as bookcase or cabinet, that may impede the flow of air through its ventilation openings. The unit should be situated away from heat sources such as radiators, heat registers, stoves, or other devices (including amplifiers) that produce heat. The unit should be connected to a power supply outlet only of the voltage and frequency marked on its rear panel. This Class I apparatus shall be connected to a MAINS socket outlet with a protective earthing connection. As the plug is used as the disconnect device, the disconnect device shall remain readily operable. The power supply cord should be routed so that it is not likely to be walked on or pinched, especially near the plug, convenience receptacles, or where the cord exits from the unit. Clean unit only as recommended in its instruction manual. The power supply cord of the unit should be unplugged from the wall outlet when it is to be unused for a long period of time and during electrical storms. Care should be taken so that objects do not fall, and liquids are not spilled, into the enclosure through any openings. This unit should be serviced by qualified service personnel when: a. The power cord or the plug has been damaged; or b. Objects have fallen, or liquid has been spilled, into the unit; or c. The unit has been exposed to rain, or liquids of any kind; or d. The unit does not appear to operate normally, or exhibits a marked change in performance; or e. The device has been dropped, or the enclosure damaged. Regulatory Information FCC Part 15 This product has been tested and found to comply with the limits for a Class B digital device, pursuant to Part 15 of the FCC Rules. These limits are designed to provide reasonable protection against harmful interference when the product is operated in a residential installation. This product generates, uses, and can radiate radio frequency energy and, if not installed and used in accordance with the instruction manual, may cause harmful interference to radio communications. However, there is no guarantee that interference will not occur in a particular installation. If this product does cause harmful interference to radio or television reception, which can be determined by turning the product off and on, the user is encouraged to try to correct the interference by one or more of the following measures: • • • • Reorient or relocate the receiving antenna. Increase the separation between the product and receiver. Connect the product into an outlet on a circuit different from that to which the receiver is connected. Consult the dealer or an experienced radio/TV technician for help. OUTDOOR ANTENNA GROUNDING If an outside antenna is connected to your tuner or tuner/preamplifier, be sure the antenna system is grounded so as to provide some protection against voltage surges and built-up static charges. Section 810 of the National Electrical Code, ANSI/NFPA No. 701984, provides information with respect to proper grounding of the mast and supporting structure, grounding of the lead-in wire to an antenna discharge unit, size of grounding conductors, location of antenna discharge unit, connection to grounding electrodes, and requirements for the grounding electrode. a. Use No.10 AWG (5.3 mm2) copper, No.8 AWG (8.4 mm2) aluminum, No.17 AWG (1.0 mm2) copper clad steel or bronze wire, or larger, as a ground wire. b. Secure antenna lead-in and ground wires to house with standoff insulators spaced from 46 feet (1.221.83 m) apart. c. Mount antenna discharge unit as close as possible to where lead-in enters house. d. Use jumper wire not smaller than No.6 AWG (13.3 mm2) copper, or the equivalent, when a separate antenna grounding electrode is used. See NEC Section 810-21 (j). EXAMPLE OF ANTENNA GROUNDING AS PER NATIONAL ELECTRICAL CODE INSTRUCTIONS CONTAINED IN ARTICLE 810. RADIO AND TELEVISION EQUIPMENT. WARNING TO REDUCE THE RISK OF FIRE OR ELECTRIC SHOCK, DO NOT EXPOSE THIS UNIT TO RAIN OR MOISTURE. CAUTION TO PREVENT ELECTRIC SHOCK DO NOT USE THIS POLARIZED PLUG WITH AN EXTENSION CORD, RECEPTACLE OR OTHER OUTLET UNLESS THE BLADES CAN BE FULLY INSERTED TO PREVENT BLADE EXPOSURE. THERE ARE NO USER SERVICEABLE PARTS IN THIS PRODUCT. DO NOT ATTEMPT SERVICING OF THIS UNIT YOURSELF. REFER SERVICING TO QUALIFIED SERVICE PERSONNEL. LASER SAFETY This compact disc player is classified as a CLASS 1 LASER PRODUCT. Only qualified service personnel should remove the cover or attempt to service this device due to possible eye injury. Invisible laser radiation when open and interlock failed or defeated. Avoid direct exposure to beam. CAUTION POWER LINES Any outdoor antenna must be located away from all power lines. 4 GDV-870 Owner’s Manual NOTE TO CATV SYSTEM INSTALLER This reminder is provided to call the CATV system installer’s attention to Article 82022 of the National Electrical Code that provides guidelines for proper grounding and, in particular, specifies that the cable ground shall be connected to the grounding system of the building, as close to the point of cable entry as practical. Chapter 1 - Welcome Introduction Congratulations on your decision to purchase the Adcom GDV-870 DVD player. The GDV-870 delivers a multitude of audio/video output options, including: • Progressive scan 480p video with field-adaptive deinterlacing from the component video output • Pure, all-digital HD video (up to 1080i) from the HDMI output • Analog HD video from the component output • Direct multichannel analog outputs even connect you to high-resolution stereo and multichannel playback for your DVD-Audio material Familiarize yourself with the diagrams that follow and read the short explanations of each feature below. When you finish, you will be well on your way to enjoying the GDV-870’s convenience, performance, and quality. Unpacking the GDV-870 Before you begin, please take a moment to make power eject menu title display 3 1 2 4 5 6 8 9 setup PBC 7 HDMI clear +10 C 0 goto aspect select step slow pause stop play prev next zoom program vid.off audio vol- vol+ compnt p.scan video output rev f wd repeat 1/all A-B subtitle angle mute off Video Features • HDMI (High Definition Multimedia Interface) output for full-bandwidth digital audio and video over a single cable • Compatible with NTSC and PAL video hardware plus standard (4:3) and wide-screen (16:9) aspect ratios • Progressive scan with reverse 3:2 pulldown for film sources • Special playback functions such as frame-byframe, zoom, and variable slow-motion and highspeed play • DVD-Video features include multi-angle, multilanguage subtitles, and multi-language audio Audio Features • Supports the following digital audio formats: - Dolby Digital® - DTS® (Digital Theater Systems) - DTS® 96/24 - DVD-Audio - MLP® (Meridian Lossless Packing) - MP3 (MPEG 1, Layer 3) - MPEG Multichannel - Linear PCM • Supported audio formats include sampling frequencies up to 192 kHz, linear PCM encoding up to 24-bit resolution, and MLP • DVD-Audio supports up to six channels at sample rates of 48, 88, 96, 176, or 192 kHz and sample sizes of 16, 20, or 24 bits • DVD Video supports 2 channels at sample rates of 48 and 96 kHz and sample sizes of 16, 20, or 24 bits • Audio CD/Video CD is limited to 2 channels, 44.1 kHz at 16 bits • Audio outputs include multichannel (5.1) analog audio outputs, stereo analog outputs and both coaxial and optical digital audio outputs • Linear Power Supply Chapter 1 - Welcome The front panel of the GDV-870 is designed for ease of operation. All controls are logically grouped for intuitive operation. Basic operations can be performed from the front panel, while additional features can be accessed with the provided remote control. Key Features on dig audio out sure the following items were included with your GDV-870: • GDV-870 • Remote control • 1.5V AAA batteries (2) • Audio/video cable • Power cord • Warranty card & statement • User’s Guide CD www.adcom.com Special Features for Custom Installation • 12V trigger • Rear panel IR mini jack (3.5mm) • Discrete power On/Off GDV-870 Owner’s Manual 5 Placing the GDV-870 Place the GDV-870 on a stable, vibration-free surface away from moisture and out of direct sunlight. Your Adcom dealer will be pleased to show you many different types of audio/video equipment racks and cabinets. Be sure to leave sufficient room behind the rear panel to accommodate cables, power cords, etc. We recommend a minimum of 5 inches of free space for maximum flexibility. About the Remote Control The GDV-870 comes with a full-featured, preprogrammed, ergonomically designed remote control. • For an overview of each remote button, see page 8. Inserting the Remote Batteries 1 Remove the cover on the back panel of the remote control. 2 Insert two AAA alkaline batteries, paying attention to the correct polarities. 3 Replace the cover. Chapter 1 - Welcome Insert two AAA batteries, paying attention to the correct polarities. A distance of 1/2” should be maintained around the GDV-870 for ventilation. Keep your GDV-870 in a room where temperatures remain fairly moderate, and never cover it with table cloths, curtains, newspapers, etc., to avoid potential overheating. 6 GDV-870 Owner’s Manual Use within 20 ft. (6m) UM -4 UM -4 Front Panel Overview The following is an overview of the GDV-870 front panel. � � � � � � � ���� ���� ����� ������� ����� ��������������������������� ��������������� Standby button Powers the GDV-870 on and off (Standby mode). • The rear panel power switch must be in the on position (|) for this button to function. • The Power LED is amber when the unit is in Standby mode. • The Power LED is red when the unit is on. 2 Status Indicators Provides a quick visual cue that one or more of the following conditions are active: • Video Mute - Activated by pressing the Vid. Off button on the remote control during CD playback. • Progressive Scan - Activated by setting Video Out to P-Scan in the Setup Menu. • Digital Out - Activated by pressing the Dig Audio Out On button on the remote control. • HDCD - Activated by loading an HDCD-encoded disc. • DVD Audio - Activated by loading a DVD Audio disc. Front panel display Displays GDV-870 status information. 3 www.adcom.com 4 Stop button Stops disc playback. • Press the Stop button once to stop and hold playback at the current position. • Press the Stop button twice to reset playback to the beginning of the disc. 5 Play button Starts disc playback. • Pressing the Play button in Standby mode powers on the player. 6 Pause button Pauses disc playback. • Pressing the Step button in Pause mode advances the picture one frame at a time. 7 Disc Tray Use to load/unload discs. • Press the Eject button on the front panel or remote control to open/close the disc tray. 8 Eject button Opens and closes the disc tray. 9 Skip Prev/Next buttons Skips to the previous or next chapter (or track) during disc playback. GDV-870 Owner’s Manual Chapter 1 - Welcome 1 ���������������������������� 7 Remote Control Overview The following is a brief overview of the GDV-870 remote control buttons and their operations. power eject title menu 1 2 3 4 5 6 7 8 9 +10 0 1 Title button Displays the DVD title menu (if available). 2 Power button Powers the GDV-870 on and off (Standby mode). • The rear panel power switch must be in the on position (|) for this button to function. 3 Display button Brings up the On-Screen Display. • The On-Screen Display shows the disc type, chapter/track number, elapsed/remaining time, and other relevant disc status information. 4 Setup button Displays the GDV-870 Setup Menu. 5 PBC button Displays the Playback Control (PBC) menu of a Video CD. 6 HDMI button Sets the video output resolution. This button is only applicable if: • Video Out is set to HD in the Setup Menu. • The player is connected to an HD-compatible display device via the HDMI (digital) or Component (analog) outputs. 7 Clear button Deletes entries in Setup Menus and on-screen displays. 8 Go To button Jumps directly to a specified title, chapter/track, or time on a disc. 9 Arrow buttons Use to navigate and make selections within DVD disc menus, Setup Menus, and other on-screen displays. display setup PBC HDMI clear C goto aspect select step Chapter 1 - Welcome slow pause stop play prev next zoom program vid.off audio vol- vol+ compnt p.scan video output f wd rev repeat 1/all A-B subtitle angle mute off on dig audio out 10 Slow button Starts slow-motion playback. 11 Pause button Pauses disc playback. • Pressing the Step button in Pause mode advances the picture one frame at a time. 12 Play button Starts playback. • Pressing the Play button in Standby mode powers on the player. 8 GDV-870 Owner’s Manual 13 Skip Prev/Next buttons Skips to the previous or next chapter (or track) during disc playback. 14 Zoom button Zooms in during playback. 15 Program button Programs a customized chapter or track order. 16 Video Off button Turns off the video display during CD playback. 17 Audio button Selects among available audio tracks during DVD playback. 18 Volume +/- buttons Adjusts the player’s volume level. 26 Stop button Stops disc playback. • Press the Stop button once to stop and hold playback at the current position. • Press the Stop button twice to reset playback to the beginning of the disc. 27 Reverse/Forward buttons Scans backwards and forwards at variable speeds during playback. 28 A-B Repeat button Loops playback between two points. 29 Repeat 1/All button Selects among various repeat modes during disc playback. Chapter 1 - Welcome 19 Video Output (Component/Progressive Scan) buttons Sets the format of the Video signal from the Component Video Outputs to Component or Progressive Scan. 25 Step button Pauses playback and steps forward one frame at a time. 30 Angle button Selects among available playback angles during DVD playback. 20 Menu button Displays the DVD disc menu (if available). 31 Subtitle button Selects among available subtitle languages during DVD playback. 21 Eject button Opens/closes the disc tray to load/unload discs. 32 Mute button Mutes and unmutes the audio during playback. 22 Number (0-9, 10+) buttons Use to enter numerical data in Setup Menus and on-screen displays. • Also use for direct selection of chapters and tracks during playback. 33 Digital Audio Out (On/Off) buttons Enables/disables the audio signal from the rear panel Digital Audio Outputs. 23 Aspect button Changes the display view to Fill, Original, Auto Fit, or Pan Scan; see View Mode on page 20 for details. 24 Select button Makes selections in DVD disc menus, Setup Menus, and other on-screen displays. Notes: • www.adcom.com If you press a button that is currently unavailable, the symbol appears on screen with an explanatory message, e.g. “Not allowed at the moment.” GDV-870 Owner’s Manual 9 Rear Panel Overview The following is an overview of the GDV-870 rear panel. ���� ��������� ��������� ������� � �� �� ���� ����� �� ��� ������������� ��� �������� ����������������� ���� ���������������������� �������������� Chapter 1 - Welcome ������� 10 ���� � �� �� ����������� � �� �� 1 Digital audio output • Optical - Connects to the optical digital audio input of your AV preamp. • Coaxial - Connects to the coaxial digital audio input of your AV preamp. 2 HDMI output • Connects to the HDMI input of an HDMIcompatible AV preamp or display device. 3 Component video output • Y/Pb/Pr - Connects to the Component/ Progressive Scan/HD inputs of a TV, AV preamp, or display device. 4 S-Video output • Connects to the S-Video input of a TV, AV preamp, or display device. 5 Composite video output • Connects to the Composite video input of a TV, AV preamp, or display device. 6 2-channel audio output • L/R - Connects to the audio inputs of a TV, AV preamp, or stereo receiver/amplifier. 7 5.1 audio output • FL/FR/SL/SR/S/C - Connects to the 5.1channel input of your AV preamp. GDV-870 Owner’s Manual ��� ���� ������� �������� ����� 8 12V DC trigger • Pass through - Connects to an external device with a 12V DC trigger input (e.g. to automatically power on a motorized screen). • Input - Connects to an external device with a 12V DC trigger output (e.g. to automatically power on the GDV-870). 9 IR input Connects to an IR remote sensor (e.g. to control the GDV-870 if the front panel display is obstructed). 10 Voltage switch Sets the GDV-870 voltage to 120V (U.S. standard) or 230V (international standard). 11 AC input Connects the GDV-870 to a standard electrical outlet using the supplied power cord. 12 Main power switch Switches the GDV-870’s main power on and off. Chapter 2 - Connections Connections Overview Adcom provides every conceivable connection to integrate the GDV-870 with your home theater system. We recommend that you choose the best video and audio options compatible with your particular display device and sound system. Video Connections • Composite video ...................................12 • S-Video ...............................................12 • Component video ..................................12 • Progressive Scan video ............................12 • HDMI .................................................13 Power/Control Connections • 12V DC triggers .....................................15 • IR sensor .............................................15 • Power connections .................................16 Before you begin connecting the GDV-870, it is recommended that you read all instructions, including the instructions for each device you plan to connect. • DO NOT CONNECT THE GDV-870 POWER CORD OR POWER ON THE GDV-870 UNTIL ALL CONNECTIONS ARE COMPLETE. CONNECTING OR DISCONNECTING DEVICES WHILE THE PLAYER AND/OR DEVICES ARE POWERED ON CAN RESULT IN SEVERE DAMAGE TO THE PLAYER AND/ OR THE CONNECTED DEVICES. About Video Cables • Video cable Use for composite video connections to standard TVs and display devices. Match yellow to yellow. • S-Video cable Use for higher quality video connections to standard TVs and display devices. • Component video cables Use for best quality analog video connections to digital and Progressive Scan TVs and display devices. Match green, blue, and red respectively. • HDMI cables Use for superior, all-digital audio/video quality to and from HDMI compatible components. Chapter 2 - Connections Audio Connections • 2-channel analog audio ............................13 • Coaxial digital audio ...............................14 • Optical digital audio ...............................14 • 5.1-channel analog audio ..........................14 Before You Begin About Audio Cables • RCA Cables Use for 2-channel and 5.1-channel analog audio connections. Match red to red and white to white. • Digital coaxial cable Use for high-quality multi-channel digital audio connections. • Digital optical cable (aka “Toslink”) Use as an alternative to coaxial cable for digital audio connections. www.adcom.com GDV-870 Owner’s Manual 11 Composite/S-Video Connections Component/Progressive Scan Composite Video Connections Composite video is used in nearly all consumer video devices. We recommend using this output only when S-Video or Component Video inputs are not available. 1 Component/Progressive Scan Connections Component video is the best available analog connection method to an HDTV display. If your display supports Progressive Scan or HD analog, the picture quality is even more impressive. Using a standard video cable, connect the composite video output on the GDV-870 to the composite video input on your display device. 1 S-Video Connections S-Video delivers a better picture than composite video connections. Using an S-Video cable, connect the S-Video output on the GDV-870 to the S-Video input on your display device. Chapter 2 - Connections 1 Using a set of Component video cables, connect the Y/Pb/Pr outputs on the GDV-870 to the corresponding Y/Pb/Pr inputs on your display device. • Be sure to match the red, green, and blue connectors accordingly. Composite Video Out S-Video Out Component Video/ Progressive Scan Out ���� ��������� ��������� ����������������� ���� ������� � �� �� ����������������� ���������������������� � �� �� ����������� � �� �� ��� ���� ������� � ������������� �� �� ��� ���������������������� ����� �������������� ������� • • GDV-870 Owner’s Manual ���� ������� �������� Notes: Composite/S-Video is the default video setting for the GDV-870 — no additional configuration is necessary. To view the Composite/S-Video output, select the corresponding Video or S-Video input on your display device. �� ��������� ��������� �������� ��� Notes: • 12 ���� ����� ��� �������������� ������� ���� ������������� • ���� � �� �� ����������� � �� �� You must set the Video Output to Component, PScan or HD in the GDV-870 Setup Menu; see page 20. To view the Component/Progressive Scan output, select the corresponding Component Video input on your display device. ��� ���� ������� ����� HDMI Connections 2-Channel Audio Connections About HDMI HDMI, or High Definition Multimedia Interface, is an advanced audio/video connection method that transfers full-bandwidth digital audio and video signals over a single cable. Connecting Analog Audio Using the analog audio output allows the internal DSP and DACs to decode and convert the data from the disc to analog signals. This output is used when connecting the player to an analog stereo preamp, and is necessary for use in many distributed audio setups. This output can also make use of analog direct modes available on many Adcom preamplifiers. As a result, digital signals can pass unfettered from your GDV-870 to an HDMI-compatible display for superior picture and sound quality. Connecting HDMI Components 1 Using an HDMI cable, connect the HDMI output on the GDV-870 to the corresponding HDMI input on your digital display device. 1 Using RCA cables, connect the audio outputs on the GDV-870 to the audio inputs on your display device or receiver. • Be sure to match the red (right) and white (left) connectors accordingly. 2-Channel Audio Out ���� ��������� ��������� ����������������� ���� ������� � ������������� �� �� ����������������� ���������������������� ��������� ��������� ��� ���� ���� � �� �� ����������� � �� �� ������� ��� ���� ���� ������� ����� � �� �� • • • • www.adcom.com � ��� �� ������������� �� • ����������� � �� �� ��� ���� ��� �� ��� �������� �������������� Notes: You must have an HDMI display device to view HDMI signals from the DVD player. You must set the Video Output to HD in the GDV-870 Setup Menu; see page 20. You should also set the HD Resolution to match the native resolution of your display; see page 20. To view the HDMI output, select the corresponding HDMI input on your display device. ���� ����� ������� �������� Notes: • ���� ���������������������� �������������� ������� Chapter 2 - Connections HDMI Output ���� ������� �������� ����� No configuration is necessary for the 2-Channel Audio Out. To listen to the 2-Channel Audio Out, select the corresponding input on your display device or receiver. GDV-870 Owner’s Manual 13 Digital Audio Connections 5.1-Channel Audio Connections Connecting Digital Audio The GDV-870 features two digital audio outputs—one coaxial and one optical—to send multi-channel Dolby Digital and DTS sound tracks from your DVD player to your AV preamp/surround sound processor. Chapter 2 - Connections 1 Connections for 5.1-Channel Audio Playback To enioy high-resolution, multi-channel audio playback, connect the six RCA jacks on the back of the GDV-870 to the 5.1 analog input on your preamp. 1 Using six RCA cables, connect the 5.1-channel audio outputs from the GDV-870 to the corresponding 5.1 inputs on your AV preamp. Connect digital audio cable(s). • Using a digital coaxial audio cable, connect the coaxial output on the GDV-870 to the corresponding coaxial input on your AV preamp. • Alternatively, use an optical (Toslink) cable to connect the optical output on the GDV870 to the corresponding optical input on your AV preamp. Coaxial Digital Audio Optical Digital Audio 5.1-Channel Audio Out ���� ��������� ��������� ������� � ������������� �� �� ��������� ��������� ��� ���� � ���� ����� �� ���������������� ������� �� �� ��� �������� ����������������� ���� ����������������� ���������������������� ���� ���������������������� ������� � �� �� ����������� � ������� �� ������ ��� ���� � ������� �� ����� �� ����������� Notes: Notes: • • • • 14 ���� �������������� �������� �������������� To configure the digital audio output, see pages 21-22. To listen to the Digital Audio Out, select the corresponding input on your AV preamp. To enjoy surround sound movies, your AV preamp must be able to decode Dolby Digital and/or DTS digital signals. GDV-870 Owner’s Manual • � �� �� ��� ���� ������� �������� ����� To listen to the 5.1 Channel Audio Out, select the corresponding input on your AV preamp. Due to copy protection issues, the digital output may need to be off during playback of DVD-Audio discs. ���� Control Connections Remote IR Sensor Connections Use the IR input jack to connect an external IR sensor to the GDV-870 if the unit is behind cabinet doors or otherwise not visible to the remote. Trigger Connections The 12V DC trigger provides a convenient way to power on your player in synch with the rest of your home theater system. • Use the trigger input with your preamp to turn the GDV-870 on and off automatically. • Use the trigger pass through to control an additional device in your system. 1 2 3 1 2 Trigger Pass through 3 Trigger Input Chapter 2 - Connections Using a cable with dual 3.5mm mono mini-plugs, connect the 12V DC trigger input on the GDV-870 to the 12V DC trigger output on your preamp. Optionally, use a second cable with dual 3.5mm mono mini-plugs to connect the 12V DC trigger pass through on the GDV-870 to the 12V DC trigger input on a compatible device (e.g., a motorized screen or another AV component). Confirm the triggers are working. • Power on your preamp. • The GDV-870 and any connected devices should power on automatically. Obtain a remote IR sensor. • Choose a remote IR sensor from an electronics distributor that suits your particular installation needs. • Install the remote IR sensor according to the manufacturer’s instructions. Connect the remote IR sensor’s 3.5mm mono mini-plug to the IR input on the back panel of the GDV-870. Confirm the IR sensor is working. • Conceal the GDV-870 front panel and attempt to control the unit by pointing the remote at the remote IR sensor. IR Input ���� ��������� ��������� ������� � �� �� ���� ����� �� ��� ������������� ��� �������� ����������������� ���� ���������������������� �������������� ������� ���� � �� �� ����������� � �� �� ��� ���� ������� �������� ����� Notes: • The 12V DC trigger is simply a “trigger” and not a relay driver. Some motorized screens will require an outboard device to be used in association with the 12V DC trigger. See the screen manufacturer’s instructions or ask your dealer or distributor. www.adcom.com GDV-870 Owner’s Manual 15 Power Connections Turning on the Power Setting this button to the on position (|) supplies power to the unit, enabling use of the Standby button on the front panel. When the main power switch is in the off position, current is cut off to the unit. When all connections are complete, you’re ready to check the voltage switch, plug in the power cable, and power on the GDV-870. 3 Checking the Voltage Switch Before plugging in the unit, make sure the voltage is set to your country’s voltage configuration. The GDV870 should be unplugged prior to flipping this switch. If you are uncertain, please have your installer or dealer verify before proceeding. Chapter 2 - Connections 1 Turn on the main power switch. • This switch effectively connects or disconnects the GDV-870 from the AC power source. To prevent damage to your equipment, make sure the rear panel voltage switch is set correctly for your geographic region. • Select 120V for U.S. and Canada. • Select 230V for EU and Australia operation. • For other regions, check with your local authorities. Connecting the Power Cable Use to connect the supplied IEC removable AC power cord. Before proceeding, please observe all precautions when connecting devices to your new GDV-870. 2 Connect the supplied power cable to the AC input and plug it into an electrical outlet. Voltage Switch Main Power Switch ���� ��������� ��������� ������� � �� ����� �� ��� ������������� �� ���� AC Input ��� �������� ����������������� ���� ���������������������� �������������� ������� ���� � �� �� ����������� Notes: • • • 16 � �� �� ��� ���� ������� �������� ����� Caution: Before you plug the power cord into an AC wall outlet, confirm that all connections to the GDV-870 have been made correctly. Warning: Never disconnect the power cord from the GDV-870 while the other end is plugged into an AC outlet. Doing so may cause an electric shock. Always connect power by plugging into the AC outlet last and disconnect by unplugging from the AC outlet first. Do not use a power cord other than the one supplied with the GDV-870. It is designed for use with the GDV-870 and should not be used with any other device. GDV-870 Owner’s Manual Chapter 3 - Setup Setup Overview The following is an overview of the GDV-870 Setup Menu, including: • • • • • • Setup Menu navigation ...........................18 Language settings .................................19 Video settings...................................... 20 Audio settings...................................... 21 Rating settings ..................................... 23 Miscellaneous settings ............................ 24 Language Video : English Subtitle : English DivX subtitle : Unicode (UTF-8) Audio : English DVD Menu : English Chapter 3 - Setup Audio OSD language Rating Misc Language Video Aspect Ratio : Auto Fit TV System : NTSC Video out Language Video Language Video Audio Audio Rating Misc Rating Misc Bass management : Off Front speakers : Large Center Speakers : None Surround Speakers : None Subwoofer : None Test tones : Off Center delay : No Delay Surr. Delay : No Delay Digital Output : PCM Night Mode : Off Down sampling : On Smart Sound : Off Audio : Component Brightness Sharpness Rating : 4:3 View Mode 1 8 16 1 8 16 HD Resolution : Auto HD Jpeg mode : Off Parental Control : 8. Adult Misc Language Video Set Password Enter Password Audio Rating Language Use Default Settings DVD Priority Video Misc : DVD Video DivX Registration Audio Rating Misc www.adcom.com GDV-870 Owner’s Manual 17 Setup Menu Navigation Use the following remote control buttons to navigate the Setup Menu. • Setup - Press the Setup button to display and exit the Setup Menu. • Arrows - Press the / buttons to move the highlight up and down the list of menu items. Press the / buttons to move the highlight left and right. • Select - Press the Select button to confirm your menu selections. power eject title menu 1 2 3 4 5 6 7 8 9 +10 0 display Setup setup PBC HDMI clear C aspect goto Select Arrows select step slow Chapter 3 - Setup pause prev next zoom program vid.off audio vol- vol+ compnt p.scan video output 18 GDV-870 Owner’s Manual stop play f wd rev repeat 1/all A-B subtitle angle mute off on dig audio out Language Settings To access the Language Settings menu: 1 Press the Setup button. 2 Use the / buttons to select Language, then press the button. 3 Use the / buttons to choose from the following menu items: OSD Language Sets the language for the GDV-870 Setup Menu and on-screen displays. • Use the / buttons to select English, Français, or Español. Language Video Audio OSD language : English Subtitle : English DivX subtitle : Unicode (UTF-8) Audio : English DVD Menu : English Rating Misc Chapter 3 - Setup Subtitle Sets the default language for DVD subtitles. • Use the / buttons to select English, French, Spanish, Auto, or Off. - Select “Auto” if you want the player to automatically select the disc’s default subtitle language. - Select “Off” if you prefer not to view subtitles. DivX Subtitles Sets the default character set for DivX subtitles. • Use the / buttons to select Unicode (UTF-8), Western European, Turkish, Central European, Cyrillic, Greek, Hebrew, Arabic, Baltic, or Vietnam. Audio Sets the default language for DVD audio sound tracks. • Use the / buttons to select English, French, or Spanish. DVD Menu Sets the default language for DVD disc menus. • Use the / buttons to select English, French, or Spanish. www.adcom.com GDV-870 Owner’s Manual 19 Video Settings Language To access the Video Settings menu: 1 Press the Setup button. 2 Use the / buttons to select Video, then press the button. 3 Use the / buttons to choose from the following menu items: Aspect Ratio Sets the aspect ratio of the GDV-870 to match your display device. • Use the / buttons to select 4:3 or 16:9. - Select “4:3” if you are using a standard 4:3 display device. - Select “16:9” if you are using wide-screen 16:9 display device. Chapter 3 - Setup View Mode Sets your preferred method of scaling video content to your display. • Use the / buttons to select Fill, Original, Auto Fit (default), or Pan Scan. - Select “Fill” to expand video content to the full dimensions of the screen. - Select “Original” to leave all video content as it is originally presented on the disc. - Select “Auto Fit” to automatically detect the optimum presentation of your video content. - Select “Pan Scan” to crop widescreen movies to fit on a 4:3 screen. TV System Sets the TV system of your display device. • Use the / buttons to select NTSC, PAL, or Multi. - Select “NTSC” if your display is NTSC compatible. - Select “PAL” if your display is PAL compatible - Select “Multi” if your display handles both NTSC and PAL signals. Video Out Sets the video output signal to match your display device and connection method. • Use the / buttons to select Component, PScan, or HD. - Select “Component” if you used the Component video outputs to connect your display device AND your display only accepts a standard definition (NTSC/PAL) video signal. - Select “Progressive” if you used the Component video outputs to connect your display device AND your display accepts a progressively scanned video signal. 20 GDV-870 Owner’s Manual Video Aspect Ratio : Auto Fit TV System : NTSC Video out Audio Brightness Sharpness Rating : 4:3 View Mode : Component 1 8 16 1 8 16 HD Resolution : Auto HD Jpeg mode : Off Misc - Select “HD” if you used the Component video outputs and/or the HDMI output to connect your display device AND your display accepts a High Definition video signal. Brightness Adjusts picture brightness. • Use the / buttons to set the brightness from 1-16. Sharpness Adjusts picture sharpness. • Use the / buttons to set the sharpness from 1-16. HD Resolution Sets the resolution of the HD video signal to match the capabilities of your display device. • Use the / buttons to select 480p/576p, 720p, 1080i, 1024x768, or 1360x768. • HD Resolution is only selectable if Video Out is set to HD. HD JPEG Mode Enables or disables high-definition JPEG playback. HD JPEG Mode is only selectable if Video Out is set to “HD.” • Use the / buttons to select On or Off. Notes: • • Use the Video Out buttons as a shortcut to switch between Component and Progressive Scan. compnt Use the HDMI button as a shortcut to change the HD Resolution. p.scan video output HDMI Audio Settings To access the Audio Settings menu: 1 Press the Setup button. 2 Use the / buttons to select Audio, then press the button. 3 Use the / buttons to choose from the following menu items: Bass Management Enables or disables bass management. Bass management automatically steers low-frequency signals to their optimal speaker depending on your speaker configuration settings. • Use the / buttons to select On or Off. Front Speakers Sets the relative size of your front speakers. • Use the / buttons to select Small or Large. - Select “Small” if you DO have a subwoofer. - Select “Large” if you do NOT have a subwoofer. Surround Speakers Sets the relative size of your surround speakers (if applicable). • Use the / buttons to select Small, Large, or None. - Select “Small” if you DO have a subwoofer. - Select “Large” if you do NOT have a subwoofer. - Select “None” if you do not have surround speakers. Subwoofer Indicates the presence of a subwoofer. • Use the / buttons to select None or Present. - Select “Present” if you DO have a Subwoofer. - Select “None” if you do NOT have a Subwoofer. www.adcom.com Video Audio Rating Misc Bass management : Off Front speakers : Large Center Speakers : None Surround Speakers : None Subwoofer : None Test tones : Off Center delay : No Delay Surr. Delay : No Delay Digital Output : PCM Night Mode : Off Down sampling : On Smart Sound : Off Test Tones Generates a “pink noise” test tone that you can move manually from speaker to speaker. This neutral tone provides an effective gauge to measure volume levels that is more objective than a movie sound track or other variable signal. • Use the / buttons to select Off, Left, Right, Center, Left surr., Right surr., or Subwoofer - If you select a speaker by name, the test tone will be heard in that speaker. - If you select “Off,” the current audio source will be heard instead of the test tone. Chapter 3 - Setup Center Speakers Sets the relative size of your center speaker (if applicable). • Use the / buttons to select Small, Large, or None. - Select “Small” if you DO have a subwoofer. - Select “Large” if you do NOT have a subwoofer. - Select “None” if you do not have a center speaker. Language Center Delay Delays the sound from your center speaker if it is closer to your primary listening area than your front speakers. • Use the / buttons to select 0.3m (1 ft.), 0.5m (2 ft.), 1m (3 ft.), 1.3m (4 ft.), 1.7m (5 ft.). - Measure the distance from your primary listening area to your front speakers (A). - Measure the distance from your primary listening area to your center speaker (B). - Subtract B from A. - The GDV-870 will add 1 ms of delay for every foot of difference. Surround Delay Delays the sound from your surround speakers if they are closer to your primary listening area than your front speakers. • Use the / buttons to select 1m (3 ft.), 2m (6 ft.), 3m (9 ft.), 4m (12 ft.), 5.1m (15 ft.). - Measure the distance from your primary listening area to your front speakers (A). - Measure the distance from your primary listening area to your surround speakers (C). - Subtract C from A. - The GDV-870 will add 1 ms of delay for every foot of difference. GDV-870 Owner’s Manual 21 Audio Settings (cont.) Digital Audio Output Sets the audio signal from the coaxial and optical digital audio outputs. • Use the / buttons to select Off, PCM, or All. - Select “Off” if you are not using the digital audio outputs. - Select “PCM” (or Pulse Code Modulation) if the digital audio output is connected to a 2channel digital AV preamp. - Select “All” if the digital audio output is connected to an AV preamp with a Dolby Digital or DTS surround sound processor. Language Video Audio Rating Misc Bass management : Off Front speakers : Large Center Speakers : None Surround Speakers : None Subwoofer : None Test tones : Off Center delay : No Delay Surr. Delay : No Delay Digital Output : PCM Night Mode : Off Down sampling : On Smart Sound : Off Night Mode Reduces the dynamic range (the difference between the softest and loudest audio portions) of a DVD sound track. This is a convenient feature for watching movies late at night. • Use the / buttons to select On or Off. Chapter 3 - Setup Down Sampling Down samples high definition audio signals if your AV preamp is not capable of decoding them. • Use the / buttons to select On or Off. - Select “On” if your preamp is NOT capable of handling 96 kHz signals. The DVD Player will automatically down sample any 96 kHz signals to 48 kHz so your system can decode them. - Select “Off” if your preamp is capable of handling 96 kHz signals. The DVD Player will pass the signal through without any further processing. Smart Sound Provides a variety of preset tone control options by musical genre. • Use the / buttons to select Off, Classical, Rock, Jazz, or Pop. Notes: • 22 GDV-870 Owner’s Manual You can use the Digital Audio Out buttons as a shortcut to enable/disable the digital audio signal. off on dig audio out Rating Settings The GDV-870 includes a password-protected Parental Control feature that prevents playback of discs based on their MPAA ratings. Language Video Parental Control : 8. Adult Set Password Enter Password Audio To access the Rating Settings menu: 1 Press the Setup button. 2 Use the / buttons to select Rating, then press the button. 3 Use the / buttons to choose from the following menu items: Rating Misc Chapter 3 - Setup Parental Control Selects the desired rating level. • Use the / buttons to select Parental Control and press Select. • Use the number keys (0-9) to enter your 4-digit password and press Select. • If you have not yet set a password, enter the default password (8-8-8-8) and press Select. • Press Select again to show the list of Parental Control ratings. • Use the / buttons to select one of the following ratings and press Select: - 1. Kid Safe - 2. G - 3. PG - 4. PG-13 - 5. PG-R - 6. R - 7. NC-17 - 8. Adult • Playback of movies at or above the selected rating will be blocked. Set Password Sets the Parental Control password. • You must enter the default password (8-8-8-8) before you can set your own password. • Use the 0-9 buttons to enter a new 4-digit password and press Select. • Your personal password and the default password will both work to unlock the Parental Control feature. Notes: • • • www.adcom.com Not all movies are rated. Write down your password and keep it in a safe place in case you forget it. If you forget your password, the factory password is 8888. GDV-870 Owner’s Manual 23 Miscellaneous Settings To access the Miscellaneous Settings menu: 1 Press the Setup button. 2 Use the / buttons to select Misc, then press the button. 3 Use the / buttons to choose from the following menu items: Use Default Settings Restores the GDV-870 to its original factory settings (except for the Parental Control password). • Select “Use Default Settings” and press Select. • When prompted with the confirmation message “Use Default Settings,” use the / buttons to select “Yes” and press Select. • The unit will restart with the original factory settings restored. Chapter 3 - Setup DVD Priority Optimizes the player for DVD Audio or DVD Video playback. • Use the / buttons to select DVD Audio or DVD Video. DivX Registration Displays the DivX® Video On Demand registration code for your particular GDV-870 player. • For more information, log onto: http://www.divx.com/vod 24 GDV-870 Owner’s Manual Language Use Default Settings DVD Priority Video Audio Rating Misc : DVD Video DivX Registration Chapter 4 - Operations Operations Overview Now that you’ve connected and configured your GDV-870, it’s time for the fun part—enjoying the full power and performance of your Adcom DVD player. This chapter covers: • • • • • • • • Basic DVD Playback ............................... Special Playback Features A to Z ............... Audio CD Playback ................................ MP3 Playback ...................................... JPEG/Picture CD Playback ....................... Divx/MPEG4 Playback ............................ Program Playback ................................. Screen Saver ....................................... 26 27 29 29 29 29 30 30 Chapter 4 - Operations www.adcom.com GDV-870 Owner’s Manual 25 Basic DVD Playback Follow these steps to play a DVD. Chapter 4 - Operations Playing a DVD 1 Before you begin: • Power on the GDV-870. • Power on your TV or display device. • Power on your AV preamp. • Select the input on your TV and/or AV preamp corresponding to the GDV-870. 2 Open the disc tray. • Press the Eject button on the remote control (or front panel) to open the disc tray. 3 Load your disc. • Insert the disc with the label side up. • Press the Eject button again to close the disc tray. 4 Play the disc. • Most discs will begin playback automatically when loaded. The disc type will appear in the top left corner of the screen. • If the disc does not play, press the Play button. • If the DVD disc menu appears, use the Arrow buttons to highlight the desired option, then press Select. 5 Adjust the volume. • Use the Volume +/- buttons to adjust the volume level. • Press the Mute button to temporarily mute the audio. 6 Pause or Stop playback. • Press the Pause button to freeze playback. Press Play to resume. • Press the Stop button once to stop and hold playback at the current playback position. Press Play to resume. • Press the Stop button twice to stop and reset the disc from the beginning. 7 Eject the disc. • Press the Eject button to open the disc tray and remove your disc. 8 Power off the player. • Press the Power button to turn off the player. You should always power off the player after use. 26 GDV-870 Owner’s Manual Power power eject title menu 1 2 3 4 5 6 7 8 9 Eject display setup PBC HDMI clear +10 C 0 goto aspect Select Arrows Pause Play Volume select step slow pause stop play prev next zoom program vid.off audio vol- vol+ compnt p.scan video output Stop f wd rev repeat 1/all A-B subtitle angle mute off Mute on dig audio out Special Playback Features A to Z angle menu Angle Press the Angle button repeatedly during DVD playback to view additional viewing angles (if available). A DVD can have up to nine selectable viewing angles. Menu Press the Menu button to return to the DVD disc menu. Disc menus often includes scene selection, set up options, and special bonus features. 1/3 aspect Audio Press the Audio button repeatedly during DVD playback to select alternative audio tracks (if available). A DVD can have up to 8 audio language selections. 1/4 goto display www.adcom.com 1 2 3 4 5 6 7 8 9 +10 0 PBC PBC If the disc is in VCD 2.0 format, press the PBC button to view the playback control menu. Then use the 0-9 keys to select the desired track. program Program Press the Program button to display the Program menu and set up a custom playback order. See page 30 for details. 1/all Repeat (1/All) Press the Repeat 1/All button to repeat a Title, Chapter/Track, or disc. 6 Ch Go To Press the Go To button to display the Search menu. Use the / buttons to choose Title, Chapter, or Time. Use the 0-9 keys to enter the desired destination, then press Select. Press Clear to delete your entry. Display Press the Display button to view current disc information. For example, during DVD playback, pressing Display will show the disc type, title number, chapter number, elapsed time, remaining time, audio language, subtitle language, angle, and bitrate. Number Buttons During playback, use the number keys to jump directly to the desired chapter or track. For chapters 10 or higher, use the 10+ button; e.g. for chapter 25, press 10+, 10+, 5. GDV-870 Owner’s Manual Chapter 4 - Operations audio Aspect Press the Aspect button during playback to change the display view to Fill, Original, Auto Fit, or Pan Scan; see View Mode on page 20 for details. 27 Special Playback Features A-Z (cont.) A-B Repeat (A-B) Loops playback between two points. Press the A-B button once to set point A. Press the A-B button a second time to set point B and begin loop playback. Press the A-B button a third time to cancel A-B Repeat. The clip should be at least 3 seconds. Rep A-B Chapter 4 - Operations rev f wd prev next slow Search Buttons Press repeatedly to search forward/backward at x2, x4, x8, and x16 normal speed. Press Play to resume normal playback. The player is muted in Search mode. 2 4 8 16 2 4 8 16 Skip Buttons Press the Prev and Next buttons to skip forward/backward one chapter/track at a time. Note that the player will not skip the WARNING section of a disc. Slow Press repeatedly to for slow motion playback at 1/2, 1/4, 1/6, and 1/8 normal speed. Press Play to resume normal playback. The player is muted in Search mode. 1/2 1/4 1/6 1/8 step subtitle Step Press the Step button to freeze playback. Then press the Step button repeatedly to step forward one frame at a time. Subtitle Press the Subtitle button repeatedly during DVD playback to select alternative subtitle languages (if available). A DVD can have up to 32 subtitle selections. ..... 1/2 title Title Press the Title button to return to the DVD title menu (the first track on a DVD disc). Some DVD discs refuse the disc title function. vid.off Video Off During CD playback, press the Vid. Off button to turn off the video display and protect your screen from possible burn-in. zoom Zoom During DVD or JPEG Picture CD playback, press the Zoom button repeatedly to magnify the on-screen image in three levels. While the image is zoomed, you can use the Arrow buttons to move around the image. Q1 Q2 Q off 28 GDV-870 Owner’s Manual Q3 JPEG/Picture CD Playback Audio CD Playback Basic Audio CD Playback 1 Load the Audio CD in the disc tray. • The disc will begin playback automatically. 2 Press the Prev and Next buttons to browse the CD tracks. 3 Press the Stop button to stop playback. 4 For additional playback options, see the figure below. MP3 Playback Elapsed time Playback status Current track/ Total tracks DivX/MPEG4 Playback DivX/MPEG4 Playback 1 Load the DivX/MPEG4 disc in the disc tray. 2 Use the Arrow keys to select the desired folder/ file and press Select to start playback. 3 Press the Prev and Next buttons to browse the video files. 4 Press the Stop button to stop playback. 5 For additional playback options, see the figure below. Folder/ file name Chapter 4 - Operations Basic MP3 Playback 1 Load the MP3 disc in the disc tray. 2 Use the Arrow keys to select the desired folder/ file and press Select to start playback. 3 Press the Prev and Next buttons to browse the MP3 tracks. 4 Press the Stop button to stop MP3 playback. 5 For additional playback options, see the figure below. Basic JPEG/Picture CD Playback 1 Load the JPEG disc in the disc tray. 2 Use the Arrow keys to select the desired folder/ file and press Select to start the slideshow. 3 Press the Prev and Next buttons to browse the slideshow. 4 During the slideshow, use the Arrow keys to rotate pictures clockwise/counter-clockwise. 5 Press the Title button to switch to thumbnail view. 6 Press the Stop button to stop the slideshow. 7 For additional playback options, see the figure below. Audio, photo, video filter 00:02:43 2/92 /....MP3 Repeat mode (All, Off, Single) Filter Selected track Track names Repeat : Off Mode : Normal Play mode (Normal, Shuffle, Music Intro) Status/JPEG Preview window Music Playing Scrolling ID3 tag (MP3 only) Edit Mode (Program Play) Notes on MP3/JPEG/MPEG4 Playback: • • • www.adcom.com Discs can have mixed MP3, JPEG, and MPEG4 files. Use the Filter function to view one or more file types. It may take several minutes to load a disc, depending on the number of files and/or folders. For Program playback, see page 30. GDV-870 Owner’s Manual 29 Program Playback 7 DVD/VCD Program Playback 1 Load a DVD or VCD. 2 Press the Program button to display the Program menu. 3 Highlight the desired title/chapter and press Select to add it to your program. • If you make a mistake, press Clear to delete the last programmed title. 4 Repeat Step 2 until you have added up to 16 titles to your program. 5 Move the cursor to Play and press Select to play your custom program. • To delete the program, move the cursor to Clear All and press Select. Title 1 1 2 Title 2 3 4 5 6 7 8 9 10 11 12 13 14 15 16 Chapter 4 - Operations Title 4 Title 5 Title 6 Play Clear Clear All CD/MP3 Program Playback 1 Load a CD or MP3 disc. 2 Highlight Edit Mode and press Select. 3 Highlight the desired track and press Select. • A check mark appears to the left of the track name. • If you make a mistake, press Select again to uncheck the track. 4 Repeat Step 3 until you have checked up to 10 tracks. 5 Highlight Add to Program and press Select. • The checked tracks will be added to your program. 6 To view your program, highlight Program View and press Select. 30 Screen Saver Screen Saver The GDV-870 is equipped with a screen saver which will appear automatically under the following conditions: • If no disc is loaded for 3 minutes. • If the player is idle for 3 minutes; i.e., in Stop mode and not in a disc or Setup menu. Press any button to restore normal operation. Program Title 3 8 Move the cursor to the first track in your program list and press Select to play your custom program. • To delete the program, move the cursor to Clear Program and press Select. To return to normal view, highlight Browser View and press Select. GDV-870 Owner’s Manual ... ... ... ... ... ... ... ... ... ... ... ... ... ... ... ... ... ... ... ... ... ... ... ... ... ... ... ... ... ... ... ... ... ... ... ... ... ... ... ... ... ... ... ... ... ... ... ... ... ... ... ... ... ... ... ... ... ... ... ... ... ... ... ... ... ... ... ... ... ... ... ... ... ... ... ... ... ... ... ... ... ... ... ... ... ... ... ... ... ... ... ... ... ... ... ... ... ... ... ... ... ... ... ... ... ... ... ... ... ... ... ... ... ... ... ... ... ... ... ... ... ... ... ... ... ... ... ... ... ... ... ... ... ... ... ... ... ... ... ... ... ... ... ... ... ... ... ... ... ... ... ... ... ... ... ... ... ... ... ... ... ... ... ... ... ... ... ... Chapter 5 - Help Customer Support Use the Troubleshooting chart on page 32 to resolve common situations that don’t require professional attention. If the information provided does not resolve your problem, please contact your Adcom dealer or contact the Adcom customer service department as follows: Adcom, LLC 8541 E. Anderson Dr., Suite 101 Scottsdale, Arizona 85255 • Telephone: (480) 607-2277 • Fax: (480) 348-9876 • Email: [email protected] • Web: www.adcom.com Adcom Protection Plan Product Care & Maintenance Before your Adcom DVD player left our factory, it was carefully inspected for physical imperfections and tested for all electrical parameters as a routine part of Adcom’s systematic quality control. This, along with full operational and mechanical testing, should ensure a product flawless in both appearance and performance. After you have unpacked the GDV-870, inspect it for physical damage. Save the shipping carton and all packing material as they are intended to reduce the possibility of transportation damage should the unit ever need to be shipped again. www.adcom.com A Special Note on “Hum” If there is a low-volume “hum” audible throughout your speakers, even with the main volume turned all the way down, you have a common phenomenon known as a “ground loop.” Generally, the cause of a ground loop is the CableTV incoming signal line. To determine if your cable system is the contributing factor, disconnect the CableTV incoming signal line (round, 75Ω) at the wall, or the first component the cable is connected to (e.g. the cable box or VCR). If the hum is no longer present, you must insert a “75Ω ground loop isolator” before reconnecting the line. Check with your Adcom dealer to obtain one. Chapter 5 - Help Adcom offers the enclosed valuable Limited Warranty. Please read the details on the Warranty Card carefully to understand the extent of the protection offered by the Warranty, its reasonable limitations, and what you should do in order to obtain its benefits. Be sure to verify that the serial number printed on the rear panel matches the serial number on the outer carton. If any number is altered or missing, you should notify us immediately in order to ensure that you have received a genuine Adcom product which has not been opened, mishandled, or tampered with in any way. Always retain your original sales receipt as a proof of purchase. In the unlikely event damage has occurred, notify your dealer immediately and request the name of the carrier so a written claim to cover shipping damages can be initiated. The right to a claim against a public carrier can be forfeited if the carrier is not notified promptly in writing and if the shipping carton and packing materials are not available for inspection by the carrier. Save all packing materials until the claim has been settled. System Reset In rare cases the GDV-870 internal processor may freeze or lock-up causing abnormal operation. This is common to all micro-processor controlled devices when the unit is subject to excessive static discharge, AC line noise, or power spikes. In most cases it is easy to solve this problem by simply turning off the GDV-870 with the rear power switch for about five minutes. After waiting, reconnect the power cord and turn the unit on. If the unit functions normally, no further action is needed. If the unit still does not operate properly, it may be necessary to manually reset the processor; see “Use Default Settings” on page 24. If the manual reset does not solve the problem, contact your authorized Adcom dealer, an authorized Adcom service center or contact Adcom’s service department directly for further advice. GDV-870 Owner’s Manual 31 Troubleshooting Chapter 5 - Help The table below shows possible causes and solutions to common GDV-870 issues. If you do not see the answers you need here, please contact your Adcom dealer or customer service department; see page 31. 32 Symptom Cause/Solution No power • Make sure the power cord is properly connected to the power outlet. • Make sure the main power is switched on. No playback • • • • • • Make sure the disc is loaded. Make sure the disc is loaded with the label side up. The disc’s region code is invalid for this player. The type of disc is invalid for this player. The disc is dirty or damaged. Try cleaning the disc or testing another disc. There may be moisture condensation inside the player. Remove the disc and leave the unit powered on for 1-2 hours. No picture • • • • • Make sure your TV is powered on. Make sure the correct AV input is selected on your TV to view the DVD player. Make sure the video cables are securely and properly connected. Check the video cables for damage. Clean your disc. Distorted or noisy picture • The disc is dirty or damaged. Try cleaning the disc or testing another disc. • Reset the color system of the player or your TV. • Try connecting the player directly to your TV instead of via other components, such as a VCR. Picture not full screen • Select the desired screen format from the player’s Setup Menu (see page 20). For full screen on a standard TV, set the View Mode to 4:3. Player malfunction • Unplug the player for 30 minutes. After 30 minutes, power on the player and the restore function should reset the player. No sound • • • • • • No surround sound • Make sure your amplifier and/or powered loudspeakers are on. • Make sure the Digital Audio Output is set to “All” in the player’s Setup Menu (refer to page 21). Cannot skip or search • Some discs are programmed to prohibit skip/search functions during certain sections, especially at the beginning of the disc (e.g. Warning messages and previews). • If the disc only has one chapter, the Skip function will not function. Distorted or noisy MP3 playback • If PC program files or other data files are mixed in with MP3 files on the same disc, the player may play the non-MP3 files with noise or no sound. • Make sure your disc only includes MP3 files. • Skip to another file. Remote control does not function • • • • • Make sure your TV and AV preamp are powered on and correctly set. Make sure the audio cables are securely and properly connected. Check the audio cables for damage. Press the Audio button to select an alternative audio track. Press the Mute button to make sure the audio is not muted. No sounds is output during Pause, Step, and Slow playback modes. Remove any obstacles between the remote control and the player. Point the remote control directly at the remote sensor on the player. Check the polarities (+/-) of the batteries in the remote control. Replace the batteries. Place the unit away from direct sun and/or reduce the amount of ambient light. GDV-870 Owner’s Manual Technical Specifications Compatibility Disc Types ............................. DVD/DVD±R/DVD±RW, CDDA, MP3/MPEG4, Picture CD, CD-R/RW Video Formats ........................ MPEG2/MPEG4 Audio Formats ........................ MPEG 1, Layer 1, Layer 2, Layer 3 Signal Output Color System .......................... PAL/NTSC/AUTO Audio System ........................ DIGITAL down mix stereo, DIGITAL digital output, Audio DAC 24bit/192kHz Video Output ......................... 1 Vp-p at 75 ohm Audio Output ......................... 2 Vrms Stereo HDMI ................................... 480p/576p, 720p, 1080i, 1024x768, 1360x768 Performance Output Terminals Video (composite) output .......... S-Video output ....................... 2-CH output ........................... 5.1-CH output ......................... Digital coaxial output ............... Digital optical output ............... YPbPr output ......................... HDMI output .......................... General Supply Voltage (Switchable) ........ Power Consumption ................. Dimensions • Width ........................... • Rack Height ................... • Full Height ..................... • Depth of Chassis .............. • Full Depth ..................... Unit Weight ........................... Trigger Pass Through ................ Trigger Input .......................... IR Input ................................ Chapter 5 - Help Frequency Response ................. CD: 4Hz-20kHz (EIAT), DVD: 4Hz-22kHz (48k), 4Hz-44kHz (96k) S/N Ratio .............................. >110dB THD .................................... <0.008% 1 1 1 1 1 1 1 1 120vAC-60Hz/230vAC-50Hz 20 watts 17 inches (431.8mm) 3.5 inches (88.9mm) 3.95 inches (100.3mm) 14.5 inches (368.3mm) 18 inches (457.2mm) 13.75 lbs. (6.24kg) 12vDC (3.5mm T/R) 12vDC (3.5mm T/R) 3.5mm T/R Specifications are subject to change without notice. www.adcom.com GDV-870 Owner’s Manual 33 Index A G S Angle 27 Aspect 27 Aspect Ratio 20 Audio 19, 27 Audio Cables 11 Audio Settings 21 Go To 27 C JPEG Playback 29 CD Playback 29 Center Delay 21 Center Speakers 21 Connections 2-Channel Audio 13 5.1-Channel Audio 14 Component Video 12 Composite Video 12 Digital Audio 14 HDMI 13 IR Sensor 15 Overview 11 Power Cable 16 Progressive Scan 12 S-Video 12 Trigger 15 Customer Support 31 L Screen Saver 30 Search Buttons 28 Setup Navigation 18 Overview 17 Sharpness 20 Skip Buttons 28 Slow 28 Smart Sound 22 Step 28 Subtitle 19, 28 Subwoofer 21 Surround Delay 21 Surround Speakers 21 Language Settings 19 T M Menu 27 MP3 Playback 29 MPEG4 Playback 29 Technical Specifications 33 Test Tones 21 Title 28 Troubleshooting 32 TV System 20 N U Night Mode 22 Number Buttons 27 Unpacking 5 Bass Management 21 Brightness 20 Chapter 5 - Help HD JPEG Mode 20 HD Resolution 20 I B D Default Settings 24 Digital Audio Output 22 Display 27 DivX Playback 29 DivX Registration 24 DivX Subtitles 19 Down Sampling 22 DVD Menu 19 DVD Playback 26 DVD Priority 24 F Features 5 Front Panel Overview 7 Front Speakers 21 34 H GDV-870 Owner’s Manual Important Safety Instructions 4 J O OSD Language 19 P Parental Control 23 Password 23 PBC 27 Placement 6 Playback Features 27 Product Care & Maintenance 31 Program 27 Program Playback 30 R Rating Settings 23 Rear Panel Overview 10 Regulatory Information 4 Remote Control Batteries 6 Overview 8 Repeat (1/All) 27 Repeat (A-B) 28 V Video Cables 11 Video Off 28 Video Out 20 Video Settings 20 View Mode 20 Voltage Switch 16 W Warranty 31 Z Zoom 28 Adcom shall not be liable for any errors contained herein or for any damages arising out of or related to this document or the information contained herein, even if Adcom has been advised of the possibility of such damages. This document is intended for informational and instructional purposes only. Adcom reserves the right to make changes in the specifications and other information contained in this document without prior notification. Adcom disclaims any obligation to update the information contained herein. www.adcom.com GDV-870 Owner’s Manual 35 8541 East Anderson Drive, Suite 101 Scottsdale, Arizona 85255 Voice: 480.607.2277 Fax: 480.348.9876 www.adcom.com GDV-870_manual_v1.0