1
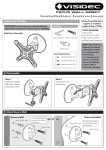
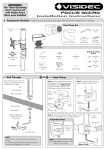
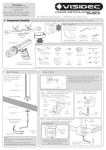
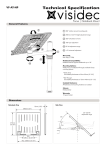
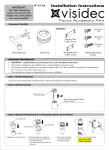
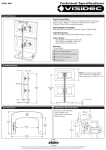
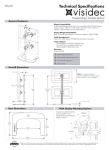
visidec
freestanding quad
Installation Instructions
Important Notes
l Each Donut Clamp Assembly supports a maximum weight of 11.5kg (25lbs)
l This product suits VESA compliant displays with 75mm x 75mm (3” x 3”) and
100mm x 100mm (4” x 4”) mounting hole patterns.
l The manufacturer does not accept responsibility for incorrect installation
Component Checklist
Check you have received all parts against this component checklist prior to installation
Bits Box
Upright Pole
Base
Donut
Clamp (x4)
Cable
Ball (x8)
Cable
Clip (x4)
Attach Upright Pole to Base
Attach the Upright Pole to the Base
as shown below. Ensure the Cable
Slot faces towards the rear.
TOOLS REQUIRED:
l Phillips Head Screw Driver
B
Extension
Clip (x16)
Mounting Screws
2.5mm Allen
Key (x1)
Horizontal
Support Donut(x1)
A
M8x50mm
Screw
(x1)
M4x10mm (x16)
M4x12mm (x16)
M4x16mm (x16)
5mm Allen
Key (x1)
Install Horizontal Support and Donut Clamp
Follow steps below to attach the Horizontal Support and Donut Clamp
assembly onto the Upright Pole. Ensure the Cable Slots in all the Poles are
facing to the rear.
B.1.
Loosen the Hex screws in the
Horizontal Support Donut using
the supplied 5mm Allen Key
B.2.
Slide the Horizontal Support
to desired position
LOOSEN
LOOSEN
POSITION
Back
Upright Pole
Cable Slot
User
IMPORTANT:
When tightening the Donut Clamp,
each of the Donut bolts must be
tightened evenly, as failure to do so
will damage the Donut Clamp. Do
not over-tighten as this may also result
in damage.
Cable
Slot
B.3.
Tighten supports firmly
using the supplied 5mm
Allen Key
TIGHTEN
TIGHTEN
M8x50mm Screw
5mm Allen Key
TIGHTEN
FIRMLY
Repeat steps B.1, B.2 and B.3
for the 2nd set of Horizontal
Support and Donut Clamp
Adjust Donut Clamps
C
Follow steps below to adjust the position of Donut Clamps. Ensure the Cable Slots
in all the Poles are facing to the rear.
C.1.
Loosen Donut Bolts evenly
using the supplied 5mm
Allen Key
C.2.
Slide the Donut Clamp to
desired position
C.3.
Tighten Donut Bolts firmly
using the supplied 5mm
Allen Key
IMPORTANT:
When tightening the Donut
Clamp, each of the Donut
bolts must be tightened
evenly, as failure to do so will
damage the Donut Clamp.
Do not over tighten as this
may also result in damage.
POSITION
LOOSEN
D
TIGHTEN
Mount Displays
F
Choose the correct Mounting Screws supplied in the bits
box and attach the display as shown.
Note: Extension
Clips are included
to suit VESA 100mm
x 100mm (4” x 4”)
Mounting Hole
Patterns.
E
100mm (4”)
Cable Management
Insert display cables into the slots in each pole, using
Cable Balls to hold them in place.
Note: When the slot in each pole cannot be used, use
the supplied Cable Clip’s to secure the display cables.
75mm (3”)
Cable
Balls
Cable
Clips
75mm
(3”) 100mm
(4”)
Adjust Ball Joint Mechanism
Adjust the Ball Joint
Mechanism to suit the
weight of your display.
Tighten or loosen
screws evenly with the
supplied 2.5mm Allen
Key, 1/4 turn at a time.
LOOSEN
2.5mm
Allen Key
TIGHTEN
Note: Ensure enough
slack is left in cables to
allow for movement.
As LCD Manufacturers are constantly releasing new monitor models, Atdec does not accept responsibility it the mounting hole pattern does not comply with the international VESA standards.
Due to continuing product development, the manufacturer reserves the right to alter specifications without notice. Published: 29.08.07©