1
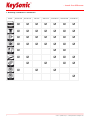
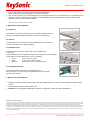
Bedienungsanleitung ACK-201, ACK-230, ACK-260, ACK-298 E&OE -2- … touch the difference 1. Einleitung / Introduction / Introduction Feature ACK-201 AR ACK-201 UR ACK-230 ACK-230 U ACK-260 AR ACK-260 UAR ACK-298 UR 1 Version 1.0 (2008/11/15) ● © 2008 by MaxPoint Handelsges. mbH Bedienungsanleitung ACK-201, ACK-230, ACK-260, ACK-298 1.1 Besondere Eigenschaften • • • • • • • • • Full-Size-Tastaturen im modernen, klaren und natürlichen Design für hohe Qualitätsansprüche Besonders leiser und spürbarer Anschlag durch hochwertige Soft-Touch-Membrantechnologie Abnehmbare Handballenauflage für ermüdungsfreies Tippen (ACK-201, 260 und 298) Seitlich integrierter PS/2-Port zum direkten Anschluss eines Mauskabels (nur ACK-298) 3× ACPI-Funktionstasten für Power, Sleep und Wake up (nur ACK-201 mit PS/2 und ACK-260) Status-LEDs für Caps-, Num- und Scroll-Lock Stabile Klappfüße zur Verstellung des Anstellwinkels für eine rutschfeste und ergonomische Arbeitsweise Plug & Play-Installation ohne speziellen Treiber Ideal für höchst anspruchsvolle Heim- und professionelle Büroanwendungen 2. Installation der Tastatur 2.1 System-Voraussetzungen Diese Tastatur erfordert einen PC mit USB- oder PS/2-Anschluss und einem der folgenden Betriebssysteme: Windows 98SE / ME / 2000 / XP / Vista Für die Installation der Tastatur unter den o.g. Betriebssystemen benötigen Sie KEINEN speziellen Treiber! 2.2 Anschluss der Tastatur an den PC Um Ihre Tastatur zu installieren, führen Sie bitte folgende Schritte aus: • USB Schließen Sie Ihre Tastatur einfach über eine freie USB-Buchse an Ihren Rechner an. • PS/2 Ist kein USB-Anschluss an Ihrem Rechner verfügbar, können Sie Ihre Tastatur auch über PS/2 anbinden: Fahren Sie hierzu Ihren Rechner herunter. Schließen Sie den PS/2-Stecker der Tastatur an die violette PS/2Tastaturbuchse an Ihrem Rechner an (NICHT an die grüne Mausbuchse!). Nun starten Sie Ihren Rechner neu. • Alle aktuellen Betriebssysteme mit Unterstützung für Plug & Play werden Ihre Tastatur nun automatisch erkennen und die erforderlichen Treiber laden. Während der Installationsphase informiert Sie Ihr Betriebssystem mit Hilfe wechselnder Popup-Informationsfenster an der Task-Leiste über den aktuellen Installationsstatus. Bitte haben Sie etwas Geduld, bis Sie das System abschließend über die erfolgreiche Installation informiert. Die Tastatur ist nun einsatzbereit. Ältere Betriebssysteme unterstützen nicht immer das automatische Erkennen von USB-oder PS/2-Geräten. Haben Sie die Tastatur angeschlossen und macht sich genau dieser Fehler bei Ihnen bemerkbar, so haben Sie folgende Möglichkeiten zur Lösung dieses Problems: • • Machen Sie ein Update Ihres Betriebssystems und beginnen wieder mit Schritt 2.2 In manchen Fällen ist gemäß den Bildschirmanweisungen die Installations-CD Ihres Betriebssystems erforderlich. Unter diesen Umständen folgen Sie bitte diesen Anweisungen*. Irrtümer und Auslassungen vorbehalten 2 … touch the difference • • • Nur für USB: Kontrollieren Sie, ob Ihr BIOS-System USB-Tastaturen unterstützt*. Manche Hersteller bieten BIOS-Updates im Internet zum Downloaden an. Nur für USB: Stellen Sie in Ihren Systemeinstellungen sicher, dass der verwendete USB-Anschluss nicht im Betriebssystem deaktiviert wurde*. Sollten System-Updates erfolglos bleiben, so empfiehlt es sich, die Tastatur mal an einen anderen PC mit gleichem Betriebssystem zu testen, um ein Hardware-Defekt der Tastatur auszuschließen. * Einzelheiten entnehmen Sie der Dokumentation Ihres PCs. 3. Besonderheiten der Tastaturen 3.1 Handballenauflage Die ACK-201, ACK-260 und ACK-298 verfügen über eine optional integrierbare Handballenauflage, die sich individuell justieren und arretieren lässt und ein ermüdungsfreies Tippen ermöglicht. 3.2 Aufstellfüße Die Tastaturen besitzen auf der Unterseite zwei Aufstellfüße, welche das Anstellen der Tastatur für eine ergonomische und ermüdungsfreie Schreibweise ermöglichen. 3.3 ACPI-Funktionen Die PS/2-Version der ACK-201 und die ACK-260 sind mit 3 ACPI-Tasten ausgestattet: Diese Funktionalität muss vom BIOS bzw. Betriebssystem unterstützt werden (Einzelheiten entnehmen Sie der Dokumentation Ihres PCs). • Power Hochfahren bzw. Herunterfahren des PCs • Sleep Herunterfahren des PCs in den Standby-Zustand • Wake up Hochfahren des PCs aus dem Standby-Zustand 3.4 Integrierter PS/2-Port Die ACK-298 UR verfügt seitlich über einen integrierten PS/2-Port zum direkten Anschluss eines Mauskabels. Zur Installation der Maus fahren Sie bitte Ihren Rechner herunter. 4. Reinigung der Tastatur • • • Staub entfernen Sie mit einem Pinsel, mit sanfter Druckluft oder mit einem Staubsauger mit Bürstenkopfdüse. Feinen Schmutz entfernen Sie mit einem nicht allzu feuchten Lappen. Verwenden Sie KEINE scharfen Putzmittel, Lösungsmittel oder Benzin zur Reinigung der Tastatur. Haftungsausschlusserklärung des Herstellers Für Informationen in diesem Dokument behält sich der Hersteller Änderungen ohne Mitteilung vor und geht keinerlei Verpflichtungen ein. Durch dieses Dokument wird, weder ausgedrückt noch angedeutet, keinerlei Garantie oder Erklärung in Bezug auf Qualität, Genauigkeit oder Eignung für einen bestimmten Zweck übernommen. Der Hersteller behält sich das Recht vor, jederzeit Änderungen zum Inhalt dieses Dokumentes zu machen und/ oder die dazugehörigen Produkte unverbindlich zu ändern ohne Verpflichtung, Personen oder Organisationen über derartige Änderungen in Kenntnis zu setzen. Unter keinen Umständen ist der Hersteller haftbar für direkte, indirekte, spezielle, zufällige oder Folgeschäden, die durch die Nutzung oder Unmöglichkeit der Nutzung des Produktes oder der Dokumentation entstehen, selbst wenn auf die Möglichkeit solcher Schäden hingewiesen wurde. Dieses Dokument enthält Materialien, die durch Copyright geschützt sind. Alle Rechte sind vorbehalten. Es ist untersagt, diese Bedienungsanleitung oder Teile daraus ohne die schriftliche Einwilligung der Autoren in irgendeiner Form zu vervielfältigen oder zu verbreiten, in welcher Form, zu welchem Zweck und mit welchen Mitteln auch immer. Produktnamen, die in diesem Dokument erwähnt werden, dienen ausschließlich als Verkaufsbezeichnung. Alle Handelsmarken, Produktnamen oder Markennamen, die in diesem Dokument erwähnt werden, sind eingetragenes Eigentum des jeweiligen Inhabers. 3 Version 1.0 (2008/11/15) ● © 2008 by MaxPoint Handelsges. mbH Operation Manual ACK-201, ACK-230, ACK-260, ACK-298 1.1 Special Features • • • • • • • • • Full-Size keyboard in modern, clear and natural design for highest demand on quality Extremely silent stroke and gently tactile feedback due to high-quality Soft-Touch membrane technology Removable palm rest for non-fatigue typing (ACK-201, 260 and 298) Sidewise integrated PS/2-Port for direct connection to the mouse cable (only ACK-298) 3× ACPI function keys for Power, Sleep and Wake up (only ACK-201 with PS/2 and ACK-260) Status LEDs for Caps-, Num- and Scroll-Lock Stable tilt feet for adjustment of the tilt angle for a skid-proof and ergonomic operation Plug & Play installation without any driver Ideal for highly demanding home users and professional office applications 2. Installation of the keyboard 2.1 System requirements This keyboard requires a PC with USB or PS/2 connection and one of the following operating systems: Windows 98SE / ME / 2000 / XP / Vista For installation of your keyboard with the above mentioned operating systems you do not need a special driver! 2.2 Connection of the keyboard to the PC In order to install your keyboard, please perform the following steps: • USB Connect simply your keyboard to a free USB port on your computer. • PS/2 If your PC does not have USB-connection, you can connect your keyboard through PS/2: Shut down your PC. Connect the PS/2 adapter to the violet PS/2 slot on your PC (NOT to the green mouse slot!). Now start your PC again. • All current operating systems which support Plug & Play will recognize your keyboard automatically and load the required drivers. During installation your operating system will give you status on your installation through useful Pop-Up information windows. Please be patient until the system informs you of the successful installation of your keyboard. The keyboard is now ready for use. Older operating systems do not always support automatic hardware recognition. If you have connected your keyboard, and exactly this error occurs on your system, you have the following alternatives to solve the problem: • • Perform an update of your operating system and return to Step 2.2 In some cases the screen instructions require to use the installation-CD of your operating system. Under these circumstances please follow the instructions *. E&OE 4 … touch the difference • • • Only for USB: Check, if your BIOS system supports USB keyboards*. Some manufacturers offer BIOS updates on Internet for download. Only for USB: Ensure in your system settings, that the used USB connection was not de-activated in your operating system *. Should your system-updates be unsuccessful, it is recommendable to test the keyboard with another PC with the same operating system to rule out hardware damage. * Refer to the documentation of your PC for details. 3. Specialities of the keyboard 3.1 Palm rest The ACK-201, ACK-260 and ACK-298 have an optionally integrable palm rest, which is individually adjustable and lockable, allowing non-fatigue typing. 3.2 Tilt feet The keyboards have on the bottom side two adjustable tilt feet for the perfect ergonomic tilt angle and non-fatigue operation. 3.3 ACPI functions The PS/2 version of ACK-201 and the ACK-260 are equipped with 3 ACPI keys: This functionality has to be supported by the BIOS and respectively to the operating system (Refer to the documentation of your PC for details.) • • • Power Sleep Wake up Boot / shut down the PC Put the PC into stand-by state Wake up your PC out of stand-by state 3.4 Integrated PS/2 port The ACK-298 UR has sidewise an integrated PS/2 port for direct connection of a mouse cable. For installation of the mouse please shut down the computer. 4. How to clean the keyboard • Dust can be removed either with a brush, with soft compressed air, or with a vacuum cleaner with brush head nozzle. • Remove fine dirt with a not-too-damp cloth. • DO NOT use any aggressive detergents, solvents, or gasoline in order to clean the keyboard. Manufacturer's Disclaimer Statement The information in this document is subject to change without notice and does not represent a commitment on the part of the vendor. No warranty or representation, either expressed or implied, is made with respect to the quality, accuracy or fitness for any particular purpose of this document. The manufacturer reserves the right to make changes to the content of this document and/or the products associated with it at any time without obligation to notify any person or organization of such changes. In no event will the manufacturer be liable for direct, indirect, special, incidental or consequential damages arising out of the use or inability to use this product or documentation, even if advised of the possibility of such damages. This document contains materials protected by copyright. All rights are reserved. No part of this manual may be reproduced or transmitted in any form, by any means or for any purpose without expressed written consent of its authors. Product names appearing in this document are mentioned for identification purchases only. All trademarks, product names or brand names appearing in this document are registered property of their respective owner. 5 Version 1.0 (2008/11/15) ● © 2008 by MaxPoint Handelsges. mbH Manuel d’Utilisation ACK-201, ACK-230, ACK-260, ACK-298 1.1 Caractéristiques • • • • • • • • • Clavier de grandeur complète dans design modern, clair et naturel pour ceux qui demandent un maximum de qualité Frappe extrêmement douce et silencieuse grâce à la technologie à membrane Soft Touch, éprouvé et de haute qualité Repose poignet détachable pour un travail sans fatigue (ACK-201, 260 et 298) Port PS/2 intégré sur le côté pour connecter directement une souris (seulement ACK-298) 3 × ACPI touches de fonction pour marche / arrêt, sommeil et réveil (seulement ACK-201 avec PS/2 et ACK-260) Diodes indiquant le verrouillage des majuscules, des nombres et du défilement Pieds escamotables stables prévu pour ajuster l’inclinaison du clavier, une bonne adhérence et une bonne ergonomie d’utilisation Installation Plug & Play sans pilote spécial Recommandé pour les particuliers les plus exigeants, mais aussi pour un usage bureautique professionnel 2. Installation du clavier 2.1 Demandes au système Ce clavier demande un PC avec connexion USB ou PS/2 et un des systèmes d’exploitation suivants: Windows 98SE / ME / 2000 / XP / Vista Pour l’installation de clavier avec des systèmes d’exploitation mentionnés ci-dessus, vous n’avez pas besoin de pilote spécial. 2.2 Installation du clavier à l’ordinateur Pour installer votre clavier, exécutez les pas suivants : • USB Branchez simple votre clavier à une borne USB libre sur votre ordinateur. • PS/2 Si votre PC ne dispose pas d’une connexion USB, vous pouvez connecter votre clavier par la porte PS/2: Eteignez votre PC, Connectez l’adaptateur PS/2 violettes à la porte PS/2 sur votre PC (Ne pas mettre ce qui est en couleur verte de la souris). Ensuite, redémarrez votre PC. • Tous les systèmes d’exploitation indiqués au dessus supportent le « Plug & Play » ; Ils reconnaîtront votre clavier automatiquement et lanceront les pilotes nécessaires. Pendant la phase d’installation, votre ordinateur vous indiquera l’état d’avancement de l’installation de votre adaptateur USB. Veuillez patienter, jusqu'à la fin de l’installation signalé par votre ordinateur. Le adaptateur USB est maintenant prêt à fonctionner. Les systèmes plus vieux ne supportent pas toujours la reconnaissance automatique de matériel. Si vous avez connecté votre clavier, y exactement cet erreur apparaît chez vous, vous aurez les possibilités suivantes pour solutionner ce problème : • • Mettez votre système d’exploitation à jour er retournez à Pas 2.2 Dans certains cas, le CD d'installation du système d'exploitation vous sera demandé lors de l’installation. Dans ces circonstances veuillez suivre les instructions *. Sous réserve d’erreurs ou d’omissions 6 … touch the difference • • • Uniquement pour l'USB : Vérifiez, si votre BIOS est compatible avec les claviers USB. Certains fabricants offrent des mises à jour du BIOS téléchargeable via Internet. Uniquement pour l'USB : Vérifiez dans vos paramètres que la connexion USB ne soit pas désactivée. Dans le cas que votre système n’a pas réussi de mettre à jour, il devrait tester votre clavier sur un autre PC avec même système d’exploitation pour exclure un dégât de disc dur. *Consultez la documentation de votre PC pour détails. 3. Fonctionnement spécial du clavier 3.1 Repose poignet Les claviers ACK-201, ACK-260 et ACK-298 sont équipés d’un repose-poignet réglable et verrouillable afin d’offrir une position de travail idéale. 3.2 Pieds escamotables Les claviers propose deux pieds escamotables en dessous du clavier, offrant ainsi une position de travail inclinée et ergonomique qui ne fatigue pas. 3.3 Fonctions ACPI Le clavier (ACK-201 avec PS/2 et ACK-260) est équipé de 3 touches ACPI (*). Le BIOS resp. système d’exploitation doit supporter cette fonctionnalité. • • • Marche/arrêt Sommeil Réveil Allumer resp. éteindre le PC Mettre le PC en état « stand-by » Réveiller le PC hors de l’état « stand-by » 3.4 Port PS/2 intégré L’ACK-298 UR a un port PS/2 intégré sur le côté pour connecter directement une souris. Pour l'installation de la souris s'il vous plaît arrêter l'ordinateur. 4. Nettoyage du Clavier • • • Ôtez la poussière en utilisant un pinceau, de l’air comprimé doux, ou un aspirateur à buse-brosse. Ôtez la saleté en utilisant un chiffon légèrement imbibé d’eau. NE PAS utiliser des nettoyants agressifs, des solvants, ou de l’essence pour nettoyer le clavier. Clause d’exonération de responsabilité du fabricant Les informations dans ce document peuvent être sujet à changement sans avertissement préalable et ne représente pas un engagement de la part du vendeur. Aucune garantie ou représentation, exprimée ou implicite, n'est faite en ce qui concerne la qualité, l'exactitude ou l’apparence pour n'importe quelle partie de ce document. Le fabricant se réserve le droit, à n’importe quel moment, d’effectuer des changements dans le contenue de ce document et/ou sur les produits associés avec, sans avoir l’obligation de le notifier à des personnes ou des organisations. En aucun cas, le fabricant ne sera tenu responsable des dommages directs, indirects, spéciaux ou consécutifs à l’utilisation ou l’incapacité d’utiliser ce produit ou ce document. Ce document contient des éléments protégés par le Copyright. Tous droits réservés. Aucunes parties de ce document ne peuvent être reproduite ou transmises sous aucunes formes, moyens ou but sans le consentement écrit de ses auteurs. Le nom des produits apparaissant dans ce document le sont pour l’identification pour la vente seulement. Toutes les marques déposées, les noms de produits ou les noms de marques apparaissant dans ce document sont des marques déposées de leurs propriétaires respectifs. 7 Version 1.0 (2008/11/15) ● © 2008 by MaxPoint Handelsges. mbH