1
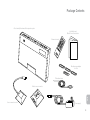
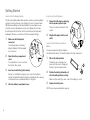
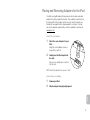
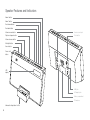
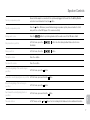
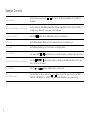
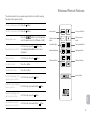
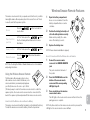
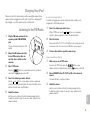
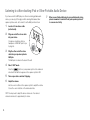
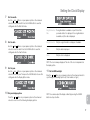
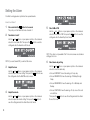
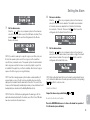
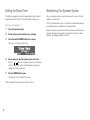
Altec Lansing Moondance Glow Digital Speaker System
and Alarm Clock for iPod®
M402SR
User Guide
Guide d’utilisation
Guía del usuario
Guia do Usuário
Welcome
Thank you for purchasing the Altec Lansing Moondance Glow speaker
system. Designed specifically to work with your iPod, this system provides
high-quality audio and radio performance that brings out the best in your
music. This Altec Lansing speaker system is designed to work with:
International Distribution
International customers: For information regarding the distribution of Altec
Lansing products in your country, please visit www.alteclansing.com and
click on your region.
• iPod touch (2nd generation)
• iPod nano (2nd generation)
• iPod touch (1st generation)
• iPod nano (1st generation)
• iPod classic
• iPod with color display
Registering Your Product
• iPod with video
• iPod mini
• iPod nano (4th generation)
• iPod with Click Wheel
Visit www.alteclansing.com to register your product online, so we can
provide you with the best possible service and technical support.
• iPod nano (3rd generation)
FCC Compliance
Please carefully read this User Guide for instructions on setting up and
using your Moondance Glow speaker system. Prior to installing or operating
the Altec Lansing Moondance Glow speaker system, refer to the end of this
guide for important product safety information.
Changes or modifications not expressly approved by the party responsible
for compliance could void the user’s authority to operate this equipment.
Getting Assistance
1) This device may not cause harmful interference, and
The answers to most setup and performance questions can be found in the
Troubleshooting section of this guide. You can also consult the frequently
asked questions (FAQ) in the customer support section of our Web site at
www.alteclansing.com.
If you live in North America and still can’t find the information you need,
please call our customer service team for assistance before returning this
product to your retailer under their return policy.
Tel: 800-258-3288 (Toll Free in US and Canada)
Email: [email protected]
If you live outside of North America, please visit our Web site at
www.alteclansing.com and select your region to locate your country’s
distributor.
ii
For the most up-to-date information, be sure to check our Web site at
www.alteclansing.com.
This device complies with Part 15 of the FCC Rules. Operation is subject to
the following two conditions:
2) This device must accept any interference received, including interference
that may cause undesired operation.
Safety Information
The lightning flash with arrowhead, within an equilateral triangle,
is intended to alert the user to the presence of un-insulated
“dangerous voltage” within the product’s enclosure that may be of
sufficient magnitude to constitute a risk of electric shock to persons.
Caution: To prevent the risk of electric shock, do not remove cover
(or back). No user-serviceable parts inside. Refer servicing to
qualified service personnel.
CAUTION
To prevent electric shock do not use this (polarized) plug with an extension cord, receptacle or other outlet
unless the blades can be fully inserted to prevent blade exposure.
WARNING
To reduce the risk of fire or electric shock, do not expose this appliance to rain or moisture.
IMPORTANT SAFETY INSTRUCTIONS
1. Read these instructions.
2. Keep these instructions.
3. Heed all warnings.
4. Follow all instructions.
5. Do not use this apparatus near water – This apparatus shall not be exposed to dripping or splashing,
and no objects filled with liquids, such as vases, shall be placed on the apparatus.
6. Clean only with dry cloth.
The exclamation point within an equilateral triangle is intended
to alert the user to the presence of important operating and
maintenance (servicing) instructions in the literature accompanying
the appliance.
13. Power source – Use only power supplies of the type specified in the operating instructions or
as marked on the appliance. If a separate power supply is included with this apparatus, do not
substitute with any other power supply – use only manufacturer-provided power supplies.
14. Unplug this apparatus during lightning storms or when unused for long periods of time.
15. Refer all servicing to qualified service personnel. Servicing is required when the apparatus has been
damaged in any way, such as power-supply cord or plug is damaged, liquid has been spilled or
objects have fallen into the apparatus, the apparatus has been exposed to rain or moisture, does not
operate normally, or has been dropped. For service, refer to qualified service personnel, return to the
dealer, or call the Altec Lansing service line for assistance.
16. For products that incorporate batteries, please refer to local regulations for proper battery disposal.
17. Only use attachments/accessories specified by the manufacturer.
18.
Use only with the cart, stand, tripod, bracket, or table specified by the manufacturer or
sold with the apparatus. When a cart is used, use caution when moving the cart/
apparatus combination to avoid injury from tip-over.
7. Do not block any ventilation openings. Install in accordance with the manufacturer’s instructions. The
apparatus should not be situated on a bed, sofa, rug or similar surface that may block the ventilation
openings. The apparatus must not be placed in a built-in installation, such as a closed bookcase or
cabinet that may impede the flow of air through the ventilation openings. Ventilation should not be
impeded by covering the openings with items such as newspapers, tablecloths, curtains, etc.
8. Do not install near any heat sources such as radiators, heat registers, stoves, or other apparatus
(including amplifiers) that produce heat.
9. No naked flame sources, such as lighted candles, should be placed on the apparatus.
10. Do not defeat the safety purpose of the polarized or grounding-type plug. A polarized plug has two
blades with one wider than the other. A grounding type plug has two blades and a third grounding
prong. The wide blade or the third prong is provided for your safety. If the provided plug does not fit
into your outlet, consult an electrician for the replacement of the obsolete outlet.
en
11. Protect the power cord from being walked on or pinched – particularly at plugs, convenience
receptacles, and the point where they exit from the apparatus.
12. Do not install in an area that impedes the access to the power plug. Disconnecting the power plug is
the only way to completely remove power to the product and must be readily accessible at all times.
1
Contents
Welcome.................................................................................................................................................................................................. ii
Safety Information................................................................................................................................................................................... 1
Package Contents................................................................................................................................................................................... 3
Getting Started........................................................................................................................................................................................ 4
Placing and Removing Adapters for the iPod......................................................................................................................................... 5
Speaker Features and Indicators............................................................................................................................................................ 6
Speaker Controls..................................................................................................................................................................................... 7
Enhanced Remote Features.................................................................................................................................................................... 9
Wireless Snooze Remote Features....................................................................................................................................................... 11
Listening to Your iPod........................................................................................................................................................................... 12
Charging your iPod................................................................................................................................................................................ 13
Listening to the FM Radio..................................................................................................................................................................... 13
Listening to a Non-docking iPod or Other Portable Audio Device........................................................................................................ 14
Mood Light............................................................................................................................................................................................ 15
Setting the Clock Display...................................................................................................................................................................... 16
Setting the Alarm................................................................................................................................................................................... 18
Setting the Sleep Timer......................................................................................................................................................................... 20
Maintaining Your Speaker System........................................................................................................................................................ 20
Troubleshooting..................................................................................................................................................................................... 21
Warranty................................................................................................................................................................................................ 24
2
Package Contents
Altec Lansing Moondance Glow speaker system
User Guide and
Quick Connect Instructions
Enhanced remote
Miscellaneous adapters
for iPod
FM radio antenna
Wireless snooze remote
en
Snooze remote receiver
Power supply
3
Getting Started
How to Install the Backup Battery
How to Install the AC Adapter
This Altec Lansing Moondance Glow speaker system uses a backup battery
system to provide continuous clock settings in the event of a power failure.
With the backup battery (not included) installed, if a power failure occurs
or the AC cord is accidentally disconnected, the display will not remain
lit and the alarm will not function, but the current time will be temporarily
maintained. Otherwise, you must reset the time and alarm settings.
1
1
Make sure the AC adapter is
connected.
Your settings may be lost during
battery installation if the AC adapter
isn’t connected.
2
Open the battery compartment
cover.
The jack is located on the back of the
system.
2
Insert one 9-volt battery (not included).
Be sure to check that the polarity (+ and – ends of the batteries)
matches the illustration inside the battery compartment. Altec Lansing
recommends the use of alkaline batteries for longer life.
4
Close the battery compartment cover.
Plug the AC adapter into the wall
outlet.
How to Install the Enhanced Remote
Battery
The enhanced remote battery (included) is
not installed at the factory. To install the battery, follow the steps below:
1
Pull out the battery holder.
The battery door is located on the
lower end of the remote. Simply pull
the tab to open the battery holder.
The compartment cover is located on
the bottom of the system.
3
Connect the AC adapter cable plug
into the speaker system’s jack.
2
Position the battery (included) so it
sits in the battery holder correctly.
Make sure the polarity (the + and – sides of the battery) is correct.
3
Replace the battery door.
NOTE Please discard used batteries properly.
4
Placing and Removing Adapters for the iPod
Your Altec Lansing Moondance Glow speaker system includes removable
adapters for today’s popular iPod models. These adapters ensure that your
iPod properly fits in the speaker system’s dock. As new iPod models are
introduced, new adapters will be made available to customers. You may
also use the adapters supplied with your iPod or available for purchase at
www.apple.com.
How to Place an Adapter
1
Select the correct adapter for your
iPod.
Using the correct adapter ensures a
proper fit for your iPod.
2
Gently press the iPod adapter into
the dock.
Now you can carefully place your iPod
into the dock.
NOTE Your iPod cannot be in a case or a “skin.”
How to Remove an Adapter
1
2
Remove your iPod.
Grip the adapter and pull gently upward.
en
5
Speaker Features and Indicators
Alarm 2 button
Alarm 1 button
Track forward button
Track back button
Volume increase button
Snooze remote jack
Play/snooze/pause button
Clock button
Volume decrease button
Mood light button
Source button
Power on/off
button
LCD
display
AUX jack
AC adapter jack
Battery compartment
FM antenna
Universal docking station for iPod
6
Speaker Controls
Turn on your speaker system
Ensure the AC adapter is connected to the system and plugged into the wall. See the Getting Started
section for more information. Press the button.
Turn off your speaker system
Press the button. Whenever you are finished using your speaker system, please remember to turn it
and your iPod or other MP3 player off to conserve electricity.
Change audio source
Press the
Play a track from your iPod
In “iPod” mode, press the
information.
Pause your iPod
In “iPod” mode, Press the
Turn up the volume
Press the + button.
Turn down the volume
Press the – button.
Skip to the beginning of the current song on
your iPod
In “iPod” mode, press the
button to cycle through and select the audio source: iPod, FM radio or AUX.
button. See the Listening to Your iPod section for more
button.
button.
Rewind the currently playing track on your iPod In “iPod” mode, press and hold the
Skip to the beginning of the next song on
your iPod
In “iPod” mode, press the
Fast-forward the currently playing track on
your iPod
In “iPod” mode, press and hold the
Tune radio stations
In “FM” mode, use the
button.
button.
en
and
button.
buttons. See the Listening to the Radio section for additional information.
7
Speaker Controls
8
Scan radio stations
In “FM” mode, press and hold the
information.
Listen to a non-docking iPod or MP3 player
See the Listening to a Non-docking iPod or Other Portable Audio Device section for specific information
on using devices attached to your speaker system’s AUX jack.
Turn on the mood light
Press the
Set the clock
See the Setting the Clock Display section for detailed instructions on setting the clock.
Set the alarm
See the Setting the Alarm section for instructions on setting the alarms.
Dismiss the alarm
Press and hold the
Snooze for 5 to 60 minutes (user-definable)
button when the alarm is sounding. See the Setting the Alarm section to learn
Press the
how to set the snooze duration.
Reset all settings
Press the
Select FM Band region
Reset all settings (see above), and use the and buttons to select the region closest to you (“USA,”
“EUROPE,” “JAPAN WIDE,” or “JAPAN.”) Then, press the CLOCK button to save your selection.
or
button. See the Listening to the Radio section for additional
button. See the Mood Light section for more information.
and
or
button for a few seconds when the alarm is sounding or has been snoozed.
buttons simultaneously for a few seconds.
Enhanced Remote Features
The enhanced remote lets you operate many functions of your Altec Lansing
Moondance Glow speaker system:
Turn on your speaker system Press the
button.
Turn off your speaker system Press the
button.
Change audio source
Press the
button to cycle through and
select the audio source: iPod, FM radio or AUX.
Play a track from your iPod
button. See
In “iPod” mode, press the
the Listening to Your iPod section for more
information.
Pause your iPod
In “iPod” mode, Press the
Turn up the volume
Press the + button.
Turn down the volume
Press the – button.
Skip to the beginning of the
current song on your iPod
In “iPod” mode, press the
Rewind the currently playing
track on your iPod
In “iPod” mode, press and hold the
Skip to the beginning of the
next song on your iPod
In “iPod” mode, press the
Fast-forward the currently
playing track on your iPod
In “iPod” mode, press and hold the
button.
Source button
Power on/off button
Volume decrease
button
Volume increase
button
Track back button
Track forward button
Alarm disable button
Play/pause button
FM preset buttons
FM preset buttons
Snooze button
button.
button.
button.
en
button.
9
Enhanced Remote Features
Tune radio stations
In “FM” mode, use the
and
buttons. See the Listening to the Radio section for additional information.
Seek radio stations
In “FM” mode, press and hold the
information.
Store a radio station
In “FM” mode, tune to the station you’d like to store, and then press and hold one of the PRESET buttons
(P1, P2, P3 or P4). See the Listening to the Radio section for more information.
Select a preset radio station
In “FM” mode, press the PRESET button (P1, P2, P3 or P4) that corresponds to the station you’d like to
hear. See the Listening to the Radio section for more information.
Set the alarm
See the Setting the Alarm section for instructions on setting the alarms.
Dismiss the alarm
Press the
Snooze for 5 to 60 minutes (user-definable)
Press the
button when the alarm is sounding. See the Setting the Alarm section to learn how to
set the snooze duration.
or
button. See the Listening to the Radio section for additional
button when the alarm is sounding.
NOTE For best results, aim the enhanced remote toward the Moondance Glow speaker system.
10
Wireless Snooze Remote Features
The wireless snooze remote lets you operate select functions of your Altec
Lansing Moondance Glow speaker system from across the room. There’s
no need to aim it at the speaker system.
button to activate the
Snooze
Press the
snooze timer.
Play a track from
your iPod
button.
In “iPod” mode, press the
See the Listening to Your iPod section for more
information.
Pause your iPod
In “iPod” mode, press the
Dismiss the alarm
Press the
sounding.
or
button.
button when the alarm is
1
Use a coin or screwdriver to turn the
battery compartment door counterclockwise.
2
The Moondance Glow speaker system comes
with a wireless snooze remote that allows you to
snooze and dismiss your alarm (and play/pause
your iPod) from across the room – up to 30 feet
(10 meters) away. In order for the wireless snooze remote to control the
speaker system, the snooze remote receiver must be connected to the
back of the speaker system and paired with the wireless snooze remote.
3
The wireless snooze remote battery (included) is not installed at the factory.
To install the wireless snooze remote battery, follow the steps below:
Replace the battery door.
NOTE Please discard used batteries properly.
How to Connect and Pair the Wireless Snooze Remote
1
Connect the snooze remote
receiver to the SNOOZE REMOTE
jack.
The jack is located on the back of
the system.
2
Press the PAIRING button on the
bottom of the snooze remote
receiver until the corresponding
LED light stays lit.
3
Press any button on the wireless
snooze remote twice.
The LED light on the snooze remote receiver will turn off once the
pairing process is complete.
NOTE Any time a button on the wireless snooze remote is pressed, the
LED light on the snooze remote receiver will flash.
en
How to Install the Wireless Snooze Remote Battery
Position the battery (included) so it
sits in the battery holder correctly.
Make sure the polarity (the + and –
sides of the battery) is correct.
NOTE See the Using the Wireless Snooze Remote section for installation
and pairing instructions.
Using the Wireless Snooze Remote
Open the battery compartment.
11
Listening to Your iPod
1
Dock your iPod in the Altec Lansing Moondance Glow
speaker system.
2
Select “iPod” mode.
How to Access Additional Features on Your iPod Using
the Enhanced Remote
Shuffle function
Press the P1 button once on the
enhanced remote to advance to the next
icon is displayed
shuffle mode. The
when the system is in song shuffle mode.
icon is displayed when the
The
system is in album shuffle mode. The icon
disappears when the shuffle function has
been turned off. Note: Use the P2 button
on some older iPod models. Functionality
may vary per iPod model.
Repeat function
Press the P2 button once on the
enhanced remote to advance to the next
icon is displayed
repeat mode. The
when the system is in the repeat one
icon is displayed when the
mode. The
system is the repeat all mode. The icon
disappears when the repeat function has
been turned off. Note: Use the P1 button
on some older iPod models. Functionality
may vary per iPod model.
Access the previous playlist
Press the P3 button on the enhanced
remote.
Access the next playlist
Press the P4 button on the enhanced
remote.
button on your speaker system or enhanced
Press the
remote until the iPod icon appears on the LCD.
3
Press the button on your iPod, speaker system, enhanced
remote, or wireless snooze remote.
Music from your iPod will start playing. The speaker system and its
remote are capable of controlling basic functions of your iPod.
4
Adjust the volume.
Use the + and – buttons on the Altec Lansing speaker system
to adjust the system volume. Or, use the + and – buttons on the
enhanced remote.
5
Find your desired song.
Press the or button on your speaker system or enhanced remote
to go to the next or previous track. Press and hold the or button
on your speaker system or enhanced remote while track is playing for
high-speed forward or reverse music search of the current track.
12
Charging Your iPod
Whenever your iPod is docked and your Altec Lansing Moondance Glow
speaker system is plugged into an AC outlet, your iPod is charging (until
fully charged) – even if the speaker system is switched off.
Listening to the FM Radio
1
Plug the FM radio antenna into the
speaker system’s FM ANTENNA
jack.
The jack is located on the back of the
system.
2
3
Extend the FM antenna wire fully
for best FM reception. Also, do
not strip, alter or attach to other
antennas.
button on your speaker system or enhanced
appears on the LCD.
1
Adjust the volume.
2
Store the station.
Press and hold the P1, P2, P3 or P4 button on the enhanced remote
for a few seconds. You can store one FM station in each preset.
3
To store other stations, repeat the above steps.
How to Recall Preset Stations
1
Make sure you are in “FM” mode.
If you’re not in “FM” mode, press the
speaker system or enhanced remote until the
2
button on your
appears on the LCD.
Press a PRESET button (P1, P2, P3 or P4) on the enhanced
remote.
The radio will tune to your preset station.
3
Adjust the volume.
Use the + and – buttons on the Altec Lansing speaker system
to adjust the system volume. Or, use the + and – buttons on the
enhanced remote.
en
Use the + and – buttons on the Altec Lansing speaker system
to adjust the system volume. Or, use the + and – buttons on the
enhanced remote.
Tune to the station you wish to store.
While in “FM” mode, use the and buttons on your speaker
system or enhanced remote to tune to the desired station.
Tune to the station you want to listen to.
Use the and buttons on your speaker system or enhanced
remote to tune in the desired station. Press and hold these same
buttons to find the next clear FM station.
5
Your Altec Lansing speaker system’s enhanced remote enables you to
program up to 4 FM station presets:
Select “FM” mode.
Press the
remote until the
4
How to Store Preset Stations
13
Listening to a Non-docking iPod or Other Portable Audio Device
If you have a non-iPod MP3 player or other non-docking portable audio
device, you can enjoy it through your Altec Lansing Moondance Glow
speaker system as well. Just connect it via the AUX jack. Here’s how:
1
Locate a 3.5 mm stereo cable
(not included).
2
Plug one end of the stereo cable
into your device.
Your device should have either a
headphone or LINE OUT jack for you
to plug into.
3
Plug the other end of the stereo
cable into your speaker system’s
AUX jack.
The AUX jack is located on the back of the unit.
4
Select “AUX” mode.
button on your speaker system or the enhanced
Press the
remote until the AUX icon appears on the speaker system’s LCD.
5
6
Turn on your device and start it playing.
Adjust the volume.
Use the + and – buttons on the speaker system to adjust the volume.
Or, use the + and – buttons on the enhanced remote.
NOTE You may need to adjust the device volume also. Your device’s
volume should be set to approximately ¾ volume.
14
7
When you are finished listening to your portable audio device,
please remember to turn both it and your speaker system off
to conserve electricity.
Mood Light
Your Altec Lansing Moondance Glow speaker system is also equipped with
a mood light to help you relax and enjoy the music.
2
Choose the color of the ambient light you’d like.
Use the and buttons on your speaker system or the enhanced
remote to cycle through all the colors the mood light can emit. When
the desired color is projected, press the
button again to enter
the Mood Light Manual Select menu.
3
Select brightness level. (Optional setting)
If in manual mode, press the or button on your speaker system
or the enhanced remote to cycle through the available brightness
settings. When the desired brightness setting is achieved, press the
button to exit the Mood Light Setup menu.
How to Turn On the Mood Light
Press the
button on your Altec Lansing speaker system.
How to Adjust the Mood Light
You can enter the Mood Light Setup menu at any time to change colors,
adjust modes and set the brightness level.
1
Press and hold the
button for 3 seconds.
This puts you in the Mood Light Setup menu.
WARNING The mood light isn’t a reading light and doesn’t provide
enough light to read by. Please don’t risk damage to your eyesight by trying
to read using the mood light.
en
15
Setting the Clock Display
How to Set the Clock Time and Date
1
4
The CLOCK button is located on the back of your Altec Lansing
speaker system. This puts you in the Time/Date Set mode.
2
Select either 12-Hour or 24-Hour Clock mode.
Press the or button on your speaker system or the enhanced
remote to select either 12-Hour or 24-Hour Clock mode. Then press
the CLOCK button to save this setting and enter the Hour Set mode.
3
5
Set AM/PM.
Press the or button on your speaker system or the enhanced
remote to select AM or PM. Press the CLOCK button to save this
setting and enter the Day Set mode.
6
Set the hour.
Use the and buttons on your speaker system or the enhanced
remote to adjust the hour. Then press the CLOCK button to save this
setting and enter the Minute Set mode.
16
Set the minute.
Use the and buttons on your speaker system or the enhanced
remote to adjust the minute. Then press the CLOCK button to save
this setting and enter the AM/PM Set mode, if 12-Hour Clock mode
was previously selected. If 24-Hour Clock mode was selected,
pressing the CLOCK button will save the minute setting and place the
unit into Day Set mode.
Press and hold the CLOCK button for 3 seconds.
Set the day.
Press the or button on your speaker system or the enhanced
remote to select the day of the week. Then press the CLOCK button
to save this setting and enter the Month Set mode.
Setting the Clock Display
7
Set the month.
Use the and buttons on your speaker system or the enhanced
remote to select the month. Press the CLOCK button to save this
setting and enter the Date Set mode.
Song Information/ If song information is available on your iPod or from
Date
your radio station, it is displayed. If no song information
is available, only the date is displayed.
8
9
Set the date.
Song Information
Only the song information is displayed, if available.
Use the and buttons on your speaker system or the enhanced
remote to select the date. Press the CLOCK button to save this
setting and enter the Year Set mode.
Date
Only the date is displayed.
Clock
Only the clock is displayed.
Set the year.
Use the and buttons on your speaker system or the enhanced
remote to select the year. Then press the CLOCK button to save this
setting and enter the Display Option mode.
10 Set your display options.
11 Set the LCD backlight.
Press the or button on your speaker system or the enhanced remote to
cycle through LCD backlight options (off, low, medium, or high.)
NOTE You can also adjust the display contrast by pressing the CLOCK
button one step at a time.
en
Press the or button on your speaker system or the enhanced
remote to select one of the following four display options:
NOTE The clock is always displayed. The size of the clock is dependent on
the display option.
17
Setting the Alarm
Your Altec Lansing speaker system has two separate alarms.
How to Set Alarm 1
1
Press and hold the
button for 3 seconds.
This puts you in the Alarm Set mode for alarm 1.
2
5
Select AM or PM.
Use the and buttons on your speaker system or the enhanced
remote to select AM or PM. Then press the
button to save this
setting and enter the Alarm Day Select mode.
Turn Alarm 1 on/off
Use the and buttons on your speaker system or the enhanced
remote to select alarm ON. Then press the
button to save this
setting and enter the Alarm Hour Set mode.
NOTE This option is only available if the 12-hour mode was selected when
setting up the clock.
NOTE If you select alarm OFF, you will exit the menu.
3
Adjust the hour.
Use the and buttons on your speaker system or the enhanced
remote to adjust the hour setting. Then press the
button to save
this setting and enter the AM/PM selection mode.
6
Select alarm day setting.
Use the and buttons on your speaker system or the enhanced
remote to select the alarm day:
• Choose EVERYDAY to have the alarm go off every day.
• Choose WEEKDAYS to have the alarm go off Monday through
Friday.
• Choose WEEKENDS to have the alarm go off on Saturday and
Sunday.
4
18
Adjust the minute.
• Choose ONE TIME to have the alarm go off only once at the next
selected time.
Use the and buttons on your speaker system or the enhanced
remote to adjust the minute setting. Then press the
button to
save this setting and enter the Alarm Source Set mode.
Then press the
button to save this setting and enter the Alarm
Source Set mode.
Setting the Alarm
8
7
Press the or button on your speaker system or the enhanced
remote to select the snooze duration. The default snooze duration
is 9 minutes and can be adjusted from 5 minutes to 60 minutes
in increments of 1 minute. Then press the
button to save this
setting and enter the Alarm Volume Set mode.
Set the alarm source.
Press the or button on your speaker system or the enhanced
remote to select the alarm source (iPod, FM radio or buzzer). Then
press the
button to save this setting and enter the Snooze
Duration Set mode.
9
NOTE If you wish to wake up to a specific song on your iPod, dock your
iPod on the speaker system, select the song on your iPod, and then
select iPod as your alarm source. The speaker system should remember
which song was selected from now on, unless the playlist on your iPod
is modified. If the playlist on your iPod is modified, either the last song on
queue or the first song on your song list will play.
NOTE Your Altec Lansing speaker system features a backup battery. If
a power failure occurs or the AC cord is accidentally disconnected, the
display will not remain lit and the alarm will not function. The correct time,
however, will be temporarily maintained (provided you have installed a 9-volt
backup battery as described in the Getting Started section).
Set the alarm volume.
Press the or button on your speaker system or the enhanced
remote to select the alarm volume (low, medium or high). The default
alarm volume is medium. Then press the
button to save this
setting and exit the Alarm Set mode.
NOTE When exiting the Alarm Set mode, the Alarm is automatically turned
on. To dismiss the alarm when it sounds, press and hold the corresponding
/
button for a few seconds.
How to Set Alarm 2
Repeat the above steps, substituting
for
.
How to Use the Snooze Feature
en
NOTE If the iPod or FM radio are playing when the alarm goes off, the
alarm will automatically default to the buzzer, even if the iPod or FM radio
have been selected as the alarm source.
Set snooze duration.
Press the SNOOZE button once to silence the alarm for a period of
5 to 60 minutes (user-definable).
19
Setting the Sleep Timer
Maintaining Your Speaker System
Your Altec Lansing speaker system is equipped with a sleep timer that
automatically turns off the unit 5 to 90 minutes after it has been set.
Place your speaker system on a level surface away from sources of direct
sunlight or excessive heat.
How to Set the Sleep Timer
Protect your furniture with a cloth or other protective material when placing
your speaker system on a natural wood or lacquered finish.
1
2
3
Turn on the speaker system.
Ensure that your selected audio source is playing.
Press and hold the POWER button for 3 seconds.
This puts you in the Sleep Timer mode.
4
Choose when you want the speaker system to turn off.
Press the or button on your speaker system or the enhanced
remote to select how long the unit should play before going on
standby (in 5-minute increments).
5
Press the POWER button again.
This takes you out of the Sleep Timer mode.
NOTE Turning off the system will cancel the Sleep Timer.
20
Clean your speaker system with a soft cloth moistened only with mild soap
and water. Stronger cleaning agents, such as benzene, thinner or similar
materials, can damage the surface of the unit.
Troubleshooting
Symptom
Possible Problem
Solution
Plug the AC adapter into a wall outlet and plug the connector into the power
supply jack on the back of the speaker system.
Speaker system doesn’t
respond (no power)
AC adapter isn’t plugged into a wall outlet
or the connector isn’t plugged into the
power supply jack on the back of the
speaker system
Wall outlet is not functioning
Plug another device into the same outlet to confirm the outlet is working.
Using the wrong adapter for iPod or no
adapter
Make sure the adapter is the proper fit for your iPod.
iPod didn’t install properly
Remove your iPod from the dock and check for obstruction on the
connectors in the dock and on your iPod. Then reseat it in the dock.
iPod is not installed properly
Remove your iPod from the dock and check for obstructions on the
connectors in the dock and on your iPod. Then reseat it in the dock.
Your iPod software is too old
Upgrade software on your iPod. For details visit
www.apple.com/ipod/download.
iPod is locked up
Please make sure your iPod is working properly before docking into the unit.
Please refer to your iPod manual for details.
Using 1st- or 2nd-generation iPod, iPod
shuffle or other devices
Your speaker system cannot control those iPod models or other devices. See
the Welcome section for a compatibility list.
iPod doesn’t dock properly
iPod doesn’t respond
to the speaker system en
21
Troubleshooting
Symptom
Possible Problem
Solution
iPod is not installed properly
Remove your iPod from the dock and check for obstructions on the
connectors in the dock and on your iPod. Then reseat it in the dock.
iPod is locked up
Please make sure your iPod is working properly before docking into the unit.
Please refer to your iPod manual for details.
AC adapter isn’t plugged into a wall outlet,
or the connector is not plugged into the
power supply jack on the back of the
speaker system
Plug the AC adapter into a wall outlet and plug the connector into the supply
jack on the speaker system.
Volume level is set too high
Decrease the volume.
Sound source is distorted
If the iPod original sound source (MP3) is of poor quality, distortion and noise
are easily noticed with high-power speakers. Try a different audio source such
as a music CD.
Battery is weak
Replace current battery with a new battery.
Enhanced remote is not pointed toward
the speaker system
Point the enhanced remote toward the Altec Lansing speaker system and
move within 10 feet of the unit.
Volume on the device is set too low
Increase the volume on the device to approximately ¾ full volume.
Source selector is not set to AUX
Set source selector to AUX.
iPod didn’t charge
Sound is distorted
Enhanced remote doesn’t
work
No sound from the AUX
device, such as an MP3
player or CD player
connected to the AUX jack
22
Troubleshooting
Symptom
Wireless snooze remote
doesn’t work.
Possible Problem
Solution
Battery is weak
Replace current battery with a new battery.
Snooze remote receiver is not properly
plugged into speaker system
See How to Connect and Pair the Wireless Snooze Remote section.
Wireless snooze remote is not paired
See How to Connect and Pair the Wireless Snooze Remote section.
en
23
Warranty
ALTEC LANSING ONE-YEAR LIMITED WARRANTY
What Does the Warranty Cover?
Altec Lansing warrants that its products shall be free from defects in materials or workmanship, with the
exceptions stated below.
What Is the Period of Coverage?
This warranty runs for one year from the date of purchase. The term of any warranties implied by law shall
expire when your limited warranty expires. Some states and/or Member States in the European Union do
not allow limitations on how long an implied warranty lasts, so the above limitation may not apply to you.
What Does the Warranty Not Cover?
This warranty does not cover any defect, malfunction or failure that occurs as a result of: improper
installation; misuse or failure to follow the product directions; abuse; or use with improper, unintended
or faulty equipment. (For information on proper installation, operation and use consult the manual
supplied with the product. If you require a replacement manual, you may download a manual from
www.alteclansing.com.) Also, consequential and incidental damages are not recoverable under this
warranty. Some states do not allow the exclusion or limitation of incidental or consequential damages,
so the above limitation or exclusion may not apply to you.
What Will Altec Lansing Do to Correct the Problem?
Altec Lansing will, at its option, repair or replace any product that proves to be defective in material or
workmanship. If your product is no longer being manufactured, or is out of stock, at its option, Altec
Lansing may replace your product with a similar or better Altec Lansing product.
How to Get Warranty Service
To get a covered product repaired or replaced, you must contact Altec Lansing during the warranty
period by email ([email protected]). You must include in your email, your name, address,
email address, telephone number, date of purchase and a complete description of the problem you
are experiencing. In the United States, you may alternatively contact Altec Lansing by telephone at
1-800-ALTEC88 – please be prepared to provide the same information. If the problem appears to be
related to a defect in material or workmanship, Altec Lansing will provide you a return authorization and
instructions for return shipment. Return shipments shall be at the customer’s expense, and the return
must be accompanied by the original proof of purchase. You should insure the shipment as appropriate
because you are responsible for the product until it arrives at Altec Lansing.
How Will State Law Affect Your Rights?
This warranty gives you specific legal rights, and you may also have other rights which vary from state
to state. Please note that in the European Union, you as a consumer might have other legal rights under
national legislation of European Union Member States governing the sale of Altec Lansing’s goods. Those
rights are not affected by this guarantee.
The above limited warranties and remedies are sole warranties and remedies available to purchaser, if, and
to the extent, valid and enforceable under the applicable law.
24
Disposal of Old Electrical and Electronic Equipment
This symbol on the product or on its packaging indicates that this product shall not be
treated as household waste. Instead it shall be handed over to the applicable collection
point for the recycling of electrical and electronic equipment. By ensuring this product is
disposed of correctly, you will help prevent potential negative consequences for the
environment and human health, which could otherwise be caused by inappropriate waste
handling of this product. The recycling of materials will help to conserve natural resources.
For more detailed information about recycling of this product, please contact your local city office or your
household waste disposal service.
25
www.alteclansing.com
Headquarters 535 Rte. 6 & 209, Milford, PA 18337-0277 • 800-ALTEC-88. 570-296-4434. • Fax 570-296-6887
Europe 13 Rue Beaumont, L-1219 Luxembourg, Luxembourg
Asia/Pacific 23/F, Office Tower, Shun Hing Square Diwang Commercial Centre, 5002 Shen Nan Dong Road, Shenzhen, China 518008
“Made for iPod” means that an electronic accessory has been designed to connect specifically to iPod and has been certified by the developer to meet Apple performance standards.
Apple is not responsible for the operation of this device or its compliance with safety and regulatory standards.
Patents pending.
©2008 Plantronics, Inc. All rights reserved.
ALTEC, ALTEC LANSING, the Altec Lansing logo, the horn design, Moondance, M402, and M402SR are trademarks or registered trademarks of Altec Lansing, a division of Plantronics, Inc.
Plantronics, the logo design, and Sound Innovation are trademarks or registered trademarks of Plantronics, Inc.
iPod is a trademark of Apple, Inc., registered in the U.S. and other countries.
All other trademarks appearing herein are the property of their respective owners.
Designed by Altec Lansing in the USA. Made in China.
« Conçu pour l’iPod » signifie qu’un accessoire électronique a été spécifiquement conçu pour se connecter à l’iPod et est garanti conforme aux normes de performance Apple par le constructeur.
Apple n’est pas responsable du fonctionnement de ce dispositif, ni de sa conformité aux normes de sécurité et réglementations en vigueur.
Brevets en instance.
© 2008 Plantronics, Inc. Tous droits réservés.
ALTEC, ALTEC LANSING, le logo Altec Lansing, le logo représentant une trompe, Moondance, M402 et M402SR sont des marques déposées ou commerciales d’Altec Lansing, une filiale de Plantronics, Inc.
Plantronics, le logo et le slogan Sound Innovation sont des marques déposées ou commerciales de Plantronics, Inc.
iPod est une marque commerciale d’Apple Computer, Inc., déposée aux États-Unis et dans d’autres pays.
Toutes les autres marques de commerce utilisées dans la présente sont la propriété de leurs détenteurs respectifs.
Conçu par Altec Lansing aux États-Unis. Fabriqué en Chine.
A12934 R06