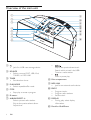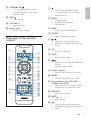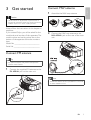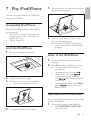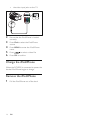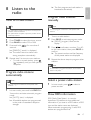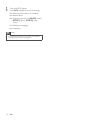
1
Docking Entertainment System
Register your product and get support at
DCM250/12
EN User manual
FR Mode d’emploi
DA Brugervejledning
IT
DE Benutzerhandbuch
NL Gebruiksaanwijzing
ES Manual del usuario
SV Användarhandbok
Manuale utente
1 Important
2
Safety
Notice
2
3
2 Your Docking Entertainment System 5
Introduction
What’s in the box
Overview of the main unit
Overview of the remote control
3 Get started
Connect FM antenna
Connect MW antenna
Connect power
Prepare the remote control
Auto install radio stations
Set clock
Turn on
4 Play disc
5
5
6
7
9
9
9
10
10
11
11
11
12
5 Play from USB
13
6 Play options
14
Skip to a track
Pause/resume play
Search within a track
Display play information
Repeat play
Random play
Program tracks
7 Play iPod/iPhone
Compatible iPod/iPhone
Load the iPod/iPhone
Listen to the iPod/iPhone
Play video from iPod/iPhone
Charge the iPod/iPhone
Remove the iPod/iPhone
14
14
14
14
14
14
14
8 Listen to the radio
17
Tune to a radio station
Program radio stations automatically
Program radio stations manually
Select a preset radio station
Show RDS information
9 Adjust sound
17
17
17
17
17
19
Adjust volume
Select a preset sound effect
Enhance bass
Mute sound
19
19
19
19
10 Other features
20
Set the sleep timer
Set the alarm timer
Listen to an external device
Listen through headphone
20
20
20
20
11 Product information
21
Specifications
USB playability information
Supported MP3 disc formats
RDS program types
21
22
22
23
12 Troubleshooting
24
15
15
15
15
15
16
16
EN
1
E n g l i sh
Contents
1 Important
g Do not block any ventilation openings.
Install in accordance with the
manufacturer’s instructions.
Safety
h Do not install near any heat sources
such as radiators, heat registers, stoves,
or other apparatus (including amplifiers)
that produce heat.
Know these safety symbols
i Protect the power cord from being
walked on or pinched, particularly at
plugs, convenience receptacles, and
the point where they exit from the
apparatus.
j Only use attachments/accessories
specified by the manufacturer.
This ‘bolt of lightning’ indicates uninsulated
material within your unit may cause an
electrical shock. For the safety of everyone
in your household, please do not remove
product covering.
The ‘exclamation point’ calls attention to
features for which you should read the
enclosed literature closely to prevent
operating and maintenance problems.
WARNING: To reduce the risk of fire or
electric shock, this apparatus should not be
exposed to rain or moisture and objects filled
with liquids, such as vases, should not be
placed on this apparatus.
CAUTION: To prevent electric shock, match
wide blade of plug to wide slot, fully insert.
Important Safety Instructions
a Read these instructions.
b Keep these instructions.
c Heed all warnings.
d Follow all instructions.
e Do not use this apparatus near water.
f Clean only with dry cloth.
2
EN
k Use only with the cart, stand, tripod,
bracket, or table specified by the
manufacturer or sold with the apparatus.
When a cart is used, use caution when
moving the cart/apparatus combination
to avoid injury from tip-over.
l Unplug this apparatus during lightning
storms or when unused for long periods
of time.
m Refer all servicing to qualified service
personnel. Servicing is required when
the apparatus has been damaged in any
way, such as power-supply cord or plug
is damaged, liquid has been spilled or
objects have fallen into the apparatus,
the apparatus has been exposed to rain
or moisture, does not operate normally,
or has been dropped.
n Battery usage CAUTION – To prevent
battery leakage which may result in
bodily injury, property damage, or
damage to the unit:
•
•
Install all batteries correctly, + and as marked on the unit.
Do not mix batteries (old and new
or carbon and alkaline, etc.).
Remove batteries when the unit is
not used for a long time.
o Apparatus shall not be exposed to
dripping or splashing.
p Do not place any sources of danger on
the apparatus (e.g. liquid filled objects,
lighted candles).
q This product may contain lead and
mercury. Disposal of these materials
may be regulated due to environmental
considerations. For disposal or recycling
information, please contact your local
authorities or the Electronic Industries
Alliance: www.eiae.org.
• Where the MAINS plug or an appliance
coupler is used as the disconnect device,
the disconnect device shall remain readily
operable.
Warning
• Never remove the casing of this apparatus.
• Never lubricate any part of this apparatus.
• Never place this apparatus on other electrical
equipment.
• Keep this apparatus away from direct sunlight, naked
flames or heat.
• Never look into the laser beam inside this apparatus.
• Ensure that you always have easy access to the power
cord, plug or adaptor to disconnect this apparatus
from the power.
Hearing safety
Listen at a moderate volume.
• Using headphones at a high volume can
impair your hearing. This product can
produce sounds in decibel ranges that
may cause hearing loss for a normal
person, even for exposure less than a
minute. The higher decibel ranges are
offered for those that may have already
experienced some hearing loss.
•
Sound can be deceiving. Over time your
hearing ‘comfort level’ adapts to higher
volumes of sound. So after prolonged
listening, what sounds ‘normal’ can
actually be loud and harmful to your
hearing. To guard against this, set your
volume to a safe level before your hearing
adapts and leave it there.
To establish a safe volume level:
• Set your volume control at a low setting.
• Slowly increase the sound until you can
hear it comfortably and clearly, without
distortion.
Listen for reasonable periods of time:
• Prolonged exposure to sound, even
at normally ‘safe’ levels, can also cause
hearing loss.
• Be sure to use your equipment
reasonably and take appropriate breaks.
Be sure to observe the following guidelines
when using your headphones.
• Listen at reasonable volumes for
reasonable periods of time.
• Be careful not to adjust the volume as
your hearing adapts.
• Do not turn up the volume so high that
you can’t hear what’s around you.
• You should use caution or temporarily
discontinue use in potentially hazardous
situations. Do not use headphones while
operating a motorized vehicle, cycling,
skateboarding, etc.; it may create a traffic
hazard and is illegal in many areas.
Notice
This product complies with the radio
interference requirements of the European
Community.
This product complies with the requirements
of the following directives and guidelines:
2004/108/EC + 2006/95/EC
EN
3
E n g l i sh
•
Any changes or modifications made to this
device that are not expressly approved by
Philips Consumer Lifestyle may void the user’s
authority to operate the equipment.
Recycling
Your product is designed and manufactured with
high quality materials and components, which can
be recycled and reused.
When you see the crossed-out wheel bin symbol
attached to a product, it means the product is
covered by the European Directive 2002/96/EC:
Never dispose of your product with other
household waste. Please inform yourself about
the local rules on the separate collection of
electrical and electronic products. The correct
disposal of your old product helps prevent
potentially negative consequences on the
environment and human health.
Your product contains batteries covered by the
European Directive 2006/66/EC, which cannot
be disposed of with normal household waste.
When you see the crossed-out wheel bin
symbol with the chemical symbol ‘Pb’, it
means that the batteries comply with the
requirement set by the directive for lead:
Please inform yourself about the local rules on
separate collection of batteries. The correct
disposal of batteries helps prevent potentially
negative consequences on the environment
and human health.
Environmental information
All unnecessary packaging has been omitted.
We have tried to make the packaging easy to
separate into three materials: cardboard (box),
polystyrene foam (buffer) and polyethylene
(bags, protective foam sheet.)
Your system consists of materials which can
be recycled and reused if disassembled by
a specialized company. Please observe the
local regulations regarding the disposal of
packaging materials, exhausted batteries and
old equipment.
This apparatus includes this label:
Windows Media and the Windows logo are
trademarks, or registered trademarks of
Microsoft Corporation in the United States
and/or other countries.
Norge
Typeskilt finnes på apparatens underside.
Observer: Nettbryteren er sekundert
innkoplet. Den innebygde netdelen er
derfor ikke frakoplet nettet så lenge
apparatet er tilsluttet nettkontakten.
For å redusere faren for brann eller
elektrisk støt, skal apparatet ikke utsettes
for regn eller fuktighet.
4
EN
Congratulations on your purchase, and
welcome to Philips! To fully benefit from the
support that Philips offers, register your product
at www.philips.com/welcome.
Introduction
What’s in the box
E n g l i sh
2 Your Docking
Entertainment
System
Check and identify the contents of your
package:
• Main unit
• Remote control with battery
• FM antenna
• MW antenna
• Video cable
• Back plate
• AC adaptor
• Power cord
• MP3 link cable
• User manual
• Quick start guide
With this DCM250, you can enjoy audio from
audio discs, USB devices, iPod players, iPhone
and other external devices, or listen to radio
stations.
The DCM250 offers you multiple sound effect
settings that enrich sound with Digital Sound
Control (DSC) and Dynamic Bass Boost (DBB).
The DCM250 supports the following media
formats:
EN
5
Overview of the main unit
a
i
b
c
j
k
l
m
n
o
d
e
f
g
p
h
a
•
•
Jack for a USB mass storage device.
b SOURCE
• Select a source: DISC, USB, iPod,
TUNER, or MP3 LINK.
c TIMER
• Set the alarm timer.
d PLAY·MODE
• Select repeat/shuffle mode.
e STOP
• Stop play or erase a program.
f IR sensor
g ALBUM·PRESET +/Select a preset radio station.
Skip to the previous/next album.
Adjust time.
6
EN
/
Skip to the previous/next track.
Search within a track/ disc/USB.
Tune to a radio station.
•
Start or pause play.
h Disc compartment
i MP3-LINK
• Jack for an external audio device.
j PROG
• Program tracks.
• Program radio stations.
• Set the clock.
k DISPLAY
• During play, select display
information.
l Dock for iPod/iPhone
m STANDBY-ON
• Turn on the apparatus, switch
to standby mode, or Eco Power
standby mode.
a
n EJECT
• Eject the disc.
o VOLUME +/• Adjust volume.
b PROG
• Program tracks.
• Program radio stations.
• Set the clock.
p Display panel
• Show current status.
c MENU
• Access the iPod/iPhone menu.
e
E n g l i sh
/
•
•
a
k
b
c
d
l
m
n
e
e
f
n
g
o
p
h
q
i
r
s
t
u
v
j
Turn on the apparatus, switch
to standby mode, or Eco Power
standby mode.
d REPEAT
• Select a repeat play mode.
Overview of the remote
control
TIMER
•
w
Skip to the previous/next track.
Navigate through the iPod/iPhone
menu.
f OK
• Confirm a selection.
g SLEEP
• Set the sleep timer.
h
/
•
•
Search within a track/disc/USB/iPod/
iPhone.
Tune to a radio station.
i Numeric keypad
• Select a track from a disc directly.
j BAND
• Select a waveband: FM or MW.
k Source selection keys (CD, USB ,
TUNER , iPod, AUX )
• Select a source: CD, USB, TUNER,
iPod/iPhone or AUX(MP3 LINK).
l SHUFFLE
• Play tracks randomly.
m EJECT
• Eject the disc.
n
•
•
Skip to the previous/next album.
Navigate through the iPod/iPhone
menu.
EN
7
o MUTE
• Mute volume.
p
•
Start or pause play.
q VOL +/• Adjust volume.
r
•
Stop play or erase a program.
s DISPLAY
• During play, select display
information.
t TIMER
• Set the alarm timer.
u DSC
• Select a preset sound setting.
v DBB
• Turns on or off dynamic bass
enhancement.
w RDS
• Display available RDS (Radio Data
System) information of an FM radio
station.
8
EN
Connect MW antenna
E n g l i sh
3 Get started
1
Assemble the MW loop antenna.
2
Connect the MW loop antenna to the
MW AERIAL jack on the rear of the main
unit.
Caution
• Use of controls or adjustments or performance of
procedures other than herein may result in hazardous
radiation exposure or other unsafe operation.
Always follow the instructions in this chapter in
sequence.
If you contact Philips, you will be asked for the
model and serial number of this apparatus. The
model number and serial number are on the
bottom of the apparatus. Write the numbers
here:
Model No. __________________________
Serial No. ___________________________
Connect FM antenna
Tip
MW AERIAL
• For optimal reception, fully extend and adjust the
position of the antenna.
1
Connect the supplied FM antenna to the
FM AERIAL jack on the main unit.
Note
• Position the antenna as far as possible from a TV, VCR
or other radiation source.
FM AERIAL
EN
9
Connect power
Caution
• Risk of product damage! Ensure that the power supply
•
•
voltage corresponds to the voltage printed on the back
or the underside of the unit.
Risk of electric shock! When you unplug the AC power
cord, always pull the plug from the socket. Never pull
the cord.
Before connecting the AC power cord, ensure you
have completed all other connections.
Note
Prepare the remote control
• The type plate is located on the bottom of the main
unit.
1
Connect the power cord to the AC
adaptor.
Caution
• Risk of explosion! Keep batteries away from heat,
sunshine or fire. Never discard batteries in fire.
For first-time use:
1
Remove the protective tab to activate the
remote control battery.
To replace the remote control battery:
1
2
2
3
Connect one end to the DC socket on
the main unit.
3
Connect the other end to the wall socket.
Open the battery compartment.
Insert 1 CR2025 battery with correct
polarity (+/-) as indicated.
Close the battery compartment.
Note
• Before pressing any function button on the remote
•
10
EN
control, first select the correct source with the remote
control instead of the main unit.
If you are not going to use the remote control for a
long time, remove the battery.
Turn on
When you connect power and no radio
stations are stored, the DCM250 automatically
begins to store radio stations.
1
1
2
Connect the DCM250 to the power
supply.
» [AUTO INSTALL - PRESS PLAY] (auto
install - press the PLAY button) is
displayed.
Press
on the main unit to start
installation.
» The DCM250 automatically stores
radio stations with sufficient signal
strength.
» When all the available radio stations
are stored, the first preset radio station
is broadcast automatically.
E n g l i sh
Auto install radio stations
Press .
» The DCM250 switches to the last
selected source.
Switch to standby
1
Press to switch the DCM250 to
standby mode.
» The backlight on the display panel is
reduced.
» The clock (if set) appears on the
display panel.
To switch the DCM250 to Eco Power
Standby mode:
1
In standby mode, press and hold for
more than 2 seconds.
» The backlight on the display panel
turns off.
Set clock
1
In standby mode, press PROG to activate
the clock setting mode.
» The 12 hour or 24 hour format is
displayed.
2
Press /
format.
3
Press PROG.
» The hour digits are displayed and begin
to blink.
4
5
Press /
6
7
to select 12 hour or 24 hour
to set the hour.
Press PROG.
» The minute digits are displayed and
begin to blink.
Press /
to set the minute.
Press PROG to confirm.
EN
11
4 Play disc
Press CD to select the disc source.
Insert a disc into the disc compartment
with the printed side facing up.
L
1
2
3
Press
12
EN
l sid
abe e
to start play.
E n g l i sh
5 Play from USB
Note
• Ensure that the USB device contains playable audio
content (see ‘USB playability information’ on page 22).
1
Connect the USB device into the
socket.
2
Press USB to select the USB source.
» The total number of tracks is displayed.
3
4
5
Press
to select a folder.
Press / to select a file.
Press
to start play.
EN
13
6 Play options
•
2
Skip to a track
For CD:
For MP3/WMA and USB: and
[ALB]. The current album is played
repeatedly.
To return to normal play, press REPEAT
repeatedly until the repeat mode is no
longer displayed.
1
Press / to select another track.
• To select a track directly, you can
also press a key on the numerical
keypad.
For MP3 disc and USB:
1
2
Press
Random play
1
Press SHUFFLE.
»
is displayed. All tracks are played in
a random sequence.
2
To return to normal play, press SHUFFLE
again.
to select an album or folder.
Press / to select select a track or file.
Pause/resume play
1
During play, press
play.
Tip
to pause/resume
Search within a track
1
2
During play, press and hold
• The repeat and shuffle functions cannot be activated at
the same time.
Program tracks
/
.
Release to resume normal play.
You can program a maximum of 40 tracks.
1
At CD/USB mode, at the stop position,
press PROG to activate the program
mode.
» [PROG] (program) blinks on the
display.
2
For MP3/WMA tracks, press
an album.
3
Press / to select a track number, then
press PROG to confirm.
4
Repeat steps 2 to 3 to program more
tracks.
5
Press
to play the programmed tracks.
» During play, [PROG] (program) is
displayed.
Display play information
1
During play, press DISPLAY repeatedly to
select different play information.
Repeat play
1
14
During play, press REPEAT repeatedly to
select:
•
: The current track is played
repeatedly.
•
: All tracks are played
repeatedly.
EN
•
to select
To erase the program, in the stop
position, press .
5
Adjust the position of the back plate to fi t
the iPod/iPhone securely.
6
When the back plate is in the correct
position, tighten the screw.
» When the DCM250 is connected to
power, the docked iPod/iPhone begins
to charge.
You can enjoy audio/video from iPod/iPhone
through this DCM250.
Compatible iPod/iPhone
Apple iPod and iPhone models with a 30-pin
dock connector:
• iPod classic, iPod touch, iPod nano, iPod
5th generation (video), iPod with color
display, iPod mini.
• iPhone, iPhone 3G.
Load the iPod/iPhone
1
Remove the screw on the dock.
Listen to the iPod/iPhone
2
3
1
Ensure that the iPod/iPhone is loaded
correctly.
2
Press iPod to select iPod/iPhone source.
» The connected iPod/iPhone plays
automatically.
•
•
•
Place the back plate upright.
Place the screw in its original position.
• Note: Do not tighten the screw.
•
To pause/resume play, press
.
To skip to a track, press / .
To search during play: press and
hold / , then release to resume
normal play.
To navigate the menu: press MENU,
press
to select, then press
OK to confirm.
Play video from iPod/iPhone
You can connect the unit to a TV to enjoy video
from the iPod/iPhone.
1
4
Place the iPod/iPhone in the dock.
Connect the supplied video cable to:
• the COMPONENT VIDEO OUT
jack on the unit.
EN
15
E n g l i sh
7 Play iPod/iPhone
•
the video input jacks on the TV.
Pr
Pb
Y
2
Ensure that the iPod/iPhone is loaded
correctly.
3
Press iPod to select the iPod/iPhone
source.
4
Press MENU to enter the iPod/iPhone
menu.
5
6
Press
to select a video file.
Press OK to confirm.
Charge the iPod/iPhone
When the DCM250 is connected to power, the
docked iPod/iPhone begins to charge.
Remove the iPod/iPhone
1
Pull the iPod/iPhone out of the dock.
16
EN
Tune to a radio station
Program radio stations
manually
Note
Tip
• For optimal FM reception, fully extend and adjust the
•
1
2
3
position of the FM antenna.
For optimal MW reception, adjust the position of the
MW loop antenna.
Press TUNER to select the tuner source.
• You can program a maximum of 40 preset radio
stations.
1
2
Press BAND to select FM or MW.
Press and hold / for more than 2
seconds.
» [SEARCH] (search) is displayed.
Repeat step 2 to tune to more stations.
• To tune to a weak station, press
/ repeatedly until you find optimal
reception.
Press PROG to activate program mode.
» [PROG] (program) blinks on the
display.
3
Press / to allocate a number (1 to 40)
to this radio station, then press PROG to
confirm.
» The preset number and the frequency
of the preset station are displayed.
4
Repeat the above steps to program other
stations.
» The radio tunes to a station with
strong reception automatically.
4
Tune to a radio station.
Note
• To overwrite a programmed station, store another
station in its place.
Program radio stations
automatically
Note
• You can program a maximum of 40 preset radio
stations.
1
In tuner mode, press and hold PROG for
2 seconds to activate automatic program
mode.
» [AUTO] (auto) is displayed.
» All available stations are programmed
in the order of waveband reception
strength.
Select a preset radio station
1
In tuner mode, press /
preset number.
to select a
Show RDS information
RDS (Radio Data System) is a service
that allows FM stations to show additional
information. If you tune to a RDS station, a RDS
icon and the station name are displayed.
When automatic programming is used, RDS
stations are programmed first.
EN
17
E n g l i sh
» The first programmed radio station is
broadcast automatically.
8 Listen to the
radio
1
2
Tune to a RDS station.
Press RDS repeatedly to scroll through
the following information (if available):
» Station name
» Program type such as [NEWS] (news(,
[SPORT] (sport), [POP M] (pop
music)...
» Radio text messages
» Frequency
Note
• The definitions of RDS program types are available
(see ‘RDS program types’ on page 23).
18
EN
E n g l i sh
9 Adjust sound
Adjust volume
1
During play, press VOL +/- to increase/
decrease the volume.
Select a preset sound effect
1
During play, press DSC repeatedly to
select:
• [POP] (pop)
• [JAZZ] (jazz)
• [CLASSIC] (classic)
• [ROCK] (rock)
Enhance bass
1
During play, press DBB to turn on or off
dynamic bass enhancement.
» If DBB is activated, DBB is displayed.
Mute sound
1
During play, press MUTE to mute/unmute
sound.
EN
19
10 Other features
Set the sleep timer
Activate and deactivate the alarm
timer
1
This DCM250 can switch to standby
automatically after a set period of time.
1
When the DCM250 is turned on, press
SLEEP repeatedly to select a set period of
time (in minutes).
» When sleep timer is activated, the
display shows [SLEEP](sleep) .
Press TIMER repeatedly to activate or
deactivate the timer.
» If the timer is activated, the display
shows .
» If the timer is deactivated,
disappears on the display.
Note
• If DISC/USB/iPod source is selected and the track
cannot be played, tuner is activated automatically.
To deactivate sleep timer
1
Press SLEEP repeatedly until “OFF” is
displayed.
» When sleep timer is deactivated,
[SLEEP](sleep) disappears on the
display.
Set the alarm timer
This DCM250 can be used as an alarm clock.
The DISC, TUNER, USB or iPod is activated to
play at a preset time.
Listen to an external device
You can also listen to an external audio device
through this unit.
1
2
3
Press AUX to select MP3 link source.
Connect the supplied MP3 link cable to:
• the MP3 LINK jack on this unit
• the headphone jack on the device
Start to play the device. (See the device
user manual)
1
Ensure that you have set the clock
correctly.
2
3
Press and hold TIMER.
Listen through headphone
Press CD, USB, TUNER or iPod to select
a source.
1
4
Press TIMER to confirm.
» The hour digits are displayed and begin
to blink.
5
6
Press /
7
8
20
to set the hour.
Press TIMER to confirm.
» The minute digits are displayed and
begin to blink.
Press /
to set the minute.
Press TIMER to confirm.
» The timer is set and activated.
EN
Plug a headphone into the
the unit.
socket on
Note
• Product information is subject to change without prior
notice.
Specifications
Amplifier
Rated Output
Power
2X15W RMS
Frequency
Response
100 Hz - 16 kHz, ±3dB
Signal to Noise
Ratio
>70dB
Aux Input
0.5 V RMS 20kohm
Tuner
Tuning Range
FM: 87.5 - 108
MHz; MW: 531 1602 kHz
Tuning grid
50 KHz
Sensitivity
- Mono, 26dB S/N Ratio <22 dBu
- Stereo, 46dB S/N Ratio <45 dBu
Search Selectivity
<28 dBu
Total Harmonic
Distortion
<3%
Signal to Noise Ratio
>45 dB
Speakers
Speaker
Impedance
4 ohm
Speaker Driver
3.5”woofer+0.8” tweeter
Sensitivity
>82 dB/m/W
General information
AC power (power
adaptor)
Disc
Laser Type
Semiconductor
Disc Diameter
12cm/8cm
Support Disc
CD-DA, CD-R, CDRW, MP3-CD, WMACD
Audio DAC
24Bits / 44.1kHz
Total Harmonic
Distortion
<1%
Frequency
Response
60Hz -16kHz (44.1kHz)
S/N Ratio
>65dBA
E n g l i sh
11 Product
information
Input: 100-240V~,
50/60Hz 1.5A MAX;
Output: 15V 3A;
(Brand name: Philips;
Model No.: OH1048A1503000U-u)
Operation Power
Consumption
16W
Standby Power
Consumption
<4W
Eco Standby Power
Consumption
<1W
USB Direct
Version 2.0/1.1
Dimensions
- Main Unit (W x H
x D)
390 x140.5 x
200.5mm
Weight
- With Packing
- Main Unit
4 kg
3.32 kg
EN
21
USB playability information
Supported MP3 disc formats
Compatible USB devices:
• USB flash memory
(USB 2.0 or USB1.1)
• USB flash players
(USB 2.0 or USB1.1)
• memory cards (requires an additional
card reader to work with this
DCM250)
Supported formats:
• USB or memory file format FAT12,
FAT16, FAT32 (sector size: 512 bytes)
• MP3 bit rate (data rate): 32-320 Kbps
and variable bit rate
• WMA v9 or earlier
• Directory nesting up to a maximum
of 8 levels
• Number of albums/ folders:
maximum 99
• Number of tracks/titles: maximum
999
• ID3 tag v2.0 or later
• File name in Unicode UTF8
(maximum length: 128 bytes)
Unsupported formats:
• Empty albums: an empty album is an
album that does not contain MP3/
WMA files, and is not be shown in
the display.
• Unsupported file formats are
skipped. For example, Word
documents (.doc) or MP3 files with
extension .dlf are ignored and not
played.
• AAC, WAV, PCM audio files
• DRM protected WMA files (.wav,
.m4a, .m4p, .mp4, .aac)
• WMA files in Lossless format
•
•
22
EN
•
•
•
ISO9660, Joliet
Maximum title number: 512 (depending
on file name length)
Maximum album number: 255
Supported sampling frequencies: 32 kHz,
44.1kHz, 48 kHz
Supported Bit-rates: 32~256 (kbps),
variable bit rates
NO TYPE
No RDS programme
type
NEWS
News services
AFFAIRS
Politics and current
affairs
INFO
Special information
programs
SPORT
Sports
EDUCATE
Education and advanced
training
DRAMA
Radio plays and
literature
CULTURE
Culture, religion and
society
SCIENCE
Science
VARIED
Entertainment programs
POP M
Pop music
ROCK M
Rock music
MOR M
Light music
LIGHT M
Light classical music
CLASSICS
Classical music
OTHER M
Special music programs
WEATHER
Weather
FINANCE
Finance
CHILDREN
Children’s programs
SOCIAL
Social Affairs
RELIGION
Religion
PHONE IN
Phone In
TRAVEL
Travel
LEISURE
Leisure
JAZZ
Jazz Music
COUNTRY
Country Music
NATION M
National Music
OLDIES
Oldies Music
FOLK M
Folk Music
DOCUMENT
Documentary
TES
Alarm Test
ALARM
Alarm
E n g l i sh
RDS program types
EN
23
12 Troubleshooting
Warning
• Never remove the casing of this apparatus.
To keep the warranty valid, never try to repair
the system yourself.
If you encounter problems when using this
apparatus, check the following points before
requesting service. If the problem remains
unsolved, go to the Philips web site (www.
philips.com/welcome). When you contact
Philips, ensure that the apparatus is nearby
and the model number and serial number are
available.
No power
•
Ensure that the AC power plug of the
unit is connected properly.
•
Ensure that there is power at the AC
outlet.
•
To save power, the system switches
off automatically 15 minutes after track
play reaches the end and no control is
operated.
No sound or poor sound
•
Adjust the volume.
•
Disconnect the headphones.
No response from the DCM250
•
Disconnect and reconnect the AC power
plug, then turn on the system again.
Remote control does not work
•
Before pressing any function button, first
select the correct source with the remote
control instead of the main unit.
•
Reduce the distance between the remote
control and the DCM250.
•
Insert the battery with its polarities (+/–
signs) aligned as indicated.
•
Replace the battery.
•
Aim the remote control directly at the
sensor on the front of the DCM250.
No disc detected
•
Insert a disc.
•
Check if the disc is inserted upside down.
24
EN
•
Wait until the moisture condensation at
the lens has cleared.
•
Replace or clean the disc.
•
Use a finalized CD or correct format disc.
Cannot display some files in USB device
•
The number of folders or files in the USB
device has exceeded a certain limit. This
phenomenon is not a malfunction.
•
The formats of these files are not
supported.
USB device not supported
•
The USB device is incompatible with the
DCM250. Try another one.
Poor radio reception
•
Increase the distance between the
DCM250 and your TV or VCR.
•
Fully extend the FM antenna.
Timer does not work
•
Set the clock correctly.
•
Switch on the timer.
Clock/timer setting erased
•
Power has been interrupted or the power
cord has been disconnected.
•
Reset the clock/timer.
© 2009 Koninklijke Philips Electronics N.V.
All rights reserved.
Document order number: