1
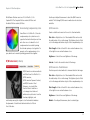
User Guide
For Capture NX 2
© 2007 Catherine Hall
Chapter 1
Introduction
Introduction to Nik Software Color Efex Pro™ 3.0 for Capture NX 2 and the User Guide
Color Efex Pro™ 3.0 for Capture NX 2
Chapter 1 : Introduction
User Guide
Versions
Nik Software offers two versions of Color Efex Pro 3.0 for
Capture NX 2. The Complete Edition contains 52 filters and
the Select Edition contains 35 filters.
What’s in the User Guide
In addition to providing installation instructions, the User Guide
shows you how to choose and control filters.
© 2008 Laurie Shupp
Introduction
Welcome to Nik Software Color Efex Pro™ 3.0 for Capture NX 2, the
most advanced set of filters for digital photography.
Digital photographers have come to appreciate and take advantage
of unprecedented levels of control over their images. They enjoy
more options than ever to enhance, stylize, and otherwise improve
upon photographs. All of this additional control, however, has led
photographers to increasingly complicated choices of adjustments,
filters and blends, and away from the art of control.
The typographical conventions used in this manual are:
•Color Efex Pro 3.0 processes and user interface components
appear in Initial Caps, with first instances in Bold Caps.
(In context-appropriate cases, later instances also appear
in Bold Caps.)
•Specific control inputs appear in Bold Italic. Control inputs
can be menu items, buttons, or sliders. Where first instances
coincide with specific control inputs, the term appears in
Bold Italic.
Color Efex Pro 3.0 filters are designed to make photographic
enhancements not only easier, but better. Based on continuous
feedback from professionals in Nik Software’s photographer
community, Color Efex Pro 3.0 is a suite of proven controls to
help photographers save time, get professional results and decomplicate the art of enhancing their images.
© 2008 Luci Dumas
Chapter 2
New Filters in 3.0
New Filters Available in Color Efex Pro™ 3.0 for Capture NX 2
Chapter 2 : New Filters in 3.0
New Filters
Color Efex Pro™ 3.0 for Capture NX 2
User Guide
Glamour Glow – Gives portrait
Color Efex Pro 3.0 offers nine new filters to Color Efex Pro 2.0 users,
along with updates to existing filters.
Bleach Bypass – Simulates the effect
of processing color film and bypassing the
bleach chemistry step. Use this filter for a
high-contrast, low-saturation effect used
by photographers and film makers alike.
Cross Balance – Simulates the look of
shooting either tungsten-balanced film in
daylight or daylight-balanced film under
tungsten lights. Use this filter to create the
cool blue or warm orange effect often used
in stylizing images.
Film Effects – Offers the look and feel
of over 30 different film types, realistically
simulating color sensitivity, contrast, and
grain for each film.
photographers a powerful way to stylize
images with dreamy, soft effects.
Low Key – Simulates the look of low-key
photography, characterized by uniformly
dark tones and low contrast.
High Key – Simulates the look of
high-key photography, characterized by
uniformly light tones and low contrast.
Polaroid Transfer – Simulates the effect
of using Polaroid color peel-apart films and
transferring the nascent image to paper
before it has fully developed. The result is
a low-contrast, low-saturation version of
the image, with subtle shifts to the colors
throughout the image, reminiscent of this
popular photographic technique.
Tonal Contrast – Allows powerful
Film Grain – Adds realistic film grain to
any image, with control over the size and
placement throughout the image.
control over the contrast only of highlights,
midtones or shadows, without affecting
the rest of the image. Use this filter for
highly targeted control of a particular
portion of the tonal range of the image.
(Please see Chapter 8: Filter Descriptions.)
© 2008 Sean Dyroff
Chapter 3
Installation
Installing and Accessing Color Efex Pro™ 3.0 for Capture NX 2
Chapter 3 : Installation
Color Efex Pro™ 3.0 for Capture NX 2
User Guide
Installation
Accessing Color Efex Pro 3.0
The installer provided with Color Efex Pro 3.0 automatically installs
the filters into the appropriate location for Capture NX 2.
After completing the installation, launch Capture NX 2. Color Efex
Pro 3.0 is accessed from the Filter menu.
Installing Color Efex Pro 3.0
To begin using Color Efex Pro 3.0:
Before you install Color Efex Pro 3.0, please close Capture NX 2.
Please do not open any other applications during the installation
process.
To begin installation:
1. Open the image that you would like to enhance.
2. Click the Filter menu.
3. Roll over either the Color Efex Pro 3.0 Traditional or Color Efex
Pro 3.0 Stylizing sub-menus. A list of filters appears.
4. Select the filter you wish to apply from this list.
Double-click on the installation file provided either on your Color
Efex Pro 3.0 CD or downloaded from the Internet. A window appears
displaying the Color Efex Pro 3.0 for Capture NX 2 Setup Wizard.
Double-click
the Installer
The installer walks you through the procedure.
After you have read the Read Me file and accepted the End User
License Agreement, click Install. When the installation is complete,
the final page of the installer appears.
Click Finish to complete the installation process.
The controls for the
filter will then appear
within the Edit List.
To change the filter
that is currently being
applied to the image,
click on the Adjust &
Filter pull-down menu
within the Edit List and
select a different filter.
© 2008 Don Gale
Chapter 4
Workflow
Workflow and Tips for Enhancing Images
Chapter 4 : Workflow
Color Efex Pro™ 3.0 for Capture NX 2
User Guide
Workflow
The order of steps involved in enhancing an image varies, depending
on the image. In general, there are only a few guidelines to consider:
•A
pply noise reduction as early as possible in the process.
• Apply output sharpening, as late as possible in the process.
• Start with distractions (global, then local), and end
with enhancements.
Start with characteristics that affect the entire image, such as color
casts, contrast and tones. Next, modify elements that affect only
localized areas, such as blemishes and small distracting objects.
Finally, apply effects that add a style or mood to the image. In other
words, move from the general to the specific.
For best results in Color Efex Pro 3.0, perform the tasks below
in the given order:
1. Adjust the filter controls.
2. Protect shadows and highlights, if necessary.
3. Selectively apply the filter using the Selection Control Points,
Selection Brush, or Selection Gradient, if desired.
© 2008 Victor Ha
11
© 2008 Laurie Shupp
Chapter 5
Color Efex Pro 3.0 Controls
Overview of Controls for Color Efex Pro™ 3.0 for Capture NX 2
Chapter 5 : Color Efex Pro™ 3.0 Interface
Filter Controls
After selecting a filter, controls
are provided unique to that filter.
(For a complete explanation,
please see Chapter 8: Filter
Descriptions.)
Shadows & Highlights
Certain filters provide the
Shadows & Highlights
controls. When expanded, this
section displays a histogram
representing the full tonal
range of the active image after
the current enhancement has
been applied as well as sliders
to protect the details in the
shadows and highlights. The
histogram changes in real time
as you adjust the filter controls and Protect Shadows/Protect
Highlights sliders.
The colored areas at both ends of the histogram help identify
potential problems. The top and bottom 2.5% of tonal values
(representing Shadows without Detail on the left and Highlights
without Detail on the right) appear in red. The next 2.5% of the
shadows and highlights (indicating Shadows with Detail on the left
and Highlights with Detail on the right) appear in green.
Color Efex Pro™ 3.0 for Capture NX 2
User Guide
Connected to each of the four colored areas (Shadows without
Detail, Shadows with Detail, Highlights without Detail, Highlights
with Detail) are numerical call-outs displaying the percentage of
pixels from the active image in each of those four areas after the
enhancement has been applied.
The Protect Shadows and Protect Highlights sliders help you keep
your image details from falling into these areas. For best results,
keep the greater part of the image between the green areas
(Shadows with Detail and Highlights with Detail) of the histogram.
Portions of the image in Shadows without Detail will likely print
pure black; those in Highlights without Detail will likely print
as paper white.
-Click and drag the Protect Shadows slider to the right to adjust
the filter’s effect and prevent details from being moved into the
Shadows without Detail area.
-Click and drag the Protect Highlights slider to the right to adjust
the filter’s effect and prevent details from being “blown out” or
being moved into the Highlights without Detail area.
Note: In general, it is best to maintain the histogram in the
region between Shadows with Details and Highlights with Details
sections. Nevertheless, many good images have values in those
areas of the histogram (e.g., highlight on a chrome bumper).
13
© 2008 Tony Corbell
Chapter 6
Selectively Applying Filters
Using the Selection Tools to Selectively Apply Filters
Chapter 6 : Selectively Applying Filters
Color Efex Pro™ 3.0 for Capture NX 2
User Guide
All of the Color Efex Pro 3.0 filters can be applied selectively using
the various selection tools found within Capture NX 2. Instructions
on using the Selection Control Points, Selection Brush, and
Selection Gradients can be found below. For additional information
on selectively applying enhancements within Capture NX 2, please
refer to the Capture NX 2 User’s Manual.
3.Adjust the size and opacity sliders to achieve the desired
result. The higher the size value, the more objects similar
to the object selected by the control point will be selected
as well. The higher the opacity slider, the more the current
enhancement will be applied to the objects selected by the
control point.
Selection Control Point
4.Add additional selection control points, or use the selection
brush tool to further modify where the current enhancement is
being applied to the image.
Selection control points utilize U Point® technology to selectively
apply the effect of an enhancement. You can use a selection control
point to selectively apply any Color Efex Pro 3.0 filter.
Selection Brush Tool
1.Select a Color Efex Pro 3.0 filter to apply to the image.
The selection brush enables you to selectively paint in or paint out
the Color Efex Pro 3.0 filter found in the current step. You can use
the selection brush to selectively apply any Color Efex Pro 3.0 filter.
2.Click on the selection control point icon in the toolbar.
To use the selection brush, follow these steps:
To use a selection control point, follow these steps:
a. If you click the
icon for the selection control point,
the Base Mask slider in the Selection section of the Edit
List palette will automatically move to 0% after adding the
first selection control point, hiding the effect of the current
enhancement. Click on the image to add a selection control
point with the opacity slider automatically set to 100%. This
will result in the current enhancement’s effect only applied
to the area selected by the control point.
icon for the selection control point,
b. If you click the
click on the image to add a selection control point with the
opacity slider automatically set to 0% to the image. The
enhancement will be applied to the entire image, except for
the area selected by the control point.
1. Select a Color Efex Pro 3.0 filter to apply to the image.
2.Click on the selection brush icon in the toolbar. Click on the
icon if you would like to apply the current enhancement
only to the area you will paint, or click on the
icon
if you would like to apply the current enhancement to the
entire image, except for where you paint. Please note: If you
first click on the
icon, the base selection slider in the
selection section of the current step in the Edit List palette will
automatically move to 0% after the first paint stroke, enabling
you to add the enhancement only to where you paint. You may
at any point adjust the base selection slider and place it at a
different value.
15
Color Efex Pro™ 3.0 for Capture NX 2
Chapter 6 : Selectively Applying Filters
3.In the tool options bar, adjust the Size, Brush Hardness, and
Opacity of the brush.
4.Click and draw within the active image window to add or
remove the effect, depending on if you selected the
icon.
or
5.At any point, switch to the opposite mode by clicking on either
or
to add to or remove from the selection drawn.
You can temporarily switch to the opposite mode by holding
down the Alt key (Windows) or Option key (Macintosh.)
6.To delete a selection created by the selection brush tool,
click on the delete button found in the current step’s
selection information section next to the “Paint & Fill Mask”
section. Alternatively, ensure that the image window is
active by clicking on the image window’s title bar and
press the delete key.
Selection Gradient Tools
The selection gradient tools enable you to gradually blend between
applying and removing the current step’s effects on your image.
You can use the selection gradient tools to selectively apply any
Color Efex Pro 3.0 filter.
User Guide
Linear Gradient Tool
The linear gradient tool adds the current effect to the image with
a gradual transition from applying to hiding the effect in a straight
line, with the direction and start and end points determined by the
line drawn when applying this tool.
Radial Gradient Tool
The radial gradient tool adds the current effect to the image in a
circular pattern, with a gradual transition from applying to hiding the
effect radiating from a central point, with the center, start, and end
points determined by the line drawn when applying this tool.
To use a selection gradient tool to selectively apply the current
step’s enhancements to your image, follow these steps:
1. Select a Color Efex Pro 3.0 filter to apply to the image.
2.Click on the selection gradient icon in the toolbar. Click on
the
icon if you would like to determine first where the
enhancement starts, or click on the
icon if you would
like to determine first where the enhancement ends.
There are two selection gradient tools to choose from. You can select
among these tools by holding the mouse down on the selection
gradient icon in the toolbar and selecting from the tools that appear.
16
Chapter 6 : Selectively Applying Filters
Color Efex Pro™ 3.0 for Capture NX 2
User Guide
3.Click and draw a line within the active image window.
Depending on if you chose the
or the
icons, the
point where you start the line will either be the part where the
effect is added at 100% to the image or where the effect is
removed entirely from the image. If you use the linear
gradient tool, the enhancement will be applied in a straight
line, following the direction of the line you created. If you use
the radial gradient tool, the enhancement will be applied in
a circular pattern, radiating from the point that you selected
by first clicking on the image.
4.After drawing the gradient, the line that you created will still
be visible, along with start, mid, and end anchor points. Click
on an anchor point to reposition the gradient and control the
gradient’s effect on the image.
5.At any point, switch to the opposite mode by clicking on either
or
to add another gradient. Each additional
gradient will blend with the previously drawn gradients. You
can mix different gradient types (linear and radial) as well
as
and
. Please note: Once you have added an
additional gradient, the anchor points for the previously
drawn gradient will no longer be accessible.
6.To delete a selection created by a gradient tool, click on the
delete button found in the current step’s selection information
section next to the “Paint & Fill Mask” section.
17
© 2008 Laurie Shupp
Chapter 7
Upgrading from Nik Color Efex
Pro 2.0 for Capture NX
Special Considerations When Upgrading from Nik Color Efex Pro 2.0 for Capture NX
Chapter 7 : Upgrading from Nik Color Efex Pro 2.0 for Capture NX
Capture NX 2 is a fully non-destructive image editing application,
ensuring the maximum level of flexibility when working with
enhancements. Color Efex Pro filters take advantage of this nondestructive functionality, ensuring that the image is always
processed with the highest quality as well as ensuring that the
enhancements can always be removed or adjusted, even after the
image is saved and closed.
When working on a computer that does not have Nik Color Efex Pro
2.0 for Capture NX installed, Color Efex Pro 3.0 for Capture NX 2
provides you with two different options for working with NEF files
that contained Nik Color Efex Pro 2.0 for Capture NX filters:
• In the first instance, opening an NEF file that contained a Nik
Color Efex Pro 2.0 for Capture NX filter when Color Efex Pro 3.0 for
Capture NX 2 is installed, the image is processed and displayed
with the exact same enhancement and quality, using the same
filter algorithms. The filter however cannot be adjusted and can
only be turned on and off, or deleted
• In the second instance, the Color Efex Pro 3.0 NEF Update Tool is
used to convert the Color Efex Pro 2.0 filters applied within the NEF
file into the corresponding Color Efex Pro 3.0 filters with equivalent
filter settings. Using the Update Tool attempts to achieve the same
filter effect and allows modification to the filter’s settings. As the
filter algorithms were changed slightly within Color Efex Pro 3.0 to
provide greater control and quality, the exact same filter effect may
not be possible. For more information on the Update Tool, please
see the section below.
Color Efex Pro 3.0 NEF Update Tool
To convert NEF files that contain Nik Color Efex Pro 2.0 for Capture
NX filters to Color Efex Pro 3.0 for Capture NX 2 compatible filters,
follow these steps:
Color Efex Pro™ 3.0 for Capture NX 2
User Guide
1. Launch the Update Tool. The Update Tool will either be
accessible through the following methods.
Windows
Start Menu > Programs > Color Efex Pro 3.0 for Capture NX 2
Macintosh
Macintosh HD : Library : Application Support : Nikon : Capture
NX 2: Color Efex Pro 3.0
2.Drag one or more NEF files or folders containing NEF files
into the application window. Alternatively, click within the
application window to open a file dialog window to locate the
files to be converted.
3. Click the Start Update button to start converting the NEF files.
4.Each NEF file will be updated adding a new version with the
Nik Color Efex Pro 2.0 for Capture NX filter applied.
Note: Only Capture NX 2 or the Color Efex Pro 3.0 NEF Update
Tool can be open at one time. A warning will be displayed if
you attempt to launch either application with the other already
running. Please quit out of Capture NX 2 prior to launching the
Color Efex Pro 3.0 NEF Update Tool.
After the conversion process has completed, you are presented with
the results of the conversion process. Files that had a warning or
that failed are displayed, enabling you to review the images and
resolve any issues before running the Update Tool again.
Images that may not appear the same due to the difference in the
filter algorithms are indicated with a warning. The file can always
be reverted back to the Nik Color Efex Pro 2.0 for Capture NX version
using the new version added to the NEF file.
19
© 2008 Don Mahr
Chapter 8
Filter Descriptions
Effects and Controls for Each Filter
Color Efex Pro™ 3.0 for Capture NX 2
Chapter 8 : Filter Descriptions
Nik Software offers two versions of Color Efex Pro 3.0 for
Capture NX 2. The Complete Edition contains 52 filters and
the Select Edition contains 35 filters.
Understanding Complementary Colors
Some filters in Color Efex Pro 3.0 involve
complementary colors, which are color
opposites that reside directly across from
each other on a color wheel. A color’s
complement can be created by mixing
the other two primary colors together. For
example, red’s complementary color is
cyan, which can be created by mixing green and blue together.
User Guide
Use the provided pull-down menu to select the B/W Conversion
method. The following B/W Conversion methods and controls are
available:
B/W Conversion
Creates a traditional conversion from color to black and white.
Filter Color – Adjusts the color of the simulated filter and controls
the relationship of colors in the image. This lightens objects of that
color in the image and darkens objects of the complementary color.
Filter Strength – Slides to the left for less contrast between colors,
to the right for more contrast between colors.
Brightness – Controls the overall lightness of the image.
B/W Conversion (3 Effects)
Updated in Color Efex Pro 3.0
Complete Edition
Contrast – Controls the overall contrast of the image.
Select Edition
Traditional
B/W Conversion combines methods
and filters from Color Efex Pro 2.0 –
B/W Conversion,
B/W Conversion Dynamic Contrast,
and B/W Conversion Tonal
Enhancer – in a single filter.
Use this filter to transform a
color image into a black and
white version, with control over the
shadows, highlights, and
relationships among the original colors. Each method simulates
the placement of a traditional black and white color filter in
front of the lens.
B/W Conversion: Tonal Enhancer
Provides special contrast methods to increase details in the image.
Filter Color – Adjusts the color of the simulated filter and controls
the relationship of colors in the image. This lightens objects of that
color in the image and darkens objects of the complementary color.
Filter Strength – Slides to the left for less contrast between colors,
to the right for more contrast between colors.
Brightness – Controls the overall lightness of the image.
Method – From the pull-down menu, select a contrast type.
21
Color Efex Pro™ 3.0 for Capture NX 2
Chapter 8 : Filter Descriptions
B/W Conversion: Dynamic Contrast
Creates exaggerated contrast and stylistic black and white images.
Filter Color – Adjusts the color of the simulated filter and controls
the relationship of colors in the image. This lightens objects of that
color in the image and darkens objects of the complementary color.
Filter Strength – Slides to the left for less contrast between colors,
to the right for more contrast between colors.
Brightness – Controls the overall lightness of the image.
Contrast Enhancer – Controls the additional contrast introduced to
the image for a stylistic effect.
Bi-Color Filters (20 Effects)
Complete Edition
Select Edition
Traditional
Blends two colors and then adds the
result to the active image.
From the pull-down menu, select a
pre-defined color combination, each
with four variations. Each variation
provides the following controls:
User Guide
Vertical Shift – Controls the placement of the filter’s horizon.
Rotation – Controls the angle of the filter’s horizon.
Bi-Color User Defined
Complete Edition
Select Edition
Traditional
Blends two user-defined colors and then adds the result to
the active image.
Upper Color – Specifies the top color to be applied to the image.
Use either the supplied eyedropper to select a color from the current
image or click on the color patch to access a color picker.
Lower Color – Specifies the bottom color to be applied to the image.
Use either the supplied eyedropper to select a color from the current
image or click on the color patch to access a color picker.
Opacity – Controls the overall strength of the filter.
Blend – Controls the size of the blend between the two colors
in the filter.
Vertical Shift – Controls the placement of the filter’s horizon.
Rotation – Controls the angle of the filter’s horizon.
Opacity – Controls the overall
strength of the filter.
Blend – Controls the size of the blend
between the two colors in the filter.
22
Color Efex Pro™ 3.0 for Capture NX 2
Chapter 8 : Filter Descriptions
Bleach Bypass
New in Color Efex Pro 3.0
User Guide
Burnt Sienna
Complete Edition
Select Edition
Stylizing
Simulates the effect of processing color film and bypassing the bleach
chemistry step. Use this filter for a high-contrast, low-saturation effect
used by photographers and film makers alike.
Complete Edition
Select Edition
Stylizing
Adds extreme warmth and contrast to affect the mood and style
of the image.
Brightness – Controls the overall lightness of the image.
Brightness – Controls the overall lightness of the image.
Contrast – Controls the overall contrast of the image.
Saturation – Controls the overall vibrancy of colors by increasing or
decreasing saturation throughout the image.
Global Contrast – Controls the overall contrast throughout the image.
Local Contrast – Creates contrast within objects, accentuating
details.
Brilliance/Warmth
Complete Edition
Select Edition
Traditional
Classical Soft Focus (6 Effects)
Updated in Color Efex Pro 3.0
Complete Edition
Select Edition
Traditional
Introduces traditional photographic
effects to stylize an image and soften
unwanted detail. This filter simulates
traditional, soft focus filters and
diffusion techniques.
Adds either a cool or warm cast to the image while applying a
saturation effect.
Brilliance – Increases or decreases saturation of the colors
in the image.
Warmth – Controls the temperature of the colors in the image. Move
the slider to the left to cool the colors (adding blues), or to the right to
warm the colors (adding reds).
From the pull-down menu, select the
type of blur to add to the image. Each
blur type offers the following controls:
Diffused Detail – Controls the amount of random detail added to the
soft focus effect. This can help maintain the appearance of detail
and prevent banding.
Strength – Controls the degree to which you want to apply the filter.
Brightness – Controls the overall lightness of the image.
23
Color Efex Pro™ 3.0 for Capture NX 2
Chapter 8 : Filter Descriptions
Color Stylizer
Complete Edition
Select Edition
Stylizing
Overlays a color on top of the image and lets you control the
saturation of the original image’s color.
Color – Adds a color to the image. To select a color for this control
you may either use the eyedropper within the active image or
click on the color patch using the color picker in your image
editing application.
Contrast – Controls the overall contrast of the image.
Saturation – Controls the amount of color to include from the
original image. Slides to the left to create a monochrome image, to
the right to maintain the full level of color from the original image.
Colorize (6 Effects)
Complete Edition
Select Edition
Stylizing
Inks the image with a color and
provides different color and
contrast relationships to stylize
the image.
User Guide
Color – Lets you select a color to add to the image. To select a color
for this control you may either use the eyedropper within the active
image or click on the color patch using the color picker in your image
editing application.
Strength – Controls the degree to which you want to apply the filter.
Contrast Color Range
Updated in Color Efex Pro 3.0
Complete Edition
Select Edition
Traditional
Provides control over the contrast between selected colors within an
image. Use this filter to isolate or blend objects with other objects,
according to their color.
Color – Selects the color range to which to apply contrast. This
lightens objects of that color in the image and darkens objects of the
complementary color.
Color Contrast – Controls the contrast between the color selected
and other colors in the image. Slides to the left for less contrast
between colors, to the right for more contrast between colors.
Brightness – Controls the overall lightness of the image.
Contrast – Controls the overall contrast of the image.
From the pull-down menu, select
the relationship between the
original colors in the image
and the color being added.
Each option provides the
following controls:
24
Color Efex Pro™ 3.0 for Capture NX 2
Chapter 8 : Filter Descriptions
Contrast Only
Complete Edition
User Guide
balanced film with tungsten lights, while the Tungsten to Daylight
emulate using tungsten balanced film in daylight.
Select Edition
Traditional
Strength – Controls the degree of cross balance effect.
Increases the contrast of an
image without affecting the
color characteristics of
the image.
Cross Processing (19 Effects)
Brightness – Controls the
overall lightness of the
image without affecting the
color and saturation.
Simulates the effect of processing color film with the wrong
chemistry; that is, processing negative film with slide chemistry
(C41 to E6 cross-processing) or slide film with negative chemistry
(E6 to C41 cross-processing).
Contrast – Controls the
overall contrast of the image
without affecting the color
and saturation.
From the provided pull-down menu, select the Cross Processing
method. Select C41 to E6, E6 to C41, or variations on either style.
Saturation – Controls the overall vibrancy of colors by increasing or
decreasing saturation throughout the image.
Complete Edition
Traditional
Simulates the look of shooting either tungsten-balanced film in
daylight or daylight-balanced film under tungsten lights. Use this
filter to create the cool blue or warm orange effect often used in
stylizing images.
From the provided pull-down menu, select the Cross Balance
method. The Daylight to Tungsten options emulate using daylight
Complete Edition
Traditional
Strength – Controls the degree to which you want to apply the filter.
Darken/Lighten Center
Updated in Color Efex Pro 3.0
Cross Balance (6 Effects)
New in Color Efex Pro 3.0
Updated in Color Efex Pro 3.0
Complete Edition
Select Edition
Traditional
Draws the eye toward or away from the center of the image. A lighter
center and darker edges draw the eye to the center of the image, and
a darker center and lighter edges draw the eye to the edges.
From the pull-down menu, specify round or oval shape for the
Darken/Lighten effect. Both shapes provide the following controls:
Center Luminosity – Controls the brightness at the center of the
image.
25
Color Efex Pro™ 3.0 for Capture NX 2
Chapter 8 : Filter Descriptions
Border Luminosity – Controls the brightness at the edges of the image.
Center Size – Controls the relationship between the center and
the edges.
User Guide
Color Set – From the pull-down menu, select a pre-defined color
combination.
Saturation – Controls the amount of color in the shapes created
by the filter.
Place Center – Positions the center of the image. This is useful if the
subject is not in the center of the frame. Click this button and then place
the center where desired.
Brightness – Controls the lightness of the shapes created by
the filter.
Detail Stylizer (18 Effects)
Size – Controls the relationship between the shapes and the original
details of the image.
Complete Edition
Select Edition
Stylizing
Stairs
Detail Stylization combines methods
and filters from Color Efex Pro 2.0 –
Pop Art, Stairs, Weird Dreams, and
Weird Lines – in a single filter. Use
this filter to introduce effects based
on the shapes and details found in
the original image.
Breaks an image into its component shapes and brightens its
original colors to create an abstract, stylized image of stair objects.
From the pull-down menu provided,
select one of the available filters.
The following filters and controls
are available:
Weird Dreams
Pop Art
Contrast – Controls the contrast among the objects.
Effect Size – Controls the distance between objects.
Saturation – Controls the amount of color introduced to the objects.
Transforms the original image into its component shapes and forms
and applies one of six color sets to create an abstract, colorful
version of the original image.
Creates abstract color shapes and patterns from image details.
Color Set – From the pull-down menu, select colors for the shapes
in the image.
Effect Transparency – Controls the degree to which the original image
remains visible with the Pop Art effect.
Size – Controls the relationship between the shapes created by the
filter and the original image details.
26
Chapter 8 : Filter Descriptions
Color Efex Pro™ 3.0 for Capture NX 2
Weird Lines
Contrast – Controls the overall contrast of the image.
Adds texture to an image by introducing abstract, transparent
shapes and contours that mimic the shapes in the original image.
Dynamic Skin Softener
Style – From the pull-down menu, select colors for the shapes
in the image.
Size – Controls the relationship between the shapes created by the
filter and the original image details.
Contrast – Controls the contrast among the shapes.
Duplex
Complete Edition
Stylizing
Creates a stylistic, duotone effect with
options for color, blur and saturation.
Color – Adds a color to the image. To
select a color for this control you may
either use the eyedropper within the
active image or click on the color patch
using the color picker in your image
editing application.
Strength – Controls the degree to which you want to apply the filter.
Diffusion – Controls the amount of blur added for a stylistic effect.
Saturation – Controls the amount of color to include from the
original image. (At 0%, this creates the effect of the Duplex:
Monochrome filter from Color Efex Pro 2.0.)
Updated in Color Efex Pro 3.0
Complete Edition
User Guide
Traditional
Creates soft, lustrous skin, without
affecting other objects in the image.
Use this filter with objects other than
skin to take advantage of its unique
softening algorithm.
Skin Color – Select the color of the skin
tone using either the eyedropper within
the active image or click on the color
patch using the color picker in your
image editing application.
Color Reach – Controls the range of affected colors. Slides to the
left to narrow the range of affected colors to only the hue and shade
selected, to the right to expand the range beyond those selected.
At 100%, the Dynamic Skin Softener effect will be applied to the
entire image—use Control Points to limit only to the areas that
require softening.
Small Details – Controls the amount of softening applied to
small details.
Medium Details – Controls the amount of softening applied to
medium details.
Large Details – Controls the amount of softening applied to
large details.
27
Color Efex Pro™ 3.0 for Capture NX 2
Chapter 8 : Filter Descriptions
Film Effects (33 Effects)
New in Color Efex Pro 3.0
Complete Edition
User Guide
Saturation
Traditional
Offers the look and feel of
over 30 different film types,
realistically simulating
color sensitivity, contrast,
and grain for each film.
Controls the film’s saturation response to different wavelengths
of light.
Red through Violet – sliders control how saturated an object of
that color appears. Slide to the left to make objects of that color
less saturated, to the right to make them more saturated.
Tone Curve
Controls contrast and tonal response in the film.
Film Type – From the pulldown menu, select any of
the pre-defined film types.
Film Details – Displays the
settings for the currently selected film type and lets you create a
custom film type.
Brightness – Controls the overall lightness of the image.
Channels – From the pull-down menu, select a channel to
modify, then click to add anchor points to the curve to specify
the brightness, contrast, and relationship of tonal values in
the image.
Grain
Adds grain to the image and lets you specify the size of the grain
and its placement throughout the image.
Contrast – Controls the overall contrast of the image.
Grain Size – From the pull-down menu, select one of five grain
sizes, from ultra-fine to extra-coarse.
Clicking on the show/hide triangle for Film Details displays the
following controls :
Highlight Grain – Controls the degree of grain added to the
highlights of the image.
Sensitivity
Controls the film’s lightness response to different wavelengths
of light.
Red through Violet – sliders control how bright or dark an object
of that color appears. Slide to the left to make objects of that
color darker, to the right to make them brighter.
Midtone Grain – Controls the degree of grain added to the
midtones of the image.
Shadow Grain – Controls the degree of grain added to the
shadows of the image.
Grain Saturation – Controls the saturation of the grain added to
the image. Moving this slider to the left emulates monochromatic
grain, while moving this slider to the right emulates color grain.
28
Color Efex Pro™ 3.0 for Capture NX 2
Chapter 8 : Filter Descriptions
Film Grain
New in Color Efex Pro 3.0
User Guide
Flux (5 Effects)
Complete Edition
Select Edition
Traditional
Complete Edition
Select Edition
Adds realistic film grain to any image, with control over the size and
placement throughout the image.
Introduces subtle effects in
or creates an abstraction of
image details.
From the pull-down menu, select one of five grain sizes, from UltraFine to Extra-Coarse. Each grain size provides the following controls:
From the pull-down menu, select
one of the effects of the Flux
filter. The effects range from
subtle detail shifts to strong color
and contrast effects. Each option
provides the following controls:
Highlight Grain – Controls the amount of grain added to the
highlights of the image.
Midtone Grain – Controls the amount of grain added to the midtones
of the image.
Shadow Grain – Controls the amount of grain added to the shadows
of the image.
Grain Saturation – Controls the saturation of the grain added to the
image. Moving this slider to the left emulates monochromatic grain,
while moving this slider to the right emulates color grain.
Stylizing
Strength – Controls the degree to which you want to apply the filter.
Size – Controls the degree of the effect, and the relationship among
colors and details throughout the image.
Fog
Complete Edition
Traditional
Simulates traditional fog effect: A pronounced, soft focus giving the
appearance of fog.
From the pull-down menu, select one of the methods of the Fog
filter. Each method provides you with the following control:
Intensity – Controls the degree to which you want to apply the filter.
29
Color Efex Pro™ 3.0 for Capture NX 2
Chapter 8 : Filter Descriptions
Foliage
Complete Edition
User Guide
Graduated Filters (16 Effects)
Stylizing
Complete Edition
Identifies foliage and greenery in an image and enhances or stylizes
those objects.
Select Edition
Blends a color into a portion of an image, with a gradual transition
to the original image.
From the pull-down menu, select one of the effects of the Foliage
filter. Each option provides the following control:
From the pull-down menu, select a
pre-defined color combination,
each with four variations. Each
color combination provides the
following controls:
Enhance Foliage – Controls the degree to which you want to apply
the filter.
Opacity – Controls the overall
strength of the filter.
Glamour Glow
New in Color Efex Pro 3.0
Traditional
Complete Edition
Stylizing
Blend – Controls the size of the
blend between the two colors in
the filter.
Gives portrait photographers a powerful way to stylize images with
dreamy, soft effects.
Vertical Shift – Controls the
placement of the filter’s horizon.
Glow – Controls the degree of the filter’s softening technique.
Brightness – Controls tonality throughout the image.
Rotation – Controls the angle of the filter’s horizon.
Glow Temperature – Controls the temperature of the effect added
to the image. Moving this slider to the left creates a cool blue
effect, while moving this slider to the right creates a warm
red-orange effect.
Graduated Fog
Complete Edition
Traditional
Simulates traditional fog effect (very strong soft focus giving the
appearance of fog) in one half of the image.
30
Color Efex Pro™ 3.0 for Capture NX 2
Chapter 8 : Filter Descriptions
From the pull-down menu, select one of the styles of the Fog effect.
Each style provides the following controls:
User Guide
Rotation – Controls the angle of the filter’s horizon.
Opacity – Controls the overall strength of the filter.
Blend – Controls the size of the blend between the fog effect and the
original image details.
Blend – Controls the size of the blend between the fog effect and the
original image details.
Graduated User Defined
Vertical Shift – Controls the placement of the filter’s horizon.
Graduated Neutral Density
Complete Edition
Select Edition
Select Edition
Traditional
Blends a user-defined color into a portion of an image, with a
gradual transition to the original image.
Rotation – Controls the angle of the filter’s horizon.
Updated in Color Efex Pro 3.0
Complete Edition
Traditional
Darkens or lightens a portion of an
image while preserving the color of
the image. Use this filter to help
correct the tonality of an image
with too much contrast.
Upper Tonality – Controls the
brightness of the top portion
of the filter.
Color – Specifies the color of the graduated effect to be applied to
the image. To select a color for this control you may either use the
eyedropper within the active image or click on the color patch using
the color picker in your image editing application.
Opacity – Controls the overall strength of the filter.
Blend – Controls the size of the blend between the two colors
in the filter.
Vertical Shift – Controls the placement of the filter’s horizon.
Rotation – Controls the angle of the filter’s horizon.
Lower Tonality – Controls the
brightness of the bottom portion
of the filter.
Vertical Shift – Controls the
placement of the filter’s horizon.
31
Color Efex Pro™ 3.0 for Capture NX 2
Chapter 8 : Filter Descriptions
High Key
Infrared Film (9 Effects)
New in Color Efex Pro 3.0
Complete Edition
Traditional
Complete Edition
Select Edition
Traditional
Simulates the look of high-key photography, characterized by
uniformly light tones and low contrast.
Simulates both Color and Black
and White Infrared films. Use this
filter to simulate different
methods of capturing the infrared
portion of the electromagnetic
radiation spectrum, and the
effects produced by films that can
capture those wavelengths.
Add Glow – Controls the degree of glow around objects from the
high key effect.
Saturation – Controls the overall vibrancy of colors by increasing or
decreasing saturation throughout the image.
Effect Strength – Controls the degree to which you want to apply
the filter.
Indian Summer
Complete Edition
User Guide
Stylizing
Identifies foliage and greenery in an image and enhances or stylizes
those objects, creating warm colors similar to seasonal fall scenery.
From the pull-down menu, select Color or Black and White infrared
film types or different styles of both. Each option provides the
following controls:
Lighten Highlights – Controls the luminosity of the highlights within
the image.
Brightness – Controls the overall lightness of the image.
Contrast – Controls the overall contrast of the image.
From the pull-down menu, select one of the effects of the Indian
Summer filter. Each option provides the following control:
Enhance Foliage – Controls the degree to which you want to apply
the filter.
Infrared Thermal Camera
Complete Edition
Select Edition
Stylizing
Simulates the effect of night vision goggles or scientific heat-tocolor cameras. Use this filter to create a stylistic abstraction of the
original image.
32
Color Efex Pro™ 3.0 for Capture NX 2
Chapter 8 : Filter Descriptions
Type – From the pull-down menu, select the simulated effect of
either night vision goggles or a heat-to-color camera.
Low Key
New in Color Efex Pro 3.0
Center Size – Controls the size of a simulated, projected light source
onto the image.
User Guide
Complete Edition
Traditional
Simulates the look of low-key photography, characterized by
uniformly dark tones and low contrast.
Smear – Controls the degree of the filter’s softening technique.
Color – Controls the relationship between the tonal values of the
original image and the colors introduced by the filter.
Place Center – Positions the center of the image. This is useful if the
subject is not in the center of the frame. Click this button and then
place the center where desired.
Ink (11 Effects)
Updated in Color Efex Pro 3.0
Add Glow – Controls the degree of glow around objects from the
low key effect.
Saturation – Controls the overall vibrancy of colors by increasing or
decreasing saturation throughout the image.
Effect Strength – Controls the degree to which you want to apply
the filter.
Midnight (5 Effects)
Complete Edition
Select Edition
Stylizing
Complete Edition
Simulates the stylistic effect of
special photographic papers
and toners.
From the pull-down menu, select
a pre-defined color combination.
Each color combination provides
the following control:
Strength – Controls the degree to
which you want to apply the filter.
Select Edition
Stylizing
Creates the illusion of a photograph taken at night with a dark,
moody feeling. Use the Midnight filter to create a cinematic effect,
softening details throughout the image with an intelligent soft-focus
technique.
Use the provided pull-down menu to select from one of the predefined color combinations. The following controls are available for
each color combination:
Blur – Controls the amount of soft focus added for a stylistic effect.
Contrast – Controls the overall contrast of the image.
33
Color Efex Pro™ 3.0 for Capture NX 2
Chapter 8 : Filter Descriptions
Brightness – Controls the overall lightness of the image.
Color – Controls the relationship between the amount of color
added by the filter and the amount of color to include from the
original image.
Monday Morning (5 Effects)
Complete Edition
Select Edition
Stylizing
Introduces a diffused, cool, and
somewhat sleepy mood to an image.
Use this filter to control contrast and
saturation, add grain, and apply a soft
focus effect.
From the pull-down menu, select a
pre-defined color combination. Each
color combination provides the
following controls:
Grain – Controls the amount of grain
added to the image.
Brightness – Controls the overall lightness of the image.
Smear – Controls the degree of the filter’s softening technique.
User Guide
Old Photo (12 Effects)
Complete Edition
Select Edition
Stylizing
Transforms an image to resemble an old photograph, with styles to
simulate various black-and-white and color processes.
From the pull-down menu, select a pre-defined old-fashioned
photographic process. Each option provides the following controls:
Grain – Controls the amount of grain added to the image.
Brightness – Controls the overall lightness of the image.
Paper Toner (8 Effects)
Complete Edition
Select Edition
Traditional
Simulates the different types of toners typically used on black and
white prints in darkrooms. Use this filter to automatically convert an
image into a black and white version before adding the toner effect;
however, for best results and more control, use the B/W Conversion
filter first.
From the pull-down menu, select a pre-defined type of toner. Each
option provides the following control:
Strength – Controls the degree to which you want to apply the filter.
Color – Controls the relationship between the amount of color
added by the filter and the amount of color to include from the
original image.
34
Color Efex Pro™ 3.0 for Capture NX 2
Chapter 8 : Filter Descriptions
Pastel (3 Effects)
Complete Edition
Select Edition
User Guide
Use this filter to transform an otherwise plain or ordinary image to a
more stylized and desirable one.
Stylizing
Lightens and softens an image for a smooth, stylistic effect,
resulting in a subdued, desaturated image.
Use the provided pull-down menu to select from one of the Photo
Stylizer filters. The following filters and controls are available:
Varitone
From the pull-down menu,
select a pre-defined pastel.
Each option provides the
following controls:
Diffusion – Controls the amount
of detail in the image. Slides
to the left for stronger original
image details, to the right for
smoother image details.
Saturation – Controls the
overall vibrancy of colors
by increasing or decreasing
saturation throughout
the image.
Contrast – Controls the overall contrast of the image.
Photo Stylizer (18 Effects)
Complete Edition
Select Edition
Stylizing
Photo Stylizer combines filters found in Color Efex Pro 2.0 –
Varitone, Cool Ice, Cool Silver, Copper and Russet – in a single filter.
Style – From the pull-down menu, select one of the effects of the
Varitone filter.
Strength – Controls the degree to which you want to apply the filter.
Cool Ice
Style – From the pull-down menu, select one of the effects of the
Cool Ice filter.
Brightness – Controls the overall lightness of the image.
Cool Silver
Style – From the pull-down menu, select one of the effects of the
Cool Silver filter.
Strength – Controls the degree to which you want to apply the filter.
Copper
Warmth – Controls the degree of warmth (orange-red) to add to
the image.
Strength – Controls the degree to which you want to apply the filter.
Russet
Style – From the pull-down menu, select one of the effects of
the Russet filter.
Strength – Controls the degree to which you want to apply the filter.
35
Color Efex Pro™ 3.0 for Capture NX 2
Chapter 8 : Filter Descriptions
Polarization
Complete Edition
Select Edition
Traditional
Simulates the color contrasts of a conventional polarization filter.
Use this filter to enhance blue skies and other similar colors, while
increasing the contrast throughout the rest of the image.
User Guide
Outer Color – Adds elements of the original image back into the
border area. The higher the value of this slider, the more of the color
of the original image that is added to areas created by use of the
Border slider.
Saturation – Controls the amount of the original image’s colors
that are retained.
Rotate – Simulates the effect of rotating a polarization filter in front
of a lens and controls color contrasts.
Smear – Controls the degree of the filter’s softening technique.
Strength – Controls the degree to which you want to apply the filter.
Tear Off – Simulates the effect of portions of the image tearing off
during the transfer process. Move this slider to 0 to prevent any
details from being removed from the image.
Polaroid Transfer
New in Color Efex Pro 3.0
Complete Edition
Stylizing
Simulates the effect of using Polaroid
color peel-apart films and transferring
the nascent image to paper before it has
fully developed. The result is a lowcontrast, low-saturation version of the
image, with subtle shifts to the colors
throughout the image, reminiscent of
this popular photographic technique.
Border – Adds a textured border around
the image. When the slider is set to 0,
the full image is displayed.
Pro Contrast
Complete Edition
Traditional
Provides advanced control over the color and contrast of an image
by taking advantage of the TrueLight™ color processing system
available in every Color Efex Pro 3.0 filter. Use this filter to introduce
higher levels of contrast and maintain more detail than with
conventional methods of contrast enhancement.
Correct Color Cast – Controls the reduction of a color cast that the
filter automatically identifies in the image.
Correct Contrast – Increases the contrast in the image according
to the tonal distribution that the filter identifies by analyzing
the image.
Texture – Controls the addition of paper
texture to the image, emulating the use
of textured paper.
36
Color Efex Pro™ 3.0 for Capture NX 2
Chapter 8 : Filter Descriptions
Reflector Effects (3 Effects)
Complete Edition
User Guide
Color – Specifies the color cast to remove from the image. Move the
slider until the selected color matches the predominant color cast in
the image.
Traditional
Simulates traditional
photographic reflectors
to open up shadows
and control light in
the image.
From the pull-down
menu, select Silver,
Soft Gold, or Gold.
Each option provides
the following controls:
Light Intensity – Controls the amount of light the reflector adds
to the image.
Saturation Stylizer (7 Effects)
Complete Edition
Select Edition
Stylizing
Saturation Stylization combines filters from Color Efex Pro 2.0 –
Remove Brightness and Saturation to Brightness – in a single filter.
Use this filter to create abstract versions of the original image, by
altering and controlling saturation in the image.
From the provided pull-down menu, select one of the available
Saturation Stylizer filters. The following filters and controls
are provided:
Remove Brightness
Position – Controls where the falloff begins.
Removes the relationship of lightness among pixels, such that all
pixels contain uniform tonal values. The result is an image with
lower levels of contrast yet with rich, saturated colors.
Source Direction – Specifies the point at which the Reflector
effect begins.
Style – From the pull-down menu, select the color style to apply
after the filter has removed the brightness values.
Remove Color Cast
Saturation – Controls saturation in the image after the filter has
removed the brightness values.
Light Falloff – Controls how abruptly the effect trails off.
Complete Edition
Select Edition
Traditional
Brightness – Controls the overall lightness of the image.
Removes color casts quickly and effectively within an image.
Strength – Controls the degree to which you want to apply the filter.
37
User Guide
Chapter 8 : Filter Descriptions
Color Efex Pro™ 3.0 for Capture NX 2
Saturation to Brightness
Saturation – Controls saturation in the image before the filter has
added the solarization effect. (At 0%, this creates the effect of
Solarization: Black and White.)
Swaps the saturation value for the brightness value, converting
bright colors to highly saturated ones and highly saturated objects
to bright ones.
Brightness – Controls the overall lightness of the image.
Saturation – Controls the amount of color to include from the
original image.
Nudge Colors – Shifts the colors from one direction to the other.
Skylight Filter
Complete Edition
Select Edition
Traditional
Combines the effects of both a conventional skylight filter and a
conventional warming filter. Use this filter to remove offending blue
casts and apply an intelligent warming function to colors.
Strength – Controls the degree to which you want to apply the filter.
Solarization (12 Effects)
Complete Edition
Select Edition
Stylizing
Elapsed Time – Adjusts the simulated effect of more or less time in
the developer before the filter has added the solarization effect.
Sunshine
Complete Edition
Select Edition
Traditional
Makes virtually any image appear as though it was shot on a bright,
sunny day. Use this filter to add light, contrast, saturation and
warmth for a natural, realistic effect.
Saturation Correction – Controls the intensity of colors in the image.
Cool Color Reduction – Controls the reduction of cool or blue colors
in the image.
Light – From the pull-down menu,
select one of four sunlight effects,
from low-contrast, hazy light to highcontrast, direct light.
Simulates the Sabatier (more often referred to as a Solarization)
darkroom process. Use this filter to create a stylistic effect in which
some tones and colors are reversed.
Light Intensity – Controls the amount
of light the filter adds to the image. If
the light-casting algorithm is off, this
control does not affect the image.
From the pull-down menu, select the type of solarization to add to
the image. The effects are derived from simulating different paper
emulsions and development processes. Each option provides you
with the following controls:
Radius – Controls the amount of
detail-smoothing or haze in the image.
38
Color Efex Pro™ 3.0 for Capture NX 2
Chapter 8 : Filter Descriptions
Prefilter – From the pull-down menu, select one of eight color
contrast prefilters, to bring out different colors in the image.
Prefilter Strength – Controls the degree to which you want to
apply the prefilter.
Tonal Contrast
New in Color Efex Pro 3.0
Complete Edition
Stylizing
Allows powerful control over the
contrast only of highlights,
midtones or shadows, without
affecting the rest of the image.
Use this filter for highly targeted
control of a particular portion of
the tonal range of the image.
Highlight Contrast – Controls the
degree of contrast added to only
the highlights (brightest objects)
of the image.
Midtone Contrast – Controls the degree of contrast added to only the
midtones of the image.
Shadow Contrast – Controls the degree of contrast added to only the
shadows of the image.
Saturation – Controls the overall vibrancy of colors by increasing or
decreasing saturation throughout the image.
User Guide
Conventional High Pass Contrast – When off, the Tonal Contrast
filter will utilize a unique contrast method specially designed for this
filter. In some situations, this unique contrast method can create
uncover unwanted image details in the image. To prevent those
unwanted details from being revealed, turn this checkbox on to
switch from the unique contrast method to a conventional high pass
based contrast method.
Vignette
Updated in Color Efex Pro 3.0
Complete Edition
Select Edition
Stylizing
Simulates the application of a vignette in a darkroom.
Vignette Color – Lets you select a vignette color to add to the image.
To select a color for this control you may either use the eyedropper
within the active image or click on the color patch using the color
picker in your image editing application.
Shape – From the pull-down menu, select a circle, oval, smooth
rectangle, or rough-edged rectangle shape to add to the image.
Adapt Edges – Controls the relationship between the shape of the
vignette and the image details. The higher the value on the Adapt
Edges slider, the more the vignette shape integrates with the
image details.
Transition – Controls how abruptly the vignette blends into the
original image details.
Size – Adjusts the area of the image covered by the vignette.
Opacity – Controls the overall strength of the filter.
39
Color Efex Pro™ 3.0 for Capture NX 2
Chapter 8 : Filter Descriptions
Place Center – Positions the center of the image. This is useful if the
subject is not in the center of the frame. Click this button and then
place the center where desired.
Vignette Blur (4 Effects)
Updated in Color Efex Pro 3.0
Complete Edition
Select Edition
Traditional
Defocuses detail around the center of the image, drawing the eye to
the inside of the image.
From the pull-down menu, select a circle, oval or rectangle shape
as the basis for the blur effect. Each option provides the
following controls:
Blur – From the pull-down menu, select the type of blur or soft focus
to add to the image.
Transition – Controls how abruptly the vignette blends into the
original image details.
Size – Adjusts the area of the image covered by the vignette.
User Guide
White Neutralizer
Complete Edition
Select Edition
Traditional
Removes color casts from light
objects, such as white walls
and brides’ dresses, in a subtle
manner. Use this filter to clean
up images and create bright,
crisp whites, without affecting
other colors in the image.
Color Cast – Specifies the
color cast to remove from the
image. To select a color for this
control you may either use the
eyedropper within the active
image or click on the color
patch using the color picker in
your image editing application.
Adjust Whole Image – Removes the color selected in the Color Cast
control from the entire image.
Opacity – Controls the overall strength of the filter.
Place Center – Positions the center of the image. This is useful if the
subject is not in the center of the frame. Select this button and then
place the center where desired.
Neutralize Whites – Removes the color selected in the Color Cast
control from only the bright objects in the image.
40
© 2008 Catherine Hall
Chapter 9
Contact and Support
Getting Additional Support
Chapter 9 : Contact and Support
United States
Color Efex Pro™ 3.0 for Capture NX 2
User Guide
For more information on Nik Software products go to
www.niksoftware.com.
Contact Nik Software, Inc. by phone at (619) 725-3150
© 2007-2008 Nik Software, Inc.
Monday - Friday from 8:30 AM - 5:00 PM (PST) or via email at
[email protected]
Nik Software, Inc.
7588 Metropolitan Drive
San Diego, CA 92108, USA
Phone (619) 725-3150
Fax (619) 725-3151
[email protected]
U Point is a registered trademark of Nik Software, Inc. Color Efex
Pro and TrueLight are trademarks of Nik Software, Inc. All other
trade names mentioned in this manual are trademarks or registered
trademarks of their respective holders.
www.niksoftware.com
Germany
In Europe, contact Nik Software, GmbH at +49-40-47-11-35-0
Monday - Friday from 9:00 AM - 5:00 PM (CET) or via email at
[email protected].
Nik Software, GmbH
Hammerbrookstraße 93
D-20097 Hamburg, Germany
Phone +49-40-47-11-35-0
Fax +49-40-47-11-35-35
[email protected]
www.niksoftware.com
CENX30A-UG01-0608
42