1
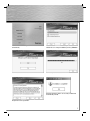
C
O
M
P
U
T
E
R
SATA HDD Docking Station,
USB 2.0 + eSATA
SATA HDD Docking Station
Station d’accueil HDD SATA
00053106
g User manual
Overview:
Package contents
Safety notes
1. Installation Instructions
2. Inserting the Hard Drive
3. Installing the Drivers
4. Backup Software
4.1 Installation
4.2 Configuration
4.3 Creating backups
5. Contact and Support Information
Package contents
•
•
•
•
•
•
Sata HDD docking station
Power supply unit
eSATA connection cable
USB connection cable
Driver CD
Installation instructions
Connect the included power supply unit to the docking
station. Then connect the docking station to your PC via
USB or eSATA.
Make sure that the toggle switch used for switching the
docking station on and off is set to “Off” when inserting
the hard drive. Next, insert the SATA hard drive into
the docking station and switch the toggle switch to
„On”.
To remove the hard drive, proceed as follows
(USB operation):
Click the “Safely Remove Hardware” button in the
taskbar.
Then, select “USB Mass Storage Device” and click
“Exit”.
Safety instructions
• Do not operate the device in damp or dusty
environments
• Do not operate this device on radiators or near
heat sources
• This device is designed for indoor use only
• Protect the device from pressure and impact
during operation
• Do not open or move the device during operation
1. Installation Instructions
3. Installing the Drivers:
The drivers for the unit are already included in Windows
2000, XP and Vista. The system installs them automatically. The docking station can be used without any
further driver installation after connecting and
restarting.
4. Backup Software
4.1 Installation
Never disconnect the hard drive from the computer
while data is being transferred. You may lose data if you
do so.
Under no circumstance does Hama GmbH & Co KG
accept liability for loss of data stored on data storage
media.
2. Inserting the Hard Drive
Note: Be aware that static electricity can damage
both the hard drive and the docking station. Discharge
yourself by touching a metal object.
6
Insert the enclosed driver/installation CD into the CDROM drive of your PC.
After the autorun menu starts, select your language.
g Operating Instruction
Now select “Install Backup Tool”. Installation starts
automatically.
Select the folder in which the Backup Tool is to be installed. You can change the folder by clicking “Browse”.
Click “Install” to start the installation.
The Backup Tool is installed.
The Backup Tool has been successfully installed and
automatically started.
Accept the licence agreement.
7
d Bedienungsanleitung
4.2 Configuration
Double-click the purple EX icon to start the Backup Tool.
This symbol is located in the notification area (system
tray) at the bottom right of the screen
Click the “Minimize” button to have the backup software run in the background.
4.3 Starting the backup
Press the backup button on the hard drive housing to
start the backup.
Navigate to the second tab from the left to select the
data to be backed up.
Press the backup button on the housing again or click
“Start”.
The backup is copied to the hard drive.
In the “File Backup” window, now select the hard
drives and folders that you wish to back up.
When this window appears, the backup has been
successfully completed.
8
g Operating Instruction
5. Support and Contact Information
If products are defective:
Please contact your dealer or Hama Product Consulting
if you have any product claims.
Internet / World Wide Web:
Product support, new drivers or product information can
be found at www.hama.com
Support Hotline – Hama Product Consulting:
Tel. +49 (0) 9091 / 502-115
Fax +49 (0) 9091 / 502-272
E-mail: [email protected]
9
All listed brands are trademarks of the corresponding companies. Errors and omissions excepted,
and subject to technical changes. Our general terms of delivery and payment are applied.
00053106/10.08
Hama GmbH & Co KG
D-86651 Monheim/Germany
www.hama.com