1
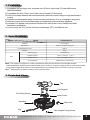
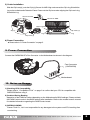
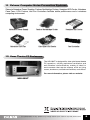
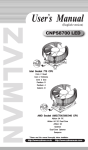
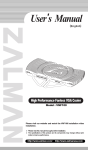
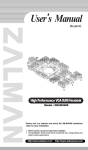
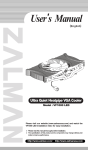
(English version)
CNPS7500
CNPS8700LED
NT
Intel Socket 775 CPU
Core 2 Quad
Core 2 Extreme
Core 2 Duo
Pentium D
Pentium 4
Celeron D
AMD Socket AM2/754/939/940 CPU
Athlon 64 FX
Athlon 64 X2 Dual-Core
Athlon 64
Opteron
Dual-Core Opteron
Sempron
* Please read this manual thoroughly before installation.
http://www.zalman.co.kr
http://www.zalmanusa.com
1. Features
1) Compatible with all single, dual, and quad core CPUs for Intel socket 775 and AMD socket
AM2/754/939/940.
2) Compatible with Slim Tower / Low Profile Home Theatre PC Enclosures.
3) 100% pure copper heatsink with aerodynamically optimized “tunnel” design for high performance
cooling.
4) Patented curved heatpipe design for heat transfer performance of up to 4 heatpipes using just 2.
5) Ultra-thin 0.2mm fins for minimized weight and significantly reduced airflow resistance.
6) Automatic Fan Speed Control feature included in the Ultra Quiet 110mm PWM(Pulse Width
Modulation) enabled fan.
7) Cools not only the CPU, but the VGA card, Northbridge, FET, and RAM as well.
2. Specifications
Model
Spec.
CNPS8700 NT
Material
Pure Copper
Dimensions
120(L) X 123(W) X 67(H)mm
Heat Dissipation Area
3300㎠
475g(1)
Weight
Fan
Bearing Type
2 Ball-Bearing
Rotation Speed
1,150 ~ 2,100 rpm ± 10 %
Noise Level(2)
17.5 ~ 30.0 dBA ± 10%
Control Method
PWM Control, Auto Restart
Note(1) The maximum weight for a cooler is specified as 450g for Intel Socket 775 and AMD Sockets
AM2/754/939/940. Special care should be taken when moving a computer equipped with a cooler that exceeds
the specified weight limit. Zalman is not responsible for any damage that occurs when moving a computer.
Note(2) Measured at 1m distance away from the sound source.
3. Exploded View
Fan
Fan Support
Fan Fixing Screw
Base Cover
Heatsink
Clip
※
Clip Lever
Fan Support Fixing Screw
The specifications of any product may change without prior notice to improve performance.
1
4. Precautions
1) Use and keep the product away from the reach of children.
2) Check the components list and condition of the product before installation. If any problem is found,
contact your place of purchase to obtain a replacement.
3) Excessive force exerted on the fan may damage the fan, resulting in damage to the system.
4) Avoid inserting any objects into the fan while it is in operation.
5) Do not ingest or put the thermal grease into the mouth. If ingested, get medical attention.
Disclaimer)
Zalman Tech Co., Ltd. is not responsible for any damages due to external causes, including but not
limited to, improper use, problems with electrical power, accident, neglect, alteration, repair, improper
installation, or improper testing.
5. Components
1) Common Components
❷
❶ Cooler (CNPS8700 NT)
❷ Thermal Grease
❸ Clip
❹ Clip Lever
❺ User’s Manual
❹
❶
❸
❺
2) Components for Intel Socket 775
❻ Four (4) Clip Support Fixing Bolts
❼ One (1) Clip Support for Socket 775
❽ One (1) Backplate for Socket 775
❼
❻
3) Components for AMD Socket AM2/754/939/940
❽
No additional components
6. Compatible CPUs
1) All CPUs conforming to Intel Socket 775 platform
2) All CPUs conforming to AMD Socket AM2/754/939/940 platform
Caution) No motherboard components such as the PSU, disk drives, VGA card, and RAM with a
height greater than 39mm should be present within a 61.5mm radius from the center of
the CPU.
38mm
30mm
61.5mm
< Intel Socket 775 >
※
61.5mm
< AMD Socket AM2/754/939/940 >
The specifications of any product may change without prior notice to improve performance.
2
7. Installation (Intel Socket 775)
1) Clip Support Installation
Align the Clip Support for Socket 775(⑦) and the Backplate for Socket 775(⑧) with the mounting holes on
the motherboard and fasten them together with the Clip Support Fixing Bolts(⑥). The Lever Slot on the Clip
Support for Socket 775 should be properly oriented on the hinged side of the Socket Lever when installing.
※ If the Lug of the Clip Support for Socket 775 interferes with any motherboard components, install the Clip
Support for Socket 775 with the Lug facing a different direction to avoid interference.
Lug
Clip Support Fixing Bolt, ⑥
Lug
Clip Support for Socket 775, ⑦
Motherboard
Socket Lever Hinge
Socket Lever
Lever Slot
Backplate for Socket 775, ⑧
2) Clip Installation
Insert the Clip(③) between the Heatpipes. Turn the Clip so that the central hole comes in alignment with the
Base Cover’
s projecting part. Now attach the Clip so that its central hole slides over the projecting part of the
Base Cover. Do not exert any excessive force on the fan during the Clip installation. Excessive force on the
fan could lead to product damage.
3) Thermal Grease Application
Clear off particles or any residue from the top of the CPU then
spread a sufficient amount of the included Thermal Grease(②)
on top of the CPU.
※
The specifications of any product may change without prior notice to improve performance.
3
4) Cooler Installation
Slide the Clip Lever(④) onto the Clip’s(③) Groove for Intel. Align and connect the Clip’s Lug Slot with the
Arrow Marked Lug on the Clip Support for Socket 775. Press onto the Clip Lever when aligning the Clip
Lever’s Lug Slot with the Lug. Make sure that the cooler is installed on the center of the CPU.
Groove for Intel
Groove for AMD
Clip’s Lug Slot
Clip,③
Clip Lever,④
Lug
Clip Lever,④
Arrow Marked Lug
5) Power Connection
◆ Please refer to “9. Power Connection” on page 5.
8. Installation (AMD Socket AM2/754/939/940)
1) Clip Installation
Insert the Clip(③) between the Heatpipes. Turn the Clip so that the central hole comes in alignment with the
Base Cover’s projecting part. Now attach the Clip so that its central hole slides over the projecting part of the
Base Cover. Do not exert any excessive force on the fan during the Clip installation. Excessive force on the
fan could lead to product damage.
2) Thermal Grease Application
Clear off particles or any residue from the top of the CPU then
spread a sufficient amount of the included Thermal Grease(②)
on top of the CPU.
※
The specifications of any product may change without prior notice to improve performance.
4
3) Cooler Installation
Slide the Clip Lever(④) onto the Clip’s(③)Groove for AMD. Align and connect the Clip’s Lug Slot with the
Lug on the motherboard’s Retention Frame. Press onto the Clip Lever when aligning the Clip Lever’s Lug
Slot with the Lug.
Groove for Intel
Groove for AMD
Clip’s Lug Slot
Clip,③
Clip Lever,④
Lug
Lug
Clip Lever,④
4) Power Connection
◆ Please refer to “9. Power Connection” on page 5.
9. Power Connection
Connect the CNPS8700 NT’s Fan Connector to the Motherboard as shown in the diagram.
Fan Connector
(CNPS8700)
Motherboard
10. Notes on Usage
1) Checking CPU Compatibility
Please refer to“Compatible CPUs”on page 2 to confirm that your CPU is compatible with
CNPS8700 before using it.
2) Cautions During Booting
Operation of the PWM fan varies depending on the Motherboard’s BIOS settings. Please activate
the PWM Control mode in the BIOS settings after installation. Refer to the mother board’s manual
for detailed information regarding the PWM Control mode.
3) OVERCLOCKING
Zaman Tech Co., Ltd. is not responsible for any damages to the system and CPU resulting from
overclocking.
※
The specifications of any product may change without prior notice to improve performance.
5
11. Zalman Computer Noise Prevention Systems
Zalman's Noiseless Power Supplies, Fanless Northbridge Coolers, Heatpipe HDD Cooler, Noiseless
Case Fans, VGA Coolers, and Fan Controllers facilitate stable performance and a noiseless
computing environment.
Noiseless Power Supply
Noiseless Case Fan
Fanless Northbridge Cooler
Heatpipe HDD Cooler
Ultra Quiet VGA Cooler
Fan Controller
12. Home Theatre PC Enclosures
The HD160XT is designed for ultra quiet home theatre
PC operation, utilizing optimized ventilation and
anti-vibration reinforcements, making it ideal for
environments that require silence such as living
rooms, bedrooms, educational facilities, and offices.
For more information, please visit our website.
HD160XT
※
The specifications of any product may change without prior notice to improve performance.
6