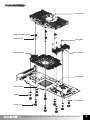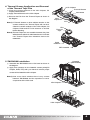
1
User’
s Manual
(English)
High Performance VGA RAM Heatsink
Model : ZM-RHS88
Please visit our website and watch the ZM-RHS88 installation
video for easy installation.
※ Please read this manual thoroughly before installation.
※ The specifications of this product and its components may change without prior
notice to improve performance.
http://www.zalman.co.kr
http://www.zalmanusa.com
Cautions on Use and Installation
1. This product is a RAM Heatsink for NVIDIA Geforce 8800 Series. It must be used with Zalman’s VF1000 LED.
2. For stable performance while running the VGA card under full load (3D games etc.), the VF1000 LED VGA
cooler must be used in Normal Mode.
3. If the VGA card and its components interfere with the installation of this product, stop the installation, refer to the
list of compatible VGA cards at Zalman’s website and install it with one of the compatible VGA cards.
4. The use of a fan positioned on the front side of the case and an exhaust fan positioned on the rear side of the
case is recommended for enhancement of product performance.
5. Zalman does not recommend overclocking of VGA cards.
Disclaimer
Zalman Tech co., Ltd. is not responsible for any damages due to external causes, including but not limited to, improper
use, problems with electrical power, accident, neglect, alteration, repair, improper installation, or improper testing.
Features
1. Die cast heatsink fin design maximizes the surface area for superior cooling performance.
2. Made with aluminum for minimized weight and effective cooling.
3. Noiseless and Durable.
4. All-in-one multi-component cooling solution for RAM, FET and I/O chipset.
5. High performance thermal tapes included for easy installation.
Specifications
1. Dimensions (mm) : 190(L)×98(W)×11(H)
2. Weight (g) : 80
3. Material : Aluminum
Components
❶ One (1) RAM Heatsink
❷ One (1) FET Heatsink A-For 8800 Ultra/GTX
❸ One (1) FET Heatsink B-For 8800 GTS
❶
❷
❸
❹ Four (4) Nipples for 8800 Series
❺ Five (5) Fixing Nuts
❻ Five (5) Fixing Nuts for SLI/CrossFire
❼ Three (3) Fixing Bolts
❹
❽ Five (5) Springs
❺
❻
❼
❽
❾ One (1) PVC Washer Plate
❿ One (1) Thermal Grease
Four (4) Rubber Rings
One (1) User’
s Manual
※
❾
❿
The specifications of the product may change without prior notice to improve performance.
1
Exploded View
VF1000 LED
Nipple for 8800 Series
Rubber Ring
Fixing Bolt
RAM Heatsink
FET Heatsink
VGA RAM
VGA Chipset
Spring
PVC Washer
Fixing Nut
※
The specifications of the product may change without prior notice to improve performance.
2
Installation Procedure
※ The following installation sequence MUST be followed.
(1. VGA Card Check → 2. Assembly of FET Heatsink → 3. Removal of the VGA Chipset Guide → 4. Thermal
Grease Application and Removal of the Thermal Tape Film → 5. ZM-RHS88 Installation → 6. Nipple Installation
onto the Retention Guide → 7. VF1000 LED Installation for Geforce 8800 Series VGA Cards → 8. Spring
Insertion onto the Fixing Nuts → 9. Assembly of Fixing Nuts onto the Nipples → 10. ZM-RHS88 Assembly →
11. VGA Card Installation)
1. VGA Card Check
Check your VGA Card and select the FET Heatsink according to the table below.
VGA Card
FET Heatsink
NVIDIA Geforce 8800 Ultra/GTX
FET Heatsink A
NVIDIA Geforce 8800 GTS
FET Heatsink B
Note 1) The images in the User’s Manual are based on NVIDIA Geforce 8800 Ultra/GTX.
Note 2) The image is included in the manual to clarify installation of ZM-RHS88. VF1000 LED is to be
purchased seperately.
2. Assembly of FET Heatsink
Assemble the FET Heatsink onto the RAM Heatsink with the Fixing Bolts as shown in the diagram.
Fixing Bolt
RAM
Heatsink
FET Heatsink A
FET Heatsink B
<Geforce 8800 Ultra/GTX>
<Geforce 8800 GTS>
Note) The VGA card model must be checked before assembling the FET Heatsink.
3. Removal of the VGA Chipset Guide
Unscrew the Fixing Bolts of the VGA Chipset Guide on the rear side of the VGA card to remove the VGA
Chipset Guide.
Note) Removing the VGA Chipset Guide by force could result in damaging the core.
VGA Chipset Guide
VGA RAM
VGA Chipset
Fixing Bolt
※
The specifications of the product may change without prior notice to improve performance.
3
4. Thermal Grease Application and Removal
of the Thermal Tape Film
Note 1) If Thermal Grease or other residue remains on the
contact surfaces, the Thermal Tapes will not stick.
Clean the contact surfaces of the VGA Chipset, I/O
Chipset, RAM and FET with acetone or alcohol
before attaching.
Note 2) Thermal Tapes are not reusable because they lose
adhesiveness after their initial attachment. Purchase
new Thermal Tapes when Heatsinks have to be
reattached.
I/O Chipset
Thermal Grease
The
rm
al Gre
ase
① Clean the contact surfaces of the VGA Chipset, I/O
Chipset, RAM and FET.
② Apply Thermal Grease on the VGA Chipset.
③ Remove the Film from the Thermal Tapes as shown in
the diagram.
VGA RAM
VGA
Chipset
FET
Film
Thermal
Tape
RAM
Heatsink
FET Heatsink
Heatsink
(ZM-RHS88)
5. ZM-RHS88 Installation
① Assemble the ZM-RHS88 on the VGA card as shown in
the diagram.
② Apply even pressure on the heatsink contact points(I/O
Chipset, RAM, FET) with your hands to ensure proper
contact of the heatsink and the chipset.
Note 1) User must check whether there is any contact
between ZM-RHS88 and the capacitors or other
components of the VGA card.
VGA Chipset
VGA Chipset
※
The specifications of the product may change without prior notice to improve performance.
4
6. Nipple Installation onto the Retention
Guide
Nipple for
8800 Series(Silver)
① Install the enclosed Nipples for 8800 Series onto the
VF1000 LED’s Retention Guide.
Note 1) Install the Nipples for 8800 Series onto the No. ❻
holes as shown on the diagram.
Note 2) The silver Nipples for 8800 Series must be used.
Do not use the black nipples.
VF1000 LED
Retention Guide
8800 Series
Nipple installation
hole
Retention Guide
7. VF1000 LED Installation for Geforce 8800 Series VGA Cards
① Install the Rubber O-Rings onto the Nipples on the retention guide.
② Install the VF1000 LED equipped with the Nipples for 8800 Series onto the VGA card’s mounting holes.
③ Simultaneously hold the VGA Cooler and the VGA card with one hand, and flip the VGA card so that its bottom
side is facing upwards.
※ Make sure that the VGA Chipset and the VGA Cooler’s base does not come apart while flipping the card.
VF1000 LED
Nipple for
8800 Series
Rubber Ring
Nipple for 8800 Series
Rubber Ring
Nipple for
8800 Series
Heatsink
(ZM-RHS88)
VF1000 LED
※
The specifications of the product may change without prior notice to improve performance.
5
8. Spring Insertion onto the Fixing Nuts
Spring
Slowly turn the Spring in counterclockwise motion so that the
Spring is completely attached to the Fixing Nut.
Note 1) Ends of the spring have different diameters. Use the
end with smaller diameter to install on the fixing nut.
Note 2) Make sure that the Spring is installed perpendicularly
and not leaning to one side.
Fixing Nut
9. Assembly of Fixing Nuts onto the Nipples
① Place a PVC Washer over each Nipple for 8800 Series.
② Slightly screw each of the four Spring-attached Fixing
Nuts onto each Nipple, then tighten each Fixing Nut one
rotation at a time until all are completely tightened.
③ In SLI or CrossFire setups, interference may occur
between one card’s cooler(VF1000 LED) and the other
card’s cooler fixing Nuts. In such a case, please use the
enclosed Fixing Nuts for SLI/CrossFire.
Note 1) Fully tightening one Fixing Nut at a time may result in
damaging the VGA Chipset. Please tighten each
Fixing Nut one rotation at a time until all are
completely tightened.
Note 2) Make sure that the VGA Cooler’s base and the VGA
Chipset are completely in contact with each other.
Note 3) Make sure that the VGA Cooler does not
interfere with the VGA card’s capacitors and other
components.
Fixing Nut
PVC Washer
Fixing Nut
for SLI/CrossFire
VF1000 LED
Fixing Nut
Spring
10. ZM-RHS88 Assembly
PVC Washer
① After installing the VF1000 LED, place a PVC Washer
over each Nipple.
② Slightly screw each of the Spring-attached Fixing Nuts
onto each Nipple, then tighten each Fixing Nut one
rotation at a time until all are completely tightened.
Note 1) Fully tightening one Fixing Nut at a time may result in
damaging the Chipset. Please tighten each of the
five Fixing Nuts one rotation at a time until all are
completely tightened.
Note 2) Make sure that the VF1000 LED and ZM-RHS88 do
not interfere with the VGA card’s capacitors and
other components.
Nipple
VF1000 LED
Nipple
PCIe Slot
11. VGA Card Installation
Insert the assembled VGA card into the motherboard’s PCIe
slot. Use the Fixing Bolt to secure the VGA card onto the
computer case.
Fixing
Bolt
(Note) The Geforce 8800 Series VGA card has a power
connector. Please plug in the power connector.
※
The specifications of the product may change without prior notice to improve performance.
6
Zalman Computer Noise Prevention Systems
When building a noiseless computer, use Zalman’
s Ultra Quiet CPU Cooler, Noiseless Power Supply, Heatpipe
HDD Cooler, Fanless Northbridge Cooler and Noiseless Case Fan for more stable performance and a noiseless
environment.
Noiseless Power Supply
Heatpipe HDD Cooler
Fanless Northbridge Cooler
Noiseless Case FAN
Ultra Quiet CPU Cooler
Computer Enclosures
GT-1000
High End Gaming Enclosure Built with
Sturdy All Aluminum Panels
Three Tool - Free Hinged Magnetic Panels
(2 Left, 1 Right) for Easy Installation and
Access to Components
Tool Free Installation of Disk Drives (HDD,
ODD), Fan Controllers, Audio Interfaces
etc.
Accommodates up to 6 Hard Drives (4 in
the HDD Chassis, 2 on the Bottom Panel)
Luxurious and Cool Aesthetics
Color Options : Black (Red LED Fans),
Titanium (Blue LED Fans)
Home Theatre PC Enclosures
The HD160XT is designed for ultra quiet home theatre
PC operation, utilizing optimized ventilation and
anti-vibration reinforcements, making it ideal for
environments that require silence such as living
rooms, bedrooms, educational facilities, and offices.
For more information, please visit our website.
HD160XT
※
The specifications of the product may change without prior notice to improve performance.
7