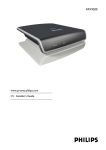
1
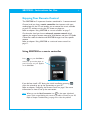
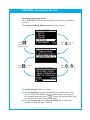
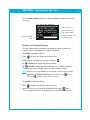
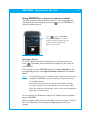
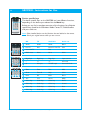
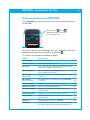
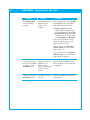
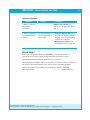
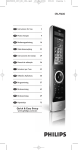
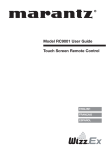
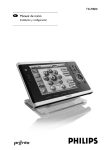
SRM7500
EN
Instructions for Use
Quick & Easy Setup
www.philips.com/urc
2
SRM7500 - Instructions for Use
Contents
Taking a first look . . . . . . . . . . . . . . . . . . . . . . . . . . . . . . . . . . . . . . . . . . . . . . . . . 2
Installing the Remote Control. . . . . . . . . . . . . . . . . . . . . . . . . . . . . . . . . . . . . . . . 4
Preparing Your PC . . . . . . . . . . . . . . . . . . . . . . . . . . . . . . . . . . . . . . . . . . . . . . 4
Configuring the Remote Control . . . . . . . . . . . . . . . . . . . . . . . . . . . . . . . . . . 5
Enjoying Your Remote Control . . . . . . . . . . . . . . . . . . . . . . . . . . . . . . . . . . . . . . . 7
Using SRM7500 as a music controller. . . . . . . . . . . . . . . . . . . . . . . . . . . . . . . 7
Using SRM7500 as a universal remote control. . . . . . . . . . . . . . . . . . . . . . . 11
Advanced features of SRM7500 . . . . . . . . . . . . . . . . . . . . . . . . . . . . . . . . . . . . . 15
Support. . . . . . . . . . . . . . . . . . . . . . . . . . . . . . . . . . . . . . . . . . . . . . . . . . . . . . . . . 24
Troubleshooting . . . . . . . . . . . . . . . . . . . . . . . . . . . . . . . . . . . . . . . . . . . . . . . 24
Need Help?. . . . . . . . . . . . . . . . . . . . . . . . . . . . . . . . . . . . . . . . . . . . . . . . . . . 29
Service - Website & Helpline. . . . . . . . . . . . . . . . . . . . . . . . . . . . . . . . . . . . . . . . 30
Help Center . . . . . . . . . . . . . . . . . . . . . . . . . . . . . . . . . . . . . . . . . . . . . . . . . . 30
Helpline . . . . . . . . . . . . . . . . . . . . . . . . . . . . . . . . . . . . . . . . . . . . . . . . . . . . . 30
IFU Approbation/Safety Content SRM7500 . . . . . . . . . . . . . . . . . . . . . . . . . . . . 31
FCC Compliancy . . . . . . . . . . . . . . . . . . . . . . . . . . . . . . . . . . . . . . . . . . . . . . 31
CE Regulations According to R&TTE . . . . . . . . . . . . . . . . . . . . . . . . . . . . . . 31
Taking a first look
Thank you for purchasing the Philips SRM7500 universal remote
control. With this remote, you do not only have a universal remote
control but also a music controller that enables you to control the
media player, installed on your PC, via the screen of the remote.
SRM7500 operates like a universal remote control that can control up
to 6 AV-devices and your PC Media Center, if available. You can also
configure 8 activities. By selecting an activity you automatically start a
sequence of maximal 25 key presses to start watching TV or listening to
your CD collection.
Thanks to the interactive feature of the SRM7500 it is possible to
receive the music information of your media player on the screen of
your SRM7500. This makes it possible to control your media player
without having your PC screen turned on or your media player active.
In the box you find your SRM7500, a USB transceiver to set up the
connection to your PC and an installation CD that contains the
software needed to operate the SRM7500 and the manuals in diverse
languages.
© 2007 - Philips Innovative Applications, Interleuvenlaan 74-76, 3001 Leuven (Belgium)
SRM7500 - Instructions for Use
SRM7500 - Instructions for Use
3
Press the Music en Mode key
simultaneously for 3 seconds to open
the Setup menu.
Music key See p 7
Power key
Mode key See p 11
Battery low icon
No connection icon
Display with context
related screens
Back key
Sending animation
As music controller:
Playback Settings menu key See p 9
As universal remote:
More key See p 11
Cursor keys and OK key
Mute key
Volume Up key
Volume Down key
Channel Up key
Channel Down key
MC Start key See p 13
Playback keys
Device specific keys See p 12
Device specific keys
MC
TV - Sat/Cable
Audio set
Digit keys
Digit keys
Input source keys
Device specific keys
MC
TV - Sat/Cable
Audio set
© 2007 - Philips Innovative Applications, Interleuvenlaan 74-76, 3001 Leuven (Belgium)
Color keys
Color keys
See p 12
SRM7500 - Instructions for Use
4
SRM7500 - Instructions for Use
Installing the Remote Control
The initial installation of your remote is divided into 2 main parts:
• Preparing the PC you want to control with the SRM7500 by
installing the MediaControl software and the USB transceiver,
enclosed.
• Configuring the remote control to set up the connection to the
correct PC and define the devices the SRM7500 will work with.
Preparing Your PC
Warning It is very important to follow the specified sequence of actions
during the installation.
First you need to install the software. This software controls the
connection of the SRM7500 to the host PC and will allow you to use
the features of your media player. Only then you can insert the USB
transceiver.
1 Insert the installation CD enclosed.
An installation wizard appears on your PC screen.
2 Install the MediaControl software by following the onscreen
instructions.
When the software is installed, the MediaControl icon
appears in
the taskbar on your PC screen.
3 When requested in the
installation wizard, insert the
USB transceiver in the
dedicated port on your PC.
The USB transceiver will be
recognized and installed
automatically.
When the USB transceiver is
correctly installed, the
MediaControl icon turns
orange:
.
4 After the USB transceiver is installed, insert the batteries in the
remote control, as shown.
© 2007 - Philips Innovative Applications, Interleuvenlaan 74-76, 3001 Leuven (Belgium)
SRM7500 - Instructions for Use
SRM7500 - Instructions for Use
Press the cover inwards
and lift it up.
Place the 3 batteries
into the battery
compartment.
5
Position the cover and
press firmly until you
hear a click.
The remote initializes and is now ready to be configured as described
below.
Note Leave your PC turned on during the configuration of the remote control.
You still need to set up the connection between the remote and the PC.
Configuring the Remote Control
A wizard on the remote’s screen will guide you through the different
steps of the initial configuration of your SRM7500.
1 Select the language for your instructions on the remote using the
cursor keys and press
.
2 Select Next and press
. Make sure the remote is within a range of
6 feet (2 meters) of the PC.
When the connection between the remote and the PC is installed
successfully, a confirmation message appears on the SRM7500 screen
and the MediaControl icon in the taskbar on your PC screen turns
green:
.
The name of the PC you want to control with your SRM7500
appears.
3 Confirm that you want to add other devices, like your TV or DVD
player, by selecting Yes and press
.
In doing so, you replace their original remote control with SRM7500.
The installation of 4 devices typically takes up to 20 minutes.
4 Select the device and brand of the device you want to add using the
cursor keys and press
.
The remote searches the database for available code sets.
© 2007 - Philips Innovative Applications, Interleuvenlaan 74-76, 3001 Leuven (Belgium)
SRM7500 - Instructions for Use
6
SRM7500 - Instructions for Use
5 Follow the onscreen instructions to test the codes.
■ When a working code set is found, your device is correctly
installed.
■ When no working code is found,
■ You can perform a full database search to find a correct code
set. It can take up to 25 minutes to perform this full database
search.
■ You can learn the codes from the original remote of the device.
Refer to chapter ‘Fix a Key’ on page 17 for more information on
how to learn codes.
When the device is installed, the following screen appears.
6 When you want to add another device, select Yes, press
and repeat
step 5 and 6.
-orWhen you added all your devices, select No and press
wizard.
to exit the
Note You can adjust the settings of SRM7500 via the Setup menu. Refer to
page 15 for more information on these advanced features.
Replacing the batteries
When the batteries are almost empty, the Battery Low icon
appears.
Please replace the batteries with new LR6 or AA type alkaline
batteries and follow the local regulations for disposal of the empty
batteries.
Warning When you replace the batteries, do not mix different brands of
batteries or place zinc carbon batteries in the remote. This can trigger
unpredictable behavior.
© 2007 - Philips Innovative Applications, Interleuvenlaan 74-76, 3001 Leuven (Belgium)
SRM7500 - Instructions for Use
SRM7500 - Instructions for Use
7
Enjoying Your Remote Control
The SRM7500 has 2 important functions combined in 1 remote control.
On one hand you have a music controller that interacts with your
media player on the PC and enables you to control the music, available
on your PC, without turning the PC screen or player on.
Refer to chapter ‘Using SRM7500 as a music controller’ on page 7.
On the other hand you have a universal remote control, which
replaces the original remote control of 6 AV-devices and your PC Media
Center. You select the device and SRM7500 changes into that specific
remote.
Refer to chapter ‘Using SRM7500 as a universal remote control’ on
page 11.
Using SRM7500 as a music controller
Press
on your SRM7500 to
connect to your media player on
your PC and to see your playlists
on the SRM7500.
If you did not install a PC during the initial installation, pressing
starts the wizard to set up the connection to your PC.
Refer to chapter ‘Configuring the Remote Control’ on page 5 for more
information on how to set up the connection.
Note When you see the No Connection icon
in the upper right-hand
corner of the screen blinking, the remote is not able to connect to your PC.
Refer to chapter ‘Troubleshooting’ on page 24 to solve the problem.
© 2007 - Philips Innovative Applications, Interleuvenlaan 74-76, 3001 Leuven (Belgium)
SRM7500 - Instructions for Use
8
SRM7500 - Instructions for Use
Browsing and playing music
With SRM7500 you can browse through the music that is available on
your PC.
To navigate through different menus on the remote:
Press
to
return to the
previous screen.
My Music screen
Press
to go to
the next screen.
All songs screen
Press
or
to
start playing the song.
Press
to return
to the playlists.
Now Playing screen
To scroll through a list on a screen:
■ Use the digit keys to jump immediately to a specific point in the
list. This is the most efficient way to scroll through a list very fast.
For example, when you press
3 times, you automatically jump
to the first item in the list that starts with ‘r’.
■ Use the Cursor Up key and Cursor Down key to select the
previous or following item in the list.
© 2007 - Philips Innovative Applications, Interleuvenlaan 74-76, 3001 Leuven (Belgium)
SRM7500 - Instructions for Use
SRM7500 - Instructions for Use
9
On the Now playing screen you get the following information about
the song.
Title of the song
Name of the artist
Title of the album
Progress indication of
the playing song
Current playback
status
Defining the Playback Settings
On your remote you can choose to repeat the playing playlist or
choose to play the playlist in a random sequence.
To enable a playback setting:
1 Press
to open the Playback Settings menu.
2 Select one of the following settings and press
■
.
Repeat: to repeat the playing playlist.
■
Shuffle: to play the selected playlist in a random sequence.
The corresponding icon will appear on the remote’s screen.
Note When you are using iTunes, you can repeat a single song by selecting
Repeat in the Playback Settings menu and pressing
The icon
appears on the remote’s screen.
twice.
To disable a playback setting:
1 Press
to open the Playback Settings menu.
2 Select the setting you would like to disable and press
again.
The corresponding icon will disappear from the SRM7500 screen.
© 2007 - Philips Innovative Applications, Interleuvenlaan 74-76, 3001 Leuven (Belgium)
SRM7500 - Instructions for Use
10
SRM7500 - Instructions for Use
Creating a queue
On your SRM7500 you can easily create a playing queue by adding songs
to the ‘Now Playing’ list (for Windows Media Player) or the
‘PartyShuffle’ list (for iTunes).
You can always delete the playing queue, but you cannot delete an
individual song in the queue.
To add a song to the playing queue:
1 Navigate with the cursor keys to the song that you would like to add.
2 Press
to add the song to the playing queue.
A confirmation message appears on the screen and the song is added to
the list.
Notes • You can only add a song to the queue while another song is playing.
When there is no song being played, the selected song will immediately
start to play.
• Pressing
will stop the currently playing song and start
the selected song.
To delete a playing queue:
1 Navigate with the cursor keys to the Now Playing list (for Windows
Media Player) or the PartyShuffle list (for iTunes) and press
.
The playing queue appears on the screen.
2 Select Clear List and press
.
The playing queue is deleted and the currently playing song stops.
Note A playing queue is not the same as a playlist on your media player. Unlike
the playlist on your PC, you are not able to save the playing queue created
on your remote. This playing queue is more like an on-the-spot playlist.
© 2007 - Philips Innovative Applications, Interleuvenlaan 74-76, 3001 Leuven (Belgium)
SRM7500 - Instructions for Use
SRM7500 - Instructions for Use
11
Using SRM7500 as a universal remote control
The music, started while using the remote as a music controller, will
continue to play even though you pressed
to use SRM7500 as a
universal remote control.
Press
on your SRM7500 to
use your SRM7500 as a universal
remote control. The device icon of
your last selected device will
appear on the screen.
Selecting a Device
To select a device, you have installed on your remote control, you
press
repeatedly until the device icon appears on the screen of
the SRM7500.
The hard keys on your SRM7500 then get the same function as the
corresponding keys on the original remote control of the selected
device.
Notes • Some specific keys that are available on the original remote will not be
available on SRM7500 or vice versa. Check your original remote for
the available functions.
• You can learn functions from the original remote. Refer to chapter
‘Fix a Key’ on page 17 for more information on how to learn codes.
• When you awaken the remote after a time out, the last selected device
before time out will be active.
You can add up to 6 AV-devices and your PC Media Center, if available,
to your SRM7500.
Refer to chapters ‘Add a Device’ and ‘Delete a Device’ on pages 16 and 17
for more information about adding and deleting devices on your
remote.
© 2007 - Philips Innovative Applications, Interleuvenlaan 74-76, 3001 Leuven (Belgium)
SRM7500 - Instructions for Use
SRM7500 - Instructions for Use
12
Device specific keys
The device specific keys on the SRM7500 can have different functions,
depending on the device you selected via the Mode key.
Below you can find a complete overview of the functions for all device
specific keys listed for the Windows Media Center, TV, Cable/Satellite
and your audio set.
Note Other installed devices use the functions that are labeled on the remote.
Check your original remote when you are not sure.
1
2
MC
TV
Sat/Cable
Audio set
1
Guide
Guide
Guide
Band
2
Live TV
Exit
Return to Live TV
Scan
3
Recorded TV
-
Exit
-
4
DVD menu
Menu
Menu
Menu
5
Digit keys
Digit keys
Digit keys
Input sources
6
*
-/--
-/--
Surround
7
#
AV input
TV/SAT input
Surround Mode
8
Text
Text
Text
RDS
9
Clear
Text off
Help
Clear
10
Enter
PIP
Enter
Enter
11
16:9
16:9
Home
GEQ
12
Color key
Color key
Color key
Front
13
Color key
Color key
Color key
Centre
14
Color key
Color key
Color key
Rear
15
Color key
Color key
Color key
Test
4
3
5
6
8
12
7
9
13
10
14
11
15
© 2007 - Philips Innovative Applications, Interleuvenlaan 74-76, 3001 Leuven (Belgium)
SRM7500 - Instructions for Use
SRM7500 - Instructions for Use
13
Selecting Extra Functions
Devices can also have extra functions, that are not covered by the hard
keys on the SRM7500.You can select these extra functions in the display.
1 Press
.
Extra functions for the selected device appear in the display.
2 Use the Cursor Up key and Cursor Down key to scroll through all
extra functions.
3 If you have selected the function you were looking for, press
.
The remote control sends out the IR signal.
For adding extra functions, see chapter ‘Add a Function’ on page 19.
Tip If you cannot find the extra function you are looking for, you can exit the
More menu by pressing
again.
Note Some devices do not have any extra functions available in the onboard
database. However, you can copy additional functions from your original
remote by learning keys. See ‘Add a Function’ on page 19.
Opening Your PC Media Center
To open your PC Media Center on your PC, press
. The PC Media
Center main menu appears on your PC or TV screen, according to your
configuration.
You browse the content of your PC Media Center with the cursor
keys and OK key.
To switch back to your PC Media Center again after controlling another
device with your SRM7500, you can:
■ Press
. This will take you back to the main menu.
■ Press
repeatedly until the PC icon appears on the remote’s
screen. This will take you to the state the PC Media Center was in
before you switched to the other device.
Note Pressing
pressing
enables you to control the music content on your PC, while
enables you to control all multimedia content on your PC.
© 2007 - Philips Innovative Applications, Interleuvenlaan 74-76, 3001 Leuven (Belgium)
SRM7500 - Instructions for Use
14
SRM7500 - Instructions for Use
Starting Up an Activity
An activity is a sequence of key presses, you can program. For example,
for watching a DVD you normally would have to:
■
■
■
■
■
Turn on the TV;
Turn on the DVD;
Turn on the surround sound system;
Select the right input on your TV and surround sound system;
Press the Play key to start the DVD.
By selecting the activity ‘Watch DVD’ all the actions are executed
automatically in the predefined sequence.
To start up an activity:
1 Press
repeatedly until the Activity name appears in the header
of the SRM7500 screen.
2 Confirm your selection by pressing
.
The activity starts up.
You can add up to 8 activities to your SRM7500.
Refer to the chapters ‘Add an Activity’ and ‘Delete an Activity’ on pages 20
and 21 for more information about adding and deleting activities on
your remote.
© 2007 - Philips Innovative Applications, Interleuvenlaan 74-76, 3001 Leuven (Belgium)
SRM7500 - Instructions for Use
SRM7500 - Instructions for Use
15
Advanced features of SRM7500
Via the Setup menu you get accesss to the various advanced features
of SRM7500.
Press and hold
and
simultaneously for 3 seconds to
open the Setup menu.
To select an option from the Setup menu, you scroll the list with your
cursor keys and confirm the selection by pressing
.
The Setup menu provides the following options:
Option
Description
p
Add a device
Adds a new device
16
Delete a device
Removes a programmed device
17
Fix a key
Fixes a key that is not working correctly, by learning
it from your original remote control
17
Adds an extra function by learning it from
your original remote control
19
Add a function
RF Settings
Show Details
Shows an indication of the strenght of the connection
to your PC
19
RF Settings
Reconnect to PC
Reestablishes the connection from your SRM7500
to your PC
19
Add an activity
Programs a sequence of different key presses
20
Delete an activity
Removes a programmed activity
21
Change language
Changes the language of the instructions on the
remote control
21
Display time out
Changes the time out of the remote control
22
Copy volume
Copies the volume keys from one source device to
another device
22
Full reset
Deletes all your settings on SRM7500
23
Exit Setup
Leaves the Setup menu and returns to the last state
the remote was in before entering the Setup menu.
© 2007 - Philips Innovative Applications, Interleuvenlaan 74-76, 3001 Leuven (Belgium)
SRM7500 - Instructions for Use
16
SRM7500 - Instructions for Use
When you want to exit the Setup menu and go:
■ Directly to your playlists, press
■ To your last selected device, press
on the remote.
on the remote.
Add a Device
To be able to operate your devices with your SRM7500, you have to
add these devices to the remote control. You can add up to 6 devices
from the list of available devices.
You cannot add a device twice. Once you have added a device to your
remote control, it disappears from the list. However, the list of devices
contains ‘TV-2’ or ‘VCR-2’ when you want to program a second TV or a
second VCR.
1 Select the option Add a device in the Setup menu by using the
cursor keys and press
.
Note If you already added 6 devices on the remote, apart from your
PC Media Center, you will be asked to delete a device.
Refer to page 17 on how to delete a device.
2 Select the device and brand you want to add and press
.
The remote will search for available codes for the brand.
3 Follow the onscreen instructions to test the codes.
■ When a working code set is found, your device is correctly
installed.
■ When no working code is found,
■ You can perform a full database search to find a correct code
set.
This means that the remote will send out all codes available in the
database until a working code is found. Keep in mind that it can
take up to 25 minutes to scan the entire database.
■ You can learn the codes from the original remote of the device.
Refer to chapter ‘Fix a Key’ on page 17 for more information on
how to learn codes.
When the device is installed, the following screen appears.
© 2007 - Philips Innovative Applications, Interleuvenlaan 74-76, 3001 Leuven (Belgium)
SRM7500 - Instructions for Use
SRM7500 - Instructions for Use
17
4 When you want to add another device, select Yes, press
and repeat
step 2 and 3.
-orWhen you added all your devices, select No and press
the Setup menu.
to return to
Delete a Device
You can delete a programmed device from your remote control.
1 Select the option Delete a device in the Setup menu by using the
cursor keys and press
.
2 Select the device you want to delete and press
.
3 Confirm you want to delete that device by selecting Yes and
press
.
The device is deleted and becomes available again in list of devices you
can add.
4 Select Exit and press
to return to the Setup menu.
Notes Keys of the deleted device that are used elsewhere, e.g. in an activity or
the volume keys you copied, will be deleted as well.
Check the activities you programmed and volume keys for your devices
and reprogram them if necessary.
Fix a Key
If a hard key is not working properly with your device, you can fix the
key by learning it from your original remote control.
You can fix all keys on SRM7500 except the Mode key, the Music key
and the MC Start Key. SRM7500 can store up to 200 learned keys.
1 Select the option Fix a key in the Setup menu by using the cursor
keys and press
.
© 2007 - Philips Innovative Applications, Interleuvenlaan 74-76, 3001 Leuven (Belgium)
SRM7500 - Instructions for Use
18
SRM7500 - Instructions for Use
2 Select the device for which you want to fix a key and press
.
3 Confirm you have a working original remote control available to learn
from by selecting Yes and press
.
Note If you already learned 200 keys, you will be noted that the memory is full
and return to the Setup menu.
Delete a device with fixed keys to clear memory. Refer to page 17 for
more information on how to delete a device.
4 Follow the onscreen instructions to fix the key.
1 Point the 2 remotes towards each other at a distance of
0.5 - 2 inch (2-5 cm).
0.5 - 2 inch
(2-5 cm)
2 Select the hard key or extra function you want to fix on the
SRM7500.
Extra functions can be selected by pressing the
key, selecting the
function with the Cursor Up key or Cursor Down key and
pressing
.
3 Press the corresponding key on the original remote until you
hear a beep.
The key is learned and fixed. The following screen appears.
© 2007 - Philips Innovative Applications, Interleuvenlaan 74-76, 3001 Leuven (Belgium)
SRM7500 - Instructions for Use
SRM7500 - Instructions for Use
19
5 When you would like to fix other keys for this device, select Yes,
press
and repeat step 4.
-orWhen all keys are fixed, select No and press
menu.
to return to the Setup
Note Fixing a key overwrites the key’s data that was stored in your SRM7500.
This means that if this key is used in an activity this will also change.
Add a function
You can add extra functions to your SRM7500.
1
2
3
4
Select the option Add a function in the Setup menu and press
Select the device you want to add a function to.
Select the label you want to use for the extra function.
Learn the function from your original remote.
.
The extra function is added to your remote control. You can access the
extra functions by pressing
.
Show details
You can check the status of the connection of your SRM7500.
1 Select the option RF Settings in the Setup menu by using the cursor
keys and press
.
2 Select Show details and press
.
The name of the connected PC and the strength of the signal appear.
3 Select Next and press
to return to the Setup menu.
Note When the details of the RF Settings show No Connection, the remote
was unable to connect to your PC.
Refer to chapter ‘Troubleshooting’ on page 24 to solve the problem.
Reconnect to PC
When you want to use your remote with another PC or in case of
technical problems, you plug out the dongle, plug it in the (new) PC,
install the software and reconnect the remote to the PC.
1 Select the option RF Settings in the Setup menu by using the cursor
keys and press
.
2 Select Reconnect to PC and press
© 2007 - Philips Innovative Applications, Interleuvenlaan 74-76, 3001 Leuven (Belgium)
.
SRM7500 - Instructions for Use
20
SRM7500 - Instructions for Use
3 Select Next and press
to return to the Setup menu.
You will no longer find the option RF settings in the Setup menu.
Add an Activity
An activity consists of several key presses that will be sent out by your
remote control when you select the activity. You can add up to
8 activities to your SRM75000. One activity can contain maximum
25 steps.
By default the SRM7500 inserts a delay of 0,6 sec between every key
press to make sure your devices are responding correctly to the signals.
You can overwrite this default delay.
■ If one of your devices needs a longer delay before receiving the
next IR signal, you can insert a delay of 1 or 3 seconds. Replacing the
default delay counts as a step in the activity.
■ If an activity needs no delay between the different key presses to
simulate a long key press, you can add the option ‘no delay’.
For example: When you would like to turn the volume up during an activity by
pressing 4 times the Volume Up key, you do not need to insert
delays between these 4 key presses. Between each step you add
the option ‘no delay’.
1 Select the option Add an Activity in the Setup menu by using the
cursor keys and press
.
Note If you already added 8 activities, you will be asked to delete an activity.
Refer to page 21 on how to delete an activity.
2 Select the label you want to use for the activity and press
.
3 Follow the onscreen instructions to create an activity.
1 Select the device, press
and press the required key, to insert a
key press.
2 Select the delay you want to add and press
.
After adding a step to your activity, the following screen appears.
© 2007 - Philips Innovative Applications, Interleuvenlaan 74-76, 3001 Leuven (Belgium)
SRM7500 - Instructions for Use
SRM7500 - Instructions for Use
21
4 When you want to add another key press to the activity, select Yes,
press
and repeat step 3.
Keep in mind that an activity contains maximum 25 steps.
-orWhen you added all key presses and delays, select No and press
The activity is installed on your remote control.
5 Select Exit and press
.
to return to the Setup menu.
Tip You start up the activity by pressing
repeatedly until the activity name
appears in the header of the SRM7500 screen and press
.
Delete an Activity
You can delete an activity from your remote control.
1 Select the option Delete an activity in the Setup menu by using the
cursor keys and press
.
2 Select the activity you want to delete and press
.
3 Confirm you want to delete the activity by selecting Yes and
press
.
The activity is deleted and becomes available again in the list of activities
you can add.
4 Select Exit and press
to return to the Setup menu.
Change Language
You can change the language of the instructions on your remote to one
of the following languages:
■
■
■
■
■
■
English
Español
Français
Deutsch
Nederlands
Italiano
1 Select the option Change language in the Setup menu by using the
cursor keys and press
.
2 Select your preferred language and press
.
The Setup menu appears on the screen in your preferred language.
© 2007 - Philips Innovative Applications, Interleuvenlaan 74-76, 3001 Leuven (Belgium)
SRM7500 - Instructions for Use
22
SRM7500 - Instructions for Use
Change Display Time Out
To save power, your SRM7500 will switch off when it is not used for a
while. This is the display time out. You can change this time out to one
of the following:
■ Short
■ Medium
■ Long
1 Select the option Display time out in the Setup menu by using the
cursor keys and press
.
2 Select the preferred display time out and press
.
The time out is changed for your remote control. The Setup menu
appears on the screen.
Note The display time out has an impact on the lifetime of the batteries, the
longer the backlight stays on, the faster the batteries will be drained.
Copy Volume
After adding devices, the SRM7500 automatically copies the Volume keys
and Mute key, as follows:
■ Video devices, like DVD, DVDR, VCR and Satellite box, use the
Volume keys of the TV (provided that you have programmed a TV).
■ Audio devices, like CD, DMR and Tuner, use the Volume keys of the
Amplifier or Receiver (provided that you have programmed an
Amplifier or Receiver).
Note By default your PC uses the Volume settings of Microsoft Windows.
These Volume keys cannot be copied to another device. You can, however,
copy the Volume keys of another device, e.g. amplifier, to the PC.
When no TV or amplifier are installed, the Volume keys will not send
codes. When the source device is added later on, the Volume keys will
be automatically updated.
You can change which Volume keys are used, for instance when you
want to use the Volume keys of the Amplifier for the DVD.
1 Select the option Copy volume in the Setup menu by using the cursor
keys and press
.
2 Select the device you want to copy the Volume keys from (e.g. TV or
AMP or RECEIVER) and press
.
© 2007 - Philips Innovative Applications, Interleuvenlaan 74-76, 3001 Leuven (Belgium)
SRM7500 - Instructions for Use
SRM7500 - Instructions for Use
23
3 Select the device you want to copy the Volume keys to (e.g. DVD or
SAT) and press
.
4 Confirm you want to copy the Volume keys from one device to the
other by selecting Yes and press
.
The Volume keys and Mute key are copied.
5 Select Exit and press
to return to the Setup menu.
Full Reset
You can reset the SRM7500 completely, deleting all programmed
devices, activities, learned keys and other settings. After the reset, you
will have to configure your remote again.
1 Select the option Full reset in the Setup menu by using the cursor
keys and press
.
2 Confirm you want to perform a full reset by selecting Yes and
press
.
3 Press
to reconfirm.
The remote control deletes all settings. When the full reset is ended,
the remote re-initializes.
If you will use the same PC you used before the full reset, you can
start immediately configuring the remote, as described on page 5, just
press
.
If you will use a new PC, you need to prepare the PC you would like to
control with the SRM7500, as described on page 4.
© 2007 - Philips Innovative Applications, Interleuvenlaan 74-76, 3001 Leuven (Belgium)
SRM7500 - Instructions for Use
24
SRM7500 - Instructions for Use
Support
Troubleshooting
Preparing your PC
Problem
Cause
Solution
I cannot install
MediaControl
Software
You need
administrator
rights to install the
software.
The software needs to be installed
by an administrator account. Once
the software is installed, all
accounts can use the remote.
The MediaControl
icon is orange:
The PC is not
configured to
connect to the
remote.
■
■
If the RF Settings option is
not available in the Setup
menu, press
on your
SRM7500 to start the wizard
and follow the onscreen
instructions.
If the RF Settings option is
available in the Setup menu,
reconnect the remote to
the PC. Refer to chapter
‘Reconnect to PC’ on page 19.
Configuring the SRM7500
Problem
Cause
Solution
‘No PC found’
Your remote is not
close enough within
range of the PC.
Move closer, up to 3 feet (1m) of
the PC and press
to try
again.
‘Cannot connect to
PC’ appears on the
SRM7500 screen.
Your PC is not
configured to
connect to the
remote.
Reconnect the remote to the PC.
Refer to chapter ‘Reconnect to PC’
on page 19.
© 2007 - Philips Innovative Applications, Interleuvenlaan 74-76, 3001 Leuven (Belgium)
SRM7500 - Instructions for Use
SRM7500 - Instructions for Use
Problem
I cannot find my
brand in the list of
the selected device.
Cause
Not all brands are
available in the
database.
Solution
When your brand is not in the
list, you select Not in list and
■
■
I cannot find my
brand in the list of
the selected device.
The brands are
divided per device
and you could be
looking in the wrong
device.
■
■
■
■
■
■
■
© 2007 - Philips Innovative Applications, Interleuvenlaan 74-76, 3001 Leuven (Belgium)
25
You can perform a full
database search. This way the
remote will test all codes that
are available on the remote.
This can take up to 25 minutes.
You can learn the keys from
the original remote control of
the device to SRM7500.
Refer to chapter ‘Fix a Key’ on
page 17.
STB contains the different settop boxes for Satellite and
DVB-T
AUDIO SET contains the
tuner-amplifier combination and
CD or DVD in some cases
HTS contains the home theater
systems
PVR contain personal video
recorders and hard disc
recorders
DMR contains Digital Media
receivers
TV-VCR, TV-DVD, DVD-VCR
DVD-HDD contain
combination devices
GAME contains the DVD
playback functions of the game
consoles e.g. Xbox and Play
Station
SRM7500 - Instructions for Use
26
SRM7500 - Instructions for Use
Problem
Cause
I want to quit the
installation
wizard.
Solution
To quit the installation wizard you
press
or
once.
■
■
When you did not yet install a
connection to the PC, the
remote will restart the wizard
on your SRM7500.
When you installed the
connection to the PC already,
the remote will turn into the
music controller. To install a
device, you need to add each
device individually like
described in chapter ‘Add a
Device’ on page 16.
Enjoying Your SRM7500
Problem
Cause
The No Connection The SRM7500 is too
far from the PC to
icon
blinks in
the upper right-hand set up a connection.
corner of the screen.
Solution
The SRM7500 should be
maximum 33 ft (10 m) from the
PC. Obstructions in the path from
the remote to the PC can reduce
this distance.
The PC is not
powered.
Turn on your PC.
The PC is in standby
mode.
It can take a while for the PC to
start up after standby mode.
During start-up, you will see the
No Connection icon blinking on
the remote.
The MediaControl
software is disabled.
Check the icon in the taskbar.
When the icon
is blue, the
software is disabled.
To enable the software, right-click
the icon in the taskbar and select
Enable. The icon will turn
green
.
© 2007 - Philips Innovative Applications, Interleuvenlaan 74-76, 3001 Leuven (Belgium)
SRM7500 - Instructions for Use
SRM7500 - Instructions for Use
Problem
Cause
The No Connection The USB transceiver
is disconnected.
icon
blinks in
the upper right-hand
corner of the screen.
27
Solution
When the MediaControl icon
in the taskbar is red, the USB
transceiver is disconnected from
the PC.
Remove the USB transceiver from
your PC, wait a few seconds and
insert it again. The icon should
change color.
Another radiant
device, e.g. a
microwave oven, is
placed near the PC
and interferes with
the signals of the
remote.
Turn off the devices placed in the
neighborhoud of the PC that
could cause the interference and
try connecting again.
The connection to
the remote on your
PC may be lost
because you
formatted your PC
or uninstalled the
driver.
Renew the connection to the
remote.
1
2
One or more keys
are not working
correctly.
Prepare your PC by installing
the software and USB
transceiver again. Refer to
chapter ‘Preparing Your PC’ on
page 4.
Reconnect the remote to
the PC. Refer to chapter
‘Reconnect to PC’ on page 19.
The specific function
is not available on
the original remote
control.
Keep in mind that SRM7500 has
only hard keys. This means that
only the hard keys on SRM7500
that have a function in the device
will work.
The code behind the
key is defect.
You can fix keys from your
original remote control. Refer to
chapter ‘Fix a Key’ on page 17.
Some keys have
device specific
functions.
Refer to chapter ‘Device specific
keys’ on page 12 for more
information.
© 2007 - Philips Innovative Applications, Interleuvenlaan 74-76, 3001 Leuven (Belgium)
SRM7500 - Instructions for Use
28
SRM7500 - Instructions for Use
Problem
The Volume keys
are not working
properly.
Cause
The default source
device for your
device is not
installed.
Solution
After adding devices, the SRM7500
automatically copies the Volume
keys and Mute key, as follows:
■
Video devices, like DVD,
DVDR, VCR and Satellite box,
use the Volume keys of the TV.
■ Audio devices, like CD, DMR
and Tuner, use the Volume keys
of the Amplifier or Receiver.
If you did not install the source
device, the Volume keys and the
Mute key will not work.
You can choose to install the
source device on your remote.
Refer to page 16.
Or you can choose to copy the
Volume keys of another source
device. Refer to page 22.
I cannot see all the
music that is available
on my PC on my
SRM7500 screen.
Only music that is
Save the music, available on your
available in the
PC in the library of your selected
library of your
media player.
selected media player
is shown on the
remote.
I cannot wake-up the
SRM7500 anymore.
The battery level is
too low.
© 2007 - Philips Innovative Applications, Interleuvenlaan 74-76, 3001 Leuven (Belgium)
Take out the batteries and insert
new batteries.
SRM7500 - Instructions for Use
SRM7500 - Instructions for Use
29
Advanced features
Problem
Cause
Solution
I want to add a PC
after initial
installation.
I want to replace my
connected PC by a
new one.
Prepare the new PC as
described in ‘Preparing Your PC’ on
page 4.
You can only have
one PC connected to
your remote.
1
2
Prepare the new PC like
described in ‘Preparing Your PC’
on page 4. You do not need to
re-insert the batteries.
Reconnect to PC via the
Setup Menu. Refer to page 19.
Need Help?
If you have any questions about the SRM7500, you can always contact us.
You will find our contact details on page 30 of this Instructions for Use.
Read this Instruction for Use carefully before you contact us.
When you call our helpline, make sure the device is at hand so that our operators
can help you determine whether your remote control is working properly.
The model number of your Philips universal remote control is SRM7500.
Date of purchase:
......../......../........ (day/month/year)
Documentation concept and elaboration:
Human Interface Group, De Regenboog 11, 2800 Mechelen, Belgium www.higroup.com
© 2007 - Philips Innovative Applications, Interleuvenlaan 74-76, 3001 Leuven (Belgium)
SRM7500 - Instructions for Use
30
SRM7500 - Instructions for Use
Service - Website & Helpline
Help Center
www.philips.com/URC
Helpline
Country
Phone number
Tariff
België/Belgique
070 253 011
€ 0,17
Danmark
35258758
Local takst
Deutschland
0180 5 007 533
€ 0,12
España
902 889 343
€ 0,15
France
08 9165 0007
€ 0,23
Ireland
01 6011158
Local tariff
Italia
199 404 043
€ 0.25
Luxembourg
40 6661 5645
Tarif local
Nederland
0900 0400 062
€ 0.20
Norge
22 70 82 58
Lokal takst
Östereich
0820 901116
Lokaler Tarif
Portugal
2 1359 1441
Preço de chamada local
Suisse/die Schweiz
044 212 00 45
Tarif local/Lokaler Tarif
Suomi
09 2294 8258
Paikallinen puhelumaksu
Sverige
08 7505196
Lokal taxa
United Kingdom
0906 1010 018
£ 0.15
United States
+1 919 573 7854
charges apply
© 2007 - Philips Innovative Applications, Interleuvenlaan 74-76, 3001 Leuven (Belgium)
SRM7500 - Instructions for Use
SRM7500 - Instructions for Use
31
IFU Approbation/Safety Content SRM7500
FCC Compliancy
This device complies with Part 15 of the FCC Rules. Operation is subject to the following two conditions:
■ This device should not cause harmful interference.
■ This device must accept any interference received, including interference that may cause undesired operation.
This equipment has been tested and found to comply with the limits for a Class B digital device, pursuant to part
15 of the FCC rule and ICES 003 in Canada.
These limits are designed to provide reasonable protection against harmful interference in residential installations.
This equipment generates, uses, and can radiate radio frequency energy and, if not installed and used in accordance
with the instructions, may cause harmful interference to radio communications.
However, there is no guarantee that interference will not occur in a particular installation. If the equipment does
cause harmful interference to radio or television reception, which can be determined by turning thee equipment off
and on, the user is encouraged to try to correct the interference by using one or more of the following measures:
■ Reorient or relocate the receiving antenna.
■ Increase the separation between the equipment and receiver.
■ Connect the equipment into to an outlet on a different circuit from the receiver.
■ Consult the dealer or an experienced radio/TV technician for help.
CAUTION:
User changes or modifications not expressly approved by the party responsible for compliance may
void the user’s authority to operate the equipment.
CE Regulations According to R&TTE
Declaration of Conformity
Hereby, Philips Consumer Electronics, BL Remote Control declares under his responsibility that the product
SRM7500 is in compliance with the essential requirements and other relevant provisions of Directive 1999/5/EC:
■ EMC Radio: ETSI EN 300 328
■ EMC: ETSI EN 301 489-17
■ Safety: EN60950-1: 2001
Name & Signature,
Werner van Eck
Dutch
Hierbij verklaart, Philips Consumer Electronics, Business Line Remote Control dat het toestel SRM7500 in overeenstemming is met de
essentiële eisen en de andere relevante bepalingen van richtlijn 1999/5/EG.
French
Par la présente, Philips Consumer Electronics, Business Line Remote Control, déclare que l’appareil SRM7500 est conforme aux exigences
essentielles et aux autres dispositions pertinentes de la directive 1999/5/CE
Swedish
Härmed intygar, Philips Consumer Electronics, Business Line Remote Controll, att denna SRM7500 står I överensstämmelse med de
väsentliga egenskapskrav och övriga relevanta bestämmelser som framgår av direktiv 1999/5/EG.
Danish
Undertegnede Philips Consumer Electronics, Business Line Remote Control erklærer herved, at følgende udstyr SRM7500 overholder de
væsentlige krav og øvrige relevante krav i direktiv 1999/5/EF
German
Hiermit erklärt Philips Consumer Electronics, Business Line Remote Control die Übereinstimmung des Gerätes SRM7500 mit den
grundlegenden Anforderungen und den anderen relevanten Festlegungen der Richtlinie 1999/5/EG.
Italian
Con la presente Philips Consumer Electronics, Business Line Remote Control dichiara che questo SRM7500 è conforme ai requisiti
essenziali ed alle altre disposizioni pertinenti stabilite dalla direttiva 1999/5/CE.
Spanish
Por medio de la presente, Philips Consumer Electronics, Business Line Remote Control, declara que el SRM7500 cumple con los requisitos
esenciales y cualesquiera otras disposiciones aplicables o exigibles de la Directiva 1999/5/CE
Portuguese
Philips Consumer Electronics, Business Line Remote Control declara que este SRM7500 está conforme com os requisitos essenciais e
outras disposições da Directiva 1999/5/CE.
© 2007 - Philips Innovative Applications, Interleuvenlaan 74-76, 3001 Leuven (Belgium)
SRM7500 - Instructions for Use
SRM7500 - Instructions for Use
32
Only for Europe- WEEE Regulation:
DK
Bortskaffelse af dit gamle produkt
Dit produkt er konstrueret med og produceret af materialer og
komponenter af høj kvalitet, som kan genbruges.
Når dette markerede affaldsbøttesymbol er placeret på et
produkt betyder det, at produktet er omfattet af det
europæiske direktiv 2002/96/EC.
Hold dig orienteret om systemet for særskilt indsamling af
elektriske og elektroniske produkter i dit lokalområde. Overhold
gældende regler, og bortskaf ikke dine gamle produkter sammen med dit
almindelige husholdningsaffald. Korrekt bortskaffelse af dine gamle
produkter er med til at skåne miljøet og vores helbred.
NL
Verwijdering van uw oude product
Uw product is vervaardigd van kwalitatief hoogwaardige
materialen en onderdelen, welke gerecycled en opnieuw
gebruikt kunnen worden.
Als u op uw product een doorstreepte afvalcontainer op
wieltjes ziet, betekent dit dat het product valt onder de EUrichtlijn 2002/96/EC.
Win inlichtingen in over de manier waarop elektrische en elektronische
producten in uw regio gescheiden worden ingezameld. Neem bij de
verwijdering van oude producten de lokale wetgeving in acht en plaats
deze producten niet bij het gewone huishoudelijke afval. Als u oude
producten correct verwijdert voorkomt u negatieve gevolgen voor het
milieu en de volksgezondheid.
FI
Vanhan tuotteen hävittäminen
Tuotteesi on suunniteltu ja valmistettu laadukkaista
materiaaleista ja komponenteista, jotka voidaan kierrättää ja
käyttää uudelleen.
Tuotteeseen kiinnitetty yliviivatun roskakorin kuva tarkoittaa,
että tuote kuuluu Euroopan parlamentin ja neuvoston direktiivin
2002/96/EC soveltamisalaan.
Ota selvää sähkölaitteille ja elektronisille laitteille tarkoitetusta
kierrätysjärjestelmästä alueellasi. Noudata paikallisia sääntöjä äläkä hävitä
vanhoja tuotteita tavallisen talousjätteen mukana. Vanhojen tuotteiden
hävittäminen oikealla tavalla auttaa vähentämään ympäristölle ja ihmisille
mahdollisesti koituvia haittavaikutuksia.
FR
Mise au rebut des produits en fin de vie
Ce produit a été conçu et fabriqué avec des matériaux et
composants recyclables de haute qualité.
Le symbole d’une poubelle barrée apposé sur un produit
signifie que ce dernier répond aux exigences de la directive
européenne 2002/96/EC.
Informez-vous auprès des instances locales sur le système de
collecte des produits électriques et électroniques en fin de vie.
Conformez-vous à la législation en vigueur et ne jetez pas vos produits
avec les déchets ménagers. Seule une mise au rebut adéquate des
produits peut empêcher la contamination de l’environnement et ses effets
nocifs sur la santé.
DE
Entsorgung Ihres alten Geräts
Ihr Gerät wurde unter Verwendung hochwertiger Materialien
und Komponenten entwickelt und hergestellt, die recycelt und
wieder verwendet werden können.
Befindet sich dieses Symbol (durchgestrichene Abfalltonne auf
Rädern) auf dem Gerät, bedeutet dies, dass für dieses Gerät die
Europäischen Richtlinie 2002/96/EG gilt.
Informieren Sie sich über die geltenden Bestimmungen zur getrennten
Sammlung von Elektro- und Elektronik-Altgeräten in Ihrem Land. Richten
Sie sich bitte nach den geltenden Bestimmungen in Ihrem Land, und
entsorgen Sie Altgeräte nicht über Ihren Haushaltsabfall. Durch die
korrekte Entsorgung Ihrer Altgeräte werden Umwelt und Menschen vor
möglichen negativen Folgen geschützt.
IT
Smaltimento di vecchi prodotti
Il prodotto è stato progettato e assemblato con materiali e
componenti di alta qualità che possono essere riciclati e
riutilizzati.
Se su un prodotto si trova il simbolo di un bidone con ruote,
ricoperto da una X, vuol dire che il prodotto soddisfa i requisiti
della Direttiva comunitaria 2002/96/CE.
Informarsi sulle modalità di raccolta, dei prodotti elettrici ed elettronici, in
vigore nella zona in cui si desidera disfarsi del prodotto. Attenersi alle
normative locali per lo smaltimento dei rifiuti e non gettare i vecchi
prodotti nei normali rifiuti domestici. Uno smaltimento adeguato dei
prodotti aiuta a prevenire l’inquinamento ambientale e possibili danni alla
salute.
NO
Avhending av gamle produkter
Produktet er utformet og produsert i materialer og
komponenter av høy kvalitet, som kan resirkuleres og brukes
på nytt.
Når denne søppelbøtten med kryss på følger med et produkt,
betyr det at produktet dekkes av det europeiske direktivet
2002/96/EU.
Finn ut hvor du kan levere inn elektriske og elektroniske produkter til
gjenvinning i ditt lokalmiljø. Overhold lokale regler, og ikke kast gamle
produkter sammen med husholdningsavfallet. Riktig avhending av de gamle
produktene dine vil hjelpe til med å forhindre potensielle negative
konsekvenser for miljøet og menneskers helse.
PT
Eliminação do seu antigo produto
O seu produto foi desenhado e fabricado com matérias-primas
e componentes de alta qualidade, que podem ser reciclados e
reutilizados.
Quando este símbolo, com um latão traçado, está afixado a um
produto significa que o produto é abrangido pela Directiva
Europeia 2002/96/EC.
Informe-se acerca do sistema de recolha selectiva local para produtos
eléctricos e electrónicos. Aja de acordo com os regulamentos locais e não
descarte os seus antigos produtos com o lixo doméstico comum. A
correcta eliminação do seu antigo produto ajuda a evitar potenciais
consequências negativas para o meio ambiente e para a saúde pública.
ES
Desecho del producto antiguo
El producto se ha diseñado y fabricado con materiales y
componentes de alta calidad, que se pueden reciclar y volver a
utilizar.
Cuando este símbolo de contenedor de ruedas tachado se
muestra en un producto indica que éste cumple la directiva
europea 2002/96/EC.
Obtenga información sobre la recogida selectiva local de productos
eléctricos y electrónicos. Cumpla con la normativa local y no deseche los
productos antiguos con los desechos domésticos. El desecho correcto del
producto antiguo ayudará a evitar consecuencias negativas para el
medioambiente y la salud humana.
SE
Kassering av din gamla produkt
Produkten är utvecklad och tillverkad av högkvalitativa material
och komponenter som kan både återvinnas och återanvändas.
När den här symbolen med en överkryssad papperskorg visas
på produkten innebär det att produkten omfattas av det
europeiska direktivet 2002/96/EG.
Ta reda på var du kan hitta närmaste återvinningsstation för
elektriska och elektroniska produkter. Följ de lokala reglerna och släng inte
dina gamla produkter i det vanliga hushållsavfallet. Genom att kassera dina
gamla produkter på rätt sätt kan du bidra till att minska eventuella
negativa effekter på miljö och hälsa.
NO
Avhending av gamle produkter
Produktet er utformet og produsert i materialer og
komponenter av høy kvalitet, som kan resirkuleres og brukes
på nytt.
Når denne søppelbøtten med kryss på følger med et produkt,
betyr det at produktet dekkes av det europeiske direktivet
2002/96/EU.
Finn ut hvor du kan levere inn elektriske og elektroniske produkter til
gjenvinning i ditt lokalmiljø. Overhold lokale regler, og ikke kast gamle
produkter sammen med husholdningsavfallet. Riktig avhending av de gamle
produktene dine vil hjelpe til med å forhindre potensielle negative
konsekvenser for miljøet og menneskers helse.
© 2007 - Philips Innovative Applications, Interleuvenlaan 74-76, 3001 Leuven (Belgium)
SRM7500 - Instructions for Use