1
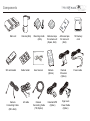
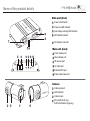
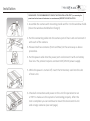
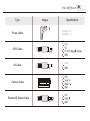
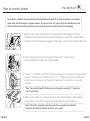
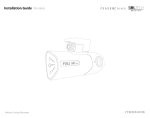
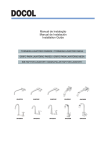
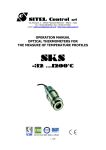
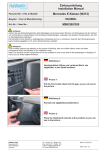
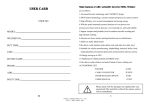
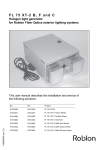
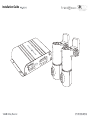
Installation Guide
Components
Main unit
SD card reader
Camera
Connecting Cable
(5M x 2EA)
Camera (2EA)
Mounting cradle
(2EA)
Cable holder
User manual
AV cable
Camera
Connecting Cable
(7M, Option)
Adhesive tape
for camera unit
(Spare, 2EA)
Remote
(Option)
External GPS
(Option)
Adhesive tape
for main unit
(2EA)
Remote
IR sensor
(Option)
Cigar ack
Power Cable
(Option)
SD memory
card
Power cable
Name of the product details
Main unit (front)
Power on/off switch
Power-on LED indicator
Low battery warning LED indicator
GPS status indicator
SD memory card slot
Main unit (back)
Front camera port
Rear camera port
IR receiver port
AV cable port
External GPS port
Power cable input port
Camera
Cable input port
LED indicator
Camera Lens
Mic on/off (short key)
Self format button (long key)
Installation
PLEASE NOTE: IT IS RECOMMENDED TO CHECK THE PRE-INSTALLATION TEST (i.e. connecting the
power from the fuse boxes to the devices in a casual manner) BEFORE THE INSTALLATION.
1. Assemble the camera with mounting cradle and fix it to the window shield.
(Clean the window shield before fixing it)
2. Put the connecting cable into the camera port of main unit and connect it
with each of the camera.
3. Please install two cameras (Front and Rear) in the same way as above
procedure.
4. Put the power cable into the power port and connect it with car battery
fuse box. The product requires constant 12V/24V DC power supply.
5. While the power is turned off, insert the SD memory card into the slot
of main unit.
6. Check all connections and power on the unit for operation to run
a TEST to make sure the system is functioning properly. After the
test is complete you can continue to mount the main control unit
and arrange cameras (see next page).
Installation
7. Fix the main unit to a suitable, accessible location with some ventilation.
Use the provided 3M tape or mount with screws so the install is secure.
8. Align the direction of the camera lens to the front. Please refer to the camera
alignment guide (arrow mark printed on each camera).
9. Connect the GPS receiver (optional) to the correct port on the main control
unit and mount receiver so it has a clear view of the sky (do not mount
behind dark tint strips or close to metal).
10. Arrange all cables with cable holders to provide a neat installation.
Check all connections at the main control unit to ensure all the correct
ports have been used.
11. Power on the unit for normal operation. Installation is now complete.
When the external GPS receiver is installed, please make
the GPS receiver face up to the sky and fully exposed
through the windshield. Then, put the GPS received cable
into the GPS port of main unit.
Type
Power Cable
Images
Specifications
Diameter: 3.5
Diameter: 1.3
GPS Cable
AV Cable
Camera Cable
Remote IR Sensor Cable
Video
How to connect power
This product is available to be connected with Uninterrupted-Power Cable (UPC) for using the product as a surveillance
camera when the vehicle engine is stopped. However, when you connect UPC, you are highly recommended to use our
authentic UPC which has battery protection circuit in order to prevent the vehicle battery from discharging.
1. Open fuse box inside of the vehicle and, by using electric testing device such as a
multimeter, find the permanent fuse which the power (constant 12V) is supllied when
the engine is off (For example, emergency flasher lights, interior lights and door lights etc.).
2. Pull out the fuse and connect one leg of the fuse with "+" end (red wire
power cable and insert back into original position.
3. Connect "-" end (black wire) of UPC to the any metal part of the vehicle. that is grounded
(check for 12V with your multimeter from "+" to "-" If there is no screw attached to the
vehicle, you must screw one on the vehicle, make sure the connection is secure and
not loose.
* Note: The unit will not work if the black wire is not properly connected to "-" ground on
the car metal chassis.
4. Make sure the product is working properly after the vehicle engine is started (when)
the ignition is on) and then arrange and hide the cables for neat installation.
* Note: When UPS is connected, please check your SD on a regular basis (Extend the
life of your SD card by formatting it more than once a week).
ITRONICS
VIDEOS