1
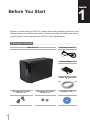
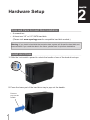
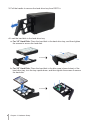
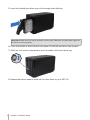
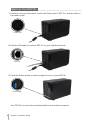
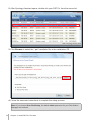
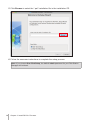
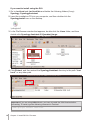
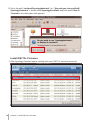
Disk Station DS710+
Quick Installation Guide
DS710+12042009
3
3
4
Chapter 1: Before You Start
5
5
5
9
Chapter 2: Hardware Setup
Package Contents
Safety Instructions
Tools and Parts for Hard Disk Installation
Install Hard Disks
Start Up Your DS710+
10 Chapter 3: Install DS710+ Firmware
10 Install from Windows
12 Install from Mac OS X
14 Install from Linux
17 Learn More
2
TOC
Table of Contents
1
Before You Start
Before you start setting up DS710+, please check the package contents to verify
that you have received the items below. Please also read the safety instructions
carefully before use to prevent your DS710+ from any damages.
Package Contents
Main Unit x 1
AC Power Cord x 1
Power Adapter x 1
2M RJ-45 LAN Cable
x1
Screws for 2.5" Hard
Drives x 10
3
Screws for 3.5" Hard
Drives x 10
Installation CD x 1
Safety Instructions
Keep away from direct sunlight and away from chemicals. Make sure
the environment does not experience abrupt changes in temperature
or humidity.
Keep Synology product upright. Do not lay it down horizontally.
Do not place the Synology product close to any liquid.
Before cleaning, unplug the power cord first. Wipe Synology product
with damp paper towels. Do not use chemical or aerosol cleaners to
clean it.
Do not place the Synology product on a cart, table, or desk, which is
not stable to avoid the product from falling over.
The power cord must plug in to the right supply voltage. Make sure
that the supplied AC voltage is correct and stable.
4
Chapter 1: Before You Start
Hardware Setup
2
Tools and Parts for Hard Disk Installation
• A screwdriver
• At least one 3.5” or 2.5” SATA hard disk
(Please visit www.synology.com for compatible hard disk models.)
Warning: If you install a hard disk that contains data, system will format the hard disk and
erase all data. If you need the data in the future, please back it up before installation.
Install Hard Disks
1 Slide the Lock switch upward to unlock the handle of one of the hard drive trays.
2 Press the lower part of the hard drive tray to pop out the handle.
Press to
pop out the
handle.
5
3 Pull the handle to remove the hard drive tray from DS710+.
4 Load the hard disk in the hard drive tray.
a For 3.5” Hard Disk: Place the hard disk in the hard drive tray, and then tighten
the screws to secure the hard disk.
b For 2.5” Hard Disk: Place the hard disk in the blue area (shown below) of the
hard drive tray, turn the tray upside down, and then tighten the screws to secure
the hard disk.
6
Chapter 2: Hardware Setup
5 Insert the loaded hard drive tray into the empty hard disk bay.
Important: Make sure the tray is pushed in all the way. Otherwise, the hard disk might not
be able to function properly.
6 Press the handle in flush with the front panel to hold the hard drive tray in place.
7 Slide the Lock switch downward to lock the handle of the hard drive tray.
8 Repeat the above steps to install all the other disks on your DS710+.
7
Chapter 2: Hardware Setup
9 The disk position is numbered as shown below (starting from left): HDD1 and
HDD2, respectively.
1
12
2
Note: If you want to set up a RAID set, it is recommended that all installed hard disks are
of the same size to make the best use of hard disk capacity.
8
Chapter 2: Hardware Setup
Start Up Your DS710+
1 Connect one end of the power cord to the Power port of DS710+, and the other to
the power outlet.
Power Port
2 Use the LAN cable to connect DS710+ to your switch/router/hub.
LAN Port
3 Push the Power button on the front panel to turn on your DS710+.
Power Button
Your DS710+ is now online and detectable from a network computer.
9
Chapter 2: Hardware Setup
Install DS710+ Firmware
On a network computer, follow the steps in this chapter to install the system
firmware for your DS710+. After the firmware is installed, you can manage all
features of your DS710+ by logging into the Disk Station Manager with a web
browser.
Install from Windows
1 Insert the installation CD into your computer, and then choose Set up the
Synology Server from the autorun menu.
10
3
2 After Synology Assistant opens, double-click your DS710+ from the server list.
3 Click Browse to select the “.pat” installation file in the installation CD.
4 Follow the onscreen instructions to complete the setup process.
Note: If you choose One-Click Setup, the default admin password for your Disk Station
Manager will be blank.
11
Chapter 3: Install DS710+ Firmware
Install from Mac OS X
1 Insert the installation CD into your computer, and then double-click the
SynologyInstall icon on the desktop.
2 In the window that appears, double-click the MacOSX folder, and then double-click
Synology Assistant-2.2-[number].dmg.
3 Double-click the Synology Assistant.app in the window that appears.
4 After Synology Assistant opens, double-click your DS710+ from the server list.
12
Chapter 3: Install DS710+ Firmware
5 Click Browse to select the “.pat” installation file in the installation CD.
6 Follow the onscreen instructions to complete the setup process.
Note: If you choose One-Click Setup, the default admin password for your Disk Station
Manager will be blank.
13
Chapter 3: Install DS710+ Firmware
Install from Linux
The Linux version is optimized for Ubuntu distribution version 8 and 9. You can
still try installation on other Linux distributions (for evaluation purpose only).
Install and Run Synology Assistant
You can install and run Synology Assistant using the command lines or the GUI.
If you want to install using the command lines:
Run the script install.sh in the Linux folder of the installation CD, which will guide
you through the steps below.
1 Remove the beta version of Synology Assistant (if any).
sudo rm -rf /usr/local/Synology /usr/local/bin/SynologyAssistant
2 Extract SynologyAssistant-2.2-[number].tar.gz to the directory you want, such
as “/usr/local” or “.”
tar -C ./ -zxvf SynologyAssistant-2.2-[number].tar.gz
3 If you are using 64bit Ubuntu, install the 32bit libraries.
sudo apt-get install ia32-libs
4 Create the shortcut to “/usr/local/bin”.
sudo ln -sf /path/install/SynologyAssistant/SynologyAssistant \
/usr/local/bin/SynologyAssistant
5 To run Synology Assistant, you can either use the following command:
/path/install/SynologyAssistant/SynologyAssistant
Or run the shortcut:
/usr/local/bin/SynologyAssistant
If “/usr/local/bin” exists in your environment variable $PATH, just type:
SynologyAssistant
14
Chapter 3: Install DS710+ Firmware
If you want to install using the GUI:
1 Go to /usr/local and /usr/local/bin and delete the following folders (if any):
Synology, SynologyAssistant
2 Insert the installation CD into your computer, and then double-click the
SynologyInstall icon on the desktop.
3 In the File Browser window that appears, double-click the Linux folder, and then
double-click Synology Assistant-2.2-[number].tar.gz.
4 Click Extract, and then extract the SynologyAssistant directory to the path “/usr/
local” or any other path.
Important: If you are using 64bit Ubuntu, you have to install the 32bit libraries before
proceeding. To install, type the following command in Terminal:
sudo apt-get install ia32-libs
15
Chapter 3: Install DS710+ Firmware
5 Go to the path “/usr/local/SynologyAssistant” (or “ [the path you just specified]/
SynologyAssistant”), double-click SynologyAssistant, and then select Run in
Terminal in the dialog box that appears.
Install DS710+ Firmware
1 After Synology Assistant opens, double-click your DS710+ from the server list.
16
Chapter 3: Install DS710+ Firmware
2 Click Browse to select the “.pat” installation file in the installation CD.
3 Follow the onscreen instructions to complete the setup process.
Note: If you choose One-Click Setup, the default admin password for your Disk Station
Manager will be blank.
Learn More
Congratulations! Your DS710+ is set up now. Refer to the User’s Guide in the
installation CD for advanced settings and management. For more information or
online resources about your DS710+, please visit www.synology.com.
17
Chapter 3: Install DS710+ Firmware
COPYRIGHT NOTICE
All title, copyright and other intellectual property rights in and to any Synology Products, the “Products”
or “Product” (including but not limited to product design and appearance, firmware, and any relevant
media, images, photographs, animations, video, audio, music, text, and applets incorporated into the
Products), the accompanying manuals and other documents, and on-line or electronic documents, if
any, are owned by Synology Inc. Unless otherwise expressly licensed by Synology Inc. in writing, any
provision of the Products does not represent any license of any of the above rights.
Copyright © 2004-2010 Synology Inc.; All rights reserved.
TRADEMARK NOTICE
Synology and other names of Synology Products are proprietary marks or registered trademarks
of Synology Inc. Microsoft, Windows series, and Internet Explorer are trademarks of Microsoft
Corporation. Apple, Mac, Mac OS series are trademarks of Apple Computer, Inc., registered in the U.S.
and other countries. Other products and company names mentioned herein are trademarks of their
respective holders.
LIMITED WARRANTY AND LIABILITY
Synology provides a limited warranty for its Products only to the initial person or entity that originally
purchased the Product from Synology or its authorized distributor or retailer. Synology warrants that
every hardware portion of the Products will be free from physical defects in material and workmanship
within warranty period, or the Product will be repaired or replaced as determined solely by Synology.
The DS1010+, DS710+, DS509+, DS508, RS409RP+, RS409+, RS409, RS408-RP, RS408, RS407,
DX510, DX5 and RX4 have three years warranty from the purchase date. All other models purchased
before 2008/2/29 have one year warranty, and those purchased after 2008/3/1 have two years
warranty from the purchase date. If the Product proves defective during this warranty period, you
can contact the local dealer in order to obtain assistance. You must provide proof of purchase and
a bar code number from the Product's packaging when asking for assistance. Synology Products
are barebones devices so Synology makes no warranty of the hard disk installed, nor warranty on
compatibility of all hard disks.
SYNOLOGY SHALL HAVE NO LIABILITY TO YOU UNDER THIS LIMITED WARRANTY IF THE
PRODUCT IS INSTALLED AND USED IN A MANNER NOT SPECIFIED OR DESCRIBED IN THE
PRODUCT SPECIFICATIONS OR DESCRIPTION, THE PRODUCT HAS BEEN MODIFIED OR
ALTERED IN ANY WAY BY ANY PARTY OTHER THAN SYNOLOGY, OR THE FAILURE OF THE
PRODUCT TO CONFORM TO ITS SPECIFICATIONS CAN BE ATTRIBUTED TO CAUSES THAT
NOT THE RESPONSIBILITY OF SYNOLOGY.
SYNOLOGY MAKES NO WARRANTY OR REPRESENTATION, EXPRESSED, IMPLIED, OR
STATUTORY, WITH RESPECT TO ITS PRODUCTS OR THE CONTENTS OR USE OF THIS
DOCUMENTATION AND ALL ACCOMPANYING SOFTWARE, AND PARTICULARLY DISCLAIMS ITS
QUALITY OR PERFORMANCE FOR ANY PARTICULAR PURPOSE.
SYNOLOGY MAKES NO GUARANTEE THAT ALL DATA STORED ON SYNOLOGY PRODUCTS IS
ALWAYS SECURE WITHOUT ANY RISKS OF DATA LOSS. SYNOLOGY REMINDS YOU TO BACK
UP THE DATA PERIODICALLY. UNDER NO CIRCUMSTANCES SHALL SYNOLOGY BE LIABLE IN
ANY WAY TO THE USER FOR DAMAGES, INCLUDING ANY SAVINGS, LOST PROFITS OR OTHER
INCIDENTAL OR CONSEQUENTIAL DAMAGES ARISING OUT OF THE USE OF, OR INABILITY TO
USE SYNOLOGY PRODUCTS OR RESULTING LOSS OF DATA FROM SUCH USE.
THIS WARRANTY GIVES YOU SPECIFIC LEGAL RIGHTS, AND YOU MAY ALSO HAVE OTHER
RIGHTS WHICH VARY FROM STATE TO STATE (OR JURISDICTION TO JURISDICTION).
SYNOLOGY'S RESPONSIBILITY FOR MALFUNCTIONS AND DEFECTS IN HARDWARE IS
LIMITED TO REPAIR OR REPLACEMENT AS SET FOR IN THIS WARRANTY STATEMENT. FOR
CUSTOMERS, EXCEPT FOR THE EXPRESS WARRANTIES CONTAINED IN THIS WARRANTY
STATEMENT, SYNOLOGY DISCLAIMS ALL OTHER WARRANTIES AND CONDITIONS, EXPRESS
OR IMPLIED, STATUTORY OR OTHERWISE, FOR THE PRODUCT, INCLUDING BUT NOT LIMITED
18
TO ANY IMPLIED WARRANTIES AND CONDITIONS OF MERCHANTABILITY AND FITNESS FOR
A PARTICULAR PURPOSE. NO OTHER WARRANTIES, WHETHER EXPRESS OR IMPLIED,
WILL APPLY AFTER THE LIMITED WARRANTY PERIOD HAS EXPIRED. SOME STATES OR
JURISDICTIONS DO NOT ALLOW THE EXCLUSION OF CERTAIN IMPLIED WARRANTIES OR
CONDITIONS, OR LIMITATIONS ON HOW LONG AN IMPLIED WARRANTY OR CONDITION
LASTS, SO THIS LIMITATION MAY NOT APPLY TO YOU. THIS LIMITED WARRANTY COVERAGE
TERMINATES IF YOU SELL OR OTHERWISE TRANSFER THIS PRODUCT TO ANOTHER PARTY.
SYNOLOGY DOES NOT ACCEPT LIABILITY BEYOND THE REMEDIES PROVIDED FOR IN
THIS LIMITED WARRANTY OR FOR SPECIAL, INDIRECT, CONSEQUENTIAL OR INCIDENTAL
DAMAGES, INCLUDING, WITHOUT LIMITATION, ANY LIABILITY FOR THIRD-PARTY CLAIMS
AGAINST YOU FOR DAMAGES, FOR PRODUCTS NOT BEING AVAILABLE FOR USE, OR FOR
LOST DATA OR LOST SOFTWARE. SYNOLOGY'S LIABILITY SHALL NOT EXCEED THE AMOUNT
YOU PAID FOR THE PRODUCT THAT IS THE SUBJECT OF A CLAIM. THIS IS THE MAXIMUM
AMOUNT FOR WHICH SYNOLOGY IS RESPONSIBLE.
SYNOLOGY INC. PRODUCTS ARE NOT INTENDED FOR USE IN MEDICAL, LIFE SAVING, OR
LIFE SUSTAINING APPLICATIONS.
DISPUTE RESOLUTION
For the purposes of this provision, the term “Dispute” means any dispute, controversy, or claim arising
out of or relating to (i) this Agreement, its interpretation, or the breach, termination, applicability or
validity thereof, (ii) the related order for, purchase, delivery, receipt or use of any product or service
from Synology, or iii) any other dispute arising out of or relating to the relationship between You and
Synology; the term “Synology” means Synology, Inc, its parents, subsidiaries, affiliates, directors,
officers, employees, beneficiaries, agents, assigns, component suppliers (both hardware and
software), and/or any third party who provides products or services purchased from or distributed
by Synology; and the term “You” means the owner or purchaser of the Synology product, or those in
privity with you, such as family members or beneficiaries. For US customers, you and Synology agree
that any Dispute between You and Synology will be resolved exclusively and finally by arbitration
under the current commercial rules of the American Arbitration Association, except as otherwise
provided below. The arbitration will be conducted before a single arbitrator, and will be limited solely
to the dispute between You and Synology. The arbitration, or any portion of it, will not be consolidated
with any other arbitration and will not be conducted on a class-wide or class action basis. The
arbitration shall be held in King County, Washington State, United States of America by submission
of documents, by telephone, online or in person as determined by the arbitrator at the request of the
parties. The prevailing party in any U.S. or non-U.S. arbitration or other legal action shall receive all
costs and reasonable attorneys’ fees, including any arbitration fee paid by the prevailing party. Any
decision rendered in such arbitration proceedings will be final and binding on the parties, and judgment
may be entered thereon in any court of competent jurisdiction. You understand that, in the absence
of this provision, You would have had a right to litigate Disputes through a court, including the right
to litigate claims on a class-wide or class-action basis, and that You have expressly and knowingly
waived those rights and agreed to resolve any disputes through binding arbitration in accordance
with the provisions of this paragraph. For non-US customers, any Dispute shall be finally resolved
by arbitration conducted by three neutral arbitrators in accordance with the procedures of the R.O.C.
Arbitration Law and related enforcement rules. The arbitration shall take place in Taipei, Taiwan, R.O.C.,
and the arbitration proceedings shall be conducted in English or, if both parties so agree, in Mandarin
Chinese. The arbitration award shall be final and binding on the parties and may be enforced in any
court having jurisdiction.
REVISIONS
Synology reserves all rights to revise or update its Products, other products, software, or related
documentation without further notice.
Synology Inc. reserves the right to revise this publication and to make changes in the content hereof
without the obligation to notify any person of such revision or changes.
19