1
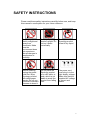
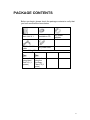
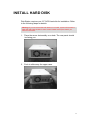
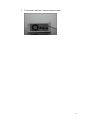
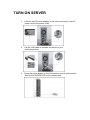
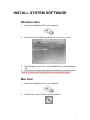
Disk Station
DS109j, DS109, DS109+
Quick Installation Guide
SAFETY INSTRUCTIONS
Please read these safety instructions carefully before use, and keep
this manual in a safe place for your future reference.
Keep away from
direct sunlight and
away from
chemicals. Make
sure the
environment does
not experience
abrupt changes in
temperature or
humidity.
Do keep Synology
product upright. Do
not lay it down
horizontally.
Do not place the
Synology product
close to any liquid.
Before cleaning,
unplug the power
cord first. Wipe
Synology product
with damp paper
towels. Do not use
chemical or aerosol
cleaners to clean it.
Do not place the
Synology product
on a cart, table, or
desk, which is not
stable to avoid the
product from falling
over.
The power cord
must plug in to the
right supply voltage.
Make sure that the
supplied AC voltage
is correct and
stable.
1
PACKAGE CONTENTS
Before you begin, please check the package contents to verify that
you have received the items below.
Main Unit X 1
Installation CD
2M RJ-45 LAN
cable
Assembling Kit
Screws for
fixing Hard
Disk X 6 (1
spares)
AC power
adapter
AC power cord
Screws for
fixing the
Synology
Case X 3 (1
spare)
2
INSTALL HARD DISK
Disk Station requires one 3.5” SATA hard disk for installation. Refer
to the following steps for details:
Warning! If you use a hard disk with data on it to install, system will format the
hard disk and erase all data in some cases. Please back up the data if you
need it in the future.
1. Place the server horizontally on a desk. The rear panel should
be facing you.
2.
Push to slide away the upper case.
3
3. Pull up the upper case.
4. Place the hard disk inside the HDD bay.
5. Fix the hard disk with the 4 HDD screws provided.
6. Attach the upper case and slide it back.
4
7. Fix the case with the 2 case screws provided.
5
TURN ON SERVER
1.
Connect the AC power adapter to the server and plug in the AC
power cord to the power outlet.
2.
Use the LAN cable to connect the server to your
switch/router/hub.
3. Press the power button on the front panel to power up the server.
Wait for the POWER LED to be constant blue.
INSTALL SYSTEM SOFTWARE
Windows User
1.
Insert the installation CD to your computer.
2. Choose Set up the Synology Server on the autorun menu.
3.
4.
Click Browse to select the “.pat” installation file in the installation
CD.
Follow the on-screen instructions to complete the setup process.
Note: If you choose One-Click Setup, the admin password will be blank.
Mac User
1.
Insert the installation CD to your computer.
2. Double click on the CD-Rom Drive thumbnail.
1
3. Double click MacOSX.
4.
Double click Synology Assistant-SYNOLOGY.dmg.
5. Double click on the automatically generated thumbnail Synology
Assistant-SYNOLOGY. dmg on the desktop.
6. Double click Synology Assistant to run the Setup Wizard.
7.
8.
Click Browse to select the “.pat” installation file in the installation
CD.
Follow the on-screen instructions to complete the setup process.
Note: If you choose One-Click Setup, the admin password will be blank.
2
CONGRATULATIONS!
Server has been set up. Refer to the User’s Guide in the installation
CD for advanced settings and management. For more information or
online resources, please visit http://www.synology.com.
3