1
USERS GUIDE
Synapse Network Appliance Protocol
SNAP
®
Reference Manual for Version 2.1
© 2007-2008. Synapse, All Rights Reserved.
All Synapse products are patent pending.
Synapse, the Synapse logo, SNAP, and Portal are all registered trademarks of Synapse
132 Export Circle
Huntsville, Alabama 35806
877-982-7888
Snap Reference Manual-v1.1 Document Number 600-0007B
Snap Reference Manual-v1.1 Document Number 600-0007B
Page 2 of 126
1.
Introduction...................................................................................................................................... 9
SNAP and SNAPpy ............................................................................................................................. 9
Portal and Gateway .............................................................................................................................. 9
Start with an “Evaluation Kit Users Guide” ...................................................................................... 10
About This Manual ............................................................................................................................ 10
Other Important Documentation ........................................................................................................ 10
2. SNAP Overview.............................................................................................................................. 12
Key features of SNAP........................................................................................................................ 12
RPC .................................................................................................................................................... 12
SNAPpy Scripting.............................................................................................................................. 13
SNAPpy Examples............................................................................................................................. 13
Portal Scripting .................................................................................................................................. 13
Python ................................................................................................................................................ 13
Portal Script Examples....................................................................................................................... 14
3. SNAPpy – The Language ............................................................................................................... 15
Statements must end in a newline...................................................................................................... 15
The # character marks the beginning of a comment .......................................................................... 15
Indentation is significant.................................................................................................................... 15
Indentation is used after statements that end with a colon (:)............................................................ 15
Branching is supported via “if”, “else”, and “elif” ............................................................................ 15
Looping is supported via “while” ...................................................................................................... 15
Identifiers are case sensitive .............................................................................................................. 16
Identifiers must start with a non-numeric characters......................................................................... 16
Identifiers may only contain alphanumeric characters and underscores ........................................... 16
Variables can be Booleans, Integers, or Strings ................................................................................ 16
String Variables can contain Binary Data.......................................................................................... 16
You define new functions using “def”............................................................................................... 16
Functions can take parameters ........................................................................................................... 16
Functions can return values ............................................................................................................... 17
Functions can do nothing ................................................................................................................... 17
Functions cannot be empty ................................................................................................................ 17
Variables at the top of your script are global..................................................................................... 17
Variables within functions are usually local….................................................................................. 17
…unless you explicitly say you mean the global one........................................................................ 17
The usual conditionals are supported................................................................................................. 18
The usual math operators are supported ............................................................................................ 18
The usual Boolean functions are supported ....................................................................................... 19
Variables do have types, but they can change on the fly ................................................................... 19
4. SNAPpy versus Python................................................................................................................... 20
Modules.............................................................................................................................................. 20
Variables ............................................................................................................................................ 20
Functions............................................................................................................................................ 20
Data Types ......................................................................................................................................... 20
Keywords ........................................................................................................................................... 21
Operators............................................................................................................................................ 21
Snap Reference Manual-v1.1 Document Number 600-0007B
Page 3 of 126
Slicing ................................................................................................................................................ 21
Concatenation .................................................................................................................................... 21
Subscripting ....................................................................................................................................... 21
Expressions ........................................................................................................................................ 21
Builtins............................................................................................................................................... 21
Print.................................................................................................................................................... 22
5. SNAPpy Application Development ................................................................................................ 23
Event Driven Programming ............................................................................................................... 23
SNAP Hooks...................................................................................................................................... 23
Transparent Data (Wireless Serial Port) ............................................................................................ 23
Scripted Serial I/O (SNAPpy STDIO)............................................................................................... 23
The Switchboard ................................................................................................................................ 24
Debugging.......................................................................................................................................... 25
Sample Application – Wireless UART.............................................................................................. 25
6. Advanced SNAPpy Application Development................................................................................ 29
Interfacing to external CBUS slave devices ...................................................................................... 29
Interfacing to external SPI slave devices ........................................................................................... 31
Interfacing to external I2C slave devices........................................................................................... 33
7. SNAPpy – The API ......................................................................................................................... 35
Alphabetical SNAP API .................................................................................................................... 35
bist() – for Synapse internal use only ............................................................................................ 35
call() – for Synapse internal use only ............................................................................................ 35
callback(callback, remoteFunction, remoteFunctionArgs…)........................................................ 35
cbusRd(numToRead) – Read bytes in from the CBUS.................................................................. 36
cbusWr(str) – Write bytes out to the CBUS .................................................................................. 36
chr(number) – generates a single-character-string......................................................................... 36
crossConnect(endpoint1, endpoint2) – tie two endpoints together................................................ 36
eraseImage() – Erase any SNAPpy image from the node.............................................................. 37
errno() – read and reset latest error code ....................................................................................... 37
flowControl(uart, isEnabled) – Enable/disable flow control ........................................................ 38
getChannel() – Get which channel the node is on ......................................................................... 38
getEnergy() – Get energy reading from current channel ............................................................... 39
getI2cResult() – Get status code from most recent I2C operation................................................. 39
getInfo(whichInfo) – Get specified system info............................................................................. 39
getLq() – Get the most recent Link Quality................................................................................... 40
getMs() – Get elapsed milliseconds since startup.......................................................................... 41
getNetId() – Get the node’s Network ID ....................................................................................... 41
getStat() – for Synapse internal use only ....................................................................................... 41
imageName() – return name of currently loaded SNAPpy image................................................. 41
i2cInit(enablePullups) – Setup for I2C.......................................................................................... 42
i2cRead(byteStr, numToRead, retries, ignoreFirstAck) – I2C Read ............................................. 42
i2cWrite(byteStr, retries, ignoreFirstAck) – I2C Write................................................................. 42
initUart(uart, bps) – Initialize a UART (short form)..................................................................... 43
initUart(uart, bps, dataBits, parity, stopBits) – Initialize a UART................................................ 44
initVm() – Initialize (restart) the SNAPpy Virtual Machine ......................................................... 44
int(obj) – Converts an object to numeric form (if possible) .......................................................... 44
Snap Reference Manual-v1.1 Document Number 600-0007B
Page 4 of 126
len(sequence) – Returns the length of a sequence ......................................................................... 45
loadNvParam(id) – Read a Configuration Parameter from NV..................................................... 45
localAddr() – Get the node’s SNAP address ................................................................................. 45
mcastRpc(group, ttl, function, args…) – Multicast RPC .............................................................. 45
mcastSerial(destGroups, ttl) – Setup TRANSPARENT MODE................................................... 46
monitorPin(pin, isMonitored) – Enable/disable monitoring of a pin............................................. 46
ord(str) – Returns the integer ASCII ordinal value of a character................................................. 47
peek(address) - Read a memory location ...................................................................................... 47
poke(address, value) – Write to a memory location...................................................................... 47
print – Generate output from your script ....................................................................................... 48
pulsePin(pin, msWidth, isPositive) – Generate a timed pulse........................................................ 48
random() – Generate a pseudo-random number ............................................................................ 49
readAdc(channel) – Read an Analog Input pin (or reference) ...................................................... 49
readPin(pin) – Read the logic level of a pin .................................................................................. 49
reboot() – Schedule a reboot .......................................................................................................... 50
resetVm() – Reset (shut down) the SNAPpy Virtual Machine...................................................... 50
rpc(address, function, args…) – Remote Procedure Call (RPC)................................................... 50
rpcSourceAddr() – Who made this Remote ProcedureCall? ......................................................... 51
rx(isEnabled) – Turn radio receiver on or off................................................................................ 51
saveNvParam(id, obj) – Save data into NV memory..................................................................... 52
scanEnergy() – Get energy readings from all 16 channels ............................................................ 52
setChannel(channel) – Specify which channel the node is on....................................................... 52
setNetId(networkId) – Specify which Network ID the node is on................................................. 53
setPinDir(pin, isOutput) – Set direction (input or output) for a pin............................................... 53
setPinPullup(pin, isEnabled) – Control internal pullup resistor .................................................... 53
setPinSlew(pin, isRateControl) – Enable/disable slew rate control .............................................. 54
setRate(rate) – Set monitorPin() sample rate................................................................................. 54
setSegments(segments) – Update seven-segment display ............................................................. 54
sleep(mode, ticks) – Go to sleep (enter low-power mode)............................................................. 57
spiInit(cpol, cpha, isMsbFirst, isFourWire) – Setup SPI Bus ....................................................... 57
spiRead(byteCount, bitsInLastByte=8) – SPI Bus Read ................................................................ 58
spiWrite(byteStr, bitsInLastByte=8) – SPI Bus Write ................................................................... 58
spiXfer(byteStr, bitsInLastByte=8) – Bidirectional SPI Transfer .................................................. 59
stdinMode(mode, echo) – Set console input options ..................................................................... 59
str(object) – Returns the string representation of an object ........................................................... 60
txPwr(power) – Set Radio TX power level.................................................................................... 60
ucastSerial(destAddr) – Setup outbound TRANSPARENT MODE ............................................. 60
uniConnect(dest, src) – Make a one-way switchboard connection ............................................... 61
vmStat(statusCode, args…) – Back door used by Portal .............................................................. 61
writeChunk(offset, data) – Synapse Use Only............................................................................... 64
writePin(pin, isHigh) – Set output pin level .................................................................................. 64
ADC ................................................................................................................................................... 65
CBUS Master Emulation ................................................................................................................... 65
GPIO .................................................................................................................................................. 65
I2C Master Emulation........................................................................................................................ 65
Misc.................................................................................................................................................... 66
Snap Reference Manual-v1.1 Document Number 600-0007B
Page 5 of 126
Network.............................................................................................................................................. 66
Non-Volatile (NV) Parameters .......................................................................................................... 66
Radio .................................................................................................................................................. 67
SPI Master Emulation ........................................................................................................................ 67
Switchboard ....................................................................................................................................... 67
System................................................................................................................................................ 68
UARTs ............................................................................................................................................... 68
8. SNAPpy Scripting Hints................................................................................................................. 69
9. SNAP Node Configuration Parameters ......................................................................................... 75
These defaults are overridden when needed!..................................................................................... 77
10.
Example SNAPpy Scripts ........................................................................................................... 83
11.
Portal API .................................................................................................................................. 88
Node Methods.................................................................................................................................... 88
Node Attributes.................................................................................................................................. 89
Portal Methods ................................................................................................................................... 89
12.
SNAP Node Views ...................................................................................................................... 92
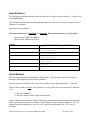
13.
SNAP Node Configuration......................................................................................................... 97
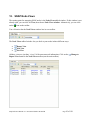
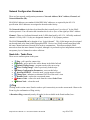
Network Configuration Parameters ................................................................................................... 98
Node Info - Tasks Pane...................................................................................................................... 98
Ping ............................................................................................................................................... 98
Refresh .......................................................................................................................................... 99
Upload Snappy Image................................................................................................................... 99
Erase Snappy Image.................................................................................................................... 100
Change Configuration................................................................................................................. 101
Intercept STDOUT...................................................................................................................... 102
Change Icon ................................................................................................................................ 102
Rename Node.............................................................................................................................. 103
Remove Node.............................................................................................................................. 103
Reboot Node ............................................................................................................................... 103
Node Info – “Snappy Scripts” Section............................................................................................. 104
Portal is a Node Too ........................................................................................................................ 105
14.
Portal Tools ............................................................................................................................. 106
New Script .................................................................................................................................. 106
Open File..................................................................................................................................... 107
Save All....................................................................................................................................... 107
Connect Serial Port /
Disconnect Serial Port ........................................................................ 107
Broadcast Ping ............................................................................................................................ 108
Node Views ................................................................................................................................. 108
Node Info .................................................................................................................................... 108
Event Log.................................................................................................................................... 108
Command Line............................................................................................................................ 108
Data Logger ................................................................................................................................ 109
Script Scheduler .......................................................................................................................... 110
Channel Analyzer........................................................................................................................ 113
Find Nodes .................................................................................................................................. 115
Snap Reference Manual-v1.1 Document Number 600-0007B
Page 6 of 126
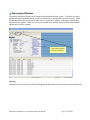
Rearranging Windows ................................................................................................................ 117
15.
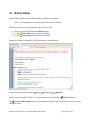
Built-in Editor .......................................................................................................................... 118
16.
Firmware Updates ................................................................................................................... 120
Obtaining Firmware ......................................................................................................................... 120
Installing new Firmware .................................................................................................................. 120
Troubleshooting ............................................................................................................................... 122
17.
License Activation.................................................................................................................... 123
Obtaining a License ......................................................................................................................... 123
Installing the License ....................................................................................................................... 123
18.
Notes for Users Familiar with SNAP 1.x ................................................................................. 124
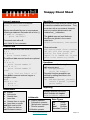
SNAPpy Cheat Sheet ............................................................................................................................ 125
RF Engine Pin Assignments................................................................................................................. 126
Snap Reference Manual-v1.1 Document Number 600-0007B
Page 7 of 126
Snap Reference Manual-v1.1 Document Number 600-0007B
Page 8 of 126
1.
Introduction
SNAP and SNAPpy
The Synapse SNAP product line provides an extremely powerful and flexible platform for developing
and deploying IEEE 802.15.4 based wireless applications.
SNAP is an acronym for Synapse Network Appliance Protocol, and is the protocol spoken by all
Synapse wireless nodes. The term SNAP has also evolved over time to refer generically to the entire
product line. For example, we often speak of “SNAP Networks”, “SNAP Nodes”, and “SNAP
Applications”.
SNAP core software runs on each SNAP node. This core code handles 802.15.4 radio
communications, as well as implementing a mini-Python interpreter.
The subset of Python implemented by the core software is named SNAPpy. Scripts written in SNAPpy
(also referred to as “Device Images”, “SNAPpy images” or even “Snappy Images”) can be uploaded
into SNAP Nodes serially (or even over the air), and dramatically alter the node’s capabilities and
behavior.
Portal and Gateway
Synapse Portal is a standalone software application which runs on a standard PC. Using a USB or
RS232 interface, it connects to any node in the SNAP Wireless Network, becoming a graphical user
interface (GUI) for the entire network. Using Portal, you can quickly and easily create, deploy,
configure and monitor SNAP-based network applications. Once connected, the Portal PC has its own
unique Network Address, and can participate in the SNAP network as a peer.
Synapse Gateway is a standalone server application, which also runs on a standard PC. It connects to
SNAP nodes over USB or RS-232 (just like Portal), but instead of providing a GUI, it acts as an XMLRPC server, allowing your own client applications to invoke functions on SNAP nodes, even over the
Internet. These client applications can be written in Python, C++, C#, etc.
It is also possible for Portal to connect to your SNAP network through the Gateway (instead of a direct
USB or RS-232 connection). This allows you to develop, configure, and deploy SNAP applications
over the Internet.
Through a Gateway, you can have a total of 15 simultaneous client connects, which can be a mix of
Portals and your own custom client applications.
Snap Reference Manual-v1.1 Document Number 600-0007B
Page 9 of 126
There are several main documents you need to be aware of:
Start with an “Evaluation Kit Users Guide”
Each evaluation kit comes with its own Users Guide. For example, the EK2500 kit comes with the
EK2500 Evaluation Kit Users Guide (“EK2500 Guide”), and the EK2100 kit comes with the
EK2100 Evaluation Kit Users Guide (“EK2100 Guide”).
Each of these guides walks you through the basics of unpacking your evaluation kit, setting up your
wireless nodes, and installing Portal software on your PC. You should start with one of those manuals,
even if you are not starting with an EK2500 or EK2100 kit (Synapse SNAP nodes and even their
component RF Engines are also sold separately, as well as bundled into evaluation kits).
About This Manual
This manual assumes you have read and understood either the “EK2100 Guide” or the “EK2500
Guide”. It assumes you have installed the Portal software, and are now familiar with the basics of
discovering nodes, uploading SNAPpy scripts into them, and controlling and monitoring them from
Portal.
This manual covers two broad categories of information:
The first category is information about SNAP and SNAPpy. This category runs from section 2
through section 11, and includes topics like the SNAPpy language, and the built-in functions
that are accessible from it. You will also find information about the different node
configuration parameters that can be changed.
The second category is information about Portal. Sections 12 through 15 pick up where the
EK2100 and EK2500 Users Guide left off, and cover the remaining toolbar buttons, pull-down
menus, and tabbed panes.
Other Important Documentation
Be sure to check out all of the SNAP documentation:
If you are migrating to SNAP version 2.1 from version 2.0, check out the “SNAP 2.1 Release Notes”.
This document highlights the changes made since the original 2.0 release.
There is a separate user manual on the new Synapse Gateway. The Gateway allows you to monitor and
control your nodes from remote locations, over TCP/IP.
There is a wealth of valuable information in the “SNAP Hardware Technical Manual”. This
document covers every jumper and every connector of every type of node included in the evaluation
kit.
For your convenience, much of the information available in the “Hardware Technical Manual” has
been broken down into individual “Quick Start” guides. For example, there is a “SN171 Proto Board
Quick Start” and a “SN132 SNAPstick Quick Start”.
Snap Reference Manual-v1.1 Document Number 600-0007B
Page 10 of 126
There is also a dedicated support forum at http://forums.synapse-wireless.com.
In the forum, you can see questions and answers posted by other users, as well as post your own
questions. The forum also has examples and Application Notes, waiting to be downloaded.
Snap Reference Manual-v1.1 Document Number 600-0007B
Page 11 of 126
2.
SNAP Overview
SNAP, the Synapse Network Appliance Protocol, is a networking protocol which uses the IEEE
802.15.4 physical layer for wireless communications. It is also an umbrella term for the Synapse
family of software technologies which together form an integrated, end-to-end solution for wireless
monitoring and control. The latest version is 2.1, which this document covers.
Key features of SNAP
•
•
•
•
•
All devices are peers – any device can be a bridge for Portal, do mesh routing, sleep, etc. There are
no “coordinators” in SNAP.
SNAP implements a full mesh topology. Any node can talk directly to any other node within radio
range, and can talk indirectly to any node within the SNAP network.
Communication among devices can be unicast (reliable) or multicast (unacknowledged)
Remote Procedure Call (RPC) among peers is the fundamental method of messaging.
The PC based user interface (Portal) appears as a peer device on the SNAP network.
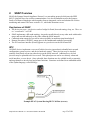
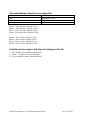
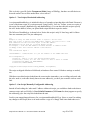
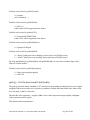
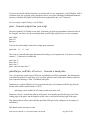
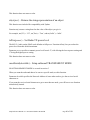
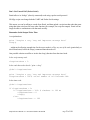
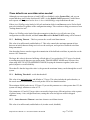
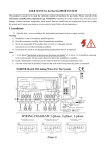
RPC
All SNAP devices implement a core set of built-in functions (procedures) to handle basic network
configuration, system services, and device hardware control. These functions may be invoked
remotely from Portal or from any other device on the SNAP network. Additional user-defined
functions may be uploaded to devices as well. This upload process can be over directly connected
serial interfaces, or over the air. Once uploaded, these functions are also callable locally or remotely,
and may themselves invoke local and remote functions. Functions are defined in an embedded subset
of the Python language, called SNAPpy.
Example HVAC System Showing RPC Call-flow (arrows)
Snap Reference Manual-v1.1 Document Number 600-0007B
Page 12 of 126
SNAPpy Scripting
SNAPpy is a subset of the Python programming language, optimized for low-power embedded
devices. A SNAPpy “script” is a collection of functions and data which are processed by Portal and
uploaded to SNAP devices. All SNAP devices are capable of running SNAPpy – it is the native
language of RPC calls.
SNAPpy Examples
On installation, Portal creates a folder under “My Documents” called “Portal\snappyImages”. Several
sample script files are installed here by default. These scripts are plain text files, which may be
opened and edited with Portal’s built-in editor. External text editors or even full-fledged Python
Integrated Development Environments (IDEs) may also be used. Feel free to copy the sample scripts
(the installed copies are read-only), and create your own as you build custom network applications.
Portal Scripting
Similar to the SNAP nodes, Portal can also be extended through scripting. By loading a script, you can
add new functions to Portal, which you (and the other SNAP nodes) can call.
Python
Instead of SNAPpy, Portal scripts are written in full Python. Python is a very powerful language,
which finds use in a wide variety of application areas. Although the core of Python is not a large
language, it is well beyond the scope of this document to cover it in any detail.
You won’t have to search long to find an immense amount of information regarding Python on the
Web. Besides your favorite search engine, a good place to start looking for further information is
Python’s home site:
http://python.org/
The Documentation page on Python’s home site contains links to tutorials at various levels of
programming experience, from beginner to expert.
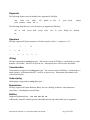
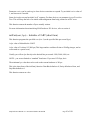
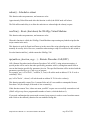
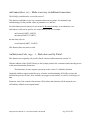
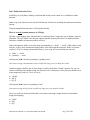
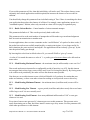
As mentioned earlier, Portal acts as a peer in the SNAP network, and can send and receive RPC calls
like any other Node. Like other nodes, Portal has a Device Image (script) which defines the functions
callable by incoming RPC messages. Since Portal runs on a PC, its script executes in a full Python
environment with access to the many libraries, services, and capabilities available there.
SNAPpy RPC Æ Portal : Gateway to Full Python…
Thanks to this capability, it is quite simple for a low-power device on
the network to (via an RPC call to Portal) send an email or update a
database in response to some monitored event.
Snap Reference Manual-v1.1 Document Number 600-0007B
Page 13 of 126
Portal Script Examples
On installation, Portal creates a folder under “My Documents” called “Portal”. Several sample script
files are installed here by default. These scripts are plain text files, which may be opened and edited
with Portal’s built-in editor. External text editors or even full-fledged Python Integrated Development
Environments (IDEs) may also be used. Feel free to copy the sample scripts (the installed copies are
read-only), and create your own as you build custom network applications.
Be sure to make copies of the provided read-only examples.
If you try to be “clever”, and change the existing files to be writable, your changes to these example
will be overwritten when you install the next version of Portal.
Snap Reference Manual-v1.1 Document Number 600-0007B
Page 14 of 126
3.
SNAPpy – The Language
SNAPpy is basically a subset of Python. Here is a quick overview of the SNAPpy language.
Statements must end in a newline
print “I am a statement”
The # character marks the beginning of a comment
print “I am a statement with a comment” # this is a comment
Indentation is significant
print “I am a statement”
print “I am a statement at a different indentation level” # this is an error
Indentation is used after statements that end with a colon (:)
if x == 1:
print “Found number 1”
Branching is supported via “if”, “else”, and “elif”
if x == 1:
print “Found number 1”
elif x == 2:
print “Found number 2”
else:
print “Did not find 1 or 2”
Looping is supported via “while”
x = 10
while x > 0:
print x
x = x -1
Snap Reference Manual-v1.1 Document Number 600-0007B
Page 15 of 126
Identifiers are case sensitive
X=1
x=2
Here “X” and “x” are two different variables
Identifiers must start with a non-numeric characters
x123 = 99 # OK
123x = 99 # not OK
Identifiers may only contain alphanumeric characters and underscores
x123_percent = 99 # OK
$%^ = 99 # not OK
Variables can be Booleans, Integers, or Strings
A = True
B = False
C = 123
D = “hello”
String Variables can contain Binary Data
A = “\x00\xFF\xAA\x55”
You define new functions using “def”
def sayHello():
print “hello”
sayHello() # prints the word “hello”
Functions can take parameters
def adder(a, b):
print a+b
Snap Reference Manual-v1.1 Document Number 600-0007B
Page 16 of 126
Functions can return values
def adder(a, b):
return a+b
print adder(1, 2) # would print out “3”
Functions can do nothing
def placeHolder(a,b):
pass
Functions cannot be empty
def placeHolder(a,b):
# ERROR! - you have to at least put a “pass” statement here
Variables at the top of your script are global
x = 99 # this is a global variable
def sayHello():
print “hello”
Variables within functions are usually local…
x = 99 # this is a global variable
def showNumber():
x = 123 # this is a separate local variable
print x # prints 123
…unless you explicitly say you mean the global one
x = 99 # this is a global variable
def showGlobal():
print x # this shows the current value of global variable x
def changeGlobal():
global x # because of this statement…
x = 99 # …this changes the global variable x
def changeLocal():
x = 42 # this statement does not change the global variable x
print x # will print 42 but the global variable x can have some other value
Snap Reference Manual-v1.1 Document Number 600-0007B
Page 17 of 126
The usual conditionals are supported
Symbol
==
!=
>
<
>=
<=
Meaning
Is equal to
Is not equal to
Greater than
Less than
Greater than or equal to
Less than or equal to
if 2 == 4:
print “something is wrong!”
if 1 != 1:
print “something is wrong!”
if 1 < 2:
print “that’s what I thought”
The usual math operators are supported
Symbol
+
*
/
%
Meaning
Addition
Subtraction
Multiplication
Division
Modulo (remainder function)
y = m*x + b
z = 5 % 4 # z is now 1
result = 8 / 4
SNAPpy does not support floating point, only integers.
SNAPpy integers are 16-bit signed values -32768 through 32767.
Snap Reference Manual-v1.1 Document Number 600-0007B
Page 18 of 126
The usual Boolean functions are supported
Symbol
and
or
not
Meaning
Both must be True
Either can be True
Boolean inversion (not True == False)
Result = True and True # Result is True
Result = True and False # Result is False
Result = False and True # Result is False
Result = False and False # Result is False
Result = True or True # Result is True
Result = True or False # Result is True
Result = False or True # Result is True
Result = False or False # Result is False
Variables do have types, but they can change on the fly
x = 99 # variable x is currently an integer (int)
x = “hello” # variable x is now a string (str)
x = True # variable x is now a Boolean (bool)
Snap Reference Manual-v1.1 Document Number 600-0007B
Page 19 of 126
4.
SNAPpy versus Python
Here are more details about SNAPpy, with emphasis on the differences between SNAPpy and Python.
Modules
SNAPpy supports import of user-defined as well as standard predefined Python source library
modules.
from module import * # Supported
import module # Not supported
Variables
Local and Global variables are supported. On RAM constrained devices, SNAPpy images are limited
to 64 system globals and 64 concurrent locals.
Functions
Up to 255 “public” functions may be defined. These are remotely callable using SNAP RPC protocol.
Non-public functions (prefixed with underscore) are limited only by the size of flash memory.
Data Types
SNAPpy supports the following fundamental Python data types:
NoneType, int, bool, string, function
int is a signed 16-bit integer, -32768 through 32767
string has max size of 255 bytes (note: built-in slice/concat/rpc have smaller limits)
SNAPpy does not currently support the following common Python types:
float, long, complex, tuple, list, dict, set
User-defined objects (class types)
Snap Reference Manual-v1.1 Document Number 600-0007B
Page 20 of 126
Keywords
The following Python reserved identifiers are supported in SNAPpy:
and
from
not
while
elif
print continue return def is
global or else
if
pass break
import
The following identifiers are reserved, but not yet supported in SNAPpy:
del
try
as with
assert yield except class
exec in
raise finally for
lambda
Operators
SNAPpy supports all Python operators, with the exception of floor (//) and power (**).
+
-
<<
>>
<
>
*
&
<=
/
|
>=
%
^
==
~
!=
<>
Slicing
Slicing is supported for string data types. The current version of SNAPpy is constrained to a single
dynamic “slice buffer,” which is 64 bytes in size. Subsequent slices will overwrite this buffer.
Concatenation
Concatenation is supported for string data types. The current version of SNAPpy is constrained to a
single dynamic “concatenation buffer,” which is 64 bytes in size. Subsequent concatenation will
overwrite this buffer.
Subscripting
Subscripting is supported for string data types.
Expressions
SNAPpy supports all Python Boolean, Binary bit-wise, Shifting, arithmetic, and comparison
expressions – including the ternary if form.
Builtins
Supported Python built-ins: len, ord, chr, int, str
Additionally, many RF module-specific embedded network and control built-ins are supported.
Snap Reference Manual-v1.1 Document Number 600-0007B
Page 21 of 126
Print
SNAPpy also supports a print statement. Normally each line of printed output appears on a separate
line. If you do not want to automatically advance to the next line (if you do not want an automatic
Carriage Return and Line Feed), end your print statement with a comma (“,”) character.
print “line 1”
print “line 2”
print “line 3 ”,
print “and more of line 3”
Snap Reference Manual-v1.1 Document Number 600-0007B
Page 22 of 126
5.
SNAPpy Application Development
This section outlines some of the basic issues to be considered when developing SNAP based
applications.
Event Driven Programming
Applications in SNAP often have several activities going on concurrently. How is this possible, with
only one CPU on the RF Engine? In SNAP, concurrency is achieved through event-driven
programming. This means that all SNAPpy functions run quickly to completion, and never “block” or
“loop” waiting for something. External events will trigger SNAPpy functions.
SNAP Hooks
There are a number of events in the system which we might like to trigger some SNAPpy function
“handler”. When defining your SNAPpy scripts, there is a way to associate functions with these
external events. That is done by specifying a “HOOK” identifier for the function. The following
HOOKs are defined:
•HOOK_STARTUP
–Called on device bootup
•HOOK_GPIN
–Called on monitored hardware pin transition
•HOOK_100MS
–Called every 100ms
•HOOK_STDIN
–Called when “user input” data is received
•HOOK_STDOUT
–Called when “user output” data is sent
•HOOK_RPC_SENT
–Called when outgoing RPC call is sent
Within a SNAPpy script, the method for specifying a HOOK is as follows:
snappyGen.setHook(SnapConstants.HOOK_XXX, eventHandlerXXX)
Transparent Data (Wireless Serial Port)
SNAP supports efficient, reliable bridging of serial data across a wireless mesh. Data connections
using the transparent mode can exist alongside RPC based messaging.
Scripted Serial I/O (SNAPpy STDIO)
SNAP’s transparent mode takes data from one interface and forwards it to another interface (possibly
the radio), but the data is not altered in any way (or even examined).
Snap Reference Manual-v1.1 Document Number 600-0007B
Page 23 of 126
SNAPpy scripts can also interact directly with the serial ports, allowing custom serial protocols to be
implemented. For example, one of the included sample scripts shows how to interface serially to an
external GPS unit.
The Switchboard
The flow of data through a SNAP device is configured via the Switchboard. This allows connections
to be established between sources and sinks of data in the device. The following Data Sources/Sinks
are defined in the file switchboard.py, which can be imported by other SNAPpy scripts:
DS_NULL
DS_UART1
DS_UART2
DS_TRANSPARENT
DS_STDIO
DS_PACKET_SERIAL
The SNAPpy API for creating Switchboard connections is:
crossConnect(dataSrc1, dataSrc2)
Cross-connect SNAP data-sources
uniConnect(dst, src)
Connect src->dst SNAP data-sources
For example, to configure UART1 for Transparent (Wireless Serial) mode, put the following statement
in your SNAPpy startup handler:
crossConnect(DS_UART1, DS_TRANSPARENT)
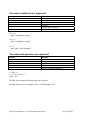
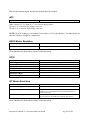
The following table is a matrix of possible Switchboard connections. Each cell label describes the
“mode” enabled by row-column cross-connect.
UART0
UART1
Transparent
UART0
UART1
Transparent
Stdio
PacketSerial
Loopback
Crossover
Wireless Serial
Local Terminal
Local Gateway
Loopback
Wireless Serial
Local Terminal
Local Gateway
Loopback
Remote Terminal Remote Gateway
Refer to the API documentation on crossConnect() in section 7 for more details.
Snap Reference Manual-v1.1 Document Number 600-0007B
Page 24 of 126
Debugging
Application development with SNAP offers an unprecedented level of interactivity in embedded
programming. Using Portal you can quickly upload bits of code, test, adjust, and try again. Some tips
and techniques for debugging:
1. Make use of the “print” statement to verify control flow and values (be sure to connect
STDIO to a UART or Intercept STDOUT with Portal)
2. When using Portal’s Intercept feature, you’ll get source line-number information, and
symbolic error-codes.
3. Invoke “unit-test” script functions by executing them directly from the Snappy Modules
Tree in Portal’s Node Info panel.
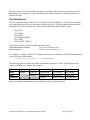
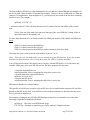
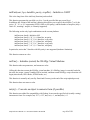
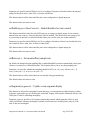
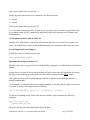
Sample Application – Wireless UART
The following scenario is very common: two devices communicating over a RS-232 serial link.
RS-232 serial data cable
The two devices might be two computers, or perhaps a computer and a slave peripheral. For the
remainder of this section, we will refer to these devices as “end points”.
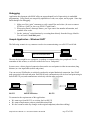
In some cases, a direct physical connection between the two end points is either inconvenient (long
distance) or even impossible (mobile end points).
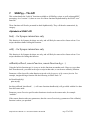
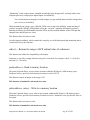
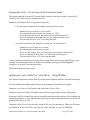
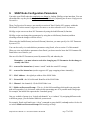
You can use two SNAP nodes to wirelessly emulate the original hardwired connection. One SNAP
node gets paired with each end point. Each SNAP node communicates with its local end point using its
built-in RS-232 port, and communicates wirelessly with the other end point.
RS-232
802.15.4 Wireless
RS-232
To summarize the requirements of this application:
• We want to go from RS-232, to wireless, back to RS-232
• We want to implement a point-to-point bidirectional link
• We don’t want to make any changes to the original endpoints (other than cabling)
Snap Reference Manual-v1.1 Document Number 600-0007B
Page 25 of 126
This is clearly a good fit for the Transparent Mode feature of SNAPpy, but there are still choices to
be made around “how will the nodes know who to talk to?”
Option 1 – Two Scripts, Hardcoded Addressing
A script named dataMode.py is included in the set of example scripts that ships with Portal. Because it
is one of the demo scripts, it is write-protected. Using Portal’s “Save As” feature, create two copies of
this script (for example, dataModeA.py and dataModeB.py). You can then edit each script to specify
the other nodes address, before you upload both scripts into their respective nodes.
The full text of dataMode.py is shown below. Notice this script is only 19 lines long, and 8 of those
lines are comments (and 3 are just whitespace).
"""
Example of using two SNAP wireless nodes to replace a RS-232 cable
Edit this script to specify the OTHER node's address, and load it into a node
Node addresses are the last three bytes of the MAC address
MAC Addresses can be read off of the RF Engine sticker
For example, a node with MAC Address 001C2C1E 86001B67 is address 001B67
In SNAPpy format this would be address "\x00\x1B\x67"
"""
from switchboard import *
otherNodeAddr = "\x4B\x42\x35" # <= put the address of the OTHER node here
def startupEvent():
initUart(1, 9600) # <= put your desired baudrate here!
flowControl(1, False) # <= set flow control to True or False as needed
crossConnect(DS_UART1, DS_TRANSPARENT)
ucastSerial(otherNodeAddr)
snappyGen.setHook(SnapConstants.HOOK_STARTUP, startupEvent)
The script as shipped defaults to 9600 baud, no hardware flow control. Edit these settings as needed,
too.
With these two edited scripts loaded into the correct nodes (remember, you are telling each node who
the other node is, each node already knows its own addresses), you have just created a wireless serial
link.
Option 2 – One Script, Manually Configurable Addressing
Instead of hard-coding the “other node” address within each script, you could have both nodes share a
common script, and use SNAPpy’s Non-Volatile Parameter (NV Param for short) support to specify
the addressing, after the script was loaded into the unit.
Look in your snappyImages directory for a script named dataModeNV.py. Since we won’t be making
any changes to this script, there is no need to make a copy of it. Simply load it into both nodes as-is.
Snap Reference Manual-v1.1 Document Number 600-0007B
Page 26 of 126
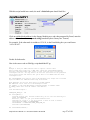
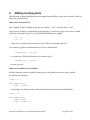
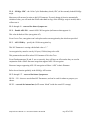
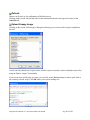
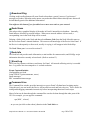
With this script loaded into a node, the node’s Node Info pane should look like:
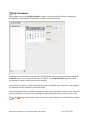
Click on setOtherNode(address) in the Snappy Modules tree, and when prompted by Portal, enter the
address of the other node as a quoted string (standard Python “binary hex” format).
For example, if the other node is at address 12.34.56, in the Portal dialog box you would enter
“\x12\x34\x56”.
Do this for both nodes.
Here is the source code to SNAPpy script dataModeNV.py
"""
Example of using two SNAP wireless nodes to replace a RS-232 cable
After loading this script into a SNAP node, invoke the setOtherNode(address)
function (contained within this script) so that each node gets told "who his
counterpart node is". You only have to do this once (the value will be preserved
across power outages and reboots) but you DO have to tell BOTH nodes who their
counterparts are!
The otherNodeAddr value will be saved as NV Parameter 254, change this if needed.
Legal ID numbers for USER NV Params range from 128-254.
Node addresses are the last three bytes of the MAC address
MAC Addresses can be read off of the RF Engine sticker
For example, a node with MAC Address 001C2C1E 86001B67 is address 001B67
In SNAPpy format this would be address "\x00\x1B\x67"
"""
from switchboard import *
OTHER_NODE_ADDR_ID = 254
def startupEvent():
"""System startup code, invoked automatically (do not call this manually)"""
global otherNodeAddr
initUart(1, 9600) # <= put your desired baudrate here!
flowControl(1, False) # <= set flow control to True or False as needed
crossConnect(DS_UART1, DS_TRANSPARENT)
otherNodeAddr = loadNvParam(OTHER_NODE_ADDR_ID)
ucastSerial(otherNodeAddr)
def setOtherNode(address):
Snap Reference Manual-v1.1 Document Number 600-0007B
Page 27 of 126
"""Call this at least once, and specify the OTHER node's address"""
global otherNodeAddr
otherNodeAddr = address
saveNvParam(OTHER_NODE_ADDR_ID, otherNodeAddr)
ucastSerial(otherNodeAddr)
snappyGen.setHook(SnapConstants.HOOK_STARTUP, startupEvent)
This script shows how to use the saveNvParam() and loadNvParam() functions to have units
remember important configuration settings. The script could be further enhanced to treat the baud rate
and hardware handshaking options as User NV Parameters as well.
You can read more about NV Parameters in section 7 and section 9.
Snap Reference Manual-v1.1 Document Number 600-0007B
Page 28 of 126
6.
Advanced SNAPpy Application Development
This section describes how to use some of the more advanced features of SNAP 2.1. Topics covered
include:
Interfacing to external CBUS slave devices (emulating a CBUS master)
Interfacing to external SPI slave devices (emulating a SPI master)
Interfacing to external I2C slave devices (emulating a I2C master)
Interfacing to external CBUS slave devices
CBUS is a clocked serial bus, similar to SPI. It requires at least four pins:
CLK – master timing reference for all CBUS transfers
CDATA – data from the CBUS master to the CBUS slave
RDATA – data from the CBUS slave to the CBUS master
CS – At least one Chip Select (CS)
Using the existing readPin() and writePin() functions, virtually any type of device can be interacted
with via a SNAPpy script, including external CBUS slaves. Arbitrarily chosen GPIO pins could be
configured as inputs or outputs by using the setPinDir() function. The CLK, CDATA, and CS pins
would be controlled using the writePin() function. The RDATA pin would be read using the readPin()
function.
The problem with a strictly SNAPpy based approach is speed – CBUS devices tend to be things like
voice chips, with strict timing requirements. Being an interpreted language, it is hard for SNAPpy to
keep up.
To solve this problem, dedicated CBUS support (master emulation only) has been added to the set of
SNAPpy built-in functions. Two functions (callable from SNAPpy but implemented in optimized C
code) support reading and writing CBUS data:
cbusRd(numToRead) – “shifts in” the specified number of bytes
cbusWr(str) – “shifts out” the bytes specified by str
To allow the cbusRd() and cbusWr() functions to be as fast as possible, the GPIO pins used for CBUS
CLK, CDATA, and RDATA are fixed:
GPIO 12 is always used as the CBUS CDATA pin
GPIO 13 is always used as the CBUS CLK pin
GPIO 14 is always used as the CBUS RDATA pin
Note! – These pins are only dedicated if you are actually using the CBUS functions. If not, they remain
available for other functions.
Snap Reference Manual-v1.1 Document Number 600-0007B
Page 29 of 126
You will also need as many Chip Select pins as you have external CBUS devices. You can choose any
available GPIO pin(s) to be your CBUS chip selects. The basic program flow becomes:
# select the desired CBUS device
writePin(somePin, False) # assuming the chip select is active-low
# read bytes from the selected CBUS device
cbusRd(10) # <- you specify how many bytes to read
# deselect the CBUS device
writePin(somePin, True) # assuming the chip select is active-low
CBUS writes are handled in a similar fashion.
If you are already familiar with CBUS devices, you should have no trouble using these functions to
interface to external CBUS chips.
A detailed example of interfacing to an external CBUS voice chip will be the topic of an upcoming
application note.
Snap Reference Manual-v1.1 Document Number 600-0007B
Page 30 of 126
Interfacing to external SPI slave devices
SPI is another clocked serial bus. It typically requires at least four pins:
CLK – master timing reference for all SPI transfers
MOSI – Master Out Slave In – data line FROM the master TO the slave devices
MISO – Master In Slave Out – data line FROM the slaves TO the master
CS – At least one Chip Select (CS)
SPI also exists in a three wire variant, with the MOSI pin serving double-duty.
Numerous options complicate use of SPI:
Clock Polarity – the clock signal may or may not need to be inverted
Clock Phase – the edge of the clock actually used varies between SPI devices
Data Order – some devices expect/require Most Significant Bit (MSB) first, others only work
Least Significant Bit (LSB) first
Data Width – some SPI devices are 8-bit, some are 12, some are 16.
The SPI support routines in SNAPpy can deal with all these variations, but you will have to make sure
the options you specify in your SNAPpy scripts match the settings required by your external devices.
Like what was done for CBUS devices, dedicated SPI support (master emulation only) has been
added to the set of SNAPpy built-in functions. Four functions (callable from SNAPpy but
implemented in optimized C code) support reading and writing SPI data:
In order to support both three wire and four wire SPI, there are more spiXXX() functions than
you might first expect.
spiInit(cpol, cpha, isMsbFirst, isFourWire) - setup for SPI (many options!)
spiWrite(byteStr, bitsInLastByte=8) - send data out SPI
spiRead(byteCount, bitsInLastByte=8) - receive data in from SPI (3 wire only)
spiXfer(byteStr, bitsInLastByte=8) - bidirectional SPI transfer (4 wire only)
Four-wire SPI interfaces transfer data in both directions simultaneously, and should use the spiXfer()
function.
Some SPI devices are write-only, and you can use spiWrite() to send data to them (three-wire or fourwire hookup).
Some three wire devices are read-only, and you must use function spiRead().
Snap Reference Manual-v1.1 Document Number 600-0007B
Page 31 of 126
The data width for SPI devices is not standardized. Devices that use a data width that is a multiple of 8
are trivial (send 2 bytes to make 16 bits total for example). However, device widths such as 12 bits are
common. To support these “non-multiples-of-8”, you can specify how much of the last byte to actually
send or receive. For example,
spiWrite(“\x12\x34”, 4)
…will send a total of 12 bits: all of the first byte (0x12), and the first (or last) nibble of the second
byte.
Which 4 bits out of the total 8 get sent are a function of the “send LSB first” setting, which is
specified as part of the spiInit() call.
To allow these functions to be as fast as possible, the GPIO pins used for CLK, MOSI, and MISO are
fixed:
GPIO 12 is always used as the MOSI pin
GPIO 13 is always used as the CLK pin
GPIO 14 is always used as the MISO pin, unless running in three wire mode
(The chip select pin is what raises the total number of pins to 3 or 4)
Note! – These pins are only dedicated if you are actually using the SPI functions. If not, they remain
available for other functions. Also, if using three wire SPI, GPIO 14 remains available.
You will also need as many Chip Select pins as you have external SPI devices. You can choose any
available GPIO pin(s) to be your SPI chip selects. The basic program flow becomes:
# select the desired SPI device
writePin(somePin, False) # assuming the chip select is active-low
# Transfer data to the selected SPI device
spiWrite(“\x12\x34\x56”)
# deselect the SPI device
writePin(somePin, True) # assuming the chip select is active-low
SPI reads are handled in a similar fashion.
The specifics of which bytes to send to a given SPI slave device (and what the response will look like)
depend on the SPI device itself. You will have to refer to the manufacturer’s data sheet for any given
device you wish to interface to.
For examples of using the new SNAPpy SPI functions to interface to external devices, look at the
following scripts that are bundled with Portal:
spiTests.py – This is the overall SPI demo script
LTC2412.py – Example of interfacing to a 24-bit Analog To Digital convertor
Snap Reference Manual-v1.1 Document Number 600-0007B
Page 32 of 126
Script spiTests.py imports the other script, and exercises some of the functions within it.
Interfacing to external I2C slave devices
Technically the correct name for this two-wire serial bus is Inter-IC bus or I2C.
Information on this popular two-wire hardware interface is readily available on the web,
http://www.i2c-bus.org/ is one starting point you could use. In particular look for a document called
“The I2C-bus and how to use it (including specifications)”.
I2C uses two pins:
SCL – Serial Clock Line
SDA – Serial Data line (bidirectional)
Because both the value and direction (input versus output) of the SCL and SDA pins must be rapidly
and precisely controlled, dedicated I2C support functions have been added for SNAP version 2.1.
i2cInit(enablePullups) – Prepare for I2C operations (call this to setup for I2C)
i2cWrite(byteStr, retries, ignoreFirstAck) – Send data over I2C to another device
i2cRead(byteStr, numToRead, retries, ignoreFirstAck) – Read data from device
getI2cResult() – used to check the result of the other functions
These routines are covered in more detail in section 7 of this document.
By using these routines, your SNAPpy script can operate as an I2C bus master, and can interact with
I2C slave devices.
When performing I2C interactions, the following GPIO pins are used:
GPIO 17 is always used as the I2C SDA (data) line
GPIO 18 is always used as the I2C SCL (clock) line
Note! – These pins are only dedicated if you are actually using the I2C functions. If not, they remain
available for other functions.
Unlike CBUS and SPI, I2C does not use separate “chip select” lines. The initial data bytes of each I2C
transaction specify an “I2C address”. Only the addressed device will respond. So, no additional GPIO
pins are needed.
The specifics of which bytes to send to a given I2C slave device (and what the response will look like)
depend on the I2C device itself. You will have to refer to the manufacturer’s data sheet for any given
device you wish to interface to.
Snap Reference Manual-v1.1 Document Number 600-0007B
Page 33 of 126
For examples of using the new SNAPpy I2C functions to interface to external devices, look at the
following scripts that are bundled with Portal:
i2cTests.py – This is the overall I2C demo script
M41T81.py – Example of interfacing to a clock/calendar chip
CAT24C128.py – Example of interfacing to an external EEPROM
Script i2cTests.py imports the other two scripts, and exercises some of the functions within them.
Snap Reference Manual-v1.1 Document Number 600-0007B
Page 34 of 126
7.
SNAPpy – The API
This section details the “built-in” functions available to all SNAPpy scripts, as well as through RPC
messaging. As of version 2.1, there are over 60 of these functions implemented by the SNAP “core”
firmware.
These functions will first be presented in detail alphabetically. They will then be summarized, by
category.
Alphabetical SNAP API
bist() – for Synapse internal use only
This function is for Synapse developer use only, and will likely be removed in a future release. User
scripts should not bother calling this function.
call() – for Synapse internal use only
This function is for Synapse developer use only, and will likely be removed in a future release. User
scripts should not be calling this function.
callback(callback, remoteFunction, remoteFunctionArgs…)
Using the built-in function rpc() it is easy to invoke functions on another node. However, to get data
back from that node, you either need to put a script in that node, or use the new callback() function.
Parameter callback specifies what function to invoke with the answer of the remote function. For
example, imagine having a function like the following in SNAP Node “A”.
def showResult(obj):
print str(obj)
Invoking callback(‘showResult’, …) will cause function showResult() will get called with the live data
from the remote node.
Parameter remoteFunction specifies what function to invoke on the remote node, for example
“readAdc”.
If the remote function takes any parameters, then the remoteFunctionArgs parameter of the callback()
function is where you put them.
Snap Reference Manual-v1.1 Document Number 600-0007B
Page 35 of 126
For example, node “A” could invoke the following on node “B”:
callback(‘showResult’,’readAdc’,0)
Node “B” would invoke readAdc(0), and then remotely invoke showResult(the-actual-ADC-readinggoes-here) on node “A”.
The callback() function is most commonly used with the rpc() function. For example:
rpc(nodeB, ’callback’, ’showResult’, ’readAdc’ ,0)
cbusRd(numToRead) – Read bytes in from the CBUS
This function returns a string of bytes read in from the currently selected CBUS device. Parameter
numToRead specifies how many bytes to read.
For more details on interfacing SNAP Nodes to external CBUS slave devices, refer to section 6.
cbusWr(str) – Write bytes out to the CBUS
This function writes the string of bytes specified by parameter str out to the currently selected CBUS
slave device.
This function does not return anything.
For more details on interfacing SNAP Nodes to external CBUS slave devices, refer to section 6.
chr(number) – generates a single-character-string
This function was added for compatibility with Python, and returns a short string based on the number
given. For example, chr(0x41) returns the string ‘A’.
crossConnect(endpoint1, endpoint2) – tie two endpoints together
The SNAPpy switchboard is covered in section 5. Refer to included script “switchboard.py" to see the
possible values for endpoint1 and endpoint2.
See also function uniConnect() if what you really want is a one-sided data path.
This function does not return a value.
Snap Reference Manual-v1.1 Document Number 600-0007B
Page 36 of 126
eraseImage() – Erase any SNAPpy image from the node
This function is used by Portal and Gateway as part of the script upload process, and would not
normally be used by user scripts. If you do call this function, be sure to call the resetVm() function
first (otherwise the SNAPpy VM will still be running the script, as you erase it out from under it).
This function takes no parameters, and does not return a value.
errno() – read and reset latest error code
This function reads the most recent error code from the SNAPpy Virtual Machine (VM), clearing it
out as it does so. The possible error codes are:
NO_ERROR = 0
OP_NOT_DEFINED = 1
UNSUPPORTED_OPCODE = 2
UNRESOLVED_DEPENDENCY = 3
INCOMPATIBLE_TYPES = 4
TARGET_NOT_CALLABLE = 5
UNBOUND_LOCAL = 6
BAD_GLOBAL_INDEX = 7
EXCEEDED_MAX_BLOCK_STACK = 8
EXCEEDED_MAX_FRAME_STACK = 9
EXCEEDED_MAX_OBJ_STACK = 10
INVALID_FUNC_ARGS = 11
UNSUBSCRIPTABLE_OBJECT = 12
INVALID_SUBSCRIPT = 13
EXCEEDED_MAX_LOCAL_STACK = 14
BAD_CONST_INDEX = 15
Some of these error codes are unlikely to occur from user generated scripts, but a few would point
directly to programming errors in the user’s SNAPpy source code. For example:
INCOMPATIBLE_TYPES: Are you trying to add a number to a string?
TARGET_NOT_CALLABLE: Are you trying to invoke foo(), but foo = 123?
UNBOUND_LOCAL: Are you trying to use a variable before you put something in it?
INVALID_FUNC_ARGS: Are you passing the wrong type of parameters to a function?
Are you passing the wrong quantity of parameters?
INVALID_SUBSCRIPT: Are you trying to access str[3] when str = “123”?
EXCEEDED_MAX_LOCAL_STACK: Do you have too many local variables?
Snap Reference Manual-v1.1 Document Number 600-0007B
Page 37 of 126
flowControl(uart, isEnabled) – Enable/disable flow control
The flowControl() function allows you to disable or enable hardware handshaking (flow control).
When flow control is enabled for UART0, GPIO pins 5 and 6 become CTS and RTS pins for that
UART. When flow control is enabled for UART1, GPIO pins 9 and 10 become CTS and RTS pins for
that UART.
It is important to realize that UART handshake lines are active-low. A low voltage level on the CTS
pin is a boolean “False”, but actually means that it is” Clear To Send”. A high voltage level on the
CTS pins is a boolean “True”, but actually means it is not “Clear To Send”. RTS behaves similarly.
When flow control is ON (isEnabled = True), the RF Engine controls the CTS pin to indicate if it can
accept more data. The CTS pin is low if the RFE can accept more characters. The CTS pin goes high
(temporarily) if the RFE is “full” and cannot accept any more characters (you can keep sending
characters, but they will likely be dropped).
When flow control is ON, the RFE also monitors the RTS pin from the attached serial device. As long
as the RFE sees the RTS pin low, the RFE will continue sending characters to the attached serial
device (assuming it has any characters to send). If the RFE sees the RTS pin go high, then it will stop
sending characters to the attached serial device.
When flow control is OFF (isEnabled = False), the RTS and CTS pins are ignored.
The benefit of turning flow control off is that it frees up two more pins (per UART) for use as other
I/O. The drawback of turning off flow control is that characters can be dropped.
This function returns no value.
getChannel() – Get which channel the node is on
The getChannel() function returns a number 0-15 representing which SNAP channel the node is
currently on.
SNAP channel 0 corresponds to 802.15.4 channel 11, 1 to 12, and so on.
SNAP
Channel
0
1
2
3
802.15.4
Channel
11
12
13
14
SNAP
Channel
4
5
6
7
802.15.4
Channel
15
16
17
18
SNAP
Channel
8
9
10
11
802.15.4
Channel
19
20
21
22
SNAP
Channel
12
13
14
15
802.15.4
Channel
23
24
25
26
This function takes no parameters.
Snap Reference Manual-v1.1 Document Number 600-0007B
Page 38 of 126
getEnergy() – Get energy reading from current channel
The getEnergy() function returns the result of a brief 802.15.4 Energy Detection scan.
The result is in the same units as the getLq() function.
This function takes no parameters.
getI2cResult() – Get status code from most recent I2C operation
This function takes no parameters. It returns the result of the most recently attempted I2C operation.
The possible return values and their meanings are:
0 = I2C_OFF means I2C was never initialized (you need to call i2cInit()!)
1 = I2C_SUCCESS means the most recent I2C read/write/etc. succeeded
2 = I2C_BUS_BUSY means the I2C bus was in use by some other device
3 = I2C_BUS_LOST means some other device stole the I2C bus
4 = I2C_BUS_STUCK means there is some sort of hardware or configuration problem
5 = I2C_NO_ACK means the slave device did not respond properly
For more information on interfacing SNAP nodes to I2C devices, refer to section 6.
getInfo(whichInfo) – Get specified system info
This function has been added in case a script needs to know details about the environment it is running
under.
Parameter whichInfo specifies the type of information to be retrieved:
0 = Vendor
1 = Radio
2 = CPU
3 = Platform
4 = Build
5 = Version (Major)
6 = Version (Minor)
7 = Version (Build)
8 = Encryption
Based on the value of whichInfo, a numeric value is returned. Many of the following “result codes”
will be expanding in the future. Here are the currently known values:
Snap Reference Manual-v1.1 Document Number 600-0007B
Page 39 of 126
Possible result codes for getInfo(Vendor):
0 = Synapse
(to be continued…)
Possible result codes for getInfo(Radio):
0 = 802.15.4
(other radios will be supported in the future)
Possible result codes for getInfo(CPU):
0 = Freescale MC9S08GT60A
(other CPUs will be supported in the future)
Possible result codes for getInfo(Platform):
0 = Synapse RF Engine
Possible result codes for getInfo(Build):
0 = “debug” build (more error checking, slower speed, less SNAPpy room)
1 = “release” build (less error checking, faster speed, more SNAPpy room)
By using getInfo(Major), getInfo(Minor), and getInfo(Build) you can retrieve all three digits of the
firmware version number.
Possible result codes for getInfo(Encryption):
0 = None (no encryption support)
1 = AES-128
getLq() – Get the most recent Link Quality
The getLq() function returns a number 0-127 (theoretical) representing the link quality (received signal
strength) of the most recently received packet, regardless of which node that packet came from (could
be a near node, could be a far node).
Because this value represents – (negative) dBm, lower values represent stronger signals, and higher
values represent weaker signals.
This function takes no parameters.
Snap Reference Manual-v1.1 Document Number 600-0007B
Page 40 of 126
getMs() – Get elapsed milliseconds since startup
The getMs() function returns the value of a free-running timer within the RF Engine. The value
returned is in units of milliseconds. The timer is only 16 bits, and rolls back around to 0 every 65.535
seconds.
Because all SNAPpy integers are signed, the counter’s full cycle is:
0, 1, 2,…,32766, 32767, -32768, -32767, -32766, …, -3, -2, -1, 0, 1,…
Some scripts use this function to measure elapsed (relative) times.
The value for this function is only updated between script invocations. If you do two back-to-back
getMs() calls, you will get the same value.
This function takes no parameters.
getNetId() – Get the node’s Network ID
The getNetId() function returns the 16-bit Network Identifier (ID) value the node is currently using.
The node will only accept packets containing this ID, or a special “wildcard” value of 0xffff (the
“wildcard” Network ID is used during the “find nodes” process).
This function takes no parameters.
getStat() – for Synapse internal use only
This function is for Synapse developer use only, and may be changed or removed in a future release.
User scripts should not bother calling this function.
imageName() – return name of currently loaded SNAPpy image
Prior to download into a SNAP node, the text form of a SNAPpy script gets compiled into a byte-code
image. It is this executable image that gets downloaded into the node, not the original (textual) source
code.
The generated image takes its base name from the underlying source script. For example, image
“foo.spy” would be generated from a script named “foo.py”.
Function imageName() returns the “base name” from the currently loaded image (if there is one). In
the example given here, function imageName() would return the string “foo”.
This function takes no parameters.
Snap Reference Manual-v1.1 Document Number 600-0007B
Page 41 of 126
i2cInit(enablePullups) – Setup for I2C
This function performs the necessary setup to allow subsequent i2cRead() and i2cWrite() calls to be
made.
Parameter enablePullups allows internal pullup resistors to be activated for the I2C clock and data
lines. These lines do require pull-ups, but normally those pull-ups are part of your external hardware,
and parameter enablePullups should be False. (Don’t “double pullup” the I2C bus).
Setting parameter enablePullups to True can come in handy when you don’t have a real I2C bus, but
are doing quick prototyping by dangling I2C devices directly off the RF Engine.
For more information about interfacing SNAP nodes to I2C devices, refer to section 6.
i2cRead(byteStr, numToRead, retries, ignoreFirstAck) – I2C Read
This function can only be used after function i2cInit() has been called.
I2C devices must be addressed before data can be read out of them, so this function really does a write
followed by a read.
Parameter byteStr specifies whatever “addressing” bytes must be sent to the device to get it to respond.
Parameter numToRead specifies how much data to read back from the external I2C device.
Parameter retries can be used to give slow devices extra time to respond. Try an initial retries value of
1, and increase it if needed.
Some devices do not send an initial “ack” response. For these devices, set parameter ignoreFirstAck to
True. This will keep the lack of an initial acknowledgement from being counted as an I2C error.
This function returns the string of bytes read back from the external I2C device.
For more information about interfacing SNAP nodes to I2C devices, refer to section 6.
i2cWrite(byteStr, retries, ignoreFirstAck) – I2C Write
This function can only be used after function i2cInit() has been called.
Parameter byteStr specifies the data to be sent to the external I2C device, including whatever
“addressing” bytes must be sent to the device to get it to pay attention.
Snap Reference Manual-v1.1 Document Number 600-0007B
Page 42 of 126
Parameter retries can be used to give slow devices extra time to respond. Try an initial retries value of
1, and increase it if needed.
Some devices do not send an initial “ack” response. For these devices, set parameter ignoreFirstAck to
True. This will keep the lack of an initial acknowledgement from being counted as an I2C error.
This function returns the number of bytes actually written.
For more information about interfacing SNAP nodes to I2C devices, refer to section 6.
initUart(uart, bps) – Initialize a UART (short form)
This function programs the specified uart (0 or 1) to the specified bits per second (bps).
A bps value of 0 disables the UART.
A bps value of 1 selects 115,200 bps (This large number would not fit into a SNAPpy integer, and so
was treated as a special case).
Usually you will set bps directly to the desired bits per second: 1200, 2400, 9600, etc.
NOTE – you are not limited to “standard” baud rates. If you need 1234 bps, do it.
The minimum bps value that can be used on the current hardware is 20 bps.
This is the short form of the initUart() function. Data Bits defaults to 8, Parity defaults to None, and
Stop Bits defaults to 1.
This function returns no value.
Snap Reference Manual-v1.1 Document Number 600-0007B
Page 43 of 126
initUart(uart, bps, dataBits, parity, stopBits) – Initialize a UART
This is the long form of the initUart() function just described.
This function programs the specified uart (0 or 1) to the specified bits per second (bps).
In addition, this variant of the initUart() function also allows you to specify the dataBits (7 or 8), the
parity (‘E’, ‘O’, or ‘N’ representing EVEN, ODD, or NO parity), and the number of stop bits (only a
value of 1, meaning 1 stop bit, is currently supported).
The following are the only legal combinations on the current platform:
initUart(uart, baud) # default to 8N1
initUart(uart, baud, 8, ‘N’, 1) # 8 data bits, no parity
initUart(uart, baud, 8, ‘E’, 1) # 8 data bits, even parity
initUart(uart, baud, 8, ‘O’, 1) # 8 data bits, odd parity
initUart(uart, baud, 7, ‘E’, 1) # 7 data bits, even parity
initUart(uart, baud, 7, ‘O’, 1) # 7 data bits, odd parity
In particular, notice that 7 data bits with NO parity is not supported (hardware limitation).
This function returns no value.
initVm() – Initialize (restart) the SNAPpy Virtual Machine
This function takes no parameters, and returns no value.
Calling this function restarts the SNAPpy virtual machine. If a SNAPpy image is currently loaded in
the node, the scripts “startup” handler will be invoked, and then normal SNAPpy script execution will
begin (timer hooks, GPIO hooks, STDIN hooks, etc.)
This function is normally only used by Portal and Gateway (at the end of the script upload process).
This function does not return a value.
int(obj) – Converts an object to numeric form (if possible)
This function was added for compatibility with Python. It converts the specified obj (usually a string)
into numeric form. For example, int(‘123’) = 123, int(True) = 1, and int(False) = 0.
Snap Reference Manual-v1.1 Document Number 600-0007B
Page 44 of 126
len(sequence) – Returns the length of a sequence
This function was added for compatibility with Python. It returns the size of parameter sequence.
Currently sequence must be a string, but this may change in a future version of SNAPpy.
As an example, len(“123”) = 3.
loadNvParam(id) – Read a Configuration Parameter from NV
This function reads a single parameter from the SNAP Node’s NV storage, and returns it to the caller.
Parameter id specifies which parameter to read. For a full list of all the supported id values, refer to
section 9. User parameters should have id values in the range 128-254.
See also function saveNvParam().
localAddr() – Get the node’s SNAP address
The localAddr() function returns a string representation of the node’s 3-byte address on the SNAP
network.
This function takes no parameters.
mcastRpc(group, ttl, function, args…) – Multicast RPC
Call a Remote Procedure (make a Remote Procedure Call, or RPC), using multicast messaging. This
means the message could be acted upon by multiple nodes.
Parameter group specifies which nodes should respond to the request. By default, all nodes belong to
the “broadcast” group, group 0x0001. You can configure your nodes to belong to different or
additional groups, refer to section 9 on Node Configuration Parameters.
Parameter ttl specifies the Time To Live (TTL) for the request. This basically specifies how many
hops the message is allowed to make before being discarded.
Parameter function specifies which remote function to be invoked. This could be a built-in SNAPpy
function, or one defined by the SNAPpy script currently loaded into that node.
NOTE! Except for built-ins, what the function actually does depends on what script is loaded
into each node.
The specified function will be invoked with the parameters specified by args, if any args are present.
Snap Reference Manual-v1.1 Document Number 600-0007B
Page 45 of 126
For example, mcastRpc(1, 3, ‘writePin’, 0, True) will ask all nodes in the broadcast group and within 3
hops of the sender to do a writePin(0, True).
mcastRpc(3, 5, ‘reboot’) will ask all nodes within 5 hops and belonging to group 1 (0x0001 or
0000000000000001b) or group 2 (0x0002 or 0000000000000010b) to do a reboot().
Notice that groups are bits, not numbers.
mcastRpc(6, 2, ‘reboot’) will ask all nodes within 2 hops and belonging to group 2 (0x0002 or
0000000000000010b) or group 3 (0x0004 or 0000000000000100b) to do a reboot().
This function normally returns True. It returns False only if it was unable to attempt the Remote
Procedure Call (for example, if the node is low on memory).
If this function returns True, it does not mean your RPC request was successfully received (SNAP
multicast messages are unacknowledged).
If you need confirmation the remote node executed your request, it needs to come from the remote
node. Refer to the callback() function for one method of doing this.
mcastSerial(destGroups, ttl) – Setup TRANSPARENT MODE
SNAP TRANSPARENT MODE is covered in section 5.
When you want the outbound data to be sent to multiple nodes, use this function.
Parameter destGroups specifies the multicast groups that are eligible to receive this data. Parameter ttl
specifies the maximum number of hops the data will be re-transmitted (in search of interested nodes).
Note that because the received serial characters will be sent using (unacknowledged) multicast
messages, multicast TRANSPARENT MODE is less reliable than unicast TRANSPARENT MODE.
If you want the received serial characters to go to only one specific node, you will have to use function
ucastSerial() instead.
This function does not return a value.
monitorPin(pin, isMonitored) – Enable/disable monitoring of a pin
This function can be used as an alternative to function readPin(), or in addition to it.
Parameter pin specifies which GPIO pin (0-18) to monitor. Parameter isMonitored makes the pin be
monitored when True, or ignored when False.
Snap Reference Manual-v1.1 Document Number 600-0007B
Page 46 of 126
“Monitoring” in this context means “sampled periodically in the background”, and only makes sense
with pins previously configured as digital inputs via setPinDir().
You could monitor an output pin, but the changes you got notified about would be changes that
you caused (via writePin()).
When monitored pins change state, a HOOK_GPIN event is sent to the SNAPpy virtual machine. If
you have assigned a HOOK_GPIN handler (using the “set hook” capability described in section 5),
then that previously specified handler function will be invoked with the number of the GPIO pin that
changed state, and the pins new value.
This function does not return a value.
See also function setRate(), which controls the sampling rate of the background pin monitoring that is
enabled/disabled by this function.
ord(str) – Returns the integer ASCII ordinal value of a character
This function was added for compatibility with Python.
Parameter str specifies a single-character string to be converted. For example, ord(‘A’) = 65 (0x41),
and ord(‘0’) = 48 (0x30).
peek(address) - Read a memory location
The peek() function allows you to read any location within the RF Engine’s 64K memory space.
Parameter address specifies which memory location to read (0-65535).
This function returns an integer in the range 0-255.
This function is intended for advanced users only.
poke(address, value) – Write to a memory location
The poke() function allows you to write to any location within the RF Engine’s 64K memory space.
Parameter address specifies which memory location to write to. Parameter value specifies the value to
be written.
This function does not return a value.
This function is intended for advanced users only.
Snap Reference Manual-v1.1 Document Number 600-0007B
Page 47 of 126
If you are not careful with this function, you could crash or even “unprogram” your RF Engine. Still, if
you know what you are doing, peek() and poke() allow you to take advantage of additional hardware
resources within the RF Engine itself (functions not supported by the “core” firmware).
See for example sample SNAPpy script PWM.py.
print – Generate output from your script
The print capability of SNAPpy is not really a function (you don’t put parentheses characters after it,
for example), but it does let you send output from your SNAPpy scripts. Here are some examples:
print “hello”
print 123
print xyz
You can also print multiple items from a single print statement:
print ‘this ‘, ‘is ‘, ‘a’, ‘test’
The result of each individual print statement will usually go on a separate line. You must use a trailing
comma (“,”) character to override this.
print “line 1”
print “line 2”
print “line 3”,
print “ and even more line 3”
pulsePin(pin, msWidth, isPositive) – Generate a timed pulse
You could generate a pulse using a GPIO pin, and multiple writePin() commands. This function lets
you initiate the pulse in a single step, gives you finer grained control of the pulse duration, and frees
your script from having to “time” (countdown) the pulse.
Parameter pin is which GPIO pin (0-18) to generate the pulse on. Parameter msWidth specifies the
desired pulse width in milliseconds (1-65535)
Specifying a pulse width of 0 will simply result in no pulse at all.
Parameter isPositive controls the polarity of the pulse. It essentially specifies the logic level of the
leading edge of the pulse, and the opposite of this value is used for the trailing edge of the pulse.
This function has no effect unless/until the specified GPIO pin is also configured as an output (via
setPinDir()).
This function does not return a value.
Snap Reference Manual-v1.1 Document Number 600-0007B
Page 48 of 126
random() – Generate a pseudo-random number
This function returns a pseudo-random number between 0-4095.
This function does not take any parameters.
readAdc(channel) – Read an Analog Input pin (or reference)
This function can be called to read one of the eight external analog input pins, the internal low voltage
reference, or the internal high voltage reference.
Parameter channel specifies which analog input channel (0-9) to read. Channels 0-7 correspond to one
of the eight external analog input pins. Channel 8 refers to the internal low voltage reference. Channel
9 refers to the internal high voltage reference.
The mapping of Analog Input Channels to GPIO pins is as follows:
Analog Input Channel
0
1
2
3
4
5
6
7
GPIO Pin
18
17
16
15
14
13
12
11
This function returns an integer value 0-1023 (these are 10-bit analog to digital converters). Since the
full-scale volage is 3.3 volts, each step represents about 3.2 millivolts.
readPin(pin) – Read the logic level of a pin
This function can be called for GPIO pins that are configured as digital inputs or digital outputs (see
also setPinDir()).
Parameter pin specifies which GPIO pin (0-18) to read.
This function returns a boolean value representing the current logic level of the specified pin. For an
input pin, this is a “live value”. For an output pin, this is the last value written to the pin.
Snap Reference Manual-v1.1 Document Number 600-0007B
Page 49 of 126
reboot() – Schedule a reboot
This function takes no parameters, and returns no value.
Approximately 200 milliseconds after this function is called, the SNAP node will reboot.
The 200 milliseconds delay is to allow the node time to acknowledge the reboot() request.
resetVm() – Reset (shut down) the SNAPpy Virtual Machine
This function takes no parameters, and returns no value.
When this function is called, the SNAPpy Virtual Machine stops running any loaded script (but the
script remains in the unit).
This function is used (by Portal and Gateway) at the start of the script upload process, and would not
normally be used by users. However, sometimes when testing a script it is useful to be able to halt it.
See also function initVm(), which restarts the SNAPpy VM.
rpc(address, function, args…) – Remote Procedure Call (RPC)
Call a Remote Procedure (make a Remote Procedure Call, or RPC), using unicast messaging. A
special packet will be sent to the node specified by parameter address, asking that remote node to
execute the function specified by parameter function. The specified function will be invoked with the
parameters specified by args, if any args are present.
For example, rpc(‘\x12\x34\x56’, ‘writePin’, 0, True) will ask the node at address 12.34.56 to do a
writePin(0, True).
rpc(‘\x56\x78\x9A’, ‘reboot’) will ask the node at address 56.78.9A to do a reboot().
This function normally returns True. It returns False only if it was unable to attempt the Remote
Procedure Call (for example, if the node is low on memory).
If this function returns True, it does not mean your RPC request was successfully sent and received
(SNAP will give up after a programmable number of retries, which defaults to 8).
If you need confirmation the remote node executed your request, it needs to come from that remote
node. Refer to the callback() function for one method of doing this.
Snap Reference Manual-v1.1 Document Number 600-0007B
Page 50 of 126
rpcSourceAddr() – Who made this Remote ProcedureCall?
If a function on a node is invoked remotely (via RPC), then the called function can invoke function
rpcSourceAddr() to find out the Network Address of the node responsible. (If you call this function
when a RPC is not in progress, it just returns None).
Having this function allows a node to respond (answer back) directly to other nodes. An example will
make this clearer.
Imagine node “A” is loaded with a script containing the following function definition:
def pong():
print “got a response!”
Now imagine node “B” is loaded with a script containing the following function:
def ping():
rpc( rpcSourceAddr(), ‘pong’)
Node “A” can invoke function “ping” on node “B”, but it has to know node B’s address to do so:
rpc(node_B_address_goes_here, ‘ping’)
When node “B” receives the RPC request packet, it will invoke local function ‘ping’, which will
generate the remote ‘pong’ request. Notice that node “B” can respond to a ‘ping’ request from any
node.
All SNAP Network Addresses are three-byte strings.
This function takes no parameters.
rx(isEnabled) – Turn radio receiver on or off
This function allows you to power down the radio, extending battery life in applications that do not
actually need the radio (or only need it intermittently).
NOTE! If you turn the radio off (using rx(False)), then you will not receive any more radio
traffic!
The radio defaults to ON in SNAP Nodes. If you invoke rx(False), the radio will be powered down.
Invoking rx(True) will power the radio back up.
In addition, sending any data over the radio will automatically wake the radio back up.
To be clear: a node can wake up its own radio by attempting to transmit. A node’s radio will not be
woken up by transmissions from other nodes. This function does not return a value.
Snap Reference Manual-v1.1 Document Number 600-0007B
Page 51 of 126
saveNvParam(id, obj) – Save data into NV memory
This function lets you store individual pieces of data into the SNAP node’s Non-Volatile (NV)
memory.
Parameter id specifies which “key” to store the obj parameter under. NV parameter IDs 0, 255, and 1127 all have pre-assigned meanings (refer to section 9). IDs 128-254 are user defined, your script can
store whatever you want, under any ID (128-254) that you want.
The obj parameter should be the data you want to store, and can be a boolean, an integer, or a string.
See also function loadNvParam().
This function does not return a value.
scanEnergy() – Get energy readings from all 16 channels
The getEnergy() function returns the result of a brief 802.15.4 Energy Detection scan (on the current
channel).
Function scanEnergy() is an extension of getEnergy(). It essentially calls getEnergy() 16 times in a
row, changing the channel before each getEnergy() scan.
Function scanEnergy() returns a 16-byte string, where the first character corresponds to the “detected
energy level” on channel 0, the next character goes with channel 1, and so on.
The units for the “detected energy level” are the same as that returned by getLq(), refer to the
documentation on that function for more info.
This function takes no parameters.
setChannel(channel) – Specify which channel the node is on
The setChannel() function takes a channel parameter 0-15 representing which SNAP channel the node
should switch to.
SNAP channel 0 corresponds to 802.15.4 channel 11, 1 to 12, and so on. Refer to the description for
function getChannel() for more on this topic.
This function returns no value.
Note that this function changes the “live” channel setting, and the effect only lasts until the next
reboot or power cycle. You can also use saveNvParam() to save the “persisted” channel setting,
if you want the node to stay on that channel.
Snap Reference Manual-v1.1 Document Number 600-0007B
Page 52 of 126
Applications wanting to change the channel now plus going forward should probably use both
functions.
This function does not return a value.
setNetId(networkId) – Specify which Network ID the node is on
The setNetId() function takes a channel parameter 0-0xFFFF representing which SNAP Network ID
the node should switch to. Note that Network ID 0xFFFF is considered a “wildcard” network ID
(matches all nodes), and you normally should only use network IDs of 0-0xFFFE.
This function returns no value.
Note that this function changes the “live” network ID setting, and the effect only lasts until the
next reboot or power cycle. You can also use saveNvParam() to save the “persisted” network ID
setting, if you want the node to stay on that network ID.
Applications wanting to change the network ID now plus going forward should probably use both
functions.
setPinDir(pin, isOutput) – Set direction (input or output) for a pin
This function should be called for each GPIO pin you want to use as either a digital input or digital
output in your application.
Parameter pin specifies which GPIO pin (0-18) to configure. Parameter isOutput makes the pin be an
output when True, or an input when False.
For a given GPIO pin, you should call this function before calling functions like setPinPullup(),
readPin() and monitorPin() (for input pins) or setPinSlew(), writePin() and pulsePin() (for output pins).
This function does not return a value.
setPinPullup(pin, isEnabled) – Control internal pullup resistor
This function should be called for each GPIO pin you are using as a digital input, if you want the
internal pullup resistor (~25K) for that pin to be enabled. (The default pullup setting is off, so you
usually do not have to call this function unless you want the pullup enabled), or you previously
enabled it and now want to disable it.
Snap Reference Manual-v1.1 Document Number 600-0007B
Page 53 of 126
Parameter pin specifies which GPIO pin (0-18) to configure. Parameter isEnabled makes the internal
pullup for the pin be active when True, or inactive when False.
This function has no effect unless/until the pin is also configured as a digital input pin.
This function does not return a value.
setPinSlew(pin, isRateControl) – Enable/disable slew rate control
This function should be called for each GPIO pin you are using as a digital output, if you want the
internal slew rate control (~30ns) for that pin to also be enabled. (The default slew rate setting is off,
so you usually do not have to call this function unless you want the slew rate control enabled).
Parameter pin specifies which GPIO pin (0-18) to configure. Parameter isRateControl makes the slew
rate control be active when True, or inactive when False.
This function has no effect unless/until the pin is also configured as a digital output pin.
This function does not return a value.
setRate(rate) – Set monitorPin() sample rate
By default, the background pin sampling that is enabled/disabled by function monitorPin() takes place
10 times a second (every 100 milliseconds). This function allows you to vary that sampling rate.
Parameter rate specifies whether the sampling should be OFF (rate =0), every 100 ms (rate = 1),
every 10 ms (rate = 2), or every 1 ms (rate = 3).
This function has no effect unless/until you are actually using pin monitoring.
This function does not return a value.
setSegments(segments) – Update seven-segment display
This function is only useful on Synapse boards that have a seven-segment (per digit) display on them.
It assumes a particular type of “shift register controlled” display, that requires continuous refresh, with
GPIO pins 13 and 14 controlling the display.
Parameter segments specifies a 16-bit binary pattern that controls which segments will be lit, and
which will be dark. Because the displays currently used do not have decimal points, only 14 of the
total 16 bits are meaningful.
Snap Reference Manual-v1.1 Document Number 600-0007B
Page 54 of 126
A segments value of 0x0000 turns off all segments. A value of 0x7F7F corresponds to “all segments
on”.
This interface gives you complete control of the display, but you can wrap the display in higher level
access functions. See for example function display2digits() in supplied script evalBase.py.
The actual “bit to segment” assignments make sort of a “clockwise inward spiral” path around each
digit.
Refer to the table on the following page for more details.
Snap Reference Manual-v1.1 Document Number 600-0007B
Page 55 of 126
Bit (in
hexadecimal)
0x0001
0x0004
0x0010
0x0040
0x0100
0x0400
0x1000
0x4000
Bit Position Within
Display
| | | |
| | | |
| | | |
| | | |
| | | |
| | | |
| | | |
| | | |
| | | |
| | | |
| | | |
| | | |
| | | |
| | | |
| | | |
| | | |
-
Bit (in
hexadecimal)
0x0002
0x0008
0x0020
0x0080
(no effect)
0x0200
0x0800
0x2000
0x8000
(no effect)
Snap Reference Manual-v1.1 Document Number 600-0007B
Bit Position Within
Display
| | | |
| | | |
| | | |
| | | |
| | | |
| | | |
| | | |
| | | |
| | | |
| | | |
| | | |
| | | |
| | | |
| | | |
| | | |
| | | |
-
Page 56 of 126
sleep(mode, ticks) – Go to sleep (enter low-power mode)
This function puts the radio and CPU on the SNAP node into a low-power mode for a specified
number of ticks. This is used to extend battery life.
Parameter mode chooses from two possible sleep modes:
0 – the radio is put completely to sleep (the processor measures time)
Parameter ticks is in units of 1.024 seconds
The timing in this node is much less accurate (+/- 30%)
If you only sleep for one tick, this mode uses less power than mode 1
If you are sleeping for more than one tick, this mode uses more power
You can sleep for up to 32767 ticks using this mode
1 – the radio stays awake just enough to “count down” the sleep interval
Parameter ticks is in units of 1.0 seconds
The timing in this mode is more accurate
If you are only sleeping for 1 tick, this mode uses more power than mode 0
If you are sleeping for more than 1 tick, this mode uses less power
You can sleep for up to 1073 ticks using this mode
A ticks parameter of 0 can be used to sleep until a button is pressed (see script pinWakeup.py), but
SNAPpy is smart enough to know if you have not enabled a wakeup pin, and will ignore a
sleep(mode, 0) if there is no wakeup possible.
This function does not return a value.
spiInit(cpol, cpha, isMsbFirst, isFourWire) – Setup SPI Bus
This function initializes the SNAP node to perform Serial Peripheral Interface (SPI) Bus interfacing.
The SPI standard has multiple options, hence the large number of parameters in spiInit().
Parameter cpol refers to Clock Polarity, and can be either True or False.
Parameter cpha refers to the Clock Phase, and can be True (rising edge) or False (falling edge).
Parameter isMsbFirst controls the order in which individual bits within each byte will be shifted out.
Setting this parameter to True will make the 0x80 bit go out first, setting this parameter to False will
make the 0x01 bit go out first.
Parameter isFourWire lets you select the variant of SPI you are connecting to. Three wire SPI omits
the MISO pin. In three-wire SPI, even if the slave does send data, it is over the MOSI pin.
Snap Reference Manual-v1.1 Document Number 600-0007B
Page 57 of 126
This function does not return a value.
spiRead(byteCount, bitsInLastByte=8) – SPI Bus Read
This function can only be used after function spiInit() has been called.
This function reads data from a three wire SPI device (for four wire SPI, you should be using the
bidirectional function spiXfer() instead).
Parameter byteCount specifies how many bytes to read.
Parameter bitsInLastByte makes it possible to accommodate devices with data widths that are not
multiples of 8 (like 12 bits). The default value of bitsInLastByte is 8. For a device with a data width of
12 bits, bitsInLastByte would be set to 4. For a device with a data width of 31 bits, bitsInLastByte
would be set to 7.
The order that bits get shifted in depends on the value of parameter isMsbFirst which was specified in
the previous spiInit() call.
This function returns a string containing the actual bytes received.
More background information on using SPI is in section 6.
spiWrite(byteStr, bitsInLastByte=8) – SPI Bus Write
This function can only be used after function spiInit() has been called.
This function writes data to a three or four wire SPI device. If you want to write and read data
simultaneously (four wire SPI only), then you should be using the bidirectional function spiXfer()
instead of this one).
Parameter byteStr specifies the actual bytes to be shifted out.
Parameter bitsInLastByte makes it possible to accommodate devices with data widths like 12 bits. The
default value of bitsInLastByte is 8. For a device with a data width of 12 bits, bitsInLastByte would be
set to 4. For a device with a data width of 31 bits, bitsInLastByte would be set to 7.
The order that bits get shifted out depends on the value of parameter isMsbFirst which was specified
in the previous spiInit() call.
This function does not return a value.
More background information on using SPI is in section 6.
Snap Reference Manual-v1.1 Document Number 600-0007B
Page 58 of 126
spiXfer(byteStr, bitsInLastByte=8) – Bidirectional SPI Transfer
This function can only be used after function spiInit() has been called.
This function reads and writes data over a four wire SPI device. If your device is read-only or writeonly, you should look at the spiRead() and spiWrite() routines.
Parameter byteStr specifies the actual bytes to be shifted out.
As these bits are being shifted out to the slave device (on the MOSI pin), bits from the slave device (on
the MISO pin) are simultaneously shifted in.
Parameter bitsInLastByte makes it possible to accommodate devices with data widths like 12 bits. The
default value of bitsInLastByte is 8. For a device with a data width of 12 bits, bitsInLastByte would be
set to 4. For a device with a data width of 31 bits, bitsInLastByte would be set to 7.
The order that bits get shifted out depends on the value of parameter isMsbFirst which was specified
in the previous spiInit() call.
This function returns a byte string consisting of the bits that were shifted in (as the bits specified by
paramter byteStr were shifted out).
More background information on using SPI is in section 6.
stdinMode(mode, echo) – Set console input options
This function controls how serial data gets presented to your SNAPpy script (via the HOOK_STDIN),
and how it appears to the user.
Parameter mode chooses between line-at-a-time (mode = 0) or character based (mode = 1).
In “line mode” (mode 0), characters are buffered up until either a Carriage Return (CR) or Line Feed
(LF) are received. The complete string is then given to your SNAPpy script in a single HOOK_STDIN
invocation. Note that either character can trigger the handoff, so if your terminal (or terminal
emulator) is automatically adding extra CR or LF characters, you will see additional empty strings (“”)
passed to your script.
The character sequence A B C CR LF looks like two lines of input to SNAPpy.
In “character mode” (mode 1), characters are passed to your SNAPpy script as soon as they become
available. If characters are being received fast enough, it still is possible for your script to receive more
than one character at a time, they are just not buffered waiting for a CR or LF.
Parameter echo is a Boolean parameter that controls whether or not the SNAP firmware will “echo”
(retransmit) the received characters back out (so that the user can see what they are typing).
Snap Reference Manual-v1.1 Document Number 600-0007B
Page 59 of 126
This function does not return a value.
str(object) – Returns the string representation of an object
This function was included for compatibility with Python.
Function str() returns a string based on the value of the object you give it.
For example, str(123) = ‘123’, str(True) = ‘True’, and str(‘hello’) = ‘hello’.
txPwr(power) – Set Radio TX power level
The 802.15.4 radio on the SNAP node defaults to full power. Function txPwr() lets you reduce the
power level from this default maximum.
Parameter power specifies a transmit power level from 0-17, with 0 being the lowest power setting and
17 being the highest power setting.
This function does not return a value.
ucastSerial(destAddr) – Setup outbound TRANSPARENT MODE
SNAP TRANSPARENT MODE is covered in section 5.
When you want the outbound data to be sent to a specific node, use this function.
Parameter destAddr specifies the Network Address of some other node to give the received serial
characters to.
If you want the received serial characters to go to more than one node, you will have to use function
mcastSerial() instead.
This function does not return a value.
Snap Reference Manual-v1.1 Document Number 600-0007B
Page 60 of 126
uniConnect(dest, src) – Make a one-way switchboard connection
The SNAPpy switchboard is covered in section 5.
This function establishes a one-way connection between two points. See included script
switchboard.py for the possible values of parameters src and dest.
See also function crossConnect() if you need a bi-directional hookup. As an alternative, two
uniConnect() calls can be equal to one crossConnect() call. For example:
uniConnect(UART1, UART2)
uniconnect(UART2, UART1)
has the same effect as:
crossConnect(UART1, UART2)
This function does not return a value.
vmStat(statusCode, args…) – Back door used by Portal
This function was originally only used by Portal, and was undocumented in version 2.0.
With the addition of the SNAP Gateway to the Synapse product line, customers started needing access
to the same functionality Portal uses.
This function is in some aspects a precursor to the version 2.1 callback() function.
Originally added to support initial discovery of nodes, and downloading of SNAPpy scripts, this
function has grown over time. Now vmStat() can trigger several actions, or retrieve several types of
data.
Parameter statusCode controls what actions will be taken, and what data will be returned (via a
tellVmStat() callback to the original node).
Snap Reference Manual-v1.1 Document Number 600-0007B
Page 61 of 126
The currently supported statusCode values are:
0 = VM_RESET: stop the SNAPpy Virtual Machine (for script uploading)
1 = VM_IMG_ERASE: erase the current SNAPpy script
2 = VM_WR_BLK: used when uploading scripts - DO NOT CALL THIS!
3 = VM_INIT: restart the SNAPpy Virtual Machine (after script uploading)
4 = VM_NVREAD: read the specified NV Parameter
5 = VM_NAME: returns NODE NAME if set, else IMAGE NAME, plus Link Quality
6 = VM_VERSION: returns software version number
7 = VM_NET: returns Network ID and Channel
8 = VM_SPACE: returns Total Image (script) Space Available
9 = VM_SCAN: scans all 16 channels for energy, returns 16 character string
10 = VM_INFO: returns Image Name (script name) and Link Quality
You probably should not be invoking vmStat() with statusCodes of 0-3 (unless you are implementing
your own downloader).
statusCodes 4-10 are safe to call.
After the statusCode, the next argument varies (depending on the statusCode).
After the "varying" argument comes a final optional argument that specifies a "time window" to
randomly reply within (more about this below).
For VM_NVREAD, the second argument is the ID of the NV Parameter you want to read (these are
the same IDs used in the saveNvParam() and loadNvParam() functions). You can also optionally
specify a "reply window".
The NV Parameter IDs are given in section 9.
The reported values will be a "hiByte" of the NV Parameter ID, and a "data" of the actual NV
Parameter value.
For VM_NAME, the only parameter is the optional reply window.
The reported "data" value will be a string name and a Link Quality reading.
For VM_VERSION, the only parameter is the optional reply window.
The reported "data" value will be a version number string
For VM_NET, the only parameter is the optional reply window.
The reported values will be a "hiByte" containing the currently active channel (0-15), and a "data"
value of the current Network ID
For VM_SPACE, the only parameter is the optional reply window.
Snap Reference Manual-v1.1 Document Number 600-0007B
Page 62 of 126
The reported "data" value will be the Total Image (script) Space Available
For VM_SCAN, the only parameter is the optional reply window.
The reported "data" value will be a 16 character string containing the detected energy levels on all 16
channels. Note that each scan just represents one point in time, you will probably have to initiate
multiple scans to determine which channels actually have SNAP nodes on them.
You can see this VM_SCAN function put to use in the Channel Analyzer feature of Portal.
See also function scanEnergy(), which returns data in an equivalent format.
For VM_INFO, the only parameter is the optional reply window.
The reported values will be a "hiByte" of the current Link Quality, and a "data" of the currently loaded
script name (a string).
Return value format:
All of the VM_xxx functions invoke a callback named tellVmStat(word, data)
The least significant byte of word will be the originally requested statusCode. The most significant
byte will vary depending on the statusCode, and is the "hiByte" described above. The data value is the
main return value, and is also dependant on the statusCode.
Return value timing:
If you do not specify a "time window" parameter, the nodes will respond immediately.
Some of these commands are multicast by Portal, and we needed a way to keep all of the nodes from
trying to respond at once.
Specifying a non-zero "time window" tells the node to pick a random time within the next "time
window" seconds, and wait until then to reply.
This function does not return a value, but it causes a tellVmStat() call to be made to the node that
requested the vmStat().
NOTE – now that the callback() function has been added, some of the vmStat() capabilities are
redundant.
Snap Reference Manual-v1.1 Document Number 600-0007B
Page 63 of 126
writeChunk(offset, data) – Synapse Use Only
This function is used by Portal and Gateway as part of the script uploading process.
There should be no reason for user scripts to call this function, and attempting to do so could erase or
corrupt all of your SNAP firmware, requiring a firmware reload (Portal has the capability to do this).
This function does not return a value.
writePin(pin, isHigh) – Set output pin level
This function allows you to control digital output pins (GPIO pins configured as digital outputs).
Parameter pin specifies which GPIO pin (0-18) to control. Parameter isHigh makes the pin go high
(True) or low (False).
This function has no effect unless/until the pin is configured as a digital output pin via setPinDir(). See
also related function setSlewRate(), which controls how quickly the pin will transition to a new value..
This function does not return a value.
Snap Reference Manual-v1.1 Document Number 600-0007B
Page 64 of 126
Here are the functions again, but this time broken down by category.
ADC
readAdc(channel)
Sample ADC on specified input channel, returns 10 bit unsigned
Note: channel is 0-9. Channels 0-7 are external analog inputs.
Channel 8 is an internal low voltage reference.
Channel 9 is an internal high voltage reference.
NOTE: All ADC readings (even channel 9) are relative to VCC (not absolute). You may require an
external reference voltage for comparision.
CBUS Master Emulation
cbusRd(numToRead)
Reads numToRead bytes from CBUS, returns string
cbusWr(byteStr)
Writes every byte in byteStr to the CBUS
These functions are discussed in section 6 of this document.
GPIO
setPinDir(pin, isOutput)
setPinPullup(pin, isEnabled)
setPinSlew(pin, isRateControl)
monitorPin(pin, isMonitored)
pulsePin(pin, msWidth, isPositive)
readPin(pin)
writePin(pin, isHigh)
setRate(rateCode)
Set direction for parallel I/O pin
Enable pullup resistor (25k) for Input pin
Enable slew rate-control (30ns) for Output pin
Enable GPIN events on Input pin
Apply pulse to Output pin
Read current level of pin
Set Output pin level
Set pin sampling rate to off (0), 100 ms (1), 10 ms (2), or 1 ms (3)
I2C Master Emulation
getI2cResult()
Returns the result of the most recent I2C operation
i2cInit(enablePullups)
Prepare for I2C operations
i2cRead(str, numBytes, retries, ignoreFirstAck) Write str out, then read numBytes back in from I2C bus.
Parameters retries and ignoreFirstAck are used with slow or
special case devices
Write str out over the I2C bus. Parameters retries and
i2cWrite(str, retries, ignoreFirstAck)
ignoreFirstAck are used with slow or special case devices
These functions are discussed in section 6 of this document.
Snap Reference Manual-v1.1 Document Number 600-0007B
Page 65 of 126
Misc
setSegments(segments)
bist()
eraseImage()
resetVm()
initVm()
vmStat(statusCode, args...)
writeChunk(ofs, str)
chr(number)
str(obj)
int(obj)
len(str)
random()
stdinMode(mode,echo)
Set eval-board LED segments (clockwise bitmask)
Built-in self test
Erase user-application FLASH memory
Reset the embedded virtual machine (prep for upload)
Initialize embedded virtual machine
Solicit a tellVmStat for system parameters
Write string to user-application FLASH memory
Returns the character string representation of “number”
Returns the string representation of obj
Returns the integer representation of obj
Returns the length of string str (0-255)
Returns a pseudo-random number 0-4095
mode is 0 for line, 1 for character at a time
echo is True or False
Network
getNetId()
Current Network ID
setNetId(netId)
Set Network ID (1-65535)
localAddr()
Local network address (3-byte binary string)
rpcSourceAddr()
Originating address of current RPC context (None if called
outside RPC)
mcastSerial(dstGroups, ttl)
Set Serial transparent mode to multicast
ucastSerial(dstAddr)
Set Serial transparent mode to unicast
callback(callbackFnObj, remoteFnObj, args...)
Remote Procedure Call of Remote Procedure Call results
rpc(dstAddr, remoteFnObj, args...)
Remote Procedure Call (unicast)
mcastRpc(dstGroups, ttl, remoteFnObj, args...)
Remote Procedure Call (multicast)
Non-Volatile (NV) Parameters
loadNvParam(id)
Load indexed parameter from NV storage
saveNvParam(id, obj)
Save object to indexed NV storage location
Snap Reference Manual-v1.1 Document Number 600-0007B
Page 66 of 126
Radio
rx(isEnabled)
tx(power)
setChannel(channel)
getChannel()
getLq()
getEnergy()
scanEnergy()
Enable/disable radio receiver
Adjust radio transmit level (0 is lowest, 17 is highest)
Set radio channel (0-15)
Radio channel (0-15)
Link Quality in (-) dBm
Detected RF energy in (-) dBm (current channel)
Detected RF energy in (-) dBm (all 16 channels)
Most applications need the radio to be on full-time (so the nodes can talk to each other). If your
application requires no wireless communications, you can reduce power consumption (increasing
battery life) by invoking rx(False) to turn off the radio.
SPI Master Emulation
spiInit(cpol, cpha, isMsbFirst, isFourWire)
spiRead(byteCount, bitsInLastByte)
spiWrite(byteStr, bitsInLastByte)
spiXfer(byteStr, bitsInLastByte)
setup for SPI, with specified Clock Polarity, Clock Phase, Bit
Order, and Physical Interface
receive data in from SPI - returns response string (three wire SPI
only)
send data out SPI - bitsInLastByte defaults to 8, can be less
bidirectional SPI transfer - returns response string (four wire SPI
only)
These functions are discussed in section 6 of this document.
Switchboard
crossConnect(dataSrc1, dataSrc2)
Cross-connect SNAP data-sources
uniConnect(dst, src)
Connect src->dst SNAP data-sources
You use crossConnect() to setup bidirectional transfers. You use uniConnect() to setup a one-way
connection. Note that multiple sources can be uni-connected to the same destination.
Snap Reference Manual-v1.1 Document Number 600-0007B
Page 67 of 126
System
getMs()
Elapsed milliseconds since startup (16bit)
getInfo(which)
Get specified system info
getStat(which)
Get debug info (Synapse developer use only)
call()
Invoke a user-defined binary function
peek(addr)
Read a memory location
poke(addr, byteVal)
Write a memory location
errno()
Read and reset last error code
imageName()
Name of current SNAPpy image
random()
Returns a pseudo-random number (0-4095)
reboot()
Reboot the device
sleep(mode,ticks)
Enter sleep mode for specified number of ticks
In mode 0, ticks are 1.024 seconds each
In mode 1, ticks are 1 second each, and can be 0-1073
UARTs
initUart(uartNum, bps)
initUart(uartNum, bps, dataBits, parity, stop)
flowControl(uartNum, isEnabled)
Enable UART at specified rate (zero rate to disable)
Enable UART at specified rate (zero rate to disable), data bits,
parity, and stop bits
Enable RTS/CTS flow control
Note: uartNum is 0 or 1
Snap Reference Manual-v1.1 Document Number 600-0007B
Page 68 of 126
8.
SNAPpy Scripting Hints
The following are some helpful hints for developing custom SNAPpy scripts for your nodes. These are
not in any particular order.
Beware of Case SensitiViTy
Like “desktop” Python, SNAPpy scripts are case sensitive – “foo” is not the same as “Foo”.
Also, because SNAPpy is a dynamically typed language, it is perfectly legal to invent a new variable
on-the-fly, and assign a value to it. So, the following SNAPpy code snippet:
foo = 2
Foo = 3
…results in two variables being created, and “foo” still has the original value of 2.
Case sensitivity applies to function names as well as variable names.
linkQuality = getlq()
…is a script error. The built-in function is not named “getlq”.
linkQuality = getLq()
…is what you want.
Beware of Accidental Local Variables
SNAPpy functions can access global variables, but (as in Python) you need to use the “global”
keyword in your functions.
count = 4
def bumpCount():
count = count + 1
…is not going to do what you want (count will still equal 4). Instead, write something like:
count = 4
def bumpCount():
global count
count = count + 1
Snap Reference Manual-v1.1 Document Number 600-0007B
Page 69 of 126
Don’t Cut Yourself Off (Packet Serial)
Portal talks to its “bridge” (directly connected) node using a packet serial protocol.
SNAPpy scripts can change both the UART and Packet Serial settings.
This means you can be talking to a node from Portal, and then upload a script into that node that starts
using that same serial port for some other function (for example, for script text output). Portal will no
longer be able to communicate with that node serially.
Remember Serial Output Takes Time
A script that does:
print “imagine a very long and important message here”
sleep()
…might not be allowing enough time for the text to make it all the way out of the node (particularly at
slower baud rates) before the sleep() command shuts the node off.
One possible solution would be to invoke the sleep() function from the timer hook.
In the script startup code:
sleepCountDown = 0
In the code that used to do the “print + sleep”
global sleepCountDown
print “imagine a very long and important message here”
sleepCountDown = 500 # actual number of milliseconds TBD
In the timer code:
global sleepCountDown
if sleepCountDown > 0:
if sleepCountDown < 100: # timebase is 100 ms
sleepCountDown = 0
sleep()
else:
sleepCountDown -= 100
Snap Reference Manual-v1.1 Document Number 600-0007B
Page 70 of 126
Remember nodes do not have a lot of RAM
SNAPv2 RF Engines only have 2-4K of Random Access Memory.
SNAPpy scripts should avoid generating a flood of text output all at once (there will be no where to
buffer the output). Instead, generate the composite output in small pieces (for example, one line at a
time), triggering the process with the HOOK_STDOUT event.
If a script generates too much output at once, the excess text will be truncated.
Remember SNAPpy Numbers Are Integers
2/3 = 0 in SNAPpy. As in all fixed point systems, you can work around this by “scaling” your internal
calculations up by a factor of 10, 100, etc. You then scale your final result down before presenting it to
the user.
Remember SNAPpy Integers are Signed
SNAPpy integers are 16-bit numbers, and have a numeric range of -32768 to +32767.
Be careful that any intermediate math computations do not exceed this range, as the resulting overflow
value will be incorrect.
Remember SNAPpy Integers have a Sign Bit
Another side-effect of SNAPpy integers being signed – negative numbers shifted right are still
negative (the sign bit is preserved).
You might expect 0x8000 >> 1 to be 0x4000 but really it is 0xC000. You can use bitwise and-ing to
get the desired effect if you need it.
X = X >> 1
X = X & 0x7FFF
Pay Attention to Script Output
Any SNAPpy script errors (see section 4) that occur will be printed to the previously configured
STDOUT destination, such as serial port 2. If your script is not behaving as expected, be sure and
check the output for any errors that may be reported.
If the node having the errors is a remote one (you cannot see its script output), remember that you can
invoke the “Intercept STDOUT” action from the Node Info tab for that node. The error messages will
then appear in the Portal event log.
Snap Reference Manual-v1.1 Document Number 600-0007B
Page 71 of 126
Don’t Define Functions Twice
In SNAPpy (as in Python), defining a function that already exists counts as a re-definition of that
function.
Other script code, that used to invoke the old function, will now be invoking the replacement function
instead.
Using meaningful function names will help alleviate this.
There is no truly dynamic memory in SNAPpy
SNAPpy scripts support some functions that in “desktop Python” require the use of dynamic memory
allocation. The core SNAP code does not support dynamic memory allocation. To implement these
functions, a handful of temporary buffers are used.
One such temporary buffer is used for string concatenation (a = ‘hello’ + ‘ world’). This buffer is only
64 bytes, so keep your concatenated strings short. Also realize that the temporary buffer is just that:
temporary. The next string concatenation done by your script will overwrite the previous one.
a = ‘hello’ + ‘ world’
b = ‘goodbye’ + ‘ mars’
At this point, both a and b are pointing at “goodbye mars”.
You can use string concatenation, but be careful how long you try to keep the results.
Another temporary buffer (also 64 bytes long) is used by the Python “slicing” operator. So you can
extract a substring from another string, but it needs to be 64 characters or less, plus you should treat it
as the temporary result it is. Use it or lose it!
a = ‘abcdef’
b = a[0:3]
c = a[1:4]
At this point, both b and c are pointing at “bcd”.
You can use string slicing, but be careful how long you try to keep the results.
There is a small one character buffer that is used when extracting a single character from another
string (subscripting).
a = “hello”
b = a[4]
c = a[1]
Snap Reference Manual-v1.1 Document Number 600-0007B
Page 72 of 126
At this point, both b and c are equal to “e”.
Finally, the chr() function also uses a temporary one character buffer.
a = chr(65)
b = chr(66)
At this point, both a and b are equal to “B”
Try to use these “temporary values” as soon as you create them. If you must have a persistent value,
try saving the string as a NV parameter by using the SNAPpy API functions saveNvParam() and
loadNvParam().
NV Parameters must be used carefully too
Because of FLASH memory compaction and relocation that can occur as new NV parameters are
saved, you should always read in (using loadNvParam(id)) a NV parameter right before you need it.
Use the Supported Form of Import
In SNAPpy scripts you should use the form:
from moduleName import *
Remember Portal Speaks Python Too
SNAPpy scripts are a very powerful tool, but the SNAPpy language is a modified subset of full-blown
Python.
In some cases, you may be able to take advantage of Portal’s more powerful capabilities, by having
SNAPpy scripts (running on remote nodes) invoke routines contained within Portal scripts.
This applies not only to the scripting language differences, but also to the additional hardware a
desktop platform adds.
As an example, even though a node has no graphics display, it can still generate a plot of link quality
over time, by using a code snippet like the following:
rpc("\x00\x00\x01", "plotlq", localAddr(), getLq())
For this to do anything useful, Portal must also have loaded a script containing the following
definition:
def plotlq(who,lq):
logData(who,lq,256)
The node will report the data, and Portal will plot the data.
Snap Reference Manual-v1.1 Document Number 600-0007B
Page 73 of 126
Remember you can invoke functions remotely
Writing modular code is always a good idea. As an added bonus, if you are able to break your overall
script into multiple function definitions, you can remotely invoke the individual routines. This can
help in determining where any problem lies.
Be careful using multicast RPC invocation
Realize that if you multicast an RPC call to function “foo”, all nodes in that multicast group that have
a foo() function will execute theirs. To put it another way, give your SNAPpy functions distinct and
meaningful names.
If all nodes hear the question at the same time, they will all answer at the same time
If you have more than a few nodes, you will need to coordinate their responses (using a SNAPpy
script) if you poll them via a multicast RPC call.
Snap Reference Manual-v1.1 Document Number 600-0007B
Page 74 of 126
9.
SNAP Node Configuration Parameters
You make your SNAP nodes do completely new things by loading SNAPpy scripts into them. You can
often adjust the way they do the things that are already built-in by adjusting one or more Configuration
Parameters.
These Configuration Parameters are stored in a section of Non-Volatile (NV) memory within the
SNAP node. For this reason Configuration Parameters are also referred to as NV Parameters.
SNAPpy scripts can access these NV Parameters by using the loadNvParam(id) function.
SNAPpy scripts can change these parameters by using the saveNvParam() function (and then
rebooting so that the changes will take effect).
When using the loadNvParam() and saveNvParam() functions, you must specify which NV Parameter
by numeric ID.
You can also easily view and edit these parameters using Portal, refer to section 13 of this manual.
When you view and edit these parameters from Portal, you do not need to know the NV Parameter ID,
Portal takes care of that for you.
Here are all of the NV Parameters (sorted by numeric ID), and what they do.
Remember – you must reboot a node after changing any NV Parameter for the change to
actually take effect.
ID 0 – reserved for internal use (0 means “erased” inside the actual NV storage)
ID 1 – reserved for internal use (used to support a NV page-swapping scheme internally)
ID 2 – MAC Address – the eight byte address of the SNAP Node
ID 3 – Network ID – the 16-bit Network Identifier of the SNAP Node
ID 4 – Channel – the channel (0-15) the SNAP Node is on
ID 5 - Multi-cast Processed Groups – This is a 16-bit field controlling which multi-cast groups the
node will respond to. It is a bit mask, with each bit representing one of 16 possible multi-cast groups.
For example, the 0x0001 bit represents the “broadcast group”.
One way to think of groups is as “logical sub-channels” or as “subnets”. By assigning different nodes
to different groups, you can further subdivide your network.
For example, Portal could multi-cast a “sleep” command to group 0x0002, and only nodes with that bit
set in their Multi-cast Processed Groups field would go to sleep.
Snap Reference Manual-v1.1 Document Number 600-0007B
Page 75 of 126
Note that a single node can belong to any (or even all) of the 16 groups.
ID 6 - Multi-cast Forwarded Groups - This is a separate 16-bit field controlling which multi-cast
groups will be re-transmitted (forwarded) by the node.
By default, all nodes process and forward group 1 (broadcast) packets.
Please note that these two fields are independent of each other. A node could be configured to forward
a group, process a group, or both.
ID 7 – Manufacturing Date – Synapse use only
ID 8 – Device Name – New for version 2.1, this NV Parameter lets you choose a name for the node,
rather than letting it be determined by what script happened to be loaded in the node at the time Portal
first detected it. If this parameter is set to None, then the old behavior will be used, you do not have to
give your nodes explicit names.
ID 9 – Last System Error – if a SNAP Node does a “panic” reboot, it stores the error code telling
why here in this NV Parameter (Synapse internal use only).
ID 10 - Device Type – This is a user definable string that can be read by scripts. This allows a single
script to fill multiple roles, by giving it a way to determine “which type of node it is running on”. This
NV Parameter gives you a way to “categorize” your nodes.
ID 11 - Feature Bits control some miscellaneous hardware settings. The individual bits are:
Bit 0 (0x0001) – Enable Serial Port 1 (USB port on a SN111 board)
Bit 1 (0x0002) – Enable hardware flow control on Serial Port 1
Bit 2 (0x0004) – Enable Serial Port 2 (RS-232 port on a SN111 or SN171 board)
(the only serial port on a SN171 Proto Board)
Bit 3 (0x0008) – Enable hardware flow control on Serial Port 2
Bit 4 (0x0010) – Enable the radio Power Amplifier (PA)
Units with PA hardware can be identified by the “RFET” on their labels. Units without PA hardware
say “RFE” instead of “RFET”.
The PA feature bit should only be set on “RFET” units. Setting this bit on a “RFE” board will not
harm the RF Engine, but will actually result in lower transmit power levels (a 20-40% reduction).
ID 12 - Default UART - controls which UART will be pre-configured for Packet Serial Mode.
Normally the UART related settings would be specified by the SNAPpy scripts uploaded into the
node. This default setting has been implemented to handle nodes that have no scripts loaded yet.
Snap Reference Manual-v1.1 Document Number 600-0007B
Page 76 of 126
These defaults are overridden when needed!
Although you can request that one or both UARTs are disabled (via the Feature Bits), and you can
request that there is no Packet Serial mode UART (via the Default UART parameter), both of these
user requests will be ignored unless there is also a valid SNAPpy script loaded into the unit.
If there is no SNAPpy script loaded, a fail-safe mechanism kicks in and forces an active Packet Serial
port to be initialized, regardless of the configuration settings. This was done to help prevent users from
“locking themselves out”.
If there is a SNAPpy script loaded, then the assumption is that the script will take care of any
configuration overrides needed, and the Feature Bits and the Default UART setting will be honored.
ID 13 – Buffering Timeout – This lets you tune the overall serial data timeout.
This value is in milliseconds, and defaults to 5. This value controls the maximum amount of time
between an initial character being received over the serial port, and a packet of buffered serial data
being transmitted.
Note that other factors can also trigger the transmission of the buffered serial data, in particular see the
next two NV Parameters.
The larger this value is the more buffering will take place. Every packet has 12-15 bytes of overhead,
so sending more serial characters per packet makes TRANSPARENT MODE more efficient. Also,
when using MULTICAST TRANSPARENT MODE, keeping the characters together (in the same
packet) improves overall reliability.
The tradeoff is that the larger this value is, the greater the maximum latency can be through the overall
system.
ID 14 – Buffering Threshold – serial data threshold
This value is in total packet size, and defaults to 75 bytes. This value includes the packet headers, so
the actual amount of serial data sent in each packet will be less than this number.
The maximum SNAP packet size is 123 bytes. If you set this parameter to a value greater than 123, the
system will simply substitute a value of 123.
Like parameters #13 and #15, larger values can result in larger (more efficient) packets, at the expense
of greater latency. Also, at higher baud rates, setting this value too high can result in dropped
characters.
ID 15 – Inter-characeter Timeout - tune inter-character serial data timeout
This value is in milliseconds, and defaults to 0 (in other words, disabled).
Snap Reference Manual-v1.1 Document Number 600-0007B
Page 77 of 126
This timeout is similar to NV Parameter #13, but this one refers to the time between individual
characters. One way of thinking of it: this timeout restarts with every received character - the other
timeout always runs to completion.
Larger inter-character timeouts can give better MULTICAST TRANSPARENT MODE reliability, at
the expense of greater latency.
Note that either timeout #13 or #15 (if enabled) can trigger the transmission of the buffered data.
Note that any of these three parameters (ID #13-15) can serve as the trigger for transmission of the
buffered serial data.
ID 16 – Carrier Sense – basically “listen before you transmit”
This value defaults to False. Setting this value to True will cause the node to do what is called a Clear
Channel Assessment (CCA). Basically this means that the node will briefly listen before transmitting
anything, and will postpone sending the packet if some other node is already talking. This results in
fewer collisions (which means more multicast packets make it through), but the “listening” step adds
about 370 microseconds to the time it takes to send each packet.
If in your network the probability of collisions is low (you don’t have much traffic), and you need the
maximum throughput possible, then leave this value at its default setting of False. If in your network
the probability of collisions is high (you have a lot of nodes talking a lot of the time), then you can try
setting this parameter to True, and see if it helps your particular application.
ID 17 – Collision Detect – basically “listen after you transmit”
This value defaults to False. Setting this value to True will cause the node to do a CCA after sending a
multicast packet. This will catch some (but not all) collisions. If the node detects that some other node
was transmitting at the same time, then it will resend the multicast packet. This results in more
multicast packets making it through, but again at a throughput penalty.
The same criteria given for NV Parameter #16 apply to this one as well. You can try setting this
parameter to True, and see if it helps your application. If not, set it back to False.
ID 18 – Collision Avoidance – Control use of “random jitter” to try and reduce collisions
This setting defaults to True.
The SNAP protocol uses a “random jitter” technique to reduce the number of collisions.
Before transmitting a packet, SNAP does a small random delay. This random delay reduces the
number of collisions, but increases packet latency
Snap Reference Manual-v1.1 Document Number 600-0007B
Page 78 of 126
If you set this parameter to False, then this initial delay will not be used. This reduces latency (some
extremely time critical applications need this option) but increases the chances of an over-the-air
collision.
You should only change this parameter from its default setting of True if there is something else about
your application that reduces the chances of collision. For example, some applications operate in a
“command/response” fashion, where only one node at a time will be trying to respond anyway.
ID 19 – Radio Unicast Retries – Control number of unicast transmit attempts.
This parameter defaults to 8. This was the previously hard-coded value.
This parameter refers to the total number of attempts that will be made to get an acknowledgement
back on a unicast transmission to another node.
In some applications, there are time constraints on the “useful lifetime” of a packet. In other words, if
the packet has not been successfully transferred by a certain point in time, it is no longer useful. In
these situations, the extra retries are not helpful – the application will have already “given up” by the
time the packet finally gets through.
By lowering this value from its default value of 8, you can tell SNAP to “give up” sooner.
A value of 0 is treated the same as a value of 1 – a packet gets at least one chance to be delivered no
matter what
ID 20 – Mesh Routing Maximum Timeout – the maximum time (in milliseconds) a route can “live”
Discovered mesh routes timeout after a configurable period of inactivity (see #23), but this timeout
sets an upper limit on how long a route will be used, even if it is being used heavily. By forcing routes
to be rediscovered periodically, the nodes will use the shortest routes possible.
Note that you can set this timeout to zero (which will disable it) if you know for certain that your
nodes are stationary, or have some other reason for needing to avoid periodic route re-discovery.
ID 21 – Mesh Routing Minimum Timeout – the minimum time (in milliseconds) a route will be
kept.
ID 22 – Mesh Routing New Timeout – a grace period (in milliseconds) that a newly discovered route
will be kept, even if it is never actually used.
ID 23 – Mesh Routing Used Timeout – how many additional milliseconds of “life” a route gets
whenever it is used.
Every time a known route gets used, it’s timeout gets reset to this parameter. This prevents active
routes from timing out as often, but allows inactive routes to go away sooner. See also parameter #20,
which takes precedence over this timeout.
Snap Reference Manual-v1.1 Document Number 600-0007B
Page 79 of 126
ID 24 – Mesh Routing Delete Timeout – this timeout (in milliseconds) controls how long “expired”
routes are kept around for book-keeping purposes.
ID 25 - Mesh Routing RREQ Retries – this parameter controls the total number of retries that will be
made when attempting to “discover” a route (a multi-hop path) over the mesh.
ID 26 – Mesh Routing RREQ Wait Time – this parameter (in milliseconds) controls how long a
node will wait for a response to a Route Request (RREQ) before trying again.
Not that subsequent retries use longer and longer timeouts (the timeout is doubled each time). This
allows nodes from further and further away time to respond to the RREQ packet.
ID 27 - Mesh Routing Initial Hop Limit – this parameter controls how far the initial “discovery
broadcast” message is propagated across the mesh.
If your nodes are geographically distributed such that they are always more than 1 hop away from their
logical peers, then you can increase this parameter. Consequently, if most of your nodes are within
direct radio range of each other, having this parameter at the default setting of 1 will use less radio
bandwidth.
This parameter should remain less than or equal to the next parameter, Mesh Routing Maximum
Hop Limit.
Also, although Portal (or Gateway) are “one hop further away” than all other SNAP nodes on your
network (they are on the other side of a “bridge” node), the SNAP code knows this, and will
automatically give a “bonus hop” to this parameter’s value when using it to find nodes with addresses
in the reserved Portal/Gateway address range of 00.00.01 – 00.00.15. So, you can leave this parameter
at its default setting of 1 (one hop) even if you use Portals and/or Gateways.
ID 28 - Mesh Routing Maximum Hop Limit – to cut down on needless broadcast traffic during mesh
networking operation (thus saving both power and bandwidth), you can choose to lower this value to
the maximum number of physical hops across your network.
ID 29 - Mesh Sequence Number - reserved for future use.
ID 30 - Mesh Override is used to limit a nodes level of participation within the mesh network.
When set to the default value of 0, the node will fully participate in the mesh networking. These means
that not only will it make use of mesh routing, but it will also “volunteer” to route packets for other
nodes.
Setting this value to 1 will cause the node to stop volunteering to route packets for other nodes. It will
still freely use the entire mesh for its own purposes.
Snap Reference Manual-v1.1 Document Number 600-0007B
Page 80 of 126
This feature was added to better supports nodes that spend most of their time “sleeping”. If a node is
going to be going to be asleep, there is no point in it becoming part of routes for other nodes while it is
(briefly) awake.
This can also be useful if some nodes are externally powered, while others are battery powered.
Assuming sufficient radio coverage (all the externally powered nodes can “hear” all of the other
nodes), then the Mesh Override can be set to 1 in the battery powered nodes, extending their battery
life at the expense of reducing the “redundancy” in the overall mesh network.
ID 31 – Mesh Routing LQ Threshold – allows penalizing hops with poor Link Quality
Until version 2.1, there was no way to take Link Quality into account when choosing the best mesh
route to use. Now, advanced users can set a threshold value.
Hops that have a link quality worse than (ie a higher value than) the specified threshold will be
counted as two hops instead of one.
This allows the nodes to choose (for example) a two-hop route with good link quality over a one-hop
route with poor link quality.
The default threshold setting is such that no “one hop penalty” will ever be applied.
See also new NV Parameter #39.
ID 32 through 38 – reserved for future Synapse use.
ID 39 – Radio LQ Threshold – allows ignoring packets with poor Link Quality
Link Quality values range from a theoretical 0 (perfect signal, 0 attenuation) to a theoretical 127 (127
dBm “down”). I say theoretical because the radio we use will never report values at these extremes.
This parameter defaults to a value of 127, which makes it have no effect (you cannot receive a packet
with a Link Quality “worse” than 127).
If you lower this parameter from its default value of 127, you are in effect defining an “acceptance
criteria” on all received packets. If a packet comes in with a Link quality worse (higher) than the
specified threshold, then the packet will be completely ignored.
This gives you the option to ignore other nodes that are “on the edge” of radio range. The idea is that
you want other (closer) nodes to take care of communicating to that node.
Caution – if you set this parameter too low, your node may not accept any packets.
Snap Reference Manual-v1.1 Document Number 600-0007B
Page 81 of 126
ID 40 – SNAPpy CRC – the 16-bit Cyclic Redundancy check (CRC) of the currently loaded SNAPpy
script.
Most users will not need to write to this NV Parameter. If you do change it from its automatically
calculated value, you will make the SNAP node think its copy of the SNAPpy script is invalid, and it
will not use it.
ID 41 through 49 – reserved for future Synapse use.
ID 50 – Enable AES-128 – control AES-128 Encryption (in firmware that supports it)
This value defaults to False (encryption off).
Even if set to True, encryption won’t take place unless an encryption key has also been provided.
ID 51 – AES-128 Key – specify the 128-bit encryption key
This NV Parameter is a string with default value of “”
An encryption key must be exactly 16 bytes (128 bits) long to be valid.
This parameter has no effect unless NV Parameter #50 is also True.
Even if both parameters 50 and 51 are set correctly, they will have no effect unless they are used in
conjunction with a SNAP firmware image that supports AES-128 encryption.
Firmware images supporting AES-128 encryption will have “AES” in their filenames.
Refer also to function getInfo() in the SNAPpy API section.
ID 52 through 127 – reserved for future Synapse use.
ID 128 – 254 – these are user defined NV Parameters, and can be used for whatever purpose you
choose.
ID 255 – reserved for internal use (0xFF means “blank” inside the actual NV storage)
Snap Reference Manual-v1.1 Document Number 600-0007B
Page 82 of 126
10. Example SNAPpy Scripts
Example Scripts
The fastest way to get familiar with the SNAPpy scripting language is to see it in use. Portal comes
with several example scripts pre-installed in the snappyImages directory.
Here is a list of the scripts preinstalled with Portal 2.1, along with a short description of what each
script does. Take a look at these to get ideas for your own custom scripts. You can also copy these
scripts, and use them as starting points.
Script Name
evalBase.py
pinWakeup.py
switchboard.py
PWM.py
ledCycling.py
servoControl.py
McastCounter.py
DarkDetector.py
buzzer.py
protoSleepcaster.py
protoFlasher.py
lunarLander.py
What it does
An importable script that adds a library of helpful routines
for use with the Synapse evaluation boards. Board detection,
GPIO programming, and relay control are just a few
examples
An importable script that adds “wake up on pin change”
functionality
An importable script that defines some switchboard related
constants (for readability)
An importable script that adds support for Pulse Width
Modulation (PWM) on pin GPIO 0
An example of using PWM.py. Varies the brightness of the
LED on the Demonstration Boards
A second example of using PWM.py. Controls the position
of a standard hobby servo motor
Maintains and displays a two-digit count, incremented by
button presses. Resets the count when the button is held
down. Broadcasts “count changes” to any listening units,
and also acts on “count changes” from other units.
Monitors a photocell via an analog input, and displays a
“percent darkness” value on the seven-segment display.
Also requests a short beep from a node running the
buzzer.py script when a threshold value is crossed.
Generates a short beep when the button is pressed. Also
provides a “buzzer service” to other nodes. The example
script DarkDetector.py shows one example of using this
script.
Like McastCounter.py but this script is only for the SN171
Proto Board, plus it goes to sleep between button presses
Just blinks some LEDs
A script that implements a numeric form of the classic
Lunar Lander game. Note that this example requires four
nodes with seven segment displays.
Snap Reference Manual-v1.1 Document Number 600-0007B
Page 83 of 126
LinkQualityRanger.py
ledToggle.py
gpsNmea.py
EvalHeartBeat.py
DarkroomTimer.py
CommandLine.py
datamode.py
dataModeNV.py
Radio range testing helper
Simple example of toggling an LED based on a switch input
Example decoding of data from a serial GPS
Example of displaying multiple networking parameters
about a node on a single seven-segment display
Operates a dark room enlarger light under user control
An example of implementing a command line on serial port
1. Provides commands for LED, relay, and seven-segment
display control
An example of using two nodes to replace a RS-232 serial
cable
A more sophisticated example of implementing a wireless
UART
Snap Reference Manual-v1.1 Document Number 600-0007B
Page 84 of 126
Here is a second table listing the included scripts, this time organizing them by the techniques they
demonstrate. This should make it easier to know which scripts to look at first.
Technique
Importing evalBase.py and using the helper functions within it
Performing actions at startup, including using the setHook()
function to associate a user defined function with the
HOOK_STARTUP event
Performing actions when a button is pressed, including the use
of monitorPin() to enable the generation of HOOK_GPIN
events, and the use of setHook() to associate a user defined
routine with those events
Sending multicast commands
Sending unicast commands
Snap Reference Manual-v1.1 Document Number 600-0007B
Example scripts that
demonstrate this
technique
CommandLine.py
DarkDetector.py
DarkRoomTimer.py
EvalHeartBeat.py
gpsNmea.py
ledToggle.py
LinkQualityRanger.py
lunarLander.py
McastCounter.py
protoSleepCaster.py
CommandLine.py
DarkDetector.py
DarkRoomTimer.py
EvalHeartBeat.py
gpsNmea.py
ledToggle.py
LinkQualityRanger.py
lunarLander.py
McastCounter.py
protoFlasher.py
protoSleepCaster
buzzer.py
DarkRoomTimer.py
gpsNmea.py
ledToggle.py
lunarLander.py
McastCounter.py
protoSleepCaster.py
LinkQualityRanger.py
lunarLander.py
McastCounter.py
protoSleepCaster.py
DarkDetector.py
Page 85 of 126
Using global variables to maintain state between events
Controlling a GPIO pin using writePin(), etc.
Generating a short pulse using pulsePin()
Reading an analog input using readAdc(), including autoranging at run-time
Performing periodic actions, including the use of setHook() to
associate a user defined routine with the HOOK_100MS event
Using the seven-segment display
Deriving longer time intervals from the 100 millisecond event
Thresholding, including periodic sampling and changing the
threshold at run-time
Discovering another node with a needed capability
Advertising a service to other wireless nodes
Adding new capabilities by writing directly to processor
registers (peek() and poke())
Snap Reference Manual-v1.1 Document Number 600-0007B
DarkDetector.py
DarkRoomTimer.py
EvalHeartBeat.py
gpsNmea.py
ledToggle.py
LinkQualityRanger.py
lunarLander.py
McastCounter.py
protoFlasher.py
protoSleepCaster.py
buzzer.py
evalBase.py
gpsNmea.py
ledToggle.py
protoFlasher.py
protoSleepCaster.py
buzzer.py
DarkDetector.py
lunarLander.py
buzzer.py
DarkDetector.py
DarkRoomTimer.py
EvalHeartBeat.py
gpsNmea.py
LinkQualityRanger.py
lunarLander.py
McastCounter.py
protoFlasher.py
protoSleepCaster.py
DarkRoomTimer.py
evalBase.py
EvalHeartBeat.py
LinkQualityRanger.py
lunarLander.py
McastCounter.py
buzzer.py
DarkRoomTimer.py
EvalHeartBeat.py
McastCounter.py
DarkDetector.py
DarkDetector.py
buzzer.py
pinWakeup.py
PWM.py
Page 86 of 126
Writing parameters to Non-volatile (NV) storage
The use of “device types” as generic addresses, or to make a
single script behave differently on different nodes
Sleeping and waking up on a button press, importing and using
pinWakeup.py
Knowing when a RPC call has been sent out, by using
HOOK_RPC_SENT.
Distributing a single application across multiple nodes
Monitoring link quality using the getLq() function
Parsing received serial data in a SNAPpy script
(contrast with Transparent Mode)
Displaying hexadecimal data on the seven-segment display
Displaying custom characters on the seven-segment display
Configuring Transparent Mode AKA Data Mode
Varying LED brightness using Pulse Width Modulation
Controlling a servo motor using Pulse Width Modulation
Snap Reference Manual-v1.1 Document Number 600-0007B
evalBase.py
buzzer.py
DarkDetector.py
evalBase.py
lunarLander.py
protoSleepCaster.py
protoSleepCaster.py
lunarLander.py
LinkQualityRanger.py
CommandLine.py
gpsNmea.py
EvalHeartBeat.py
DarkRoomTimer.py
EvalHeartBeat.py
datamode.py
dataModeNV.py
ledCycling.py
servoControl.py
Page 87 of 126
11. Portal API
This section details the API presented to Portal Scripts. The Command Line window of Portal also
has access to this API.
Node Methods
The following are functions bound to each Network Device (Node) known to Portal, i.e. visible in one
of the Node Views, or appearing in the Node Info window.
To invoke one of these methods, you must prefix the desired function name with the name of the node
that you want to invoke the function on, followed by a “.” character. For example:
McastCounter.reboot()
getColumn(name)
getFormatedNetAddr()
getFormattedNetAddr()
linkQualityAsk()
linkQualityPercentVal()
macAsk()
netParamAsk()
ping(toggleResponding=True)
reboot()
refresh(ping=True,
toggleResponding=True)
setColumn(name,
value)
setNvParam(id,
value)
setStdoutPortal()
versionAsk()
Returns the current value stored for the
specified column name
See next function - This was mis-spelled in
the previous release, and the mis-spelling
has been maintained for backwards
compatibility. New scripts should use
function getFormattedNetAddr() instead
Returns this node's network address as a
string in the format ##.##.##
Queries the node for is currently link
quality value
Returns an integer value in the range 0-100
based on the node's last queried link
quality
Queries the node for it's MAC address
Queries the node for it's channel and
network ID
PING's the node. Parameter toggleResponding
determines how the result of the PING
affects the Node Views and Node Info windows
Tells the node to reboot
Queries the node for information to display
in it's Node Info tab.
Stores the specified value for the specified
name
Tells the node to set the NV parameter id to
the specified value.
Tells the node to redirect it's STDOUT to
Portal's network address. Whatever the node
prints will appear in the Portal Event Log
Queries the node for it's current version
string
Snap Reference Manual-v1.1 Document Number 600-0007B
Page 88 of 126
Node Attributes
The following are attributes bound to each Network Device (Node) known to Portal, i.e. visible in one
of the Node Views.
Like the node methods, these must be prefixed by the name of the node you want to examine, and a “.”
character. For example:
print McastCounter.channel
Also notice that these are data fields, not functions. Do not put parentheses “()” after them.
McastCounter.channel is a number
McastCounter.channel() is an error.
channel
isResponding
lqVal
name
netAddr
networkId
version
An integer corresponding to the node's
channel
A boolean value corresponding to if the last
query was successful
A float value of the node's last queried
link quality in dBm
A string that describes this node in
Portal's node views
A string containing this node's unformatted
network address
An integer corresponding to the node's
network id
A string containing the node's last queried
version
Portal Methods
The following methods are independent of SNAP Nodes. They provide a system-level interface
between Portal Scripts and system-wide capabilities.
Because they are not node specific, you do not prefix them with a node name and a “.” character.
Some of these routines do take a node parameter. You can specify the correct node in two different
ways:
1) By explicit address
2) By node name (the node’s name within Portal)
Explicit addresses are three-byte strings. Portal shows node Network Addresses in hexadecimal, but
omits any number base prefixes or suffixes. If Portal shows a node’s Network Address as 12.34.56,
then the individual address bytes are 0x12, 0x34, and 0x56 (hexadecimal), not 12, 34, and 56
(decimal).
Snap Reference Manual-v1.1 Document Number 600-0007B
Page 89 of 126
To specify hexadecimal constants within Python or SNAPpy strings, you use a leading “\x”. Going
back to our example, if you want to specify the node with address 12.34.56, you would use
“\x12\x34\x56” in your script.
Portal also assigns names to nodes when it first discovers them. If the node with address 12.34.56 has
a displayed name of “McastCounter”, then instead of specifying an explicit address string, you can just
use the text McastCounter instead.
Notice that there are no quotation marks used when referencing nodes by name within Portal
scripts (or from the Portal command line).
So, assuming node McastCounter4 is at address AB.CD.EF, the following two commands are
equivalent:
sendData(“\xAB\xCD\xEF”, “This is a test”)
sendData(McastCounter4, “This is a test”)
logEvent(message)
logData(name,
value,
fullscale=100.0)
multicastRpc(groups,
ttl,
function,
*args)
rpc(node,
function,
*args)
sendData(node,
data)
sendEmail(recipients,
sender,
msg,
server)
Log the specified message to the Event Log
Plot the specified value to a named strip
chart in the Data Logger window
Sends a multicast RPC request to the
specified groups. Parameter function is what
routine to invoke on each node in the
specified groups, and the remaining
parameters are passed to that routine.
Sends an RPC request to the specified node.
Parameter function is what routine to invoke
on the node, and the remaining parameters
are passed to that routine.
Sends data to the specified node in a way
that mimics TRANSPARENT MODE. This lets
Portal insert data into TRANSPARENT MODE
links.
Sends an email containing msg text to the
specified recipients via the specified
(email) server, addressed as if it came from
sender.
Snap Reference Manual-v1.1 Document Number 600-0007B
Page 90 of 126
There are also some commands that must be prefixed by “root.” - This prefix is not shown in the
following table, but for example “displayTraceFile” is really specified as “root.displayTraceFile()” in
scripts or from the command line.
clearEventLog()
displayTraceFile()
sendDataModePkt(node,
data)
setPortalNetAddr(newAddr)
Clears the Portal Event Log
Pops up a tabbed window with the contents of
an internal log file sometimes used in
debugging.
This is the same as the standalone function
sendData(), use sendData() instead
Change Portal’s Network Address from the
default value of “\x00\x00\x01” (00.00.01).
You have to restart Portal for the change to
actually take effect.
There are several commands that are deprecated or for Synapse internal use only. They are listed here
only for completeness; you should not be calling these functions.
cmdDispatcher
notifyOnComplete()
setupSynapseUsb()
snappyErrorDecode(node,
errorMsg)
Synapse
Synapse
Synapse
Synapse
Snap Reference Manual-v1.1 Document Number 600-0007B
use
use
use
use
only
only
only
only
Page 91 of 126
12. SNAP Node Views
The starting point for managing SNAP nodes is the Node Views tabbed window. If this window is not
already open, you can click on View, then choose Node Views window. Alternatively, you can click
on the icon on the toolbar.
You will notice that the Node Views window has its own toolbar.
The Node Views tabbed window lets you look at your nodes in three different ways:
•
•
•
Report View
Icon View
List View
All three views are just that, “views” of the same network information. Click on the
Report View button in the Node Views toolbar (not the main toolbar).
Snap Reference Manual-v1.1 Document Number 600-0007B
Change to
Page 92 of 126
Several columns of information are shown about each node.
The Node column shows an icon and a name for each node. Both the icon and name can be changed
by the user, what you see here are just the default icons.
is used within Portal to generically represent any SNAP node.
is used within the Portal user interface to represent Portal itself.
(Remember, Portal is able to participate in the network as if it were a wireless node.)
The name for the node is assigned when the node is first discovered, and can come from three possible
sources:
•
•
•
As of version 2.1, it is possible to assign a name to a node
If you don’t give a node a name, it will use the name of any loaded script
If no name given and no script loaded, Portal will use “Node” as a base name
A trailing numeric identifier is sometimes appended to the base name, so that all nodes have unique
names. This is a Portal requirement, you can rename your units but each name must be unique.
The Network Address column shows the three byte Network Address for each node. The Network
Address is simply the last three bytes of the node’s MAC Address, and is not user definable.
The Device Image column shows the SNAPpy script/image loaded into the device. If there is no script
loaded into the node, then this field is blank. Notice that this field tracks the currently loaded script. If
you upload a different script into a node after it has been discovered/named, then this column can be
different from the Node column.
The Link Quality column shows a snapshot of the radio receive level. It is expressed as a percentage,
with 0% representing the weakest possible signal and 99% representing a maximum strength signal.
Snap Reference Manual-v1.1 Document Number 600-0007B
Page 93 of 126
It is important to understand three things about the displayed Link Quality:
1) Normally this field is not continuously refreshed - Portal does not “poll” nodes unless you tell it to.
You can use the Broadcast PING button to update the Link quality fields of all active units. There
is also a “refresh” button you can click on to force a refresh of a single node’s Link Quality. This
button is on the Node Info toolbar, and is covered in section 13. Finally, there is a Watch Nodes
button that essentially turns on “automatic Broadcast Pings”.
2) The value shown is based on the received signal strength of the most recent message from any other
wireless node. It does not represent the signal strength between Portal and the node (it is not an
indication of the USB or RS232 quality between Portal and Portal’s “bridge” node).
3) It is possible that at the time the Link Quality field was read from the unit, it had not yet received
any radio messages from any other node. In this case, a value of 0 will be reported. This does not mean
the unit has a faulty radio, it simply has not done any radio communications yet. This is most often
seen with the node that is acting as a “bridge” for Portal, because Portal can be interacting with this
directly attached node without necessarily generating any radio traffic.
The Device Type column shows one of the non-volatile (NV) configuration parameters of the unit.
Device Type is simply a second string label that can be applied to a node. Unlike the Node Name, this
label does not have to be unique, and is often used to show what job or role a node is filling. This
parameter can also be read by SNAPpy scripts, allowing a single script to act differently on different
nodes, simply by setting the Device Type of each node appropriately.
You may sometimes notice one of the nodes highlighted in blue. This is Portal’s way of showing
which node it thinks is its “bridge” onto the SNAP network.
NOTE – If you move cables around (etc.) it is possible to trick Portal. The blue highlighting is really
only accurate when you first discover your SNAP network. (You can use Network -> New
Configuration… to force a re-discovery.)
Clicking on the
Icon View button brings up the following representation of your network.
In this view only the Node Icon and Node Name are shown.
Clicking on List View brings up the final alternate view of your network.
Snap Reference Manual-v1.1 Document Number 600-0007B
Page 94 of 126
This view shows the same information as the Icon View, but comes in handy when you have a large
quantity of SNAP nodes in your network.
The fourth tool-bar button Watch Nodes has already been mentioned briefly. This button toggles
Portal’s “Node Watcher” (automatic periodic polling of nodes). If you need to “see” nodes coming and
going, you can turn on the Node Watcher instead of manually hitting Broadcast PING
periodically.
The fifth tool-bar button brings up a color selection dialog, and can be used to change the
background color of these views. You might need to do this if you are using your own custom icons.
The last control in the Node Views toolbar is a drop-down selector box that lets you choose to see only
the Active Nodes or All Nodes. Both views are identical as long as all nodes are online and
communicating.
With the filter set to show All Nodes, if a unit has stopped responding to Portal, it will be greyed-out
in all three views.
Snap Reference Manual-v1.1 Document Number 600-0007B
Page 95 of 126
With the filter set to show only Active Nodes, if a unit has stopped responding to Portal it will be
completely removed from all three views.
Screenshots are only shown for the Icon View, but the other views behave similarly.
Snap Reference Manual-v1.1 Document Number 600-0007B
Page 96 of 126
13. SNAP Node Configuration
The configuration of an individual Node can be viewed and changed from the Node Info tab. Which
node to display info about is controlled from the Node Views tabbed window.
If the Node Info tab is already visible within Portal, a single-click on a Node in one of the other tabs
will display that specific node’s info in the Node Info tab.
If the Node Info tab is not already visible, a double-click on the desired node will be required to bring
up the Node Info tab.
Starting in the upper left-hand corner, the Node Info tab shows the:
•
•
•
•
•
“logical name” of the node
Firmware version and type if special
Some Network Configuration parameters
Device Image and Image CRC
Some more Network Configuration parameters
The left-hand side continues with an Info pane. The right-hand side shows a tree view of the callable
scripted functions.
Snap Reference Manual-v1.1 Document Number 600-0007B
Page 97 of 126
Network Configuration Parameters
There are four network configuration parameters: Network Address, MAC Address, Channel, and
Network Identifier (ID).
SNAP MAC addresses are standard 64-bit IEEE MAC addresses, as required by the 802.15.4
specification. MAC addresses are assigned to the node at the factory.
The Network Address is the three byte identifier that is actually used “over the air” by the SNAP
wireless protocol. You will notice that it matches the last three bytes of the eight byte MAC Address.
Channel - There are 16 allotted channels in the 2.4GHz band used by 802.15.4. Officially numbered
channels 11-26 by 802.15.4, they are designated channels 0-15 by Synapse products.
The SNAP Network ID can be thought of as a “logical channel”. This 16-bit integer may be assigned
any hexadecimal value from 0x0001 through 0xFFFE. Devices in a SNAP network must share both
the same Channel and same Network ID in order to communicate. This allows multiple SNAP
networks to share the same channel if required, although it is preferred to place independent networks
on separate physical channels to reduce collisions.
Node Info - Tasks Pane
There are ten toolbar options in this pane:
•
•
•
•
•
•
•
•
•
•
Ping - poll a unit for connectivity
Refresh - poll a unit for the values shown in the Node Info tab
Upload SNAPpy Image - program a node with a new script
Erase SNAPpy Image - remove previously loaded script
Change Configuration Parameters - more on this below
Intercept STDOUT - divert the node’s script output to Portal
Change Icon - substitute an alternate PNG file as the node’s icon
Rename Node - replace the current node name
Remove Node - remove the node from the various Node Views
Reboot Node – reboot the node
Ping
Clicking on this action causes Portal to make a quick connectivity test to the current node. Observe the
Event Log for confirmation of Ping activity.
A Broadcast Ping command (seen by all nodes) is also available in the Portal toolbar, here:
Snap Reference Manual-v1.1 Document Number 600-0007B
Page 98 of 126
Refresh
Observe the Event Log for confirmation of Refresh activity.
Clicking on this action will poll the node for the information shown in the upper left corner of the
Node Info tab.
Upload Snappy Image
Clicking on this action will bring up a dialog box allowing you to choose which script to upload into
the unit.
A node can only contain one script at a time, but the script can actually consist of multiple source files,
using the Python “import” functionality.
If you are not sure which script you want, you can click on the Preview button to take a quick look at
the currently selected script. Click OK when you are done looking at it.
Snap Reference Manual-v1.1 Document Number 600-0007B
Page 99 of 126
Once the “root” script has been chosen, Portal will tell the node to erase any previous script, and then
upload the new script to the Node.
Once the entire script has been uploaded to the node, Portal will automatically reboot the node, which
in turn will cause the node to execute any script code contained within the HOOK_STARTUP event
handler of that script.
SNAPpy scripting is discussed in section 5.
Erase Snappy Image
Clicking on this action will erase any currently loaded (and running) script from the selected node.
NOTE – You do not have to manually erase a previous script to load a new one, Portal will do this for
you. This button has been added so that mis-behaving scripts can be shut down, while you work on
making corrections to them.
If you click on the name of a script within the Node Info window, an editor window containing that
script will be opened for you.
Snap Reference Manual-v1.1 Document Number 600-0007B
Page 100 of 126
Change Configuration
Clicking on this task will bring up the following (tabbed) dialog box:
From this dialog box, you can view and edit the Configuration Parameters of the current SNAP Node.
Configuration Parameters are also known as NV Parameters, and they are all described in section 9.
You can see the different NV Parameters broken down by category by clicking on one of the six
named tabs within the dialog box.
The Network tab lists parameters relating to general radio operations.
The Device tab lists parameters relating to node “identity”, and some hardware features.
The Multi-cast tab lists parameters relating to multicast communications.
The UART tab lists parameters relating to the buffering of data received from either of the two system
UARTs.
Snap Reference Manual-v1.1 Document Number 600-0007B
Page 101 of 126
The Mesh tab lists parameters relating to the Mesh Routing capabilities of the node.
Synapse nodes communicate with each other using Mesh Routing. Basically this means that any unit
can talk to any other unit (they are all logical peers within the mesh), even though in some cases units
that are out of radio range of each other might have to talk “through” intermediate nodes to do so.
Only units that are within radio range of each other can communicate directly (physical peers).
The necessary “route discovery” and “packet forwarding” necessary to make this work are all done
automatically by the node.
There are several Mesh Routing Timeouts. The default values should cover most network topologies.
Be careful if changing these values on remote nodes – you could make it impossible to communicate
with the node remotely.
Contact Synapse Customer Support for assistance with tuning these timeout parameters.
There are also several “non-timeout” parameters:
The Security tab lists parameters relating to AES-128 encryption.
Note that not all nodes support AES-128 encryption, this is a function of the SNAP firmware
currently loaded into the node.
To change one or more of the editable fields, just type the replacement value(s) in before clicking on
OK.
Intercept STDOUT
Script output (from “print” statements) normally goes to the “data sink” specified by the script itself.
For example, the script might be outputting text to serial port 2.
For testing purposes, it is sometimes handy to “intercept” the script output from the node (which might
be remotely located), and display it within Portal instead.
Clicking on this action will send the necessary commands to the node to accomplish this.
The intercepted text will appear in the Portal Event Log.
In the above example, the script did a print “text1=hello, world”. The node name (“chain1”) was prepended by Portal, providing an easy way to see which node the text came from.
Change Icon
You can replace the default icon Portal uses to represent each node with your own 60x60 PNG files.
This might be used to make it easier to track which nodes are serving what purpose.
Snap Reference Manual-v1.1 Document Number 600-0007B
Page 102 of 126
Rename Node
The default “logical name” for a node with no name provided by the user, and no scripts loaded is
“Node” (for the first one found) or “NodeX” (for subsequent nodes), where “X” is a number (starting
at 2) that represents the order in which Portal discovered the nodes.
Once a script has been uploaded into a Node, the default name becomes “scriptname” (for the first
node found) or “scriptnameX” (for subsequent nodes), but this new default will not override a name
already assigned by Portal.
The Rename Node action allows you to choose your own name for a node, instead of using the default
name assigned by Portal. Starting with version 2.1, this “given name” is stored in the node itself, and
will automatically be re-used by Portal (instead of “Node” or the “scriptname”) if Portal re-discovers
the node in the future.
Remove Node
Clicking on this action will remove the node from Portal, including removing the node from the Node
Views.
However, be aware that if the node really does still exist, it will simply be re-discovered by Portal on
the next broadcast ping.
Reboot Node
Clicking on this action will bring up the following prompt.
If you really do want to reboot (restart) the node, press Yes, otherwise press No.
Snap Reference Manual-v1.1 Document Number 600-0007B
Page 103 of 126
Node Info – “Snappy Scripts” Section
The right hand side of the Node Info tab shows a tree view of all the callable functions within that
node.
The BuiltIn functions represent the core SNAPpy feature set, and are functions that can be called even
when no user script has been uploaded into the node. These same functions are also always available
for use within scripts.
Refer to section 7 for details on these built-in SNAPpy functions.
The second branch of the tree view shows the name of the uploaded script’s name, and underneath
shows all of the callable functions implemented by that script.
Hovering the mouse cursor over the links in either branch of the tree will bring up a short tool-tip on
that function.
NOTE – for this to be useful for the functions defined in your scripts, be sure to put a Python “doc
string” as the second line of your function definitions. For example:
def mySuperFunction():
‘’’This is the text that will appear as a tool-tip’’’
Snap Reference Manual-v1.1 Document Number 600-0007B
Page 104 of 126
Clicking on any function name will remotely execute that function.
If the function takes parameters, a dialog box will pop up and prompt the user for the needed values.
In the above example, clicking on the setPinDir() function has brought up a dialog box asking for
“pin” (which GPIO pin, 0-18), and for a Boolean (True or False) value to make the pin be an input
(False) or an output (True).
Once the values are filled in by the user, click on the OK button to invoke the function on the actual
node.
This can be very useful for learning the built-in functions, as well as testing and debugging scripts.
Portal is a Node Too
Most of this section has been focused on using Portal to interact with remote SNAP nodes. However,
Portal itself can function as a node on the network, and if you click on Portal in the Node Views pane,
the Node Info pane will show info similar to the following.
If a Portal script has been loaded, you will see it in the Portal Modules function tree as well. You can
invoke any functions defined in that script by clicking on them, just like you can with the functions
defined in the remote SNAP nodes.
Snap Reference Manual-v1.1 Document Number 600-0007B
Page 105 of 126
14. Portal Tools
The main toolbar provides quick access to Portal’s tabbed windows. These windows can be enabled,
disabled, or rearranged to suit a variety of operational modes. Some of the toolbar buttons invoke
immediate commands instead of opening new tabbed windows.
New Script
Clicking on this button will open a new Edit Window containing a new (empty) source file.
The default name of the script will be “NewScriptX” where “X” is a trailing number to enforce
uniqueness.
The Edit Window is described in section 15.
Snap Reference Manual-v1.1 Document Number 600-0007B
Page 106 of 126
Open File
Clicking on this button will bring up a file chooser dialog, from which you can select a previously
saved source or Portal configuration file.
Source (.py) files can be SNAPpy scripts (these go into your SNAP nodes) or full Python files (these
can be loaded into your Portal).
A Portal configuration specifies things like which Python script is currently loaded as the Portal Base
File. Portal configurations are saved in files having a .SWN extension (Synapse Wireless Network),
and are created using this next toolbar button.
Save All
This toolbar button will initiate creation of a .SWN file containing all of the currently active Portal
settings. The most recently saved configuration file will automatically be re-loaded by Portal when it
restarts.
Connect Serial Port /
Disconnect Serial Port
This modal toolbar button is used to connect and disconnect from the attached bridge node. Because
the icon and tool-tip changes when you connect or disconnect, it also serves as a quick status indicator.
If your nodes do not seem to be responding, this is the first item to check.
Snap Reference Manual-v1.1 Document Number 600-0007B
Page 107 of 126
Broadcast Ping
Clicking on this toolbar button will cause Portal to broadcast a special “answer if you hear me”
message to all nodes. When the nodes answer, any nodes that Portal did not already know about will
be individually queried for additional information.
You might use this button if you just added one or more new nodes to your network.
Node Views
This tab provides a graphical display of the nodes in Portal’s internal device database. Internally,
Portal indexes all nodes by network address. When a new network address is discovered, a
corresponding icon in the Node Map will be created.
Deleting a Node (click on the Node and then select Remove Node from the Node Info tab) removes
the Device from Portal’s internal database. This removes all knowledge of the Device from Portal. If
the Device is subsequently re-discovered, usually via a ping, it will reappear in the Node Map.
The Node Views pane is covered in section 12.
Node Info
The Node Info tab provides node information, a mini-toolbar for common tasks, and SNAPpy script
information about the currently selected node. (Refer to section 13).
Event Log
The Event Log captures real-time event history for Portal. All network-affecting activity is recorded
here. Log entries are time-stamped to a 1-second resolution.
Events Captured Include:
Configuration save/load
Script STDOUT (print statements, errors)
Status messages
RPC communication messages
Command Line
The Command Line window provides interactive access to Portal’s Python based scripting engine.
Using this tool, you can invoke the Device API on all discovered and active devices. This is useful for
testing and debugging commands interactively before incorporating them into Portal scripts.
Most of what can be done through the command line can also be done through the other parts of the
GUI. For example, you can type the command:
rpc(‘KB1’, ‘reboot’)
…or you can just click on the reboot() function in the Node Info tree.
Snap Reference Manual-v1.1 Document Number 600-0007B
Page 108 of 126
Within the Command Line pane, you can use the up and down cursor arrows to re-select previously
executed commands. Position the cursor on a previously executed command, and it will be redisplayed (but not executed yet) at the bottom of the Command Line window. You can then edit the
recalled command (use the left and right cursor keys to move the cursor horizontally within the
command). When the command line has been edited to your liking, press the ENTER key to execute
it.
To re-execute the most recently executed command as-is (no changes), just press the keys UP,
ENTER, ENTER.
Within the Command Line window, you can type shell.help() to learn more of the tricks the
Command Line window supports.
Data Logger
The Data Logger window gives a strip-chart view of a set of values plotted over time. It is very simple
for scripts to add completely new categories of data (just use a unique name, and you’ve created a new
strip).
Scaling
The vertical axis is fixed at 100 units. Since a heterogeneous collection of data types may occupy the
same plot, generic units are used. However, the logData() function accepts a scaling factor so that
each value can map its full-scale range onto the vertical axis. The horizontal axis is a continuous
timeline, with automatic scaling. You can plot multiple values, from the same or multiple nodes.
Snap Reference Manual-v1.1 Document Number 600-0007B
Page 109 of 126
Script Scheduler
This button brings up the Script Scheduler window, which provides the ability to manage the
scheduling of events (handler subroutines) from the current Portal script.
Normally events in Portal are invoked either by the user (by clicking on function names within the
Node Info pane), or by remote SNAP nodes (via RPC). The Script Scheduler provides a third
mechanism by which script functions can be invoked.
Note that you must have a Portal script loaded in order to schedule any events (the “event handlers”
are functions already defined by your Portal script).
Note also that Portal has to actually be running in order for the scheduled event to be run. It does no
good to schedule an event to occur at midnight, and then shut Portal down (or turn your PC off).
The and
ones.
buttons at the bottom of the event list are used to add new events and delete existing
Snap Reference Manual-v1.1 Document Number 600-0007B
Page 110 of 126
If you click on the
add button, you will be prompted to provide a name for the event.
Enter a unique event name in the dialog box, and click on OK. An event with the requested name will
be created, but you still have to configure it.
Click on an event in the list to select it, and then configure the event’s start date, start time, and
repeatability.
You choose the event’s start date using the calendar control near the top of the pane. There is a Today
button that is a shortcut to scrolling back to the current day (if you have changed it).
You choose the start time using the clock control to the right of the calendar control. There is a Now
shortcut button, but since time marches on you will have to make some manual adjustments (Portal
will not allow you to schedule an event in the past).
The Repeats control lets you choose if the event should only occur once (Repeats = Never), or if it
should repeat every minute, every hour, or every day. You can also choose the special case of “On
Load”, which means the event will occur when Portal next loads a configuration containing that event
(for example, at Portal startup).
After you have specified when you want the event to occur (and any optional “repeats”), you then
must specify what you actually want to happen.
Snap Reference Manual-v1.1 Document Number 600-0007B
Page 111 of 126
The Functions: drop-down selector lets you choose any of the functions defined in the currently active
Portal script.
This means you must load the correct Portal script first, before you can define events that use
that script.
In the screenshot above, both the Script Scheduler pane and a Script Editor pane are shown. You
can see the correlation between the Functions: field and the script source code.
When the event has been configured like you want, be sure to press the Save Event button.
Snap Reference Manual-v1.1 Document Number 600-0007B
Page 112 of 126
Channel Analyzer
Clicking this button will open the Channel Analyzer pane within Portal.
Performing a “channel analysis” (energy detection scan) consumes significant resources on your
“bridge” node, so the function is only performed on demand.
Like many panes, the Channel Analyzer pane has its own mini-toolbar.
The Start button begins continuous channel scanning.
Once started, the Stop button can be used to stop it.
The Clear Values button can be used to erase any existing data and start a fresh plot.
The Save Graph button can be used to save the currently graphed data.
The Channel Help button brings up a list of channels, from weakest signal seen (most clear
channel) to strongest signal seen (most crowded channel). This can help you choose a channel to put
your nodes on.
A dBm Floor slider lets you choose a cutoff value for the graphed data. This lets you ignore low-level
signals and focus on stronger ones.
Here is a screenshot taken from a system while scanning was actually in progress. Note that you may
not have as much active traffic as in the example shown!
Snap Reference Manual-v1.1 Document Number 600-0007B
Page 113 of 126
The colored bars in the chart provide three pieces of information simultaneously:
1) The horizontal position of each bar tells you the channel the signal was seen on
2) The vertical position tells you the signal strength seen on that channel
3) The color of each bar tells you the number of times a signal of that level has been seen (in %
form). A color legend near the top of the pane shows you the scaling.
In the example above, you can see that the strongest signals have been detected on channel 7 (around 22 dBm), but that the most frequently seen signal is on channel 6 (at around -70 dBm).
Note that the Channel Analyzer takes “live” readings, and can only detect nodes that are actually
powered on, awake, and communicating at the time of the scan.
You can restart your graph at any time with the Clear Values button, and you can save as many
graphs as you want using the Save Graph button.
Be sure to use the Stop button when you are done. This will give your “bridge” node more time to
handle other network traffic.
Snap Reference Manual-v1.1 Document Number 600-0007B
Page 114 of 126
Clicking on Channel Help would bring up a dialog similar to the following:
As you would expect from the example chart, channel 15 is the best choice for newly deployed nodes
(that channel is relatively quiet right now), followed by channels 2, 0, and 3.
Find Nodes
Clicking on this button will bring up the following interactive dialog:
First choose a specific channel to scan, or click on All Channels. Next click the Scan button.
Snap Reference Manual-v1.1 Document Number 600-0007B
Page 115 of 126
Portal will switch the “bridge” node to a special “wildcard” Network ID value that all nodes will
respond to. Portal will then do broadcast pings on the specified channel (or all channels) and build up a
list of all SNAP nodes that respond.
Note that this is an active scan, and Portal can only find nodes that are powered on, and awake.
In the example shown here, four nodes were found on Channel 7, Network ID 0xFACE.
Because the broadcast ping process uses (unacknowledged) broadcast messages, some nodes may not
respond. You may have to hit the Scan button more than once to find the node you are looking for.
If any of these nodes were supposed to be on the same channel and network ID that Portal’s bridge
node is usually on, then they could be highlighted within the list, and the Move to my Network button
clicked. Portal would then command the node to change channel and/or network ID as needed.
Press the Cancel button to close this dialog and resume normal Portal operations.
Snap Reference Manual-v1.1 Document Number 600-0007B
Page 116 of 126
Rearranging Windows
The tabbed windows in Portal can be dragged and repositioned on the screen. To do this, press and
hold the left mouse button while the cursor is positioned over the tab label you want to move. While
holding the button down, drag the tab until you see a light blue “shadow” indicating a possible new
position for the window. When you’ve found a suitable new position, just release the mouse button
and the move will be complete.
Drag tab as shown
to move windows
Resizing
Windows may be resized by clicking and dragging the horizontal and vertical borders separating them.
Snap Reference Manual-v1.1 Document Number 600-0007B
Page 117 of 126
15. Built-in Editor
Portal includes a built-in code editor, making it an all-in-one solution.
Note – if you already have a favorite editor, you can use it instead.
There are several ways to open an editor pane, here are a few:
•
•
•
Click on a script name from the Node Info pane
Use the Open File button on the main toolbar
Use the New Script button on the main toolbar
Regardless of how you opened it, all the edit windows work the same.
A mini-toolbar provides buttons to
Save,
Save As, and
Open File.
Next is a search window (CTRL-F is a keyboard shortcut for this), and a
Find Next button.
The Test SNAPpy Script button lets you validate SNAPpy scripts (only) before you try to upload
them into a node.
Snap Reference Manual-v1.1 Document Number 600-0007B
Page 118 of 126
If you have opened a read-only file, an error message on the mini-toolbar will tell you so.
You can do a Save As to create a separate writable copy. This lets you start with an existing demo
script, and make your own custom variation.
If you try to type characters into the edit window of a read-only file, Portal volunteers to save the file
to a writable copy for you.
If you did not mean to be editing the read-only file, just click on No.
If you do want to edit a copy of the original read-only file, click on Yes.
The usual “file chooser” dialog box will allow you to choose the new file name. The edit window will
automatically switch to editing the newly created file.
Be sure to Save your edits when you are done. Your new script can be uploaded into one or more
SNAP nodes using the Upload Snappy Image button in the Node Info window.
Snap Reference Manual-v1.1 Document Number 600-0007B
Page 119 of 126
16. Firmware Updates
The Firmware Version is shown in the Node Info pane for each SNAP node in your network.
Upgrading your devices to a newer version of SNAP is easy with Portal.
Upgrades use UART1 of the RF Engine. This means
a connection to the second serial port (usually RS232) of the Device being upgraded is required. Note
that the new SNAPstick carrier does not support reprogramming. You must move the RFE to some
other board (like an SN171 Proto Board) in order to
upgrade that RF Engine’s firmware.
Obtaining Firmware
Each new release of Portal contains the most current version of the SNAP firmware at the time of that
Portal release. Intermediate “firmware only” updates may also be available on the Synapse Support
Web Site.
http://forums.synapse-wireless.com/
Look in the Latest Releases thread on the forum, under the Software Releases topic.
Note: Unlike in version 1 of SNAP, there is not separate firmware for what used to be called the
Coordinator (SCO) and End Devices (EDs). Now a single common firmware image is used in all
nodes.
Installing new Firmware
First make sure you have an RS232 connection to the Device you are upgrading. This requires a
connection to the DB9 connector on the Evaluation kit board, as USB is not supported for firmware
upgrades.
From Portal’s Options menu, select Firmware Upgrade… The following dialog box will be
displayed.
Snap Reference Manual-v1.1 Document Number 600-0007B
Page 120 of 126
Portal will scan your COM ports, and should find the first Synapse device connected to a serial port. If
that is not the node you want to upgrade, you can hit the Re-scan serial ports button to
automatically search for the next serial port with a responding node on it.
If Portal does not automatically find your SNAP node, you can manually select the correct COM port.
If you have more than one node connected via RS-232 ports, you may also manually select the correct
one instead of repeatedly pressing the button.
Select the Firmware Image to be used for the upgrade. Note that starting with version 2.1, there are
now four types of firmware images to choose from:
Firmware images with “debug” in the title have extra error checks to help debug user scripts
and configurations. These extra diagnostic checks come at the expense of a slight decrease in
speed and SNAPpy image space.
Firmware images without “debug” in the title do not have these extra error checks, which allow
them to run faster, and have more room for SNAPpy images.
Firmware images with AES128 in their name have built-in support for AES-128 over-the-air
encryption. These images are not included with Portal, but can be ordered separately from
Synapse (there is an additional charge for AES-128 support).
Firmware images without AES in the title do not support AES-128 encryption.
The firmware image names also indicate the version of that firmware. For example, 2.1.5 is newer
firmware than 2.0.32, and 2.1.8 is newer than 2.1.7.
After choosing the correct firmware image to load, press the Upgrade button to begin.
Follow the instructions given in the dialog, which may have you restart (power-cycle or reset) your
device to complete the process.
New firmware will be sent to the SNAP node over the serial connection.
Snap Reference Manual-v1.1 Document Number 600-0007B
Page 121 of 126
Choose Yes to download the same image into another SNAP node, or No to return to Portal.
Troubleshooting
There is a possibility of interruption (power, serial connection, etc.) in the midst of the upgrade
process. This may leave the SNAP node in a state where the SNAP application firmware is unusable.
However, upgrade is still possible, since the SNAP boot-loader firmware is protected in a “locked”
region of flash. Simply restart the upgrade process – this time you’ll need to manually select the
appropriate COM port for RS232 communication, since Portal won’t be able to detect a running RF
Engine on the serial port.
Snap Reference Manual-v1.1 Document Number 600-0007B
Page 122 of 126
17. License Activation
The default install of Portal Software is licensed as Portal-12. This limits your SNAP Network to 12
nodes, but provides a base level of product features suitable for evaluation and simple, small network
configuration.
Versions of Portal included in some of the smaller “Evaluation Kits” may be licensed for smaller
numbers of nodes.
Obtaining a License
Portal product levels beyond 12 nodes require the purchase and installation of a License. Licenses
may be purchased online at http://www.synapse-wireless.com/, or you may contact a Synapse Sales
representative at 1-877-982-7888.
Installing the License
Your Portal License is delivered as a single file, which you can simply copy into the directory on your
hard drive where Portal was installed. By default, this is:
C:\Program Files\Portal
(Your install directory may differ, if you changed the location during install.)
The License file should be renamed to: PortalLicense.dat
After installing a new license, Portal must be restarted for the new features to take effect. Once
restarted, you should see the new Portal product level reported in the title-bar of the Portal application
window.
You can also use Help -> License Details… to see what your current license settings are.
Snap Reference Manual-v1.1 Document Number 600-0007B
Page 123 of 126
18. Notes for Users Familiar with SNAP 1.x
Fundamental differences between SNAP version 1.x and SNAP version 2.x sometime confuse users of
the older product line. (Users who have never even seen a SNAP 1 node can ignore this section).
The seven-segment display is no longer just Link Quality
In the original SNAP products, the seven-segment display was only used to show Link Quality. In
SNAP 2.x, users have complete control over all 14 segments (2 character positions times seven
segments each).
Nothing is put on the seven-segment displays by default. You must use a SNAPpy script to write data
to these displays.
To reiterate: a blank seven-segment display does not mean your unit is dead!
There are no longer any AT Commands
SNAP 1.x had no Packet Serial mode, and did not support Remote Procedure Calls (RPC).
SNAP 2.x replaces the AT command interface of SNAP 1.x with a more robust Packet Serial interface,
and an even more powerful RPC capability.
There are no longer Coordinators and End Devices
One node still has to act as a “bridge” to connect Portal to the rest of the network, but there is no
longer a dedicated Coordinator. Instead, any node with an available serial interface can act as a bridge,
and all nodes can perform Mesh Routing, etc.
Snap Reference Manual-v1.1 Document Number 600-0007B
Page 124 of 126
Snappy Cheat Sheet
Identifiers
Snappy Language
All statements must end in a newline:
print “I am a statement”
Blocks are indicated by one or more spaces,
following a statement that ends with a colon (:)
if name == “Snappy”:
print “Welcome!”
Comments start with a #:
print “Hello” # I’m a comment
Control Flow
Use if to decide what code block to execute:
x = 1
if x == 1:
print “Found number 1”
The elif and else reserved words are optional:
x = 1
if x == 1:
print “Found number 1”
elif x == 2:
print “Found number 2”
else:
print “Did not find 1 or 2”
Use while to execute code as long as a
condition is met:
x=0
while x < 10:
print x
x = x + 1
Conditionals
== Equals
!= Not equals
> Greater than
< Less than
>= Greater than or equals
<= Less than or equals
and Both must be true
or Either can be true
not Boolean inversion
Identifiers are case sensitive names used
to describe variables and functions. They
must start with a non-numeric character
and only contain alphanumeric and
underscore (_) characters.
The global reserved word declares
identifiers as globals in the current
code block:
global buttonState, buttonCount
Reserved words:
and assert break class continue
def del elif else except exec
finally for from global if
import in is lambda not or pass
print raise return try while
Functions
Functions are defined using the
def reserved word:
def mySnappyFunc():
print “Hi Snappy!”
Required function parameters are
defined by adding identifiers in the
parentheses:
def addrFunc(param1, param2):
result = param1 + param2
print result
Importing
Snappy modules can import
other modules with import
from evalBase import *
Arithmetic
+ Addition operator
- Subtraction operator
* Multiplication operator
/ Division operator
% Modulo operator
Snap Reference Manual-v1.1 Document Number 600-0007B
600-0005A
SNAPpy Cheat Sheetwww.synapse-wireless.com
Data Types
str
String
int
Integer
bool
Boolean
function Function
Page 125 of 126
Version 1.0
RF Engine Pin Assignments
Pin No.
Name
Direction
Description
1
2
3
4
5
6
7
8
9
10
11
12
GND
GPIO0_TPM1CH2
GPIO1_KBI0
GPIO2_KBI1
GPIO3_RX_UART0
GPIO4_TX_UART0
GPIO5_KBI4_CTS0
GPIO6_KBI5_RTS0
GPIO7_RX_UART1
GPIO8_TX_UART1
GPIO9_KBI6_CTS1
GPIO10_KBI7_RTS1
Bidirectional
Bidirectional
Bidirectional
Input
Output
Bidirectional
Bidirectional
Input
Output
Bidirectional
Bidirectional
13
14
GPIO11_AD7
GPIO12_AD6
Bidirectional
Bidirectional
15
16
17
18
19
20
21
22
23
24
GPIO13_AD5
GPIO14_AD4
GPIO15_AD3
GPIO16_AD2
GPIO17_AD1
GPIO18_AD0
VCC
PTG0/BKDG
RESET*
GND
Bidirectional
Bidirectional
Bidirectional
Bidirectional
Bidirectional
Bidirectional
Bidirectional
Input
-
Power Supply
GPI/O, or Timer1 Channel 2 (ex. PWM out)
GPI/O, Keyboard In
GPI/O, Keyboard In
UART0 Data In
UART0 Data Out
GPI/O, Keyboard In, or UART0 CTS
GPI/O, Keyboard In, or UART0 RTS
RS232*/UART1 Data In
RS232*/UART1 Data Out
GPI/O, Keyboard In, or RS232*/UART1 CTS
GPI/O, Keyboard In, or RS232*/UART1 RTS
GPI/O, Analog In, CBUS CDATA, or SPI
MOSI (Master Out Slave In)
GPI/O, Analog In, CBUS CLK, or SPI CLK
GPI/O, Analog In, CBUS RDATA, or SPI
MISO (Master In Slave Out)
GPI/O, or Analog In
GPI/O, or Analog In
GPI/O, or Analog In
GPI/O, Analog In, or I2C SDA
GPI/O, Analog In, or I2C SCL
Power Supply
Background Debug Communications
Module Reset, Active Low
Power Supply
Snap Reference Manual-v1.1 Document Number 600-0007B
Page 126 of 126