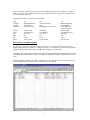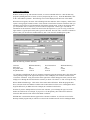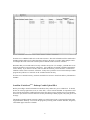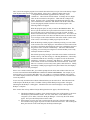
1
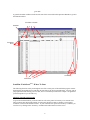
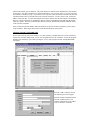
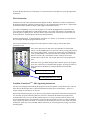
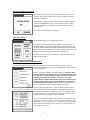
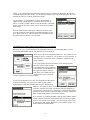
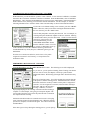
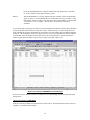
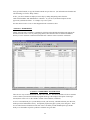
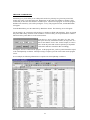
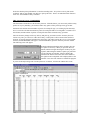
HandSpring Visor TM Symbol SPT-1500/1700 Version Installation and Operation Instructions Palm Program Version 1.32 Excel Version 1.10 Desktop Conduit Version 1.60 September 30, 2001 2001 DATAssociates Inc. 456 Freehall St. Mertztown, PA 19539 Phone: 610-682-0823 Fax: 509-357-3610 Email: [email protected] 1 ScanMan “PottieScan"TM Inventory - Installation Instructions To begin the installation process, you must have the Palm Desktop installed on the PC. Once the Palm Desktop installation is complete, you can begin installing ScanMan “PottieScan”. For the CD Version: From the TaskBar, select Start, Run and type x:\setup.bat where “x” is the drive letter of the CD drive. Restart the computer. For the 3.5” floppy version: There are 3 parts to the installation process as follows: 1) HotSync Registration (2 disks) 2) PC Conduit Program (3 disks) 3) PDA Program Files and Excel Workbook (1 disk) Begin by inserting the HotSync Registration Disk 1 into the 3.5" drive. From the TaskBar, select Start, Run and type a:\setup.exe. Follow the prompts to install the HotSync components required for the program. When the HotSync Registration installation is complete, place the ScanMan “PottieScan” Conduit Program Disk 1 into the 3.5" drive. From the TaskBar, select Start, Run and type a:\setup.exe. Follow the prompts to install the HotSync components required for the program. When the installation is complete, Restart the computer. When the installation of ScanMan “PottieScan” Conduit Program is complete, place the disk labeled "Palm Program Files Disk 1 of 1" in the 3.5" drive. From the TaskBar, select Start, Run and type a:\setup.bat. You will be prompted for a user (Palm) for the program to be installed on. Select the desired user. The program will require you to perform a HotSync with the appropriate Palm in the HotSync cradle. When the HotSync is complete the program will be loaded on the PDA. ScanMan “PottieScan”TM - System Requirements The system requirements to run PottieScan are as follows: Microsoft Windows 95/98/NT/2000 Intel Pentium 266 or higher 32 MB RAM 15 MB hard drive space Microsoft Excel 97 higher Palm OS based barcode scanner and PDA Palm Desktop software loaded on PC ScanMan “PottieScan”TM - Program Orientation PottieScan is a complete inventory and route management system. Set up your inventory and customer list in the Excel workbook, then schedule deliveries. Upload the data to the PDA. When the driver/employee makes a delivery, pick-up or performs maintenance, they navigate to the appropriate screen and scan the pottie barcode. At the end of the day, the PDA is downloaded to the desktop. The Inventory is automatically updated. You can keep complete records of unit maintenance, as well as track maintenance times. 2 The Excel workbook contains a program interface to make data entry quick and accurate. It gives you the ability to track inventory on site and in the yard. There are three parts to PottieScan - the program that resides on the PDA, the Excel Workbook program, and the desktop conduit program that takes data from the either the PDA (download) or the Excel Workbook (upload) and transfers that data to the other. ScanMan “PottieScan”TM - Pottie Labeling It is assumed that the user will place barcode labels on the Potties to be tracked. Just about any barcode type is supported by PottieScan except the Interleaved 2 of 5 symbology. The forecasting ability of PottieScan requires potties to be labeled with prefixes. Although you don't have to use the descriptions listed below, you must have the same alphabetic prefixes in the barcode. The prefixes and descriptions for pottie labeling are as follows: AQ DG HDC P W WS Aqua Dark Green Handicapped Pewter Wedding Wash Station The number following the prefix can be any combination of numbers, as long as the total number of characters including the prefix is no greater than 15. You don't have to use the rational for labeling listed above, but if you want forcasting to work, you must use these prefixes. ScanMan “PottieScan”TM - Excel Operating Instructions INTRODUCTION The PottieScan Excel workbook is named "download.xls" and is located in the "C:\DAT Palm Apps\PottieScan directory. Open Microsoft Excel by pressing the "Start" button on the Task Bar, select "Programs", then "Microsoft Excel". When Excel finishes loading, select "File" on the Menubar (top left), then select "Open" and navigate to the "DAT Palm Apps\PottieScan" directory. Select the file "download.xls" and press the "OK button. The workbook will load and be displayed on the desktop. At the bottom of the workbook you will see grey tabs that indicate the different worksheets in the workbook. Never rename the sheets, as the Excel program for data entry relies on the sheet names as they are set up at installation. The sheets included in the workbook and a brief description of their use are listed below: DeliveriesFromPalm DeliveriesToPalm Inventory- - Customers Maintenance PickUpPrompt - InventoryForecast - Holds data transferred from the PDA to the desktop PC Holds deliveries waiting to be made, transferred to PDA A list of the potties and their barcode numbers, transfer to and updated by the PDA A list of customers, transfer to and updated by the PDA Maintenance information downloaded from the PDA Planning sheet that shows what potties are to be picked up for a given time period A count of each type of pottie projected to be in inventory for any 3 given date A general orientation to Microsoft Excel with some of the terms used in this Operator's Manual are given in the illustration below: Worksheet Columns MenuBar Worksheet Rows Scroll Bars Worksheets ScanMan “PottieScan”TM - Where To Start The following directions walk you through the use of the various parts of the PottieScan program. Follow the directions and examples below and enter the same data we do in Excel and the PDA. You may want to jump right in and start entering your own data, but we recommend you follow the example. We guarantee you'll learn quicker if you do it this way. SETTING UP THE INVENTORY To get started with PottieScan, you need a label for each of the potties in inventory or at customer sites. Then you must enter the barcode number for each pottie into the inventory worksheet. The inventory worksheet is shown in the illustration above. If your workbook isn't open to the Inventory worksheet, you can select it by clicking on the "Inventory" worksheet tab at the bottom left of the screen. 4 The barcode number goes in column A. The serial number in column B is the manufacturer's serial number for the pottie. The other columns are for customer information. You can enter it now, or you can wait until the Customer worksheet is set up. If you choose to set it up now, make sure that the Customer, Job Site and Comments match entries you'll make later in the Customer worksheet. You may want to wait, and use the PDA to collect the data…in effect delivering the unit to that customer after the fact using the "Unscheduled Delivery" option on the PDA, or scheduling a delivery in Excel, uploading the PDA and using the normal "Delivery" option. That way you'll make sure that the Customer, Job Site and comments match the entries in the Customer worksheet. Once you have the barcode numbers and serial numbers set up in the Inventory worksheet, you're ready to set up customers. Don't forget that you have to put the barcode labels on the potties. SETTING UP THE CUSTOMER LIST Now its time to set up your list of customers. To enter customers, schedule deliveries, sort the worksheets and forecast inventory and pick-ups, you can use a program built in to the worksheet. To start the program, hold down the control key (Ctrl) while pressing the "G" key. The program will start, and the Main Menu will appear: Press the "Add a Customer" button. The following screen will appear: Enter the customer information, then press the "Update" button. The customer information will be added to the "Customers" worksheet. 5 Once you press the "Update" button, you can continue adding customers to the "Customers" worksheet. Make sure you press the "Update" button when you're finished each entry. Enter a few customers just so we can move to the next step. Specifically, enter these 3 customers for the example: Code Company Job Site Comments 111 Williams Pharmacy Around Back Get Key at Office 222 Zeus Construction Site 1 Behind Supervisor's Trailer Contact Street City State Zip Phone Tom Reynolds 123 Main Street New York NY 12343 222-333-4545 Al Bensing 222 Walnut St. New Yord NY 12122 333-454-9988 333 Mothers Weddings Smith Residence For wedding use, customer delivers Mother Smith 3222 Home Avenue New York NY 12333 222-876-4637 MULTIPLE CUSTOMER ENTRIES You may have a customer with many job sites or locations. You will have to make an entry for each unique location that will get a delivery. Change the "Job Site" or "Comments" for the customer to indicate that this is different than other locations with the same company or customer name. Pressing the "Exit" button will terminate the program. Pressing the "Main Menu" button will take you back to the Main Menu described above. When you're finished, entering the customer information above, press "Exit". When the program terminates, click on the "Customers" tab at the bottom left of the screen, and you will see the following screen, with the customer information you just entered. 6 ADDING DELIVERIES With the inventory set up, and customers entered, we can now schedule deliveries. Start the data entry program by holding down the "Control" (Ctrl) key and pressing the "G" key. From the Main Menu, click on the "Add A Delivery Button. The following screen will be displayed, but the boxes will be blank: When the screen appears, the cursor will be flashing in the box under the "Select Company / Jobsite Here:" caption. Start typing the customer's name. If the customer existed in the Customers worksheet when you started the program, the box will automatically fill with the customer name. If this is the customer name you want, hit the "Tab" or "Enter" key to move to the next input field - "Pottie Type". Note that the information for the customer is filled in the boxes below the input boxes so you can verify you have the right customer Type the prefix of the pottie type to be delivered. Now, hit "Tab" or "Enter" to advance to the box where you will enter the scheduled delivery date. Then enter the scheduled pick-up date. Enter the following customer deliveries: Customer Pottie Type Proj. Deliv. Date Proj. Return Date Williams Pharmacy AQ 9/15/01 12/31/01 Zeus Construction AQ 9/15/01 10/31/01 Williams Pharmacy AQ 9/15/01 1/1/02 For customers with different job sites or comments, instead of typing the customer name, click on the little "down-pointing" triangle to the right of the input box. This will display a list of all the customers in the "Customers" worksheet. Using the scroll bar at the right of the window that appears when you click on the triangle, move through the list and select the customer you desire. Hit "Enter" or "Tab" to accept the entry. Where did the information go? Click on the "Exit" button and we'll find out. When the program shuts down, select the "DeliveriesToPalm" worksheet tab on the bottom left of the screen. Although the entries might be different if you didn't follow the example, the worksheet looks like this: Note that if you have multiple deliveries for the same customer, you can change the "Qty" box to the number to be delivered. For example, if you put in "3" for the quantity, there will be three deliveries entered for that customer in the "DeliveriesToPalm" worksheet. NEVER enter a customer that doesn't appear in the Customers worksheet. It will cause an error in the Desktop Conduit program and you will have to return to the worksheet and fix it before loading the PDA. 7 Note that we've scheduled 2 deliveries to the same customer. Since this information will be transferred to the PDA and the employee will collect data that is unique to the pottie, we need to make multiple entries for multiple deliveries to the same customer/jobsite/comments in the Customers worksheet. Remember that you can make entries into any worksheet at any time. For example, you didn't have to use the Excel program to enter customers or deliveries. You could have selected the worksheet and made the entries directly. If you choose to do this, make sure that the customer, job site and notes./ comments are identical to those in the "Customers" worksheet. If they aren't you'll have an error in the Desktop Conduit program and you'll have to come back to the worksheet and fix the entry. Now that we've entered inventory, customers and deliveries its time to transfer the delivery information to the PDA. ScanMan “PottieScan”TM - Desktop Conduit Upload PDA Before proceeding to transfer information to the PDA, always make sure you've exited Excel. To do this, hit the "X" at the top right of the screen, or select "File", "Close" from the Task Bar. Its important to close Excel, because the Desktop Conduit Program will use the sheet to process the data to be sent to the PDA. If Excel is open, the sheet won't be able to be used by the Desktop Conduit program, and you'll get an error message. The Desktop Conduit program is named "conduit.exe" and is located in the "c:\Program Files\DAT Palm Apps\PottieScan" directory. You can run the program by selecting "Start" from the Task Bar, "Programs", "DAT Palm Apps" and select "Conduit". 8 Since you will be using the program a lot to transfer data to the PDA, set up an icon on the desktop. RightClick anywhere there isn't an icon on the desktop. Select "New", "Shortcut" and navigate to the "c:\Program Files\DAT Palm Apps\PottieScan" directory. Select "conduit.exe". Then click the "Finish" button. To change the icon, RightClick on the icon and select "Properties". Then click the "Change Icon" button. Navigate to the "C:\DAT Palm Apps\PottieScan" directory and select "PottieScan.ico" and hit the "OK" button. Then hit the "OK" button. To start the program, Double-Click the icon to run the program. The following window will appear: When the program opens, its ready to transfer data FROM the PDA. The data we just entered needs to be processed before transfer TO the PDA. To process the data you just entered in Excel, press the "Transfer To Palm" button on the bottom center of the Desktop Conduit screen. You will see the green bar (bottom of the screen above the buttons) turn red, and will be able to see messages on the red bar and in the white status window (on the center of the screen) as the Desktop Conduit program process the data. When the Desktop Conduit program is finished processing, a screen similar to the one below left will be displayed. Note that the bar at the bottom of the screen above the buttons has turned from red to green, and that the caption in the green bar states "Transfer to Palm Ready". This is the indication that everything went well with processing the Excel Data and that you are ready to HotSync the data to the PDA. Note that the processing messages in the white status window read from the bottom to the top. The first message is "Checking Worksheets", followed by a confirmation that the error checking is complete for each of the transfer worksheets, "Customers", "Inventory" and "Delivery". Then there is a count of the number of items from each sheet that will be transferred. In this case, there are 3 customers, 432 inventory items (potties) and 3 deliveries. Finally, the Desktop Conduit program prepares the palm transfer files, then displays the message that we are ready to HotSync. If there was a conflict with the data, you would be prompted in the white status window where the error occurred. DO NOT EXIT THE DESKTOP CONDUIT IF THERE ARE ERRORS. For example, if you entered a delivery for a customer that didn’t exist, you would see a "Customer NoMatch" entry with the row number displayed in the status window. You would then have to go back to the Excel worksheet and correct the problem. You're now ready to load the PDA with the information that you entered in Excel. Place the PDA in the cradle and press the HotSync button. The PDA will beep and the HotSync Progress Box will appear indicating that the HotSync is taking place. Watch the PDA screen until it displays a message that the HotSync is complete. If the scanner does not beep and the HotSync Dialog Box does not appear, check the following: 1) The HotSync Manager is running. Check the bottom right corner of the monitor by the clock. The HotSync symbol should be visible. If it isn't, select "Start" on the Taskbar, select "Programs", select "Palm", and select "HotSync Manager". The icon by the clock should appear. Now press the HotSync button on the cradle. 2) If the HotSync icon is by the clock, reset the PDA by removing it from the cradle and push the reset button using a paper clip in the reset hole in the back of the PDA. After resetting the PDA, place the unit in the cradle and press the HotSync button again. 9 Now that the data from Excel is in the PDA, we can use the PDA to make deliveries, pick-ups and perform maintenance. PDA Orientation: PottieScan will work with any PalmOS Personal Digital Assistant. With built in contact, calendar and todo programs and plenty of memory for data storage, it is an economical and versatile device. Coupled with the barcode scanner, the PDA becomes a lightweight automated data collector. If you have a Handspring Visor, take out the plastic cover from the SpringBoard slot on the back of the Visor and insert the Momentum or CSM scanning module. The scanner will initialize, and the PDA will show the generic scanning screen. Press the "house" on the bottom left of the screen to return to the icon menu on the PDA. The Icon Menu looks like the illustration below: Note the PottieScan Icon. To start PottieScan, just tap the icon. Before we get started, we need to discuss how to navigate through the program and how to scan. For any screen with options, simply click on the checkbox or button, and you will be taken to the appropriate screen. Once on the desired screen, data can be input manually or with the PDA scanner. On the HandSpring Visor, scan a bar code by pressing and releasing one of the scrolling buttons. To operate the locator blip, press and hold one of the scrolling buttons. Once the target barcode is found, release the scroll button to scan the code. Note that the scanner will beep, but not shut off when the bar code is read. The scanner shuts off on a pre-programmed timer. If the PDA screen goes blank during the data collection process, pressing the power key will return you to the PottieScan program. Pressing any other key along the bottom of the PDA will terminate PottieScan and start that program. PottieScan Program Icon Scrolling Buttons-Press to Scan ScanMan “PottieScan”TM - PDA Operating Instructions The first screen displayed when starting the program is the "Enter Operator" screen shown below. The user must enter his identification here so that the information he inputs can be correlated later. There are a couple of things to remember as we move on: When in the PottieScan program, if you press any of the buttons on the bottom of the PDA associated with the "on board" programs (calendar, phone list, to-do list or memopad), the PottieScan program will be terminated wherever you were in the data collection process. If you've selected a pottie or delivery and haven't finished the process, the information will be lost and you will have to start over. This also happens when you press the silkscreen "House" or "Calculator on the bottom part of the screen on either side of the Grafitti pad. Make sure you are finished with the transaction you are entering before pressing one of these buttons/graphics. 10 ENTER THE PDA OPERATOR: The Operator Code can be entered manually with Graffitti or can be scanned. The operator code has to be at least one character, and no more than 5 characters. If the operator scans his Operator code, the program will immediately advance to the Main Menu screen. If the Operator Code is entered manually, pressing the "Continue" button will advance to the Main Menu Screen. The "Exit" button terminates the program. THE MAIN MENU: The Main Menu appears as is illustrated at the left: Note that the operator has the option of making a regular delivery, an unscheduled delivery, performing maintenance (including picking up a unit), and "admin" which allow editing and looking up data. The "Exit" button terminates the program. The "i" in the top right of the screen will display the PottieScan program information when pressed. Each of the options will be discussed below, using the sample data we entered in Excel earlier. HOW TO DISPLAY LIST INFORMATION: To start, let's see the information that was uploaded to the PDA, specifically the inventory of potties, customer list and deliveries. Press the "ADMIN" button. The following screen is displayed: Before we continue, remember the following point. The table editing features about to be described are for experienced PottieScan users. You must take care when making changes to the tables on the PDA. Changing information on customers or inventory may cause synchronization with the information in the Excel workbook to fail, as the Desktop Conduit program checks the PDA lists against the Excel lists during the download. Editing features are provided so you can view information, and make small changes to the tables. OK, lets look at the customer list. Press the "Edit Customers" button. The screen below left will be displayed. You should see the first customer (ordered alphabetically) you entered in the "Customers" worksheet in Excel. If you touch any lined item with your stylus, you will be able to modify its content (it's not a good idea to do this) by using the keypad or Grafitti. There are also navigation buttons at the bottom to move from one entry to the next. Use the "Left Arrow" to move to the previous entry. The "Right Arrow" moves to the next entry. Note that if you press the "Right Arrow" button when on the last entry in the list, you'll be asked if you want to add a new record. 11 Pressing the "New" button clears the screen and gives you the ability to enter a new customer. The "Del" button will delete the customer that is displayed. The "Back" button takes you to the previous menu, where you select the inventory you want to edit or view. Using the arrows, navigate through the customer list to see the entries you made in the "Customers" worksheet in Excel. When you're finished, use the back button to return to the menu. The other "Edit" buttons edit information originally entered using the Excel workbook with the exception of the "Edit Maint. Record". This list is created when the employee enters maintenance data, and starts out as a blank list. The other option we haven't discussed is the "Look-Up Customer" button. When pressed, the following screen is displayed: This option gives you the ability to look up customer information by typing in some of the characters of the customer name. For our example, we've typed in an "O" and now press the "Continue" button. Every Customer name with an "O in it is now displayed on the screen. You can edit the information on the screen in the same manner as in the "Edit Customer" option described above. We’re now ready to start discussing the "meat" of the program delivering, picking-up, and performing maintenance. Click the "Back" buttons until the "Main Menu" is displayed on the screen. MAKING SCHEDULED DELIVERIES: From the Main Menu, press the "Delivery" key. The screen at the bottom left, with the list of deliveries entered in the Excel worksheet is displayed: You select the delivery by pressing on the customer name/job site combination you want to select. It will turn black when you select it. Pressing the "Detail" button at the bottom left of the screen displays the full customer information for that delivery (as show at the right). Pressing "Back" from the detail screen takes you back to the screen where you selected the delivery. Note that you can "thumb" through this or any similar list in PottieScan by using the scroll buttons on the PDA (see PDA Orientation in this manual) Pressing the "Next" Button will take you to the screen where you will scan the barcode of the pottie delivered to this customer. The screen appears as follows: Now scan the pottie barcode that will be delivered. For this example, we will scan pottie number AQ004. A couple of things to keep in mind on this screen: Like all screens where you can use the barcode reader, you can also key enter the number. Just press the "Done" button when you're finished. If you picked the wrong customer and want to go back to select another, press the "Abort" button. 12 Finally, if you want to change the information in the inventory to contain a modification to the job site or comments displayed for the customer, you can make the changes by pressing on the appropriate area, and changing the entries by using the keyboard or Grafitti. For the example, we've changed the site from "Around Back" to "Right in Front", and the Notes (or comments) from "Get Key at office" to "No Key Needed". When you scan the barcode, or manually enter it and press the "Done" button, you are taken back to the Main Menu screen. Press the "DELIVERY" button again, and look at the delivery list. You can see that one of the deliveries to Williams Pharmacy is now gone. When a delivery is made, the delivery list is modified to show only those deliveries that have yet to be made. UNSCHEDULED DELIVERIES WITH EXISITNG CUSTOMERS: PottieScan also gives you the ability to make unscheduled deliveries. From the Main Menu, press the "UNSCHED DELIVERY" button. The following screen is displayed: There are two options for unscheduled deliveries. You can deliver to an existing or "Active" customer, or you can deliver to a new customer. A new customer is one that isn't on the "Customers" worksheet of the Excel workbook. Lets try the simple option first and deliver to an existing customer. Press the "Select" button, and the screen displaying existing customers will be shown as in the illustration at the right. Note that the "Job Site" and "Notes" are available for you to change on this screen. Select the customer, and press the "Continue" button. You are now prompted to scan or key enter the pottie barcode number. To make it interesting, we're going to try to deliver pottie number AQ004 again, but this time, instead of delivering it to Willamsburg Pharmacy, we're going to deliver it to Mothers Weddings. PottieScan checks the inventory list to make sure that the pottie isn't assigned to a customer before it allows delivery of the pottie. If the pottie has already been delivered to a customer, PottieScan displays a message, and doesn't allow a pottie already delivered to be delivered again. If we wanted to, we could use the PDA to pick-up pottie number AQ004, and the customer information assigned that pottie in inventory would be removed. We won't do it now though. Clear the message on the screen by pressing the "OK" button. Then deliver pottie number AQ005. You will be returned to the Main Menu. 13 UNSCHEDULED DELIVERIES WITH NEW CUSTOMERS With PottieScan, you can also deliver a pottie to a new customer. A new customer is defined as a customer that isn't in the "Customers" worksheet of the Excel workbook. From the Main Menu, select "UNSCHED. DELIVERY". Then, from the Unscheduled Delivery menu, press the "Add" Button. PottieScan displays a blank customer screen, allowing you to fill in the customer information. For this example, we enter the following information for a customer called "Vinart Car Dealership" as shown in the illustration below: If you want to exit without entering a new customer, press the "ABORT" button. Otherwise, when you are done entering the information about the new customer, press the "ADD" button. You are then prompted to enter the pottie barcode. For our example, we will assign the pottie numbered "AQ006" to the new customer. Entering a valid barcode returns you to the main menu. Check to see that the new customer is in the customer list. From the Main Menu, press the "UNSCHED. DELIVERY" button, then the "SELECT" button. You will see "Vinart Car Dealership" show up in the customer list. Press the "ABORT" button to go back to the Unscheduled Delivery menu, then press "ABORT" again to go to the Main Menu. Now that we've made some deliveries, and we have a few potties assigned to customers in our inventory, we can perform some maintenance tasks. PERFORMING MAINTENANCE - CLEANING From the Main Menu, press the "PERFORM MAINT" button. The following screen will be displayed: As you can see, you can perform Cleaning, Extra Cleaning, note that the unit was "not serviced", Note Repair, or Pick-Up a pottie from the Maintenance Menu. We'll briefly go through each to describe how they work. Press the "Cleaning" button. You will be prompted to enter the barcode of the pottie to start the cleaning process. When the barcode is entered, PottieScan checks the inventory to make sure the pottie is assigned to a customer. If it isn't assigned to a customer, it doesn't allow cleaning to take place, and gives the operator a message. Otherwise, a screen is displayed prompting for the scanning of the barcode when cleaning is complete. For the example, we're going to clean pottie AQ005. The screen at the right is the screen where the pottie barcode is scanned at the completion of the cleaning. PottieScan asks the barcode to be scanned twice because it is keeping track of the time elapsed for the maintenance step. When the cleaning operation is complete, scan the barcode again. You will be returned to the Main Menu. If the PDA "goes to sleep" during the cleaning process, you can pick up 14 where you left off by pressing the power button on the PDA. Make sure you don't press any of the other program buttons, or you'll lose your place in the program. The start time will be recorded, but there will be no completed time. PERFORMING MAINTENANCE - EXTRA CLEANING From time to time, potties need special cleaning, generally associated with a special reason for this action. From the Maintenance Menu, press the "EXTRA CLEANING" button. The screen below left is displayed. PottieScan allows you to enter reason codes for extra cleaning operations. Just check the box for the reason, or check the "Other" box, and enter the reason for the cleaning operation. Pressing the "CON'T" button displays the screen prompting for scanning a barcode to begin the cleaning process. For the example, we will check the "Requested" box, then press the "CON'T" button. We will perform extra cleaning on pottie number AQ006. The screen prompting for barcode entry at the end of the cleaning is displayed. Entering AQ006 again returns us to the Main Menu. PERFORMING MAINTENANCE - NOT SERVICED Sometimes, a pottie can't be serviced because the employee can't get to it, for example if the gate is locked. You can make a "Not Serviced" entry by pressing the "NO SERVICE" button from the Maintenance menu. You are then prompted to scan or enter a pottie barcode. For our example, we are going to enter AQ005 as the barcode of a pottie that wasn't serviced. The screen at the right is displayed, prompting for a "no service" reason. You can press the "NO ACCESS" button or enter a reason. For the example, press the "NO SERVICE" button. Then press the "DONE" button. You are returned to the Main Menu. PERFORMING MAINTENANCE - NOTE REPAIR If an employee notices while cleaning or delivering potties that a pottie is in need of repair, PottieScan gives him the ability to make an entry so the repair will be noted in the Excel worksheet when the data is transferred. From the Maintenance Menu, press the "NOTE REPAIR" Button. The screen below is displayed: The operator enters the particulars of the repairs needed in the area under the "Service Notes:" caption, then scans or enters the pottie barcode. For our example, we are going to enter "Door Hinge Broken" as the Service Notes, and enter the barcode AQ004. Now press the "Continue" button. You will be returned to the Main Menu. 15 PERFORMING MAINTENANCE - PICK-UP To pick up a pottie, press the "PERFORM MAINT" button on the Main Menu. Then press the "PICK-UP" button on the Maintenance Menu. You will be prompted to scan/enter a pottie barcode to be picked up. When the barcode is entered, PottieScan will make sure the pottie is assigned to a customer, and if it isn't, will display a message to the operator. For our example, enter pottie number AQ004 as the pottie to be picked up. MAKE A FINAL DELIVERY Now, make one more delivery. From the Main Menu, select the button for normal delivery, and pick the remaining delivery for "Williams Pharmacy". Scan/enter pottie number AQ007 as the pottie delivered. CHANGING JOBSITE ON DELIVERED UNITS AFTER UPLOAD…. We haven't discussed the "LOOKUP POTTIE" option from the Main Menu yet. This option is used after the unit has been delivered to the customer, and the delivery has been uploaded to the Excel worksheet. When performing maintenance to a unit, the operator can scan the pottie number, and bring up the information associated with the pottie in the inventory. The Job Site and Comments entries can be edited here. From our example, assume that the data has been uploaded to the Excel worksheet, then reloaded to the PDA. The operator can scan pottie number "AQ004" and will see the screen at the left. The operator can then change the entries in Job Site and Comments by entering more pertinent data. This option is also helpful for viewing the Job Site and Comments for potties that can't be found on the customer's site for maintenance. In this case, the operator would enter the pottie number using the keyboard or Grafitti, and pressing the "Done" button. TRANSACTION SUMMARY - PDA EXAMPLE We've finished the PDA data collection example. Now we're ready to download the data from the PDA to the Excel worksheet. Lets recap the transactions we've entered on the PDA: 1) 2) 3) 4) 5) 6) 7) 8) 9) Delivered AQ004 to Williams Pharmacy, changed the Job Site to "Right in Front" and Notes / Comments to "No Key Needed". Made an unscheduled delivery of pottie AQ005 to Mothers Weddings Made an unscheduled delivery of pottie AQ006 to a new customer called Vinart Car Dealership Cleaned pottie AQ005 Performed "Requested" Extra Cleaning to pottie AQ006 Logged "No Service" for pottie AQ005, because of "No Access" Noted pottie AQ004 needed repair for a broken door hinge. Picked up pottie AQ004 Delivered AQ007 to Williams Pharmacy, no changes to Job Site or Notes / Comments We're now ready to download the PDA data into the Excel Worksheet. 16 ScanMan “PottieScan”TM - Desktop Conduit Download PDA Before proceeding to transfer information from the PDA, always make sure you've exited Excel. To do this, hit the "X" at the top right of the screen, or select "File", "Close" from the Task Bar. It's important to close Excel, because the Desktop Conduit Program will use the Excel workbook to process the data to be sent from the PDA. If Excel is open, the sheet won't be able to be used by the Desktop Conduit program. Start the Desktop Conduit program. Refer to the section above for directions on starting the program. When the program loads, it's ready to take information out of the PDA and deposit it into the Excel worksheet. If you left the program running after loading the PDA and it is still visible on the PC, press the "Palm From Palm" button on the bottom left of the screen. Place the PDA in the HotSync cradle and press the HotSync button on the cradle. Watch the PDA screen until the "HotSync Complete" message appears. When the HotSync finishes, the screen of the Desktop Conduit program should be identical to the screen on the left. Lets look at what happened during the HotSync. Remember that we read the status window from bottom to top. First, the Desktop Conduit was "Waiting for HotSync". Then, it loaded the files from the PDA onto the desktop. Then it updated the Excel workbook with 5 entries in maintenance, 4 deliveries and 1 new customer. Finally, it displayed the message that the HotSync and Desktop Conduit process was complete. The data from the PDA is now in the Excel workbook. Let's open the workbook and look at it. ScanMan “PottieScan”TM - Excel Operating Instructions, Continued…. The PottieScan Excel workbook is named "download.xls" and is located in the "C:\DAT Palm Apps\PottieScan directory. Open Microsoft Excel by pressing the "Start" button on the Task Bar, select "Programs", then "Microsoft Excel". When Excel finishes loading, select "File" on the Menubar (top right), "Open" and navigate to the "DAT Palm Apps\PottieScan" directory. Select the file "download.xls". "DeliveriesFromPalm" WORKSHEET Now that we have the workbook open, on the bottom left of the screen, click the "DeliveriesFromPalm" tab. The screen below will appear. It contains the delivery data we entered on the PDA. Specifically, the following entries were made in the "DeliveriesToPalm" worksheet of the workbook: ROW 3 - The first delivery to "Williams Pharmacy" of pottie AQ004. Note that the Job Site is "Right In Front" and the Comments are "No Key Needed" that we changed before scanning/entering the pottie number. Remember this, as the changes we made will have ramifications in the "DeliveriesToPalm" worksheet we'll look at next. We picked-up this pottie, but the delivery is still noted. We'll see the pick-up entry below. ROW 4 - The final delivery that we made before downloading the PDA data, pottie number AQ007. Note the date and time indicates that it is the last delivery, also that the Job Site and Notes/Comments haven't been changed. ROW 5 - The unscheduled delivery of pottie AQ005 to Mothers Weddings. The way you can 17 tell its an unscheduled delivery is that the column with "Proj. Return Date" isn't filled in. Look in column J for the projected delivery date. ROW 6 - The unscheduled delivery of pottie AQ006 to the new customer "Vinart Car Dealership". Again, we know it’s an unscheduled delivery because there is no entry in column J, "Proj Return Date", but there's really no way here in the "DeliveriesFromPalm" worksheet that we can know it’s a new customer. We'll be able to see that in the "Customers" worksheet. As you collect delivery data, the new entries are placed are placed at the bottom of the list with a blank line in between the old entries and the start of the new entries. PottieScan keeps a record of all the deliveries made, including the employee that made them, the customer, the pottie number delivered and the date/time of delivery. By sorting the worksheet (see "Help" in Excel), you can get information like the rental history of a particular pottie, the number of potties delivered in a given time period to a specific customer, the number of potty deliveries made in a given time period by a particular employee, etc. "DeliveriesFromPalm WORKSHEET ILLUSTRATION Now lets look at the "DeliveriesToPalm" worksheet, because downloading from the PDA has made some changes there. "DeliveriesToPalm" WORKSHEET Click the "DeliveriesToPalm" tab on the bottom left of the screen. The illustration below shows what you should see if you followed the example. 18 Remember when we entered deliveries using the program built into Excel, we entered a total of three deliveries and transferred them to the PDA. On the PDA, we made both deliveries to "Williams Pharmacy". As you can see in the illustration, one of the "Williams Pharmacy" deliveries has been deleted. But we made both deliveries! Why wasn't the second delivery deleted? PottieScan will delete the deliveries in Excel if they've been made, but IF THE JOBSITE AND NOTES/COMMENTS ARE CHANGED DURING THE DELIVERY, THE ENTRY WILL STAY IN THE "DeliveriesToPalm" WORKSHEET. This is because when the deliveries come in from the PDA, PottieScan looks for the Customer, JobSite, Notes/Comments, and Projected Return Date in the "DeliveriesToPalm" worksheet. In our example, PottieScan was looking for "Williams Pharmacy", "Around Back", "Get Key at Office" and "12/31/01" in the "DeliveriesToPalm" Worksheet. It didn't find it, so it didn't delete an entry. For the second delivery to "Williams Pharmacy", it looked for the same information, only with a projected delivery date of "1/1/02". It found the entry and deleted it. Since you could've entered other deliveries since loading the PDA, and some of those entries could have been deliveries to "Williams Pharmacy" PottieScan didn't want to delete an entry in "DeliveriesToPalm" that wasn't the right delivery. The second delivery to "Williams Pharmacy" matched perfectly, so it was deleted from the worksheet. PottieScan assumes that you'll check the "DeliveriesFromPalm" against the "DeliveriesToPalm" worksheet for each PDA download to check for changed customer information on a delivery if you allow your employees to use the option to change Job Site and Notes / Comments during a delivery. You may decide to tell employees not to change information during a delivery, so the "DeliveriesToPalm" list will be accurate. "DeliveriesToPalm" WORKSHEET ILLUSTRATION 19 PottieScan also made changes to the "Inventory" worksheet. Lets look at it next. "Inventory" WORKSHEET PottieScan also made entries in the "Inventory" worksheet. Remember on the PDA when we tried to deliver a pottie that had already been assigned to a customer? On the PDA inventory list, the Customer, Job Site and Notes/Comments were filled in. When the PDA is downloaded it updates the "Inventory" with customer information. That way, when you upload another PDA, you can't deliver that pottie number, nor can you perform any maintenance operation unless the pottie is assigned to a customer. OK, lets look at the data. We can see pottie AQ005 and AQ006 were unscheduled deliveries (no return date), and that there was a scheduled delivery of AQ007. Note that pottie AQ004 has no customer assigned to it. We did deliver it, but then we picked it up. The delivery is noted in the "DeliveriesFromPalm worksheet, as we've already seen. The pick-up is noted in the "Maintenance" worksheet. "Inventory" WORKSHEET ILLUSTRATION The Projected Return Date (column J) is important to two features that will be discussed later….the "PickUp' prompter, and the 'Inventory Forcast' feature. If you set your inventory up without using the Excel program, make sure you fill in these entries. If you used the program, you don't have to worry because it wouldn't let you complete the delivery entry without entering the Return Date. 20 Since we did a lot of maintenance in our example, lets look at the "Maintenance" worksheet next, and see what happened to the data. "Maintenance" WORKSHEET Cleaning, Extra Cleaning, Not Serviced, Repair and Pick-Ups are shown on the "Maintenance" worksheet. Click on the "Maintenance" worksheet tab on the bottom left of the Excel screen. The screen should be similar to the one shown below: "Maintenance" WORKSHEET ILLUSTRATION Remember the maintenance entries we made on the PDA? First we cleaned pottie AQ005 (Row 3). Then we performed extra cleaning that was requested to pottie AQ006 (Row 4). Note that the transaction code column (column C) contains the "operation"…meaning the category button you pressed on the PDA before entering the barcode. The "No Service Reason" column (column I) is what the employee entered when the PDA prompted him to make an entry. Continuing with the entries we made on the PDA, we logged no service to pottie AQ005 because there was no access to it (Row 5). Then we noted that pottie AQ004 needed repair because of a broken door hinge (Row 6). Finally, we picked up pottie AQ004 (Row 7). The "Time-In" and "Time-Out" (columns F & G) are of particular interest in the "Maintenance" worksheet. Not only do you now know what time the service was conducted, you know how long the service call took. The blank column titles "Elapsed Time" (column H) can be used to calculating the time of the service call. 21 Just type in the formula, or copy the formula entered on a previous row. (for information on formulas and cell formatting, see Excel's "Help" feature) In fact, you can reconstruct an employee's entire day by cutting and pasting entries from the "DeliveriesFromPalm" and "Maintenance" worksheet. As you can see, PottieScan replaces all the paperwork you had to do before…in a simple, easy to use system. One last sheet to look at. Let's see what happened in the "Customers" sheet. "Customers" WORKSHEET Finally, lets look at the "Customers" worksheet by clicking on the tab labeled with the same name at the bottom left of the screen. Not very much going on here, but remember when we did the unscheduled delivery to a new customer? PottieScan entered the new customer in the "Customers" worksheet! "Customers" WORKSHEET ILLUSTRATION There are two ways to tell if PottieScan entered a new customer. The first is that there will be no customer code in column A, because the PottieScan program doesn't give the employee the option of entering it. Second, there will be a "T" in the "NEW?" column of the worksheet (column K). As we've seen PottieScan gives you the ability to track your inventory, schedule and track your deliveries, and keep track of maintenance activity. It completely replaces the paper system you're using now. There are two other features of PottieScan we'll look at next - the ability to find scheduled pick-ups, and the ability to see the number of potties you'll have available on a given date. 22 THE PICK-UP PROMPTER PottieScan gives you the ability to see which potties need to be picked up in a given time period. This feature only works if you entered the "Proj. Return Date" on the "DeliveriesToPalm" worksheet. We'll assume that you have the "download.xls" worksheet open. Start the Excel program. To start the program, hold down the control key (Ctrl) while pressing the "G" key. The program will start, and the Main Menu will appear: From the Main Menu, press the "Run Pick-Up Worksheet" button. The following screen will appear: For the example, our "Customers" and "Inventory" worksheet are filled with actual data. There are around 400 potties and as many customers in the worksheet. For the inventory, the "Proj Return Date" column is filled in for those potties that are on-site with customers. Note that we've put in a "From:" date and a "To:" date. This date span can be any combination of dates, as long as the "To:" date is later than the "From:" date. In this example, we want to know about the potties that need to be picked up in September and October and have entered the dates accordingly. Pressing the "Process" button runs the program. As the program runs, you'll see pottie information copied to the "PickUpPrompt" worksheet. When processing is complete, press the "Exit" button on the program screen. In our example, the following information was copied to the "PickUpPrompt" worksheet: 23 Notice the that the pick-up information is sorted in ascending order. All you have to do is print out the worksheet, and you can schedule your drivers to pick up the units. There's one other PottieScan feature to check out - the on-hand inventory worksheet. THE "InventoryForecast" WORKSHEET The final feature of PottieScan is the Inventory Forecast. With this feature, you can not only tell how many potties are in your yard today, you can also tell how may potties will be picked up on any given date. PottieScan will calculate the total number of potties for each prefix type. (see "Setting Up The Inventory" above) It will also calculate the number of potties for each prefix that are not assigned to a customer as of this moment, and the number of potties of each prefix that will be returned on any given date. Since the Inventory changes with every delivery and pick-up, you need to run the "Inventory Forecast" routine every time you want to see what's in inventory or when potties will be returned. Start the Excel program. To start the program, hold down the control key (Ctrl) while pressing the "G" key. The program will start, and the Main Menu will appear. From the Main Menu, press the "Inventory Forecast" button. The following screen will appear: PottieScan has determined that in this example, there are 432 potties in inventory. When you press the "Process" button, PottieScan begins checking the inventory for pickup dates, and totaling the number of potties per prefix that will be picked up on each date. When it finished, the number in the left box will be the same as the number in the right box and "Completed" will be displayed above the numbers. Press the "Exit" button to terminate the program. If you're not already looking at the "InventoryForecast" worksheet, click the tab with that title on the 24 bottom left of the screen. For our example, the data above is displayed in the worksheet: Look at Row 4. The total number of potties for each category prefix are shown in this row, along with the total number of potties in Column H. In the illustration above there are 173 Aqua (AQ), 138 Dark Green (DG), 8 Pewter (P), 6 Handicap (HDCP), 10 Wash Station (WS), 16 Wedding (W) potties in the inventory. You can see the totals of "unassigned" potties in Row 6: 34 AQ, 23 DG, 1 P, 1 HDCP, 9 WS and 16 W. Assuming that today is September 11, 2001, we find (in Row 16) that there are 2 AQ and 3 DG potties scheduled for pick-up today, for a total of 36 AQ and 65 DG potties available in inventory. That way we know if a client calls today, and wants 35 Aqua potties delivered immediately, we probably won't have them until the end of the day today. PottieScan makes inventory projections easy. A couple of administrative notes: If you go to Row 6, Column A and insert a different date, the other dates in Column A will be changed automatically. PottieScan comes set up with 2 years of dates entered in Column A, but you can modify the start date at any time. The bold numbers in Row 6 are the totals for each prefix category that had pick-up dates prior to the current date. Summary We've seen that PottieScan can really help organize your pottie rental business. It eliminates paperwork by giving you the ability to schedule deliveries, plan pick-ups and analyze your inventory. PottieScan eliminates paperwork. Your employees no longer need a clipboard and pencil. Paper can be eliminated, and with it the changes of data entry errors and lost forms and reports. PottieScan gives you the ability to track employee performance, keep track of maintenance and needed repairs, and integrates your data into an easy to use and understand Excel worksheet. If you have any questions or comments, please feel free to email or call us at the information given on the cover sheet of this manual. We will continue to serve you by making improvements in PottieScan, and helping you any way we can. 25