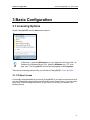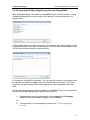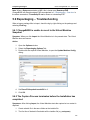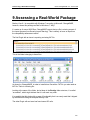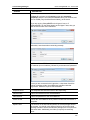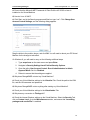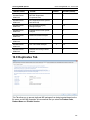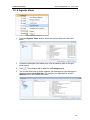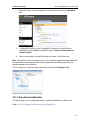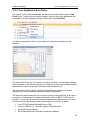
1
Quest® ChangeBASE 5.3 User Guide © 2013 Quest Software®, Inc. ALL RIGHTS RESERVED. This guide contains proprietary information protected by copyright. The software described in this guide is furnished under a software license or nondisclosure agreement. This software may be used or copied only in accordance with the terms of the applicable agreement. No part of this guide may be reproduced or transmitted in any form or by any means, electronic or mechanical, including photocopying and recording for any purpose other than the purchaser’s personal use without the written permission of Quest Software, Inc. If you have any questions regarding your potential use of this material, contact: Quest Software World Headquarters LEGAL Dept 5 Polaris Way Aliso Viejo, CA 92656 www.quest.com Email: [email protected] Refer to our Web site (www.quest.com) for regional and international office information. TRADEMARKS Quest, Quest Software, and the Quest Software logo, are trademarks and registered trademarks of Quest Software, Inc. For a complete list of Quest Software's trademarks, please see http://www.quest.com/legal/trademark-information.aspx. Other trademarks and registered trademarks are property of their respective owners. DISCLAIMER The information in this document is provided in connection with Quest products. No license, express or implied, by estoppel or otherwise, to any intellectual property right is granted by this document or in connection with the sale of Quest products. EXCEPT AS SET FORTH IN QUEST'S TERMS AND CONDITIONS AS SPECIFIED IN THE LICENSE AGREEMENT FOR THIS PRODUCT, QUEST ASSUMES NO LIABILITY WHATSOEVER AND DISCLAIMS ANY EXPRESS, IMPLIED OR STATUTORY WARRANTY RELATING TO ITS PRODUCTS INCLUDING, BUT NOT LIMITED TO, THE IMPLIED WARRANTY OF MERCHANTABILITY, FITNESS FOR A PARTICULAR PURPOSE, OR NON-INFRINGEMENT. IN NO EVENT SHALL QUEST BE LIABLE FOR ANY DIRECT, INDIRECT, CONSEQUENTIAL, PUNITIVE, SPECIAL OR INCIDENTAL DAMAGES (INCLUDING, WITHOUT LIMITATION, DAMAGES FOR LOSS OF PROFITS, BUSINESS INTERRUPTION OR LOSS OF INFORMATION) ARISING OUT OF THE USE OR INABILITY TO USE THIS DOCUMENT, EVEN IF QUEST HAS BEEN ADVISED OF THE POSSIBILITY OF SUCH DAMAGES. Quest makes no representations or warranties with respect to the accuracy or completeness of the contents of this document and reserves the right to make changes to specifications and product descriptions at any time without notice. Quest does not make any commitment to update the information contained in this document. Quest® ChangeBASE Version 5.3 Last updated – May 28, 2013 Contents Quest ChangeBASE 5.3 - User Guide Contents About This Guide..................................................................................................... 10 Overview .............................................................................................................................10 Conventions .................................................................................................................10 1 Introduction .......................................................................................................... 11 1.1 ChangeBASE Product Editions ....................................................................................11 1.2 Key Phases of a Migration Project ...............................................................................12 1.2.1 Flowchart showing the Key Phases ...................................................................13 1.2.2 Assessment Capabilities ....................................................................................14 1.3 Why ChangeBASE? .....................................................................................................14 1.3.1 Fast, Automated Migration to Windows 7, Windows 8, Microsoft Office 2010, Microsoft Office 2013, and Virtualized Package Environments ..................................14 1.3.2 Features and Benefits ........................................................................................15 1.3.3 Automate & Accelerate Compatibility Testing for Internet Browsers .................16 2 Installation ............................................................................................................ 17 2.1 ChangeBASE System Requirements ...........................................................................17 2.1.1 Local Database Setup ........................................................................................17 2.1.2 Remote Database Setup ....................................................................................19 2.1.2.1 Dashboard Setup ...................................................................................................... 19 2.1.2.2 Requirements for Remote Database Setup .............................................................. 21 2.1.3 2.1.4 2.1.5 2.1.6 Virtual Machines .................................................................................................22 Working Directory ...............................................................................................23 Recommended Configuration for Optimal Performance ....................................24 Deployment to Virtual Machines .........................................................................24 2.1.6.1 Client......................................................................................................................... 24 2.1.6.2 Database .................................................................................................................. 24 2.1.7 Deployment to Remote Desktop Services/Terminal Services ...........................24 2.1.8 Database Backup Requirements........................................................................25 2.1.9 Recommended Configuration for Multi-User Installations..................................25 2.1.9.1 Requirements ........................................................................................................... 25 2.1.9.2 Process Optimization ................................................................................................ 26 2.2 SQL Setup ....................................................................................................................26 2.2.1 Assigning Permissions using SQL Server Management Studio ........................27 2.2.2 SQL Setup for a Multi-User Environment ...........................................................31 2.2.2.1 SQL Setup using Windows Authentication................................................................ 32 2.2.2.2 SQL Setup using a SQL Login .................................................................................. 32 2.3 Installing ChangeBASE ................................................................................................33 2.3.1 Pre-Installation ....................................................................................................33 2.3.2 Installation ...........................................................................................................33 2.4 Upgrading ChangeBASE ..............................................................................................36 3 Basic Configuration ............................................................................................. 37 3.1 Licensing Options .........................................................................................................37 3 Contents Quest ChangeBASE 5.3 - User Guide 3.1.1 Online License ....................................................................................................37 3.1.2 Offline License ....................................................................................................39 3.1.3 Swapping Licenses .............................................................................................40 3.1.4 Troubleshooting ..................................................................................................41 3.1.4.1 License Expiry .......................................................................................................... 41 3.1.4.2 Unlicensed Number of Packages .............................................................................. 41 3.2 Database Setup ............................................................................................................42 3.2.1 Renaming a Database ........................................................................................48 3.2.2 Multiple Databases .............................................................................................48 3.2.3 Creating a New Database if your SQL Server is centrally managed by a DBA 49 3.3 SQL-related Troubleshooting .......................................................................................49 3.3.1 Failure to create a Database ..............................................................................49 3.3.2 Failure to connect to a Database .......................................................................51 3.4 Configuring and enabling the Dashboard Components for the ChangeBASE Database(s) ........................................................................................................................53 3.4.1 Registering the Dashboard Web Application with the IIS Server.......................54 3.4.2 Dashboard-related Troubleshooting ...................................................................55 3.4.2.1 Insufficient privileges................................................................................................. 55 3.4.2.2 ‘999’ Error ................................................................................................................. 56 3.4.2.3 Windows Authentication-related Errors ..................................................................... 57 3.4.2.4 ‘No Database’ Error .................................................................................................. 58 4 ChangeBASE User Interface................................................................................ 60 4.1 Packages Panel ............................................................................................................60 4.2 Reports Panel ...............................................................................................................61 4.3 Summary Panel ............................................................................................................61 4.4 Tabs ..............................................................................................................................61 4.4.1 New Project Wizard ............................................................................................61 4.5 Portfolio Summary ........................................................................................................62 4.6 Reports and Report Groups .........................................................................................63 4.6.1 Overview .............................................................................................................63 4.6.1.1 Example .................................................................................................................... 64 4.6.2 Online Report Group Loading ............................................................................65 4.6.3 Offline Report Group Loading ............................................................................66 4.6.4 Which Report Groups Should I Add? .................................................................66 4.6.5 Troubleshooting ..................................................................................................66 4.6.5.1 Plugins failing to load ................................................................................................ 66 4.6.5.2 Inability to access Services in the Upgrade Tab ....................................................... 66 4.7 AppID Feature ..............................................................................................................67 4.7.1 AppID Maintenance ............................................................................................68 4.7.1.1 Single Selection ........................................................................................................ 69 4.7.1.2 Multiple Selection ...................................................................................................... 69 4.7.1.3 Adding a new AppID ................................................................................................. 70 4.7.1.4 Updating or Deleting an existing App ID ................................................................... 70 5 Importing Packages ............................................................................................. 71 5.1 Importing Packages - Overview ...................................................................................71 5.2 Import Methods .............................................................................................................72 5.2.1 Drag and Drop ....................................................................................................72 5.2.1.1 Dragging and Dropping Files onto ChangeBASE ..................................................... 72 4 Contents Quest ChangeBASE 5.3 - User Guide 5.2.1.2 Dragging and Dropping Folders onto ChangeBASE ................................................. 73 5.2.2 Browse Dialog .....................................................................................................74 5.2.3 Browse with SCCM .............................................................................................75 5.2.3.1 Main Dialog ............................................................................................................... 76 5.2.3.2 SCCM Options .......................................................................................................... 77 5.2.3.3 Configuring a new server/database .......................................................................... 79 5.2.3.4 Viewing packages and programs .............................................................................. 81 5.2.3.5 Adding the packages/programs to ChangeBASE ..................................................... 84 5.2.3.6 Importing SCCM packages/programs into ChangeBASE ......................................... 85 5.2.4 CSV Import .........................................................................................................87 5.2.5 Import Warnings .................................................................................................89 5.3 Repackaging - Overview ..............................................................................................90 5.4 Repackaging – Configuration .......................................................................................91 5.4.1 Virtual Machine Setup ........................................................................................91 5.4.2 ChangeBASE Repackaging Options ..................................................................94 5.4.2.1 ESXi 5.1 (VMware Server) ........................................................................................ 95 5.4.2.2 Hyper-V..................................................................................................................... 96 5.4.2.3 VMware Workstation 9 .............................................................................................. 98 5.4.3 Repackaging Filters ............................................................................................99 5.4.4 Template msi ....................................................................................................101 5.5 The Repackaging Process .........................................................................................101 5.6 Repackaging – Troubleshooting.................................................................................105 5.6.1 ChangeBASE is unable to revert to the Virtual Machine Snapshot .................105 5.6.2 The Capture Process terminates before the Installation has completed .........105 5.6.3 The Repackaging Process results in an MSI with no Files ..............................106 5.6.4 The Package fails to Import ..............................................................................106 5.6.5 Reboots during Repackaging ...........................................................................108 5.6.5.1 Stop Reboots with Windows XP ............................................................................. 108 5.6.6 Abnormal End to Session? ...............................................................................109 6 Assessing Packages and Viewing Results ...................................................... 110 6.1 Choosing the Right Report Groups ............................................................................110 6.2 Assessing Packages ..................................................................................................111 6.3 RAG Status: Red, Amber & Green .............................................................................112 6.3.1 Green ................................................................................................................112 6.3.2 Amber ...............................................................................................................112 6.3.3 Red ...................................................................................................................113 6.4 Analyzing Results .......................................................................................................113 6.5 Viewing Results: ChangeBASE ..................................................................................114 6.5.1 Packages Tab ...................................................................................................114 6.5.2 Reports Tab ......................................................................................................115 6.6 Viewing Results: Assessment Results .......................................................................115 6.7 Viewing Results: Issue Summary ...............................................................................117 6.7.1 Setting up Issue Summary Reports..................................................................117 6.7.2 Creating Individual Issue Summary Reports ....................................................118 6.7.3 Creating Bulk Issue Summary Reports ............................................................118 6.8 Summary Report Examples, showing AppIDs ...........................................................119 6.8.1 Profile ................................................................................................................119 5 Contents Quest ChangeBASE 5.3 - User Guide 6.8.2 Packages by RAG ............................................................................................120 6.8.3 Report Group by RAG ......................................................................................120 6.8.4 Report by RAG .................................................................................................121 6.8.5 Package Issue Summary ..................................................................................121 6.8.6 AppID Expand and Collapse ............................................................................122 6.8.7 Running Reports from the Command Line .......................................................122 6.9 Troubleshooting ..........................................................................................................122 7 Dashboard ........................................................................................................... 123 7.1 What is Dashboard? ...................................................................................................123 7.2 Using Dashboard ........................................................................................................123 7.2.1 Configuring Dashboard for your Target Environment ......................................123 7.2.1.1 ROI Setup ............................................................................................................... 125 7.2.2 Executive Summary ..........................................................................................127 7.2.2.1 Pie Charts ............................................................................................................... 128 7.2.2.2 Top 5 Issues ........................................................................................................... 128 7.2.2.3 Filtering ................................................................................................................... 129 7.2.2.4 Progress Summary ................................................................................................. 131 7.2.2.5 Best Way Forward .................................................................................................. 132 7.2.3 7.2.4 7.2.5 7.2.6 Executive Detail ................................................................................................133 Application Summary ........................................................................................133 Package Overview Report ................................................................................136 ROI Calculation Detail ......................................................................................137 7.2.6.1 Testing .................................................................................................................... 138 7.2.6.2 Remediation ............................................................................................................ 140 7.2.6.3 Virtualization ........................................................................................................... 141 8 The Top Five Issues Explained ......................................................................... 143 8.1 Custom Action Security ..............................................................................................143 8.1.1 Explanation of the Issue ...................................................................................143 8.1.2 Remediation Steps ...........................................................................................144 8.2 Legacy Help Files .......................................................................................................144 8.2.1 How to Reproduce the Problem .......................................................................144 8.2.2 Explanation of the Issue ...................................................................................145 8.2.3 Remediation Steps ...........................................................................................145 8.3 Hard-coded File References ......................................................................................146 8.3.1 How to Reproduce the Problem .......................................................................146 8.3.2 Explanation of the Issue ...................................................................................146 8.3.3 Remediation Steps ...........................................................................................146 8.4 UAC File Headers .......................................................................................................147 8.4.1 How to Reproduce the Problem .......................................................................147 8.4.2 Explanation of the Issue ...................................................................................147 8.4.3 Remediation Steps ...........................................................................................148 8.5 Legacy Control Panel Applets ....................................................................................148 8.5.1 How to Reproduce the Problem .......................................................................148 8.5.2 Explanation of the Issue ...................................................................................149 8.5.3 Remediation Steps ...........................................................................................149 9 Assessing a Real-World Package ..................................................................... 150 10 Fixing Packages ............................................................................................... 152 6 Contents Quest ChangeBASE 5.3 - User Guide 10.1 Troubleshooting ........................................................................................................153 10.1.1 Multi-User Issues ............................................................................................154 11 Virtualizing Packages ....................................................................................... 155 11.1 Virtualization Compatibility Matrix ............................................................................155 11.2 Configuration ............................................................................................................156 11.2.1 Virtual Machine Setup: General .....................................................................156 11.2.2 Virtual Machine Setup: Symantec Workspace Virtualization .........................158 11.2.3 Virtual Machine Setup: Microsoft App-V and App-V 4.6 SP1 ........................158 11.2.3.1 Avoid Balloon Tips by resetting the Screen Resolution or disabling the Tips........ 159 11.2.4 Virtual Machine Setup: Citrix XenApp Streaming Profiler 6.5 ........................160 11.2.5 Virtual Machine Setup: VMware ThinApp ......................................................160 11.2.6 ChangeBASE Configuration ...........................................................................160 11.2.7 Advanced Settings: App-V 4.6 SP1................................................................163 11.2.8 Advanced Settings: App-V 5.0 .......................................................................165 11.3 How to Virtualize Packages ......................................................................................166 11.3.1 Package Virtualization: One virtual package per MSI ....................................166 11.3.2 Package Virtualization: One virtual package from multiple MSIs ..................166 11.3.3 Package Virtualization: Virtualizing EXEs and manual configuration ............167 11.3.4 Package Virtualization: Using a Manifest file .................................................169 11.4 Performance Issues and Optimization .....................................................................170 11.5 Troubleshooting: Virtualizing Packages ...................................................................170 12 ChangeBASE Options ...................................................................................... 173 12.1 General Tab ..............................................................................................................173 12.1.1 Report Options................................................................................................173 12.1.2 Transforms ......................................................................................................174 12.1.3 Package Import/Fix .........................................................................................174 12.1.4 File Extensions automatically added during folder scans ..............................175 12.1.5 Database Options ...........................................................................................175 12.2 Issue Summary Tab .................................................................................................176 12.3 Core App Lists Tab ...................................................................................................176 12.4 Platforms Tab ...........................................................................................................176 12.5 Upgrade Tab .............................................................................................................177 12.6 Services Tab .............................................................................................................177 12.7 Security Tab..............................................................................................................178 12.8 Report Costs Tab .....................................................................................................180 12.8.1 Recommended Cost and Effort Values ..........................................................181 12.9 Duplicates Tab ..........................................................................................................184 12.10 Browser Compatibility Tab .....................................................................................185 12.11 Add-In Tab ..............................................................................................................186 12.12 Repackaging Options Tab ......................................................................................186 12.13 Dashboard ..............................................................................................................186 12.14 Virtualize .................................................................................................................187 12.15 Other Tab ................................................................................................................187 12.16 Changing the Text-Based Configuration File Threshold ........................................187 13 Advanced Usage............................................................................................... 189 13.1 Packages Tree Context Menu ..................................................................................189 7 Contents Quest ChangeBASE 5.3 - User Guide 13.1.1 Save/Retrieve Reports ...................................................................................189 13.1.2 Package Selector ...........................................................................................190 13.1.3 Create View ....................................................................................................190 13.1.4 Organize Views...............................................................................................192 13.1.5 Virtualize from Manifest ..................................................................................193 13.1.6 Expand ............................................................................................................194 13.1.7 Collapse ..........................................................................................................194 13.2 Package-Level Context Menu ..................................................................................194 13.2.1 Delete .............................................................................................................195 13.2.2 Save/Retrieve Reports ...................................................................................195 13.2.3 Select App IDs ................................................................................................195 13.2.4 Open Containing Folder .................................................................................195 13.2.5 View Dependencies ........................................................................................195 13.2.6 View Log .........................................................................................................198 13.2.7 Edit MSI with Orca ..........................................................................................199 13.2.8 Edit MSI with MSI Studio for ChangeBASE ...................................................199 13.2.8.1 Right-clicking a Package without Transforms ....................................................... 200 13.2.8.2 Right-clicking a Transform .................................................................................... 200 13.2.8.3 Right-clicking a package that has Transforms ...................................................... 201 13.2.9 View History ....................................................................................................202 13.2.10 Checkin .........................................................................................................202 13.2.11 Re-Import ......................................................................................................202 13.2.12 Add to Core App List ....................................................................................202 13.2.13 Add to Matching Analysis .............................................................................202 13.2.14 Create Issue Summary Report .....................................................................203 13.2.15 Extract CABs from MSI.................................................................................203 13.2.16 Overrides ......................................................................................................203 13.2.17 Views ............................................................................................................203 13.2.18 Bulk Issue Summary.....................................................................................203 13.2.19 Expand/Collapse ..........................................................................................204 13.3 Importing Operating System Images ........................................................................204 13.3.1 Gold Images ...................................................................................................204 13.3.2 Limitations .......................................................................................................204 13.3.3 Alternatives to WIM files .................................................................................204 13.3.4 Installing the WIM Driver files .........................................................................205 13.3.5 Mounting the WIM file .....................................................................................205 13.3.6 Loading into ChangeBASE .............................................................................205 13.4 CAS (Core Application Scan) ...................................................................................206 13.4.1 Core Application Scan Rules ..........................................................................208 13.4.2 Understanding the CAS Rules .......................................................................209 13.4.3 Core Application Rules Settings .....................................................................210 13.5 Important Files and Folders ......................................................................................211 13.6 Command Line Invocation of ChangeBASE Functions ...........................................212 13.6.1 DBLIST ...........................................................................................................212 13.6.2 IMPORT ..........................................................................................................212 13.6.3 LISTREPORTS ...............................................................................................213 13.6.4 LISTPACKAGES ............................................................................................213 8 Contents Quest ChangeBASE 5.3 - User Guide 13.6.5 REPORT .........................................................................................................213 13.6.6 EXPORT .........................................................................................................213 14 Writing Custom Plugins ................................................................................... 215 14.1 14.2 14.3 14.4 Moving Reports and Re-organizing Existing Plugins ...............................................215 Adding Report Groups ..............................................................................................216 Adding a Report ........................................................................................................216 Adding Rules to a Report .........................................................................................218 15 Browser Compatibility ..................................................................................... 222 15.1 Loading URLs ...........................................................................................................222 15.2 Auto Logon ...............................................................................................................222 15.2.1 Auto Logon Process Overview .......................................................................223 15.2.2 Auto Logon Process Explained ......................................................................223 15.2.3 Configuring Auto Logon Settings....................................................................224 15.2.4 Selecting Logon Controls ...............................................................................226 15.2.5 Selecting an Existing Group of Settings .........................................................228 15.2.6 Deleting a Group of Settings ..........................................................................228 15.3 Web Crawl Settings ..................................................................................................228 15.4 The Web Application Import Process .......................................................................228 15.4.1 HTTP Authentication ......................................................................................229 15.5 Loading Source Folders for Web Data Capture .......................................................230 15.6 Client Side Capture (CSC) .......................................................................................230 15.6.1 CSC Architecture ............................................................................................231 15.6.2 System Requirements ....................................................................................232 15.6.3 CSC Installation ..............................................................................................232 15.6.4 CSC Configuration ..........................................................................................233 15.6.4.1 CSC Manager – Manage Default Parameters ...................................................... 233 15.6.4.2 Manage Filters ...................................................................................................... 235 15.6.5 Verify CSC Setup ...........................................................................................236 15.6.5.1 Web Service ......................................................................................................... 236 15.6.5.2 CSC Agent ............................................................................................................ 237 15.6.6 Using CSC from a Client ................................................................................238 15.6.7 Loading the Data from the CSC Server to ChangeBASE ..............................239 15.7 Importing and Assessing Web Files against Browser Plugins .................................241 15.8 Troubleshooting Web Capture .................................................................................241 15.8.1 Problems arising from the Loading of URLs and Folders ..............................241 15.8.2 Problems arising from the use of CSC ...........................................................242 15.8.3 ‘Process Uploaded Files’ option greyed out ...................................................243 Index ....................................................................................................................... 244 About Quest Software®, Inc. ................................................................................ 250 Contacting the Quest® ChangeBASE Community ..........................................................250 Contacting Quest Software® ............................................................................................250 Contacting Quest® Support .............................................................................................250 9 About This Guide Quest ChangeBASE 5.3 - User Guide About This Guide Overview This guide contains the information required to configure and use Quest® ChangeBASE (hereafter referred to simply as “ChangeBASE”, and now an integral part of Dell’s Software offering). It is intended for network administrators, consultants, analysts, and any other IT professionals using the product. Conventions In order to help you get the most out of this guide, we have used specific formatting conventions: ELEMENT CONVENTION Bolded text Interface elements that appear in Quest products, such as menus and commands. Italic text Used for comments. Blue text Indicates a cross-reference or hyperlink. Used to highlight additional information pertinent to the process being described. Used to provide Best Practice information. Used to highlight processes that should be performed with care. + A plus sign between two keystrokes means that you must press them at the same time. 10 1 Introduction Quest ChangeBASE 5.3 - User Guide 1 Introduction ChangeBASE is a leading provider of automated application compatibility analysis, remediation and conversion. Its scope continues to evolve: in addition to automated analysis and remediation, it can automatically convert MSI packages into virtual formats, and also detect potential Web application compatibility issues by capturing and checking Web data. 1.1 ChangeBASE Product Editions ChangeBASE uses a flexible licensing model, and the features available in the different editions of the product are as follows: Capability Browser Standard Application Discovery with Asset Manager Standard Plus Pro Pro Plus Ultimate Ongoing Application Compatibility and Management Windows 7/8, 32- and 64-bit, Windows Server 2003/2008 inc. R2, Windows Server 2012 Office 2007/2010/2013 Windows Updates Application Virtualization/Remote Desktop Services In-House Packaging Standards Browser Compatibility MSI Packaging with MSI Studio SCCM Integration 11 1 Introduction Quest ChangeBASE 5.3 - User Guide 1.2 Key Phases of a Migration Project Identify: The first step is to identify both the managed and unmanaged packages across the enterprise. Quest® Workspace™ Asset Manager can be used to perform this step. Plan/Rationalize: Once the packages have been identified, the best practice is to rationalize packages that have similar functionality and/or have multiple versions. This approach means that only the latest versions of software are being submitted to the migration project. Once the number of packages has been defined, the amount of project resources can also be planned. Import: The list of packages collated during the rationalization phase should be imported into ChangeBASE in order to test compatibility with the target environment. Assess: The packages should be assessed against the required, specific target environment checks. Armed with the compatibility results, packages can undergo another round of rationalization to ensure that effort is only spent on packages that will work in the target environment. Incompatible packages should be upgraded, redeveloped or delivered to you through an alternative method such as the Quest vWorkspace solution. Using the assessment results, the project resource schedule can now also be tweaked, as a better understanding will exist of the complexity of the packages requiring migration. Fix: ChangeBASE assesses packages according to a Red/Amber/Green (RAG) system (refer to 1.2.1 Flowchart showing the Key Phases). ChangeBASE can automatically remediate most identified Amber issues by means of MST (Transform) files. The underlying packages and installations are never modified directly. ChangeBASE can also fix compatibility issues through the use of additional files such as Manifests and runtimes to allow packages to run correctly on the new Platform. By using Transform files, subsequent upgrades or patches can still be applied while allowing you to maintain support for the particular packages. Virtualize: ChangeBASE can automatically create a virtualized package in a number of formats, including Microsoft’s App-V, Symantec Workspace Virtualization (SWV), VMware’s ThinApp, and Citrix’s XenApp Streaming Profile. UAT: The fixed package is now ready for User Acceptance Testing (UAT). Package owners can test in the target environment Deploy: The package and fixes are deployed to the target environment. Manage: Patches that are released from Microsoft are made available on the ChangeBASE Platform shortly after each ‘patch Tuesday’ (the second Tuesday of every month). These are available in a reporting group which can be used to assess the impact against the package in your portfolio. 12 1 Introduction Quest ChangeBASE 5.3 - User Guide 1.2.1 Flowchart showing the Key Phases The key phases in the previous section can be visualized as follows: 13 1 Introduction Quest ChangeBASE 5.3 - User Guide 1.2.2 Assessment Capabilities ChangeBASE provides automated application compatibility testing and fixing, where appropriate, for the following: • • • • • • • • • • • • Windows 7, 32-bit and 64-bit Windows 8, 32-bit and 64-bit Windows Server 2003 including R2, 32-bit and 64-bit Windows Server 2008 including R2, 32-bit and 64-bit Windows Server 2012 Microsoft Office 2010 and 2013 dependencies Windows and Office Updates Inter-package and OS conflict management MSI Installer Integrity - ICEs (Internal Consistency Evaluators) checking and fixing Microsoft App-V, VMware ThinApp, Citrix XenApp and Symantec SWV Custom Report Authoring (Checking for adherence to Company Standards and Packaging Best Practices) Browser Compatibility features allow the automated testing of websites, intranets, extranets, web portals and web packages for compatibility with Internet Explorer 8, 9 and 10, and Firefox. 1.3 Why ChangeBASE? Please note that, depending on the license type you purchased, not all functions described may be available to you. Refer to 1.1 ChangeBASE Product Editions. If in doubt, contact your Sales representative. 1.3.1 Fast, Automated Migration to Windows 7, Windows 8, Microsoft Office 2010, Microsoft Office 2013, and Virtualized Package Environments Application compatibility issues present the biggest hurdle to achieving timely and complete migrations to Windows 7, Windows 8, Microsoft Office 2010, Microsoft Office 2013, and virtualized package environments. It is a huge challenge to find out which packages may be incompatible with these business-critical platforms, and why. Since these platforms differ significantly and their deployments all require considerable investment of time and money, it is essential to test compatibility between the packages and platforms, even prior to purchase. 14 1 Introduction Quest ChangeBASE 5.3 - User Guide ChangeBASE can assess and fix application compatibility issues automatically prior to migration to the latest Microsoft platforms and virtualized package environments. The appropriate editions of ChangeBASE also enable you to virtualize your packages automatically. 1.3.2 Features and Benefits • • Compatibility Assessment o Identify compatibility issues before deploying a package to the target environment for accurate and informed decisions on timeframes and costs. o Automatically assess package suitability for target environments to prioritize packages for relicensing, replacement and testing. o Include non-standard or legacy packages to test your entire inventory of packages for compatibility issues. Microsoft Office Dependency Testing o • Auto-Fix Compatibility Issues o • • Highlight potential issues for packages that will be integrated with Office 2007/2010/2013. Identify dependencies on earlier versions of Microsoft Office that may create issues and cause those packages to fail. Ensure that application packages are compliant with Active Directory policies. Resolve application compatibility issues prior to deployment with minimal manual effort, to avoid repeated assessment cycles and to substantially accelerate package delivery. Reduce post-migration support issues. Ongoing Management o Take advantage of the latest Windows updates and patches through periodic automated re-evaluation of your package estate. Reduce security risks and deployment times by completing patch impact assessments within minutes. o Introduce changes quickly, easily and reliably, with the highest degree of confidence. Virtual Compatibility Assessment o Determine which packages you can virtualize within seconds, and track for middleware dependencies, saving days of testing time. 15 1 Introduction • Auto-Fix for Virtual Platforms o • Evaluate packages for compatibility issues with target virtual platforms and repair them in just a few simple steps. Automate Corporate Packaging Standards o • Quest ChangeBASE 5.3 - User Guide Test for issues related to in-house and packaging (MSI) standards and apply automated fixes to ensure compliance. Develop and customize QA checks and related remedies in order to achieve significant time and cost savings compared to manual checking. Package Virtualization o Automatically virtualize your packages. Save time, avoid errors and meet demand more quickly than with manual conversions. 1.3.3 Automate & Accelerate Compatibility Testing for Internet Browsers Many packages which are used to handle daily business tasks are web-based or accessed via a browser. When it is time to upgrade to a new browser, compatibility issues may prevent a package’s content or interface from being displayed correctly, or, at worst, prevent a package from working at all. ChangeBASE’s unique, automated solution provides a quick, easy and cost-saving alternative to the manual compatibility testing of web packages and websites, whether on the internet, or on an intranet or extranet. With the extensive range of automated compatibility checks included, you can ensure that your browser upgrade is deployed without incident or unnecessary burden on IT resources. The detailed reports help you to prioritize remediation so that issues with the greatest impact will get resolved first. For further information, refer to Chapter 15 Browser Compatibility. 16 2 Installation Quest ChangeBASE 5.3 - User Guide 2 Installation • • • • 2.1 ChangeBASE System Requirements 2.2 SQL Setup 2.3 Installing ChangeBASE 2.4 Upgrading ChangeBASE 2.1 ChangeBASE System Requirements Before installing ChangeBASE, ensure that your system meets the minimum hardware and software requirements depending on your configuration, as described in the following sub-sections. 2.1.1 Local Database Setup For a training course, a POC (Proof Of Concept) installation, or where there is only to be one user of ChangeBASE, it is usual for all components to be installed on the same machine: SQL 17 2 Installation Quest ChangeBASE 5.3 - User Guide Operating System • • • • • • • Windows XP SP3 Windows Vista SP2 Windows 7 Windows 8 Windows Server 2003 (inc R2) SP2 Windows Server 2008 (inc R2) Windows Server 2012 Minimum Hardware • • • • 2.5GHz dual core processor or greater 4GB RAM 50GB hard disk space 1024 x 768 display Software Requirements • • • Microsoft.NET Framework 3.5 SP1 and 4.0.30319 or later (Full Client) Microsoft Log Parser 2.2 (For importing folders as packages) Hypervisors for ‘Legacy Conversion’ (hereafter typically referred to as ‘Repackaging’). See 2.1.3 Virtual Machines. Database Microsoft SQL Server 2008 (inc. R2) - Express, Standard or Enterprise Internet Connectivity Recommended It is highly recommended that an internet connection is available when using ChangeBASE, as the licensing model, software updates and Plugins are dependent on this. If this is not possible, please contact Quest Software to discuss alternative methods. Dashboard viewed in Windows Server Environments When viewing Dashboard pages in Windows Server 2012, the ‘Desktop Experience’ Windows feature must be enabled and the ‘IE Enhanced Security Configuration’ (IEESC) setting must be turned off. When viewing Dashboard pages in Windows Server 2003 and 2008 (including R2), the IEESC setting must be turned off. 18 2 Installation Quest ChangeBASE 5.3 - User Guide 2.1.2 Remote Database Setup In the event that more than one user connects to the same database, the ChangeBASE client software may be installed on each of the workstations, and the database hosted on a central machine. 2.1.2.1 Dashboard Setup Dashboard is installed as part of the ChangeBASE installation by the Server Components feature (via the drop-down option Will be installed on local hard drive): The Server Components comprise the Dashboard web pages running as ASP.NET pages under Microsoft IIS (Internet Information Services). They are only required on the machine hosting Dashboard. 19 2 Installation Quest ChangeBASE 5.3 - User Guide Note: If you are installing on Windows XP, and the Windows XP installation media are not in the installation path, then you will be prompted to supply them. Please ensure that either the CD is available or the source files have been copied to a local or network location that you can access. Dashboard can be installed on any machine on which IIS is installed, including a client machine (provided that it meets the criteria shown in 2.1.2.2 Requirements), or the machine on which the SQL Server is running. Where multiple clients connect to the same database, it is advisable to install Dashboard on a central machine to provide uninterrupted service (refer to 2.2.2 SQL Setup for a MultiUser Environment). In this case, the following selection should be made on each of the clients for installing just the ChangeBASE software and not the Server Components: When running in a multi-user environment (as shown in the diagram in 2.1.2 Remote Database Setup), the Server Components require access to the database accessed by the clients, with Dashboard making a SQL connection to the database used by ChangeBASE. For full details of Dashboard configuration following ChangeBASE installation, refer to 3.4 Configuring and enabling the Dashboard Components for the ChangeBASE Database(s). 20 2 Installation Quest ChangeBASE 5.3 - User Guide 2.1.2.2 Requirements for Remote Database Setup Client Operating System • • • • • • • Windows XP SP3 Windows Vista SP2 Windows 7 Windows 8 Windows Server 2003 (inc. R2) SP2 Windows Server 2008 (inc. R2) Windows Server 2012 Minimum Hardware • • • • 2.5GHz dual core processor or greater 4GB RAM 50GB hard disk space 1024 x 768 display Software Requirements • • • • • Hypervisors for Repackaging. See 2.1.3 Virtual Machines. Microsoft.NET Framework 3.5 SP1 and 4.0.30319 or later (Full Client) Microsoft Log Parser 2.2 (For importing folders as packages) Microsoft System CLR Types for SQL Server 2008 x86 (10.0.x) Microsoft SQL Server 2008 Shared Management Objects x86 (10.0.x) Note: Although you will normally be connecting to SQL Server on a remote machine, the above SQL server components must be installed on the client machine. Note that 10.5.x versions will not work. Also, we specifically require the 32-bit installations, even if you are running 64-bit SQL. These are available for download from Microsoft from: http://www.microsoft.com/enus/download/details.aspx?id=27 596 Dashboard Database Operating System Operating System • • • • • • Windows XP SP3 Windows 7 Windows 8 Windows Server 2003 (inc. R2) SP2 Windows Server 2008 (inc. R2) Windows Server 2012 Note: For Windows XP systems, you will need to have an i386 folder available, or the original media, as the Dashboard software will attempt to install IIS. • • • • • • • • Recommended Hardware • Minimum Hardware • • • • 2.5GHz dual core processor or greater 4GB RAM 50GB hard disk space 1024 x 768 display Software Requirements • • • • • • IIS Version 6 or later. Note: The installer will attempt to install and configure IIS on the machine running the Dashboard web pages. (See note above for XP users). Microsoft.NET 4.0 framework on the machine running the Dashboard web pages. In order to access all Dashboard functionality, a PDF reader will need to be installed on any machines that connect to it. The latest version of Adobe Reader is recommended. Windows XP SP3 Windows Vista SP2 Windows 7 Windows 8 Windows Server 2003 (inc. R2) SP2 Windows Server 2008 (inc. R2) Windows Server 2012 64-bit OS preferred Intel i7 or other fast quad-core processor 16GB RAM If using an external HDD the minimum requirement is eSATA Disk space dependent on package count. 5GB per 400 packages. Database • • • Microsoft SQL Server 2008 (inc R2) - Express, Standard or Enterprise SQL Server Browser service set to Automatic TCP/IP protocol enabled in database The server may run SQL Server Express, but due to its 1 GB of RAM usage restrictions, as well as its database size limits, it is recommended that SQL Express is used for no more than 600 packages. Internet connectivity recommended. Virtual machines are not supported for ChangeBASE clients. 21 2 Installation Quest ChangeBASE 5.3 - User Guide 2.1.3 Virtual Machines Virtual machines are utilized by ChangeBASE for the repackaging of legacy installers (EXE, VBS, BAT) into MSI, and for the conversion of MSI/EXE into virtual formats. Repackaging (EXE/BAT/VBS) Package Virtualization Hypervisors Hypervisors As per ‘Repackaging’ • • • • Microsoft Hyper-V VMware Workstation 9 VMware Server 2.x ESX Server 5.1 Operating System • • • Windows XP SP3 (or later) 32-bit Windows 7 32-bit Windows Vista is not supported Virtual Hardware At least 1GB of RAM Software installed on Virtual Machine • • • • Microsoft.NET Framework 3.5 SP1 Full VMware Tools for a VMware-based VM Hyper-V Integration Services for a Microsoft Hyper-V-based VM QVMTools Operating System • • • Windows XP SP3 (or later) 32-bit Windows 7 32-bit (x86) and 64-bit Windows Vista is not supported Virtual Hardware As per ‘Repackaging’ Software installed on Virtual Machine • • • • • • • • • Microsoft.NET Framework 3.5 SP1 Full VMware Tools (only if using a VMware-based VM) Hyper-V Integration Services for a Microsoft Hyper-V-based VM App-V Sequencer 4.6 SP1/5.0 (also requires Microsoft.NET Framework 4.0 Full and Windows 7 SP1). and/or Citrix XenApp Streaming 6.5 0 (also requires Microsoft.NET Framework 4.0 Full Client) and/or ThinApp Setup Capture 4.6.1 and/or Symantec Workspace Virtualization Admin (Client) 6.1 Symantec Wise Composer QVMTools 22 2 Installation Quest ChangeBASE 5.3 - User Guide 2.1.4 Working Directory ChangeBASE uses a Working Directory to store copies of all packages which are imported into the database. The Working Directory is also used to store log files, report files and temporary files. The following should be considered when deciding where the Working Directory will be located: • • • The Working Directory must be accessible by both the SQL Server and all ChangeBASE clients. The Working Directory must have enough space to store a copy of every package imported into ChangeBASE, with several additional GB for other working files. To improve import performance in a multi-user environment, check the option Store Working Data on Local Disk on the Options > Services Tab. This will cache the packages in the local user profile while processing the import of the application, before the files are transferred to the Working Directory. Local Databases • Scenario: Only one ChangeBASE client accessing local database. • Unique Working Directory for each database. • For DB1, the Working Directory is C:\CB Working\DB1. Remote Databases • Scenario: Multiple ChangeBASE clients accessing databases remotely. • Shared folder on central server contains working directories. • UNC path used to define Working Directory. • For DB1, the Working Directory is \\PC07\CB Working\DB1. • Alternatively, each client maps the same drive letter to the shared folder and this path is used. 23 2 Installation Quest ChangeBASE 5.3 - User Guide 2.1.5 Recommended Configuration for Optimal Performance For optimal performance it is recommended that: • If you are using VMware Workstation, you use 64-bit Windows for the host machine. • If you are using 64-bit Windows for the SQL Server machine, you use 64-bit SQL Server. If you are running below these recommendations, then you should consider increasing the Server Timeout setting in Options > General to give the conversion process more time to complete (the maximum available setting is 90 minutes). Space requirements for the database are 8GB per 400 packages (18GB per 1000). Additionally, twice the space taken up by the portfolio on disk must be allowed for the working package that ChangeBASE keeps in its cache (e.g. a 200GB package portfolio would require an allowance of 400GB). If you have the Always Analyze option checked for Web Analysis Mode in the Browser Compatibility Tab under Options, then ChangeBASE will import web-based content from every loaded item (MSI files, OS image, CSS files, HTML files). This is the recommended setting if you are Loading Source Folders for Web Data Capture and/or Using Client Side Capture (CSC). The recommended setting if you are Loading URLs is Web Based Applications Only, so that web content is imported only for websites and web applications. If you are not using the Browser Compatibility module, you should set Web Analysis Mode to Disabled. 2.1.6 Deployment to Virtual Machines 2.1.6.1 Client Whilst it is technically possible to install ChangeBASE inside a Virtual Machine and achieve full functionality, this is not supported due to the intensive processing required. 2.1.6.2 Database Where sufficient resources are available, SQL Server may be installed in a virtual environment. 2.1.7 Deployment to Remote Desktop Services/Terminal Services ChangeBASE is not supported in a Remote Desktop Services or Terminal Services environment. 24 2 Installation Quest ChangeBASE 5.3 - User Guide 2.1.8 Database Backup Requirements It is recommended that the database is installed on a centrally managed server. Daily incremental backups should be taken, and a full weekly backup should be taken of all the databases, Working Directories, saved XMLs, and Excel reports. AOK.cbl and WorkBenchSettings.xml should also be backed up on a weekly basis (refer to 13.5 Important Files and Folders for their location). The file server (or folder where the source files are stored) should also be incrementally backed up daily, with a full back up on a weekly basis. The term “source files” is used to describe the MSI files or other installation types along with all source files required for the installation. The source files are required for the complete dependency analysis of the installation packages to analyze API calls, dependent files and file header analysis. • • • 2.1.9 Recommended Configuration for Multi-User Installations Important: If you have a license for the Browser Compatibility module as part of the Ultimate edition (refer to 1.1 ChangeBASE Product Editions), then you should also consider the above setup integrated with Client Side Capture shown in 15.6.1 CSC Architecture. 2.1.9.1 Requirements File Server • As per 2.1.4 Working Directory. Database • Windows Server 2008 R2 25 2 Installation Quest ChangeBASE 5.3 - User Guide • Virtual OS supported • SQL Server 2008 (Standard or Enterprise) • Quad-core or greater CPU • 16GB or greater RAM • Multiple DBs can be per SQL instance or across multiple SQL instances • 8GB database space per 400 packages imported • Max packages per DB: 5000 Dashboard • As per 2.1.2.2 Requirements for Remote Database Setup. 2.1.9.2 Process Optimization With the above setup, multiple users can remediate applications in ChangeBASE, provided that: • applications are imported from UNC paths on the LAN; • the import of applications is split between clients to optimize import timing (importing applications requires a large amount of processing by clients). Note: Within ChangeBASE, RAG assessment results can only be viewed by the user who ran them. However, Dashboard can be used by multiple users simultaneously to view assessment results. 2.2 SQL Setup It is preferable for the packages database to be created by the ChangeBASE application (refer to 3.2 Database Setup). If you are also using Client Side Capture setup, it is likewise advisable for the web data capture database to be created by the ChangeBASE CSC Manager (refer to 15.6.4 CSC Configuration). In both cases, the account which connects to SQL Server (whether via Windows authentication or SQL security) must have the dbcreator server role: 26 2 Installation Quest ChangeBASE 5.3 - User Guide This will be sufficient for the initial database setup and the day-to-day running of ChangeBASE and Client Side Capture (CSC). However, where it is necessary for a DBA (Database Administrator) to create the database, the following must be observed: • • The collation setting Latin1_General_CS_AS must be used for ChangeBASE, and the setting Latin1_General_CI_AS must be used for CSC. The SQL database user(s) must be set up with the following permissions. Database role db_datareader Basic database-level permissions must be granted. Database role db_datawriter Basic database-level permissions must be granted. Stored procedures EXECUTE Permissions must be granted to execute stored procedures in the database. tempdb Create TABLE Create Table permissions must be assigned to the tempDB system database. Procedures and examples are given in 2.2.1 Assigning Permissions using SQL Server Management Studio. Note: Control of the individual functions within ChangeBASE is managed through the Security Tab in the ChangeBASE options, and not by altering the SQL permissions. Important: The user who is performing the initial setup of the tables within the ChangeBASE database, and upgrading them, needs to be assigned the following additional permissions (or alternatively, they can be a Database Owner (dbo)): Database role db_ddladmin The following database-level permissions must be granted: ALTER ANY ASSEMBLY, ALTER ANY ASYMMETRIC KEY, ALTER ANY CERTIFICATE, ALTER ANY CONTRACT, ALTER ANY DATABASE DDL TRIGGER, ALTER ANY DATABASE EVENT, NOTIFICATION, ALTER ANY DATASPACE, ALTER ANY FULLTEXT CATALOG, ALTER ANY MESSAGE TYPE, ALTER ANY REMOTE SERVICE BINDING, ALTER ANY ROUTE, ALTER ANY SCHEMA, ALTER ANY SERVICE, ALTER ANY SYMMETRIC KEY, CHECKPOINT, CREATE AGGREGATE, CREATE DEFAULT, CREATE FUNCTION, CREATE PROCEDURE, CREATE QUEUE, CREATE RULE, CREATE SYNONYM, CREATE TABLE, CREATE TYPE, CREATE VIEW, CREATE XML SCHEMA COLLECTION, REFERENCES 2.2.1 Assigning Permissions using SQL Server Management Studio Unless a local Dashboard instance is being accessed on a Windows XP machine in accordance with 2.1.1 Local Database Setup, in which case SQL Authentication must be used, permissions can be assigned for either Windows or SQL Security: 27 2 Installation Quest ChangeBASE 5.3 - User Guide The detailed procedure encompassing both methods is as follows 1. Create a new login as follows: a. Expand the Security folder of the SQL Server. b. Right-click on Logins and select New Login. c. If SQL Security is being used, select SQL Server Authentication and go to step 2. If Windows Security is being used, you need to create a new login for an Active Directory-based user or group. Therefore, select Windows Authentication, and then go to step 1d. 28 2 Installation Quest ChangeBASE 5.3 - User Guide d. Click the Search button and select the Active Directory user or group. Note: If the user or group does not appear in the list, ensure that the correct object types are being searched for. In many instances, groups are not enabled by default, resulting in an error message that the object you are looking for cannot be found. 2. Assign role-based permissions to the SQL Databases, as follows: a. Right-click on the newly created user, and select Properties, followed by User Mapping: 29 2 Installation Quest ChangeBASE 5.3 - User Guide b. Check each database, and associate it with the required permissions in the Database role membership panel. As a minimum, you must have db_datareader and db_datawriter selected. c. Close the Properties window and collapse the Security tree. 3. Assign Execute Permissions to each database, as follows: a. Click the New Query button at the top of the screen. b. Select the required ChangeBASE or CSC database from the drop-down menu below the New Query button, e.g. Important: It is vital that the correct database is selected before you proceed. 30 2 Installation c. Quest ChangeBASE 5.3 - User Guide Assign permissions to the selected database using the following command: grant execute to "<Database User>" (e.g. "PROD\QDL.RD.ChangeBASE" in the above example). Important: The "<Database User>" is case sensitive, and the double quotes are mandatory. Note: For Windows Authentication, the domain ("PROD\" in the above example) needs to be specified. d. Click Execute on the toolbar. e. Either repeat from step 3a for the next database, or move to step 4. 4. Assign Create Table permissions to the tempDB system database, as follows: a. Click the New Query button at the top of the screen. b. Select the tempDB database from the drop-down menu below the New Query button, e.g. c. Assign permissions to the database using the following command: grant CREATE TABLE to "<Database User>" (e.g. "PROD\QDL.RD.ChangeBASE" in the above example). Important: The "<Database User>" is case sensitive, and the double quotes are mandatory. Note: For Windows authentication, the domain ("PROD\" in the above example) needs to be specified. d. Click Execute on the toolbar. 2.2.2 SQL Setup for a Multi-User Environment When installing ChangeBASE in a multi-user environment, it is desirable to install Dashboard in one central location, and CSC, if relevant, in another central location. 31 2 Installation Quest ChangeBASE 5.3 - User Guide This method of installation will allow users who do not have ChangeBASE installed to view the reporting results in Dashboard. It is advisable to have a dedicated machine on which to install Dashboard, and another on which to install CSC, if relevant, in order to provide an uninterrupted service. The Dashboard and CSC IIS servers require access to the ChangeBASE SQL database. This can be achieved by using either of the following methods: • Windows authentication, which is the recommended method (refer to 2.2.2.1 SQL Setup using Windows Authentication). Or • SQL Security (refer to 2.2.2.2 SQL Setup using a SQL Login). 2.2.2.1 SQL Setup using Windows Authentication 1. Add the name of the machine hosting Dashboard to the Active Directory group created in 2.2.1 Assigning Permissions using SQL Server Management Studio (this machine is "PC01" in the following example): 2. Follow the procedure in 3.2 Database Setup and 15.6.4 CSC Configuration, and ensure that Use Windows Security is checked when connecting to the database. 2.2.2.2 SQL Setup using a SQL Login 1. Ensure that you have set up a SQL login on the database with the permissions assigned in 2.2.1 Assigning Permissions using SQL Server Management Studio. 2. Follow the procedure in 3.2 Database Setup and 15.6.4 CSC Configuration, and ensure that Use Windows Security is unchecked when connecting to the database. 32 2 Installation Quest ChangeBASE 5.3 - User Guide 2.3 Installing ChangeBASE 2.3.1 Pre-Installation 1. Ensure that you have met all the system requirements. 2. If running SQL Server and ChangeBASE on separate machines: • The SQL Server Browser service must be running, and set to Automatic in the machine where SQL is installed. • Both “SQL Browser Service” and “SQL Server” must be allowed through your firewall. • The TCP/IP protocol must be enabled. Both “TCP/IP” and “SQL Server Browser” can be configured in SQL Server Configuration Manager: 3. 4. 5. Ensure that the Working Directory location has been considered, and a share created if necessary (refer to 2.1.4 Working Directory). Ensure that you have a ChangeBASE license. Download ChangeBASE from: https://support.quest.com. 2.3.2 Installation 1. Run the ChangeBASE installation MSI (Local Administrative privileges are required), and click Next. 33 2 Installation Quest ChangeBASE 5.3 - User Guide 2. Accept the license agreement and click Next. 3. If you require the Dashboard to be hosted on this client you should change the Server Components feature to Will be installed on local hard drive by clicking the drop-down (refer to 2.1.2.1 Dashboard Setup). Otherwise, you should select Entire feature will be unavailable. 34 2 Installation 4. Click Next, and then Install: 5. Once installation is complete, click Finish. Quest ChangeBASE 5.3 - User Guide 35 2 Installation Quest ChangeBASE 5.3 - User Guide 2.4 Upgrading ChangeBASE With this release of ChangeBASE, proceed as follows: 1. If you are upgrading from ChangeBASE 4.x or earlier, you must obtain a new license, as licenses from earlier versions will not work. 2. Back up the database (refer to 2.1.8 Database Backup Requirements). 3. Ensure that all users close ChangeBASE. 4. Run the ChangeBASE 5.3 installation on one client machine (it will uninstall the previous version). 5. Launch ChangeBASE 5.3. 6. Comply with the resultant prompt to upgrade the database. You will only need to do this once. 7. If the installation is satisfactory, upgrade the other client machines to ChangeBASE 5.3. 8. On any one of the client machines using Dashboard, go to Options > Dashboard > Status and click the Upgrade button – otherwise, you may see the error detailed in 3.4.2.4 ‘No Database’ Error. 9. Click the Upgrade button the first time that you select Browse with SCCM. 10. If you are using Virtual Machines for virtualization, upgrade QVMTools within those Virtual Machines (refer to 5.4.1 Virtual Machine Setup), and then take a new snapshot. 11. Click the Upgrade Tab to get the latest Plugins. It is important prior to the first upgrade that, if you are not a Database Owner (dbo), you have the SQL permissions assigned in 2.2 SQL Setup, most notably db_ddladmin. All ChangeBASE clients connecting to a database must have the same version number. 36 3 Basic Configuration Quest ChangeBASE 5.3 - User Guide 3 Basic Configuration 3.1 Licensing Options Launch ChangeBASE from the Start menu shortcut. In Windows 7, press the Windows key on your keyboard, then type "cha". On Windows 8 or Windows Server 2012, press the Windows key + "Q", then type "cha". The ChangeBASE shortcut will then appear under Programs. There are two licensing options when you first launch ChangeBASE: Online or Offline. 3.1.1 Online License It is strongly recommended that you launch ChangeBASE in an online environment so that you can automatically download the latest Plugins from the Quest Server. If you are online at the time of first launching the product, all you need to do is enter your details in the following format: 37 3 Basic Configuration Quest ChangeBASE 5.3 - User Guide If a proxy server is used for internet access then you should enter its details in the Proxy Settings dialog: Clicking OK on the License Setup dialog will trigger ChangeBASE to connect to the authorization server to validate the authorization code and the software will proceed to the database connection wizard. If you experience issues validating your license online, consider the following: • • • • Verify that you can access the following URL in a web browser on the machine running ChangeBASE: http://www.aokserver.com/AOKUpgrade/Upgrade.asmx If you can, this shows that the machine has internet connectivity and can access the ChangeBASE license server. Try checking/unchecking the Use Proxy option in the Proxy Settings dialog. Double check that all the proxy server details are correct. Try adding or removing the Domain name in the Proxy Settings dialog. If you are still unable to validate your authorization code online, you will need to use an Offline License. 38 3 Basic Configuration Quest ChangeBASE 5.3 - User Guide 3.1.2 Offline License If the system where you wish to install ChangeBASE has no internet access, or you have problems with authentication via the proxy server, the following procedure will allow you to activate a valid license. However, you will need at least one computer with internet access and, more importantly, one that can see our activation server in the UK. (Some corporate firewalls/proxies have been known to block access if they have not encountered the site before.) 1. 2. Start ChangeBASE. When prompted for License Setup information, enter the following details: Customer Name Email Address Authorization Code (as supplied by Quest Licensing team) 3. Click the Create Offline License button: 4. A dialog appears with an OK button telling you how to activate the license. 5. In the Explorer window that opens, copy the AOK.cbl and AOK Activation Page URL files to external media (e.g. a USB drive). Leave the Explorer window open for later use. 39 3 Basic Configuration 6. 7. Quest ChangeBASE 5.3 - User Guide Take the external media to a machine that has internet access. Double click the Activation Page URL on the external media: When prompted, browse to the temporary AOK.cbl file on the external media, double click the AOK.cbl file and click Submit. 9. When prompted to download the new file, save the new AOK.cbl back to the external media (overwriting the temporary copy already there). 10. Take the external media back to the machine running ChangeBASE and copy the new AOK.cbl from the external media onto the machine, overwriting the file already there. 11. Start ChangeBASE. It will pick up the license file downloaded from the server, and then ask for the name of the SQL server. 8. 3.1.3 Swapping Licenses ChangeBASE can only use one license at any one time. Where there is a requirement to switch licenses, the following process should be followed: 1. 2. 3. 4. 5. 6. 7. Close ChangeBASE. Browse to the UserData folder (specified in 3.1.4.1 License Expiry). Rename the AOK.cbl file. Start ChangeBASE. You will be prompted for a new license code. Enter this and activate it online, or browse to the offline license file. ChangeBASE will then start, and load the previously set up databases. To swap back to the original license, close ChangeBASE, rename AOK.cbl, then rename the original license file back to AOK.cbl. Then start ChangeBASE. 40 3 Basic Configuration Quest ChangeBASE 5.3 - User Guide 3.1.4 Troubleshooting 3.1.4.1 License Expiry If your license expires, you will see a message to this effect and will no longer be able to load Plugins or packages. This is most likely to happen after a ‘proof of concept’ or ‘evaluation’ where the license is only active for a few days. You will need to contact your Quest® account manager to request that your license is extended. If your installation of ChangeBASE is in an offline environment, use the ‘ChangeBASE Activation Page’ to re-activate the license. The ‘ChangeBASE Activation Page’ link can be found in the following location: Windows XP %USERPROFILE%\Local Settings\Application Data\ChangeBASE\UserData Windows Vista, 7 and 8 %localappdata%\ChangeBASE\UserData Windows Server 2003, 2008 and 2012 %localappdata%\ChangeBASE\UserData The license file name is AOK.cbl, which is also located in the above named folder. If you are working online, simply go into the Upgrade Tab in order to refresh your license file. The license file extension will then be processed automatically. 3.1.4.2 Unlicensed Number of Packages If you attempt to load more packages than the number for which you have been licensed, the message of the kind shown in the example below will be displayed: You should then apply for an increase in package count. Once the increase has been approved, you will receive a new AOK.cbl license file via e-mail, which you should then copy into %USERPROFILE%\Local Settings\Application Data\ChangeBASE\UserData so that you overwrite the previous file. If you are working online, simply go into the Upgrade Tab in order to refresh your license file. The license file extension will then be processed automatically. 41 3 Basic Configuration Quest ChangeBASE 5.3 - User Guide 3.2 Database Setup Once you have successfully added your license, the database connection wizard will appear. You can either connect to an existing database or create a new database. Note: If your setup follows 2.2.2.1 SQL Setup using Windows Authentication, leave Use Windows Security checked. If it follows 2.2.2.2 SQL Setup using a SQL Login, then leave the box unchecked. The Server Name syntax is as follows: SQL EDITION SQL Standard or Enterprise SYNTAX [SQL SERVER HOSTNAME OR IP] EXAMPLES sqlserver01 192.168.0.100 127.0.0.1* localhost* * Valid where SQL is installed locally. Note: If SQL Server is set up using an instance name then this also needs to be specified, for example sqlserver01\<your_instance> SQL Express [SQL SERVER HOSTNAME OR IP]\[SQL INSTANCE] sqlserver01\SQLEXPRESS sqlserver01\<your_instance> 192.168.0.100\SQLEXPRESS 127.0.0.1\SQLEXPRESS* localhost\SQLEXPRESS* .\SQLEXPRESS* * Valid where SQL is installed locally. 42 3 Basic Configuration Quest ChangeBASE 5.3 - User Guide If you want to know the name of your SQL Server instance, open the Services window, and select SQL Server, for example: The instance name is given in brackets (SQLEXPRESS in the above example). Proceed as follows: 1. 2. 3. Enter the Server Name in accordance with the above notes. If SQL Server has been configured to use SQL Security (as in 2.2.3.2 SQL Setup using a SQL Login), uncheck Use Windows Security and enter the SQL username and password. Click Next and the SQL connection will be tested. 43 3 Basic Configuration Quest ChangeBASE 5.3 - User Guide If a successful connection has been established to the database server, click Next and move to step 4. If incorrect credentials were supplied for the database server, the following will be displayed. Click Previous to enter a different user name or password. If the database server cannot be found, the following will be displayed. Click Previous to enter a different server/instance name. If the following requirements have not been met from those listed in 2.1.2.2 Requirements for Remote Database Setup: • Microsoft System CLR Types for SQL Server 2008 x86 (10.0.x) • Microsoft SQL Server 2008 Shared Management Objects x86 (10.0.x) then you will receive the following error: 44 3 Basic Configuration Quest ChangeBASE 5.3 - User Guide 4. To connect to an existing database, click the drop-down list and select the database name. To create a new database, enter the required name. Space characters can be used if desired. Click Next. 5. Now the Working Directory must be defined. See 2.1.4 Working Directory for more information. a. Where a single client connects to the database, a local Working Directory would be used, so click the Browse button and locate it. A typical path would be C:\ChangeBASE Working\Test Database. Then click Next. 45 3 Basic Configuration Quest ChangeBASE 5.3 - User Guide b. Where multiple clients connect to the same database, a shared folder accessible through a UNC path is advisable. In this event, check the Specify UNC Path option and type in the UNC path to the Working Directory, for example: \\server01\ChangeBASE Working\Test Database. Then click Next. 46 3 Basic Configuration Quest ChangeBASE 5.3 - User Guide 6. If a new database was specified at step 4, the database is created. 7. Click Finish. 8. The ChangeBASE New Project Wizard is displayed. 47 3 Basic Configuration Quest ChangeBASE 5.3 - User Guide 3.2.1 Renaming a Database You can rename a database by right-clicking on the database name at the bottom of the screen. Important: After you rename the database, you need to do the following: 1. Navigate to the Dashboard Tab under Options. 2. Click Unregister followed by Register. This process associates Dashboard with the renamed database so that assessment results can be successfully viewed. If these actions are not followed, an error will occur when starting Dashboard. 3.2.2 Multiple Databases ChangeBASE supports the use of multiple databases. These may be hosted on the same SQL server, or different SQL servers. It may be advantageous to use multiple databases where you want to segment your packages logically. For example, if you are testing both desktop packages and web applications, it may be helpful to create one database for the desktop packages and one for the web applications. To create additional databases, right-click on any of the database tabs and click Create Database. 48 3 Basic Configuration Quest ChangeBASE 5.3 - User Guide 3.2.3 Creating a New Database if your SQL Server is centrally managed by a DBA If your SQL Server machine is centrally managed by a DBA (Database Administrator) and you do not have the privileges to create a new database on the server, then the person responsible for creating the new database from SQL Server needs to have dbowner rights. The only non-standard configuration setting when creating the new database is the collation type, which needs to be changed to Latin1_General_CS_AS. All other settings can remain as default. Once a successful connection has been established to the database server, you will be asked to supply a name for the new database. Enter a suitable name and click Next. 3.3 SQL-related Troubleshooting 3.3.1 Failure to create a Database If you have been through all the steps in 3.2 Database Setup, and the creation of a database still fails, for example you are still receiving either of the following kinds of error: 49 3 Basic Configuration Quest ChangeBASE 5.3 - User Guide then ensure that the SQLServer service is running for the appropriate instance on the machine where SQL is installed: 50 3 Basic Configuration Quest ChangeBASE 5.3 - User Guide If it is running and the database creation fails again, try using a different method of entering the Server Name, e.g. localhost, ComputerName, IP Address. 3.3.2 Failure to connect to a Database If incorrect credentials were supplied, the following kind of error will be displayed. Click Previous to enter a different user name or password. If you still cannot connect to SQL, try using the same credentials in SQL Server Management Studio to test them. If the credentials do not work in SQL Server Management Studio, you should either obtain the correct credentials or reinstall/reconfigure SQL Server in accordance with 2.2 SQL Setup. If you get an error when you try to connect to a database, such as the error below, this means that there is an issue with the configuration of SQL within ChangeBASE or that the SQL Server Service has been stopped. First of all, go into the Service Control Manager and ensure that the SQL Server Service is running. 51 3 Basic Configuration Quest ChangeBASE 5.3 - User Guide If you are connecting remotely to your SQL database, you should also ensure that the SQL Browser service is also running, and that the SQL Server is set up to accept TCP/IP connections (this is configured in the SQL Server Configuration Manager). Important: You should ensure that both “SQL Browser Service” and “SQL Server” are allowed through your firewall. In the SQL Server Configuration Manager, you should also ensure that the VIA (Virtual Interface Adapter) is switched off. If you need to troubleshoot this issue further, try to install SQL Server Management Studio and check that you can connect to the database using the same credentials. 52 3 Basic Configuration Quest ChangeBASE 5.3 - User Guide 3.4 Configuring and enabling the Dashboard Components for the ChangeBASE Database(s) After ChangeBASE has been installed, it can optionally be configured to integrate with the Dashboard website. To do this, start ChangeBASE and go to the Options screen and select the Dashboard Tab. Initially this will show that the Dashboard is not installed. To install it, simply click the Install button. After this, the Tab will show the version of Dashboard installed. 53 3 Basic Configuration Quest ChangeBASE 5.3 - User Guide Note: The four Platform tabs enable you to prioritize the Dashboard Migration Groups so that a priority matrix can be used in Best Way Forward reporting (refer to 7.2.1 Configuring Dashboard for your Target Environment and 7.2.2.5 Best Way Forward). The Status panel shows whether or not: • the Dashboard is currently installed in the database; • the Dashboard processes are enabled; • the database is registered with the Dashboard web pages. Note: When new versions of Dashboard are installed, the Dashboard Tab may show that an upgrade option is available. This upgrade should be run at the earliest opportunity. As long as the Dashboard remains installed and enabled for the database, Dashboard data will be captured into the Dashboard tables in the database. If necessary, the capture process can be stopped by clicking the Disable button. It can then be restarted by clicking Enable. Note: Any package imports or reports run during the period when Dashboard data capture is disabled, will not be imported into Dashboard. You can also uninstall Dashboard, which will remove all Dashboard data from the database. 3.4.1 Registering the Dashboard Web Application with the IIS Server After installing Dashboard, you need to register the application with the IIS Server, as follows: 1. In the Options > Dashboard > Status panel, validate that the URL shows the hostname of the machine where IIS and the Dashboard Server Components have been installed (without any http prefix or any page suffix, e.g. <myServer>/Dashboard). For a standalone system, the URL will simply be <machine name>/Dashboard. Important: For a standalone system, you will need to have installed Server Components during the ChangeBASE installation (refer to 2.3.2 Installation). Otherwise, Dashboard registration will fail. 2. Click the Register button. 3. Test the connection by opening up the Dashboard via the Assessment Results menu: 54 3 Basic Configuration Quest ChangeBASE 5.3 - User Guide Dashboard can now be launched from any remote machine, by typing the URL to the Dashboard server: Note: You can click Unregister to break the link between the web pages and database. This does not delete any Dashboard data from the database: it simply makes that database unavailable to the Dashboard web pages. You simply click the Register button to re-establish the link. 3.4.2 Dashboard-related Troubleshooting 3.4.2.1 Insufficient privileges If you install Dashboard and see an error message to the effect that the account is not able to create tables, then ensure that the account used to connect to ChangeBASE has sufficient privileges as shown below: 55 3 Basic Configuration Quest ChangeBASE 5.3 - User Guide 3.4.2.2 ‘999’ Error If you see the following error message: then you should check the <assembly> tags in the web.config file (typically found in C:\Program Files (x86)\Quest Software\ChangeBASE\Dashboard). For example, if you see a number of such tags, e.g. <assemblies> <add assembly="System.Data.Linq, Version=4.0.0.0, Culture=neutral, PublicKeyToken=B77A5C561934E089" /> <add assembly="System.Design, Version=4.0.0.0, Culture=neutral, PublicKeyToken=B03F5F7F11D50A3A" /> 56 3 Basic Configuration Quest ChangeBASE 5.3 - User Guide <add assembly="System.Windows.Forms, Version=4.0.0.0, Culture=neutral, PublicKeyToken=B77A5C561934E089" /> <add assembly="ADODB, Version=7.0.3300.0, Culture=neutral, PublicKeyToken=B03F5F7F11D50A3A" /> <add assembly="mscorlib, Version=4.0.0.0, Culture=neutral, PublicKeyToken=B77A5C561934E089" /> </assemblies> then remove all tags after the first one, so that it becomes: <assemblies> <add assembly="System.Data.Linq, Version=4.0.0.0, Culture=neutral, PublicKeyToken=B77A5C561934E089" /> </assemblies> Note: You should also ensure that the correct database name appears throughout the web.config file. 3.4.2.3 Windows Authentication-related Errors If you see the following kind of error message: then this indicates that you are using Windows authentication, but that the name of the machine hosting ChangeBASE has not been added to the group with the requisite SQL permissions – refer to 2.2.3.1 SQL Setup using Windows Authentication. Complete the following steps: 1. Add the name of the machine to the group. If you still receive an error, proceed to the next step. 57 3 Basic Configuration Quest ChangeBASE 5.3 - User Guide 2. Have a SQL login set up in accordance with 2.2.3.2 SQL Setup using a SQL Login. 3. Disconnect and then reconnect to the Database in the ChangeBASE Workbench using the new SQL login (just re-entering the properties is not good enough — you must disconnect): 4. Re-register the Dashboard to the IIS Server (this will tell the IIS Server to connect to this database using the new Workbench connection): 5. Test the connection by opening up the Dashboard via the Assessment Results menu, as in 3.4.1 Registering the Dashboard Web Application with the IIS Server. 3.4.2.4 ‘No Database’ Error If you see the following error when you select Dashboard from the ChangeBASE Workbench: this probably indicates that either: • ChangeBASE Workbench has been updated without Dashboard being updated. In this case, go to Options > Dashboard > Status and click the Upgrade button (if it is available). Or 58 3 Basic Configuration • Quest ChangeBASE 5.3 - User Guide ChangeBASE has been updated without the previous version of ChangeBASE being completely uninstalled. Referring to 3.4.1 Registering the Dashboard Web Application with the IIS Server, you simply need to click Unregister, and then click Register again to re-establish the link between the web pages and database. 59 4 ChangeBASE User Interface Quest ChangeBASE 5.3 - User Guide 4 ChangeBASE User Interface The following is an example of the Workbench for a user running the Ultimate Edition of ChangeBASE (refer to 1.1 ChangeBASE Product Editions): Notes: • If you wish to hide the left hand panels, click can then click • in the top right of the screen. You to toggle them on again. There are many references in the guide to the Options window. To access this, click in the top right of the screen. The various tabs that are available are fully described in 12 ChangeBASE Options. • For the latest news on ChangeBASE, click in the top right of the screen. • For help on ChangeBASE, either press F1 or click the down arrow to the right of and select Help. For the version of ChangeBASE that you are running, click the same down arrow and click About. 4.1 Packages Panel Browse: This is an alternative to the drag and drop functionality. It enables you to browse to a folder, then scan that folder and subfolders for packages which can be imported into ChangeBASE. Browse with SCCM: This enables you to browse for packages and programs that are located in a SCCM server or database. 60 4 ChangeBASE User Interface Quest ChangeBASE 5.3 - User Guide Import: This imports packages (and offline Plugins) into the database to allow automated assessment. CSV Import: This is a more automated way to load packages. You prepare a CSV file from a supplied template and provide the details of the packages in this file. ChangeBASE will read the CSV file and load all of the listed packages. Assess: This assesses the packages against the selected report groups. Fix: This creates fixes for packages where automated fixing is available. Virtualize: This converts MSI packages to a Virtual format. 4.2 Reports Panel Refresh Results: This is used to refresh the results tree. Clear Results: This is used to clear any reporting results from the ChangeBASE interface. Assessment Results: This allows you to access the HTML reports showing assessment results. You can access several different reports to analyze the status of the packaging project. It is also possible to export the results to CSV format for customized reports and data filtering. 4.3 Summary Panel Packages: The number of packages currently imported into the database. Reports: The number of reports (Plugins) currently imported into the database. Rules: The total number of logic checks within all reports (Plugins) imported into the current database. Scanned Rules: The number of logic checks in the currently selected reports (Plugins). Issues: The number of issues being displayed currently. Upgrades Available: The number of new reports (Plugins) available for download. These can be downloaded in the Upgrades Tab in Options. 4.4 Tabs For the Packages Tab, refer to 6.5.1 Packages Tab. For the Reports Tab, refer to 6.5.2 Reports Tab. 4.4.1 New Project Wizard If you are new to ChangeBASE, the New Project Wizard takes you through the entire ChangeBASE flow in steps, and illustrates your progress through the flow by ticking each step as it is completed. 61 4 ChangeBASE User Interface Quest ChangeBASE 5.3 - User Guide If you do not want to configure ChangeBASE to use Virtual Machines at this point – i.e. if you have no legacy installers to import for repackaging - check N/A (‘Not Applicable’) on the right of the screen. Note: If you do not want this wizard to be displayed when you next start ChangeBASE, uncheck the box Display Wizard when I launch ChangeBASE at the bottom of the window. The hyperlink on the right of each step takes you to the relevant section of the online help. 4.5 Portfolio Summary The Portfolio Summary has two fully expandable and collapsible trees: Packages – this is used on the Packages Tab to show the imported packages and files, and the results of their assessments. Reports – this is used on the Packages Tab to show the loaded report groups and reports, and, on the Reports Tab, to show the latest assessment results by report group and report. 62 4 ChangeBASE User Interface Quest ChangeBASE 5.3 - User Guide For further details, refer to 6.5 Viewing Results: ChangeBASE. 4.6 Reports and Report Groups 4.6.1 Overview Report Groups contain reports (also known as Plugins), which provide automated assessment for a specific technology. For example, the Windows 7 Report Group contains reports that assess packages for Windows 7 compatibility. A report is a group of codified rules that check for a particular issue within a package or packages. ChangeBASE contains over 250,000 rule sets which are grouped into reports of various categories. A report may contain several rule sets; the number varies according to the logic that goes into making up a particular report. 63 4 ChangeBASE User Interface Quest ChangeBASE 5.3 - User Guide 4.6.1.1 Example Report Group: Windows 7 Report Name: Active Directory GPO Settings Analysis The grey cog icon indicates that automated fixing is available for a report. Issue Description: This ChangeBASE Plugin analyses each imported and selected application package for registry entries that match the corresponding registry settings included in the Windows Vista and Windows 7 standard Active Directory (AD) Group Policy Objects (GPOs). This Plugin will raise an Amber issue if these registry settings are detected in an application package. Impact of leaving the issue in the package: Windows Vista, Windows 7/8, Windows Server 2003/2008 (inc. R2) and Windows Server 2012 include a number of deployment and configuration settings that are used to manage the installation and use of packages on the target workstation Platform and server environment. Group Policy tools use Administrative template files to populate policy settings in the user interface. These settings allow administrators to manage registry-based policy settings for both the local machine and user components. As Microsoft periodically updates and adds to these Group Policy settings it is not advisable that an application package (MSI) contains these selected registry keys. If these settings are inadvertently included in an application package, the application will appear to install correctly. However, the workstation, user environment or application may not behave as expected. Fix Logic if Fix available: An automated fix for this issue is available through ChangeBASE. Updates are automatically generated that correctly set the target package’s registry configuration. 64 4 ChangeBASE User Interface Quest ChangeBASE 5.3 - User Guide 4.6.2 Online Report Group Loading It is highly recommended that ChangeBASE is used from an online client. This will ensure that the latest reports are available for download, and that any report updates (typically released on a monthly basis) are also immediately available. Your ChangeBASE license dictates which report groups are available for download. These can be accessed by clicking on the Options button in ChangeBASE, then changing to the Upgrade Tab. The report groups you are entitled to download are displayed: To download a report group, check the associated box. It is also possible to download individual Plugins by expanding the report group and checking the required Plugins. 65 4 ChangeBASE User Interface Quest ChangeBASE 5.3 - User Guide When you click OK, ChangeBASE will download the report groups and Plugins. By default, the report groups will automatically be loaded into the database. Quest Best Practices recommend that you select all reports that are pertinent to the assessment that you would like to run. 4.6.3 Offline Report Group Loading Where it is not possible to connect to the ChangeBASE server, reports can be loaded offline. To be able to do this, you should request a set of offline report groups from Quest Support. These will be supplied as a set of CBP (ChangeBASE Plugin) files. To load offline Plugins, simply drag and drop the folder that contains the CBP files onto ChangeBASE, then click Import. Note: When working offline, you will not receive any notification when Plugins are updated and updated Plugins will have to be requested as offline Plugins and then manually imported into ChangeBASE. 4.6.4 Which Report Groups Should I Add? For advice on which report groups to download and use, refer to 6.1 Choosing the Right Report Groups. 4.6.5 Troubleshooting 4.6.5.1 Plugins failing to load If Plugins fail to load online, then you should verity your web connection and retry the Plugin downloads. The best approach for this is to click on Refresh Results, check to see if the Plugins have already been loaded into the report group and, if not, click the Import button to reload the Plugins. If a Plugin fails to load after several attempts (3+), then contact Support with the following: • • A screenshot of the error message when the cursor is on the red cross. A zipped copy of the log folder, which is located in the database Working Directory. 4.6.5.2 Inability to access Services in the Upgrade Tab Intermittent internet connectivity can prevent the Plugins from being downloaded from the Upgrade server, so you should retry the load process after a few minutes. If access is still unavailable, then you should check whether you have proxy settings, as these can prevent you from being able to access the Upgrade Services. To verify the settings: 1. Configure them via the Services Tab in the Options menu. 2. Click OK to save your changes. 66 4 ChangeBASE User Interface Quest ChangeBASE 5.3 - User Guide 3. Close the Options window. 4. Re-open the window, and go to the Upgrade Tab. 5. If you still cannot access the services in the Upgrade Tab, open a web browser and enter the following URL: http://www.aokserver.com/AOKUpgrade/Upgrade.asmx If the web page from the URL above is not displayed, then either your internet connection is down or your firewall is blocking access. 6. If the web page is accessible and proxy configuration details have been configured correctly, visit any web page which is not cached (for example, Google News), so that the proxy server can authenticate the logged on user. If you find that Plugins fail to run, then you may have the wrong version of Plugins for the version of ChangeBASE that you are running. Ensure that you always have the latest version of the software and that you have the latest Plugins loaded. You should also ensure that the Manually Add Reports and Plugins setting within the Security Tab is checked for your user role: 4.7 AppID Feature This feature provides you with the ability to represent your applications in the exact manner in which they are intended to be deployed. For example, some applications (such as MS Office) are comprised of multiple packages (e.g. MS Office incorporates MS Word, MS Excel, MS Outlook and MS Powerpoint, amongst others). The AppID feature allows you to report on the individual packages, but also show them as a single, overall application. The feature also allows you to represent applications in accordance with your own internal naming conventions. 67 4 ChangeBASE User Interface Quest ChangeBASE 5.3 - User Guide The AppID(s) column in the main package tree shows the AppIDs that have been assigned to packages, separated by commas where there is more than one AppID associated with a package: You can order packages according to those that are associated with AppIDs, by clicking the AppID(s) column header. 4.7.1 AppID Maintenance To add new AppIDs to one or more packages, or to maintain the existing IDs for one or more packages: 1. Highlight the required package(s) (hold down the <Shift> key to highlight a range of packages, or the <Ctrl> key to make individual selections). 2. Right click to access the context menu. 3. Click Select App IDs. The maintenance screen is then shown in one of two modes: 68 4 ChangeBASE User Interface • • Quest ChangeBASE 5.3 - User Guide Single Selection – A single package was selected from the context menu. Multiple Selection – Multiple packages were selected from the context menu. 4.7.1.1 Single Selection 4.7.1.2 Multiple Selection Both dialogs show the package(s) selected in the main interface, followed by any AppIDs that have been selected for the package(s) in the left hand, Available IDs, panel, and any AppIDs that are available for selection in the right hand, Selected IDs, panel. The difference between the dialogs is that the selections in the Single Selection dialog apply only to the single package shown, whereas the selections in the Multiple Selection 69 4 ChangeBASE User Interface Quest ChangeBASE 5.3 - User Guide dialog apply to all the packages shown, thereby allowing you to assign/unassign AppIDs quickly across the entire range of selected packages. Move IDs as required, using the central arrow keys: > >> < << Selects a single AppID for the package(s) shown by moving it from Available IDs to Selected IDs. Selects all AppIDs for the package(s) shown by moving them from Available IDs to Selected IDs. Deselects a single AppID for the package(s) shown by moving it from Selected IDs to Available IDs. Deselects all AppIDs for the package(s) shown by moving them from Selected IDs to Available IDs. To save all changes, click OK. 4.7.1.3 Adding a new AppID You can add a new AppID to the list of Available IDs by clicking on the Add button above this list. When you see the following dialog: create a new AppID by entering a name and clicking Add. The AppID can be created using letters, numbers, spaces, underscores and hypens. You can add duplicate names but you will be asked for confirmation before proceeding. 4.7.1.4 Updating or Deleting an existing App ID You can double-click an AppID in either the list of Available IDs or the list of Selected IDs, in order to modify or remove it. When you see the following dialog: you can either edit the name as required and click Update, or else click Delete, when you will be asked for confirmation that the AppID is to be removed from all packages. 70 5 Importing Packages Quest ChangeBASE 5.3 - User Guide 5 Importing Packages 5.1 Importing Packages - Overview Packages can be imported into ChangeBASE in one of two ways: 1. 2. A large number of installation formats can be imported directly by ChangeBASE (using the methods described in 5.2 Import Methods). The other, legacy, formats shown should be imported via a Virtual Machine (refer to the sections starting with 5.3 Repackaging - Overview). Note: Installation EXEs (e.g. setup.exe) must be repackaged (that is to say, imported via a Virtual Machine for assessment). However, Microsoft updates supplied as EXEs may be imported into ChangeBASE directly. 71 5 Importing Packages Quest ChangeBASE 5.3 - User Guide 5.2 Import Methods There are four methods of importing packages, regardless of format: • • • • 5.2.1 Drag and Drop 5.2.2 Browse Dialog 5.2.3 Browse with SCCM 5.2.4 CSV Import For details on import packages issues, please refer to 5.2.5 Import Warnings. 5.2.1 Drag and Drop 5.2.1.1 Dragging and Dropping Files onto ChangeBASE 1. Ensure that the files types to be imported are checked in the General Tab in the Options window. 2. Drag and drop the file(s) onto the ChangeBASE Workbench. 3. Once the file(s) appears in the Workbench, then: a. If an application can be imported directly, click on Import in the Packages Panel to load the associated package(s) into the database. Or b. If an application is to be repackaged, proceed as in 5.5 The Repackaging Process. 72 5 Importing Packages Quest ChangeBASE 5.3 - User Guide 5.2.1.2 Dragging and Dropping Folders onto ChangeBASE 1. In order to ensure that all files types in the folder are imported, uncheck all the file types in the General Tab in the Options window. 2. Drag and drop the folder onto ChangeBASE. 3. Once the folder appears in the Workbench, right-click on it to display the following menu: 4. If you dragged the folder onto ChangeBASE because: • the application to be imported is locally installed but its source files are no longer available, then click Legacy Package Capture (this will result in ChangeBASE attempting to find any associated registry keys, shortcuts and shared files). • the application works by a folder located on a network share being copied to the local machine, then click Source Capture (this will result in ChangeBASE scanning the folder, picking up all the files, analyzing them and attempting to construct an MSI). • the application to be imported is to be repackaged, select Repackaging Configuration and proceed as in 5.5 The Repackaging Process. 73 5 Importing Packages Quest ChangeBASE 5.3 - User Guide Note: For the IIS Folder option, refer to 15.5 Loading Source Folders for Web Data Capture. 5. If the application can be imported directly, click on Import in the Packages Panel to load the associated package into the database. Note: If you are using Legacy Package Capture, then Convert it Local must be set for your user in the Security Tab in the Options window. If you are using Source Capture, then Convert it Source Capture must be set for your user in the Security Tab in the Options window. Refer to 12.7 Security Tab. 5.2.2 Browse Dialog 1. Click Browse in the Packages Panel (refer to 4.1 Packages Panel). 2. Click Browse button in the Browse dialog and locate the folder containing the packages you want to import. 3. ChangeBASE scans the folder and subfolders for any files with the selected extensions (these are configured in Options > General). 4. The total number of files located in the folder structure is displayed in the first row of the Auto Selected column. 74 5 Importing Packages Quest ChangeBASE 5.3 - User Guide 5. The right-hand panel lists all located files in the folder structure. Transforms for a specific MSI are listed at the base of the right-hand panel. Note: By selecting different folders in the left-hand panel you can filter the results to show just the files in the selected folder. 6. Check the files to be imported, and then click OK. 7. After a brief delay, the selected files are then displayed as ‘pre-loader items’ in ChangeBASE: Note: You can remove any ‘pre-loader items’ by right-clicking and choosing Delete. Note: If you want to relocate a package at any time in your file structure, right-click the package and select Open Containing Folder. 8. If an application is to be repackaged, proceed as in 5.5 The Repackaging Process. However, where ‘pre-loader’ items can be imported directly, click on Import in the Packages Panel to load the associated package(s) into the database. While the packages are loading, progress bars are displayed next to them. Hovering over a progress bar brings up a tooltip with more detailed progress information, for example: Overall progress is shown in the status bar at the bottom of the window, for example: 5.2.3 Browse with SCCM The SCCM (System Center Configuration Manager) Interface is invoked by clicking Browse with SCCM in the Packages panel (refer to 4.1 Packages Panel). This will enable you to browse for packages contained in your SCCM database. 75 5 Importing Packages Quest ChangeBASE 5.3 - User Guide Note: ChangeBASE is compatible with SCCM 2007, and with SCCM 2012 for basic package/program support. 5.2.3.1 Main Dialog Once you click the link, the ChangeBASE SCCM Interface dialog is displayed: The initial screen shows the version of the SCCM interface installed (if any) plus any upgrades available and allows you to set the SCCM interface options. This screen also lists the SCCM servers/databases. The buttons beneath the list of SCCM servers are as follows: • • New – To configure a new server/database. Refer to 5.2.3.3 Configuring a new server/database. Properties – To display details of an existing server/database. 76 5 Importing Packages • Quest ChangeBASE 5.3 - User Guide Delete – To remove a server/database from the ChangeBASE system. This will also remove all data associated with that server/database, excluding any packages already imported. • Packages/Refresh – To extract information from the packages/programs within the selected SCCM server/database. This information is retrieved using the Refresh button. The Packages button displays the packages/programs found during the refresh process. At this point the packages/programs have not been loaded into ChangeBASE. 5.2.3.2 SCCM Options The SCCM options dialog will appear if you click the Options button from the main dialog: The options allow you to specify the following: • The format of the SCCM view grouping string. • Whether the SCCM interface should search Distribution Points as well as package source if it cannot access or find the required files in the package source. • When Loader Support is enabled (licensable option). • Fixed exclusion filters which will hide packages/programs as necessary. The SCCM view grouping string is used to group SCCM packages under the SCCM view within ChangeBASE after such packages are imported to ChangeBASE. This string can contain a combination of literal values and data extracted from SCCM. The available data for inclusion is as follows: • • • • • • • • • SCCM Server name SCCM Database name SCCM Package Folder SCCM Package Manufacturer SCCM Package Name SCCM Package Version SCCM Package Language Package Source Folder SCCM Package ID 77 5 Importing Packages Quest ChangeBASE 5.3 - User Guide When entering the format string, an example of the group name is shown below the input. If the format string entered is invalid, an error message will be shown and you will not be able to save the format. Loader Support should only be checked if you use an indirect method – i.e. via a loader.exe file – to locate MSI files, where each MSI is accessed via a loader.ini file. Then, when the SCCM interface encounters a loader.exe, it processes the loader.ini and adds the appropriate MSI (or EXE) rather than the loader.exe. The fixed exclusions can be entered by clicking the Exclusions button on the Options dialog. This will result in the Exclusions dialog being displayed, where you can view, add, edit or remove exclusions: Exclusions filters will exclude any package/program that matches any filter. For example, if an exclusion filter is set up for the Program Name with a Match value of ‘Uninstall*’, then all programs with a name starting ‘Uninstall’ will not be displayed. Exclusion filters can be set up against the following fields: • • • • • • • • SCCM Program Name SCCM Package Language SCCM Package Manufacturer SCCM Package Version SCCM Program Command Line Program Type (as determined by the ChangeBASE SCCM Addin) SCCM Package Name SCCM Container Note: Exclusion filters hide entries by default. However these can be overridden on the package/program list by right clicking in the list and selecting Show Excluded Items from the context menu. 78 5 Importing Packages Quest ChangeBASE 5.3 - User Guide 5.2.3.3 Configuring a new server/database The following is displayed when you click the New button: When defining an SCCM system to ChangeBASE, you can configure access via the SCCM server in one of two ways: • Using WMI • Connecting directly to the SCCM database. In the case of WMI, the server is the name of the SCCM server and the database is the SCCM Database name as shown in SCCM. The SCCM credentials are also required. In the case of direct Microsoft SQL Server database access, the server is the name of the SCCM Server and the database server. If your database server is different from the SCCM server, or has a non-default instance, you can enter the database server/instance of the SQL server in the Database server input box. For direct database access, either SQL Login credentials (User/Password Security) or Windows Integrated Security can be used. 79 5 Importing Packages Quest ChangeBASE 5.3 - User Guide You can also choose whether to have the system remember the password (in which case the system stores it in an encrypted format), or not (in which case, the system will re-prompt you for the password each time it is required, e.g. during a refresh). After entering the necessary data, you can click the Test button to verify whether or not the data has been entered correctly. If successful, a dialog such as that shown below will be displayed: 80 5 Importing Packages Quest ChangeBASE 5.3 - User Guide 5.2.3.4 Viewing packages and programs After the server has been defined, and a refresh performed, you can view the packages available on the SCCM server by clicking the Packages button. The retrieved packages will be shown like this: Note: If you wish to back up the SDDM source files prior to the import into ChangeBASE, ensure that the following field is checked: Copy SCCM Package source files to the following location before importing into ChangeBASE. Use the option where the SCCM folders will be updated with any fix files produced by ChangeBASE. Also ensure that you have specified/browsed to the required location in the box immediately below the field. By default, only those packages/programs that are advertised and can be imported into ChangeBASE are shown. This can be modified by right clicking and selecting the Show Unadvertised Programs and/or Show Unsupported Types menu items. You can alter the column width and order at the top of the dialog. The last settings are saved for the next time. You can limit the number of packages/programs shown at a time, by clicking the <number> per page drop-down. This can be switched to Unlimited if required. You can also click a column header to display the column sort and filter dialog, allowing you to sort a column (ascending or descending), or to filter the items shown by the values in that column: 81 5 Importing Packages Quest ChangeBASE 5.3 - User Guide When a filter or sort is selected, the down arrow on the column header will change color to show that a filter/sort is in place on that column. In the example below, the Manufacturer column has been filtered only to only show packages/programs by certain manufacturers. If you only have a limited number of packages/programs to import, and do not wish to change the way in which they are displayed, then simply click Add to ChangeBASE and go to Importing SCCM packages/programs into ChangeBASE. Note: If the Copy SCCM Package…. check box is selected, the source files will be copied to the specified location and added from there rather than being accessed by ChangeBASE from the SCCM package source/distribution point. You would normally do this if remediation was to be performed on the packages, that is to say, where MST files were likely be generated. If you have multiple pages of packages/programs to import, you should consider using the Export and Import buttons, as outlined below. Exporting and Manipulating filtered packages/programs prior to import into ChangeBASE The Export and Import buttons allow you to export the filtered packages/programs into CSV files offline, add the required action flags, view names and AppIDs, and then import the amended CSV file content directly into ChangeBASE. This saves you having to go through pages of packages/programs, importing a page at a time. To export the filtered packages/programs, click the Export button in the bottom left of the dialog, and create a CSV file with an appropriate name. The following example shows such a file opened in Microsoft Excel, with the top row emboldened and the column widths adjusted accordingly: 82 5 Importing Packages Quest ChangeBASE 5.3 - User Guide You can mark selected packages to be processed upon import, by including the relevant processing code against each package in the Action column. There are four available processing codes: Code Meaning A Add the package/program to ChangeBASE. The package is not imported, just added, which is, for example, the equivalent of dragging an MSI onto ChangeBASE - you would still have to select the package and click Import in ChangeBASE to process it. R Normally, if an SCCM package/program has already been added to ChangeBASE, it cannot be re-added unless the Import flag is reset, thereby preventing the accidental reprocessing of packages that have already been added. Adding the ‘R’ code resets this Import flag and allows the SCCM to re-add the package to ChangeBASE. Note: This flag only resets the SCCM interface. If the package already exists within ChangeBASE, another copy is simply added (the original is not removed). V Changes the SCCM view name for the package. By default, when SCCM packages are added to ChangeBASE and then imported, they appear as sub-views (that is to say, sub-entries of the main SCCM View within ChangeBASE). The sub-view name is constructed according to the customer’s settings, e.g. the name might include the manufacturer and package name, or the package language. By using the ‘V’ code, you can specify your own custom sub-view name, for example a project name and/or phase. Note: The custom view name will only be applied when the package is imported into ChangeBASE (not when the SCCM interface adds it to ChangeBASE). Once the package has been imported, the view name will not change unless the package is deleted and re-added or re-imported. X If the customer had previously applied a custom view name, they can reset it to the default view name using the ‘X’ option. Note: The view name will not change back until the package is deleted and either re-added or re-imported. Note: The above flags can be combined, with the exception of the V and X options, which are mutually exclusive. 83 5 Importing Packages Quest ChangeBASE 5.3 - User Guide An example of setting three packages to be added to ChangeBASE, with associated view names and AppIDs, is shown below: Note: If you are adding multiple AppIDs, as shown above, then you must not add spaces between them (although actual AppID names can contain spaces). Multiple AppIDs must be separated by semi-colons. The import process will create new AppIDs as required. 5.2.3.5 Adding the packages/programs to ChangeBASE If you have exported a CSV file, as in the previous section, then, after editing the file, you should: 1. Save the file as a CSV file. 2. Go back to the SCCM interface in ChangeBASE. 3. Select the correct SCCM server (if there is more than one) and go back to the initial package/program view: 4. Click Import. 5. Select the amended CSV file. 6. The interface reads and validates the file, and assuming that everything is valid, performs the actions specified. 7. Go to Importing SCCM packages/programs into ChangeBASE. 84 5 Importing Packages Quest ChangeBASE 5.3 - User Guide 5.2.3.6 Importing SCCM packages/programs into ChangeBASE When packages/programs are added to ChangeBASE from the SCCM interface, a dialog is displayed showing the success or failure of the process. Success would result in a dialog like this: A failure dialog shows the reason for the failure. For example, the named program file may not have been found, or you may not have access to the necessary network shares on the SCCM Server/distribution points to access the files: On completion - successful or otherwise – you can copy the contents of the progress list to the clipboard, by clicking the Copy button in the bottom right of the screen. This copied information can then be pasted into another application, such as Notepad or Microsoft Word. After the packages/programs have been added to ChangeBASE, they must be imported in the same way as packages/programs added in other ways, i.e. a. If an application can be imported directly, click on Import in the Packages Panel to load the associated package(s) into the database. Or b. If an application is to be repackaged, proceed as in 5.5 The Repackaging Process. 85 5 Importing Packages Quest ChangeBASE 5.3 - User Guide Once an SCCM package has been imported, it will appear automatically under the ChangeBASE SCCM view, grouped according to the SCCM Options, e.g. Note: For changes to views made in an export file, refer to the V and X settings. When SCCM packages are successfully imported into ChangeBASE, the SCCM interface dialog will indicate this by displaying Imported under the Status column, and the time of the import under the Imported column: If such packages need to be re-imported (for example after they have been deleted from ChangeBASE for some reason), you will have to reset the import status by doing one of the following: • • Use the ‘R’ flag in an amended export file (refer to the R setting). Select the required package(s), right-click, and select Selected Item, Reset Import Status. Or 86 5 Importing Packages • Quest ChangeBASE 5.3 - User Guide Check the required package(s), right-click, and select Checked Items, Reset Import Status. 5.2.4 CSV Import Applications can be imported using the CSV Import option. This method applies to both packages that can be imported directly and legacy applications (EXE, VBS, BAT). The CSV file header should have the following fields. NAME Executable File Name PURPOSE Path to the MSI, EXE, VBS or BAT installation file. For more information on importing legacy apps, refer to 5.3 Repackaging - Overview. Examples: Command Line Arguments • F:\AppRepository\Mapper\mapper.msi • D:\ChangeBASE\Packages\divxinstaller.exe Installation options or MST for application. Examples: Support Files (Y/N) • /silent • TRANSFORMS="C:\ChangeBASE\Packages\MsiStore-2\AdbeRdr930_en_US\FIXES35.mst" N: Only the Executable Filename will be copied to the Virtual Machine. Y: All files and subfolders in the same folder as the Executable Filename will be copied to the Virtual Machine. Note: This option only applies to Repackaging. AutoComplete (Y/N) With this option checked, ChangeBASE will attempt to click on the buttons on the installation dialogs (Next, Finish, etc.) to allow the installation to progress unattended. Note: This option only applies to the importing of Legacy Applications. ProductName Specifies the product name that will be displayed in the ChangeBASE Workbench. Note: This option only applies to the importing of Legacy Applications. ProductVersion Specifies the product version that will be displayed in the ChangeBASE Workbench. Note: This option only applies to the importing of Legacy Applications. MSI Output Folder Location of the MSI that is created during a legacy application import. Note: This option only applies to the importing of Legacy Applications. 87 5 Importing Packages NAME Quest ChangeBASE 5.3 - User Guide PURPOSE Launch Application Where VBScripts are imported, this field will automatically be populated with WScript. This is the script host for running VBScript on Windows. Alternative script hosts (such as CScript) can be specified if required. Manufacturer Name of the manufacturer. Note: This option only applies to the importing of Legacy Applications. View Name of the View to which the imported application should be added. For more information on Views see Advanced Usage in this document. AppID The bulk CSV import process supports the use of an AppID column in the CSV file. You can specify a semi-colon-separated list of AppID names in this column. Then, when the CSV file is imported, ChangeBASE will generate the AppIDs automatically if they do not already exist. Note: AppIDs can be created using letters, numbers, spaces, underscores and hypens. The use of any other characters may cause the bulk import to fail. An example import preview screen for a WinZip package with the group ‘Compression’ is shown in step 3 below. The CSV used for the import is as follows: Executable File Name,Command Line Arguments,Support Files (Y/N),AutoComplete (Y/N),ProductName,ProductVersion,MSI OutPut Folder,Launch Application,Manufacturer,View,AppID D:\ChangeBase\InstallableApps\WinZip.msi,,N,N,WinZip,0,,,,,Compression;Winzip A sample file for the CSV import is provided as part of the ChangeBASE installation and is named BulkCSVImport.csv. This will be located in folder C:\Program Files (x86)\Quest Software\ChangeBASE. Once the import file has been configured, applications can be imported into ChangeBASE. 1. Click CSV Import 88 5 Importing Packages Quest ChangeBASE 5.3 - User Guide 2. Click Browse and select the CSV file that has been configured for import. If the first line of the file contains header information (as is the case with the provided sample file), ensure that the Has Header Row box is checked. 3. ChangeBASE will read the CSV file. If all the parameters for an application are configured correctly, a green check will appear in the Valid column. If there are errors, look in the Reason column, fix any issues, and repeat this procedure from step 1. 4. Click Commit. This will load the applications into the ChangeBASE Workbench. 5. If an application can be imported directly, click on Import in the Packages Panel to load the associated package(s) into the database. If an application is to be repackaged, proceed as in 5.5 The Repackaging Process. 5.2.5 Import Warnings When ChangeBASE imports packages, any issues are indicated in the Import Warnings column: 89 5 Importing Packages SEVERITY ICON COLOR Quest ChangeBASE 5.3 - User Guide TYPICAL REASON COMMENTS Low Green MSI schema issue Unlikely to have an impact on the compatibility assessment results High Red File missing Depending on which files are missing, this could have an impact on the compatibility assessment results. View the log to assess how extensive this issue is. Where import issues have been flagged, you should double-click the import warning icon to view the log file and assess the cause of the import warnings. The log can be filtered by clicking Show Error Only. Review the error to assess whether further investigation is required. 5.3 Repackaging - Overview File formats that cannot be read directly by ChangeBASE must be repackaged. In this scenario a pre-configured Virtual Machine will be controlled by ChangeBASE. The software being imported will be installed on the Virtual Machine while ChangeBASE monitors the changes which occur during the installation. These changes will be used to create an MSI. The MSIs produced as part of this process are suitable for installation, in most cases, depending on their complexity and quality. Typically, the following file types would be repackaged as MSIs using a Virtual Machine: • • • Executable installation (EXE) VBScript (VBS) Batch file (BAT) 90 5 Importing Packages Quest ChangeBASE 5.3 - User Guide Bootstrap EXEs Be careful when attempting to import EXE installers into ChangeBASE, as many of them are bootstrap EXEs, in that they already contain MSI packages. When such an EXE is launched, it extracts the MSI into a temporary folder. The EXE then installs the MSI package. It is always preferable to import the MSI directly into ChangeBASE rather than attempt to convert the EXE installation into an MSI. ChangeBASE is designed to detect when a bootstrap EXE has been imported. A low severity import warning will be displayed, and the package type icon will be shown as . 5.4 Repackaging – Configuration In order to be able to import legacy packages into ChangeBASE, the following must be configured: • • • 5.4.1 Virtual Machine Setup 5.4.2 ChangeBASE Repackaging Options 5.4.3 Repackaging Filters 5.4.1 Virtual Machine Setup ChangeBASE supports the following hypervisors: • Microsoft Hyper-V • VMware Workstation • VMware Server (ESX)/vCenter Server o You may encounter errors connecting to ESX servers 5.1 and above. If you do receive such errors, download and install the latest VIX library from the above link. o The VMware VIX library only allows connections to one type of provider per process. This means that you can only configure ChangeBASE to use either Workstation- or Server-based Virtual Machines, not both. o If you are running ChangeBASE on a machine which does not have VMware Workstation installed and you wish to connect to an ESX/vCenter server, then you will need to install the VIX SDK (http://www.vmware.com/support/developer/vix-api/). Once the Virtual Machine has been built as per the requirements in 2.1.3 Virtual Machines, the user account inside the Virtual Machine should be assigned administration rights. In addition, if Windows 7 is running on the Virtual Machine to be used for the repackaging: 1. Ensure that the User Account Control (UAC) Settings are switched off, as follows: a. Click on the Windows Start button, and type ‘UAC’ into the ‘Search programs and files’ box, and press [Return]. You should see the following screen: 91 5 Importing Packages Quest ChangeBASE 5.3 - User Guide b. Drag the slider control down to Never notify and click OK. 2. Disable the Program Compatibility Assistant (PCA), as follows: a. Click the Windows Start button, and select Control Panel. b. Double-click Administrative Tools. c. Double-click Services, to display the available Services. d. Scroll down and select Program Compatibility Assistant Service. e. Right-click and select Stop. f. Right-click and selecting Properties. g. Change the Startup type to Disabled. 92 5 Importing Packages Quest ChangeBASE 5.3 - User Guide Other, general, configuration requirements are as follows: 1. 2. 3. 4. 5. The build should mimic that of a ‘packaging build’, that is to say: a. Core packages installed (e.g. Microsoft Office). b. Middleware installed (e.g. Microsoft.NET, Java runtime, Oracle client. c. Antivirus auto-updates turned off. d. Any synchronization elements turned off (e.g. Offline folders). e. Windows Defender service disabled. f. Deployment services like SCCM stopped. g. Windows Update services turned off. h. Where an individual application requires dependencies/middleware, this should be installed on the Virtual Machine. Log on with a user account which has a password set (blank passwords are not supported). It is recommended that a local account be used. If using NAT in the Virtual Machine, ensure that the DHCP lease is set to at least 7 hours. Ensure that any firewall is switched off. Install QVMTools. a. Inside the Virtual Machine, copy the ‘QVMTools Setup.msi’ installer (which is located in C:\Program Files (x86)\Quest Software\VReady on the machine running ChangeBASE) to the guest. b. Run ‘QVMTools Setup.msi’ to start the installation process. c. QVMTools will automatically launch once installation is complete. d. You will now find QVMTools running in the system tray. Double click it or right-click and select View Log to open the log. You can also exit QVMTools if required. e. Ensure that the QVMTools log window is closed (if you opened it). f. Delete ‘QVMTools Setup.msi’ from the Virtual Machine. 93 5 Importing Packages 6. 7. 8. Quest ChangeBASE 5.3 - User Guide If you are using Windows XP VMs running in Hyper-V, the following tasks are also required: For Hyper-V VMs, ChangeBASE uses WMI to connect to the guest VM for user authentication. With Windows XP this needs to be enabled as it is disabled by default. To enable remote WMI, follow the steps below: a. Navigate to Start > Control Panel > Administrative Tools > Local Security Policy. b. Navigate to Security\Local Policies\Security Options c. Network Access: Let Everyone permissions apply to anonymous users Set to Enabled. d. DCOM: Machine Access Restrictions - Add Anonymous, Everyone, Interactive, Network, System with full rights options set. e. Network Access: Sharing and security model for local accounts - Set to Classic. f. Reboot the guest to make sure the settings are applied. Take a Snapshot of the Virtual Machine while it is logged on. Make a note of the Snapshot name (and ensure that no other Snapshots exist with the same name). 5.4.2 ChangeBASE Repackaging Options Open the ChangeBASE options and select the Repackaging Options Tab: Up to five Virtual Machines can be added. Click Add to set up a Virtual Machine. The types that you can set up are as follows: 94 5 Importing Packages Quest ChangeBASE 5.3 - User Guide 5.4.2.1 ESXi 5.1 (VMware Server) Note: You need to install the latest VIX libraries – refer to 5.4.1 Virtual Machine Setup. You should also note that you cannot connect from a machine on which you have already used VMware Workstation. The configuration settings are as follows: SETTING DESCRIPTION Type (mandatory) VMWareServer (ESX) Name (mandatory) A unique name for this configuration. Enabled (mandatory) Allows you to enable or disable the Virtual Machine. VMX (mandatory) The name of the Virtual Machine on the ESXi server. Username (mandatory) The username for the Virtual Machine. Password (mandatory) The password for the Virtual Machine. SystemFolderPath (optional) This allows you to specify a non-standard path to the Windows system folder. This field can be left empty if the Virtual Machine’s system folder is already the default of C:\Windows\System32. 95 5 Importing Packages Quest ChangeBASE 5.3 - User Guide SETTING DESCRIPTION FileMonitorInstallFolder (optional) This is the folder on the Virtual Machine where the file monitor will be installed. Ensure that the user specified has permissions to this folder. If this field is left empty, it will use the default path of C:\Program Files\File Monitor. HostName (mandatory) The IP address or Hostname of the ESXi server. Host Username (mandatory) The name used to log into the ESXi machine. Host Password (mandatory) The password for the HostUsername. SnapshotName (mandatory) The name of the Virtual Machine Snapshot that the repackaging process is to use. This is case sensitive. TimeOut (optional) This is the time-out value for the Virtual Machine. The time is set in minutes. A value of 15 (the default if not set), for example, will mean that ChangeBASE will terminate the Virtual Machine after 15 minutes. RaisePriority (optional) This field should be left blank. It should only be used under the instruction of the ChangeBASE support team for debugging purposes. RevertToSnapshot LaunchGUI (optional) This value should be set to 1 if ChangeBASE has issues reverting to the Snapshot. 5.4.2.2 Hyper-V The configuration settings are as follows: 96 5 Importing Packages Quest ChangeBASE 5.3 - User Guide SETTING DESCRIPTION Type (mandatory) Hyper-V Name (mandatory) A unique name for this configuration. Enabled (mandatory) Allows you to enable or disable the Virtual Machine. Name (mandatory) The exact name of the Virtual Machine that the repackaging process is to use, as it appears in Hyper-V Manager. Username (mandatory) The username for the Virtual Machine. Password (mandatory) The password for the Virtual Machine. SystemFolderPath (optional) This allows you to specify a non-standard path to the Windows system folder. This field can be left empty if the Virtual Machine’s system folder is already the default of C:\Windows\System32. FileMonitorInstallFolder (optional) This is the folder on the Virtual Machine where the file monitor will be installed. Ensure that the user specified has permissions to this folder. If this field is left empty, it will use the default path of C:\Program Files\File Monitor. HostName (mandatory) The NetBIOS name for the Hyper-V host (not localhost), e.g. Note: Using a full DNS name or IP address is likely to result in failure. Host Username (mandatory) The name used to log into the Hyper-V Server. Host Password (mandatory) The password for the Host Username. SnapshotName (mandatory) The Snapshot/Checkpoint name as it appears in Hyper-V Manager. 97 5 Importing Packages Quest ChangeBASE 5.3 - User Guide SETTING DESCRIPTION TimeOut (optional) This is the time-out value for the Virtual Machine. The time is set in minutes. A value of 15 (the default if not set), for example, will mean that ChangeBASE will terminate the Virtual Machine after 15 minutes. RaisePriority (optional) This field should be left blank. It should only be used under the instruction of the ChangeBASE support team for debugging purposes. RevertToSnapshot LaunchGUI (optional) This value should be set to 1 if ChangeBASE has issues reverting to the Snapshot/Checkpoint. 5.4.2.3 VMware Workstation 9 The configuration settings are as follows: SETTING DESCRIPTION Type (mandatory) VMwareWorkstation Name (mandatory) A unique name for this configuration. Enabled (mandatory) Allows you to enable or disable the Virtual Machine. VMX (mandatory) For VMware Workstation, the field is for the path to the Virtual Machine’s VMX file, e.g. E:\VM\XPx86_VMware\XPx86_VMware.vmx Quotes are not needed even if spaces exist in the path. These settings can be found in the configuration settings of your Virtual Machine. The VM Configuration Tab is located on the VMwareServer Control Panel interface. 98 5 Importing Packages SETTING Quest ChangeBASE 5.3 - User Guide DESCRIPTION Username (mandatory) The username for the Virtual Machine. Password (mandatory) The password for the Virtual Machine. SystemFolderPath (optional) This allows you to specify a non-standard path to the Windows system folder. This field can be left empty if the Virtual Machine’s system folder is C:\Windows\System32. FileMonitorInstallFolder (optional) This is the folder on the Virtual Machine where the file monitor will be installed. Ensure that the user specified has permissions to this folder. If this field is left empty, it will use the path: C:\Program Files\File Monitor. SnapshotName (mandatory) The name of the Virtual Machine Snapshot that the repackaging process is to use. This is case sensitive. TimeOut (optional) This is the time-out value for the Virtual machine. The time is set in minutes. A value of 15 (the default if not set), for example, will mean that ChangeBASE will terminate the Virtual Machine after 15 minutes. RaisePriority (optional) This field should be left blank. It should only be used under the instruction of the ChangeBASE support team for debugging purposes. RevertToSnapshotLaunchGUI (optional) This value should be set to 1 if ChangeBASE has issues reverting to the Snapshot. 5.4.3 Repackaging Filters When the Virtual Machine is monitored by ChangeBASE during an import there will be changes made to the file system and registry by both the installation routine and by other processes which are not related to the installation routine. The changes made by other processes are known as ‘noise’. It is important that this ‘noise’ is not captured by ChangeBASE, so filters have been developed which define files/folders/registry that can safely be ignored during an import. The filters can be downloaded from the Upgrade Tab on the Options screen. Select the report group called ConvertIT Filters and click OK. If you work in an offline environment and are unable to download the filters via the Upgrade Tab, please contact Quest support enclosing a screenshot of your license details (available on the Help, About screen in ChangeBASE) and these filters will be supplied as a CBP file. In most cases the default values in the filters will not need modifying. However, if you notice that unwanted ‘noise’ is being captured in the MSIs that ChangeBASE produces, you can modify the repackaging filters. To do so, expand the ConvertIT Filters report group, right-click on Basic Filters then click Edit Repackaging Filters. 99 5 Importing Packages Quest ChangeBASE 5.3 - User Guide This interface allows the existing Files and Registry Keys that are being excluded to be modified. Note: It is possible to use both regular expressions and exact paths. Import If an existing exclusion list needs to be added to ChangeBASE, use the Import button. INI and Excel files can be imported. 100 5 Importing Packages Quest ChangeBASE 5.3 - User Guide Backup/Restore Backups and Restores of the repackaging filters are possible using the Create Backup and Restore Backup buttons. 5.4.4 Template msi When repackaging, ChangeBASE creates an MSI based on a default MSI template. If you prefer to apply your own standards, you can supply your own MSI template. To do so, copy your MSI template as template.msi to the Program Files folder \Quest Software\ChangeBASE\AddIn. 5.5 The Repackaging Process Using any of the methods described in 5.2 Import Methods, drag and drop/import the legacy installers so that each appears as a yellow folder icon on the Workbench. For each application to be repackaged, proceed, as follows: 1. Right-click on the application and select Repackaging Configuration. The following configuration settings are displayed: 101 5 Importing Packages 2. Quest ChangeBASE 5.3 - User Guide Edit these settings as needed. It is strongly recommended that you always update the ProductName and ProductVersion as these will be displayed in ChangeBASE. SETTING DESCRIPTION Executable Filename This field will be populated automatically with the path to the installer file. Command Line Arguments Specify any command line arguments. This could enable a silent installation or some other installation setting. ChangeBASE will attempt to determine these values automatically for certain EXE installers. Support Files None: Only the ‘Executable Filename’ will be copied to the Virtual Machine. Other files in folder and subfolders: All files and subfolders in the same folder as the ‘Executable Filename’ will be copied to the Virtual Machine. 102 5 Importing Packages SETTING Auto Complete Enabled Quest ChangeBASE 5.3 - User Guide DESCRIPTION With this option checked, ChangeBASE will attempt to click on the buttons on the installation dialogs (Next, Finish, etc.) to allow the installation to progress unattended. Considerations: • • This option should only be enabled where a ‘default’ installation is desired. Where a custom installation is required (i.e. where non-default options will be selected during the installation), Auto Complete should not be enabled and the import of the package will require manual intervention to choose the correct options. Some installer dialogs contain buttons which cannot be programmatically detected and clicked (Java-based installations for example). For these installations, it will be necessary to manually click on the dialog buttons to progress the installation. Target Virtual Machine Allows an application to be converted on any available Virtual Machine or a specific Virtual Machine. Properties Specify any custom MSI properties that should be added to the MSI produced by ChangeBASE. The default properties that will be pre-populated are Manufacturer, ProductName and ProductVersion. 3. If needed, click the Advanced button: 103 5 Importing Packages SETTING Quest ChangeBASE 5.3 - User Guide DESCRIPTION MSI Copy Filename In cases where the MSI package produced by ChangeBASE is required for installation, the MSI Copy Filename field should be edited with a path and filename by clicking the folder button. This file will be created when ChangeBASE converts the legacy installer into MSI format. Intermediate CAP Filename This option allows a CAP file to be used. However, in most cases, it is no longer used. Launch Application Where VBScripts are imported, this field will automatically be populated with WScript. This is the script host for running VBscript on Windows. Alternative script hosts (such as CScript) can be specified if required. Unrestricted Capture This option forces ChangeBASE to monitor all processes on the Virtual Machine and not just the process tree from the installation executable. This should be used where importing an EXE-based installation results in an MSI with missing files or other items. It is recommended that this option is selected if you want to capture settings manually outside of the installation process. 4. Click Save in Repackaging Configuration. Once you ready to import the configured applications, click Import in the Packages Panel. ChangeBASE begins importing the legacy packages. Where multiple Virtual Machines have been configured, multiple legacy packages will be imported simultaneously. Tip: By hovering the mouse pointer over the package in ChangeBASE, you can monitor progress more closely. Note: The capture process works by monitoring the installer process for the duration that the legacy file runs. If you need to capture additional configuration settings or installers, then refer to the use of a batch file in 5.6.2 The Capture Process Terminates Before the Installation has Completed. Once the packages have completed importing, they will display as in the following example: 104 5 Importing Packages Quest ChangeBASE 5.3 - User Guide Note: When a Setup.exe contains an MSI, this is known as a Bootstrap EXE. ChangeBASE will detect bootstrap EXEs as explained in 5.3 Repackaging - Overview. In the above screenshot, iTunesSetup72.exe is shown as a bootstrap EXE. 5.6 Repackaging – Troubleshooting When a legacy package fails to import, check the log by right-clicking on the package and selecting View Log. 5.6.1 ChangeBASE is unable to revert to the Virtual Machine Snapshot Symptom: When you click Import the Virtual Machine is in the paused state. The Virtual Machine does not resume. Action: 1. 2. 3. Open the Options window. Select the Repackaging Options Tab. Double-click the required Virtual Machine, to open the Update Machine Config. dialog: 4. Set RevertToSnapshotLaunchGUI to 1. 5. Click OK. 5.6.2 The Capture Process terminates before the Installation has completed Symptoms: After clicking Import, the Virtual Machine starts the capture but no content is captured. 1. 2. Create a batch file in the same folder as the installer file. The first line of the batch file should call the installer file (e.g. setup.exe). 105 5 Importing Packages Quest ChangeBASE 5.3 - User Guide 3. The second line should contain the word “pause”. This will pause the conversion process once the installer has completed. 4. 5. 6. Drag the .bat file onto ChangeBASE. Click Import. Monitor the Virtual Machine as ChangeBASE imports the installer. 5.6.3 The Repackaging Process results in an MSI with no Files Symptoms: When you view the MSI created by ChangeBASE, the File table is empty. 1. 2. Ensure that the installer does install files. It is possible that the installer is launching a process which is not part of the same process tree. This prevents ChangeBASE from capturing any installed files. Create a batch file as shown in 5.6.2 The Capture Process terminates before the Installation has completed. 5.6.4 The Package fails to Import Symptoms: A red X is displayed when you attempt to import the package, e.g. The most basic reason for a failure to import is that you may have exceeded your licensed number of packages. If you have received the error message shown in 3.1.4.2 Unlicensed Number of Packages, then proceed according to the instructions given there. Otherwise, there are various other checks that you can carry out: • Are Security settings preventing package load? Verify in the Security Tab within the Options window that the Add Package option is Enabled for your user role, e.g. 106 5 Importing Packages Quest ChangeBASE 5.3 - User Guide • Ensure that both ChangeBASE and VMware are running in the same user context. Above all, right-click on the shortcut properties for VMware and view the Application compatibility Tab. Ensure that Run As Administrator is not set. • Right-click on View Log and read the log file to look for issues, e.g. Go to the point at which the package failed to load and trace back the previous steps to establish the cause. Most of the messages will be self-explanatory. However, the following bullet points may help. • Is it a duplicate? Any duplicate packages will be marked as such when you hover over the red cross icon in the Issues column. This information is stored in the log file. • Is software on the Virtual Machine causing issues? If the log file shows that the import process repeatedly fails at the same point for different packages and ChangeBASE has already created the MSI, then the issue is likely to be caused by 107 5 Importing Packages Quest ChangeBASE 5.3 - User Guide a package killing the process. This can be caused by anti-virus software or packages such as VMSphere on the host machine. • Are there any VIX errors? VIX is used by ChangeBASE to interact with the Virtual Machine. If the ChangeBASE log file contains VIX errors, then the following may help with troubleshooting: http://www.vmware.com/support/developer/vixapi/vix17_reference/errors/errorsList.html If the log file does not allow you to locate the problem, then make the following checks: • Verify that the application installs on your current version of Windows. • Verify that the application has access to its required files, e.g. external Cabinet Files (CABs). • Verify that the application loads into Orca and/or MSI Studio and/or WISE/Installshield, and apply the associated MST file. If you are unable to do this in Orca, you can suppress the Transform validation flags and errors in the Options menu within Orca. If the package loads now that the validation flags and errors are switched off, then you should be able to check Suppress Transform Validation Errors within the General Tab in Options in ChangeBASE to load the MSI with the MST. If the MSI and MST combination still do not load, try the MSI on its own. • Check the MSI Media table entries in MSI Studio or Orca. Invalid sequences, duplicate CAB names and other invalid MSI entries can all cause ChangeBASE to fail to load. If a Transform is being applied, remember to apply the Transform in MSI Studio or Orca too. Invalid media table directives may cause ChangeBASE to fail during load. It is recommended that you obtain the correct source media to resolve this issue. 5.6.5 Reboots during Repackaging Some application installers request that a Windows reboot is performed to complete the installation process. If a machine reboots while ChangeBASE is monitoring an installer for repackaging as an MSI, then the process will be disrupted and information will be lost. This will cause the application repackaging to fail. The best way to proceed with applications like this is to manually proceed the application through the installation process within the Virtual Machine, and then decline the reboot when the installer requests one. You may encounter some application installers that demand a reboot operation without even prompting for one. These are quite rare, but again this will disrupt the repackaging process. 5.6.5.1 Stop Reboots with Windows XP A small program that can detect and abort these reboot attempts has been supplied as part of the ChangeBASE repackaging software, but it is only recommended for use with Windows XP. You need to start this program manually inside the Virtual Machine while the application under conversion is being installed. The program is called StopReboot.exe and can be found in the ‘%program files%\File Monitor’ directory on the Virtual Machine. Either create a shortcut to this program, or use Windows Explorer to view this directory and double-click on the program to start it. 108 5 Importing Packages Quest ChangeBASE 5.3 - User Guide 5.6.6 Abnormal End to Session? If your session ends unexpectedly, please take a screenshot and log the error via the selfservice portal at https://support.quest.com/. You may be asked to supply, in addition to the screenshot, a detailed report on the actions taken prior to the issue (for example, if running a report, specify which report against which package). Support may also request a copy of the MSI(s) in question in order to identify the issue. If ChangeBASE does not load subsequently, try to delete the WorkBenchSettings.xml file (refer to 13.5 Important Files and Folders) and to re-establish the connections to your databases. 109 6 Assessing Packages and Viewing Results Quest ChangeBASE 5.3 - User Guide 6 Assessing Packages and Viewing Results • • • • • • • 6.1 Choosing the Right Report Groups 6.2 Assessing Packages 6.3 RAG Status: Red, Amber & Green 6.4 Analyzing Results 6.5 Viewing Results: ChangeBASE 6.6 Viewing Results: Assessment Results 6.7 Viewing Results: Issue Summary 6.1 Choosing the Right Report Groups As an example, answer the four questions below about the target environment to which you are going to migrate - this will determine which report groups to select. QUESTION Operating System? Architecture? Hosted Packages? Package Format? ANSWER CHANGEBASE REPORT GROUP Windows 7 Windows 7 Windows Server 2008 (inc. R2) Windows Server 2008 32-bit Windows 32-bit 64-bit Windows 64-bit Yes Virtualization – Citrix XenApp – hosted and MS RDS No No report group needed Virtual Virtualization – App-V Virtualization – VMware ThinApp Virtualization – Symantec Workstation Virtualization Virtualization – Citrix XenApp streamed Native No report group needed 110 6 Assessing Packages and Viewing Results Quest ChangeBASE 5.3 - User Guide Examples: • • You have a client who wants to move to Windows 7 x64 and would like to virtualize their packages with App-V. Report groups: o Windows 7 o Windows 64-bit o Virtualization – App-V You want to host packages on a Windows 2008 R2 Terminal Server and for delivery as native installers (MSI & Legacy). Report groups: o Windows Server 2008 o Windows 64-bit o Virtualization – Citrix XenApp – hosted and MS RDS 6.2 Assessing Packages Once the appropriate report groups have been imported, and the packages have been imported, the automated assessment can begin: 1. Check the appropriate report groups. 2. Check the packages which require assessment. 3. Click the Assess button in the Packages panel (refer to 4.1 Packages Panel). The assessment progress is shown in the lower left hand side of the screen with a message “Running Selected Reports” and with a status bar in the lower right hand side of the screen. The time taken to run the reports is based on the size and number of packages and on the complexity of the reports to be run. 111 6 Assessing Packages and Viewing Results Quest ChangeBASE 5.3 - User Guide Once the reports have been run, an overview of the results is shown in the Portfolio Summary section, as shown below: The issues are presented in a RAG (Red, Amber, Green) format for each package. Where Amber or Red issues are present, the number of issues is shown within the Amber/Red box. Where no compatibility issues are identified, a Green tick is displayed. See the 6.3 RAG Status: Red, Amber & Green topic for a detailed definition of each status. 6.3 RAG Status: Red, Amber & Green The issues are presented in a RAG (Red, Amber, Green) format for each package, as follows: • • • 6.3.1 Green 6.3.2 Amber 6.3.3 Red 6.3.1 Green Green means that no compatibility issues were identified. Those packages can proceed directly to User Acceptance Testing (UAT), then to the deployment phase. 6.3.2 Amber Where ChangeBASE flags an Amber issue, this indicates that a compatibility issue has been found which can be fixed by applying a change to the package and that a change to the program code within the package files is not required. These account for the majority of issues. In most cases, automated fixing is provided for Amber issues, which are indicated by the cog icon. Where automated fixing is not available, a manual fix can be applied to the Windows Installer routine (MSI or MST) by an application packager. 112 6 Assessing Packages and Viewing Results Quest ChangeBASE 5.3 - User Guide ChangeBASE provides information on how a manual fix can be achieved in a text panel, which is displayed when the adjacent More Info column (magnifying glass icon) is clicked. In addition, there are “Next Steps” documents available for a number of the issues which are accessible through Dashboard (see Chapter 7 Dashboard for more information). 6.3.3 Red A Red issue is generally one that pertains to how the code or actual program works. In this case, ChangeBASE will flag Red issues where a package tries to use objects or functions that have been deprecated from the OS or where their use has been restricted. In this case, there are no changes that can be made to the install routine to fix the problem. The problem needs to be dealt with at the program code level by the programmer who wrote it or by providing a more up to date driver. For vendor MSIs, an upgrade may be required. The recommendation with packages containing Red issues is that they are tested to see if the issue is either causing it to fail to install or for a critical part of its functionality to fail. It is possible that a package that contains a Red issue can be used if either the Red issue is not used in the package or if the part of the package that relies on it is not important. 6.4 Analyzing Results Consider the diagram shown below. This explains how packages are affected by the different technologies: When reviewing assessment results in ChangeBASE, it is always advisable to start with the Operating System and then work your way through the issues until you reach the package format. There would be no benefit in fixing virtualization issues when the package was not compatible with the Operating System. The above diagram explains how these different technologies are in fact dependent on each other. It is a common misconception that virtualizing a package resolves any compatibility issues with the Operating System. This is not the case. Package virtualization is not a compatibility solution. 113 6 Assessing Packages and Viewing Results Quest ChangeBASE 5.3 - User Guide For example: Here we should initially analyze the Window 7 and Windows 64-bit issues. If these can be resolved or overridden then we can progress to the App-V issues. 6.5 Viewing Results: ChangeBASE Viewing the assessment results in ChangeBASE is quick and easy and a good place to start once the automated assessment is complete. 6.5.1 Packages Tab The Packages Tab displays each package as an individual entity. Where issues are identified you can expand the package to display the report group, then Plugin, then issue details. 114 6 Assessing Packages and Viewing Results Quest ChangeBASE 5.3 - User Guide 6.5.2 Reports Tab The Reports Tab displays the assessment results sorted by the report groups and associated Plugins. This allows you to identify quickly which packages have issues that were flagged by a specific report. 6.6 Viewing Results: Assessment Results The Assessment Results drop-down menu in the Reports panel gives access to a number of built-in reports. The reports are generated by checking the packages to be included in the reports, then clicking Assessment Reports and the report name. Note that the report will only include the checked packages. 115 6 Assessing Packages and Viewing Results REPORT Summary ISSUE DETAILS No INTENDED AUDIENCE Project Coordinator/Program Manager Quest ChangeBASE 5.3 - User Guide DESCRIPTION An HTML report that provides a summary of the number of checked packages, the number of reports run etc., then a breakdown of each report group showing the number of issues identified. This report also includes a description of Red, Amber and Green status flags. This report includes Cost/Effort calculations. Profile No Project Coordinator/Program Manager An HTML report that simply displays the current RAG status for each checked package for each report group. Useful when compared to the Profile (Post Fixing) report. Profile (Post Fixing) No Project Coordinator/Program Manager An HTML report that simply displays the RAG status for each checked package for each report group if all automated fixing were to be applied. Useful when compared to the Profile report. Packages By RAG No Project Coordinator/Program Manager An HTML report that lists all Red packages, Amber packages and Green packages (where the package has been checked). Report Group By RAG No Project Coordinator/Program Manager An HTML report that lists each checked package and report group (where issues have been identified) within each RAG status. Report By RAG Optional Package Specialist An HTML report that lists each checked package, report group, and full issue details (if required) within each RAG status. Package Issue Sammary Yes Package Specialist An HTML report that lists every checked package and every report which has been run against that package. CSV Export Yes Package Specialist The report will create a CSV file containing a row for each issue for packages which have been checked. This report includes Cost/Effort calculations. 116 6 Assessing Packages and Viewing Results Quest ChangeBASE 5.3 - User Guide 6.7 Viewing Results: Issue Summary The Issue Summary reports are either text or HTML reports, which show the issue details for individual packages. The reports are useful for package owners or package specialists who are working on a specific package. For more details about Issue Summary reports, refer to the following topics: • • • 6.7.1 Setting up Issue Summary Reports 6.7.2 Creating Individual Issue Summary Reports 6.7.3 Creating Bulk Issue Summary Reports 6.7.1 Setting up Issue Summary Reports 1. Open the ChangeBASE options and select the Issue Summary Tab: 2. Selecting the required report group will display all the reports. To add all reports in 3. 4. the report group to the Issue Summary, click . Repeat this process, adding as many report groups as are needed for the Issue Summary report. Click OK. 117 6 Assessing Packages and Viewing Results Quest ChangeBASE 5.3 - User Guide 6.7.2 Creating Individual Issue Summary Reports 1. Right-click a package and select Create Issue Summary Report. 2. Once the reports have been run against the package you will be asked which format should be used (HTML or text). The report will then be opened. 6.7.3 Creating Bulk Issue Summary Reports 1. Select multiple packages by using either the CTRL or SHIFT keys. Right-click the last selected package and click Bulk Issue Summary. 2. Choose where the reports should be created, and the report format, and then click Start. 118 6 Assessing Packages and Viewing Results Quest ChangeBASE 5.3 - User Guide By default, the name of the Readme will be taken from the ProductName Property rather than the actual filename. It is generally more useful, however, to choose the MSI FileName value instead. 6.8 Summary Report Examples, showing AppIDs 6.8.1 Profile 119 6 Assessing Packages and Viewing Results Quest ChangeBASE 5.3 - User Guide 6.8.2 Packages by RAG 6.8.3 Report Group by RAG 120 6 Assessing Packages and Viewing Results Quest ChangeBASE 5.3 - User Guide 6.8.4 Report by RAG 6.8.5 Package Issue Summary 121 6 Assessing Packages and Viewing Results Quest ChangeBASE 5.3 - User Guide 6.8.6 AppID Expand and Collapse All of the reports shown above allow you to click on an AppID heading to toggle the visibility of the packages/reports/report groups belonging to that AppID. You can also toggle the visibility of all packages/reports/report groups belong to all AppIDs by clicking on the Show All/Hide All labels at the top of the screen. Note: You must have Javascript enabled in order for these operations to work. 6.8.7 Running Reports from the Command Line All of these reports can also be run from the command line. Refer to 13.6 Command Line Invocation of ChangeBASE Functions. As an example, to run the Profile report against the first ChangeBASE database, you would use the following command line: cbExec EXPORT WBDB1 –X1 "C:\temp\report1.html" 6.9 Troubleshooting If the Assessment Results option drop-down in the Reports panel is disabled, so that you cannot run reports, verify in the Security Tab within the Options menu that the Add Package option is Enabled for your user role, e.g. 122 7 Dashboard Quest ChangeBASE 5.3 - User Guide 7 Dashboard 7.1 What is Dashboard? Dashboard is a reporting module that focuses on three different areas: • • • Advanced Application Reporting, which is used to view applications’ compatibility results per target Platform, understand which technologies are impacting on applications’ compatibility, and contains detailed remediation steps for each issue identified. Return On Investment (ROI) Calculator, which allows for an ROI to be calculated based on manual versus automated remediation; OR The Top 5 Issues chart, which shows a bar chart of the top 5 most common issues identified from all packages assessed. Progress Summary Report, which tracks and charts the amount of applications imported, assessed, converted and fixed. 7.2 Using Dashboard For more details on how to use Dashboard, refer to the following topics: • • • • • • 7.2.1 Configuring Dashboard for your Target Environment 7.2.2 Executive Summary 7.2.3 Executive Detail 7.2.4 Application Summary 7.2.5 Package Overview Report 7.2.6 ROI Calculation Detail 7.2.1 Configuring Dashboard for your Target Environment The following target platforms are pre-configured: • • • • Windows 7 64-bit Windows 7 64-bit with App-V XenApp 6 Hosted/MS RDS XenApp 6 Hosted/MS RDS with App-V This section describes how Dashboard can be configured to suit your target environment. Configuring your target platforms: 1. Open ChangeBASE and click the Options button . 123 7 Dashboard Quest ChangeBASE 5.3 - User Guide 2. Click the Dashboard Tab. 3. From this screen there are a variety of options that can be configured: • Executive Summary and Platform Groups: The Executive Summary is displayed on the Dashboard home screen, whilst the Platform Groups are displayed on the Executive Details page (refer to 7.2.3 Executive Detail). You can do the following: Set up titles for each pie chart. Set up tool tips for each pie chart. Select which report groups will be included in the Executive Summary and Platform Groups. Platform Groups can also be excluded from Dashboard by checking Hide this chart. 124 7 Dashboard Quest ChangeBASE 5.3 - User Guide As an example, your target environment could be Windows 7 64-bit with App-V and, as an alternative, you could have Windows 7 64-bit without AppV for applications that you are unable to sequence in App-V. To achieve this you could: o o • In the Platform 1 Group, select Windows 7, 64-bit and App-V. In the Platform 2 Group, select Windows 7 and 64-bit. Top 5 Issues and ROI: At the bottom of the screen, choose whether the Top 5 Issues or ROI box is to be displayed. To save the changes without closing the Options window, click the Apply button. To save the changes and close the window, click the OK button. 7.2.1.1 ROI Setup If the Executive Summary page has been configured to include the ROI section and not the Top 5 Issues section, there are additional options that can be configured to tailor the ROI to your environment. The ROI calculator is installed with zero pricing values, so these will need to be added before the calculator can be used effectively: 1. Open your browser and load the Dashboard. 2. Click anywhere on the ROI section in the upper right corner. This will open the ROI Calculator page. Click Edit in the upper right corner to change these settings. Firstly, select the currency you wish the calculator to use. Next, change the ChangeBASE product type (refer to 1.1 ChangeBASE Product Editions) and enter the cost per desktop value in the currency you have chosen. Click Save to save your changes. Next, you need to set up the details to calculate the manual costs. Enter the appropriate details for each row and then click Save. A short description of each field is mentioned below. The grid on the right is explained in 7.2.6 ROI Calculation Detail as it is not part of the setup process. 125 7 Dashboard Quest ChangeBASE 5.3 - User Guide FIELD DESCRIPTION Total application portfolio This is the total number of applications expected to be migrated over the duration of the project. It will be used to calculate both manual and automated costs and effort. Number of Desktops This is used to calculate the ChangeBASE costs. Estimated complexity (%) Simple This is the estimated percentage of applications that are expected to be easy to migrate. It is used to work out the number of applications that are limited in complexity. Medium This is the estimated percentage of applications that have a medium degree of complexity in migrating to the new environment. It is used to work out the number of moderately complex applications. Complex This is the estimated percentage of applications that are the hardest to migrate to the new environment. It is used to calculate the number of applications with high complexity. Average Rate (Hourly) EMEA This is the estimated hourly cost of migrating an application in the EMEA region. It is used to work out the average hourly rate. NAMR This is the estimated hourly cost of migrating an application in the NAMR region. It is used to work out the average hourly rate. 126 7 Dashboard Quest ChangeBASE 5.3 - User Guide FIELD DESCRIPTION APAC This is the estimated hourly cost of migrating an application in the APAC region. It is used to work out the average hourly rate Application Testing (hours per package) Simple This is the number of hours expected to test the simple migration of an application. Medium This is the number of hours expected to test the moderately complex migration of an application. Complex This is the number of hours expected to test the complex migration of an application. Application Remediation (hours per package) Simple This is the number of hours expected to fix the simple migration of an application. Medium This is the number of hours expected to fix the moderately complex migration of an application. Complex This is the number of hours expected to fix the complex migration of an application. Application Virtualization (hours per package) Simple This is the number of hours expected to prepare a simple application for virtualization. Medium This is the number of hours expected to prepare a moderately complex application for virtualization. Complex This is the number of hours expected to prepare a complex application for virtualization. 7.2.2 Executive Summary This is the top level page of the Dashboard and is split into three sections: the Executive Summary Pie Charts; Return on Investment (ROI) Calculator OR Top 5 Issues; and the Progress Summary. 127 7 Dashboard Quest ChangeBASE 5.3 - User Guide 7.2.2.1 Pie Charts This section of the screen has two pie charts showing the before and after view of the application estate. The pie charts are split by RAG status for the combined view of the applications. The left hand chart (before) displays details prior to any amber applications being fixed. The right hand chart (after) combines the fixed Amber applications with the Green status applications. This chart reflects the Executive Summary chart configured in the Options > Dashboard section of ChangeBASE. Note: It is possible to drill-down to a detailed view of the results simply by clicking on either chart. Refer to the 7.2.3 Executive Detail topic later in this document. 7.2.2.2 Top 5 Issues An alternative to the ROI section in the Executive Summary is the Top 5 Issues chart. This is configured in the Dashboard Options screen. This chart, shown in the top right corner of the Dashboard Executive Summary screen, shows a bar chart of the top 5 most common issues identified from all packages assessed. 128 7 Dashboard Quest ChangeBASE 5.3 - User Guide Clicking on any column drills down into the Issue Detail Report, e.g. Click Next Steps and refer to Chapter 8 The Top Five Issues Explained. 7.2.2.3 Filtering In the upper right of the Executive Summary is a filter button. 129 7 Dashboard Quest ChangeBASE 5.3 - User Guide Clicking this will display a small window which allows you to filter the details being displayed in the Executive Summary, Progress Summary and the Executive Detail charts. If Views have been set up in ChangeBASE, then a specific View may be selected so that only the packages that are linked to that View will be part of the Chart details: In addition to selecting a View, you can also select from the options below No Date Filter. These allow you to filter according to a date, which can be a specific date or a number of days, weeks or months previous to the current date. 130 7 Dashboard Quest ChangeBASE 5.3 - User Guide Once you have selected your filter, press the Save button to apply the filter. The Executive Summary screen will redisplay with the selected filter. Note: If a filter is applied, the filter button changes to yellow. 7.2.2.4 Progress Summary This section of the main Dashboard page gives a high level view of the current project status, showing the journey that needs to be taken to reach the goal. The line chart displays an historical progress view, starting from when the project was created until the current day. Each line gives the cumulative total value at the set dates displayed. Each line is identified in the legend to the right of the chart. The top item in the legend is the total number of packages that have been added since the start of the project (or since Dashboard was installed). The next shows the number of legacy applications imported. Assessed shows the number of packages that have had Reports run against them with the total number of reports included in brackets. The fourth line indicates the number of packages that have been fixed. The final line identifies the number of packages that have been converted into a virtual format. Target Date and Target Packages, which can be set up in the Dashboard Options screen, are used for the Progress Summary chart. They are represented on the chart by pink dashed lines. The Target Date is a vertical line with the date in a white background 131 7 Dashboard Quest ChangeBASE 5.3 - User Guide box. The Target Packages are represented by a diagonal line, starting at zero from the left and finishing with the Target amount on the right. Note that both lines are not drawn to scale because, where the target values are large, this could reduce the progress values to flat lines at the base of the chart. 7.2.2.5 Best Way Forward The Best Way Forward page groups packages to preferred platforms where each Platform has one or more report groups. Packages that are Red or Amber are moved to the next suitable Platform. If the RAG Status is Red or Amber for all Platforms, then it will be assigned to an ‘Incompatible’ group. To view the Best Way Forward page, click the Best Way Forward button in the top right corner of the Executive Summary page. The Best Way Forward page displays a series of pie and column charts. The charts on the left display the original values from when the details were first assessed; the middle charts show the current state; and the charts on the right show the Potential with Auto fixing. The Platform colors in the charts indicate the order of preference: the preferred Platform is the darkest green, whilst the least preferred is the lightest shade of green. You can drill-down to the Application Summary Screen by clicking on a Platform (slice or column). This is not available for the ‘Incompatible’ slices/columns. 132 7 Dashboard Quest ChangeBASE 5.3 - User Guide 7.2.3 Executive Detail If you drill-down from the Executive Summary page using the pie charts, the Executive Detail page is displayed. Up to four sets of charts can be displayed on this page, as defined in 3.4 Configuring and enabling the Dashboard Components for the ChangeBASE Database(s) . Each of the four sections has two pie charts showing the before and after view of the package grouping. The pie chart’s groupings are defined on the Dashboard Options screen. Platform 1 is the first group of pie charts on this screen; Platform 2 is reflected by the charts on the top right; Platform 3 is represented by the pie charts in the bottom left hand corner; and Platform 4 is represented by the pie charts in the bottom right hand corner. The pie charts display compatibility results according to RAG status. For each group of charts: the left hand chart Before displays details prior to any Amber applications issues being fixed; and the right hand chart titled After shows what the state of the applications would be if Automated Fixing was to be applied. Along the top of each section is the title name that was set up in the Dashboard Options screen. Next to the title is a link to return to the Executive Summary screen. It is possible to drill-down to a detailed view of application status simply by clicking on either chart in any section. This is discussed in the next section. 7.2.4 Application Summary The Application Summary screen shows a list of applications and their current status for the selected Chart group. The column on the left shows an icon for the overall status of each package against your chosen target Platform, e.g. 133 7 Dashboard Quest ChangeBASE 5.3 - User Guide The icons have the following meanings: ICON DESCRIPTION No compatibility issues were identified. An Amber issue indicates that a compatibility issue has been found which can be fixed by applying a change to the package, and that a change to the program code within the application files is not required. In most cases, the solution set provides automated fixing for Amber issues, which are indicated by the icon with a black tick within an amber circle. Where automated fixing is not available, a manual fix can be applied to the Windows Installer routine (MSI or MST) by an application packager and this is indicated by the icon with an exclamation mark within an amber triangle. A Red issue is generally one that pertains to how the code or actual program works. In this case, the solution set will flag Red issues where a package tries to use objects or functions that have been deprecated from the Operating System or where their use has been restricted. In this case, there are no changes that can be made to the install routine to fix the problem. The problem needs to be dealt with at the program code level by the programmer that wrote it or by providing a more up to date version. For vendor MSIs an upgrade may be required. The recommendation with applications containing Red issues is that they are tested to see if the issue is either causing it to fail to install or for a critical part of its functionality to fail. It is possible that an application that contains a Red issue can be used if either the Red issue is not used in the application or if the part of the application that relies on it is not important. 134 7 Dashboard ICON Quest ChangeBASE 5.3 - User Guide DESCRIPTION Not all reports in the target report groups have been run against this package. Therefore, it is not possible to assign a final status to the package. The above information can be displayed on screen by clicking the Info button right hand corner of the page. in the top After the overall package status are the package details – package name, version, manufacturer and the full path and filename. It is possible to drill-down to the package overview screen by clicking on the package name. For more details on this screen, refer to 7.2.5 Package Overview Report. This report shows details about the package, including all the Reporting Groups against which the package has been assessed. The next columns show the status of the package for each reporting group within the chart group. Again, it is possible to drill-down to the package overview screen by clicking on the icon. The subsequent report displays information about the package at the Reporting Group level. It is also possible to drill-down to the package overview screen by clicking on the Reporting group column title. This will display details of each group that has been reported against for the selected reporting group. The page details can be shown in a more printer friendly view by clicking the Print icon which will open a new Tab or browser window (depending on the browser settings) and display all packages with a white background, for example: , From here you can use the browser’s printing capability to print the report. 135 7 Dashboard Quest ChangeBASE 5.3 - User Guide 7.2.5 Package Overview Report The Package Overview Report presents a web based report of the Package details. Unlike previous screens, this displays the details in a scrolling report format. This allows you to see more details in the view rather than having to show the information on multiple pages. Navigation through the report can be done either by scrolling the report or by use of the in-page links. These are highlighted by the blue or purple underlined text. You can return to the Application Status page at any time by pressing the Return to Application Status links throughout the report. At the top of each package header is the Package Contents. This tabbed list provides an easy way of going directly to a section of the report. Once clicked, the Report will reposition itself at the location of that section. At the end of each section there is a Back to top of Report link that will reposition the report back to the top. When selecting a multi-package report from the Application Settings screen (by clicking on the Reporting Group column title), there will be an extra section at the top listing all the Packages in the report. This gives the ability to go directly to an individual package by clicking on the link, for example: 136 7 Dashboard Quest ChangeBASE 5.3 - User Guide Note also that there is an extra link back to the top of each Package at the bottom of each section of this report. At the top right of the report there is a Print icon, which opens a new Tab or page and displays a more printer-friendly version of the Report. This can then be printed using the browser’s printing capability. The printer-friendly version removes all the links. 7.2.6 ROI Calculation Detail The ROI Calculation details can be seen when you drill-down from the main Dashboard screen. Click on either of the ROI Bar charts and the screen shown in the example below will be displayed. 137 7 Dashboard Quest ChangeBASE 5.3 - User Guide The ROI details screen is also used to show the setup details, which were explained in 7.2.1.1 ROI Setup. The grid on the right displays the ROI Calculations. It breaks the calculations down into three main sections: Testing, Remediation and Virtualization. The sections are further broken down into Simple, Medium and Complex and these are calculated for both manual costs and number of days. Note: Virtualization calculations are only calculated when the ChangeBASE Professional, Professional Plus or Ultimate version is selected (refer to 1.1 ChangeBASE Product Editions). 7.2.6.1 Testing Simple Calculations FIELD CALCULATION Manual Cost (Number of Applications * Simple percentage) * Testing Simple hours effort * Average Hourly Rate Manual Days (Number of Applications * Simple percentage) * Testing Simple hours effort / 8 ChangeBASE Days (Number of Applications * Simple percentage) * ChangeBASE Simple Hourly Cost Days Saved Manual Days – ChangeBASE Days Percent Saved Manual Days / Days Saved * 100 138 7 Dashboard Quest ChangeBASE 5.3 - User Guide Medium Calculations FIELD CALCULATION Manual Cost (Number of Applications * Medium percentage) * Testing Medium hours effort * Average Hourly Rate Manual Days (Number of Applications * Medium percentage) * Testing Medium hours effort / 8 ChangeBASE Days (Number of Applications * Medium percentage) * ChangeBASE Medium Hourly Cost Days Saved Manual Days – ChangeBASE Days Percent Saved Manual Days / Days Saved * 100 Complex Calculations FIELD CALCULATION Manual Cost (Number of Applications * Complex percentage) * Testing Complex hours effort * Average Hourly Rate Manual Days (Number of Applications * Complex percentage) * Testing Complex hours effort / 8 ChangeBASE Days (Number of Applications * Complex percentage) * ChangeBASE Complex Hourly Cost Days Saved Manual Days – ChangeBASE Days Percent Saved Manual Days / Days Saved * 100 Total Calculations FIELD CALCULATION Manual Cost Sum of Manual Costs Manual Days Sum of Manual Days ChangeBASE Cost ChangeBASE Cost * Total Applications ChangeBASE Days Sum of ChangeBASE Days Cost Saved Manual Cost – ChangeBASE Cost Days Saved Sum of Days Saved Percent Saved Manual Cost / ChangeBASE Cost * 100 139 7 Dashboard Quest ChangeBASE 5.3 - User Guide 7.2.6.2 Remediation Simple Calculations FIELD CALCULATION Manual Cost (Number of Applications * Simple percentage) * Remediation Simple hours effort * Average Hourly Rate Manual Days (Number of Applications * Simple percentage) * Remediation Simple hours effort / 8 ChangeBASE Days (Number of Applications * Simple percentage) * ChangeBASE Simple Hourly Cost Days Saved Manual Days – ChangeBASE Days Percent Saved Manual Days / Days Saved * 100 Medium Calculations FIELD CALCULATION Manual Cost (Number of Applications * Medium percentage) * Remediation Medium hours effort * Average Hourly Rate Manual Days (Number of Applications * Medium percentage) * Remediation Medium hours effort / 8 ChangeBASE Days (Number of Applications * Medium percentage) * ChangeBASE Medium Hourly Cost Days Saved Manual Days – ChangeBASE Days Percent Saved Manual Days / Days Saved * 100 Complex Calculations FIELD CALCULATION Manual Cost (Number of Applications * Complex percentage) * Remediation Complex hours effort * Average Hourly Rate Manual Days (Number of Applications * Complex percentage) * Remediation Complex hours effort / 8 ChangeBASE Days (Number of Applications * Complex percentage) * ChangeBASE Complex Hourly Cost Days Saved Manual Days – ChangeBASE Days Percent Saved Manual Days / Days Saved * 100 140 7 Dashboard Quest ChangeBASE 5.3 - User Guide Total Calculations FIELD CALCULATION Manual Cost Sum of Manual Costs Manual Days Sum of Manual Days ChangeBASE Cost ChangeBASE Cost * Total Applications ChangeBASE Days Sum of ChangeBASE Days Cost Saved Manual Cost – ChangeBASE Cost Days Saved Sum of Days Saved Percent Saved Manual Cost / ChangeBASE Cost * 100 7.2.6.3 Virtualization Simple Calculations FIELD CALCULATION Manual Cost (Number of Applications * Simple percentage) * Virtualization Simple hours effort * Average Hourly Rate Manual Days (Number of Applications * Simple percentage) * Virtualization Simple hours effort / 8 ChangeBASE Days (Number of Applications * Simple percentage) * ChangeBASE Simple Hourly Cost Days Saved Manual Days – ChangeBASE Days Percent Saved Manual Days / Days Saved * 100 Medium Calculations FIELD CALCULATION Manual Cost (Number of Applications * Medium percentage) * Virtualization Medium hours effort * Average Hourly Rate Manual Days (Number of Applications * Medium percentage) * Virtualization Medium hours effort / 8 ChangeBASE Days (Number of Applications * Medium percentage) * ChangeBASE Medium Hourly Cost Days Saved Manual Days – ChangeBASE Days Percent Saved Manual Days / Days Saved * 100 141 7 Dashboard Quest ChangeBASE 5.3 - User Guide Complex Calculations FIELD CALCULATION Manual Cost (Number of Applications * Complex percentage) * Virtualization Complex hours effort * Average Hourly Rate Manual Days (Number of Applications * Complex percentage) * Virtualization Complex hours effort / 8 ChangeBASE Days (Number of Applications * Complex percentage) * ChangeBASE Complex Hourly Cost Days Saved Manual Days – ChangeBASE Days Percent Saved Manual Days / Days Saved * 100 Total Calculations FIELD CALCULATION Manual Cost Sum of Manual Costs Manual Days Sum of Manual Days ChangeBASE Cost ChangeBASE Cost * Total Applications ChangeBASE Days Sum of ChangeBASE Days Cost Saved Manual Cost – ChangeBASE Cost Days Saved Sum of Days Saved Percent Saved Manual Cost / ChangeBASE Cost * 100 142 8 The Top Five Issues Explained Quest ChangeBASE 5.3 - User Guide 8 The Top Five Issues Explained ChangeBASE includes ‘Next Steps’ documentation for a number of the reports. These can be accessed via the drill-down reports in Dashboard - refer to 7.2.2.2 Top 5 Issues. The ‘Next Steps’ documents for the top five identified issues are shown below: 8.1 Custom Action Security 8.2 Legacy Help Files 8.3 Hard-coded File References 8.4 UAC File Headers 8.5 Legacy Control Panel Applets • • • • • 8.1 Custom Action Security 1. Ensure that User Account Control (UAC) is enabled. 2. Run the installation. 3. The install will have either failed with an error message, or else silently. The following message is typical for a related installation error: 4. If you received no error message, then you should check the following: • • • • Start by looking at the name of the custom action in the ChangeBASE error message. If it is related to uninstallation, attempt to remove the software. If it is related to rollback, then you should try installing again, and selecting Cancel just before it completes. Other names may indicate the area of the software on which you should concentrate your testing. 8.1.1 Explanation of the Issue Custom actions allow the install author to extend the capabilities of Windows Installer by inserting custom code. One of the settings available to the author is the ability to run the custom action with either the current user’s rights or with system rights. Most authoring 143 8 The Top Five Issues Explained Quest ChangeBASE 5.3 - User Guide tools have the default set to run with the user’s rights and some do not even offer the ability to run as the system user. In any case, when they were being run on Windows XP, as you needed to be an administrative user to install the software in the first place, the install author found that it made no difference as to which account they set the custom action to run in. However, when UAC is enabled in Windows 7, Windows 8, Windows Server 2008 and Windows Server 2012, the account under which custom actions run does have an effect, namely: • • Those actions set to run with user privileges are only allowed to make changes to the current user’s profile. Those actions set to run with system privileges can make global changes. ChangeBASE identifies the custom actions that are set to run with the user’s rights. 8.1.2 Remediation Steps Selecting the issue in ChangeBASE, followed by Fix-It, will change the custom action so that it runs in the system rather than the user context. You should check the names of the actions to ensure that they do not look like they are supposed to be making changes to settings in the user profile. In a corporate environment the user performing the installation is often a user who will never be using the software, so you will also need to check that there is a method for getting them applied, such as an HKCU (HKEY_CURRENT_USER) keypath or an advertised shortcut combination. 8.2 Legacy Help Files 8.2.1 How to Reproduce the Problem 1. Install the software on Windows 7, Windows 8, Windows Server 2008 or Windows Server 2012. 2. After installation, navigate to the .HLP file identified by the test and double-click on it. You will see the error message shown below. You may also be able to bring up the error by selecting F1 or by going to the help menu from within the software. 144 8 The Top Five Issues Explained Quest ChangeBASE 5.3 - User Guide 8.2.2 Explanation of the Issue The help engine that came with Windows 3.0 looked like this: At the time it was designed, it was quite novel to have hyperlinks that, when clicked on, took you to another page. Many of its other features have also been superseded by the functionality offered in web pages. As a result, the help engine has been withdrawn from Windows 7, Windows 8, Windows Server 2008 and Windows Server 2012, and an error message is shown whenever a program or document attempts to use it. 8.2.3 Remediation Steps A fix is offered that installs the old WinHlp32 engine into the ProgramFiles folder and associates HLP files with it. This will only work if the program tries to open the help file via its extension. You should run this test on all your packages to see how widespread the issue is. If there are only a few packages that rely on HLP files, and those files are not crucial to the use of the software, then you could consider not fixing the problem. If there are many packages using HLP files and they are important, then the best thing to do would be to go to this page http://support.microsoft.com/kb/917607, choose the 145 8 The Top Five Issues Explained Quest ChangeBASE 5.3 - User Guide appropriate engine for your Platform and arrange for it to be merged into the Operating System by the appropriate team within your organization. 8.3 Hard-coded File References 8.3.1 How to Reproduce the Problem Install the software in your target environment and run through the test plan provided by the users, checking the original requirements documentation that is associated with the package. When you test it there will either be parts of the software that malfunction or settings that are not valid. 8.3.2 Explanation of the Issue Whether virtualizing, moving to a 64-bit Operating Systems or upgrading from XP to Windows 7, there are paths that have changed. For example: • • • App-V packages are installed to Q:\ instead of C:\Program Files\ 32-bit software is installed to C:\Program Files(x86)\ instead of C:\Program Files\ on 64-bit Windows Windows 7’s user settings are stored in C:\Users\ instead of C:\Documents and Settings\ on Windows XP The majority of paths inside an installation package are tied to properties and variables so that when they are deployed in a different environment from the one for which they were designed and tested, everything still works. 8.3.3 Remediation Steps In all cases it is safe to select all issues, followed by Fix-It. Where a path has been hard-coded to a drive other than C:, ChangeBASE will replace the root with a property called CBDriveRoot# (where # is the drive letter), leaving you to check that it will still be installed to the same mapped drive in the new environment. If it has changed, then all you need to do is to update the value in the Property table of the MSI and all instances of its use throughout the rest of the package will reflect its new assignment. 146 8 The Top Five Issues Explained Quest ChangeBASE 5.3 - User Guide 8.4 UAC File Headers 8.4.1 How to Reproduce the Problem 1. Install the software. 2. Find the program identified by the test. 3. You will notice that the icon is overlaid with a yellow and blue shield. 4. When you run the program you will see a User Account Control prompt looking like this. Note: Unless your users are all going to have the administrator password, you will need to suppress this dialog. 8.4.2 Explanation of the Issue Windows looks inside the properties of portable executable files to see if they contain certain keywords such as setup, update, etc. If it finds them, it sets the shield icon to indicate that the program will need to be run with elevated privileges. 147 8 The Top Five Issues Explained Quest ChangeBASE 5.3 - User Guide Other files can contain Manifests that can force the program to require elevation. A Manifest is a settings file that can either be embedded inside the file or be a separate file as shown by red.exe.manifest in the screenshot at step 3 above. The Manifest contains instructions on how the program is to be run and includes a setting for elevation. The Elevated Privileges Detection test looks for Manifest files forcing elevation, whereas this test looks for the keywords in file properties. When the program is run, the UAC prompt is shown, allowing you to enter an administrator’s credentials. If they are entered, then the program will run with those rights and be able to change settings that will affect all users. Selecting No to the UAC prompt does not run the program with the user’s credentials but it cancels the running of the program. 8.4.3 Remediation Steps When you click the button to fix the issues, a Manifest file will be created (if one does not already exist) and the executable will be forced to run with the launching user’s credentials. The main consequence of removing the elevation is that the program will be unable to make global changes, affecting other users of the computer, and if it tries to do so then it may crash or exhibit unusual behavior. However, this is often preferable to handing out the administrator password. Executable files with embedded internal Manifests are not automatically fixed, as there is a much higher risk involved in modifying an executable directly and so it is not something we currently want to automate. You could modify the internal Manifest manually by downloading a tool from http://www.resedit.net/, which can be used to modify the Manifest. There is a guide on how to do it here: http://csi-windows.com/toolkit/240-great-pe-editor-for-internal-manifests. As an alternative, you could use the ACT from Microsoft and create a shim. Whichever technique you use, you will need to set the execution level to asInvoker. 8.5 Legacy Control Panel Applets 8.5.1 How to Reproduce the Problem This rule is important because there are differences in behavior in the way that control panels will work on Windows XP and subsequent versions of Windows. Before you test the software on Windows 7, Windows 8, Windows Server 2008 or Windows Server 2012, you should, in order to be able to tell the difference, familiarize yourself with the way that the control panel was previously working on Windows XP in a standard user’s account. When you run the control panel in the later version of Windows, you will observe the following: • Settings that were unable to be changed on XP will be able to be changed by closing and reopening the control panel. 148 8 The Top Five Issues Explained • Quest ChangeBASE 5.3 - User Guide Once the control panel is closed, you will receive a Program Compatibility Assistant prompt, e.g. Choosing Open the control panel using recommended settings will prompt a standard user for a password. Choosing This control panel works correctly runs it using Windows file and registry virtualization, causing it to run differently than it would on XP. 8.5.2 Explanation of the Issue Control panel files do not get elevated on Windows 7, Windows 8, Windows Server 2008 and Windows Server 2012, so the Program Compatibility Dialog appears because the presumption is that they need elevating. Open the control panel using recommended settings in an enterprise environment will not be very useful, as the users will not have the administrator password. This control panel works correctly will allow users to appear to change settings for which they do not have permissions. Settings that the control panel attempts to write to HKEY_LOCAL_MACHINE in the registry will be redirected inside the user profile so that the setting will appear to be applied, even if the particular user has no write-access to the key in the registry. As well as changing the intent of the permissions, this may not work or they are to be read by a service. Services run in a different account and will not be able to access the keys. So, in the scenario of migrating from XP to a later version of Windows, the Operating System offers two choices, neither of which is suitable. 8.5.3 Remediation Steps Select all issues as suggested in the software and fix them. It will add an XML Manifest file that will force it to work in the same way as it did on XP. There are no problems associated with always fixing all issues. 149 9 Assessing a Real-World Package Quest ChangeBASE 5.3 - User Guide 9 Assessing a Real-World Package Bentley View 8.1 is compatible with Windows 7 according to Microsoft. ChangeBASE, however, shows this package as Red for Windows 7. Why? It’s made up of around 2000 files. ChangeBASE reports that one file is missing as part of the import process (Low Severity Import Warning). This is unlikely to have an impact on the compatibility assessment results. The first Plugin with an issue is reporting a missing INF file: This is the folder belonging to those files: As shown by ChangeBASE, in order to install driver files with a CAT file you also need an INF file. There is a missing file. Looking at the name of the folder, buried deep in the Bentley folder structure, it is called “as needed”, which might indicate that it is not used very often. It is possible that this deals with an area of functionality that is so rarely used that it slipped by the Microsoft testing lab and past Bentley’s QA. The other Plugin with an issue has found some API calls: 150 9 Assessing a Real-World Package Quest ChangeBASE 5.3 - User Guide This file bentleydgn.dll has three references to functions that cannot be called on 64-bit Windows. ChangeBASE is unable to see whether or not they are used on 64-bit Windows. It can only detect their presence. The recommendation is that this package should be run through User Acceptance Testing to validate that no issues are found when using the software. 151 10 Fixing Packages Quest ChangeBASE 5.3 - User Guide 10 Fixing Packages Where fixing is available, as indicated by the presence of the cog icon in the Fixes Available column, check the box associated with the issue to be fixed. This will activate the Fix function in the packages view of ChangeBASE. Run the Fix function against one or several fixable issues. Note: It is generally recommended that you apply fixes to packages using Transform (MST) files. To specify your MST requirements, select the General Tab: • • • • Recommended option to add fixes to a new or existing MST: Deselect Backup MSI before applying Fix and select the Generate Transforms check box and the Roll up Fixes check box if you would like the Fixes to be wrapped up into the standardization Transform. Where multiple Transforms have been applied, the Fixes are always rolled up into the first Transform in the sequence Add fixes to a new MST: MSI with standardization Vendor MSI Deselect Backup MSI before applying Fix and select the Generate Transforms check box. Add fixes directly to the MSI: Select Backup MSI before applying Fix and deselect the Generate Transforms check box. Update the MSI and create a fix MST for the original MSI: If in doubt, deselect Backup MSI before applying Fix and select the Generate Transforms check box and the Roll up Fixes check box. This can safely be used for all types of installation. 152 10 Fixing Packages Quest ChangeBASE 5.3 - User Guide The fixing scripts running in the background will use SQL statements to update the Repackaged MSI or the MST for the vendor MSI. There are 3 types of fix available: • • • SQL statements to resolve the issues within the MSI file. The removal of files or registry keys, which should not be included as part of the installation package. The inclusion of a Manifest or runtime element to allow the package to run (e.g. for Control Panel Applet support on Windows 7). When fixing is run against a package, a log file will be generated. This log file can be viewed by right-clicking the package and selecting View Log. The log file contains the SQL statements used to fix the package, so that the fixes can be verified. Note: MSI Studio or Orca can also be used to verify that the fixes have been applied successfully. All log files are stored against a package within the Package History details, which can also be viewed by right-clicking the package and selecting View History: 10.1 Troubleshooting If a package fails to be fixed, then carry out the following checks: • • • Check the Log File: If the error message relates to a CAB or media file, check that the media file actually exists in the specified location. See Does the package have all of its required files? below in this topic. Package in use? Check that the package is not in use or opened by a package editing tool such as AdminStudio or Wise Package Studio, or open it in MSI Studio or Orca. It may be accessed by an editing tool on a Virtual Machine or RDP session, so ensure that this is not the case. Package or folder set as read-only? The package itself or the entire package folder may be set to read-only. Ensure that you have the correct permissions to 153 10 Fixing Packages • • • • • • Quest ChangeBASE 5.3 - User Guide write to the folder and to make changes to the MSI by creating a backup of the MSI, saving it into the same folder, and then editing it and saving the changes. Package no longer accessible? The package may have been renamed or moved, or the network connection required to access the package may no longer be available. Package in incorrect format? The package may be an MSM renamed as an MSI or in a format that does not have the minimum MSI tables required for it to run as an installation file. Check the package format in MSI Studio or Orca and, if in doubt, try to install the package. If you cannot install it, then you should not be running it through ChangeBASE. You should gather the current live instance of the package from its Deployment Source location. Are the Plugin and hotfix versions up to date? Your Plugin versions may not be in line with the version of ChangeBASE or the hotfix version that you are using. Ensure that you have the latest version of the software and that you have all of the latest versions of the Plugins downloaded from the Upgrade Server. If you work in offline mode, request your latest Plugin pack from your ChangeBASE contact/support. Can you open the package in MSI Studio and/or Orca and/or Wise? If not, then there is an underlying issue with the package and you can assume that it is not the current live and installable release and therefore not a suitable candidate for reporting and fixing. Does the package have all of its required files? For example, external or internal CAB files and/or uncompressed source files. To verify this, try to install the application. If the installation does not complete due to missing files, you need to go back to the live deployment source and copy the complete source media. Is the Plugin working correctly for this package? There may be a peculiarity in the package that is not allowing the fixing script to run correctly. 10.1.1 Multi-User Issues Settings within ChangeBASE Options may revert to the default where there are workstations connecting to the ChangeBASE database that are set up with different configurations of the software. Packages may not run or fix correctly if they are loaded from common shares and are therefore not accessible to other users. 154 11 Virtualizing Packages Quest ChangeBASE 5.3 - User Guide 11 Virtualizing Packages In ChangeBASE, an MSI package or EXE can be directly converted into a virtual package, in accordance with 11.1 Virtualization Compatibility Matrix. The supported package virtualization technologies are: • • • • Microsoft App-V 4.6 SP1 and 5.0 VMware ThinApp 4.6 Symantec Workspace Virtualization 6.1 Citrix XenApp Streaming Profile 6.5 Packages are virtualized on Virtual Machines. The Virtual Machine requirements are as per 2.1.3 Virtual Machines. 11.1 Virtualization Compatibility Matrix The table below covers the compatibility of the above-listed technologies with the 32-bit and 64-bit versions of both Windows XP and 7, with regard to the virtualization of MSI and EXE files on a Virtual Machine. Virtualization Technology Conversion Type Compatible with Windows XP 32-bit on Virtual Machine? Compatible with Windows XP 64-bit on Virtual Machine? Compatible with Windows 7 32-bit on Virtual Machine? Compatible with Windows 7 64-bit on Virtual Machine? Microsoft App-V MSI to Virtual Yes No Yes Yes Microsoft App-V EXE to Virtual Yes No Yes Yes VMware ThinAPP MSI to EXE Yes No Yes Yes VMware ThinAPP EXE to Virtual Yes No Yes Yes Symantec Workspace Virtualization MSI to Virtual Yes No Yes Yes 155 11 Virtualizing Packages Quest ChangeBASE 5.3 - User Guide Virtualization Technology Conversion Type Compatible with Windows XP 32-bit on Virtual Machine? Compatible with Windows XP 64-bit on Virtual Machine? Compatible with Windows 7 32-bit on Virtual Machine? Compatible with Windows 7 64-bit on Virtual Machine? Symantec Workspace Virtualization EXE to Virtual Yes No Yes Yes Citrix XenApp Streaming Profile MSI to Virtual Yes No Yes Yes Citrix XenApp Streaming Profile EXE to Virtual Yes No Yes Yes For more details about virtualization, see the following topics: 11.2 Configuration • • • • • • • • 11.2.1 Virtual Machine Setup: General 11.2.2 Virtual Machine Setup: Symantec Workspace Virtualization 11.2.3 Virtual Machine Setup: Microsoft App-V 11.2.4 Virtual Machine Setup: Citrix XenApp Streaming Profiler 6.5 11.2.5 Virtual Machine Setup: VMware ThinApp 11.2.6 ChangeBASE Configuration 11.2.7 Advanced Settings: App-V 4.6 SP1 11.2.8 Advanced Settings: App-V 5.0 11.2.1 Virtual Machine Setup: General 1. 2. 3. 4. 5. 6. Create a Virtual Machine with at least 1GB of RAM. Install the required Operating System on the Virtual Machine. Install all the core packages and middleware on the Virtual Machine (not essential, but recommended). Install Microsoft.NET Framework 3.5 SP1 Full (for Windows 7 and 8, this must have been installed using turn Windows features on or off in the Control Panel). Install VMware Tools for VMware-based Virtual Machines, or Hyper-V Integration Services for Microsoft Hyper-V-based Virtual Machines. Install the latest QVMTools. a. Inside the Virtual Machine, copy the QVMTools Setup.msi installer (which is located in ProgramFiles\Quest Software\VReady on the machine running ChangeBASE) to the guest. b. Run QVMTools Setup.msi to start the installation process. c. QVMTools will automatically launch once installation is complete. 156 11 Virtualizing Packages 7. 8. 9. 10. 11. 12. 13. 14. 15. 16. 17. 18. 19. 20. Quest ChangeBASE 5.3 - User Guide d. You will now find QVMTools running in the system tray. Double-click it or right-click View Log to open the log. e. Ensure that the QVMTools log window is closed (if you opened it). f. Delete QVMTools Setup.msi from the Virtual Machine, and empty the Recycle Bin. Disable the Operating System firewall. Disable any third party firewall software. Disable any antivirus software. Disable UAC if running Windows 7 or Windows 8. Disable Windows Updates. Disable Windows Search. Disable Windows Defender. Disable and switch off any Action Center messages. Ensure that the default web browser is launched at least once on the machine, and that any initial pop-up queries are answered so that they do not reappear. If using Windows XP or Windows 8 running in Hyper-V, the tasks listed below are also required: a. For Hyper-V VMs ChangeBASE uses WMI (Windows Management Instrumentation) to connect to the guest VM for user authentication. With Windows XP this needs to be enabled as it is disabled by default. To enable remote WMI follow the steps below: i. Navigate to Start > Control Panel > Administrative Tools > Local Security Policy ii. Navigate to Security Settings\Local Policies\Security Options. iii. Open the policy Network Access: Let Everyone permissions apply to anonymous users. Set it to Enabled. iv. Open the policy DCOM: Machine Access Restrictions… Then click Edit Security. Add ANONYMOUS LOGON; Everyone; INTERACTIVE; NETWORK; SYSTEM. Set Allow for both Local Access and Remote Access for all the above groups. v. Open the policy Network Access: Sharing and security model for local accounts. Set it to Classic. vi. Reboot the guest to make sure the settings are applied. b. For a Windows 8 Virtual Machine, you must make the following changes: i. Type secpol.msc on the start screen and press Enter. ii. Navigate to Security Settings\Local Policies\Security Options. iii. Open the policy User Account Control: Run all administrators in Admin Approval Mode. Set it to Disabled. iv. Reboot the guest to ensure that the settings are applied. If you are using VMware Workstation and the networking is set to either NAT or Host-only, then, in the Virtual Network Editor, ensure that the Minimum DHCP Lease Time is set to 8 hours and 30 minutes, and that the Maximum Lease Time is set to 9 hours. Ensure that the firewall on the host is turned off. Ensure that you can ping the host from the Virtual Machine. Ensure that you can ping the guest from the machine running the ChangeBASE client. 157 11 Virtualizing Packages Quest ChangeBASE 5.3 - User Guide 21. Continue to the relevant section below to complete the Virtual Machine setup. 11.2.2 Virtual Machine Setup: Symantec Workspace Virtualization 1. 2. 3. 4. 5. 6. 7. Install Symantec Workspace Virtualization Admin (Client) 6.1 SP6/SP7. Install Symantec Wise Composer. Reboot the machine if prompted. Ensure there are no unnecessary packages running on the Virtual Machine that may be updating files (for example, Windows Desktop Search). Leave the machine idle for around 10 minutes. This will create a better session as most of the locks will be cleared by that point. Snapshot the Virtual Machine whilst it is running. Shut down the Virtual Machine (Start, Shutdown) or just power it off. 11.2.3 Virtual Machine Setup: Microsoft App-V and App-V 4.6 SP1 1. 2. 3. Shut down the Virtual Machine and add a new hard disk. Start up the Virtual Machine and create a new partition. Assign this partition the drive letter you will use for the mount point in the sequenced packages. Install App-V 4.6 SP1 or 5.0 Sequencer. The 5.0 Sequencer requires the prior installation of Microsoft.NET Framework 4.0 Full and PowerShell 3.0. The latter is included in Windows Management Framework 3.0, which can be downloaded from http://www.microsoft.com/en-us/download/details.aspx?id=34595. Ensure that you install ALL Windows Updates, including those for .Net Framework. Note: You may need to reboot and check for additional updates multiple times. Failure to do so will result in the inability of the automatic clicker to click on the required controls in the App-V Sequencer. The option to launch the Sequencer is checked by default in the installer and you need to ensure that you uncheck this so that the Sequencer is not launched automatically on the Virtual Machine after install. 4. 5. 6. 7. Ensure that there are no unnecessary applications running on the Virtual Machine that may be updating files (for example, Windows Desktop Search). Leave the machine idle for around 10 minutes. This will create a better session as most of the locks will be cleared by that point. Take a Snapshot of the Virtual Machine whilst it is running. Shut down the Virtual Machine (Start, Shutdown) or just power it off. By default, a temporary App-V package will be created on your Virtual Machine's desktop in a new folder. This can be overridden by adding a line into the GUIApp.ini file, as follows: a. Open your GUIApp.ini (%localappdata%\ChangeBASE\UserData) in a text editor. 158 11 Virtualizing Packages Quest ChangeBASE 5.3 - User Guide b. Using the table below, navigate to the correct section in your GUIApp.ini file. Note: There may be legacy section names in the file. Section names are case-sensitive. Platform Architecture Section name Windows XP x86 [AppVWinXP86] Windows 7 x86 [AppVWin786] Windows 7 x64 [AppVWin764] c. If you are using Windows 7 x64 for virtualization, locate the [AppVWin764] section and add the following key: PackagePath=<path in guest to create package> Where <path in guest to create package> is a valid location in the guest Virtual Machine where you want the App-V sequencer to create the output virtual package. ChangeBASE will now use this path in the guest Virtual Machine to copy out the virtualized package to the export folder on the host. 11.2.3.1 Avoid Balloon Tips by resetting the Screen Resolution or disabling the Tips When App-V 4.6 SP1 is running on the Virtual Machine, balloon tips can be displayed in the notification area. Because the virtualization process works in App-V by using key clicks, the appearance of these tooltips could upset the key click process, causing the virtualization process to fail. You can avoid this situation in either of two ways: • Set the screen resolution of the Virtual Machine to 1024x768. Or • Change the registry so that tooltips are disabled on the Virtual Machine. There are two *.reg files included in the ChangeBASE installation: ‘Disable Balloon Tips XP or Vista.reg’ and ‘Disable_Notifications Win7.reg’. Both files can be found in C:\Program Files (x86)\Quest Software\VReady\AppV Disable Balloon tips reg files.zip (or wherever ChangeBASE is installed). Simply unzip the *.reg file that is relevant to your Virtual Machine’s operating system and install it. 159 11 Virtualizing Packages Quest ChangeBASE 5.3 - User Guide 11.2.4 Virtual Machine Setup: Citrix XenApp Streaming Profiler 6.5 1. 2. 3. 4. 5. 6. Install Citrix Streaming Profiler 6.5. Reboot the machine if prompted. Ensure there are no unnecessary packages running on the Virtual Machine that may be updating files (for example, Windows Desktop Search). Leave the machine idle for around 10 minutes. This will create a better session as most of the locks will be cleared by that point. Snapshot the Virtual Machine whilst it is running. Shut down the Virtual Machine (Start > Shut down) or just power it off. 11.2.5 Virtual Machine Setup: VMware ThinApp 1. 2. 3. Install VMware ThinApp 4.6.1. Reboot the machine if prompted. Open a command prompt as administrator, and run the following command: “C:\Program Files\VMware\VMware ThinApp\Snapshot.exe” C:\Start.Snapshot 4. 5. 6. 7. 8. When the Snapshot has been taken, close the command prompt. Ensure that there are no unnecessary packages running on the Virtual Machine that may be updating files (for example, Windows Desktop Search). Leave the machine idle for around 10 minutes. This will create a better session as most of the locks will be cleared by that point. Snapshot the Virtual Machine whilst it is running. Shut down the Virtual Machine (Start, Shutdown) or just power it off. 11.2.6 ChangeBASE Configuration 1. Open the ChangeBASE options and change to the Virtualize Tab. 2. Select the relevant item in the Virtualization Technology dropdown. 160 11 Virtualizing Packages 3. Quest ChangeBASE 5.3 - User Guide 5. Next select the OS and Architecture of the VM that will be used to virtualize applications. Select Apply Package Naming Mask if you want to define a standardized naming convention for the folder and virtual package filename. The package naming mask can use the Manufacturer name, Product Name, Product Version and the MSI filename (excluding the extension). Click Configure. 6. Set the following options according to your environment: 4. Each field that needs to be configured is explained below. SETTING Hypervisor Selection DESCRIPTION If VMware Workstation is selected, click Browse and a text box will open to allow you to choose the location of the VMX file. This is the Virtual Machine that should be used for conversions. Select the required VMX file and click Open. 161 11 Virtualizing Packages SETTING Quest ChangeBASE 5.3 - User Guide DESCRIPTION If Hyper-V is selected, click Connect to open the connection properties window. Then enter the NetBIOS name (not localhost, and not the FQDN (Fully Qualified Domain Name)), of the server. If you are running ChangeBASE on the Hyper-V host, or if ChangeBASE is on the same domain as the Hyper-V host, then you will not need to enter user credentials: Otherwise, enter these when connecting remotely: If VMware Server/ESX is selected, enter the server name, FQDN or IP address (but not localhost), followed by a username and password: Once you are connected to the hypervisor, a drop-down list will be shown containing all the Virtual Machines registered with that hypervisor. Select the required Virtual Machine. Snapshot Name The Snapshot that should be used for the sequencing. VM Username This is the username for the Virtual Machine. VM Password This is the password for the Virtual Machine. Power Off VM Forces the Virtual Machine to be powered off when the conversion is complete. Export Folder The location on the host machine where the virtual packages should be created. You should use a different folder for each of the virtual package formats to ensure that different packages are not copied into the same folder. Additionally, the folder you specify must already exist. 162 11 Virtualizing Packages SETTING Manual Configuration Quest ChangeBASE 5.3 - User Guide DESCRIPTION Allows you to make any manual application modifications after package installation is complete, but before virtualization capture completes. This allows you to make any configuration changes to the software that will be stored in the virtual package. 11.2.7 Advanced Settings: App-V 4.6 SP1 SETTING DESCRIPTION Override Server Address The protocol, hostname and port can all be overridden. Path The path field is important where the App-V 4.6 infrastructure will be used for deployment. Unchecked: No subfolder will be added to the path of the AppV package, e.g. RTSP://SERVER:123/orca.sft Checked, blank path: A subfolder will be added to the App-V package path. The subfolder name will be set to be the same as the package name, e.g. RTSP://BENHOST:123/orca/orca.sft Checked, set path to “Source”: Two subfolders will be added, e.g. RTSP://BENHOST:123/Source/orca/orca.sft 163 11 Virtualizing Packages SETTING Quest ChangeBASE 5.3 - User Guide DESCRIPTION Operating Systems The default Operating System can be overridden. Enforce Security Descriptors Use default: Uses the setting from the sequencer on the Virtual Machine. Yes: Turns on Enforce Security Descriptors. No: Turns off Enforce Security Descriptors. Generate MSI Packages Use default: Uses the setting from the sequencer on the Virtual Machine. Yes: Turns on Generate MSI Packages. No: Turns off Generate MSI Packages. Compress Package Use default: Uses the setting from the sequencer on the Virtual Machine. Yes: Turns package compression on. No: Turns package compression off. Mount Point Sets the mount point in the App-V package to the selected drive letter. Detect MSI installer path property for silent installs Detects the public property in the MSI that would override the default install path for the package. If not set then the package will install into its default location. Feature Block 1 Enables the creation of Feature Block 1 during conversion. All package shortcuts are launched during the creation of Feature Block 1. Manual Feature Block 1 Capture By default, all captured applications are launched if FB1 capture is enabled. This option allows you to manually launch the applications they require instead of all applications being launched. You must have access to the VM to be able to use this feature. 164 11 Virtualizing Packages Quest ChangeBASE 5.3 - User Guide 11.2.8 Advanced Settings: App-V 5.0 SETTING DESCRIPTION Operating Systems The default Operating System can be overridden. Primary Virtual Application Directory Sets the Primary Virtual Application Directory in which the package should be installed to. Detect MSI installer path property for silent installs Detects the public property in the MSI which would override the default install path for the package. If not set then the package will install into its default location. Feature Block 1 Enables the creation of Feature Block 1 during conversion. All package shortcuts are launched during the creation of Feature Block 1. Manual Feature Block 1 Capture By default, all captured applications are launched if FB1 capture is enabled. This option allows you to manually launch the applications they require instead of all applications being launched. You must have access to the VM to be able to use this feature. 165 11 Virtualizing Packages Quest ChangeBASE 5.3 - User Guide 11.3 How to Virtualize Packages Preparation for all scenarios: 1. Import the packages(s) into ChangeBASE. 2. Assess the packages(s) for compatibility with the virtualization technology and the target Operating System (optional). 3. Where necessary, fix or override any compatibility issues (optional). ChangeBASE will not prevent the virtualization of packages with Amber or Red issues, but some issues may prevent the application from virtualizing successfully. Scenarios: • 11.3.1 Package Virtualization: One virtual package per MSI • 11.3.2 Package Virtualization: One virtual package from multiple MSIs • 11.3.3 Package Virtualization: Virtualizing EXEs and manual configuration 11.3.1 Package Virtualization: One virtual package per MSI This is the most commonly used scenario for package virtualization. ChangeBASE will attempt to create a virtual package for each checked MSI. 1. Check the MSI packages(s) to be virtualized. 2. Click the Virtualize button. a. If only one MSI has been checked, the virtualization process will begin, using the selected virtualization technology. b. If more than one MSI has been checked, the following dialog will appear: c. Click Multiple sequences. d. For each MSI, a virtual package will be created in the Export Folder. 11.3.2 Package Virtualization: One virtual package from multiple MSIs This section covers the scenario where a virtual package containing multiple MSIs is required. An example of where this may be required is where an application and its middleware are supplied as two MSI packages. A single virtual package may be required containing both the middleware and the application. 1. Check the MSI packages(s) to be virtualized. 166 11 Virtualizing Packages Quest ChangeBASE 5.3 - User Guide 2. Click the Virtualize button. The following dialog will appear. 3. Click Single sequence. 4. A single virtual package containing all the checked MSIs will be created in the Export Folder. 11.3.3 Package Virtualization: Virtualizing EXEs and manual configuration In some scenarios it will be necessary to virtualize packages where the installation source is an EXE file. You also may want to override the default settings when creating a single virtual package from multiple packages. These settings are configured in the Sequence Configuration dialog. There are three ways to access this dialog: 1. Check multiple MSI packages, click Virtualize, then click Manually configure. 2. Check an EXE package (or packages, with or without other MSIs being checked) and click Virtualize. 3. Check any number of packages by holding down the Shift key, and click Virtualize. 167 11 Virtualizing Packages SETTING Quest ChangeBASE 5.3 - User Guide DESCRIPTION Add Package(s) Add MSI or EXE to the virtual package. Remove Package Remove MSI or EXE from the list of packages to be virtualized. Sequence Name This name will be used for the name of the virtual package created in the Export Folder (Options, Virtualize). New Create a new ‘Sequence’ (container for a set of packages which will be converted into a single virtual package). It is possible to create multiple ‘Sequences’. Default Arguments The default command line switch for MSI-based packages. This can be overridden for individual packages using the Arguments field. Plugin This drop-down list contains all of the configured Virtual Machines. For each sequence you can set which Plugin you wish to use for the currently selected sequence. Detect MSI Install Path Property (App-V only) This option only applies to App-V, which requires that the package is installed into a particular path. When this option is checked, the property which overrides the install path in the MSI is detected and used as an argument. Manual post install application configuration (seconds) If you check this box, ChangeBASE will pause the virtualization process after all the packages have been installed. This allows you to make additional changes on the Virtual Machine before the virtual package is finalized. This could include creating shortcuts or making changes to application settings. This feature is not available with XenApp Streaming conversions. The configuration period can be set. The default is 10 seconds. ChangeBASE will prompt you with the following dialog on the Virtual Machine when it is ready for the manual configuration: Clicking Pause Timer will stop the countdown timer and the manual configuration changes can be made. Clicking Exit will prompt ChangeBASE to finalize the virtual package. Add Prerequisite This allows you to browse the file system for EXE or MSI file. Any EXE/MSI files added in this way will be installed on the Virtual Machine before the virtual package creation begins. This option is useful when you have a prerequisite which is not installed on your Virtual Machine, but which is required for the installation of the application being virtualized (even though it may not actually be required within the virtual application itself). 168 11 Virtualizing Packages SETTING Quest ChangeBASE 5.3 - User Guide DESCRIPTION Up/Down/ Remove This allows you to change the order in which the applications are installed on the Virtual Machine, or remove applications from the sequence. Package path Displays the path of the selected package. Arguments The arguments to use when installing the package. Detect Attempts to detect the silent install arguments for the selected package. Manual install If checked, then the arguments for the currently selected package are not used. You must manually install the package within the Virtual Machine. Use Converted MSI If the currently selected package is an EXE-based installer and the package has been repackaged within ChangeBASE, then you can check this option to use the generated MSI. Is it a Prerequisite? If this option is checked, then the package will be installed as a prerequisite – that is to say, before capture begins. Copy all source media If the package you wish to capture has source files which are external to the installer, then checking this option will copy all files in the folder in which the package resides. Be careful when checking this option if your packages are all contained within the same folder, as this could result in ChangeBASE copying a large set of files to the Virtual Machine unnecessarily. Save Manifest Clicking this will allow you to save the currently defined sequence configuration to an XML Manifest file for use with the “Virtualize from Manifest” option. 11.3.4 Package Virtualization: Using a Manifest file To virtualize from a Manifest file you have saved in the Manual sequence configuration dialog, simply right-click on the Packages node in ChangeBASE and select Virtualize from Manifest. The following dialog will appear: Click Browse to choose the Manifest file you have saved. Clicking OK will virtualize with the chosen Manifest file. Clicking Edit will use the chosen Manifest file and then take you to the Manual sequence configuration dialog. 169 11 Virtualizing Packages Quest ChangeBASE 5.3 - User Guide 11.4 Performance Issues and Optimization Create a separate output folder for each virtualization tool and ensure that there are no duplicate packages in the output folders. Should you notice unusual growth in disk space utilization, you can safely delete the contents of the Packages folder within the Working Directory and any folders directly in the Working Directory that are denoted with a GUID. If you have the Import COM Snapshot Data box checked in the General Tab under Options, this will slow down the loading and reloading of packages due to the increase in the amount of processing required when extracting all of the COM information for self-registering files. Uncheck this option unless it is specifically required to re-extract COM information. Keep the number of Virtual Machine Snapshots to a minimum, as the Virtual Machine disks can easily become fragmented. If you have accrued a large number of Snapshots, delete all previous unnecessary Snapshots and run the VMware defragmentation tool. 11.5 Troubleshooting: Virtualizing Packages Q: Why does the App-V 5.0 Sequencer show warnings as follows? A: When ChangeBASE controls the App-V 5.0 sequencer you will always see the warning “Other applications are running” because the ChangeBASE controller application is detected by the Sequencer. However, any other warnings, such as “Windows Defender is active”, should be addressed by updating your Virtual Machine to resolve the issue. Q: Why can I not see the Virtualize Tab in the Options? A: Make sure you have a valid license for the ChangeBASE virtualization functionality. Q: Why does nothing happen when I click the Virtualize button? 170 11 Virtualizing Packages Quest ChangeBASE 5.3 - User Guide A: Ensure that the Microsoft.NET Framework 4 Client Profile v4.0.30319 or later is installed on the Virtual Machine. Q: How do I turn off UAC? A: Click Start, and in the Search programs and files box type “uac”. Click Change User Account Control Settings, and the following dialog appears. Drag the slider to the position shown, and click OK. You will need to reboot your PC/Virtual Machine for the change to take effect. On Windows 8, you will need to carry out the following additional steps: 1. Type secpol.msc on the start screen and press Enter. 2. Navigate to Security Settings\Local Policies\Security Options. 3. Open the policy User Account Control: Run all administrators in Admin Approval Mode. Set it to Disabled. 4. Reboot to ensure that the settings are applied. Q: Why does ChangeBASE not start my Virtual Machine? A: Check your Virtual Machine settings in the Virtualize Tab. Check the path to the VMX file, and the VM username and password. Q: Why does ChangeBASE not do anything after starting my Virtual Machine? A: Check your Virtual Machine settings in the Virtualization Tab. Q: Why does my conversion to ThinApp fail? A: Check the Internet Explorer settings on the Virtual Machine. Select the Security Tab, click on Custom Level, go to the Miscellaneous section, and ensure that “Launching packages and unsafe files” is enabled: 171 11 Virtualizing Packages Quest ChangeBASE 5.3 - User Guide 172 12 ChangeBASE Options Quest ChangeBASE 5.3 - User Guide 12 ChangeBASE Options 12.1 General Tab 12.1.1 Report Options Retain Report Results on Tab Change keeps the report results available even if you have accessed another database or closed and re-opened ChangeBASE. As soon as the package is closed, the report results will be cleared from memory. Show Checked Out Packages Only displays only the packages that the current user has currently checked out. By default, a user ‘owns’ all packages that they have imported and, therefore, they are checked out in that user’s profile and show the padlock icon in the Information column. Identify Packages with ProductName displays packages by the value of their ProductName property rather than the filename of the package. You can interchange the display between the filename and Package Name by using the function Ctrl+N. Confirm Clear Results controls a warning dialog which can appear when you click Clear Results. 173 12 ChangeBASE Options Quest ChangeBASE 5.3 - User Guide 12.1.2 Transforms Generate Transforms should be checked to create fixes in a Transform file (MST). The supported way of changing a vendor-supplied MSI is by generating the changes within a Transform file. When you use this option it is not necessary to select Backup MSI before applying Fix because the MSI file is not modified. Roll up Fixes should be selected if you would like to add the fixes to an existing Transform (e.g. a standardization Transform) that has been imported into the database. If there are multiple Transforms in the database, ChangeBASE automatically chooses the first Transform in the sequence into which to roll the fixes. Suppress Transform Validation Errors should be checked when importing generic standardization Transforms, which may not conform to Windows Installer’s Transform error and validation handling. For example, if you cannot load a Transform in Orca without going into Tools and Options and unchecking the error and validation flags, you will need to select Suppress Transform Validation Errors. This option is on by default. Auto-Select Single Transforms. When MSI files are either dragged onto ChangeBASE or selected through the Browse dialog, this option controls whether single Transform files (which are in the same folder as the MSI) are automatically selected to be imported with the MSI. Where Multiple Transform files are present in the same folder as an MSI, they will not be selected for import by default. If you need to select multiple Transforms to be imported, you should use the Browse dialog as shown in 5.2.2 Browse Dialog.. Where multiple MSIs exist in a folder with one or more Transforms, the following dialog will appear: 12.1.3 Package Import/Fix Backup MSI Before Applying Fix. This option should be used for repackaged MSIs, whereby the fixing is being applied directly to the MSI file. It is always advisable to back up the MSI before applying the fix in case it is necessary to revert to the previous version. This is also helpful if you need to perform a package comparison to verify which changes have been made during the fix process. 174 12 ChangeBASE Options Quest ChangeBASE 5.3 - User Guide Import Non-Core MSI Tables This option is used to import any non-standard Windows Installer tables that may be required for later analysis. For example, InstallShield packages have a number of proprietary tables such as those that handle XML files, which could be imported and have custom QA checks run against them. Import COM Snapshot Data extracts the COM information (Class IDs, ProgIDs and Type Libraries) for all self-registering files within the MSI package being imported. Checkout Packages Automatically This option checks the package out to the user who imports the package. Create external cabinets This option is used to force the generation of external CAB files when fixing MSIs directly. By default, the build type is followed in order to establish how to create the fix files (e.g. if the build is uncompressed, the fix files will also be uncompressed). Note: This option is greyed out unless Generate Transforms is unchecked in 12.1.2 Transforms. PE File Extension Additions This option is used to set up additional file types (e.g. .bpl files), so that their header information and APIs can be imported in. This data is also used by the Best Practice, WRP and Conflict Analysis Plugins to determine the issue and resulting fix. 12.1.4 File Extensions automatically added during folder scans When dragging folders onto ChangeBASE or using the Browse button, only the checked file extensions will be imported into ChangeBASE. 12.1.5 Database Options Server Timeout (mins) is set to 30 minutes by default. However, if you have more than 5,000 packages or if you are running ChangeBASE on a system that does not meet the minimum hardware specifications, it is recommended to set the option to the maximum time (90 minutes) to prevent any timeout issues when running reports against large numbers of packages. Connection Test Timeout (secs) is set to 20 seconds by default, but it is recommended to set the option to the maximum time (30 seconds), to give ChangeBASE sufficient chance to connect to the SQL Server database. Maximum No. Simultaneous Imports By default, this option is set to 5, which is the maximum value and is aimed at a workstation with 4GB of RAM and a 2.2 GHz processor. If you are seeing performance issues on your workstation, you should consider lowering this figure. SQL Server loads packages and Plugins more efficiently using multi-threaded processing. SQL Server performs more efficiently using the multithreading option available with Maximum number of simultaneous imports set between 3 and 5 as opposed to 1. If you would like to increase the number of simultaneous imports to be more than 5, you can set the <NumSimultaneousThreads> setting in the WorkBenchSettings.xml file, which is found in: C:\Users\{UserName}\AppData\Local\ChangeBASE\UserData 175 12 ChangeBASE Options Quest ChangeBASE 5.3 - User Guide Remote DB Server Install Folder This option is used to redirect the database to core package files such as the SQLCompression.dll, which is necessary for queries to be compressed as efficiently as possible between the client and server machines. 12.2 Issue Summary Tab This is covered in 6.7 Viewing Results: Issue Summary. 12.3 Core App Lists Tab The Core App Lists Tab is used to create a group to which packages can be added. Typically, it would be necessary to have a group of core packages against which to check other packages or groups of packages. Enter the name of the group that you would like to create and then click Add. The group name will then appear in the list box below. Once you have created the group, you can add packages to that group by right-clicking them and selecting Add to Core App List. Once you have added all the core packages, the group will appear under the Reports section. Select the Core Apps. group in the Reports section and then, in the Packages section, select the packages that you would like to run against the core applications. 12.4 Platforms Tab The Platforms Tab is used to set the target Dashboard Platforms (refer to 7.2.1 Configuring Dashboard for your Target Environment). Only features, components and custom actions relevant to the Platform selected will be taken into consideration when results are displayed. All other features, components and custom actions will be excluded from being displayed as results. It is advisable to check the option marked Filter reporting issues within the context of the selected Platform, so that the issues are only shown for that Operating System. 176 12 ChangeBASE Options Quest ChangeBASE 5.3 - User Guide 12.5 Upgrade Tab This Tab is described in 4.6.2 Online Report Group Loading. 12.6 Services Tab The Upgrade Service URL/UNC is defined within the Services Tab. This should not be altered unless you are specifically instructed to do so by a member of the Quest® team. 177 12 ChangeBASE Options Quest ChangeBASE 5.3 - User Guide A proxy server can be configured in the lower section of the Services Tab. Enter the details as they are configured in your browser in order to allow ChangeBASE access to the internet through the company’s proxy server. To improve import performance in a multi-user environment, check the option Store Working Data on Local Disk. This will cache the packages in the local user profile while processing the import of the application, before the files are transferred to the Working Directory. 12.7 Security Tab The administrator role is associated with all the rights granted by the ChangeBASE license, and this is the role that everyone uses unless security has been specifically set up in the Security Tab. The minimum required to set up this security is to specify an administrator password. Once you have done this, then, unless you go to the Security Tab and enter the administrator password, you will only have Standard User rights. By default, these rights do not allow you to do anything – you have to manually add the required functions to the Standard User role (shown in the Role drop-down in the top left hand corner of the screen). The Role drop-down allows you to select either the Admin User or the Standard User role and then apply the required permissions to each role. In addition to permission settings, the administrator can also clear the packages checked out against a given user or multiple users. Simply select the required user role and then click the Clear Checkouts button. 178 12 ChangeBASE Options SETTING Quest ChangeBASE 5.3 - User Guide DESCRIPTION Add Middleware Allows a package to be added as a Middleware check, whereby the Files and Registry keys within the package will be verified within the other packages. Add OS Snapshot Allows the import of WIM images or SOE capture files. Add Package Allows packages to be dragged and dropped, or imported via the Packages > Browse option. Add Package to Core App List Allows users to right-click packages within the Packages section and add them to any Core App List that has been previously created via Options > Core App Lists. Allow Additional Package Views Allows the creation of Views. Allow SFT Files (Virtualization Streams) to be imported Enables support for the importing of App-V SFT files for reporting purposes. Convert it Local Enables the use of the right-click Repackaging > Legacy Package Capture option. Refer to 5.2.1.2 Dragging and Dropping Folders onto ChangeBASE. Convert it Source Capture Enables the use of the right-click Repackaging > Source Capture option. Refer to 5.2.1.2 Dragging and Dropping Folders onto ChangeBASE. Copy Issue to Clipboard Copies the Issue description, so that it can be pasted into a report or other document. Core App Lists (Scan) Enables users to create a Core Apps. Group within the Options menu, add packages to the Group, and run the Core App Scan and any associated Fixing. Create Readme Allows users to generate the underlying structure of a Readme file, as well as utilize the Readme function from the right-click of a package. Database Maintainer Enables users to create a new database and rename an existing database. Delete Package Allows users to remove a package from the database permanently. Delete Report Allows users to remove a report from the database permanently. Edit MSI Package (Orca) Enables users to right-click and open the package in Orca. Edit Plugins (Plugin Editor) Allows users to create and update Plugins and create report groups. Extract Cab Files This option allows users to extract all the files from internal and external CAB files. This is necessary for Dependency Scan, API Call Extract and File Header Analysis. Fix Package Allows packages to be fixed using the configuration settings in the Options menu. Load Web Site Allows the import of URLs, websites and CSCWEB files. 179 12 ChangeBASE Options SETTING Quest ChangeBASE 5.3 - User Guide DESCRIPTION Manually Add Reports or Plugins (offline) Allows CBP (ChangeBASE Plugin) files to be dragged and dropped onto ChangeBASE and loaded. Multiple Database Support Allows the support of multiple databases. Print Report Allows users to print the reports available in the Results section of the Reports view. Reimport Package Allows users to re-import packages that already reside in the database. ReportIt View Allows users to view the assessment results on the Reports Tab (refer to 6.5.2 Reports Tab). Transform Application Directory Structure to MSI This setting allows ChangeBASE to scan and import the files, dependencies and registry keys, based on the contents of the Application Folder. If this security setting is disabled, the folder dragged onto ChangeBASE will simply be analyzed for any recognized file formats, such as MSI, MSM, MST, WSI, WSE, and will then be imported directly into the database. If no such file format is found, nothing will be imported into the database. Use the Dashboard Tab in the Options Screen Gives you access to the Dashboard Tab so that you can configure Dashboard. VReady-it Allows users to virtualize packages. 12.8 Report Costs Tab The Report Costs Tab allows you to select a Report Group from the drop-down of Report Groups to which your license entitles you. You can then enter a cost associated 180 12 ChangeBASE Options Quest ChangeBASE 5.3 - User Guide with the manual Fixing of each issue and the effort associated with it in either minutes or hours (but you must stick to the same measurement throughout). This is an invaluable tool for the accurate measurement of the ROI. You can use this as a basis for a business case to buy the ChangeBASE solution set or use further solution set modules. 12.8.1 Recommended Cost and Effort Values From experience, the following are the values that have been found to be the most accurate: REPORT GROUP PLUGIN FIXING? Y EFFORT (HOURS) Virtualization - App-V Active Setup Detection Virtualization - App-V Package Size Limit 0 Virtualization - App-V COM+ Analysis 0.5 Virtualization - App-V DCOM Analysis 0.5 Virtualization - App-V Entrypoint Analysis Y 2 Virtualization - App-V Hard-Coded File References Scan Y 0.01 Virtualization - App-V Inaccessible Control Panel Detection Y 0.1 Virtualization - App-V Microsoft Office and Internet Explorer Add-in detection 1 Virtualization - App-V Multi-Line Registry Analysis 0.5 Virtualization - App-V Non-Supported Drivers (Streamed) 1 Virtualization - App-V Non-Supported DSN Settings 1 Virtualization - App-V Non-Supported ODBC Drivers 1 Virtualization - App-V Non-Supported Services Installation 1 Virtualization - App-V Non Supported System Startup Settings Virtualization - App-V Shell Extension Detection 0.5 Virtualization - App-V Virtualization Local Host Check 1 Virtualization - App-V Windows Service Detection 1 Virtualization - App-V Windows 7 - Windows Resource Protection Scan n/a Windows 64-bit 16-bit File Analysis 0.5 Y 1 0.01 181 12 ChangeBASE Options REPORT GROUP Quest ChangeBASE 5.3 - User Guide PLUGIN FIXING? EFFORT (HOURS) Windows 64-bit 32-bit NameSpace Detection 0.5 Windows 64-bit 64-bit Registry Reflection Deprecated APIs 0.5 Windows 64-bit DirectX Video Acceleration API Analysis 0.5 Windows 64-bit Non-Supported Drivers (Server and 64-bit OS) 1 Windows 64-bit Non-Supported VDM Functions and Registry Settings Analysis (64-bit) 0.5 Windows 64-bit PAE and AWE API Analysis 0.5 Windows 64-bit Windows 16-bit Deprecated API Analysis 0.5 Windows 7/8 Active Directory GPO Settings Analysis Windows 7/8 Common Dialog Compatibility Analysis Windows 7/8 Custom Action Security Scan Windows 7/8 Deprecated API Analysis Windows 7/8 Elevated Privileges Detection Windows 7/8 GINA Deprecated Component Windows 7/8 Hard Coded File References Scan y 0.01 Windows 7/8 Install Logic Scan Y 0.01 Windows 7/8 IPv6 Networking Scan 2 Windows 7/8 IPv6 Strong Host Check 2 Windows 7/8 Legacy Control Panel Applet Scan Y 0.01 Windows 7/8 Legacy Help File Scan Y 0.01 Windows 7/8 Microsoft Message Queue Analysis 1 Windows 7/8 Named Pipe Hardening Analysis 1 Windows 7/8 Nested Install Scan Windows 7/8 NETDDE Deprecated Component Scan Y 0.01 1 Y 0.03 0.5 Y 0.5 1 Y 0.01 1 182 12 ChangeBASE Options REPORT GROUP Quest ChangeBASE 5.3 - User Guide PLUGIN FIXING? EFFORT (HOURS) Windows 7/8 Non Supported Drivers (32-bit OS) 1 Windows 7/8 Non-Accessible Registry Settings Analysis 0.5 Windows 7/8 Portable Device Driver Update Analysis 1 Windows 7/8 Session 0 Isolation Analysis 1 Windows 7/8 TCP-IP WFP - IPX-SPX Scan 1 Windows 7/8 UAC File Header Analysis Windows 7/8 Windows File Library Feature Analysis Windows Server 2008/2012 Active Directory GPO Settings Analysis Windows Server 2008/2012 Common Dialog Compatibility Analysis Windows Server 2008/2012 Custom Action Security Scan Windows Server 2008/2012 Deprecated API Analysis 0.5 Windows Server 2008/2012 GINA Deprecated Component 1 Windows Server 2008/2012 Hard-Coded File References Scan Y 0.01 Windows Server 2008/2012 Install Logic Scan Y 0.01 Windows Server 2008/2012 IPv6 Networking Scan 2 Windows Server 2008/2012 IPv6 Strong Host Check 2 Windows Server 2008/2012 Legacy Control Panel Applet Scan Y 0.01 Windows Server 2008/2012 Legacy Help File Scan Y 0.01 Windows Server 2008/2012 Microsoft Message Queue Analysis 1 Windows Server 2008/2012 Named Pipe Hardening Analysis 1 Windows Server 2008/2012 Nested Install Scan Y 0.5 1 Y 0.01 1 Y Y 0.1 0.01 183 12 ChangeBASE Options REPORT GROUP Quest ChangeBASE 5.3 - User Guide PLUGIN FIXING? EFFORT (HOURS) Windows Server 2008/2012 NETDDE Deprecated Component Scan 1 Windows Server 2008/2012 Non Supported Drivers (Server and 64-bit OS) 1 Windows Server 2008/2012 Non-Accessible Registry Settings Analysis 0.5 Windows Server 2008/2012 Portable Device Driver Update Analysis 1 Windows Server 2008/2012 Session 0 Isolation Analysis 1 Windows Server 2008/2012 TCP-IP WFP - IPX-SPX Scan 1 Windows Server 2008/2012 UAC File Header Analysis Windows Server 2008/2012 Windows File Library Feature Analysis Y 0.5 1 12.9 Duplicates Tab This Tab allows you to prevent duplicate MSI packages from being imported based on the file name, and six MSI properties. We recommend that you select the Product Code, Product Name and Product Version. 184 12 ChangeBASE Options Quest ChangeBASE 5.3 - User Guide 12.10 Browser Compatibility Tab Static Web Search Url Count Threshold: Controls how many URLs will be clicked by the web crawler. The default limit is 500. However, if you are importing large websites, you are advised to keep well below this limit - otherwise, the performance of ChangeBASE may be adversely affected. Static Web Search Time Limit (minutes): Controls how long the web crawler will spend capturing web data on each website. Domain Filter: • Url domain & associated sub-domains: Unlimited web crawling throughout the URL domain and sub-domains. • Url sub-domain only: Limited to the URL sub-domain. No sub-domains of the URL will be crawled. For example, only http://www.bbc.co.uk will be crawled, not links going to http://www.bbc.co.uk/news. Web Analysis Mode: • Always Analyze: ChangeBASE will import web-based content from every loaded item (MSI files, OS image, CSS files, HTML files). This is the advised setting if you are Loading Source Folders for Web Data Capture and/or Using Client Side Capture (CSC). • Web Based Applications Only: ChangeBASE will import web content only for websites and web applications. This is the advised setting if you are Loading URLs. • Disabled: No web content is imported. 185 12 ChangeBASE Options Quest ChangeBASE 5.3 - User Guide 12.11 Add-In Tab The Add-In Tab allows you to launch other tools from within ChangeBASE. Click Add to display the following dialog: Description: Enter a description of the Add-In that you would like to include, e.g. the tool or package name. Type: ContextMenu. Exe Path: Browse to the path of the EXE that you would like to launch. In the example below, the InstEdit EXE file has been used. Enabled: This option is always selected by default, but should be deselected if you would like to temporarily disable the Add-In. Menu Text: This is the text that will be displayed in ChangeBASE. Packages: Enable this right-click option on packages. Reports: Enable this right-click option on reports. Multiple Selections: Allow multiple selections. Use Master: Use the original file from the source, rather than the file in the Working Directory. 12.12 Repackaging Options Tab Here the Virtual Machines used for importing legacy installers are configured. This is covered in detail in 5.4.1 Virtual Machine Setup. 12.13 Dashboard This is covered in 3.4 Configuring and Enabling the Dashboard Components for the ChangeBASE Database(s). 186 12 ChangeBASE Options Quest ChangeBASE 5.3 - User Guide 12.14 Virtualize This is covered in 11.2.6 ChangeBASE Configuration. 12.15 Other Tab The Background Wallpaper option within the Other Tab enables the selection of a .jpg or .gif file as the background wallpaper for the ChangeBASE interface. If you wish to revert to the default image, select the Use Default check box. The Excel Culture setting no longer applies. In the Database Management section, Auto Index Management should be checked to allow the database to be indexed on an ongoing basis without any further related maintenance being required. It rebuilds the indexes following package import but is only really necessary when importing many packages simultaneously. SQL Compression is required to stream data on slower networks. You will first of all need to install ChangeBASE on the SQL Server machine to enable SQL compression. ChangeBASE will then automatically stream data between the clients and the server in 50kb chunks to ease the flow of data and prevent the ‘freezing’ of the package. 12.16 Changing the Text-Based Configuration File Threshold Text-based configuration files are read when packages are imported. This includes files with the following extensions: • • • • • • INI CONFIG XML BAT CMD VBS By default, there is a threshold of 5000 bytes on these files. However, you can change this by adding a line to %localappdata%\ChangeBASE\UserData\WorkBenchSettings.xml. For example, to change the threshold to 50000 bytes, you can add the line highlighted below: 187 12 ChangeBASE Options Quest ChangeBASE 5.3 - User Guide Note: The value is in bytes. Note: Until the ChangeBASE Plugins are updated, you will need to write a custom Plugin to run checks on this data (it is stored in the table tblmsiTextBasedFileData). Refer to Chapter 14 Writing Custom Plugins. 188 13 Advanced Usage Quest ChangeBASE 5.3 - User Guide 13 Advanced Usage 13.1 Packages Tree Context Menu There are a number of different options available that allow you to organize and modify the way in which you view your packages. These options are available in a context menu when you right-click the Packages tree: 13.1.1 Save/Retrieve Reports This option allows you to save the current set of report results for subsequent retrieval. Saved results are not affected by the Clear Results command. To use this, select the Save new results group option as shown above. 189 13 Advanced Usage Quest ChangeBASE 5.3 - User Guide Choose a name for the group: Once you have saved this group, it will become available from the same option in the future, unless you choose the Manage Results groups option, which will appear after you have created at least one saved report group. This option will allow you to delete saved report groups you no longer require. 13.1.2 Package Selector This option is used to select only the packages containing the types of issue that you choose. All other packages will be deselected. For example, if you only want to select packages that contain non-supported drivers for Windows 7, choose the option shown below: 13.1.3 Create View Use the Create View option on the Packages tree right-click menu to create Views or Groups for your packages. You may use the Views to organize your packages by Business Unit, Package Type or any other kind of logical structure. 190 13 Advanced Usage Quest ChangeBASE 5.3 - User Guide 1. First of all, you are asked to give a name to the View. 2. When you click OK, you will see that your View has been added to the View list in ChangeBASE: 3. Now you can organize your packages into categories, grouping them together for whatever purpose you need. 4. Right-click again on the packages row and select Organize Views (described in 13.1.4 Organize Views). 191 13 Advanced Usage Quest ChangeBASE 5.3 - User Guide 13.1.4 Organize Views 1. From the Organize Views window, select the required View in the left hand panel. 2. Choose the packages to be added to the View by selecting them in the right hand window. 3. 4. Click . The packages will be added to the Packages panel. You can add Sub-Views to further organize your packages by right-clicking on a View and selecting Add Sub Item. For example, you might want to set up a Workflow View, with various Sub-Views: 192 13 Advanced Usage Quest ChangeBASE 5.3 - User Guide These Sub-Views are then displayed as follows when you select the Workflow View: 5. Clicking OK will return you to ChangeBASE, where you can now filter the packages using the Views filter shown in step 3. Views and Sub-Views are shown in Green. 6. After running reports, the total RAG status is shown on the View’s row. Note: You can link a View to a report group, so that, when the applications associated with that that View have the characteristics that you specified in the report group, they are grouped together on the interface. To set a report link, right-click on the required View and select Set Report Link: 13.1.5 Virtualize from Manifest This option allows you to virtualize packages by selecting a Manifest in XML format: Refer to 11.3.4 Package Virtualization: Using a Manifest file. 193 13 Advanced Usage Quest ChangeBASE 5.3 - User Guide 13.1.6 Expand This option expands the list of packages completely or by View. 13.1.7 Collapse This option collapses the Packages tree. 13.2 Package-Level Context Menu There are a number of different options available when you select a package that has been imported into the database, and then right-click to display the associated context menu: Note: Except where specified, you are able to select the above options for multiple packages. In order to utilize this capability, you can either multi-select a range of adjacent packages, using [SHIFT] | Select (mouse click), or you can select non-adjacent packages using the [Ctrl] | Select (mouse click) option. In both cases, you should right-click on the final package in the selection to see the drop-down menu. You will then have the multi-select options that are available for your particular license. 194 13 Advanced Usage Quest ChangeBASE 5.3 - User Guide 13.2.1 Delete Delete is used to remove the package from the database. Note: The physical package will still reside in its source folder. 13.2.2 Save/Retrieve Reports Save/Retrieve Reports opens to the sub-menu Save new results group – for its use, refer to 13.1.1 Save/Retrieve Reports. 13.2.3 Select App IDs Select App IDs allows you to organize application IDs as in 4.7.1 AppID Maintenance. If you have selected a single package, the option opens to the dialog shown in 4.7.1.1 Single Selection. If you have selected multiple packages, the option opens to the dialog shown in 4.7.1.2 Multiple Selection. 13.2.4 Open Containing Folder Open Containing Folder opens the folder in which the selected package resides, so that you can review the package and any associated fix Transforms. 13.2.5 View Dependencies View Dependencies. This option is only available when a single item is highlighted. When the Dependency Viewer is opened, it populates the Package Dependencies tree (the uppermost tree) with a list of files on which the selected package has one or more dependencies (in other words, those files that contain functions called by the main package). The main package is displayed at the top of the tree. You can drill-down into the tree into ever lower levels of dependency. 195 13 Advanced Usage Quest ChangeBASE 5.3 - User Guide A green tick is displayed to the left of a tree node whenever ChangeBASE detects that the corresponding file is actually installed by the package. On the other hand, if a file is listed as a dependency but is not installed by the package, the item is greyed out and an exclamation mark is displayed. When you click on one of the nodes of the Package Dependencies tree, a list of other packages that also have dependencies on the selected component is displayed in the second tree, and a list of other packages that install the selected component is displayed in the bottom tree. These are considered to be Shared Dependencies: 196 13 Advanced Usage Quest ChangeBASE 5.3 - User Guide You will notice that the item at the bottom tree is greyed out. This is to indicate that it is the main package displayed at the top of the Package Dependencies tree. When you click on the topmost node of the Package Dependencies tree, the Dependency Viewer iterates through all of the dependencies of the main package and checks to see which other packages share one or more of these dependencies. The results are then displayed in the second tree, showing both the shared component and the package name. This is known as Shared Dependencies Rollup: 197 13 Advanced Usage Quest ChangeBASE 5.3 - User Guide When the Exclude Operating System Files option is checked, Operating System files, such as KERNELL32.DLL for example, are excluded from the results, thus greatly reducing and simplifying the data returned. This filter works by loading an Operating System Snapshot (such as a .SOE file) and simply excluding all of the files contained within it from the result sets. You can choose your own Snapshot by selecting it from the Operating System Snapshot dropdown list. Context Menu options are available such that you can right-click on a package within the middle and bottom tree and select ‘View Dependencies’ to open a new Dependency Viewer window for that package. 13.2.6 View Log View Log displays the path and the name of the MSI file that is being imported and/or fixed. It shows the version of the database against which the import or fixes are being run, and then shows a step-by-step log of all importing/fixing actions that take place against the package. 198 13 Advanced Usage Quest ChangeBASE 5.3 - User Guide Some of the logging is used by ChangeBASE internally to recognize how the fixes are being applied. Most of the logging, however, shows the SQL statements used to remediate the issues previously reported. All logging details are also stored in the database. Importantly, you have the option to save this log as a file, which is often needed for cases where support is needed. Note also, the drop-down box at the bottom, which allows you to display errors only. 13.2.7 Edit MSI with Orca If you have Orca installed (not SuperOrca or anything similar), then Edit MSI with Orca opens the MSI in the Orca editing tool. 13.2.8 Edit MSI with MSI Studio for ChangeBASE Edit MSI with MSI Studio for ChangeBASE opens the MSI in the MSI Studio editing tool. This option is only available if all of the following conditions are met: • • • your ChangeBASE license entitles you to use MSI Studio. you have right-clicked against a single (not multiple) package. the selected package is one of the following: o a natively imported MSI o a Transform file o an EXE, where you have specified a filename in the MSI Copy Filename field in the Advanced Settings of the Repackaging Configuration (refer to 5.5 The Repackaging Process). 199 13 Advanced Usage Quest ChangeBASE 5.3 - User Guide What you see will depend on which of the following actions you have taken. 13.2.8.1 Right-clicking a Package without Transforms Where there are no Transforms involved, you will simply see Edit MSI with MSI Studio for ChangeBASE as a right-click option. Selecting the option loads the selected package into MSI Studio, for example: If you save the MSI Studio project, the timestamp of the MSI file changes, so that, when you close MSI Studio for ChangeBASE, the package will be seen in ChangeBASE as out of date. A red icon is therefore displayed in the Package out of date column: If you select Re-import from the right-click menu, the red icon will disappear once the file has been re-imported. 13.2.8.2 Right-clicking a Transform You will see Edit MST with MSI Studio for ChangeBASE as a right-click option. Selecting the option opens MSI Studio for ChangeBASE, and loads the MST, along with the MSI to which the MST belongs. If you save the MSI Studio project, the MST’s timestamp changes, so that, when you close MSI Studio for ChangeBASE, the MST will be seen in ChangeBASE as out-of-date. A red icon is therefore displayed in the Package out of date column: 200 13 Advanced Usage Quest ChangeBASE 5.3 - User Guide This is not propagated up to the package level, so if the package is collapsed so that the Transform is not displayed, the package will not show as being out of date. The same would be true if you had saved the changes as a new Transform. 13.2.8.3 Right-clicking a package that has Transforms You will see Edit MSI with MSI Studio for ChangeBASE as a non-selectable option that provides a sub-menu, e.g. Selecting the top option in the sub-menu results in the behavior described in 13.2.8.2 Right-clicking a Transform, and selecting the bottom option results in the behavior described in 13.2.8.1 Right-clicking a package without Transforms. 201 13 Advanced Usage Quest ChangeBASE 5.3 - User Guide 13.2.9 View History View History displays the import/fix history, showing who imported the selected package, as well as any fixes that have been applied, with accompanying timestamps, e.g. Note: This package history is cumulative during the time that the package resides in the database. 13.2.10 Checkin Checkin checks the package back in, so that any user can run fixes against the package. Note: When a package is checked out, only the user who has the package checked out can run fixes; all other users can only run assessments. 13.2.11 Re-Import Re-import allows the re-import of a file or web application. Note: This is run automatically every time that fixing is undertaken. 13.2.12 Add to Core App List Add to Core App List adds the package to the group that has been created in the Core App Lists Tab under Options. Note: This option will only appear if you have created at least one Core App List. 13.2.13 Add to Matching Analysis Add to Matching Analysis can be used with any package type that installs a type of software considered to be “middleware” that might possibly clash with other packages. Packages can then be checked against the Matching Analysis Plugin. 202 13 Advanced Usage Quest ChangeBASE 5.3 - User Guide 13.2.14 Create Issue Summary Report Create Issue Summary Report runs a set of reports on an individual package as defined in Options > Issue Summary. 13.2.15 Extract CABs from MSI Extract CABs from MSI is used to extract internal CAB files from an MSI. 13.2.16 Overrides Override All Issues; Specify Overrides; View/Update Overrides are all prompts that allow the management of the manual overrides of Red or Amber conditions. If you have not yet selected this feature for a package, the first two prompts will be seen; otherwise, it will be the third one. You can either override all issues for a package, thus making it Green, or specify individual overrides, e.g. The Override icon against them. is displayed against all packages that have overrides set 13.2.17 Views This option will appear if you have created any views, so that you can add this package to them. 13.2.18 Bulk Issue Summary In addition to 13.2.14 Create Issue Summary Report, you also have the option to select multiple packages, and then select Bulk Issue Summary in order to report on all the selected packages simultaneously. Firstly, select the packages on which you need to report by holding down the Ctrl key as you click them, then right-click and select Bulk Issue Summary. 203 13 Advanced Usage Quest ChangeBASE 5.3 - User Guide 13.2.19 Expand/Collapse The Expand and Collapse options are used to expand or collapse the package tree view. At this level, expanding the tree shows details of the reports that generated Amber or Red warnings. 13.3 Importing Operating System Images ChangeBASE supports the conflict analysis of packages against one another as well as against the Operating System Image. In order to test your packages against an Operating System Snapshot, you can load Operating System images into ChangeBASE via SOE capture files generated by Wise Package Studio or, most commonly, via WIM (Windows Imaging Format) images. WIM files are the modern standard for storing and manipulating Operating System images prior to deployment. The ChangeBASE supports importing WIM files so that the contents can be examined. Once the WIM has been loaded into ChangeBASE you can use it as part of the Core Application Scan functionality to test for conflicts with packages. 13.3.1 Gold Images Loading Operating Systems into ChangeBASE takes a very long time, as information has to be read from tens of thousands of files. It is highly recommended that the Operating System and the absolute minimum of core packages are included in the Operating System. Any package that you intend to load (and manage) separately should be added to ChangeBASE separately and not included in the WIM. 13.3.2 Limitations Images larger than 5Gb or containing more than 100,000 files, are not supported by ChangeBASE. If you attempt to load images larger than these recommended limits, the loading will run for many hours and is likely to fail prior to completion. 13.3.3 Alternatives to WIM files Microsoft VHD files can be mounted on Windows 7 with Disk Management Console by entering diskmgmt.msc in the Run box and going to Action > Attach VHD. On Windows XP you will need to download and run VHDMount. Download Virtual Server 2005 and follow the installation and mounting instructions. VMware vmdk images can be mounted with a free tool available here: http://www.vmware.com/download/eula/diskmount_ws_v55.html There are a range of tools available for mounting ISO files, such as: http://www.slysoft.com/en/virtual-clonedrive.html and: http://www.daemon-tools.cc/eng/products/dtLite 204 13 Advanced Usage Quest ChangeBASE 5.3 - User Guide Once you have the image mounted, follow the instructions in 13.3.6 Loading into ChangeBASE. 13.3.4 Installing the WIM Driver files 1. Download the Windows AIK (Automated Installation Kit) from here: http://www.microsoft.com/downloads/en/details.aspx?FamilyID=696dd665-9f764177-a811-39c26d3b3b34 2. 3. Install waikx86.msi or waikAMD64.msi depending on your Platform. Navigate to the folder: C:\Program Files\Windows AIK\tools 4. Choose the correct folder for your CPU type (x86 or AMD64). 5. 6. Locate the ImageX tool in the same folder as wimfltr.inf (or wimmount.inf). Right click on wimfltr.inf (or wimmount.inf) and choose Install. 13.3.5 Mounting the WIM file 1. 2. 3. 4. 5. 6. It is not recommended that you place the WIM file on your desktop. Place the file in a folder that can be accessed by all users. To avoid other problems, you should set NTFS permissions on the file to give Everyone Full Control to the WIM file. Create a folder that will be mapped to the WIM contents, e.g. C:\WIM. This must be an empty folder. Open a CMD Command Prompt with Administrative Elevated permissions. Navigate to the folder containing ImageX (as above). Mount the WIM using the following command line: ImageX /MOUNT <path to your WIM> 1 <path created in step 3> 7. WIM files can contain multiple volumes. Check the size of your mounted folder. If it is too small, then you may have mounted the wrong volume. Return to the previous step and use a higher number (2, 3, 4, etc.) in the third command line argument. 13.3.6 Loading into ChangeBASE 1. 2. 3. 4. 5. Drag and drop the folder representing the mounted WIM file onto ChangeBASE while holding SHIFT (this ensures that it does not seek out MSIs in the sub-folders). You may be prompted to load the Microsoft Log Parser at this point. Whilst this is required for some ChangeBASE functions, it is not necessary for WIM file loading, so you can choose to install it when asked, or just select Continue. Right-click on the folder in ChangeBASE and change its setting to Repackaging > Source Capture (OS Snap). If you do not see this option, contact your ChangeBASE representative. If you have UAC enabled then you must close ChangeBASE and reopen it as an Elevated Administrator. Click Import. 205 13 Advanced Usage 6. 7. Quest ChangeBASE 5.3 - User Guide When it has loaded, right-click on the package and add it to a Core Application Group. Locate the Core Application and set it as an Operating System Snapshot. 13.4 CAS (Core Application Scan) The CAS (Core Application Scan) is a reporting structure supported by ChangeBASE, which allows you to quickly and easily create a group of packages that can check for “package” level conflicts with other selected and imported application packages. The CAS is intended to check a number of application packages against a core list of application packages that are already imported into the database. What is Conflict Management? Conflict Management is a method of addressing issues where applications conflict with one another and the Operating System. There are a number of problems that are encountered, especially if a number of applications are installed and uninstalled on a system. Common issues: 1. Incompatible Versions - A particular version of a library may be incompatible with an older or newer version. There have been many rules put in place to prevent these situations but this can still occur, particularly with older applications. Many applications relied on the bugs that existed in these libraries and when a new version is released where the functionality is fixed, they don't function any more. 2. DLL Stomping - Different installers have the ability to replace libraries on the file system with older versions. Software vendors often wrote their own installers that ignored versioning rules as a consequence. Windows Installer handles these correctly and will only be able to update any library if it has a newer version. With Windows 7 comes the additional security of Windows Resource Protection, which means that the Operating System will prevent certain files and registry keys from being replaced if they are not installed with the ‘trusted installer’. 3. Incorrect COM Registration - In COM, the registry is often used to determine the underlying resource that should be used. If the COM information in the registry is overwritten, it could result in an incorrect resource being loaded, which could cause the application to fail. 4. Shared-in memory modules - This only applies to 16bit resources. 32-bit and 64-bit resources can be loaded into the memory simultaneously, apart from when they are in the same folder when memory-mapping will occur. Other issues that we want to know about: • INI Files being overwritten • Registry Values being replaced • ODBC settings being over written • File Associations being replaced • Files and Registry keys that will be removed during uninstallation. 206 13 Advanced Usage Quest ChangeBASE 5.3 - User Guide There is a recommended process for “building” this list of packages and then importing them into ChangeBASE: 1. Create a Core Application Reporting Group. Refer to 12.3 Core App Lists Tab. 2. Load an Operating System image into ChangeBASE. Refer to 13.3 Importing Operating System Images. 3. Right-click on the Operating System and add it to the Core Application Report Group 4. The Operating System will now appear in the Core Applications Report group and needs to be set as the OS. This can be done by right-clicking on the Report and selecting the OS Snapshot option: 5. Add the first Core Application to the Core Application Group. 6. The newly added Core Application will now be listed as a report in the Core Application Group. 7. To check if any conflict exists between the applications and/or Operating System, select the applications Core Applications and or OS in the Core Application Group and select the application against which results should be shown. 207 13 Advanced Usage Quest ChangeBASE 5.3 - User Guide 13.4.1 Core Application Scan Rules The types of conflicts that ChangeBASE can identify are configurable through the CAS Filters option. To edit the Rules that should apply, right-click any of the applications that are shown in the Core Applications Report Group, and select CAS Filters. You will then be presented with a screen where the rules that should apply can be selected: The radio buttons at the top of the screen are used to set which rules should be changed (either packages or the Operating System). An Operating System behaves differently than applications as it does not have any components with component IDs. The most relevant rules to identify conflicts will be selected by default but, if desired, additional rules can be enabled to troubleshoot specific applications. The tabs at the top indicate which set of rules are currently being displayed. In the above screenshot, for example the File Rules are displayed. Let’s use BPF16 – BPF18 as an example. This will show an issue if the filenames between two applications are the same but the file versions are different. Other characteristics of the file are as follows: • • • • It’s a PE File (Portable Executable like an EXE). It’s not a COM File (i.e. it does not register COM information). The install location matches. The ComponentID that installs the Component is different. 208 13 Advanced Usage Quest ChangeBASE 5.3 - User Guide BPF 16 (Best Practise File Issue 16) will display an issue if the file version is older than that of the Core Application, BPF 17 will display an issue if the file version is newer than the one added to the Core Applications and BPF 18 will display an issue if the file version is the same as the one added to the Core Applications. 13.4.2 Understanding the CAS Rules For a full detailed list and next step information for each check, see the Next Steps folder in c:\Program Files (x86)\Quest Software\ChangeBASE\Dashboard on x64bit platforms or c:\Program Files\Quest Software\ChangeBASE\Dashboard on x86 platforms, e.g. 209 13 Advanced Usage Quest ChangeBASE 5.3 - User Guide 13.4.3 Core Application Rules Settings The Settings Tab contains additional filters that can be applied to filter out items that are deemed unimportant. For example, Merge Modules are commonly used inside an application to avoid conflicts. Older versions of MergeModules could conflict with later versions of MergeModules simply because the MergeModules have files that are different versions. MergeModules would be backwards compatible 99.9% of the time. Therefore, if your application estate produces a large number of conflicts because of different file versions, results can be filtered out by unchecking Include issues relating to Merge Module components. 210 13 Advanced Usage Quest ChangeBASE 5.3 - User Guide 13.5 Important Files and Folders The ChangeBASE license and settings files are stored within the user’s profile in a folder called ChangeBASE: Windows XP %USERPROFILE%\Local Settings\Application Data\ChangeBASE Windows Vista, 7 and 8 %localappdata%\ChangeBASE Windows Server 2003, 2008 and 2012 %localappdata%\ChangeBASE The most significant sub-folder in this location is the UserData folder, which contains the following: • AOK.cbl, which is the ChangeBASE license file that governs your entitlement to the modules that you have purchased. • ChangeBASE Activation Page, which is a web link to the page where you can submit a license for activation or re-activation. • GUIApp.ini, which is the configuration file for automated application virtualization. • sequences.xml, which contains the information about the last virtualization you performed. • WorkBenchSettings.xml, which is used to store all the settings configured within the ChangBASE Options. The other main folder is the Working Directory, which is defined during the initial creation of a database (refer to 2.1.4 Working Directory), and is typically located on a network share, so that all users of the solution set have access to the centrally shared information. There is always one Working Directory per database Each Working Directory contains the following sub-folders: • The HTML folder, which is no longer used. • The Logs folder, which is used to store output from virtualization. • The MSIXML folder, which is no longer used. • The Packages folder, which contains cached MSIs and MSTs that have been imported into the database. • The Plugin folder, which contains Plugins that are generated using the Report Generator. This functionality is only available with the Plugin editor. • The PluginSource folder, which is the location for any files to be added by a Plugin. It is a local cache for Plugins. • The Workfiles folder, which is a temporary staging area for system use. • The WebTmp folder, which is only utilized when importing web data. • The XMLData folder, which contains a cache of files used by ChangeBASE, such as the latest, viewed CSV and HTML reports. 211 13 Advanced Usage Quest ChangeBASE 5.3 - User Guide You can check the location of the Working Directory for a database by right-clicking the associated database Tab in the Workbench, then clicking Properties. Enter the server name, and then click Next as prompted until the Working Directory screen appears: 13.6 Command Line Invocation of ChangeBASE Functions The command set listed below can be invoked using cbExec.exe. This executable must reside in the ChangeBASE install directory. One or more databases must have already been registered to the machine through the product’s UI prior to using this tool. Simple examples are provided for each command. 13.6.1 DBLIST This returns a list of logical and physical database names registered with ChangeBASE from the executing machine. A logical name is required for other commands listed below. Example: cbExec DBLIST 13.6.2 IMPORT This imports a package into a specified database. The full path of the package must be specified after the logical database name. One or more Transforms can be appended as further arguments. Examples: cbExec IMPORT WBDB1 "C:\Packages\BARCODE00030853.msi" 212 13 Advanced Usage Quest ChangeBASE 5.3 - User Guide cbExec IMPORT WBDB1 "C:\Packages\ABACUS.MSI" "C:\ Packages\ABACUST_US.mst" 13.6.3 LISTREPORTS This lists reports in a specified database, returning a list of report identifiers and associated report names. A report identifier is required by the REPORT command. Example: cbExec LISTREPORTS WBDB1 13.6.4 LISTPACKAGES This lists packages in a specified database, returning a list of package identifiers and associated package file names. Package identifiers are required to define a set of explicit packages against which to run the report. Example: cbExec LISTPACKAGES WBDB1 13.6.5 REPORT This run a report in a specified database. A report can be executed against all packages in a database, or against an explicitly defined set of packages. Example: cbExec REPORT WBDB1 “2698da37-ef2f-4303-ad8c-7c73a120191f” cbExec “–Fc:\temp\PkgList.dat" REPORT WBDB1 "2698da37-ef2f-4303-ad8c7c73a120191f” The first example runs the specified report against all packages within WBDB1. The second example runs the specified report against the list of package identifiers within PkgList.dat. This is a list of identifiers from (LISTPACKAGES). Each identifier is listed on a new line. 13.6.6 EXPORT Export from a specified database. Example: cbExec EXPORT WBDB1 –X6 “C:\temp\test.csv” This exports one of the in-built ChangeBASE reports to a specified file. The “X” argument indicates which report is to be exported. The table below lists identifiers for each report. Summary 0 Profile 1 Profile (Postfix) 2 213 13 Advanced Usage Quest ChangeBASE 5.3 - User Guide Packages By RAG 3 Reports By RAG 4 CSV 6 Package Issue Summary 7 Raw XML 8 214 14 Writing Custom Plugins Quest ChangeBASE 5.3 - User Guide 14 Writing Custom Plugins One of the features included in ChangeBASE is the ability to create new Report Groups and new Reports (e.g. Custom QA Checks). Automatically checking for and remediating standardization QA checks can save vast amounts of time and cost in the packaging process. For more details, see the following topics: • • • • 14.1 Moving Reports and Re-organizing Existing Plugins 14.2 Adding Report Groups 14.3 Adding a Report 14.4 Adding Rules to a Report 14.1 Moving Reports and Re-organizing Existing Plugins Before you start creating and updating Plugins, there is a simple mechanism to re-organize each Plugin within and across Report Groups. In order to move a particular Plugin from one Report Group to another: 1. 2. 3. 4. 5. Ensure that you have the correct privileges to update reports. Right-click the Plugin. Select Move Report. Select the appropriate target Report Group. Once the ChangeBASE screen has refreshed, the Plugin will have been relocated to the new Report group: You will need to create your target Report Group first, before you can move a Plugin into it. 215 14 Writing Custom Plugins Quest ChangeBASE 5.3 - User Guide 14.2 Adding Report Groups To add a new Report Group: 1. 2. Select the Root Report tree-element within ChangeBASE. Right-click and select Add Report Group. 14.3 Adding a Report You may have already added a new Report Group or you may choose to add a Plugin to an existing Report Group. To add a new Report: 1. 2. 3. Ensure that you have the correct privileges to update and create reports. Select desired Report Group in the Report tree-element within ChangeBASE. Right-click and select Add Report. Once you have selected this option, the Report Generator is launched: 216 14 Writing Custom Plugins Quest ChangeBASE 5.3 - User Guide There are a number of key fields that are critical to the successful completion of the Plugin generation process, including: • Name: This is the name used to display the Plugin within ChangeBASE. • Description: This is a text field that includes the Plugin’s descriptive text that should follow the structure below: 1. 2. 3. 4. Brief overview of the Plugin logic. Sample rule Items and the potential risk of leaving the issue within the package. A description of the Fixing logic (where applicable). Source of the rules and remediation logic. • Support URL: The support URL is the web reference that links to either the Plugin topic or corporate support page. • More Info URL: This is the web link or URL that contains further information on the problem, the Plugin or the remediation logic for issues raised. • Report Template: The Report Template drop down is used to select a template containing the required logic to run the required reports. There are a number of existing templates: • • • • • Pattern Scan - scans the required table(s) within the database for packages that contain the particular pattern that you have entered, without needing to enter wildcard symbols. For example, if you look in the FileName column of the File table for the string “.xla”, the Pattern scan will return all instances of .xla files within the packages selected. Two-Dimensional Result Set - contains two columns, or ‘two dimensions’, of data such as a FileName and Version, a Registry key and Value, a Property and Value or INIFile name and Section. This report or result type is typically used to capture information on lists of filenames or registry keys and is employed in the Middleware reports. One-Dimensional Result Set - contains one column, or ‘one dimension’, of data such as a FileName, a Registry key, a Property or INIFile name. This report or result type is typically used to capture information on lists of filenames or registry keys. All Table Scan - scans all of the primary tables within the database for packages, using Report Proc. prGenScan_RA1. Custom - allows you to select from either one of the empty stored procedures, such as prGenDummy results, to create a report from scratch or to leverage one of ChangeBASE’s existing report templates, which can be extended to include custom logic. 217 14 Writing Custom Plugins Quest ChangeBASE 5.3 - User Guide Report Proc: Most typically used in conjunction with the Custom Report Template to select an individual report, whose logic most closely meets the requirements. Fix Proc: This drop-down box allows the selection of specified types of remediation or ‘Fix logic’. The most common Fix type is GENCLEAN, which safely removes any entries that have been reported upon. Merge Module: This mechanism for reporting on entries that are contained in a Merge Module is no longer in use. Version No.: This field is vital to ensure that a Plugin is updated, with the later version being automatically downloaded, the previous version being deleted, and then the later, updated version being installed. For this process to function correctly, each Plugin has to be correctly and incrementally versioned. Effort and Cost: These fields are used to pre-configure the amount of effort in hours or minutes and the cost associated with fixing the issue manually. This information is used in conjunction with the Reports Tab to show the savings made by Fixing issues using the solution set. Rule Summary: This section provides an overview of the rules, their target tables and the RAG status for each grouping. A sample looks like the following: 14.4 Adding Rules to a Report Once you have created the Report description fields, determined which reporting and Fix logic will be employed, you will generally need to add data to the Plugin. There are exceptions to this as some Plugins rely solely on business logic in SQL stored procedures or hard-coded values and properties. This is the exception, as most Plugins will access the Rules section of the database for at least part of any reporting or remediation process. The Rules section is available from the Rules Tab displayed when editing Report metadata. The Rules Tab is intended to provide an intuitive User Interface (UI) to the ChangeBASE database, while mimicking some of the functionality and database structures of the MSI Installer database. To make full use of the Rules Tab included within the Report Generator, you should be familiar with the MSI Installer table structures and database schema. 218 14 Writing Custom Plugins Quest ChangeBASE 5.3 - User Guide Target Table: The Target Table drop-down box contains a list of all imported tables that are available to query within the database. For example, to view or add rules that pertain to the APINames table, such as Filenames, select the APIName option from this box. Target Columns: The Target Columns drop-down box is used to select which columns will be analyzed once a table has been selected. For example, selecting the APINames table will present the columns for FileName and APIName. Selecting and adding one of these columns to the text box below will include these columns in all subsequent checks for this Plugin. When editing an existing report, some tables will be highlighted in red. This color-coded highlighting is intended as a hint for all tables that contain matching entries. FixType: The FixType drop-down box is an essential part of the rules and specifies on a rule-level which remediation option will be engaged if the Fix button is selected for a particular issue. The main Fix is GENCLEAN, which is composed of one of the following types of Fix procedure: 1. 2. GENCLEAN: This Fix type removes any errant entries safely and completely. GUIDSYNC: This Fix type is used by the Core Application Scan (CAS) and, when appropriately matched with a specified type of CAS report, will 219 14 Writing Custom Plugins 3. 4. 5. Quest ChangeBASE 5.3 - User Guide automatically synchronize the Component IDs of two components residing in separate application packages (MSIs). ADDMANIFEST: This Fix type is used by reports that require automated Fixes to create security Manifests for targeted files within an application package. One example of a Plugin that uses this Fix is the Control Panel Applet Platform Integrity Scan. ADDMMCAB: This Fix type adds a specified merge module to the target MSI. One example of a Plugin that employs this Fix type is the Windows Help File Platform Integrity Plugin. ISOLATECONFLICT: This Fix type is used by the Core Application Scan (CAS) and is used to generate a specially formatted XML file and Manifest to deliver the required COM registry information and Side by Side Assembly (SxS) information to fully isolate a conflict COM object in a target MSI Installer package. RAG Status: The RAG status field (derived from Red, Amber, and Green) is used to denote what type and severity of errors should be raised with the matching rule data. Green is used for informational results, Amber for non-critical, generally Fixable issues and Red is employed to signify packages that will experience serious functionality and compatibility issues on the target Platform. RuleSource: This (optional) text field is used to describe the source from which the rules originate. For example, certain Platform Integrity rule-sets are derived from Microsoft documentation and other Plugin rule and data-sets are derived from customer data. Value Set: This area is the heart of the Plugin and contains the raw rule-data required to report and Fix package issues within ChangeBASE. This section will become active once you have selected a table (i.e. the File table) from the Target Table drop-down box and at least one column from the Target Columns dropdown box and added it to the text box below using the Add button. 220 14 Writing Custom Plugins Quest ChangeBASE 5.3 - User Guide Note: You are free to type individual values or cut and paste from text sources such as Notepad or Excel. When adding data for more than one column, it is advisable to cut and paste from Excel. The Paste button will only become enabled when the following conditions have been met: • • • • There are matching elements in the Paste buffer. For example, single dimension checks will expect a single column while two column checks will require two columns of text data. A target table has been selected. At least one target column has been selected and added appropriately. Once this has been accomplished you see your rule data appear in the Value Set section of the Report Generator. 221 15 Browser Compatibility Quest ChangeBASE 5.3 - User Guide 15 Browser Compatibility This chapter covers the testing of your Web browser(s) for compatibility issues. Important: It is highly recommended that you use an account specifically created for the purposes of testing. This is to avoid a situation whereby a link is automatically followed that could cause information in a live environment to be deleted or modified. Ideally, this account should not have high levels of authority, thus reducing the risk of accidental damage. 15.1 Loading URLs URLs (Uniform Resource Locators) can be dropped onto the ChangeBASE Workbench directly from your browser’s address bar, or from any document that recognizes URLs, such as Microsoft Word or WordPad. Note: This functionality has been removed from Internet Explorer from Version 9 upwards, so, if you are testing Internet Explorer compatibility, it is recommended that you use a text editing tool, such as those mentioned above. Once a URL has been dropped onto ChangeBASE, click the Import link on the Packages Panel and the URL will be spidered automatically. The results are affected by the options set in the Browser Compatibility Tab. In particular, you should set Web Analysis Mode to Web Based Applications Only. The limit of URLs that can be loaded is set in the Static Web Search Url Count Threshold field in this Tab. The default limit is 500. However, if you are importing large websites, you are advised to keep well below this limit - otherwise, the performance of ChangeBASE may be adversely affected. 15.2 Auto Logon Auto Logon allows you to configure the credentials needed for web applications that use Forms Authentication. Before configuring Auto Logon, web application URLs should be loaded onto the ChangeBASE Workbench as described above. After loading one or more URLs, you should be ready to configure Auto Logon. 222 15 Browser Compatibility Quest ChangeBASE 5.3 - User Guide 15.2.1 Auto Logon Process Overview 15.2.2 Auto Logon Process Explained 1. Create the Web Package The first step in creating a Web package for Auto Logon processing is to drag a URL from a word document or browser onto the ChangeBASE Workbench. The URL should point to the base page of the website you wish to capture. This will create a new package item in the list identified by the URL. 2. Configure Auto Logon Settings Before starting the capture and import process, you must configure the Auto Logon settings that determine the pages and controls used for site authentication. Further details can be found in 15.2.3 Configuring Auto Logon Settings. 223 15 Browser Compatibility Quest ChangeBASE 5.3 - User Guide 3. Start the Package Import With the Auto Logon settings configured, start the capture process by clicking the Import link on the Packages Panel, or, for packages that have already been imported once, right-click and choose Re-import. 4. Enter Logon Credentials When the capture process starts, it begins by looking at the configured heartbeat page. If it cannot find a match, it will then prompt you for logon credentials. See 15.4 The Web Application Import Process for further details. You may cancel the capture when prompted for credentials. In this case, the import process is stopped and the package import is marked as failed. 5. Website Capturing Once site authentication is complete, the capture process will collect pages and resources from the website according to any limits that have been set. The data is stored locally in temporary files before the final processing stage. If any errors occur, or if any failure limits are hit for the capture process, the import process is stopped and the package import is marked as failed. Refer to 15.8.1 Problems arising from the Loading of URLs and Folders for further details. 6. Final Import Once all data has been collected, it is then processed and written to the ChangeBASE database ready for assessment against ChangeBASE reports. 7. Import Completed Once all data has been written to the database, the import is complete. Refer to Chapter 6 Assessing Packages and Viewing Results for help on understanding the results of the capture and import process. 15.2.3 Configuring Auto Logon Settings The Auto Logon feature allows you to define a group of URL and control settings for a package. You can create new settings for a project by right-clicking on a URL in the Workbench and selecting one of the following options: • Auto Logon > Configure Logon Settings – This option will open the selected settings. Selection is indicated with a check box against the settings name. If no selection has been made for this package then a new group of settings will be created. • Auto Logon > Create New Logon Settings – This option will always create a new group of settings and, if configuration is successfully completed, these settings will be marked as selected against the package. 224 15 Browser Compatibility Quest ChangeBASE 5.3 - User Guide For example, if you select Create New Logon Settings, the following screen is displayed: 225 15 Browser Compatibility SETTING Quest ChangeBASE 5.3 - User Guide DESCRIPTION Package Base URL The Auto Logon crawler should start searching for pages at this address following authentication. Auto Logon Description This is a descriptive name, which can be used to identify this group of settings. It must contain only alphanumeric characters, spaces, hyphens and underscores. Logon URL The logon URL should be the location of the web page where you can authenticate against the site using Forms Authentication. This must be a valid, formatted URL. Refresh Button This button will load the Login URL into the browser window, as in the example in 15.2.4 Selecting Logon Controls. It is disabled while the page is being loaded. Heartbeat URL The Heartbeat URL should be set to a page that can be reached by the import process once it has been authenticated against the site. Heartbeat Unique String To allow the crawler to distinguish heartbeat pages from pages that can be accessible by guests before they are authenticated, a unique string can be configured here. This unique string could be, for example, the full name of the user shown following logon. The string should not be shown by the website prior to authentication of the import process, as this may give a false positive. Note: The heartbeat string will be matched against the HTML source for the heartbeat page. It is therefore important to ensure that the string which is visible on the page is also searchable in the page source. Otherwise, it will not be possible for the Auto Logon crawler to match the heartbeat page. To check the page source, you can right-click on the browser window and click View Source. To check that the unique string is searchable, simply search for the unique string in this text. Browser Status Once a request to navigate to a page has been initiated through the Refresh button, this box shows the status of the browser. The navigation process can be stopped by clicking the Stop button The Browser Window to the right of the status box. This window shows the currently loaded logon page. It is used to show you that the logon page has been successfully located and loaded, and is also used to select the logon controls in the next step. 15.2.4 Selecting Logon Controls To be able to log onto a website using the URL specified, the Auto Logon feature needs to know which controls should be used to initiate a Forms Authentication request. When the login page is loaded into the browser window, a list of the available controls for the page is loaded into the Available Controls box on the bottom right of the screen: 226 15 Browser Compatibility Quest ChangeBASE 5.3 - User Guide Choose a minimum of the following controls from the list, before clicking OK: • A text (input) box used to enter a username or email address. • A text (input) or password box to enter the user’s password. • A button or link (submit) clicked by the user in order to initiate the login request. To make the process easier for you, it is possible to click on the control to be selected in the browser window and, if the control does not already exist in the list of Available Controls, the newly selected control will move to the top of the Available Controls list. To move a control between the Selected and Available Controls, click the adjacent arrow. The logon credentials will be entered when the web application is imported. 227 15 Browser Compatibility Quest ChangeBASE 5.3 - User Guide 15.2.5 Selecting an Existing Group of Settings Once you have defined a group of settings, it is saved under its Auto Logon Description on the right-click menu. Simply select Configure Logon Settings if you wish to modify the settings. 15.2.6 Deleting a Group of Settings To remove a group of settings, you need to select Configure Logon Settings from the right-click menu, and then click the Delete button on the bottom right of the settings screen shown in 15.2.4 Selecting Logon Controls. 15.3 Web Crawl Settings The web crawling process can be controlled by setting the options described in 12.10 Browser Compatibility Tab. Note that the default setting for the Static Web Search URL Count Threshold is 500. To allow you to control the depth of the web crawling process, you must add the following XML setting to the WorkBenchSettings.xml file: <WebCrawlMaxDepth>{DEPTH}</WebCrawlMaxDepth> where {DEPTH} is the number of branches that the web crawler will take from the Base URL of the package. For example, if this was set to ‘2’, then the import process would only look at the first page and any direct links from that page. 15.4 The Web Application Import Process The Web application import process is initiated through the ChangeBASE Workbench via either the Import link on the Packages Panel or the Re-import option on the context menu for the package. 228 15 Browser Compatibility Quest ChangeBASE 5.3 - User Guide Once an import has started, the Packager process will begin to crawl the web pages and resources hosted under the package URL. If Auto Logon settings have been configured for this package then the first step will be website validation using Forms Authentication: Enter your username, password and/or any other details required for authentication, and click OK. If you click Cancel, the import process is halted. 15.4.1 HTTP Authentication During an import, if a page or area of the web site being crawled is protected by HTTP Authentication, then the following dialog will be shown: Enter your username, password and/or any other details required for authentication, and click OK. If you click Cancel, the import process is halted. To avoid confusion between sites using HTTP Authentication and Forms Authentication, the Auto Logon configuration screen will block any requests for HTTP authentication and display the following message: 229 15 Browser Compatibility Quest ChangeBASE 5.3 - User Guide In this situation, it is recommended that you do not configure Auto Logon settings for sites that only require this type of authentication, because the logon screen will automatically be displayed for HTTP authentication. However, if the site requires both types of authentication, then you will need to configure the Auto Logon settings. 15.5 Loading Source Folders for Web Data Capture Source folders can be dropped onto the ChangeBASE Workbench directly from Windows Explorer, as explained in 5.2.1.2 Dragging and Dropping Folders onto ChangeBASE. The results are affected by the options set in the Browser Compatibility Tab. In particular, you should set Web Analysis Mode to Always Analyze. Once a particular folder containing web data has been dropped onto the Workbench, proceed as follows: 1. 2. 3. Right-click the folder in the ChangeBASE window Select Repackaging > IIS Folder. Click the Import link on the left-hand side of the ChangeBASE screen and the source folders will be processed (the results are dependent on the options set in the Browser Compatibility Tab – refer to 12.10 Browser Compatibility Tab). 15.6 Client Side Capture (CSC) The options described previously are suitable for static web data. However, for the capture of more dynamic web pages, e.g. your corporate Intranet site, it is advisable to use Client Side Capture. Note: Data generated by scripts within the web pages, such as data generated via Ajax, is not captured. Important: Client Side Capture (CSC) requires additional setup and needs to be integrated with third party systems (e.g. the corporate proxy server), so you should seek guidance from Quest Professional Services. You should use a test environment. Within this environment, it is advisable that, wherever possible, you install the version of the browser to which you wish to migrate. This will avoid the accumulation of minor browser compatibility issues, e.g. W3C and CSS standards issues, and give you a clear view of any major issues. Before starting, you need to set Web Analysis Mode in the Browser Compatibility Tab to Always Analyze. 230 15 Browser Compatibility Quest ChangeBASE 5.3 - User Guide 15.6.1 CSC Architecture If you are using the Browser Compatibility module on its own, and not as part of the Ultimate Edition (refer to 1.1 ChangeBASE Product Editions), you can view the setup simply as follows: 231 15 Browser Compatibility Quest ChangeBASE 5.3 - User Guide Note: As an alternative, CSC, SQL and ChangeBASE can all be installed on the same machine. In this event, IIS will be installed for you. 15.6.2 System Requirements General • • • • The Client Side Capture installation source must have been provided by Quest Support. ChangeBASE must have been installed as described in 2 Installation. ChangeBASE must have been configured as described in 3 Basic Configuration. The SQL Server hosting the ChangeBASE database should also be used to host the Client Side Capture database. Refer to 2.2 SQL Setup. A machine must have been designated for the CSC Server role. This can be the same machine as the one used for SQL Server and/or ChangeBASE, or a separate machine. The machine requirements are as follows: Client CSC Server Operating System • • • • • • • Windows XP SP3 Windows Vista SP2 Windows 7 Windows 8 Windows Server 2003 (inc. R2) SP2 Windows Server 2008 (inc. R2) Windows Server 2012 Minimum Hardware • • • • 2.5GHz dual core processor or greater 4GB RAM 50GB hard disk space 1024 x 768 display Software Requirements • Microsoft.NET Framework 3.5 SP1 and 4.0.30319 or later (Full Client) Internet connectivity required Operating System • • • • • • Windows XP SP3 Windows 7 Windows 8 Windows Server 2003 (inc. R2) Windows Server 2008 (inc. R2) Windows Server 2012 Note: For Windows XP systems, you will need to have an i386 folder available, or the original media, as the CSC installer will attempt to install IIS. Minimum Hardware • • • • 2.5GHz dual core processor or greater 4GB RAM 50GB hard disk space 1024 x 768 display Software Requirements • The installer will attempt to install and configure IIS on the CSC Server (see note above for XP users). • Microsoft.NET Framework 3.5 SP1 and 4.0.30319 or later (Full Client). 15.6.3 CSC Installation Important: Ensure that you have already installed ChangeBASE. Run CSCInstaller_v1.9a.msi and accept all the defaults. 232 15 Browser Compatibility Quest ChangeBASE 5.3 - User Guide 15.6.4 CSC Configuration 15.6.4.1 CSC Manager – Manage Default Parameters 1. Run the following program as Administrator: ChangeBASE CSC Manager. The following dialog is displayed: 2. CSC needs to create a database, so, in the blank field, specify the SQL Server instance name, using the syntax shown in 3.2 Database Setup, e.g. localhost\sqlexpress, and, below it, enter the required database name. 3. Choose the SQL Security mode by checking or unchecking Use Windows Security… You will need to enter the SQL credentials if you uncheck it. Refer to 2.2 SQL Setup. 4. Click OK. 5. In CSC Manager, select Tools > Manage Default Parameters. 6. Check Auto-Populate This Field to add the Database Template Location. For example: 233 15 Browser Compatibility Quest ChangeBASE 5.3 - User Guide where ‘\\EU9068\’ in the above example is your \\<computer name>\. The CSC Agent (AOKCCControl.exe) uses an Access database to store a local copy of the captured data, prior to uploading it to the CSC Server. The Agent obtains a fresh, empty, copy of this database from the location specified in the Database Template Location field every time it starts. Therefore, this is a mandatory field. 7. Ensure that the Output File Target Location is set appropriately. This is the destination of the uploaded files (refer to 15.6.5.2 CSC Agent). Note: The extension has to remain as .CSCWEB. 8. Change the Initial Poll Interval and Initial Poll Unit as required. (For example, set them to ‘2’ and ‘Hours’ respectively, for a registered client to contact the CSC Server at two-hourly intervals.) 9. At the bottom of the dialog, you can also set the size of file, in MB, at which the creation of an output file will be triggered. 10. Click OK. 11. If you wish to use a non-default connection string to enable the web service to connect to the CSC database or a non-default storage location for uploaded data, select Tools > Manage Web Service Configuration. The Folder to store uploaded files… path shows the location where the CSCWEB files (containing the captured web data) will be created. This defaults to the Output File Target Location set above. Modify it as required. 234 15 Browser Compatibility Quest ChangeBASE 5.3 - User Guide 12. Click OK. 15.6.4.2 Manage Filters This option allows you to prevent data from particular URLs from being captured (by ‘blacklisting’ them) and/or to ensure that data from particular URLs is included (by ‘whitelisting’ them). 1. Select Tools > Manage Filters, to open the associated dialog: 2. Enter URLs as follows: • If you enter a string in the URL column and do not check either the Include or Exact box, then CSC will ‘blacklist’ any URL that starts with the entered string (for example, http://www.bbc.co.uk/news without any additional filters will exclude the entire BBC news website). • If you enter a string in the URL column and tick the Exact box, CSC will exclude any URL that is an exact match for the entered string (for example, http://www.bbc.co.uk/news/10284448/ticker.sjson will exclude only the BBC News ticker feed and not the wider BBC). • If you enter a string in the URL column and tick the Include box but not the Exact box, CSC will include only URLs that start with the entered string (for example, http://www.bbc.co.uk/weather will include only the BBC weather site and exclude everything else). 235 15 Browser Compatibility • 3. Quest ChangeBASE 5.3 - User Guide If you enter a string in the URL column and tick both the Include and Exact boxes, CSC will include only that exact URL (for example, http://www.bbc.co.uk/radio4 will include only the BBC Radio 4 main page and exclude everything else). Click OK to save your entries and clear the dialog. 15.6.5 Verify CSC Setup 15.6.5.1 Web Service To verify that Client Side Capture is correctly configured, open Internet Explorer on the CSC Server and browse to: http://localhost/AOKCSCWS/ConfigService.asmx The following page should appear: Click on the DBConnectivityTest link, and then click Invoke. You should see the following: 236 15 Browser Compatibility Quest ChangeBASE 5.3 - User Guide Note: The number of clients registered could be higher than 0 if you have previously set up Client Side Capture. 15.6.5.2 CSC Agent The next step is to verify that the CSC Agent can be launched on the CSC Server. You would not normally run the agent on the CSC Server, but this test verifies that the Agent is set up correctly. 1. 2. Click Start, type run and press [Return]. Type \\<ComputerName>\aokcsc_client, e.g. 3. Click OK to open the shared folder containing the CSC Agent files, e.g. 4. Run AOKCCControl.exe. 237 15 Browser Compatibility 5. Quest ChangeBASE 5.3 - User Guide The CSC Agent icon either appears in the system tray: or it may be hidden in the adjacent notification area. The CSC Agent has a right-click context menu containing relevant commands: Start capture: This command causes CSC to start to monitor the incoming web traffic and store it in a local cache. It should be noted that all textual content is removed from the web page before it is stored. This is to ensure that users’ personal data is not compromised. Stop capture: This command causes CSC to stop monitoring and storing web traffic. Upload data to Central Server: This command causes CSC to upload its local cache of captured data to the computer designated as the CSC Server. If Start Capture was previously active, then CSC will temporarily stop monitoring web traffic prior to the cache upload, and then resume web traffic monitoring following the upload. About…: This command displays a screen with information that will be useful in the event of a support requirement. Exit: Quits the package. 6. If you are running CSC from the CSC Server, then you can simply select the CSC Agent options described above, as required. If you are running CSC from a client, proceed to 15.6.6 Using CSC from a Client. 15.6.6 Using CSC from a Client 1. Unless you have all the relevant filters set up for you (refer to 15.6.4.2 Manage Filters), ensure that all other websites apart from the one that you wish to capture are shut down. 2. Repeat steps 1 to 4 of the previous section. 238 15 Browser Compatibility Quest ChangeBASE 5.3 - User Guide 3. Right-click the CSC Agent that is either now running in the system tray or is hidden in the adjacent notification area: 4. Select Start capture from the context menu. If the following kind of prompt appears: then check the Private networks… box and click Allow access. 5. When you are ready to stop importing data from the website that is running, rightclick on the CSC Agent then click Stop capture. 6. Right-click on the CSC Agent and then click Upload data to Central Server. After the upload, the following dialog is displayed: 15.6.7 Loading the Data from the CSC Server to ChangeBASE The uploaded client data will have been collated into files with a CSCWEB suffix, in the Output File Target Location that was set in 15.6.4.1 CSC Manager – Manage Default Parameters. Typically, this location is: C:\Program Files (x86)\ChangeBASE\AOKCSC\AOKCSCWS\TransientStorage Proceed as follows: 239 15 Browser Compatibility Quest ChangeBASE 5.3 - User Guide 1. Log onto the CSC Server and locate at the above location the files that you wish to be imported into ChangeBASE. 2. Verify by the date stamp the files that you want to import. Important: If required, you can rename the files to something more meaningful, as these are the names that will be used in ChangeBASE Workbench. 3. You can now either: • Load the required files into ChangeBASE by dragging them directly onto ChangeBASE Workbench. Then select them and click Import on the Packages Panel. Or • Import them directly into ChangeBASE by running ChangeBASE CSC Manager, and then proceeding as follows: a) Click Uploaded Content > Process uploaded files to bring up a dialog that allows you to select the database and files to import into ChangeBASE. If the Process uploaded files option is greyed out, refer to 15.8.3 ‘Process Uploaded Files’ option greyed out. b) Select the required ChangeBASE database from the drop-down list. c) Check the files that you wish to import into ChangeBASE. 240 15 Browser Compatibility Quest ChangeBASE 5.3 - User Guide If you wish the files to be backed up prior to import, check the Take backup box. If you wish the files to be removed following import, check the Delete after import box. d) Click OK. e) The files are imported into ChangeBASE Workbench. Note: Depending on the size of the imported files, this may take some time. You will be informed once processing is complete. f) If you have the ChangeBASE Workbench open, click Refresh Results in the Reports Panel and the files will appear in the Packages tree of the Portfolio Summary. If ChangeBASE is not running, open it and the files will be displayed as available for reporting. 15.7 Importing and Assessing Web Files against Browser Plugins Once web files has been successfully imported into ChangeBASE, then: 1. Go to the Reports tree (refer to 4.5 Portfolio Summary) and select the reports for the relevant browser version, for example ‘Internet 10 Presentation Compatibility’ reports. 2. Click Assess on the Packages Panel. 3. Following the assessment of your website, switch from the Packages to the Reports tab for an immediate view of the results of your compatibility tests, for example: 15.8 Troubleshooting Web Capture 15.8.1 Problems arising from the Loading of URLs and Folders 1. Examine the ChangeBASE log (refer to 13.2.6 View Log) to see whether any of the following limits or checks have resulted in errors: 241 15 Browser Compatibility Quest ChangeBASE 5.3 - User Guide Statistic Description Limits / Retries Allowed Failed Forms Authentication Logins Incorrect credentials were entered or the login page could not be reached. 3 Failed HTTP Authentication Login Incorrect credentials were entered for HTTP authentication. 3 Failed Heartbeat URL Check The URL of the heartbeat page could not be reached. 3 Failed Heartbeat Unique String Check The Unique string configured by the user could not be found on the heartbeat page. 3 Failed Download A download failed to complete successfully, e.g. due to network failure. 20 Successful Forms Authentication Login 0 Successful HTTP Authentication Login 0 Successful Heartbeat Check 0 Successful Download A successful download of a queued URL. 0 User Skipped Page User requested to cancel authentication when prompted. 5 Crawler Skipped Page The crawler decided to skip a page due to it being outside of the relevant domain or due to it having an excluded MIME type. 0 Downloading Skipped Page When downloading, it may be necessary to skip a page if its MIME type is excluded. Downloads are also skipped if a page returns HTTP Status 204 (No Content). 0 2. If none of the above appear in the log, but the log does not otherwise give you any indications as to any problems you might be encountering, then you should relay the contents of the log to Quest Professional Services. 15.8.2 Problems arising from the use of CSC If you have any issues while using CSC, then you should proceed as follows: 242 15 Browser Compatibility Quest ChangeBASE 5.3 - User Guide 1. Go to %temp%\AOK and open the ‘AOK’ folder. This holds the Access database files referred to in 15.6.4.1 CSC Manager – Manage Default Parameters. It also holds any log files. 2. Examine the log files and take any remedial actions indicated. 3. If the log files do not give you any indications as to the problems you might be encountering, then you should relay the contents of the log files to Quest Professional Services. 15.8.3 ‘Process Uploaded Files’ option greyed out This issue occurs when the ChangeBASE packager program does not exist where indicated in the configuration file. Proceed as follows: 1. Locate the AOKCSCManager.exe.config file, typically found in: C:\Program Files (x86)\ChangeBASE\AOKCSC\AOKCSCWS\CENTRAL_SERVER 2. Open the file and modify the following line to point to the correct installation folder of ChangeBASE Workbench: <add key="AOKProgramLocation" value="C:\Program Files (x86)\Quest Software\ChangeBASE\cbPkgr.exe"/> Note: If using Windows 7 or 8, or Windows Server 2008 or 2012, then, depending on your User Account Control settings, you may need to run Notepad in Administrator mode to edit this file. 243 Index Quest ChangeBASE 5.3 - User Guide Index A Active Directory, 15, 28, 29, 32, 64, 182, 183 Add to Core App List, 202 Add to Matching Analysis, 202 Add-In Tab, 186 Adding Reports, 216 Adding Rules Custom Plugin, 218 Report, 218 Advanced Usage, 88, 189 Analyzing Results, 110, 113 AppIDs, 67, 68, 69, 70, 82, 84, 88, 119, 122, 195 Add, 70 Maintenance, 68 Select, 195 Application Compatibility, 14 Application Remediation, 127 Application Summary, 123, 132, 133 Application Testing, 127 Application Virtualization, 11, 127 App-V, 12, 14, 22, 110, 111, 114, 123, 125, 146, 155, 156, 158, 159 4.6 SP1 Advanced Settings, 163 5.0 Advanced Settings, 165 Sequencer, 170 Balloon Tips Avoid, 159 Architecture Client Side Capture, 231 ASP.NET, 19 Assessing a Real-World Package, 150 Assessing Packages, 110, 111 Assessment Results, 54, 58, 61, 110, 115, 122 Assigning Permissions using SQL Server Management Studio, 27, 32 Auto Logon Loading URLs, 222 Process Overview, 223 Settings, 224 Auto-Fix, 15, 16 Automated Installation Kit. See Windows AIK B Balloon Tips Avoid, 159 BAT, 22, 87, 90 Best Way Forward, 54, 132 Bootstrap EXEs, 91, 105 Browse Packages, 60, 74, 75, 174, 179 SCCM, 60, 75 Browser Compatibility, 11, 14, 24, 25, 185, 222, 228, 230 Browser Compatibility Tab, 24, 185, 186 Bulk Issue Summary, 203 Reports, 118 BulkCSVImport, 88 C CAS, 206, 208, 219, 220 Rules, 208 Settings, 210 Understanding, 209 Check-in, 202 Citrix Xenapp. See XenAPP Citrix XenApp. See XenApp Client Side Capture, 25, 26, 27, 230, 232, 236, 237 Agent, 237 Architecture, 231 Assessment of Web Files, 241 Blacklist, 235 Configuration, 233 Installation, 232 Loading Data from Server, 239 Manage Filters, 235 Server, 232 System Requirements, 232 Troubleshooting, 242 Using from Client, 238 Verify Setup, 236 Collapse Package Tree View, 204 Command Line Invocation, 212 Compatibility Matrix Virtualization, 155 Complex Calculations, 139, 140, 142 Configuration Recommended, 24 Connection Test Timeout, 175 Core App List, 176, 179 Core Application Scan. See CAS Cost and Effort Values, 181 Create Table, 27 Create View, 190 Creating Report Groups, 215, 216 244 Index Creating Reports, 215 CSC. See Client Side Capture CSV Import, 61, 72, 87, 88 Custom Action Security, 143 Custom Plugins Adding Rules, 218 Creating, 215 D Dashboard, 18, 19, 20, 21, 26, 31, 32, 34, 36, 48, 53, 54, 55, 56, 58, 113, 123, 124, 125, 127, 128, 131, 133, 137, 143, 209, 232 Configuration for Target Environment, 123 Filtering, 129 Options, 186 Progress Summary, 131 Register with IIS Server, 54 Setup, 19 SQL Setup, 31 Troubleshooting, 55 Unregister, 48, 55, 59 Database Backup Requirements, 25 Rename, 48 Database Options, 175, 176, 177, 178, 180 Database Setup, 20, 21, 26, 32, 42, 233 Local, 17 Remote, 19 Databases Create Additional, 48 Multiple, 48 db_datareader, 27, 30 db_datawriter, 27, 30 db_ddladmin, 27, 36 DBA, 27, 49 dbcreator, 26 DBLIST Command, 212 dbo, 27, 36 dbowner, 49 Default Cost and Effort Values, 181 Delete Packages, 195 Dependencies View, 195 Deployment to Remote Desktop Services, 24 Deployment to Terminal Services, 24 Deployment to Virtual Machines, 24 Depth of Web Crawl, 228 Direct Import, 71 Dragging and Dropping Files onto ChangeBASE, 72 Dragging and Dropping Folders onto ChangeBASE, 73, 179, 230 E ESX, 22, 91, 95, 162 Quest ChangeBASE 5.3 - User Guide EXE, 22, 87, 90, 91, 102, 104, 155, 156, 167, 168, 169, 186, 199 Execute Stored Procedures, 27 Executive Detail, 123, 124, 128, 130, 133 Executive Summary, 124, 125, 127, 128, 129, 130, 132, 133 Expand Package Tree View, 204 EXPORT Command, 213 Extract CABs from MSI, 203 F File Extensions Automatically Added, 175 Firefox, 14 Fixing Packages, 152 Troubleshooting, 153 Fix-it, 144, 146 Flexible licensing model, 11 Flowchart showing Key Phases, 13 Forms Authentication, 222, 226, 229, 242 G Gold Images, 204 GUIApp.ini, 158, 159, 211 H Hard-coded File References, 143, 146 Help Files, 144 History View, 153, 202 HKEY_CURRENT_USER, 144 HTTP Authentication, 229, 242 Hyper-V, 22, 91, 94, 96, 97, 156, 157, 162 Hypervisor Selection, 161 Hypervisors, 18, 21, 22 I IE Enhanced Security Configuration Setting, 18 IIS, 19, 20, 21, 32, 54, 58, 74, 230, 232 IMPORT Command, 212 Import Warnings, 72, 89 Important Files and Folders, 211 Importing Legacy Packages, 90, 91, 101 Configuration, 91 Overview, 90 Troubleshooting, 105 Methods, 72 Operating System Images, 204 Packages, 71 Directly, 71 Overview, 71 245 Index SCCM packages/programs into ChangeBASE, 85 Web Application, 228 Installation, 17 Installing ChangeBASE, 33 Internet Browsers, 16 Internet Explorer, 1, 14, 171, 222, 236 Internet Information Services. See IIS Introduction, 11 Issue Summary Reports, 117, 118 Create, 203 K Key Phases, 12 Flowchart, 13 L Lease Time Maximum, 157 Minimum, 157 Legacy Control Panel Applets, 143, 148 Legacy Conversion, 22 Legacy Help Files, 143, 144 Legacy Installers, 22, 62, 186 Legacy Package Capture, 73, 74, 179 License Activation, 39, 211 License Expiry, 41 License File, 25, 39, 40, 41, 211 License Server, 38 Licenses Swapping, 40 Licensing, 37 Flexible model:, 11 Offline, 39 Online, 37 LISTPACKAGES Command, 213 LISTREPORTS Command, 213 Loading Source Folders for Browser Compatibility, 230 Loading URLs Auto Logon Process Overview, 223 Settings, 224 Auto Logon, 222 Loading URLs for Browser Compatibility, 222 Local Database, 17 Setup, 17 Log View, 198 M Manifest File, 148, 149, 169, 193 Manifests, 12, 148, 220 Maximum Lease Time, 157 Maximum No. Simultaneous Imports, 175 Quest ChangeBASE 5.3 - User Guide Medium Calculations, 139, 140, 141 Microsoft Office, 14, 15, 93 2010, 14 2013, 14 Microsoft SQL Server 2008, 18, 21, 44 Microsoft.NET Framework, 18, 21, 22, 156, 158, 171, 232 Middleware, 93, 179, 217 Minimum DHCP Lease Time, 157 Minimum Hardware Local Database Setup, 18 MSI, 11, 14, 16, 22, 24, 25, 33, 61, 64, 75, 78, 83, 87, 90, 91, 103, 104, 105, 106, 107, 108, 109, 111, 112, 119, 134, 146, 152, 153, 154, 155, 156, 161, 164, 165, 166, 167, 168, 169, 174, 175, 179, 180, 184, 185, 187, 198, 199, 200, 213, 218, 220 Edit, 200 Edit with MSI Studio, 199, 200, 201 Edit with Orca, 199 Extract CABs, 203 Studio, 153 MSI Studio, 199, 200 MSM, 154, 180 Multiple Databases, 48 Multiple Transforms, 174 Multi-User Environment, 31 Multi-User Installations, 25 Requirements, 25 Optimization, 26 Multi-User Setup, 23 N Network Address Translation, 93, 157 New Project Wizard, 61 O Offline License, 39 Online License, 37 Open Containing Folder, 195 Operating System Images Importing, 204 Optimization Virtualization, 170 Options, 23, 24, 36, 48, 53, 54, 58, 60, 61, 65, 66, 67, 72, 73, 74, 77, 78, 86, 94, 99, 105, 106, 108, 122, 123, 125, 128, 131, 133, 154, 157, 168, 170, 171, 174, 179, 180, 202, 203, 211 Options Window, 173 Add-In Tab, 186 Browser Compatibility Tab, 185 Core App Lists Tab, 176 Dashboard Tab, 186 Duplicates Tab, 184 General Tab, 173 Database Options, 175 246 Index File Extensions Automatically Added, 175 Package Import/Fix, 174 Report Options, 173 Transforms, 174 Issue Summary Tab, 176 Other Tab, 187 Platforms Tab, 176 Repackaging Options Tab, 186 Report Costs Tab, 180 Security Tab, 178 Services Tab, 177 Upgrade Tab, 177 Virtualize Tab, 187 Orca, 199 Organize Views, 192 Other Tab, 187 Overrides, 203 P Package Dependencies Tree, 195 Package Issue Summary, 121, 214 Package Overview Report, 123, 135, 136 Package Selector, 190 Package Virtualization, 16, 22, 169, 193 EXEs and Manual Configuration, 166, 167 One Package from Multiple MSIs, 166 One Package per MSI, 166 Packages by RAG, 120, 214 Context Menu, 194 Delete, 195 Importing, 71 Panel, 60, 72, 74, 75, 85, 89, 104, 111, 192, 222, 224, 228, 241 Tree Context Menu, 189 PCA, 92 Performance Issues Virtualization, 170 Pie Charts, 127, 128 Platform Groups, 124 Hide, 124 Plugins, 64, 66, 114, 150, 154, 168, 188, 211, 217, 219, See also Reports Custom, 215 Matching Analysis, 202 Troubleshooting, 66 Portfolio Summary, 62 Process Uploaded Files Option Greyed Out, 243 Product Editions, 11 Program Compatibility Assistant. See PCA Q QVMTools, 22, 93, 156, 157 Quest ChangeBASE 5.3 - User Guide R RAG, 12, 26, 110, 112, 116, 128, 132, 133, 193, 214, 218, 220 Real-World Package Assess, 150 Recommended Configuration, 24 Multi-User Installations, 25 Red Amber Green. See RAG, See RAG Re-Import, 202 Remediation, 140, 144, 145, 146, 148, 149 Remote Database, 20, 21, 26 Setup, 19 Remote Desktop Services Deployment, 24 Rename Database, 48 Repackaging. See also Legacy Conversion Configuration, 91, 101, 104, 199 Filters, 91, 99 Options, 94, 105, 186 Overview, 90 Process, 101 Troubleshooting, 105 REPORT Command, 213 Report Group by RAG, 120 Report Groups, 63, 66, 110, 180, 215 Adding, 215, 216 Load, 65 Which Ones?, 66 Reports, 61, 62, 63, 67, 111, 115, 117, 122, 131, 176, 180, 186, 195, 215, 218 Adding, 215, 216 Adding Rules, 218 by RAG, 121, 214 Panel, 61, 241 Retrieve, 189 Running from the Command Line, 122 Save, 189 Troubleshooting, 122 Requirements Remote Database Setup, 21 Retrieve Reports, 189 ROI, 123, 125, 127, 128, 137, 138, 181 Calculator, 125 ROI Calculation, 123, 137 Roll Up Fixes, 152, 174 S Save Reports, 189 SCCM, 11, 60, 72, 75, 76, 77, 78, 79, 81, 82, 83, 84, 85, 86, 93 Database Name, 77 Options, 77 Package Folder, 77 Package ID, 77 Package Language, 77 247 Index Package Manufacturer, 77 Package Name, 77 Package Version, 77 Server Name, 77 Security Tab, 178, 180 Select AppIDs, 195 sequences.xml, 211 Server Components, 19, 20, 34, 54 Server Timeout, 175 Shared Dependencies Rollup, 197 Simple Calculations, 138, 140, 141 Snapshot, 97, 99, 105, 158, 160, 162, 170, 175, 179, 198, 204, 206 Software Requirements Local Database Setup, 18, 21, 232 Source Capture, 73, 74, 179, 205 Source Folders Loading for Browser Compatibility, 230 Quest ChangeBASE 5.3 - User Guide Total Calculations, 139, 141, 142 Transform MST, 12, 108, 152, 174, 180, 199, 200, 201 Transforms, 152, 174, 195, 200, 201, 212 Multiple, 174 Troubleshooting, 41, 49 Client Side Capture, 242 Dashboard, 55 Fixing, 153 Importing Legacy Packages, 105 Plugins, 66 Repackaging, 105 Reports, 122 SQL-related, 49 Virtualization, 170 Web Capture, 241 U Space Requirements UAC, 91, 143, 144, 148, 157, 171, 183, 184, 205 SQL Enterprise, 18, 21, 26, 42 SQL Express, 21, 42 SQL Permissions, 27 SQL Security, 27, 28, 32, 43, 233 SQL Server, 18, 20, 21, 23, 24, 26, 33, 43, 44, 49, 51, 52, 79, 175, 187, 232, 233 Unlicensed Number of Packages, 41 Upgrade Tab, 41, 65, 67, 99, 177, 178, 180 Upgrading ChangeBASE, 36 URL Count Threshold, 185 URLs Database, 24 64-bit, 24 Authentication, 28 Management Studio, 27, 52 SQL Setup, 17, 26, 32, 42, 43, 51, 57, 58 Dashboard, 31 Multi-User Environment, 20 SQL Standard, 42 SQLCompression.dll, 176 SQL-related Troubleshooting, 49 Stored Procedures, 27 Execute, 27 Summary Report Examples, 119 Swapping Licenses, 40 SWV, 12, 14 Symantec Wise Composer, 22, 158 Symantec Workspace Virtualization, 22, 155, 156, 158, See SWV System Requirements, 17 T Target Date, 131 Target Environment, 110 Target Packages, 131 tempDB, 27, 31 Terminal Services Deployment, 24 ThinApp, 12, 14, 22, 110, 155, 156, 160, 171 Top 5 Issues, 123, 125, 127, 128 Top Five Issues, 143 File Headers, 147 Loading for Browser Compatibility, 222 Use Windows Security, 32, 42, 43 User Account Control. See UAC, See UAC User Interface, 60 V VBScript, 90 VHD Files, 204 View Create, 190 History, 153, 202 View Dependencies, 195 View Log, 198 Viewing Results, 63, 110, 114, 115, 117, 176 Views, 203 Organize, 192 Virtual Hardware, 22 Virtual Machine Setup, 186 Virtual Machines, 18, 21, 22, 91, 155, 169 Deployment, 24 Setup, 91, 95, 156 App-V, 158 App-V, 156 General, 156 Symantec Workspace Virtualization, 158 Symantec Workspace Virtualization, 156 ThinAPP, 160 XenAPP, 156, 160 Virtualization, 110, 111, 138, 141, 142, 155, 160, 171, 179, 181 248 Index Troubleshooting, 170 Virtualization Compatibility Matrix, 155 Virtualize from Manifest, 169, 193 Virtualize Packages, 155 How to, 166 Virtualize Tab Configuration, 160, 187 Virtualized Package Environments, 14 VIX, 91, 95, 108 VMware, 1, 12, 14, 22, 91, 95, 98, 107, 110, 155, 156, 157, 160, 161, 162, 170, 204 Server, 22, 162 Tools, 22, 156 Workstation, 22, 24, 98, 157, 161 W Web Analysis Mode, 24, 185, 222, 230 Web Application Importing, 228 Web Capture Troubleshooting, 241 Web Crawling, 185, 228, 229 Settings, 228 WIM, 179, 204, 205 Alternatives, 204 Driver Files, 205 File Loading into ChangeBASE, 205 Mounting, 205 Windows 32-bit, 11, 14, 22, 155 Quest ChangeBASE 5.3 - User Guide Windows 64-bit, 11, 14, 21, 22, 110, 111, 114, 123, 125, 146, 151, 155 Windows 7, 1, 11, 14, 18, 21, 22, 37, 63, 64, 91, 110, 111, 123, 125, 146, 150, 153, 155, 156, 157, 159, 190, 204, 206, 232 Windows 8, 11, 14, 18, 21, 37, 157, 171, 232 Windows AIK, 205 Windows Authentication, 28, 31, 32, 42, 57 Errors, 57 Windows Defender, 93, 157, 170 Windows Imaging Format. See WIM Windows Security, 27 Windows Server 2003, 11, 14, 18, 21, 41, 64, 211, 232 Windows Server 2008, 11, 14, 18, 21, 41, 64, 110, 111, 211, 232 Windows Server 2012, 14, 18, 21, 37, 64, 232 Windows Vista, 22, 41, 64, 211 Windows XP, 18, 20, 21, 22, 41, 94, 108, 144, 146, 148, 155, 157, 159, 204, 211, 232 WorkBenchSettings.xml, 25, 109, 175, 187, 211, 228 Working Directory, 23, 25, 33, 45, 66, 170, 186, 211, 212 Writing Custom Plugins, 215 X XenApp, 12, 14, 22, 110, 111, 123, 155, 156, 160, 168 249 About Quest Software®, Inc. Quest ChangeBASE 5.3 - User Guide About Quest Software®, Inc. Established in 1987, Quest Software (Nasdaq: QSFT) provides simple and innovative IT management solutions that enable more than 100,000 global customers to save time and money across physical and virtual environments. Quest products solve complex IT challenges ranging from database management, data protection, identity and access management, monitoring, user workspace management to Windows management. For more information, visit www.quest.com. Contacting the Quest® ChangeBASE Community For the latest hotfixes, release notes and patch news, and the opportunity to become generally involved in the development of ChangeBASE, go to http://communities.quest.com/community/changebase. Contacting Quest Software® Email [email protected] Mail Quest Software, Inc. World Headquarters 5 Polaris Way Aliso Viejo, CA 92656 USA Website www.quest.com Refer to our Website for regional and international office information. Contacting Quest® Support Quest Support is available to customers who have a trial version of a Quest product or who have purchased a Quest product and have a valid maintenance contract. Quest Support provides unlimited 24x7 access to our Support Portal at www.quest.com/support From our Support Portal, you can do the following: • Retrieve thousands of solutions from our online Knowledge Base • Download the latest releases and service packs • Create, update and review Support cases View the Global Support Guide for a detailed explanation of support programs, online services, contact information, policies and procedures. The guide is available at: www.quest.com/support. 250