1
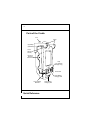
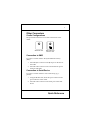
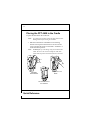
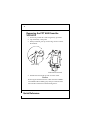
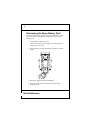
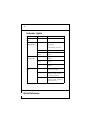
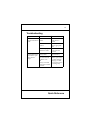
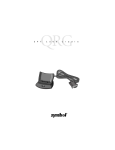
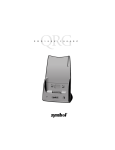
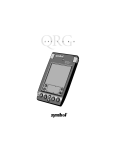
RS 2200/3200 Series VCD 4612 Quick Reference 1995-1998 SYMBOL TECHNOLOGIES, INC. All rights reserved. Symbol reserves the right to make changes to any product to improve reliability, function, or design. Symbol does not assume any product liability arising out of, or in connection with, the application or use of any product, circuit, or application described herein. No license is granted, either expressly or by implication, estoppel, or otherwise under any patent right or patent, covering or relating to any combination, system, apparatus, machine, material, method, or process in which Symbol products might be used. An implied license only exists for equipment, circuits, and subsystems contained in Symbol products. Symbol is a registered trademark of Symbol Technologies, Inc. Other product names mentioned in this manual may be trademarks or registered trademarks of their respective companies and are hereby acknowledged. Symbol Technologies, Inc. One Symbol Plaza Holtsville, New York 11742-1300 http://www.symbol.com Quick Reference 3 Introduction Cradles are optional devices which can be used for charging the terminal’s battery and for communicating with the host or with other cradle chains. The PPT 4600 offers several cradle configurations: a standard cradle that can be tabletop- or wall-mounted, and a cradle for vehicle use. About This Guide This guide provides the operator and system administrator with instructions for mounting, connecting, operating, and troubleshooting the VCD 4612 vehicle-mount cradle. Information on the standard cradle can be found in the CRD4600 Cradle Quick Reference Guide, p/n 70-15861-XX. Quick Reference 4 Parts of the Cradle Lock Wings Upper Step (Half-VGA) Lower Step (Full Screen) Mounting Bracket Attachment Clips (for Half-VGA Display Only) Power LED Spare Battery Charging LED Lower Holding Brackets Quick Reference Spare Battery Charging Slot 5 Installing the Vehicle Cradle The vehicle cradle can be mounted on the floor or dash of a truck. Each cradle includes a vehicle power supply capable of power conditioning in an operating range of 10-48 volts. To install the vehicle cradle: 1. Release the cradle from the metal bracket by removing the four #8 phillips-head screws in the cradle as shown below. 2. Install the mounting bracket on the dash or other appropriate mounting surface. a. Position the bracket on the mounting surface. b. Fasten using the appropriate hardware. Remove Four Screws Remove Bracket for Positioning on Mounting Surface 3. Position the cradle against the mounting bracket. 4. Fasten using the four #8 phillips-head screws removed in Step 1. 5. Insert the power connector in the power port on the bottom of the cradle. Quick Reference 6 6. If the power connector is equipped with a cigarette adapter (10-48V), plug the adapter into the cigarette lighter receptacle. If the power connector is equipped with a standard 1048V wire connect, connect the cable directly to a fuse panel. Note: This must be done by a qualified installer. Quick Reference 7 Other Connectors Cradle Configurations The ports illustrated below are located on the bottom of the cradle. With Power Port With Power Port and RJ-41 Port Connection to SMG To connect a vehicle cradle to the Symbol Mobile Gateway (SMG): 1. Insert the RJ-41 connector in the RJ-41 port on the base of the cradle. 2. Insert the other connector in the communications port in the back of the SMG. Connection to Serial Device To connect a vehicle cradle for serial connectivity (e.g., a printer): 1. Using the RS-232 cable, insert the 6-pin connector in the port on the base of the cradle. 2. Insert the other connector in the serial port on the other device. Quick Reference 8 Placing the PPT 4600 in the Cradle To place the PPT 4600 in the VCD 4612: Note: For a full-screen terminal, remove the clips from the lower holding bracket before seating the terminal. 1. Slide the terminal base in behind the lower holding bracket and snap the terminal back in one motion. The wings automatically slide over the 4600’s “shoulders” to secure the unit in position. Note: Do NOT pull up on the wings to lay the terminal in the cradle. The unit is not secure and may not make solid contact with the power and communications connectors. Snap Back in One Motion Slide Base Behind Bracket PPT 4600 Secured in the VCD 4612 Quick Reference 9 2. The terminal powers on automatically. The terminal’s Communications LED turns solid green if the terminal is enabled, and flashes if the terminal also has control of the bus. The Communications LED does not light if the cradle is not enabled. 3. To lock the terminal in the cradle, push down the lock at the top of the cradle. (A key is provided with the cradle.) “Lock” in Place Key Lock Quick Reference 10 Removing the PPT 4600 from the VCD 4612 1. If necessary, unlock the cradle using the key provided. 2. Grip the 4600 by a side panel. 3. With your thumb, press up on the wing’s notch to release the terminal. Press on Wing Lift Terminal Out of Cradle 4. Pull the terminal straight up and out of the cradle. Caution Removing the terminal from the cradle when the COMMUNICATIONS LED is blinking may disrupt communications between the terminal and communicating device. Quick Reference 11 Recharging the Battery in the Terminal The cradle automatically recharges the battery when the terminal is properly inserted in the cradle. Note: Charge the battery fully before using the terminal. Note: Ensure that the terminal placed in the cradle has a battery installed. Note: To charge the spare battery pack, it must be inserted in the cradle before the terminal is inserted (refer to the Recharging the Spare Battery Pack section). To charge a battery pack in the terminal: 1. Verify that the cradle has power. Connect the cradle’s power supply jack as described in Installing the Vehicle Cradle. 2. Insert the terminal in the cradle and verify that it is properly seated. The terminal automatically powers on (if the necessary software driver is loaded in the terminal) and the Battery Charging LED turns amber. 3. The terminal’s Battery Charging LED shows amber while charging. When the battery pack is close to being charged, the LED toggles between amber and green, and switches to solid green once the pack is fully charged. 4. Leave the terminal in the cradle for a minimum of 1 hour. The cradle requires up to 2 hours to recharge a fully discharged battery. To prevent overcharging, the cradle power shuts off once the battery is fully charged. Quick Reference 12 Recharging the Spare Battery Pack To charge a spare battery pack, it must be inserted in the cradle before a terminal is placed in the cradle. To recharge a spare battery pack: 1. Verify that the cradle has power. Connect the cradle’s power supply jack as described in Installing the Vehicle Cradle. 2. Insert the battery pack in the charging slot until it is firmly seated. 3. The battery begins charging immediately. 4. Check the cradle LEDs to determine the spare pack’s charging status. Quick Reference 13 • If the Spare Battery Charge LED is amber, the pack is still charging and should not be used. • The LED toggles between amber and green when the pack is close to being fully charged. • When the LED changes to green, the battery pack is fully charged. 5. When the pack is fully charged, remove the battery from the charging slot. Depress the battery pack release switch and lift the pack out of the charging slot. Quick Reference 14 Indicator Lights LED LED Color Status Cradle: Power LED Green Power on. Cradle: Battery Charging LED Green Spare battery in cradle slot is fully charged OR No spare battery in cradle. Amber Spare battery charging. Amber <-> Green Spare battery is ALMOST fully charged. Amber Battery pack in terminal is charging. Amber <-> Green Spare battery is ALMOST fully charged. Green Battery pack in terminal is fully charged. Terminal: Battery Charging LED Terminal: COMM Off LED Cradle mode disabled and/or terminal not in cradle. Solid Green Cradle mode enabled and terminal in cradle. Terminal not controlling the bus. Flashing Green Cradle mode enabled and terminal in cradle. Terminal is controlling the bus. Quick Reference 15 Troubleshooting Symptom Probable Cause No communication Cradle driver not between terminal and loaded. cradle Rechargeable battery in terminal or spare battery did not charge Action Ensure that the cradle driver is loaded. Cradle mode not enabled. Enable cradle mode via the appropriate API. Terminal improperly installed in cradle. Remove terminal from cradle and re-insert. Battery failed. Replace battery. Terminal or battery was removed from cradle too soon OR Battery or terminal improperly installed in cradle. Replace terminal and/or spare battery in cradle and begin charging over. Battery requires 2 hours to recharge fully. Quick Reference 16 Regulatory Information Radio Frequency Interference Requirements United States This device has been tested and found to comply with the limits for a Class A digital device pursuant to Part 15 of the Federal Communications Commissions Rules and Regulation. These limits are designed to provide reasonable protection against harmful interference when the equipment is operated in a commercial environment. This equipment generate, uses, and can radiate radio frequency energy and, if not installed and used in accordance with the instruction manual, may cause harmful interference to radio communications. Operation of this equipment in a residential area is likely to cause harmful interference in which case the user will be required to correct the interference at his own expense. However, there is no guarantee that interference will not occur in a particular installation. If the equipment does cause harmful interference to radio or television reception, which can be determined by turning the equipment off and on, the user is encouraged to try to correct the interference by one or more of the following measures: • Re-orient or relocate the receiving antenna. • Increase the separation between the equipment and receiver. • Connect the equipment into an outlet on a circuit different from that which the receiver is connected. • Consult the dealer or an experienced radio/TV technician for help. Radio Frequency Interference Requirements Canada This Class A digital apparatus meets the requirements of the Canadian Interference-Causing Equipment Regulations. Cet appareil numérique de la Classe A respecte toutes les exigences du Reglement sur le Materiél Brouilleur du Canada. CE Marking and European Union Compliance Products intended for sale within the European Union are marked with the CE Mark which indicates compliance to applicable Directives and European Normes (EN), as follows. Amendments to these Directives or ENs are included: Applicable Directives: • • Electromagnetic Compatibility Directive 89/336/EEC Low Voltage Directive 73/23/EEC Quick Reference 17 Applicable Standards: • • • • • • • EN 55 022 - Limits and Methods of Measurement of Radio Interference Characteristics of Information technology Equipment EN 50 082-1 - Electromagnetic Compatibility - Generic Immunity Standard, Part 1: Residential, commercial, Light Industry IEC 801.2 - Electromagnetic Compatibility for Industrial Process Measurement and Control Equipment Part 2: Electrostatic Discharge Requirements IEC 801.3 - Electromagnetic Compatibility for Industrial Process Measurement and Control Equipment Part 3: Radiated Electromagnetic Field Requirements IEC 801.4 - Electromagnetic Compatibility for Industrial Process Measurement and Control Equipment Part 4: Electrical Fast Transients Requirements EN 60 950 + Amd 1 + Amd 2 - Safety of Information Technology Equipment Including Electrical Business Equipment EN 60 825-1 (EN 60 825) - Safety of Devices Containing Lasers Quick Reference 18 Warranty Information In the U.S.A., for service information, warranty information, or technical assistance, call the Symbol Support Center: 1-800-653-5350 If you purchased your Symbol product from a Symbol Business Partner, contact that Business Partner for service. Outside North America, contact your local Symbol representative. Warranty Symbol products are warranted against defects in workmanship and materials for a period of one year from the date of shipment, provided that the product remains unmodified and is operated under normal and proper conditions. This warranty is limited to repair or replacement at Symbol’s option, with reasonable promptness after being returned to Symbol by a carrier selected and paid for by the customer. These provisions do not prolong the original warranty term for any product which has been repaired or replaced by Symbol. This warranty applies to the original owner and does not extend to any product which has been subject to misuse, neglect, accidental damage, unauthorized repair or tampering. Preventive maintenance activities are not covered by warranty. Quick Reference Patents This product is covered by one or more of the following U.S. and foreign Patents: U.S. Patent No.4,360,798; 4,369,361; 4,387,297; 4,460,120; 4,496,831; 4,593,186; 4,603,262; 4,607,156; 4,652,750; 4,673,805; 4,736,095; 4,758,717; 4,816,660; 4,845,350; 4,896,026; 4,897,532; 4,923,281; 4,933,538; 4,992,717; 5,015,833; 5,017,765; 5,021,641; 5,029,183; 5,047,617; 5,103,461; 5,113,445; 5,130,520 5,140,144; 5,142,550; 5,149,950; 5,157,687; 5,168,148; 5,168,149; 5,180,904; 5,229,591; 5,230,088; 5,235,167; 5,243,655; 5,247,162; 5,250,791; 5,250,792; 5,262,627; 5,262,628; 5,266,787; 5,278,398; 5,280,162; 5,280,163; 5,280,164; 5,280,498; 5,304,786; 5,304,788; 5,306,900; 5,321,246; 5,324,924; 5,337,361; 5,367,151; 5,373,148; 5,378,882; 5,396,053; 5,396,055; 5,399,846; 5,408,081; 5,410,139; 5,410,140; 5,412,198; 5,418,812; 5,420,411; 5,436,440; 5,444,231; 5,449,891; 5,449,893; 5,468,949; 5,471,042; 5,478,998; 5,479,000; 5,479,002; 5,479,441; 5,504,322; 5,519,577; 5,528,621; 5,532,469; 5,543,610; 5,545,889; 5,552,592; 5,578,810; 5,581,070; 5,589,679; 5,589,680; 5,608,202; 5,612,531; 5,619,028; 5,664,229; 5,668,803; 5,675,139; 5,693,929; 5,698,835; 5,714,746; 5,723,851; 5,734,152; 5,734,153; D305,885; D341,584; D344,501; D359,483; D362,435; D363,700; D363,918; D370,478; D383,124; D391,250. Invention No. 55,358; 62,539; 69,060; 69,187 (Taiwan); No. 1,601,796; 1,907,875; 1,955,269 (Japan). European Patent 367,299; 414,281; 367,300; 367,298; UK 2,072,832; France 81/03938; Italy 1,138,713. rev. 4/98 70-17024-03 Revision A — June 1998