1
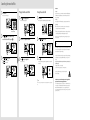
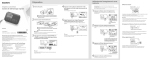
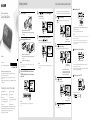
Let’s use the memory card recorder Getting Started Memory Card Recorder Quick Start Guide 1 Insert two batteries. 4 Turning the power off Press or to select “YES,” then press the clock settings. to set The clock setting screen appears. 2 Slide and lift the battery compartment lid. Insert LR03 (size AAA) alkaline batteries with correct polarity, and close the lid. Insert the supplied SD memory card. 1 This section explains how to play back the test recording file immediately. The recorded files are not erased if you record the next file within few seconds. Press to start recording. The button is lighting up and the memory card recorder enters the recording mode. Slide the HOLD·POWER switch in the direction of “POWER” and keep it there until “Power Off” animation appears. The memory card recorder will turn off in a few seconds. 5 Hint Set the year, month, day, hour, and minute in or sequence using and . When you set the minute, the “Setting Completed” message is displayed. 2 Elapsed recording time Remaining recording time Press to stop recording. “Please Wait” appears in the display window, then the recording stops. Open the cover of the memory card slot. Insert a memory card securely to the end of the slot until it clicks into place. Close the cover of the memory card slot. ICD-LX30 4-297-165-31 (1) Note © 2011 Sony Corporation Printed in China The memory card recorder does not have an internal memory. Be sure to insert the memory card before recording. Welcome to your new Sony memory card recorder! This is the Quick Start Guide, which provides you with instructions on the basic operations of the memory card recorder. Please read it carefully. We hope you enjoy using your new Sony memory card recorder. Please refer to the operating instructions stored on the supplied SD memory card for details of functions. 3 Slide the HOLD·POWER switch in the direction of “POWER” and keep it there to turn on the memory card recorder. When you are not going to use the memory card recorder for a long time, we recommend to turn off the memory card recorder. When the memory card recorder is in the stop mode, and you leave the memory card recorder without attempting an operation for approx. 30 minutes, the auto power off function will take effect. About memory card access indicator Memory card access indicator Hint The status of the memory card recorder You can return to the previous window by pressing MENU if you make a mistake in the clock settings. 3 The number of the recorded file (in the sequence of files that were recorded on the same day)/Displays the total number of files that were recorded on the same date Press The memory card access indicator is flashing in orange when the memory card recorder is accessing the memory card. Do not remove the SD memory card, batteries, or disconnect the AC adaptor while the memory card access indicator is flashing. To set the beep sound to OFF to play back. The test recording starts playing back. Checking the contents of the package Memory card recorder (1) SD memory card (2GB) (1) LR03 (size AAA) alkaline batteries (2) Carrying pouch (1) Hand Strap (1) Operating Instructions The strap is attached via the strap hole of the memory card recorder. AC adaptor (1) (Stored in the supplied SD memory card) Quick Start Guide (1) When you format the supplied SD memory card, the operating instructions stored in the supplied SD memory card will also be erased. To get another copy of the operating instructions, please visit the Sony support home page: http://support.sony-europe.com/DNA The recording start date Hint The HOLD·POWER switch returns to the center position automatically when you release it. 4 The elapsed playback time Press to stop the playback. The test recording stops. Press MENU to enter the menu mode. Press or to select “Beep,” then press . Press or to select “OFF,” then press . Searching the recorded files 1 Precautions Press SEARCH. The date selection screen appears. Playing back the searched file Erasing the searched file 1 1 Press to start playing back. The selected file starts playing back. Press ERASE. “Erase?” appears and the specified file is played back for confirmation. On power Operate the unit only on 3.0 V or 2.4 V DC. Use two LR03 (size AAA) alkaline batteries or two NH-AAA rechargeable batteries, or connect DC IN 3V jack to a wall outlet using an AC adaptor. On safety Do not operate the unit while driving, cycling or operating any motorized vehicle. On handling Do not leave the unit in a location near heat sources, or in a place subject to direct sunlight, excessive dust or mechanical shock. 2 Should any solid object or liquid fall into the unit, remove the battery and have the The recorded date box unit checked by qualified personnel before operating it any further. Press or to select the date when you recorded the desired file, then press . 2 Press VOL +/– to adjust the volume. 2 Press or to select “YES.” If you have any questions or problems concerning your unit, please consult your nearest Sony dealer. Do not install AC adaptor in a confined space, such as a bookcase or built-in cabinet. As the main plug of AC adaptor is used to disconnect the AC adaptor from the mains, connect it to an easily accessible AC outlet. Should you notice an abnormality in it, disconnect it from the AC outlet immediately. 3 Press Press Press or to select a file. to select a more recent file. to select an earlier file. 3 Press to stop the playback. The selected file stops. 3 Press . The “Erasing...” animation appears in the display window and the selected file will be erased. To reduce the risk of fire or electric shock, do not expose the AC adaptor to dripping or splashing, and do not place objects filled with liquids, such as vases, on the AC adaptor. Capacity of the supplied SD memory card with the memory card recorder (User available capacity) 2 GB (approx. 1.80 GB = 1,932,734,976 Byte) A part of the memory capacity is used as a management area. To prevent possible hearing damage, do not listen at high volume levels for long periods. Hint When a file is erased, the remaining files will advance so that there will be no space between files. Notice for the customers: the following information is only applicable to equipment sold in the countries applying EU directives The manufacturer of this product is Sony Corporation, 1-7-1 Konan Minato-ku Tokyo, 108-0075 Japan. The Authorized Representative for EMC and product safety is Sony Deutschland GmbH, Hedelfinger Strasse 61, 70327 Stuttgart, Germany. For any service or guarantee matters please refer to the addresses given in separate service or guarantee documents.