1
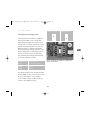
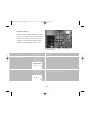
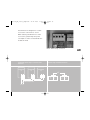
BP13370_NT_10000_englisch
23.11.2005
17:40 Uhr
Seite 1
MANUAL
User Manual for
Sunways Solar Inverter NT 10000
200
BP13370_NT_10000_englisch
23.11.2005
17:40 Uhr
Seite 2
SOLAR
INVERTERS
User Manual for
Sunways Solar Inverter NT 10000
BP13370_NT_10000_englisch
R
S
23.11.2005
17:40 Uhr
Seite 3
Table of contents
1.0
General Information
1.1
Safety Instructions
1.2
91
General Safety Instructions
92
Opening the Device
Sunways Solar Inverter
93
Scope of Delivery
NT 10000
94
Integrating the Solar Inverter
in the PV System
2.0
Installation Instructions
2.1
Safety Instructions
2.2
2.3
Basic Settings
Installation
96
Structure of NT 10000
98
Protection Concept
101
Electrical Safety
101
Mechanical Safety
102
Cleaning Instructions
103
Setting the Fixed Voltage Level
104
Country Settings
107
Installation Site Requirements
108
Mechanical Installation
108
Electrical Connection and Cable Entry
109
Grid Connection
112
Connecting the PV Generator
115
Communication Interfaces
87
GB
BP13370_NT_10000_englisch
23.11.2005
17:40 Uhr
Seite 4
118
Connecting the Alarm Relay
120
Connecting the Insolation and
Temperature Sensor
2.4
Commissioning the Solar Inverter
122
Starting-Up and Shutting-Down the
Solar Inverter
2.5
Dismantling the Solar Inverter
3.0
Operating Instructions
3.1
Operating the Display
3.2
123
General Information
125
Menu Guide
125
Navigating with the Arrow Keys
125
Setting Values
126
Menu Navigation Diagram
Configuration of the Solar Inverter 128
Setting the RS485 address
128
Setting the Date / Time
128
Setting the Display Language
128
Setting the LCD Contrast
128
Setting the Total Yield
3.3
3.3 Internal Data Memory
129
General Information
3.4
Sunways Monitor 2.0 Software
130
General Information
3.5
Sunways Portal and Sunways
131
General Information
Communicator
88
BP13370_NT_10000_englisch
3.6
23.11.2005
Communication Link
17:40 Uhr
Seite 5
131
Modem Link
132
Interface Cables
132
Interface Transformer
133
Linking and Interconnecting Possibilities
3.7
Error Display
139
Errors 001 to 036
3.8
Error Diagnosis
144
Error, Causes and Remedies
4.0
Appendix
4.2
Tyco Solarlok Connectors
154
Safety Instruction and Installation
List of Special Terms and
156
Designation and Description
Technical Data NT 10000
158
Solar Inverter NT 10000
Conformity and Safety
160
EU Low Voltage Directive 73/23/EEC
Declarations
161
EMC Directive 89/336/EEC, Including Changes
4.2
GB
Abbreviations
4.3
4.4
91/263/EEC
162
Safety Clearance / Certificate of Compliance
(VDEW 4th edition 2001)
4.5
Terms and Conditions of
163
Guarantee
4.6
General Exclusion of Liability
Duration of Guarantee, Conditions,
Exclusion of Liability
165
Rights, Registered Trademarks
89
BP13370_NT_10000_englisch
23.11.2005
1.0 General information
17:40 Uhr
Seite 6
Thank you for having chosen a Sunways
Solar Inverter NT 10000! You have acquired
a high-quality product with unique features
and a top efficiency level. This Solar Inverter
is designed in accordance with the proven
HERIC® topology and therefore guarantees
you a maximum energy yield.
The Solar Inverter is equipped with three
independent energy units which transform
the energy of three separately connected
PV generators into grid-compatible AC
power and inject it in three phases. Thanks
to the MPP multitracking process, PV generators with various ratings can be connected
to the same Solar Inverter with the
NT 10000.
In this user manual, you will find explanations on how to use the Sunways Solar
Inverter NT 10000. It includes information
on installation, commissioning, the functioning method, and system monitoring.
90
BP13370_NT_10000_englisch
1.1
23.11.2005
17:40 Uhr
Safety Instructions
Seite 7
General Safety Instructions
The user manual contains safety instruc-
All safety instructions contained in this
tions. They are marked by a triangle with
section as well as in the entire user manu-
an exclamation mark.
al must be observed to ensure the safety
!
of the user. The described product may
not be operated if any mechanical or electrical component is defect.
Prior to commissioning the PV system, we
strongly recommend reading and observing
the manual and the instructions carefully!
Non-compliance may lead to serious consequences such as damage to the device,
damage to other assets, personal injury, or
fatal accidents.
The Solar Inverter may only be installed
by a trained and qualified electrician.
It must be approved by the power supply
company in charge. In the chapter
headings, the due steps are additionally
marked by the adjacent symbol.
91
GB
BP13370_NT_10000_englisch
!
23.11.2005
17:40 Uhr
Seite 8
Opening the Device
Prior to opening the housing, always
disconnect the device from the grid and
the PV generator.
After having been disconnected from the
PV generator, there is still lethal voltage
inside the device and at the PV generator
hubs for approximately five minutes. It
takes that long for the energy-storing
capacitors to fully discharge.
After having disconnected the device
from the grid and the PV generator, wait
at least five minutes before opening the
device.
92
BP13370_NT_10000_englisch
1.2
23.11.2005
17:40 Uhr
Sunways Solar Inverter NT 10000
Scope of Delivery
Seite 9
Checking the Consignment
Prior to shipment, our products are checked to make sure they are in a perfect con-
· Sunways Solar Inverter NT 10000
dition. They are carefully packaged in recy-
· assembly frame
clable materials. Nevertheless, damage may
· user manual, setup, guarantee card,
occur during transportation which is nor-
CD ROM with software
mally the fault of the forwarding company.
· 3 pairs of Tyco Solarlok connectors
Please check the delivered Solar Inverter
carefully!
Should you notice any damage to the
packaging or to the Solar Inverter, please
notify the forwarding company immediately. If required, your specialist dealer will
be glad to support you. If a damage report
is needed, it must be filed with the forwarding company no later than seven days
after receipt of the consignment.
93
GB
BP13370_NT_10000_englisch
23.11.2005
17:40 Uhr
Seite 10
Integrating the Solar Inverter
in the PV System
· The warmer the module gets, the smaller the output of the cells will be.
Rating of the PV Generator
Therefore, make sure your PV generator
has sufficient back ventilation when you
The technical data of the selected PV
install it.
generator must be compatible with the
specification of the Solar Inverter (see
· Check your PV generator for contami-
Technical Data). An incompatible rating
nation approximately every three years.
may reduce the yield or destroy the
Contamination mostly occurs on the
device. The rating program Sunways NT
lower edge of the module; it forms a
Sundim can help you select the correct PV
veil that is not even washed off by
generator rating. You will find Sunways
heavy rain. A loss of yield can be pre-
NT Sundim on the enclosed CD ROM or
vented by cleaning the modules with a
on our homepage www.sunways.de.
wet cloth or a brush.
Prior to planning your system, please take
· Make sure none of the modules or solar
the following considerations into account:
cells of your system are in the shade.
That may lead to a significant loss of
· Mind the orientation of the modules.
yield.
In Central Europe, you will gain a maximum yield if the module has a horizon-
· The NT 10000 has three internal energy
tal angle of 30° and the PV generator
units that are supplied by three inde-
field points directly towards the south.
pendent PV generators. The NT 10000 is
based on the «MPP multitracking» principle; i. e. each inlet has its own MPP
controller.
94
BP13370_NT_10000_englisch
23.11.2005
17:40 Uhr
Seite 11
Standard Components of a PV System
Depending on the recommendations of
your PV planner, your PV system is made
up of the following components:
Standard components of the PV system
(1)
PV
(1)
PV
(1)
INVERTER
PV
(1) PV generator switch
(2) Insolation sensor with
integrated temperature
probe
(3) Grid fuse
(4) Power meter
(3)
(2)
(4)
PC
GRID
The PV generator switch is designed as a
Grid connection:
DC switch-disconnector and is made for
The NT 10000 is connected to the grid in
disconnecting the PV generator from the
three phases. Each phase is internally con-
Solar Inverter.
trolled and monitored independently of
Rating: at least 900 V, ≥16 A
the others.
Since the NT 10000 is supplied by three
independent PV generators, the DC main
switches must also be independently of
each other. It can be designed as a packettype switch, for example.
95
BP13370_NT_10000_englisch
23.11.2005
Structure of NT 10000
17:40 Uhr
Seite 12
The Solar Inverter NT 10000 is made up of
three energy units that are controlled
independently of each other. Each energy
unit has its own DC inlet.
Energy Unit
DC Inlet
Control Circuit Board
AC Grid Connection
Energy unit 1
DC inlet 1
Control circuit board 1
Phase L1
Energy unit 2
DC inlet 2
Control circuit board 2
Phase L2
Energy unit 3
DC inlet 3
Control circuit board 3
Phase L3
The following illustration shows the connection of the DC inlet and the layout of
the energy unit:
96
BP13370_NT_10000_englisch
23.11.2005
17:40 Uhr
Seite 13
Solar Inverter NT 10000
Energy unit 3
Control circuit board 3
Energy unit 2
Control circuit board 2
Energy unit 1
Control circuit board 1
Interface circuit board
Underside of
the device
+
+ +
(1) (2) (3) DC inlet
–
–
–
97
L1
L2
L3
N
PE
AC grid
connection
BP13370_NT_10000_englisch
23.11.2005
17:40 Uhr
Seite 14
Protection Concept
The micro controller continuously and
The numbering 1 to 3 refers respectively
simultaneously monitors and displays the
to the performance unit 1 to 3:
following parameters. Numbers 1 to 3
refer to the energy units 1 to 3:
Error No.
Description
Error
Description
001
DC overvoltage 1
No.021
Insulation fault 2
002
DC overvoltage 2
022
Insulation fault 3
003
DC overvoltage 3
023
DC injection 1
004
Frequency fault 1
024
DC injection 2
005
Frequency fault 2
025
DC injection 3
006
Frequency fault 3
026
Isolated operation
007
Overheating of heat sink 1
027
Grid overvoltage 3-phase
008
Overheating of heat sink 2
028
Surge fault 1
009
Overheating of heat sink 3
029
Surge fault 2
010
Grid undervoltage 1-phase 1
030
Surge fault 3
011
Grid undervoltage 1-phase 2
031
Grid voltage 10 minutes mean value
012
Grid undervoltage 1-phase 3
013
Grid overvoltage 1-phase 1
014
Grid overvoltage 1-phase 2
015
Grid overvoltage 1-phase 3
016
Grid undervoltage 3-phase
017
AFI fault 1
034
Control circuit board 1 fault
018
AFI fault 2
035
Control circuit board 2 fault
019
AFI fault 3
036
Control circuit board 3 fault
020
Insulation fault 1
038
Back-up battery empty
> 10 percent Unominal 1
032
Grid voltage 10 minutes mean value
> 10 percent Unominal 2
033
Grid voltage 10 minutes mean value
> 10 percent Unominal 3
98
BP13370_NT_10000_englisch
23.11.2005
17:40 Uhr
Seite 15
In case of an error, the current injection
is immediately stopped, and the grid relay
is triggered which disconnects the Solar
Inverter from the grid.
In addition, there are the following protection devices on the grid side and on
the PV generator side:
· Varistors on the grid side
GB
They protect the power semiconductors
in case of high-power, temporary voltage
peaks in the grid, and they discharge the
throttle in case of disconnection from
the grid.
· Varistors on the PV generator side
Varistors offer protection from atmospheric overvoltage (e. g. caused by
remote lightning strikes).
99
BP13370_NT_10000_englisch
2.0
23.11.2005
17:40 Uhr
Seite 16
Installation Instructions
100
BP13370_NT_10000_englisch
2.1
23.11.2005
Safety Instructions
!
17:40 Uhr
Seite 17
Electrical Safety
Prior to opening the housing, disconnect
the Solar Inverter from the electricity of
the grid and the PV generator.
After disconnection from the PV generator
and the grid, there is still lethal voltage
inside the Solar Inverter and at the
PV generator hubs for approximately five
minutes. It takes that long for the energystoring capacitors to fully discharge.
After having disconnected the Solar Inverter from the grid and the PV generator,
wait at least five minutes before opening
the Solar Inverter.
Mechanical Safety
During assembly, make sure the cables
or connecting lines attached to the Solar
Inverter are installed safely and suitable
mechanical cable retaining devices (e. g.
cable channels) are used.
101
GB
BP13370_NT_10000_englisch
!
23.11.2005
17:40 Uhr
Seite 18
Cleaning Instructions
Prior to cleaning your PV modules, always
disconnect the PV system from the power
grid by opening the grid disconnecting
device (main fuse), and open the DC circuit
breaker on the PV generator to prevent
the risk of an electric shock.
Use a dry, soft cloth to clean your PV
modules. Never use caustic, solvent-based,
or scouring cleaning agents or polish.
Please observe the instructions of the
PV module manufacturer.
102
BP13370_NT_10000_englisch
2.2
23.11.2005
17:40 Uhr
Basic Settings
Seite 19
«420 V» position
«540 V» position
Setting the Fixed Voltage Level
Your Sunways Solar Inverter is equipped
with a precise MPP control. If less than
200 watt are injected, the control of the
energy unit concerned operates at a fixed
voltage level. That prevents unnecessary
MPP searching. To minimise adjustment
GB
losses during fixed voltage operation, the
fixed voltage level of each energy unit of
the Solar Inverter can be set separately.
The optimum fixed voltage level depends
on your PV generator model.
Fixed voltage
No-load voltage
level
PV generator at 25 °C
420 V
≤ 630 V
540 V
> 630 V
Illustr.: Slide switch «S100» for setting the
fixed voltage level
The fixed voltage can be set with the slide
switch «S100» on the control circuit board.
Ex works, the switch is set to «420V».
To set a fixed voltage of 540 V, slide the
switch to the «540V» position.
103
BP13370_NT_10000_englisch
23.11.2005
17:40 Uhr
Seite 20
Country Settings
Please note that it takes different configurations to operate Sunways Solar Inverters
in different countries. The setting can be
adjusted accordingly with the DIP switch
«S300» below the display circuit board.
Illustr.: DIP switch «S300» for changing the
country setting
Country
Change
AFI
AFI
Voltage
10/15%
3 phased
Voltage
10/15%
Spain
3-phase
Germany
Switch position
· Opening time after power failure: 3
· Grid monitoring 1-phase
104
BP13370_NT_10000_englisch
23.11.2005
17:40 Uhr
Seite 21
To change the country setting, the housing
cover must be removed. The DIP switch
must be re-positioned to the respective
country setting on all three control circuit
boards.
When delivered, the Solar Inverters are
pre-set to the intended destination country. The pre-set country is indicated by
the first two digits of the serial number:
GB
Germany
00.....
Spain
02.....
105
BP13370_NT_10000_englisch
17:40 Uhr
Seite 22
The Solar Inverter may only be installed by
Installation
!
a trained and qualified electrician.
Special tools are needed for installation.
Please read this chapter very carefully.
➟
min. 300 mm
min. 300 mm
Cool air
300 mm
➟
Wall
300 mm
Warm
air
➟
Ceiling
➟
2.3
23.11.2005
BP13370_NT_10000_englisch
23.11.2005
17:40 Uhr
Installation Site Requirements
Seite 23
If the Solar Inverter is installed in a switch
cabinet, make sure the heat is removed to
· Mechanical Load-Bearing Capacity
a sufficient degree.
During assembly, please keep in mind that
the Solar Inverter weighs 30 kg. The
The ambient temperature may not drop
assembly foundation must be solid and
below -25° C or rise above +40° C.
capable of bearing the weight in the long
run.
To protect the Solar Inverter from unnecessary external heat sources, do not expose
· Thermal Interaction
the Solar Inverter to direct sunlight.
GB
The assembly foundation must be made
of flame-retardant material (unsuitable:
wooden or plastic foundation; suitable:
· Protection from Moisture and Foreign
Objects
concrete and masonry), because the frame
Thanks to the high protection level IP 54,
of the Solar Inverter can reach up to 70° C.
the Solar Inverter can be installed indoors as
well as in a sheltered outdoor area, but it
Maintain a minimum distance of 300 mm
may not be directly exposed to rain.
to other devices, cabinets, ceilings, cable
channels, etc. above, below, and next to
Make sure the dust filter on the lower left
the housing.
side is not clogged by contamination.
That would impair the intake of cooling air.
The Solar Inverter must be installed in an
Depending on the surroundings, the filter
upright position to ensure unobstructed
should be cleaned at regular intervals.
convection.
Do not install several Solar Inverters on
top of each other, as they might heat
each other up.
107
BP13370_NT_10000_englisch
23.11.2005
17:40 Uhr
Mechanical Installation
!
Seite 24
Electrical Connection and Cable Entry
!
For assembly, please observe the instruc-
As soon as the Solar Inverter is fixed to the
tions in the «Setup» leaflet!
assembly frame, it can be electrically connected. The device may only be opened
by a qualified electrician. For this purpose,
loosen the four lateral hexagon socket
screws by one rotation. The cover can now
be moved up to the upper rabbet. Fix the
cover in position by simply inserting the
hexagon key on the lower right side. The
wiring space is now accessible.
108
BP13370_NT_10000_englisch
23.11.2005
17:40 Uhr
Grid Connection
Seite 25
As an input-to-grid line protection element, we recommend using a 3 x 25 A
The Solar Inverter must be connected to
automatic circuit breaker for the NT
the grid with five-cores (L1, L2, L3, N, PE).
10000. No consumers may be connected
We recommend a cable cross-section of
to the supply line from the Solar Inverter
5 x 4 mm2.
to the automatic circuit breaker. The Solar
The Solar Inverter is connected to the
Inverter injects in three phases via termi-
supply grid via its internal printed-circuit
nals L1, L2, and L3. Please mind the pin
board terminals.
assignment. A wrong assignment may
destroy the device.
GB
Alarm relais, RS485 (in and out),
DC1 DC2 DC3
DC+
irradiation sensor with integrated
AC wiring loom
temperature measurement
L1, L2, L3, N, PE
USB
RS 232
DC–
Illustr.: Entry openings on the underside of the device
109
BP13370_NT_10000_englisch
23.11.2005
17:40 Uhr
Seite 26
Three-phase grid connection
PE N L3 L2 L1
25 A
L1 L2
L3
N
PE
Always use sufficiently dimensioned cable
Inverters may repeatedly switch on and off.
cross-sections to prevent a significant increase of the grid impedance between the
Carry out the following steps carefully:
service distribution system and the Solar
Inverter. The capacity of the AC terminals is
0.5 mm2 to 6 mm2 for rigid cables, and 0.5
· Prior to inserting the power cable into
the device, make sure it is de-energised.
mm2 to 10 mm2 for flexible cables. If the
grid impedance is high, i. e. due to relatively long or thin cables, the voltage at the
grid terminal is increased during injection.
If the terminal voltage exceeds the admissible value, the Solar Inverter is disconnected
from the grid. If the power grid is weak
and the PV output is high, individual Solar
110
BP13370_NT_10000_englisch
23.11.2005
17:40 Uhr
Seite 27
· Insert the five-core AC cable (outer
diameter 9–17 mm) into the M32 cable
gland.
· Connect lines L1, L2, L3, N, and PE to
the slated printed circuit board terminal
with a slotted screwdriver.
GB
· Pull the M32 cable gland tight, so the
cable cannot exert mechanical force on
the printed circuit board terminal.
111
BP13370_NT_10000_englisch
23.11.2005
17:40 Uhr
Connecting the PV Generator
!
· Preparation
Seite 28
4. Accessible and conductive parts of the
PV generator (e. g. metal frame, support
structure, etc.) must be earthed (connection to PE).
5. Make sure the PV generator is earthfault free.
Please note that the NT 10000 has three
independent DC inlets. The PV generators
may have different ratings, but they must
6. Connect the Solar Inverter to the power
line.
be compatible with the specifications of
the Solar Inverter.
1. Install the DC cables in accordance with
the system ratings prescribed by your PV
planner. Measure the no-load voltage
and the short-circuit current of each PV
phase to make sure they work perfectly.
2. Read the type plate of the Solar Inverter
to make sure it is licensed for the maximum PV generator voltage.
3. To avoid dangerous touch voltage
during the assembly of PV systems, the
positive and negative conductors must
be kept away from the earth potential
(PE) electrically.
112
BP13370_NT_10000_englisch
23.11.2005
17:40 Uhr
· Connection
The PV generator is connected by means of
the externally accessible, touch-safe Tyco
Solarlok connectors included in the consignment. The Tyco Solarlok connectors are
designed for a cable cross-section of 4 mm2
and have to be crimped. For further infor-
Seite 29
Important Information
!
· The DC voltage can reach up to 850 V.
mation, please read chapter 4.2 «Tyco
The device may only be opened by a
Solarlok Connectors».
qualified electrician!
Please note:
· As soon as the PV generator has been
All PV generator inlets are positioned in
connected to the Solar Inverter by means
pairs. Inlet 1 is left, inlet 2 is in the middle,
of the DC connectors and the PV genera-
and inlet 3 is right. The upper connections
tor has been switched on, the PV genera-
are «POSITIVE», and the lower ones are
tor voltage is applied internally!
«NEGATIVE».
· Please note that the inlet capacitors are
still live, even after the PV generator has
been switched off or the PV generator
connector has been pulled out!
· After the AC and DC sides have been
isolated, the Solar Inverter remains live
for up to approximately five minutes!
· Therefore, wait at least five minutes for
Illustr.: PV generator connection via Tyco
the internal voltage to discharge. Prior to
Solarlok connectors
working on the Solar Inverter, always
113
GB
BP13370_NT_10000_englisch
23.11.2005
17:40 Uhr
Seite 30
check the residual DC voltage with a voltmeter. Then you may work on the terminals. See chapter 2.1.
· Always disconnect the PV generator side
first by opening the PV generator switch;
then interrupt the grid connection by isolating (switching off) the corresponding
grid fuse!
· Never disconnect the PV generator by
pulling out the Tyco Solarlok connectors
under load. Otherwise a powerful electric
arc might damage the connectors. The
damaged connectors then have to be
replaced!
· If your PV system does not have a PV
generator switch, interrupt the grid connection by isolating (switching off) the
corresponding grid fuse first. A fault will
then be recorded in the fault memory
of the Solar Inverter, however.
114
BP13370_NT_10000_englisch
23.11.2005
17:40 Uhr
Seite 31
Communication Interfaces
!
The communication interfaces enable you
to retrieve operating data from the data
memory with an external computer and to
change certain settings. There are several
Illustr.: USB connector (left) and SUB-D9
communication interfaces: USB, RS232,
connector (right) for the RS232 connection
and RS485.
on the underside of the device.
The standard communication interface is
the USB interface which is installed in
every common PC or Notebook. This interface will let you communicate with your
Solar Inverter via an interconnecting USB
cable. As an alternative, you can also use
the RS232 interface. The RS485 interface is
for cross-linking several Solar Inverters.
The USB and RS232 interfaces are connec-
Illustr.: Terminal block for the RS485
ted on the outside of the housing with a
connection
standard USB connector or a SUB-D9 connector.
115
GB
BP13370_NT_10000_englisch
23.11.2005
17:40 Uhr
Seite 32
· RS485 Wiring
Use a twisted two-wire cable for the RS485
Solar Inverters NT 10000 can be cross-lin-
wiring of the Solar Inverter. Connect the
ked via RS485. When doing so, please keep
terminals «RS485 +» between the Solar
in mind that the Solar Inverters must be
Inverters with one core and the terminals
connected in series. Cross-linking them
«RS485 -» with the other.
point-to-point is not admissible. Interface
RS485 is connected via the printed circuit
If you use a shielded twisted two-wire
board terminals and the corresponding
cable, you can earth the shield. That will
M12 cable glands inside the housing. Prior
improve the communication reliability.
to wiring the RS485, move the cover of the
Solar Inverter up, and fix it in position by
With the last Solar Inverter, the jumper
tightening a lateral screw. See chapter 2.1
«RS485 MATCH» must be closed. With all
«Safety Instructions».
other Solar Inverters, it has to be in the
open position (see chapter 3.6 «Com-
The required cable terminal block («X6»)
munication Link»).
with the connections «RS485 +», «RS485 -»,
and «RS485 GND» is in the lower section of
· Connecting a cable to the spring-loaded
the circuit board (see illustr. page 115).
terminal
Caution: There are two each of all termi-
· Use a small screwdriver. Press the orange
nals, so the ingoing and outgoing lines can
be connected separately.
terminal. The terminal will open.
· Insert the (at least 11 mm bare) cable into
the respective terminal hole.
· Release the pressure from the screwdriver. The cable is now attached to the
connection.
· Make sure the cable is connected tightly.
116
23.11.2005
17:40 Uhr
Inverter 3
Data –
Data +
Interface
transformer
IT
USB/RS232
· Release the pressure from the screwdriver. The cable is now attached to the
connection.
· Make sure the cable is connected tightly.
117
RS 485 –
RS 485 +
RS485GND
RS485 –
RS485 +
RS485GND
RS 485 –
RS 485 +
RS485GND
RS485 –
RS485 +
RS485MATCH
RS 485 –
SPARE
RS485MATCH
RS 485 +
SPARE
RS485MATCH
RS485GND
SPARE
RS485 –
connection
RS485 +
RS485
RS485GND
Jumper
Seite 33
Inverter 2
Inverter 1
RS485GND
BP13370_NT_10000_englisch
BP13370_NT_10000_englisch
23.11.2005
17:40 Uhr
Connecting the Alarm Relay
Seite 34
The required terminal block with the
connections «S-» and «S+» is on the lower
All Sunways Solar Inverters are equipped
right side of the circuit board («X5»).
with a potential-free alarm relay. The relay
Allocate the terminals as shown:
is designed as a make-contact element
and is always triggered when the device
reports an error. That ensures that any
faults in the PV system are reported
quickly and reliably on site. With PV
systems with several Solar Inverters, the
individual relays can be paralleled and
connected via a joint indicator light.
· Important Information:
!
The alarm relay is rated for 230 V / 2 A.
The alarm relay cannot be triggered if
Any higher power/voltage may destroy the
there is a power failure on L1, because
relay. The connected indicator module
that is the supply phase for the Solar
must be fused separately!
Inverter.
· Connecting a cable to the spring-loaded
The alarm relay cannot be triggered if
terminal
there is a grid failure on L1 since this is
· Use a small screwdriver. Press the orange
the supply phase for the solar inverter.
terminal. The terminal will open.
· Insert the (at least 11 mm bare) cable
· Connection
Move the cover of the Solar Inverter
up, and fix it in position by tightening a
lateral screw. See chapter 2.1 «Safety
Instructions».
into the respective terminal hole.
· Release the pressure from the screwdriver. The cable is now attached to the
connection.
· Make sure the cable is connected tightly.
118
BP13370_NT_10000_englisch
23.11.2005
17:40 Uhr
Seite 35
The terminals are designed for a cable
cross-section of 0.2 mm2 to 1.5 m2.
When selecting the dimensions of the
cross-section, please keep the power
consumption of the connected indicator
module in mind!
Illustr.: Alarm relay connection
GB
Paralleled alarm relays of several Solar
Inverters
INVERTER
(1)
INVERTER
(2)
Alarm relay terminal allocation
INVERTER
(n)
S–
INDICATOR LIGHT
L1 N
S–
S+
S+
BP13370_NT_10000_englisch
23.11.2005
17:40 Uhr
Seite 36
Connecting the Insolation and
The optional insolation sensor with the
Temperature Sensor
temperature probe is connected to the
cable terminal block «X4» in the lower
The optional insolation sensor (type
section of the circuit board.
Si-01TC-T by Ing.-Büro Mencke & Tegtmeyer) with its integrated PT-100 temperature probe for measuring the temperature
lets you record the insolation data and the
corresponding module temperature and
store them in the internal data memory
as a 15-minute average value.
This additional measuring unit helps you
analyse the performance of the system.
Based on the values, any faults in the PV
generator, e. g. shaded or defect solar
Illustr.: Connection insolation sensor
cells, can be detected.
Prior to connecting an insolation sensor,
move the cover of the Solar Inverter up,
and fix it in position by tightening a lateral screw. Please note that the inlets and
outlets are not short-circuit-proof. Please
observe chapter 2.1 «Safety Instructions».
120
BP13370_NT_10000_englisch
23.11.2005
17:40 Uhr
Seite 37
· Allocation of the cable terminal block:
Sensor pin name
Solar inverter pin name
Pin 1
Plus signal temperature
S-Temp
Pin 2
Plus signal insolation intensity
P-Solar
Pin 3
Plus connection supply +5 V
V+
Pin 4
Earth reference
V-
Pin allocation
sensor connector
· Use a small screwdriver. Press the
orange terminal. The terminal will open.
· Insert the (at least 11 mm bare) cable
into the respective terminal hole.
· Release the pressure from the screwdriver. The cable is now attached to
the connection.
· Make sure the cable is connected tightly.
121
BP13370_NT_10000_englisch
2.4
23.11.2005
17:40 Uhr
Commissioning the Solar Inverter
Seite 38
Starting-Up and Shutting-Down the
Solar Inverter
Prior to starting up the Solar Inverter,
move the housing cover downwards by
As soon as the Solar Inverter has been
releasing the lateral fixation on the right
mechanically installed and connected to
lower side of the housing and pulling the
the power lines, it can be commissioned as
four lateral hexagon socket screws tight.
follows. Depending on whether or not you
are using DC main switches, the start-up
Do not deposit any objects (e. g. this
and shut-down sequence for the DC and
manual) on the housing of the Solar
AC side differs.
Inverter. The ventilation behind the Solar
Note: The Solar Inverter is supplied from
Inverter must not be obstructed.
the grid. If the PV output is high enough,
the Solar Inverter will switch on autom
If the device is installed outdoors, please
atically. For that purpose, on and off thres-
double-check that the cable glands, the
hold values have been determined.
housing cover, and the protection cap of
the SUB-D9 connector (provided this terminal is not allocated) are tight.
Start-up (with DC main switch)
1. Switch the grid connection on with the
external automatic circuit breaker.
2. Switch the PV generator voltage on
by closing the DC main switch. If the
PV input voltage is sufficient, the Solar
Inverter will start and inject solar
energy into the electrical grid. The
injection is indicated by the power
pointer on the display.
122
BP13370_NT_10000_englisch
23.11.2005
17:40 Uhr
Start-up (without DC main switch)
1. Connect the Tyco Solarlok connectors
to your Solar Inverter.
2. Start-up the AC side.
Seite 39
!
Never disconnect the PV generator by
pulling out the Tyco Solarlok connectors
under load! Otherwise a powerful electric
Shut-down (with DC main switch)
arc might damage the connectors.
1. Disconnect the PV generator side by
The damaged connectors then have to
opening the DC main switch.
be replaced!
GB
2. Open the grid connection by isolating
(switching off) the corresponding grid
2.5
Dismantling the Solar Inverter
fuse.
To dismantle the Solar Inverter, loosen the
3. After a waiting time of at least five
hexagon socket screws, and move the
minutes, the Solar Inverter is deener
cover up. Make sure the Solar Inverter is
gised.
de-energised; then remove the supply
lines. The Solar Inverter may then be lifted
Shut-down (without DC main switch)
out of the assembly frame.
1. Interrupt the grid connection by isolating (switching off) the corresponding
grid fuse. A fault will then be recorded
in the fault memory of the Solar
Inverter.
2. Pull the Tyco Solarlok connector out of
your Solar Inverter.
123
BP13370_NT_10000_englisch
3.0
23.11.2005
17:40 Uhr
Seite 40
Operating Instructions
18
124
BP13370_NT_10000_englisch
3.1
23.11.2005
17:40 Uhr
Operating the Display
Seite 41
· Menu Guide
Activate the main menu by pressing any
A dot matrix LCD display with 2 x 16 cha-
random key. In the top menu level, there
racters is integrated in the housing of the
are four items to choose from:
Solar Inverter. The language of the dis-
· display current values
played messages can be selected (German,
· display energy yield
English, Spanish, Italian, or French). The
· change settings
four arrow keys to the right of the display
· display Solar Inverter specifications
are for navigating the menu structure. The
background lighting of the display is acti-
· Navigating with the Arrow Keys
vated by pressing any random key. It auto-
You can use the UP arrow
matically switches off if no input is made
arrow
for more than one minute.
level. To select a menu item, press the
and DOWN
keys to scroll within a menu
RIGHT arrow key
. To return to a
higher menu level, press the LEFT arrow
shows the current total output of the Solar
key
As a standard, line one of the display
.
Inverter, and line two shows the partial
output of the three energy units 1 to 3.
· Setting Values
This information is always displayed if no
To set values, move to the next figure by
key is pressed for one minute.
pressing the RIGHT arrow key. To change
the current figure, press the UP/DOWN
arrow key. If the cursor is on the last figure, you can confirm the input by pressing
the RIGHT arrow key. To abort the changes
during entry, press the LEFT arrow key.
125
GB
BP13370_NT_10000_englisch
23.11.2005
17:40 Uhr
Seite 42
If a displayed value can be changed, an
Main menu
Display current
mode.
values
the RIGHT arrow key to reach the «edit«
arrow is shown behind it. In this case, press
The current power and voltage values are
displayed separately for each of the three
yield
Display
energy units.
126
specifications
Solar Inverter
settings
Change
BP13370_NT_10000_englisch
23.11.2005
17:40 Uhr
Seite 43
Power (kW)
DC current (A)
DC voltage (V)
AC current (A)
AC voltage (V)
Temp. module (°C)
Insolation (W/m2)
Date / Time
Error display
Today’s yield
Yesterday’s yield
Annual yield
Monthly yield
Total yield
Change
Serial number
Energy unit 2
Date of commissioning
Energy unit 1
Energy unit 3
Firmware version
127
Total
Works menu
Total yield
LCD contrast
Language
Date / Time
Address RS485
Change
BP13370_NT_10000_englisch
3.2
23.11.2005
17:40 Uhr
Configuring the Solar Inverter
Seite 44
Setting the Date / Time
To set the time or date, select the menu
You can enter the following settings in
item «change settings» / «date/time», and
your Solar Inverter:
move to the «edit» mode by pressing the
RIGHT arrow key.
· set RS485 address
· set date / time
Setting the Display Language
· set display language
To set the display language, select the
· set LCD contrast
menu item «change settings» / «lan-
· set total yield
guage». Here, you can choose from the
languages German, English, Spanish,
Please note that the configuration can only
French, and Italian by pressing the
be changed when the Solar Inverter is ope-
UP/DOWN arrow key. Confirm your input
rating. Alternatively, you can change these
by pressing the RIGHT arrow key.
settings by using the enclosed software
Sunways Monitor.
Setting the LCD Contrastt
If you wish to change the LCD contrast to
Setting the RS485 Address
improve the clarity of the display, select
To use the communication via the RS485
the menu item «change settings» / «LCD
bus, the Solar Inverters must have consecu-
contrast». Press the RIGHT arrow key to
tive RS485 addresses. That means, if you
activate the «edit» mode; then select the
link three Solar Inverters together, their
desired contrast by pressing the UP/DOWN
addresses must be 1, 2, 3. When delivered,
arrow key. To confirm your input, press
address 1 is preset. To change the address,
the RIGHT arrow key.
select the menu item «settings» / «RS485
address», and press the RIGHT arrow key to
Setting the Total Yield
call up the «edit» mode. There, you can
If your Solar Inverter needs to be replaced,
enter an address from 1 to 99.
you can take over the total yield from the
128
BP13370_NT_10000_englisch
23.11.2005
17:40 Uhr
former Solar Inverter to your new one.
Seite 45
3.3
Internal Data Memory
You can either take over the total yield of
the device, or the individual yield of each
Your Solar Inverter is equipped with an
energy unit. If you set the total yield of the
internal data memory as a standard fea-
device, it will automatically be split among
ture. With the enclosed software Sunways
the energy units 1 to 3 in equal shares.
Monitor, you can access these data. These
If you change the yield of the individual
Solar Inverter data will give you detailed
energy units separately, they will be added
information on the functioning method
up to the total yield.
and relevant values of your solar energy
supply at any time. The measured values
To do so, select the menu item «change
are stored in a ring buffer that automati-
settings» / «total yield». Here, you can
cally overwrites the earliest values with
select the total yield, energy unit 1, energy
the latest ones. The following measured
unit 2, or energy unit 3. To start changing
values are stored in your Solar Inverter
the displayed value, press the RIGHT arrow
NT 10000:
key.
15 minutes average values (500 data
records, each with date/time):
· DC current
· DC voltage
· AC current
· AC voltage
· injected power
· insolation (optional)
· module temperature (optional)
129
GB
BP13370_NT_10000_englisch
23.11.2005
17:40 Uhr
In addition, the following total injected
Seite 46
3.4
Sunways Monitor 2.0 Software
energy values (electrical output) are
stored:
General Information
The visualisation software Sunways Monitor
· daily yield (40 days)
2.0 is for monitoring the PV system and
· monthly yield (13 months)
configuring the Sunways Solar Inverter with
· total yield (since commissioning)
a PC. You can install it on your PC from the
enclosed CD ROM.
The last 100 errors of the Solar Inverter
To download the latest software version
are stored with their date, time, and error
free of charge, please visit www.sunways.de
number.
on the Internet. Our system recommendation is:
Please note that, in the nominal case, all
displayed values have a maximum measu-
· Intel Pentium with at least 500 MHz
ring accuracy of 5 percent. The power
· Microsoft Windows 98 Second Edition,
meter of your power supply company is an
Windows 2000, Windows XP
absolute reference for the injected energy.
· Microsoft .NET-Framework 1.1
· 200 MB available ROM
· 256 MB RAM
· VGA monitor with at least 1024 x 768
resolution, at least 256 colours
With the Sunways Monitor 2.0 software, all
measured values stored in the Solar Inverter
are retrieved and filed in a data bank. The
software lets you visualise the measured
values in diagrams or in tables.
130
BP13370_NT_10000_englisch
23.11.2005
17:40 Uhr
You can flexibly manage as many PV
Seite 47
3.6
Communication Link
systems as you like with up to 99 Solar
Inverters and different types of con-
Every Sunways Solar Inverter NT 10000 is
nections (modem or direct).
equipped with the interfaces RS232, RS485,
and USB, by which it can be connected to
To learn more about the software possi-
your PC. If the PV system and the PC are
bilities, please read the instructions on
far apart, the data can also be retrieved via
the CD ROM.
a modem link. If linked via the RS485
interface, up to 99 Solar Inverters can be
monitored and read out.
3.5
GB
Sunways Portal and Sunways
Communicator
Modem Link
For that purpose, a modem (remote
To supervise a solar system with several
modem) must be connected to the Solar
Sunways Solar Inverters, we recommend
Inverter. We recommend using the «ACER
using the Sunways Communicator. This
surf 56» modem by ACER as a remote
device lets you connect your system to
modem. This accessory is available from
the Sunways portal where you can access
your Solar Inverter dealer.
your system data via the Internet.
For further suppliers, please visit our
Moreover, it can warn you of system faults
website ww.sunways.de.
by email, fax, or SMS.
Connect the second modem (local modem)
If you would like to find out more infor-
to the RS232 interface of your PC.
mation about the Sunways Communicator,
look it up on the supplied CD ROM.
To learn more about the Sunways
Communicator, please look up the information on the enclosed CD ROM.
131
BP13370_NT_10000_englisch
23.11.2005
17:40 Uhr
!
Seite 48
using products made by ICP Germany to
ensure a reliable data transfer
To connect the interface transformer to a
Modem types not recommended by
COM port (RS232) of your PC, use the
Sunways are not necessarily guaranteed
«I-7520» model; to connect it to a USB-port
to work.
of your PC, use the «I-7561» model. This
accessory is available from your Solar
For the remote modem to automatically
Inverter dealer. For further suppliers, plea-
respond to an incoming call and open the
se visit our website ww.sunways.de.
line, it has to be initialised with the
Sunways Monitor software prior to installation. For this, please also observe the
software instructions.
Interface Cables
Depending on the type of link, different
!
To set up the RS485 communication bet-
types of interface cables are needed. They
ween the Solar Inverters properly, the
are available from your Solar Inverter dea-
RS485 addresses have to be set consecuti-
ler. For further suppliers, please visit our
vely, starting with address 01 (see chapter
website ww.sunways.de.
«Setting the RS485 Address»).
Interface Transformer
If you wish to read out the Solar Inverter
data with your PC via the RS485 interface,
you need an interface transformer to
transform the RS485 signals into PC-compatible RS232 signals. We recommend .
132
BP13370_NT_10000_englisch
23.11.2005
17:40 Uhr
Seite 49
Linking and Interconnecting Possibilities
Depending on the distance to be overcome and the number of Solar Inverters,
there are the following linking possibilities:
Type of Link
Distance
Solar System with 1
Solar System with up to 99
Solar Inverter
Solar Inverters
(cross-linked via RS485)
Sunways
PC not more than Connection of the PC via
Monitor Direct
5 - 25 m away
Link
Connection between the PC and
USB (max 5 m) or RS232
the Solar Inverter via USB with
(max. 25 m) (see 1)
the RS485 address 01 (max. 5 m)
(see 4)
Sunways
PC not more than Link between Solar
Monitor Local
500 m away (mi-
Inverter and PC via RS485
PC via RS485 bus, using an inter-
Link
nus RS485 cable
bus, using an interface
face transformer at the PC
length between
transformer at the PC
(see 5)
Link between Solar Inverter and
the Solar Inverters) (see 2)
Sunways
PC more than
Use of a remote modem
Connection of the remote
Monitor
500 m away
at the Solar Inverter RS232
modem via an interface trans-
port; link via modem at
former at the RS485 of the Solar
the PC (see 3)
Inverter with the RS485 address
Remote Link
01, link via modem at the PC
(see 6)
Sunways
Sunways Commu-
Use of an RS485 cable set
Use of an RS485 cable set
Communicator
nicator not more
(comes with the Sunways
(comes with the Sunways
Direct Link
than 25 m away
Communicator)
Communicator)
BP13370_NT_10000_englisch
23.11.2005
17:40 Uhr
Seite 50
The cables and interface transformers that
should be used are shown in the following
diagrams.
INVERTER
(1)
(1) Local link with a maximum distance of 25 m between the Solar Inverter and the PC
SUB-D9 connector
SUB-D9 connector
PC
USB
USB
(Sunways cable type 1, null modem cable female / female
(alternative: Sunways cable type 5, USB-device cable)
INVERTER
(1)
(2) Local link with an interface transformer between the Solar Inverter and the PC
Connection bar
RS485
RS 485 –
Data +
Data –
RS485 +
RS485GND
RS 485 –
RS485 +
SUB-D9 connector
PC
(Sunways cable type 2, modem cable female / male)
(twisted 2-wire cable)
RS485GND
Sub-D9 hub
IC
IT
134
BP13370_NT_10000_englisch
23.11.2005
17:40 Uhr
Seite 51
INVERTER
(1)
(3) Remote link with a modem between the Solar Inverter and the PC
Sub-D9 connector SUB-D9 hub
MODEM
MODEM
Sub-D9 hub SUB-D9 connector
PC
(Sunways cable type 2
modem cable hub/connector)
(Sunways cable type 2
modem cable hub/connector)
SPARE
RS485MATCH
SPARE
RS485MATCH
INVERTER
(3)
RS485MATCH
RS485
INVERTER
(2)
SPARE
RS485
INVERTER
(1)
(4) Local link for up to 99 Solar Inverters with a maximum distance of 25 m
between the Solar Inverters and the PC
RS485
PC
USB
(Sunways cable type 5,
USB plug)
USB
135
BP13370_NT_10000_englisch
23.11.2005
17:40 Uhr
Seite 52
(5) Local link for up to 99 Solar Inverters (IT or USB)
SPARE
RS485MATCH
SPARE
RS485MATCH
INVERTER
(3)
RS485MATCH
RS485
INVERTER
(2)
SPARE
RS485
INVERTER
(1)
Alternatively USB
RS485
PC
PC
USB
SUB-D9
connector
IT
(twisted pair
cable)
SUB-D9 hub
(Sunways cable type 2,
modem cable female / male)
IT
USB
(Sunways cable type 5,
USB device cable)
Ad (5): Local Link for up to 99 Solar
interface transformer with the following
Inverters
allocation: «RS485 +» to «DATA+» and
With this interconnection, up to 99 Solar
«RS485 -» to «DATA-».
Inverters can be cross-linked and read out.
That results in a maximum RS485 cable
The interface transformer transforms the
length of 500 m between the Solar
RS485 signal into RS232. It is linked to the
Inverters and the interface transformer.
PC with cable type 2 (standard modem
cable). With the Solar Inverter that is fur-
The RS485 signal is transferred from the
thest away from the interface transformer,
first Solar Inverter in the row into the
the jumper RS485 MATCH must be closed.
136
BP13370_NT_10000_englisch
23.11.2005
17:40 Uhr
Seite 53
!
With all other Solar Inverters, it has
to be in the open position.
To identify the individual Solar Inverters, a
clear RS485 has to be assigned to each of
them. See chapter «Setting the RS485
Address».
SPARE
RS485MATCH
SPARE
RS485MATCH
INVERTER
(3)
RS485MATCH
RS485
INVERTER
(2)
SPARE
RS485
INVERTER
(1)
(6) Remote link for up to 99 Solar Inverters with an interface transformer and a modem
RS485
(twisted pair cable)
PC
SUB-D9
connector
(twisted pair cable)
(twisted pair cable)
IT
SUB-D9
SUB-D9
connector hub
MODEM
(Sunways cable type 3
modem cable
connector/connector)
MODEM
SUB-D9
hub
(Sunways cable type 2
modem cable
hub/connector)
BP13370_NT_10000_englisch
23.11.2005
17:40 Uhr
Seite 54
Ad (6): Remote Link for up to 99 Solar
Finding the Jumper «RS485 MATCH»
Inverters
in the Solar Inverter
If you wish to connect several Solar
Please make sure the jumper «RS485
Inverters to the remote monitoring system,
MATCH» is in the right position, considering
the individual Solar Inverters must be cross-
the communication interconnection you
linked via RS485. The RS485 signal of the
have chosen. This jumper is on the under-
first Solar Inverter in the row is transferred
side of the interface circuit board.
into the interface transformer with the following allocation: «RS485 +» to «DATA+»
and «RS485 -» to «DATA-». Connect the
remote modem to the interface transformer. With the last Solar Inverter, the jumper «RS485 MATCH» must be closed. With
all other Solar Inverters, it has to be in the
open position.
!
Illustr.: Position of the jumper «RS485
MATCH»
To identify the individual Solar Inverters,
a clear RS485 has to be assigned to each of
them. See chapter «Setting the RS485
Address».
138
BP13370_NT_10000_englisch
3.7
23.11.2005
17:40 Uhr
Error Display
Seite 55
Errors 001 to 003
Your Solar Inverter works fully automatically.
· DC overvoltage
Should external or internal factors neverthe-
A maximum PV generator no-load voltage
less lead to an error, an error number will be
of 850 V is admissible. All components of
flagged on the display. Below, you will find
the DC inlet have a sufficient safety factor. If
a description of the error for each error
this limit is exceeded, the Solar Inverter will
number. If three consecutive error numbers
stop the injection, and «error 001» will be
are listed in the description, each of them
flagged, for example. That means an over-
refers to an energy unit of the Solar Inverter.
voltage of the PV generator on inlet 1 or on
E. g. for the description of errors 004 to 006,
the lower energy unit.
this means:
· Error 004 refers to:
Errors 004 to 006
DC inlet 1 (left DC connection)
energy unit 1 (lower control circuit board)
· Frequency fault
grid phase L1
The Solar Inverter continuously monitors
the applied grid frequency. Should it be
· Error 005 refers to:
outside the range specified in E DIN VDE
DC inlet 2 (middle DC connection)
0126-1-1, the Solar Inverter will stop the
energy unit 2 (middle control circuit board)
injection, and «error 004» will be flagged,
grid phase L2
for example. That means a grid frequency
error on grid phase L1 or on the lower
· Error 006 refers to:
energy unit.
DC inlet 3 (right DC connection)
energy unit 3 (upper control circuit board)
grid phase L3
139
GB
BP13370_NT_10000_englisch
23.11.2005
17:40 Uhr
Errors 007 to 009
Seite 56
Errors 013 to 015
· Overheating
· Grid overvoltage 1-phase
Your Solar Inverter is designed for an
Your Solar Inverter continuously monitors
ambient temperature of up to +40° C.
the voltage level of the injection phase.
If the maximum temperature of the heat
If it rises above the maximum admissible
sink is exceeded, the injection will stop.
limit value, the Solar Inverter will stop the
When the heat sink temperature has
injection and only restart when the voltage
dropped, the Solar Inverter will automa-
value drops below the maximum admissi-
tically restart. If the upper heat sink over-
ble limit value. If there is a grid overvolta-
heats, for example, «error 009» will be
ge on phase L2, for example, «error 014»
flagged.
will be flagged.
Error 016
Errors 010 to 012
· Grid undervoltage 3-phase
· Grid undervoltage 1-phase
Your Solar Inverter is equipped with an
Your Solar Inverter continuously monitors
intrinsically safe 3-phase grid monitoring
the voltage level of the injection phase.
system that complies with E DIN VDE
If it drops below the minimum admissible
0126-1-1. The voltage level of phases L1,
limit value, the Solar Inverter will stop the
L2, and L3 is continuously monitored.
injection and only restart when the voltage
If it drops below the minimum admissible
value rises above the minimum admissible
limit value, the Solar Inverter will stop the
limit value. If the voltage of L1 drops
injection and only restart when the voltage
below 160 V, the Solar Inverter can no
value rises above the minimum admissible
longer be supplied, and the display will
limit value.
switch off. If there is a grid undervoltage
on phase L3, for example, «error 012» will
be flagged.
140
BP13370_NT_10000_englisch
23.11.2005
17:40 Uhr
Errors 017 to 019
Seite 57
Errors 023 to 025
· AFI fault current
· DC injection
The error «AFI fault current» occurs if fault
Your Solar Inverter continuously monitors
current has penetrated the PV system and
the quality of the injected electricity. If an
the Solar Inverter has subsequently discon-
increased share of DC current is detected in
nected from the grid. The earth fault is
the injected electricity, the Solar Inverter
monitored on the AC and on the DC side
will stop the injection The Solar Inverter
(universal current sensitive FI). If this error
will only try to continue the injection after
message occurs, the entire PV system must
the system has been shut down and restar-
be checked for insulation faults. The func-
ted manually, or automatically the next
tioning method complies with E DIN VDE
day.
0126-1-1. In case of fault current at inlet 1
of the PV generator, for example, «error
Error 026
017» will be flagged.
· Isolated operation
Errors 020 to 022
Your Solar Inverter is equipped with a
high-quality redundant grid monitoring
· Insulation faults
system that complies with E DIN VDE
Prior to start-up, your Solar Inverter always
0126-1-1 and continuously monitors the
checks the PV system for an earth fault or
grid. If one of the monitoring phases fails,
an insulation fault. Should such a fault be
or if the phase relation changes between
detected, the injection will not start. The
the individual conductors, the Solar
functioning method complies with E DIN
Inverter will stop the injection and only
VDE 0126-1-1. In case of an insulation fault
restart when the error has been elimina-
at inlet 2 of the PV generator, for example,
ted, i. e. when the AC grid works properly
«error 021» will be flagged.
again.
141
GB
BP13370_NT_10000_englisch
23.11.2005
17:40 Uhr
Error 027
Seite 58
Errors 031 to 033
· Grid overvoltage 3-phase
· Grid overvoltage > 10 percent
Your Solar Inverter is equipped with an
If the voltage of the injecting phase has
intrinsically safe 3-phase grid monitoring
exceeded 253 V for more than ten minutes,
system that complies with E DIN VDE 0126-
the Solar Inverter will stop the injection
1-1. The voltage level of phases L1, L2, and
and only try to restart when the grid
L3 is continuously monitored. If it rises
voltage is within the admissible range
above the maximum admissible limit value,
again. The functioning method complies
the Solar Inverter will stop the injection
with E DIN VDE 0126-1-1. If the applied
and only restart when the voltage value
grid voltage at phase L2 is higher than
drops below the maximum admissible
253 V for more than 10 minutes, for
limit value.
example, «error 032» will be flagged.
Errors 028 to 030
Errors 034 to 036
· Surge fault
· Control fault
Your Solar Inverter continuously monitors
Your Solar Inverter is equipped with a self-
the quality of the AC grid. If there are high
monitored micro controller as a standard
voltage peaks in the grid, the Solar Inverter
feature. If a fault occurs in the control
will stop the injection and try to restart.
sequence, the Solar Inverter will stop the
If such a surge impulse is detected at
injection and will only restart when the
energy unit 3, for example, «error 030»
fault has been eliminated. If a fault occurs
will be flagged.
in the control circuit board of the third
energy unit (upper energy unit), for example, «error 036» will be flagged.
142
BP13370_NT_10000_englisch
23.11.2005
17:40 Uhr
Seite 59
There are two «D302» and «D304» LEDs
each on the three control circuit boards;
they describe the current status of the
Solar Inverter:
LED green
on
Led red
off
LED green
blinking
LED red
blinking
Led green
off
LED red
on
Solar Inverter is operating normally
Solar Inverter has detected a fault
GB
Internal control fault
Illustr.: Operation indicator LED
143
BP13370_NT_10000_englisch
3.8
23.11.2005
17:40 Uhr
Seite 60
Error Diagnosis
You can look up error causes yourself in
the following list. Select the occurred error,
and read the «Remedies» to find out how
to eliminate it.
Error
Causes
Remedies
Errors 001 to 003
The maximum DC voltage
Check the rating of your PV generator.
DC overvoltage
has been exceeded.
Reduce the number of modules in the
Too many modules are
DC inlet concerned, and recommission
connected in series.
the system.
Errors 004 to 006
The grid frequency is outsi-
Ask your power supply company about
Frequency fault
de the admissible range.
the stability and design of the grid.
Errors 007 to 009
The maximum admissible
The installation site is not suitable.
Overheating
ambient temperature of
Please select a different installation site.
40°C has been exceeded.
If contamination is blocking the cooling
The required air circulation
system, clean the Solar Inverter.
was not considered during
installation.
144
BP13370_NT_10000_englisch
Error
23.11.2005
17:40 Uhr
Seite 61
Causes
Remedies
Objects have been deposi-
Remove the objects.
ted on the heat sink,
obstructing the convection.
Errors 010 to 012
The grid voltage of the
Ask your power supply company about
Grid under-
injecting phase is too low.
the stability and design of the grid.
voltage 1-phase
The Solar Inverter monitors
the lower and upper admis-
Check the rating of your grid connection
sible grid voltage limits. If
(power meter) or the grid injection
the voltage drops below the
point to your power supply company.
lower limit (Umin = 184 V),
the Solar Inverter will automatically switch off and will
only restart when the voltage value rises above the
lower limit again. The shutdown can already be triggered if the voltage drops
below the lower limit for a
short time.
Errors 013 to 015
The grid voltage of the
Ask your power supply company about
Grid overvoltage
injecting phase is too high.
the stability and design of the grid.
1-phase
The Solar Inverter monitors
the lower and upper admissible grid voltage limits.
145
BP13370_NT_10000_englisch
Error
23.11.2005
17:40 Uhr
Seite 62
Remedies
Causes
If the voltage exceeds the
upper limit (Umax = 264 V),
the Solar Inverter will automatically switch off and will
only restart when the voltage value drops below the
upper limit again. The shutdown can already be triggered if the voltage drops
below the lower limit for
a short time.
The cable cross-section of
Check the rating of your grid connection
the AC supply line to the
(power meter) or the grid injection point
Solar Inverter is insufficient.
to your power supply company.
Your solar system injects
Ask your power supply company about
electricity into an insuffi-
the stability and design of the grid.
ciently rated spur line.
146
BP13370_NT_10000_englisch
23.11.2005
17:40 Uhr
Seite 63
Error
Causes
Remedies
Error 016
The grid voltage is too low.
Ask your power supply company about
Grid under-
The Solar Inverter monitors
the stability and design of the grid.
voltage 3-phase
the lower and upper admissible grid voltage limits in
3-phases. If the voltage
drops below the lower limit
(Umin = 184 V), the Solar
Inverter will automatically
switch off and will only
restart when the voltage
value rises above the lower
limit again. The shutdown
can already be triggered if
the voltage drops below the
lower limit for a short time.
Errors 017 to 019
The AFI fault is flagged if
The entire PV system must be checked
AFI fault current
fault current has penetrated
for insulation faults.
the PV system and the Solar
Inverter has subsequently
disconnected from the grid.
147
BP13370_NT_10000_englisch
23.11.2005
17:40 Uhr
Seite 64
Error
Causes
Remedies
Errors 020 to 022
During start-up, the Solar
Check your PV system for insulation
Insulation fault
Inverter has detected an
faults.
insulation fault in the PV
system.
Errors 023 to 025
The Solar Inverter has detec-
Restart the Solar Inverter. Should the
DC injection
ted a DC share > 1 A in the
fault still occur, please call the technical
grid current.
hotline. The phone number is on the
back of the user manual.
Check the grid phases L1, L2, and L3.
Error 026
Failure of one or more of
Isolated opera-
the grid phases L1, L2, or L3.
tion
The position of the indivi-
Ask your power supply company about
dual phase conductors in
the stability and design of the grid.
relation to each other has
moved beyond the admissible tolerances.
148
BP13370_NT_10000_englisch
23.11.2005
17:40 Uhr
Seite 65
Error
Causes
Remedies
Error 027
The grid voltage is too high.
Ask your power supply company about
Grid overvoltage
The Solar Inverter monitors
the stability and design of the grid.
3-phase
the lower and upper admissible grid voltage limits in
3-phases. If the voltage
exceeds the upper limit
(Umax = 264 V), the Solar
Inverter will automatically
switch off and will only
restart when the voltage
value drops below the
upper limit again. The shutdown can already be triggered if the voltage rises
above the upper limit for
a short time.
Errors 028 to 030
The Solar Inverter has detec-
The Solar Inverter will automatically
Surge fault
ted a high voltage peak in
restart when the error has been elimina-
the injecting phase.
ted. Should the error occur often, please
consult your power supply company.
149
BP13370_NT_10000_englisch
23.11.2005
17:40 Uhr
Seite 66
Error
Causes
Remedies
Errors 031 to 033
The grid voltage of the
The grid impedance of your grid connec-
Grid overvoltage
injecting phase is too high.
ting point is too high.
> 10 %
The Solar Inverter monitors
Ask your power supply company about
the lower and upper admis-
the stability and design of the grid.
sible grid voltage limits.
If the voltage exceeds the
upper limit by 10 % (Umax =
253 V), the Solar Inverter
will automatically be disconnected from the grid after
10 minutes (in compliance
with E DIN VDE 0126-1-1).
The cable cross-section of
Check the rating of your grid connection
the AC supply line to the
(power meter) or the grid injection point
Solar Inverter is insufficient.
to your power supply company.
Your PV system injects elec-
Ask your power supply company about
tricity into an insufficiently
the stability and design of the grid.
rated spur line.
Errors 034 to 036
The self-monitoring Solar
Please call the technical hotline. The
Control error
Inverter has detected a con-
phone number is on the back of the
trol fault.
user manual.
150
BP13370_NT_10000_englisch
23.11.2005
17:40 Uhr
Seite 67
Error
Causes
Remedies
Error 038
The back-up battery on the
Have the battery (button cell) exchanged
Back-up battery
interface circuit board is
by a qualified person. The battery is on
empty
empty.
the LCD display circuit board.
Display is blank,
The display contrast is bad,
That can happen if the ambient tempera-
despite sufficient
because the temperature is
ture is high. As soon as the temperature
injection
high.
drops, the display will work properly
again. That does not affect the injection
of electricity.
The display circuit board is
not supplied with electricity.
Make sure the ribbon cable between
The PV generator is (partly)
the display circuit board and the control
covered with snow.
circuit board is not loose. For this purpose, switch the Solar Inverter off, and
disconnect the AC and DC supply.
When doing so, please observe chapter
2.1 «Safety Instructions».
Clear the snow off the PV generator,
or wait until it has melted.
151
BP13370_NT_10000_englisch
23.11.2005
17:40 Uhr
Seite 68
152
BP13370_NT_10000_englisch
4.0
23.11.2005
17:40 Uhr
Seite 69
Appendix
18
153
BP13370_NT_10000_englisch
4.1
23.11.2005
17:40 Uhr
Seite 70
Tyco Solarlok Connectors
!
· Tyco Solarlok connectors may only be
connected to permanent lines!
Illustr.: Manual crimping tool for assembly
· They may not be disconnected under
of Tyco Solarlok connectors
load!
· For this purpose, interrupt the electric
Contamination of any kind (dust, moisture,
circuit at a suitable point! Put a corre-
etc.) has a negative effect on the working
sponding sticker on the lines near the
order of the connector system over its aspi-
Tyco Solarlok connector!
red service life. That especially applies to
· To avoid an electric shock, always
the working order of the seals and the
disconnect the Tyco Solarlok connec-
crimping of the contacts. Therefore, make
tors from all other voltage sources
sure everything is clean during assembly.
during preparation!
Illustr.: Tyco Solarlok connectors
154
BP13370_NT_10000_englisch
23.11.2005
17:40 Uhr
With Tyco Solarlok connectors, different
Seite 71
1. Bare the de-energised line by 8 mm
kinds of annular contacts are used for different conductor cross-sections. Make sure
2. Crimp the annular contact
to use the right tools for these cross-sections. The enclosed Tyco Solarlok connectors are equipped with annular contacts
3. Slide the gland, the compression sleeve,
and the seal onto the line
for a cable cross-section of 4 mm. The
enclosed seals have an internal diameter of
6 mm (for lines with a cladding diameter
4. Engage the contact in the connector
housing
of 5.3 to 6.2 mm) and 8 mm (for lines with
a cladding diameter of 7.2 to 8.0 mm).
5. Screw the lock nut on
Make sure to use a seal that fits the cladding diameter of the cable used.
6. Tightening torque for the cable gland:
1.5 Nm
When installing the Tyco Solarlok connectors, proceed in the following order:
155
GB
BP13370_NT_10000_englisch
4.2
23.11.2005
17:40 Uhr
Seite 72
List of Special Terms and Abbreviations
Designation
Description
AC
Alternating Current: grid current
AFI, RCD
Operator protection in the event of residual currents
AFI: Universal Sensitive Residual Current
RCD: Residual Current Device
DC
Direct Current
PV generator side of the solar inverter
EMC
Electromagnetic Compatibility
EB
Electricity Board
IC
Interface Converter
IP
Identification of class of protection against external
environ-mental influences (penetration of water and
mechanical foreign bodies)
kW
Kilowatt
LCD
Liquid Crystal Display
156
BP13370_NT_10000_englisch
23.11.2005
17:40 Uhr
Seite 73
Designation
Description
MPP
Maximum Power Point
Grid impedance
Resistance of grid, impedance
PT
Temperature sensor
PV
Photovoltaic
PV generator switch
DC load break switch to cut off the PV generator
from the solar inverter
157
GB
BP13370_NT_10000_englisch
4.3
23.11.2005
17:40 Uhr
Seite 74
Technical Data NT 10000
Model
Solar Inverter NT 10000
Recommended solar generator output
7000–12000 Wp
DC Nominal input
Standby consumption
Night consumption
Injection starts from
Nominal voltage
UMPP voltage range
No-load voltage
Turn-on voltage
Turn-off voltage
Maximum current
Nominal current
Number of inlets
Maximum efficiency level
European efficiency level (weighted)
HERIC® topology
AC Nominal output continuous operation Pn
Maximum output Pp
Nominal frequency
Grid voltage
Grid voltage tolerance range
Nominal current per phase
Max. current per phase
Distortion factor with Pn
Reactive power factor (cos phi)
Current waveform
11000 W
20 W
< 0.3 W
7W
400 V
350 <= UMPP <= 750 V
850 V
420 V
340 V
10 A per MPP multitracking inlet
9 A per MPP multitracking inlet
1 per MPP multitracking inlet;
3 altogether
96.4 percent (with ventilator operation)
95.9 percent (with ventilator operation)
yes
10000 W
10000 W
50 Hz
400 V
-20 to +15 percent
14.5 A
18.2 A
< 3 percent
approx. 1
sine
158
BP13370_NT_10000_englisch
23.11.2005
17:40 Uhr
Seite 75
Grid voltage monitoring
Earth-fault monitoring
Insulation monitoring
Frequency monitoring
DC monitoring
Outlet characteristics
Grid connection fuse rating
Required number of phases per grid connection
Number of injection phases (230 V single-phase)
Three phase according to E DIN VDE 0126-1-1
AFI (universal sensitive) according to E DIN
VDE 0126-1-1
Yes, according to E DIN VDE 0126-1-1
Yes, according to E DIN VDE 0126-1-1
Yes, according to E DIN VDE 0126-1-1
Current source
3 x 25 A
3
3
Data interfaces
Sensor interfaces
Display
RS232, RS485, USB
Irradiation, temperature
LCD, 2 x 16 characters, 100 x 25 mm screen size
Level of protection against environmental factors
Max. relative air humidity
Cooling
Ambient temperature (Celsius)
Dimensions (height x width x depth)
Weight
IP 54
95 percent
Ventilator above back panel, 2-chamber system
-25° C to 40° C
max. 805 x 500 x 175 (height x width x depth)
30 kg (without assembly frame)
Subjekt to technical changes.
159
BP13370_NT_10000_englisch
4.4
23.11.2005
17:40 Uhr
Seite 76
Conformity and Safety Declarations
Declaration of Conformity to EU Low Voltage Directive 73/23/EEC, Appendix III B
We hereby declare that the product described below, including the required accessories,
conforms to the provisions of EU Directive 73/23/EEC following 93/68/EEC:
Product
Solar Inverter
Manufacturer
Sunways AG, Photovoltaic Technology
Macairestr. 3 - 5, D - 78467 Konstanz, Germany
Sunways NT 10000
Type
15 September 2005
As from manufacturing date
Applied standards
Standard
EN 50178, EN 60950
Title
Electronic equipment for use in power
installations
Edition
1998
Comments
This product is a component, which is designated for the installation in a PV system and therefore only can correspond to the
guidelines for end devices, machines or systems depending on where it is installed in the overall PV system. The assessment of
the electrical and mechanical safety and the environmental influences (foreign bodies, moisture) must follow in the installed
condition in the overall PV system. In the installed condition, the EMC characteristics of this product can change. Therefore for
the overall PV system, a check of the EMC characteristics through the final product manufacturer is practical. Changes reserved.
The currently valid issue is available upon request.
Constance, 13 Sept. 2005
Place, date
160
Roland Burkhardt, Executive Board
BP13370_NT_10000_englisch
23.11.2005
17:40 Uhr
Seite 77
Declaration of Conformity to EMC Directive 89/336/EEC, Including Changes 91/263/EEC
and 93/68/EEC
We hereby declare that the product described below conforms to the provisions of EU
Directive 89/336/EEC (EMC Directive with changes 91/263/EEC and 93/68/EEC):
Product
Solar Inverter
Manufacturer
Sunways AG, Photovoltaic Technology
Macairestr. 3 - 5, D - 78467 Konstanz, Germany
Type
Sunways NT 10000
As from manufacturing date
15 September 2005
Applied standards
Standard
EN 50082-2 (EN 61000-4-2, -4-3, -4-4, -4-6, -4-8)
EN 55014-1; EN 55011; EN 61000-3-2;
EN 61000-3-3; E DIN VDE 0126-1-1
Comments
The adherence to the EMC guideline presupposes an installation of the components in the system or machine, which is suitable
for EMC. The installation instructions in the technical documents are to be observed. The checks follow for an installation,
which is typical for the system on a measuring station, which conforms to the norms. The legal requirements for the stability
and the emitted interference, limit values and norms are listed in the documentation named above. The Sunways products are
intended for the installation in a PV system. The check results are not transferable in all cases to the installed condition in the
PV system. This declaration therefore does not contain the assurance of EMC characteristics of the final product. Changes reserved. The currently valid issue is available upon request.
Constance, 13 Sept. 2005
Place, date
161
Roland Burkhardt, Executive Board
GB
BP13370_NT_10000_englisch
23.11.2005
17:40 Uhr
Seite 78
Safety Clearance / Certificate of Compliance with the Directives on the Connection and
Parallel Operation of In-Plant Generation Systems to the Low-Voltage Grid (VDEW
[German Electricity Association], 4th Edition 2001)
We hereby declare that the following product complies with the provisions of the applicable VDE [German Association for Electrical, Electronic & Information Technologies]
directive for operation parallel to the grid. In particular, the directives for connection and
parallel operation of in-plant generation systems to the low-voltage grid of the energy
supply company (VDEW 4th edition 2001) and DIN 0838 are complied with.
Product
Solar Inverter
Manufacturer
Sunways AG, Photovoltaic Technology
Macairestr. 3 - 5, D - 78467 Konstanz, Germany
Sunways NT 10000
Type
15 September 2005
As from manufacturing date
Applied standards
Norm
Title
In-Plant Generation Systems to the
Low-Voltage Grid
Edition
th
4 edition 2001
Explanations
Sunways Solar Inverters of series NT 10000 are Solar Inverters that inject in three-phases and are not capable of isolated operation. The NT 10000 consists of three single-phase inverters with a three-phase voltage monitoring system that inject into different
phases. These integrated inverters control their phase angle independently of each other. They are equipped with a voltagemonitoring system and a three-phase monitoring system for any reduction of the linked voltage, in accordance with section 2.4.2
of the VDEW directive (4th edition 2001). Therefore, no always accessible isolating point is required (see section 2.1.2 Schaltstelle
mit Trennfunktion [Control Point with Disconnection Function]). A routine test is carried out with each device to make sure the
turn-off values of the three-phase voltage reduction protection are maintained. Subject to changes. Currently valid edition available at request.
For the latest valid version of this declaration, please visit our website www.sunways.de.
Constance, 13 Sept. 2005
Place, date
162
Roland Burkhardt, Executive Board
BP13370_NT_10000_englisch
4.5
23.11.2005
17:40 Uhr
Seite 79
Terms and Conditions of
inform us beforehand, stating your name,
Guarantee
address, phone number, email address (if
applicable), and the serial number. The
· Duration of Guarantee
phone number is on the back of the user
The duration of guarantee is five years,
manual.
starting from the day the Solar Inverter
is purchased by the end user. The gua-
The Solar Inverter may only be shipped
rantee chard enclosed with the device
with the prior approval of Sunways AG.
must be completed and sent back to
The approval will be granted as soon as
Sunways AG.
the completed fault protocol has arrived,
Please keep the original receipt with the
stating the occurred fault and the way you
date of purchase and the serial number.
would like the guarantee claim to be pro-
In case of a guarantee claim, it is requi-
cessed. Devices sent to Sunways AG
red as evidence, together with the gua-
without prior notification cannot be
rantee card.
accepted and repaired.
· Conditions
The time required to correct the fault
Within the guarantee period, the Solar
must be granted. Sunways AG will try to
Inverter will be repaired in the factory in
correct the fault within 14 days after
Constance, Germany, without material or
having received the device. If that is not
labour being charged. Assembly costs
possible, we will let you know the reason
shall be borne by the customer, unless
and when the fault will be corrected.
something else has been agreed on.
Please keep the original packaging, even
The completed guarantee card must be
after the guarantee period has run out.
sent to Sunways AG, Constance, within
Forwarding companies may only accept
seven days after purchase.
the Solar Inverter if it is in the transportproof original packaging. Therefore, please
In case of a guarantee claim, please
let us know if you have lost the original
163
GB
BP13370_NT_10000_englisch
23.11.2005
17:40 Uhr
Seite 80
packaging, prior to having the device pic-
Any further-reaching or other claims for
ked up. We will be glad to send you a new
direct or indirect damage, especially claims
packaging against payment.
for compensation including ones for positive breach of contract are excluded, unless
· Exclusion of Liability
they are compellingly prescribed by law.
Claims and liability for damage directly or
indirectly caused by the following reasons
are excluded:
· interventions, changes, and repair
attempts
· insufficient ventilation
· force majeure (e. g. lightning strike,
water damage, vandalism, fire,
overvoltage, storm, etc.)
· inappropriate transportation
· non-compliance with applicable regulations, or wrong installation/commissioning
· leakage of overvoltage of the varistors
on the DC side at the PV generator
164
BP13370_NT_10000_englisch
4.6
23.11.2005
17:40 Uhr
General Exclusion of Liability
Seite 81
All rights reserved. © Sunways AG
Although the accuracy and completeness
The products named in the title are protec-
of the information in this manual have
ted by copyright and are sold under license.
carefully been checked, no liability what-
Without a prior written permission of
soever can be accepted for mistakes or
Sunways AG and the Sunways licensors, no
omissions.
part of this document may be reproduced
in any form.
· Sunways AG reserves the right to change the hardware and software features
Registered trademark
GB
described here at any time, without
prior notification.
· Without the prior written approval of
Sunways AG, this manual may not be
Sunways NT 10000 and the Sunways logo
are registered trademarks of Sunways AG,
Constance, Germany.
duplicated, transferred, copied, or translated into other languages in any form
HERIC® is a registered trademark of
or by any means, in part or in whole.
Fraunhofer Gesellschaft, Munich, Germany.
· Sunways AG does not accept responsibility for damage caused by false or lost
data due to wrong operation or malfunctions of the Solar Inverter, the software, additional devices, or PCs.
165
23.11.2005
17:40 Uhr
Seite 82
Sunways AG
Photovoltaic Technology
Macairestraße 3 - 5
D - 7 8 4 6 7 Konstanz
Telefon + 49 7531 996770
Fax + 49 7531 996774 4 4
E-Mail info @ sunways.de
www. sunways.de
Technische Hotline +49 7531 99677577
9-1-36-0-0 Version 11/05
BP13370_NT_10000_englisch