1
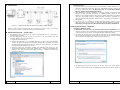
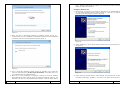
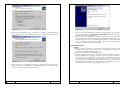
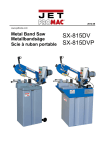
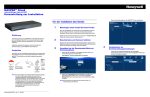
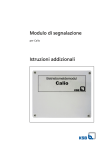
■ INTRODUCTION USB to RS-485 Converter Part Number: USB-485-1 The USB-485-1 is a port-powered USB to RS-485 converter that can be used to convert any standard Communications made easy USB port (USB 2.0 - backward compatible) into a two-wire balanced RS-485 port and vice versa. The unit can be used to communicate with one loop of up to 256 units of RS-485 devices and it comes with a built-in selectable 120-Ohm terminator for system reliability and easy installation. This USB to RS-485 converter cable is powered from the USB port and it supports data auto-sensing & self-adjusting, therefore, no baud rate setting is required; and with the data direction CONTENTS auto-turnaround technology, no flow control is necessary for RS-485 communications. The USB-485-1 uses the latest FTDI chipset and is fully compatible with Windows 8/7/Vista/XP/Server 2008/Server 2003/2000/98 (32-bit), Windows 8/7/Vista/XP/Server 2008/Server 2003 (64-bit), Win CE, Mac, and INTRODUCTION……………………………………………………………………… 2 FEATURES………………………………………………………………………………. 2 SPECIFICATIONS……………………………………………………………………. 2 PIN ASSIGNMENT…………………………………………………………………… 2 CONNECTIONS……………………………………………………………………….. 3 DRIVER INSTALLATION – QUICK GUIDE………………………………….. 3 DRIVER INSTALLATION – EXAMPLES……………………………………….. 4 EXAMPLE 1 (WINDOWS VISTA)………………………………………………………………… 4 EXAMPLE 2 (WINDOWS XP)……………………………………………………………………… 6 EXAMPLE 3 (WINDOWS 2000)…………………………………………………………………. 8 Linux. ■ FEATURES Adds one RS-485 port to your USB port. Supports 256 nodes of 2-wire RS-485 devices. Rugged terminal block with built-in selectable 120Ω terminator. Operates reliably from 300 to 3M baud. Supports Windows 8/7/Vista/XP/Server 2008/Server 2003/2000/98 (32-bit), Windows 8/7/Vista /XP/Server 2008/Server 2003 (64-bit), Win CE, Mac, and Linux. Supports remote wakeup and power management. Built-in 15kV ESD static and circuit protection. Port-powered, no external power required. Plug and play (hot-pluggable, data format auto-sensing and self-adjusting). Data direction auto-turnaround, no flow control is required. No IRQs required, no IRQ conflicts. Surface Mount Technology manufactured to RoHS and ISO-9001 standards. Safety: Strictly certified by SGS (Cert no. E1/2013/90010C; E1/2013/90011C). 5-year manufacturer’s warranty. ■ SPECIFICATIONS Compatibility: Power Source: Current Consumption: RS-232 Data Rate: Distance: TROUBLESHOOTING………………………………………………………………… 10 GENERAL……………………………………………………………………………………………………… 10 DRIVER REINSTALLATION EXAMPLES………………………………………………………. 11 Connectors: SUPPORT……………………………………………………………………………….. 16 LEDs: Maximum number of drops: End-of-Line Terminator: Static Protection (ESD): Dimensions (H x W x D): Cable Length: Weight: Operating Temperature: Operating Humidity: Windows 8 / 7 For Windows 8 and 7, drivers will be installed automatically when your computer is connected to the Internet. Alternatively, you may install the drivers from the CD provided with the product. Revision: 1.0 www.CommFront.com Page 1 of 16 USB 2.0 and EIA/TIA RS-232/RS-485 standards From USB port Less than 60mA 300 to 3M bps (auto-sensing and self-adjusting) USB side: 10ft (3m); RS-485 side: Up to 4000ft (1.2km) at 19,200 bps USB side: Type A Female; RS-485 side: DB-9 Male/5-Way Terminal Block TX, RX and Power 256 120Ω (built-in, selectable) Up to 15KV 0.8 x 1.3 x 3.6 in (20 x 32 x 92 mm) (excluding cable) 3.3 ft (1 m) 3.8 oz (108 g) 32ºF to 104ºF (0ºC to 40ºC) Up to 90% RH (no condensation) ■ PIN ASSIGNMENT RS-485 Side (DB-9 Male Connector / Terminal Block): DB-9 Male: 1 2 5 6,7 Function: BA+ GND Tie to turn ON the 120Ω end-of-line terminator Terminal Block: A+ BG 120 Function: RS485+ RS485GND Tie to turn ON the 120Ω end-of-line terminator Revision: 1.0 www.CommFront.com Page 2 of 16 Important notes: 1) If it’s the first time you install the driver for CommFront’s USB to Serial device, you will need to install the driver twice. One is for “USB Serial Converter”, and the other one is for “USB Serial Port”. DO NOT close the 2nd “Found New Hardware Wizard” window while installing the driver. 2) Upon completion of driver installations, remember to check the Windows Device Manager to make sure that the drivers are installed properly (Figure 2). If the drivers are not installed correctly, there will be a yellow exclamation icon displayed under the “Ports (COM & LPT)” or “USB Serial Bus controllers”, right-click on the yellow exclamation icon and select “Update driver”. Then search for the driver in the CD supplied. 3) The drivers are not available via Microsoft Windows Updates, however, Windows Vista will search for the drivers via Microsoft Windows Updates by default, so disconnect your Vista PC from the internet before the driver installation. ■ CONNECTIONS (Figure 1: 2-WIRE RS-485 MASTER-SLAVE MULTI-DROP CONNECTIONS) Note: The 120Ω end-of-line terminator adds heavy DC loading to a system; connect it only when the data rate is over 19.2kbps or the RS-485’s distance exceeds 660ft (200m). ■ DRIVER INSTALLATION – QUICK GUIDE For Windows 8 and 7, drivers will be installed automatically when your computer is connected to the Internet. For other Operating Systems, drivers are included on the CD supplied with the converter, please refer to the details below: 1) Insert the CD into the drive. 2) Connect the USB-485-1 to an available USB port, and the “Found New Hardware Wizard” will guide you through the installation process. When prompted to connect to Windows Updates to search for drivers, select “No, not at this time”, and follow the instructions for installing from the CD. 3) Once the drivers are successfully installed, the USB-485-1 will show up in the Windows Device Manager: under “Ports (COM & LPT)” – labeled as “USB Serial Port (COMx)”, and under “Universal Serial Bus controllers” - labeled as “USB Serial Converter” (Figure 2). ■ DRIVER INSTALLATION - EXAMPLES Example 1 (Windows Vista) 1) Disconnect your PC from the internet before driver installation. This is because the drivers are not available via Microsoft Windows Updates, but Windows Vista will search for the drivers via Microsoft Windows Updates by default. 2) Insert the CD into the drive and connect the USB-485-1 to an available USB port, the “Found New Hardware” window will pop up. Click on the “Locate and install driver software (recommended)” button to continue (Figure 3). (Figure 3) 3) Windows Vista will look for the driver in the CD, click on the “Next” button to continue. This will start the driver installation for “USB Serial Converter” (Figure 4). (Figure 2) Revision: 1.0 www.CommFront.com Page 3 of 16 Revision: 1.0 www.CommFront.com Page 4 of 16 LPT)” – labeled as “USB Serial Port (COMx)”, and “Universal Serial Bus controllers” labeled as “USB Serial Converter”. Example 2 (Windows XP) 1) Insert the CD into the drive and connect the USB-485-1 to an available USB port, the “Found New Hardware Wizard” window will pop up. Select “No, not this time” and click on the “Next” button to continue (Figure 6). (Figure 4) 4) When the driver is successfully installed, the following window will pop up confirming that the driver installation of “USB Serial Converter” has been completed successfully. Click on the “Close” button to continue (Figure 5). (Figure 6) 2) Select “Install from a list or specific location (Advanced)” to install the driver from CD (Figure 7). (Figure 5) 5) The 2nd “Found New Hardware” window will pop up, prompting you to install the driver for “USB Serial Port”. DO NOT close this window! And repeat steps 1) to 4) to install the driver for “USB Serial Port”. 6) When the 2nd driver installation is completed, remember to check the Windows Device Manager to confirm that the drivers are installed successfully (Figure 2). The USB-485-1 will show up in the Windows Device Manager: under the “Ports (COM & Revision: 1.0 www.CommFront.com Page 5 of 16 (Figure 7) 3) Select “Search for the best driver in these locations” and check the box of “Search removable media (floppy, CD-ROM…)”. Then click on the “Next” button (Figure 8). Revision: 1.0 www.CommFront.com Page 6 of 16 Example 3 (Windows 2000) 1) Insert the CD into the drive and connect the USB-485-1 to an available USB port, the “Found New Hardware Wizard” window will pop up. Click on the “Next” button to continue (Figure 10). (Figure 8) 4) When the driver is successfully installed, the following window will pop up, confirming that the driver installation of “USB Serial Converter” has been completed. Click on the “Finish” button to continue (Figure 9). (Figure 10) 2) Select “Search for a suitable driver for my device (recommended)” and click on the “Next” button to continue (Figure 11). (Figure 9) (Figure 11) 5) The 2nd “Found New Hardware” window will pop up, prompting you to install the driver for “USB Serial Port”. DO NOT close this window! And repeat steps 1) to 4) to install the driver for “USB Serial Port”. 6) When the 2nd driver installation is completed, remember to check the Windows Device Manager to confirm that the drivers are installed successfully (Figure 2). The USB-485-1 will show up in the Windows Device Manager: under “Ports (COM & LPT)” – labeled as “USB Serial Port (COMx)”, and under “Universal Serial Bus controllers” - labeled as “USB Serial Converter”. Revision: 1.0 www.CommFront.com Page 7 of 16 3) Check the box of “CD-ROM drives”, and then click on the “Next” button to continue (Figure 12). Revision: 1.0 www.CommFront.com Page 8 of 16 (Figure 12) (Figure 14) 4) Windows will automatically locate the driver, for example, “e:\drivers\windows 2000_server 2003_xp_vista x32\ftdibus.inf”. Click on the “Next” button to continue (Figure 13). 6) The 2nd “Found New Hardware” window will pop up, prompting you to install the driver for “USB Serial Port”. DO NOT close this window! And repeat steps 1) to 5) to install the driver for “USB Serial Port”. 7) When the 2nd driver installation is completed, remember to check the Windows Device Manager to confirm that the drivers are installed successfully (Figure 2). The USB-485-1 will show up in the Windows Device Manager: under “Ports (COM & LPT)” – labeled as “USB Serial Port (COMx)”, and under “Universal Serial Bus controllers” - labeled as “USB Serial Converter”. ■ TROUBLESHOOTING General 1) Make sure that the USB-485-1 is connected to your USB port, and the driver is installed correctly (Figure 2); otherwise, please reinstall the driver (Please refer to the “Driver reinstallation examples” below). 2) Make sure the “Power” LED on USB-485-1 is lit up. 3) Perform a loopback test by using CommFront’s 232Analyzer software (included on the CD supplied with the converter): Connect two numbers of USB-485-1 converters (A+ to A+, B- to B-) to your USB ports and run two instances of the 232Analyzer software, then send commands from one COM port, you should receive an echo of the commands sent on the other COM port. By performing a simple loopback test like this, you can test both (Figure 13) the transmitter and receiver of the converter. This is very helpful when you are in doubt about the performance of your converter (Figure 15). 5) When the driver is successfully installed, the following window will pop up, confirming that the driver installation of “USB Serial Converter” has been completed. Click on the “Finish” button to continue (Figure 14). Revision: 1.0 www.CommFront.com Page 9 of 16 Revision: 1.0 www.CommFront.com Page 10 of 16 (Figure 16) 1) Right-click on the “USB Serial Converter” that displays with the yellow exclamation icon, and select “Update Driver Software…” (Figure 16). 2) Click on the “Browse my computer for driver software” button to continue (Figure 17). (Figure 15) Driver reinstallation examples Drivers might not be installed properly if the above driver installation procedures were not followed; for example, the user did not disconnect the PC from the internet while installing drivers on Vista machines, or the 2nd “Found New Hardware Wizard” window was closed before the driver installation was completed. Below are some examples showing how to reinstall the drivers. Example 1 (Windows Vista) Symptoms: A yellow exclamation icon appears besides the “USB Serial Converter”. Also, there is no display of the “Ports (COM & LPT)” in the Windows Device Manager (Figure 16). (Figure 17) 3) Locate the driver in the CD provided and click on the “Next” button to continue (Figure 18). Revision: 1.0 www.CommFront.com Page 11 of 16 Revision: 1.0 www.CommFront.com Page 12 of 16 (Figure 18) 4) When the driver is successfully updated, the following window will pop up, confirming that the driver installation of “USB Serial Converter” has been completed. Click on the “Close” button to exit (Figure 19). (Figure 20) 1) Right-click on the “USB Serial Port” that displays with the yellow exclamation icon, and select “Update Driver Software…” (Figure 20). 2) Click on the “Browse my computer for driver software” button to continue (Figure 21). (Figure 19) Example 2 (Windows Vista) Symptoms: A yellow exclamation icon appears besides the “USB Serial Port” (Figure 20). (Figure 21) 3) Locate the driver in the CD provided, and click on the “Next” button to continue (Figure 22). Revision: 1.0 www.CommFront.com Page 13 of 16 Revision: 1.0 www.CommFront.com Page 14 of 16 (Figure 24) 3) Click on the “Finish” button to complete the un-installation of the drivers (Figure 25). (Figure 22) 4) When the driver is successfully updated, the following window will pop up, confirming that the driver installation of “USB Serial Port” has been completed. Click on the “Close” button to exit (Figure 23). (Figure 25) 4) Follow the correct driver installation procedures above to reinstall the drivers for your USB-485-1 converter. ■ SUPPORT Check out CommFront’s website: www.CommFront.com for product updates, FAQs, and other support. (Figure 23) Example 3 (Windows Vista/XP/2003/2000/98/ME) Symptoms: No yellow exclamation signs, but COM port does not exist or is not functioning. 1) Locate and execute the driver un-installation program FTDIUNIN.exe in its respective folder. For example, for Windows 2000/Server_2003/XP/Vista 32-bit, the un-installation program is located at “E:\Drivers\Windows 2000_Server 2003_XP_Vista X32\” 2) Unplug the USB-485-1, and click on the “Continue” button to uninstall the drivers (Figure 24). Revision: 1.0 www.CommFront.com Page 15 of 16 Revision: 1.0 www.CommFront.com Page 16 of 16