1
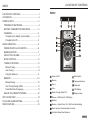
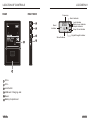
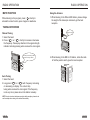
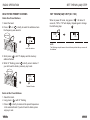
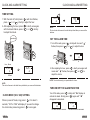
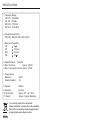
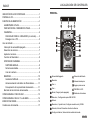
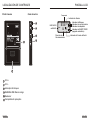
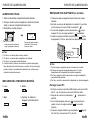
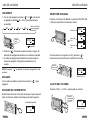
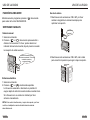
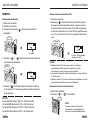
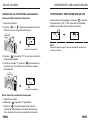
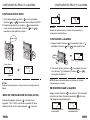
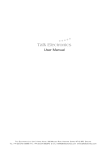
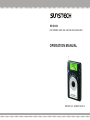
RP-DS30
FM STEREO MW SW LW DIGITAL RECEIVER
OPERATION MANUAL
PATENT NO.: 200830154750.X
KEY FEATURES
Frequency Range:
FM: 87.0-108.0 MHz
MW: 522-1710 KHz
SW: 2.30-23.00 MHz
LW: 153 - 279 KHz
235 Station Memories
Auto / Manual Frequency Tuning
Auto Tuning Storage (ATS)
Sleep Timer Function (05-90 minutes
Alarm Clock Function (by Radio)
Key Lock Function
Mute Function
LED Backlight
Battery Level & Signal Strength Indicator
Reset Function
Digital Volume Control
Intellectualized Rechargeable Function
Mini-USB Jack
Stereo Earphone Jack
Use 3 x AAA batteries
Radio Size: 110 x 69 x 13 mm
Accessories: Stereo Earphones, USB Cable, Carrying
Case & Operation Manual
NOTE:
Press shortly: about 0.2 second;
Long press: about 2~3 seconds.
LOCATION OF CONTROLS
INDEX
LOCATION OF CONTROLS...............................................1
FRONT
LCD DISPLAY......................................................................3
POWER SUPPLY................................................................4
POWERED BY BATTERIES...........................................4
BATTERY CONSUMPTION INDICATION......................4
89.8
CHARGING....................................................................4
FM
Charged by the Adaptor (not included).......................5
56 25
Charged by the PC.....................................................5
RADIO OPERATION..........................................................6
POWER ON/OFF & LOCK SWITCH..............................6
BAND SELECTION........................................................7
ADJUST THE VOLUME..................................................7
MUTE FUNCTION..........................................................8
TUNING IN STATIONS...................................................8
Manual Tuning............................................................8
Auto Tuning.................................................................8
Using the Antenna......................................................9
MEMORY......................................................................10
Manual Saving..........................................................10
Auto Tuning Storage (ATS)........................................11
Recall the Stored Frequency ....................................11
DELETE THE PRESET STATIONS..............................12
Power On/Off
Band Switch
Memory
Telescopic Antenna
Freq. +
Strap Hole
Freq. -
LCD Display
Delete; Charge (Radio Off)
Earphone Jack
SET THE MW STEP..........................................................13
Memory -; MW Step 9K / 10K Setting
CLOCK AND ALARM SETTING.......................................14
Speaker
SPECIFICATIONS............................................................16
Memory +; Adjust Time; 12H / 24H Clock Mode Setting
Mute; Activate / Deactivate Alarm Function
Set Alarm; Meter Band Selection
GB-01
LCD DISPLAY
LOCATION OF CONTROLS
RIGHT SIDE
REAR
Frequency
Alarm Indicator
Band
Indicator
89.8
FM
56 25
RP-DS30
Stored Address
Lock Indicator
Battery Level Indicator
Adaptor Indicator
Sleep Timer Indicator
Signal Strength Indicator
VOL +
VOL Lock Switch
USB Jack / Charging Jack
Reset
Battery Compartment
GB-02
GB-03
POWER SUPPLY
POWER SUPPLY
POWERED BY BATTERIES
Charged by the Adaptor (not included)
1. Open the battery cover.
2. Install 3 new rechargeable or alkaline batteries (AAA size),
then close the battery cover.
3. Turn on the unit.
1. Install 3 AAA size rechargeable batteries correctly.
2. Plug one port of the adaptor into the AC socket and plug the
other port into the USB jack, "
" will display.
3. With the radio off, press <
> shortly to charge. The battery
power icon "
" flows.
4. When the battery power is full, "
" stops flowing. Please
disconnect the adaptor and the radio.
0 05
-
25
-
+
+
+
Install the batteries correctly
according to the battery polarity.
After installing the batteries,
the LCD displays as above.
NOTE:
1. Please don't mix the used batteries with new ones.
2. Please don't mix the rechargeable batteries with the alkaline ones.
3. Please don't charge the alkaline batteries.
4. When the radio is not being used for a long period, remove the batteries
to avoid leakage and corrosion. If battery leakage occurs, wipe the battery
compartment with a soft cloth before inserting new batteries.
BATTERY CONSUMPTION INDICATION
1. Full
Adaptor
Plug into the
USB Jack
NOTE:
1. While charging, please make sure the connection is ok.
2. Charging time is approx. 2 ~ 7 hours, which depending on the capacity of the
rechargeable batteries.
3. Please turn off the radio when charge the radio via adaptor to avoid interrupt.
4. Please plug or unplug the adaptor with the radio off.
2. Medium
Charged by the PC
3. Low
GB-04
4. Exhausted, the unit will
turn off automatically.
1. Plug one port of the supplied USB cable into the USB jack of
the PC and the other port into the USB jack of the radio.
2. After connecting correctly, "
" will appear in the display.
3. With the radio off, press <
> shortly to charge, and the
battery power icon "
" flows.
4. When the battery power is full, "
" stops flowing. Please
disconnect the PC and the radio.
GB-05
RADIO OPERATION
RADIO OPERATION
POWER ON
BAND SELECTION
1. In radio OFF mode, press <
> or <
> shortly to select the
sleep timer 05 ~ 90 or "
" (permantly ON).
05
10
20
(only the sleep
icon displays)
90
Push the <Band Switch> to "FM", "MW", "SW" or "LW" to
select your desired band.
FM Band
press
shortly
05
flashes
2. Press <
> shortly to turn on the unit, the sleep timer indicator
will appear in the display.
3. The radio will turn off automatically when reaching your preset
sleep timer.
NOTE: When there is "
" in the display, the sleep timer function is activated.
05
990
89.8
FM
89.8
FM
MW Band
MW
LW Band
LW
05
205
While listening to the SW program, press <
select the meter band.
05
> shortly to
press
shortly
20.755
SW
POWER OFF
In radio ON mode, press <
05
SW Band
> shortly to turn it off.
ADJUST THE VOLUME
LOCK SWITCH
Push the <Lock Switch> upwards to lock all buttons, push
it downwards to unlock all buttons.
Locked
0 05
30
Press <VOL+> or <VOL-> to adjust the volume.
"press shortly"
or "long press"
89.8
FM
20
VOL
Volume Level
GB-06
GB-07
RADIO OPERATION
RADIO OPERATION
Using the Antenna
MUTE FUNCTION
While listening to the program, press <
> shortly to
activate the mute function, press it again to deactivate.
1. While listening to the FM and SW station, please change
the length of the telescopic antenna to get the best
reception.
TUNING IN STATIONS
change the length
Manual Tuning
1. Select the band.
2. Press <
> or <
> shortly to increase or decrease
the frequency. Please pay attention to the signal strength
indicator and stop pressing when receives the clear signal.
press shortly: manual tuning in stations
long press: auto tuning in stations
2. While listening to the MW or LW station, rotate the radio
to find the position which gives the best reception.
Auto Tuning
1. Select the band.
2. Long press <
> or <
> with frequency increasing
or decreasing on display. The unit will stop
tuning when receives the clear signal. If the frequency
is not very clear, please tune in the station manually.
NOTE: In order to reduce interference and gain better reception, please do not
use the adaptor when tuning in the station automatically.
GB-08
GB-09
RADIO OPERATION
RADIO OPERATION
MEMORY
Auto Tuning Storage (ATS)
Manual Storing Station
1. Select the band.
2. Long press <
> until frequency changing. The unit
will auto tune and save all strong signal into memory.
(FM and SW freq. will be saved from the address (50),
MW freq. will be saved from the address (15), LW freq.
will be saved from the address (05).
1. Select the band.
2. Tune in a station.
3. Shortly press <
> with the memory icon "E" flashes.
press shortly
89.8
FM
long press
50
89.8
FM
"E" flashes
4. Press <
> or <
89.8
FM
50
5. Press <
> shortly to store the staion into memory. If
you don't want to save, press any key to exit.
NOTE:
FM band: can save 100 (00 ~ 99) frequencies;
MW band: can save 25 (00 ~ 24) frequencies;
SW band: can save 100 (00 ~ 99) frequencies.
LW band: can save 10 (00 ~ 09) frequencies.
GB-10
FM freq. will be saved from
the address (50).
> shortly to select the stored address.
press shortly
50 05
NOTE:
1. While ATS, please get very close to the window or stand on the outdoor field
to avoid the interrupt and gain the best reception.
2. The new frequencies will cover the old ones if the radio is being ATS once
again.
3. While ATS, please disconnect the adaptor and the radio in order to avoid
the interrupt by the adaptor.
Recall the Stored Frequency
1. Select the band.
2. Press <
> or <
> shortly.
press shortly
NOTE:
While recalling the stored frequency, the unit
will jump over the empty address automatically.
GB-11
RADIO OPERATION
SET THE MW (AM) STEP
SET THE MW (AM) STEP (9K / 10K)
DELETE THE PRESET STATIONS
Delete One Preset Stations
1. Select the band.
2. Press < > or < > shortly to select the address where
the frequency was saved in.
When in power off mode, long press <
> for about 5
seconds, "A09" or "A10" will display. Repeat again to change
the AM tuning step.
A09
press shortly
89.8
FM
25
25
99 05
select the address
NOTE:
The AM tuning step will resume to the inital factory default after you remove all
the batteries.
3. Short press < > with "d" displays and the memory
address flashes.
4. While "d" flashing, press < > shortly once to delete. If
you don't want to delete, press any key to exit.
press shortly
89.8
FM
99
"address" flashes
Delete all the Preset Stations
1. Select the band.
2. Long press <
> with "d" flashing.
3. Press <
> shortly to delete all the preset frequencies
in the selected band. If you don't want to delete, press
any key to exit.
GB-12
GB-13
CLOCK AND ALARM SETTING
CLOCK AND ALARM SETTING
TIME SETTING
1. With the radio off, short press <
> with hour flashes,
press <
> or <
> shortly to adjust the hour.
2. After adjusting the hour, press <
> shortly once again,
with the minute flashes, press <
> or <
> shortly
to adjust the minute.
press shortly
H24
25
25
NOTE:
The clock mode will resume to the initial factory default after you remove all the
batteries.
SET THE ALARM TIME
1. Turn off the radio, press <
> shortly with hour and "
"
flashes, then press <
> or <
> to adjust the hour.
0 05
Press
shortly
25
"Hour" and "
" flashes
Hour : Minute
0 05
25
8 25
25
Second
2. After adjusting the hour, press <
> shortly once again with
minute and "
" flashes, then press <
> or <
> to
adjust the minute.
NOTE: The unit will alarm by your preset station & volume.
NOTE:
The clock will resume to the initial factory default after you remove all the batteries.
TURN ON/OFF THE ALARM FUNCTION
CLOCK MODE (12H / 24H) SETTING
When in power off mode, long press <
> for about 5
seconds, "12H" or "24H" will display. If you want to change
the clock mode, please long press <
> once again.
Turn off the radio, press <
> shortly with "
" displays to
activate the alarm. Shortly press <
> again with "
"
disappears to deactivate.
0 05
25
The alarm function is activated.
GB-14
0 05
25
The alarm function is deactivated.
GB-15
SPECIFICATIONS
1. Frequency Range
FM: 87.0 - 108.0 MHz
LW: 153 - 279 KHz
MW: 522 - 1710 KHz
SW: 2.30 - 23.00 MHz
2. Preset Memories (235):
FM (100); MW (25); SW (100); LW(10)
3. Noise Limit Sensitivity
FM
5 V
LW
3.0mv/m
MW
2.5mv/m
SW
50 V
4. Signal Selection
40dB
5. Max. Out Power:
Approx. 150mW
6. Max. Consumption Current: Approx. 120mA
7. Power Source
Batteries:
External Adaptor:
AAA*3
5V
8. Speaker
9. Earphone
10. Dimensions
11. Weight:
D50mm
D3.5mm
Approx. 110 * 69 * 13mm
Approx. 81g(excl. Batteries)
You can help protect the environment!
Please remember to respect the local regulations:
hand in the non-working electrical equipments to
an appropriate waste disposal center.
GB-16
CARACTERÍSTICAS PRINCIPALES
RP-DS30
RECEPTOR DIGITAL ESTÉREO FM OM OC OL
MANUAL DE FUNCIONAMIENTO
Rango de frecuencia
FM: 87.0-108.0 MHz
OM: 522-1710 KHz
OC: 2.30-23.00 MHz
OL: 153 - 279 KHz
Memoria para 235 emisoras
Sintonización de frecuencia automática/manual
Almacenamiento Automático de Presintonías
Función Sleep (Apagado Automático 05-90 minutos)
Función Alarma Despertador (por radio)
Función Bloqueo de Teclas
Función Silenciador
Sistema de retroiluminación LED
Indicador de Nivel de Baterías y Fuerza de Señal
Función de Reinicio
Control Digital de Volumen
Función de Recarga Inteligente
RANURA MINI USB
Toma de Auriculares Estéreo
Usa 3 pilas AAA
Tamaño de la Radio: 110 x 69 x 13 mm
Accesorios: Auriculares Estéreo, Cable USB, Funda
Portátil y Manual de Instrucciones
NOTAS:
Presionar brevemente: sobre 0.2 segundos
Presionar y mantener apretado:
Alrededor de 2~3 segundos
LOCALIZACIÓN DE CONTROLES
ÍNDICE
UBICACIÓN DE LOS CONTROLES ...................................1
FRONTAL
PANTALLA LCD...................................................................3
FUENTE DE ALIMENTACIÓN
.........................................4
ALIMENTADO A PILAS....................................................4
INDICACIÓN DEL CONSUMO DE PILAS.......................4
89.8
CHARGING......................................................................4
FM
RECARGAR CON EL CARGADOR (no incluído) .......5
56 25
Recargar con el PC .....................................................5
Uso de la Radio ...................................................................6
Interruptor de encendido/apagado...................................6
Selección de emisora.......................................................7
Ajuste del volumen...........................................................7
Función de Silenciador.....................................................8
SINTONIZAR CADENAS.................................................8
SINTONÍA MANUAL ....................................................8
Sintonía automática .....................................................8
Uso de la antena .........................................................9
MEMORIA......................................................................10
Grabación MANUAL ..................................................10
Almacenamiento Automático de Presintonías............11
Recuperación de la presintonía almacenada ............11
Borrado de las sintonías almacenadas .........................12
CONFIGURAR EL PASO DE OM .....................................13
Encendido/Apagado
Selección de Banda
Memoria
Antena telescópica
Frec. +
Agujero para correa
Frec. -
PANTALLA LCD
Borrar; Cargar (radio apagada)
Salida de Auriculares
CONFIGURAR EL RELOJ Y LA ALARMA ........................14
Memoria -; Configuración paso OM 9K/10K
ESPECIFICACIONES........................................................16
Altavoz
Condiciones de Garantía....................................................17
Memoria +; Ajustar hora; Configurar modo de reloj 12/24H
Silenciar; Activar/ Desactivar función de Alarma
Configurar Alarma; Selección del medidor de banda
ES-01
PANTALLA LCD
LOCALIZACIÓN DE CONTROLES
Cara derecha
Parte trasera
Frequencia
Indicador de Alarma
INDICADOR
de BANDA
RP-DS30
89.8
FM
56 25
Dirección de
Almacenamiento
Indicador de Bloqueo
Indicador de nivel de batería
Indicador de adaptador
Indicador de SLEEP TIMER
(apagado automático)
Indicador de Fuerza de Señal
VOL +
VOL interruptor de bloqueo
RANURA USB/ Ranura carga
Restaurar
Compartimento para pilas
ES-02
ES-03
FUENTE DE ALIMENTACIÓN
FUENTE DE ALIMENTACIÓN
ALIMENTADO A PILAS
RECARGAR CON ADAPTADOR (no incluído)
1. Abra la cubierta del compartimento para baterías.
2. Coloque 3 pilas nuevas recargables o alcalinas (tamaño
AAA), y cierre el compartimento para pilas.
3. Encienda la unidad principal.
1. Coloque tres pilas recargables tamaño AAA de la manera
indicada.
2. Enchufe un extremo del adaptador en la salida CA y enchufe
el otro extremo en la ranura USB, se mostrará "
".
3. Con la radio apagada, presione brevemente <
> para
recargar. El icono de carga de batería "
" parpadeará.
4. Cuando la carga de la batería haya finalizado, "
" dejará
de parpadear. Por favor, desconecte el adaptador y la radio.
0 05
-
25
-
+
+
+
Instale las pilas correctamente,
según la polaridad de las pilas.
Después de instalar las pilas,
la pantalla LCD se muestra
como más arriba.
NOTAS:
1. Por favor, no mezcle pilas nuevas y usadas.
2. Por favor, no mezcle pilas recargables con alcalinas.
3. Por favor, no recargue las pilas alcalinas.
4. Cuando la radio no esté en uso durante un período prolongado,
retire las pilas para evitar derrames y corrosión. Si ocurriera algún
derrame, limpie el compartimento para pilas con un trapo suave
antes de insertar pilas nuevas.
Adaptador
Enchufe en la
RANURA
INDICADOR DEL COMSUMO DE BATERÍA
NOTAS:
1. Cuando cargue, asegúrese de que la conexión es correcta.
2. El tiempo de carga es de aproximadamente 2 a 7 horas,
dependiendo de la capacidad de las pilas recargables.
3. Por favor, apague la radio cuando esté en carga vía adaptador
para evitar interrupciones.
4. Por favor, enchufe y desenchufe el adaptador con la radio apagada.
1. Lleno
Recargar con el PC
3. Bajo
ES-04
2. Medio
4. Agotado, la unidad se
apagará automáticamente.
1. Enchufe un extremo del cable USB incluído en la ranura USB
del PC, y el otro extremo en la ranura USB de la radio.
2. Después de conectar correctamente, "
" aparecerá en
pantalla.
3. Con la radio apagada, presione <
> brevemente para
cargar; el icono de carga de batería "
" se muestra
fluyendo.
4. Cuando la carga de batería haya completado, "
" deja de
fluir. Por favor, desconecte el PC y la radio.
ES-05
USO DE LA RADIO
USO DE LA RADIO
ENCENDIDO
SELECCIÓN DE BANDA
1. Con la radio apagada, presione < > o < > seleccionar
el apagado automático: 05 ~ 90 o" (permanentemente
encendido)
Presione el interruptor de Banda a la posición FM, MW, SW
o LW para seleccionar la banda que desea.
05
10
20
90
(Solo se muestra el
icono del apagado
automático)
89.8
Banda FM
FM
05
990
89.8
presión
corta
FM
05
parpadea
2. Presione <
> brevemente para encender el equipo. El
indicador de Apagado automático se mostrará en pantalla.
3. La radio se apagará automáticamente cuando llegue al
tiempo de apagado configurado previamente por el
usuario.
NOTA: Si aparece "
activada.
Banda MW
(OM)
MW
Banda LW
(OL)
LW
205
05
Cuando escuche el programa en OC, presione <
>
brevemente para seleccionar el medidor de la banda.
Presione
brevemente
20.755
" ien pantalla, la opción de Apagado Aut. está
SW
APAGADO
05
Banda SW (OC)
Con la radio encendida, presione brevemente <
apagarla.
> para
AJUSTE DEL VOLUMEN
Presione <VOL+> o <VOL-> para ajustar el volumen.
BLOQUEO DEL INTERRUPTOR
Deslice hacia arriba el <Interruptor de bloqueo> para bloquear
todos los botones; deslice hacia abajo para desbloquearlos.
Locked (bloqueado)
0 05
30
ES-06
05
Presione
brevemente
o seguido
89.8
FM
20
VOL
Nivel de volumen
ES-07
USO DE LA RADIO
USO DE LA RADIO
Uso de la antena
FUNCIÓN SILENCIADOR
Mientras escuche programas, presione <
para activar la función SILENCIADOR.
> brevemente
1. Mientras escuche emisoras en FM o SW, por favor
cambie la longitud de la antena telescópica para
optimizar la recepción.
SINTONIZAR CANALES
Cambie la
longitud.
Sintonía manual
1. Seleccione la banda
2. Presione <
>o<
> brevemente para aumentar o
disminuir la frecuencia. Por favor, preste atención al
indicador de fuerza de la señal; deje de presionar cuando
la recepción de señal sea clara.
Presione brevemente para
sintonizar manualmente. En sintonía
automática, presione y
mantenga pulsado.
2. Mientras escuche emisoras en FM o SW, rote la radio
para encontrar la posición que logra la mejor recepción.
Sintonía automática
1. Seleccione la banda
2. Presione <
>o<
> manteniendo apretado.
La frecuencia aumentará o disminuirá en pantalla. El
equipo dejará de sintonizar cuando reciba una señal clara.
Si la frecuencia no se recibe con claridad, por favor
sintonice manualmente.
NOTA: Para reducir interferencias y mejorar la recepción, por favor
no utilice el adaptador cuando esté sintonizando emisoras
automáticamente.
ES-08
ES-09
USO DE LA RADIO
USO DE LA RADIO
MEMORIA
Almacenamiento automático (ATS)
Almacenamiento Manual
1. Seleccione la banda.
2. Mantenga <
> apretado hasta que cambie la frecuencia.
El equipo sintonizará automáticamente y almacenará en la
memoria todas las señales fuertes. (FM y SW se guardarán
a partir de la referencia (50). La frec. MW se guardará desde
la ref. (15). Las frecuencias de LW se guardarán desde la ref.
(05).
1. Seleccione la banda.
2. Sintonice la emisora.
3. Presione brevemente <
parapadea.
> El icono de memoria "E"
presione
brevemente
89.8
FM
Presione
seguido
89.8
50
FM
"E" parpadea
4. Presione <
> o < > brevemente para seleccionar las
frecuencias almacenadas.
presione
brevemente
89.8
FM
50
5. Presione <
> brevemente para almacenar la emisora
en la memoria. Si no desea guardarla, presione cualquier
tecla para salir.
NOTAS:
La banda FM almacena 100 (00 ~ 99) frecuencias;
La banda MW almacena 25 (00 ~ 24) frecuencias;
La banda SW almacena 100 (00 ~ 99) frecuencias;
La banda LW almacena 10 (00 ~ 09) frecuencias.
ES-10
50 05
Las frec. FM se guardan
desde la ref. (50)
NOTAS:
1. Mientras realice ATS, acérquese mucho a la ventana o
manténgase fuera del campo de recepción para evitar
interrupciones y lograr la mejor recepción posible.
2. Las nuevas frecuencias cubrirán las antiguas si vuelve a efectuar
el ATS de nuevo.
3. Mientras realice ATS, por favor desconecte el adaptador y la radio
para evitar interrupciones por parte del adaptador.
Recuperar la Frecuencia almacenada
1. Seleccione la banda.
2. Presione <
>o<
> brevemente
presión
corta
NOTA:
Cuando recupere una frecuencia
almacenada, el equipo saltará las
direcciones vacías automáticamente.
ES-11
USO DE LA RADIO
CONFIGURAR EL PASO de MW (OM)/AM
BORRADO DE LAS PRESINTONÍAS ALMACENADAS
Borrado de UNA presintonía almacenada
1. Seleccione la banda.
2. Presione <
>o<
> brevemente para seleccionar la
dirección en la que se guardó la frecuencia.
CONFIGURAR EL PASO DE MW (AM) (9K/10K)
Cuando esté en modo apagado, mantenga <
> apretado
5 segundos aprox. "A9" o "A10" aparecerá en la pantalla.
Repitade nuevo para cambiar el paso de sintonía.
A09
presiçon
corta
89.8
FM
25
25
99 05
Seleccione la dirección
NOTA:
Después de quitar las pilas, el paso de sintonía AM regresará a la
selección de fábrica.
3. Presione <
> brevemente. "D" se muestra y la dirección
almacenada parpadea.
4. Cuando se muestre "d", presione <
> brevemente una
vez para borrar. Si no desea borrar, presione cualquier
tecla para salir
presión
corta
89.8
FM
99
La dirección parpadea
Borrar todas las presintonías almacenadas
1. Seleccione la banda
2. Mantenga <
> apretado, "D" parpadeará.
3. Presione <
> brevemente para borrar todas las
presintonías almacenadas en la banda seleccionada.
Si no desea borrar, presione cualquier tecla para salir.
ES-12
ES-13
CONFIGURAR EL RELOJ Y LA ALARMA
CONFIGURAR EL RELOJ Y LA ALARMA
CONFIGURACIÓN DE HORA
1. Con la radio apagada, presione <
>; la hora parpadea.
Presione <
>o<
> brevemente para configurar la HORA.
2. Después de ajustar la hora, presione <
> brevemente de
nuevo, los minutos parpadean. Presione <
>o<
>
brevemente para ajustar los minutos.
presión corta
H24
25
25
NOTAS:
Después de quitar las pilas, el modo de hora regresará a la
configuración inicial de fábrica.
CONFIGURAR LA ALARMA
1. Apague la radio. Presione < > brevemente; la hora y " "
parpadean. Presione <
>o<
> oara ajustar la hora.
0 05
presión
corta
25
"Hora" y " " parpadean.
Horas : Minutos
0 05
25
8 25
25
Segundos
NOTAS:
Después de quitar las pilas, el reloj se reinicia a la configuración de
fábrica.
MODO DE CONFIGURACIÓN DE HORA (24/12H)
Cuando esté apagado, presione <
> durante unos 5
segundos. "12H" o "24H" se mostrará en pantalla. Si quiere
cambiar el modo de hora, deje presionado <
> de nuevo.
2. Tras ajustar la hora, presione <
> brevemente de nuevo.
Los. minutos y " " parpadean. Presione <
>o<
>
para ajustar los minutos.
NOTA: El equipo activará la alarma con la emisora y volumen
configurados por el usuario.
ENCENDER/APAGAR LA ALARMA
Apague la radio. Presione <
> brevemente. " " se muestra
para activar la alarma. Presione brevemente < > de nuevo.
" " desaparece para desactivarla.
0 05
25
La función de alarma
está activada.
ES-14
0 05
25
La función de alarma
está desactivada.
ES-15
ESPECIFICACIONES
1. Rango de radiofrecuencia
FM: 87.0 - 108.0 MHz
OL: 153 - 279 KHz
OM: 522 - 1710 KHz
OC: 2.30 - 23.00 MHz
2. Memoria para 235 presintonías
FM (100); OM (25); OC (100); OL (10)
3. Límite de sensibilidad de ruido
FM
5 V
OL
3.0mv/m
OM
2.5mv/m
OC
50 V
4. Selección de señal
40dB
5. Potencia máxima de salida :
Aprox. 150mW
6. Consumo máximo de corriente: Aprox. 120mA
7. Fuentes de alimentación:
Pilas
3 pilas tamaño AAA
Adaptador externo 5V
8. Altavoz
9. Auriculares
10. Dimensiones
11. Peso
ES-16
D50mm
D3.5mm
Aprox. 110 * 69 * 13mm
Aprox. 81g(excl. Pilas).
Condiciones de Garantía
Este equipo tiene garantía de 2 años a partir de la
fecha original de compra.
Durante los primeros seis meses la garantía será
total.
A partir de los primeros seis meses, serán exentas
de la garantía las averías producidas por un uso
incorrecto del aparato, mala instalación o
instalados en lugares inapropiados para su buena
conservación, roturas, actualizaciones de software
que no sean los facilitados por la marca, piezas
desgastadas por su propio uso o por un uso no
doméstico o inadecuado, así como, por
manipulación por personas o talleres ajenos a
nuestra empresa.
Para que la garantía tenga validez, se deberá
adjuntar la factura o tíquet de caja que corrobore
la adquisición y fecha de venta de este producto.
¡Ayúdenos a proteger el medio ambiente!
Respete la normativa local en vigor: Deposite
su aparato eléctrico fuera de uso en un centro
de recolección apropiado.
ES-17