1
SON'tt';
3072 7,,( os
Video Cassette
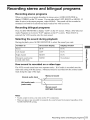
Recorder
Operating
Instructions
For customers in the USA
If you have any questions about your Sony VCR, you may call Sony
Customer Information Services Company at 1-800-VHS-SONY
(847-7669).
For all other Sony product questions, please call Sony Customer
Information Services Company at 1-800-222-SONY (7669).
Or write to: Sony Customer Information Services Company
12451 Gateway Boulevard Ft. Myers, FL 33913
For Customers in Canada
if this product is not working properly, please call 1-877-602-2008
Peace of Mind Warranty
Replacement
service.
tbr
For other product related questions please contact
Information
Service
Centre at 1-877-899-7669
our Customer
or write to us at:
Customer
Intbrmation
M2H 3R6
Road,
Service
SLV-N88
SLV-N77
SLV-N55
© 2002 Sony Corporation
115 Gordon
Baker
Toronto,
Ontario,
WARNING
• Do not install the unit near heat sources
To prevent
fire or shock hazard, do not
expose the unit to rain or moisture.
•
Ax Ax
C_Lr_ON:
11_ _U_E
DO NOT
THE
RBNOVE
RI_(
C0_5_
LI_R._ER_flCEJ_BLE
P_=B_
6BRVIONG
Ihis
/_
/_
TO QUALIRED
symbol
•
OF EU_CTRJC
tON
BACI_.
pART_
IN,DE.
SERvlOE
is intended
8HCCI_
pERSONNB-
to alert rile user
"dangerous
within the product's
to the presencevoltage"
of uninsulated
enclosure
that may be of sufficient
magnitude
to constitute
a risk of electric
shock to persons.
Ihis symbol is intended to alert tile user
to themaintenance
presence of (selvicing)
important instructions
operating
and
in rile literatm'e accompanying
the
applim_ce.
CAUTION
1o prevent electric shock, do not use this polarized
AC plug with an extension
cord, receptacle or other
outlet unless the blades can be fully inserted to
prevent blade exposure.
Precautions
2
•
•
such as
radiators or air ducts, or in a place subject to
direct sunlight, excessive dust, mechanical
vibration or shock.
Do not install the unit in an inclined position.
It
is designed to be operated al a horizontal
position
only
Keep the unit and cassettes away fi-om equipment
with strong magnets, such as microwave
ovens or
large loudspeakers.
Do not place heavy objects on the unit.
If the unit is brougb_ directly fi'om a cold to a
warm location, moisture may condense inside the
VCR and cause damage to the video head and
tape. When you first install the unit, or when you
move it fi'om a cold to a warm location, wait for
about three hours before operating the unit.
Information
For customers in the USA
CAUTION
You are cautioned that rely changes or modifications
not expressly
approved in this manual could void
your authority to operate this equipment.
NOTE:
This equipment
has been tested and found to
comply with the limits for a Class B digital device,
pursuant to Part 15 of the FCC Rules
These limits are designed to provide reasonable
protection
against harmful interihrence
in a
residential
installation.
This equipment
generates, uses, and can radiate
radio frequency
energy m_d, if not installed and used
in accordance
with the instructions,
may cause
harm ful interference
to radio communications.
Safety
• Operate the unit onIy on 120VAC,
60Hz.
• If anything falls into _be cabinet, unplug the unit
and have it checked by qualified personnel belbre
operating
it any fresher
• l'his unit is not disconnected
from the AC power
source (mains) as long as it is connected
to the
wall outlet, even if the unit itself has been turned
oft2
• Unplug the unit from the wall outlet if you do not
intend to use it for an extended period of time.
l'o disconnect
the cord, pull it out by _be plug,
never by the cord.
• One blade of lhe plug is wider than the other lbr
_be purpose of safety and will fit into the power
outlel only one way. If you are unable to insert
_be plug fully into the outlet, contact your Sony
dealer.
However, there is no guarantee that interference
will
not occur in a pal_icular installation.
If this
equipment does cause harmt?fl interference
to radio
or television reception,
which can be determined
by
turning the equipment off and on, the user is
encouraged
to *ry to correct the interference
by one
or more of the tbllowing measures:
• Reorient or relocate the recalling
antenna.
• Increase the separation
between the equipment
and receiver
Installing
• Atlow adequate air circulation
to prevent internal
heat buildup.
• Do not place the unit on surfaces (rags, blankets,
etc) or near materials
(curtains, draperies)
_bat
may block the ventilation
slots.
Record these numbers in the spaces provided below
Refer to them whenever
you call upon your Sony
dealer regarding
this product.
Model No.
Serial No.
WARNING
• Connect the equipment
into an outlet on a circuit
different from that to which the receiver is
connected.
• Consult the dealer or an expetienced
radio/TV
technician
for help.
Owner's
record
The model and serial numbers are located at the rear
of _be ualt.
Important
Safeguards
For your protection,
please read these safely
instructions
completely
before operating tile
appliance,
and keep tiffs manual for fixture rel?rence.
Carefully
obselwe all warnings,
precautions
and
instructions
on the appliance, or the one described in
the operating
inslmctions
and adhere to tbem.
Use
Power sources
Ibis set should be operated only
from tbe _ype of power source
indicated
on the marking label. If
you are not sure of the type of
electrical
power supplied to your
home, consult your dealer or local power compm_y.
For those sets designed to operate from battery
power, or other sources, refer to the operating
instructions.
Grounding
or Polarization
Ibis set is equipped with a polarized ac power cord
plug (a plug having one blade wider than the other),
or with a three-wire
grounding type plug (a plug
having a third pin for grounding).
Follow the
instructions
below:
For the set with a polarized
ac power cord
plug:
Ihis plug will fit into the power
outlet only one way. Phis is a
safety feature. If you are unable
to insert the plug fully into the outleh try reversing
the plug. If the plug should still fail to fit, contact
your electrician
to ha_e a suitable outlet installed.
Do not defeat the safety purpose of the polarized
plug by lbrcing it in.
For the set with a three-wire
grounding
type ac plug:
Ibis ping will only fit into a
grounding-*ype
power outlet.
Ihis is a safety feature. If you are
unable to insert the plug into the outlet, contact your
electrician
to have a suitable outlet installed.
Do not
defeat
tbe safety purpose
of the grounding
Overloading
Do not overload wall outlets,
extension
cords or convenience
receptacles
beyond their capacity,
since this can result in fire or
electric shock.
Object
and
Liquid
rv,.¢¢_
IQ_¢_
spill liquid of any kind on the set.
not
recommended
by the manufacturer,
they may cause hazards.
as
Cleaning
Unplug the set from the wall
outlet before cleaning or polishing
it. Do not use liquid cleaners or
aerosol cleaners.
Use a cloth
lightly dampened
with water for
cleaning the exterior of the set.
Installation
Water
and
Moisture
Do not use power-line
operated sets
near water - for example,
near a
bathtub, washbowl,
kitchen sink. or
laundry tub, in a wet basement, or
near a swimming pool, etc.
Power-Cord
Protection
r"_
IG_-..
Route tbe power cord so that it is
not likely to be walked on or
pinched by items placed upon or
against them, paying particular
attention to the
plugs, receptacles,
and the point wbere the cord exits
from tbe appliance
Accessories
Do not place the set on an
_
unstable cmt, stand, tripod,
bracket, or table,
l'be set may
Pall, causing serious injury to a
child or an adult, and sel_ous damage to the set. Use
only a cart stand tripod, bracket, or table
recommended
by the manuPacmrer.
An appliance
combination
and cart
should be moved
witb care. Quick stops, excessive
force, and uneven surfaces may
cause the appliance
and cm_
combination
to overturn.
Ventilation
Ibe slots mid openings in the cabinet are provided for
necessmN ventilation,
fo ensure reliable operation of
tbe set, and to protect it from overheating,
d_ese slots
mid openings must never be blocked or covered.
•
Never cover
the stots and
openings with a clotb or otber
materials.
Entry
tbe set through openings as they
may
Never touch
push dangerous
objects of voltage
any kind into
points or short out paris tbat could
result in a fire or electric shock.
Never
plug.
Attachments
DO not
use
attachments
•
Never block the slots and
openings by placing the se* on
a bed, sofa. pug or otber similar
surface.
important Safeguards
3
Service
• Never place tbe set in a
confined space, such as a
bookcase,
or buitt-in cabinet,
unless propel" ventilation
is
provided.
Damage
Requiring
Service
Unplug the set from the wall outlet and refer
selwicing to qualified service personnel under
following conditions:
• Do not place the set near or
over a radiator or heat register,
or where it is exposed to direct
sunlight.
_ _0_ _
_ ._'_-:
• When the power cord or plug is
damaged or fl'ayed.
_tD
AC
the
_ "rA_r
e._
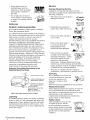
Antennas
Outdoor antenna grounding
If an outdoor antenna
fbllow tbe precautions
o1"cable system
below.
is installed,
An outdoor antenna system should not be located in
the vicinity of overhead power lines or other electric
ligbt or power circuits, or where it can come in
contact with such power lines or circuits.
WHEN INS IALL[NG
AN OUTDOOR
ANTENNA
• If the set has been exposed to
rain or water.
SYSTEM, EXTREME
CARE SHOULD BE
IAKEN TO KEEP FROM CON IAC'I ING SUCH
POWER LINES OR CIRCUI FS AS CONqAC
F
WIFH IHEM IS ALMOST
INVARIABLY
FAFAL
• [fthesethasbeensu_ect
to excessive
shock by
being dropped, orthe
cabinethas
be_ damaged.
Be sure tbe antenna system is grounded so as to
provide some protection
against voltage surges and
built-up static charges
Section 810 of the National
Electrical Code provides inibrmation
with respect to
proper grounding
of the mast and supporting
structure, grounding
of the lead-in wire to an
antenna discharge
unit, size of grounding
conductors,
location of antenna-discbarge
mtig
connection
to grounding
electrodes,
and
requirements
for the grounding
electrode.
Antenna
National
Grounding
Electrical
According
Code
to the
kntenr/a Lead
in Wire
Grounding
Conductors
(NKC Section 810-21)
nd Clamps
=
NEC-NATIONAL
Power Service Grounding
Electrode System
(NKC Art 250 Part H)
ELECTRICAL
CODE
Lightning
For added protection
Ibr fitis set during a lightning
storm, or when it is left unattended
and unused lbr
long periods of time, unplug it from the wall outlet
and disconnect
the antenna or cable system. Ihis
will prevent damage to the set due to lightning and
power-line
surges.
Important Safeguards
t
• If the set does
not operate
normally when following the
€_{'_z:_
operating
instructions.
Adjust
onIy those controls that are
specified in the operating
instractions.
Improper adjustment
of other
controls may result in damage and will often
require extensive work by a qualified technician
to restore the set to normal operation.
• Wben the set exhibits a distinct change in
performance
-tbis indicates a need for selvice.
Antenna Discharge tmR
(NKC Section 810-20)
4
• If liquid has been spilled or
objects have _allen into the set.
Servicing
Do not attempt to service the set
yourself as opening or removing
covers lnay expose you to
dangerous
hazards.
voltage
Refer all servicing
_h , _,r_,,,
"
or other
to qualified
selwice
personnel.
Replacement
parts
Wben replacement
pints are required,
be sure the
selvice tecbnician
has used replacement
pints
specified by the manufacturer
that have the same
characteristics
as the original pints
Unamhorized
substitutions
may resuh in fire,
electric shock, or otber bazards.
Safety Check
Upon completion
of any service
or repairs to tbe set, ask the
selwice tecbnician
to perform
routine safety checks (as specified
by the manulhcmrer)
to determine
tbat the set is in safe operating
condition.
_
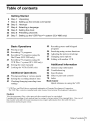
Table of contents
Getting
Started
6
7
10
17
Step 1
Step 2
Step 3
Step 4
: Unpacking
: Setting up the remote commander
: Hookups
: Selecting a language
18
23
Step 5 : Setting the clock
Step 6 : Presetting channels
27
Step 7 : Setting up the VCR Plus+®* system (SLV-N88 only)
53
Basic Operations
30
Playing a tape
33
Recording
36
44
Recording TV programs using the
Dial Timer (SLV-N88 only)
Recording TV programs using the
VCR Plus+ _ system (SLV-N88 only)
Setting the timer manually
47
Locking the VCR (Child Lock)
41
Additional
TV programs
Operations
48
Playing/searching
50
51
Setting the recording duration time
Checking/changing/canceling
timer
settings
at various speeds
* VCR Plus+ and PlusCode
are registered
The VCR Plus+ system is manufactured
54
Recording stereo and bilingual
programs
Searching using various functions
56
57
Adjusting
Changing
58
Editing with another VCR
the picture (tracking)
menu options
Additional
Information
60
General setup information
62
Troubleshooting
64
65
70
Specifications
Index to parts and controls
index
Back Cover
Quick reference
to using the VCR
tradelnarks
of Gelnstar
Development
Corporation.
under license from Gemstar Development
Corporation.
Caution
[elevision
programs, films, video tapes and other materials may be copyrighted.
Unauthorized
recording of such material may be contrmy to the provisions
of the copyright
laws. Also, use of
this recorder with cable television transmission
may require authorization
from the cable television
transmission
and/or program owner.
Table of contents I 5
Getting
Started
Step 1 : Unpacking
Check that you have received
• Remote
the tbllowing
items with the VCR:
commander
• Size AA ([{6) batteries
• 75-ohm
coaxial
cable with F-type
connectors
Check your model name
The instructions
in this manual
are for the 3 models:
SLV_N88,
SEV-N77
Check your model name by looking at the rear panel of your VCR.
SLV-N88 is the model used for illustration
purposes.
Any difference
indicated in the text, for example, "SLV-N88
only."
6 Unpacking
and SEV N55.
in operation
is clearly
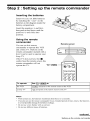
Step 2 : Setting up the remote commander
Inserting
Insert
the batteries
two size AA (R6) batteries
by matching the + and
batteries to the diagram
battery compartment.
insert
the negative
()
on the
inside the
end tirst,
then push in and down until the
positive (+) end clicks into
position.
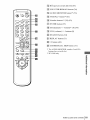
Using the remote
commander
Remote sensor
commander
to operate this VCR
and a Sony TV. Buttons on the
YOU can use this remote
remote commander
marked with a
[_c_
--i_
dot (,) can be nsed to operate
t_
your
_
_
o
_
f"
If the TV does not have the []
symbol near the remote sensor,
remote commander
will not
f
.Htr
Sony TVI
"_-
f'"--this
J"_-'
....
..................-
_
•TV/VIDEOoperate
the TV.
_
"CZ) CZY"CZD
"CD CD CD
'Q'Q
"@'Q
To operate
Set .TV / VIDEO to
the VCR
VIDEO and point at the remote sensor at the VC'R
a Sony TV
•TV and point at the relnote sensor at the TV
Notes
•
With normal
•
If you do not use the relnote comlnander
tbr an extended
to avoid possible damage from batteD_ leakage.
use, the batteries
•
Do not use a new battery
•
Do not use different
types
with
should
last about
three
to six months.
period
of tilne, relnove
the batteries
an old one.
of batteries.
continued
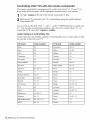
Setting up the remote commander
Controlling
The remote
I sted m the tollow
1
other TVs with the remote
commander
is preprogramed
ng table,
Set ,TV/_
to control
set the appropr
at the top of the remote
ate manufacturer
commander
Hold down I/Q), and enter your TV's code number
Then release I/Q).
Now you can use the I/Q), VOL +/-,
CH +/,
commander
non-Sony
TVs.
to ,TV.
using the number
and TV/VIDEO
buttons
TV. YOu can also use the buttons marked with a dot (-) to control
control the VCR, reset -TV / VIDEO to VIDEQ.
Code
numbers
of controllable
Code
Sony
Akai
0I
Panasonic
06, 19
04
Philco
03, 04
AOC
04
Philips
08
Centurion
12
Pioneer
16
Coronado
03
Pol_land
03
Cm_is-Mathes
12
Quasar
06, 18
Daytron
12
Radio
Emerson
03, 04, 14
RCA
04, I0
11
Sampo
12
06, I 0
Smlyo
11
03, 04, 17
Scott
12
Hitachi
02, 03
Sears
07, I0, 11
J.C.Penney
04, I2
Sharp
03, 05, 18
JVC
09
Sylvania
08, I2
KMC
03
];eknika
03, 08, 14
Magnavox
03, 08, 12
]_shiba
07
Marantz
04, I3
Wards
03, 04, 12
MGA/Mitsubishi
04, 12, 13, 17
Yorx
12
NEC
04, 12
Zenith
15
Gold
Electric
Star
Setting up the remote commander
your
To
them one at a time until you find
Code
General
8
to control
a Sony TV.
TV brand
Fisher
number
buttons.
TVs
if more than one code number is listed, try entering
the one that works with your TV.
TV brand
If your TV is
s code number.
Shack
number
05, 14
Notes
•
If you enter
•
If the TV uses a different
VCR, you cannot control
a new code nmnber,
the code number
previously
entered
wilI be erased.
•
When you replace the batteries
of the remote commander,
the code number
the appropriate
code number eve W time you replace the batteries.
•
When you press the AUDIO MONITOR
button, your TV's menu may appear on the TV
screen.
To exit the TV menu, press the MENU button on the TV remote commander
or wait
until the menu disappears
automatically.
remote control system l?oln the one programed
your TV with the remote comlnander.
to work with
may change.
the
Set
Setting up the remote commander
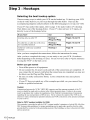
Step 3 : Hookups
Selecting
There
the best hookup
option
are many ways in which your VCR can be hooked
up.
'Ib hook up your VCR
so that it works best tbr you, first scan through the table below. Then use the
accompanying
diagrams and procedures
on the tbllowing pages to set up your VCR.
lfyour TV has audio/video
inputs, refer to page 11 tbr audio/video
(A/V) hookup.
Then tbllow one of the hookups below. If your TV does not have A/V inputs, do
directly to one of the hookups below.
If you have
Use
Refer to
Antenna onb_ no cable TV
Hookup 1
(Plug and Play)
Pages 12 and 13
No c_ble box or cable box witb only a
f:cwscrambled cbannels
Hookup 2
(Plug and Play)
Pages
Cable box witb many scrambled
channels
Hookup 3
Page 16
After
you have completed
the connecfions,
After
you have completed
the setup,
tbllow
the instructions
14 and 15
for setup.
you are ready to use your VCR.
differ depending
on the hookup you used.
to using the VCR" on the back cover.
For an overview,
Procedures
retbr to "Quick
reference
Before you get started
• Turn offthe
power
to all equipment.
• Do not connect the AC power cords until all ofthe connections
are completed,
if
you connect the AC power cord betbre the connections
are completed,
you may not
be able to use the Plug and Play function.
• Be sure you make connections
distortion.
firmly.
Loose connections
• If your TV does not match any of the examples
dealer or qualified technician.
provided,
may cause picture
see your nearest
Sony
Caution
Connections
between
the VCR's
VHF/UHF
connector
and the antenna
terminals
of the TV
receiver shouId be made only as shown in the following
instructions.
Failure to do so may
resuIt in operation
tbal violates the reguIations
of the Federat Comlnunications
Colmnission
regarding
the use and operation
of RF devices.
Never connect the output of the VCR to an
antenna or make simultaneous
(parallel)
antenna and VCR connections
al the antenna terminals
of your receiver.
Note to CATV
system
installer
(in USA)
This relninder
is provided
to call the CATV system
NEC that provides
guidelines
for proper grounding
ground shalI be connected
to the grounding
system
entry as practical.
10
Hookups
installer's
altention
to Article 820- 40 oftbe
and, in particular,
specifies
thai the cable
of the building, as close to the point of cable
Audio/video
(A/V) hookup
if your TV has audio/video
(A/V)
input jacks,
you will get a better
if you hook up your VCR using these connections.
experience,
you should connect the audio outputs
system.
If your TV does not have A/V inputs,
cable hookups.
if you are not planning
the tbllowing
[]
pages
see the following
to use your VCR to record
the VCR after you have made the connections
record regular or cable TV programs, complete
tbr antenna
picture
and sound
For a true "home theater"
of your VCR or TV to your stereo
programs,
pages
tbr antenna
you finished
setting
or
up
shown on this page. if you want to
these connections
first, and then go to
or cable hookups.
Use this hookup if your TV has stereo jacks
VCR
Stereo receiver
TV
LINE L_NE
OUT _NI
i
AUDIO OUT
AUDIO
r
Audio/video
[]
cable (not supplied)
Audio cable (not supplied)
Use this hookup if your TV does not have stereo jacks
VCR
Stereo receiver
TV
LINE L_NE
CUT _NI
VIDEO
AUDIO
Video cable (not supplied)
Audio cable (not supplied)
Notes
•
To play a tape
•
If you do not have a stereo receiver,
AUDIO IN jack on your TV.
in stereo,
you must
use the A/V connection.
connect
the white
LINE
OUT/AUDIO
L jack
to the
Hookups
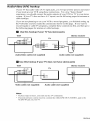
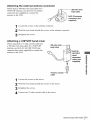
Hookup
1 (Plug and Play)
Antenna
hookup
Make the fbllowing
'rv).
[]
connections
Use this hookup
if you are using an antenna
(if you do not have cable
if you are using:
• VHF/UHF antenna (you get channels 213 and channels 14 and higher)
• UHF-only antenna (you get channels 14 and higher)
• Separate VHF and UHF antennas
RearofTV
VHF/UHF
A Match the type of
connector on your
TV: A, B, or C.
VCR
VHF
÷
N
i
|
,
....
=
,
UHF
i i °r
fl
,,=
I"-_:_'--_D_---"
VH,
"--_
c
UHF
[]
Use this hookup if you are using a VHF-oniy antenna (you get
channels 2-13 only)
RearofTV
VHF/UHF
///.//
_
or
i .............
I
i
OUT
f
,,
I
_
_
B
Forconnectortypes
UHF
B and C, no UHF
connection is
VHF
req U'red.
or
_
_-m:,------------:_
connector
on your
Match the type
of
TV: A, B, or C.
VHF
VCR
b
A
- --
_
C
UHF
If you cannot
connect
your antenna
cable
to the VCR
directly
If'your antenna cable is a flat cable (300*ohm twin lead cable), attach an external
antenna connector (not supplied) so you can connect the cable to the RF IN
connector,
if you have separate cables tbr VHF and UHF antennas,
U/V band mixer (not supplied) (page 61).
12 Hookups
you should use a
Hookup
1 : VCR setup
Plug the VCR
into the AC outlet.
The VCR automatically
is plugged
presets
the VCR's
clock and TV channels
when the VCR
into the AC outlet.
AC power cord_
to AC outlet _
The VCR starts presetting the clock and
channels.
2n
i
When Auto preset is completed,
the current
time appears in the display window.
onn
U'UU
You have now completed
]_ change
the on-screen
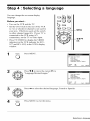
"Step 4 : Selecting
VCR setup.
display
a language"
language
The clock is set using a time signal
is incorrect, or "-<--"
Set" on page 21.
appears
to French
or Spanish,
see
on page 17.
provided
in the display
by some
TV channels.
window,
see "Using
]_ add or disable channels manually, see "Presetting/disabling
manually" on page 25.
If the clock
Manual
Clock
channels
Notes
•
If you connect the AC power cord belbre the antenna connections
are completed,
the
channeIs may be incorrectly
set. If this happens, see "Step 6 : Presetting
channels"
on
page 23.
•
Do not press any buttons
•
Auto preset starts
a_er you purchase
•
Auto preset can be perlbrmed
the VCR power turned of}'.
on the VCR or remote
automalically
the VCR.
only
when
by pressing
commander
during
you plug in the AC power
•
STOP
continuously
Auto
cord
preset.
lbr the l]rst time
Ibr 5 seconds
or more wifll
Hookups
Hookup
2 (Plug and Play)
You have no cable box, or a cable box with only a few
scrambled
channels
Recommended
use
Use this hookup if you do not have a cable box.
system scrambles only a few channels.
What
you can do with
• Record
What
any unscrambled
you cannot
• Record
scrambled
Also use this hookup
if your cable
this hookup
channel
by selecting
the channel
on the VCR
do
channels
that require
a cable box
Rear of TV
VHF/UHF
_A
-I
or
on your TV: A,
B, or C.
VHF
B
or
UHF
Connect tothis
cable_
directly
your
TV
For connector
types B and C,
no UHF
connection is
VHF
you do not have a
cable box.
=
Cable box
!'r.......
_
C
UHF
OUT
i
14 Hookups
Match the type
of connector
required.
Hookup
2 : VCR setup
Plug the VCR
into the AC outlet.
The VCR automatically
is plugged
presets
the VCR's
clock and TV channels
when the VCR
into the AC outlet.
7Z,iL
The VCR starts presetting the clock and
channels.
; 0/4 K0¢
When Auto preset is completed,
the current
time appears in the display window.
You have now completed
VCR setup.
]_ change the on-screen display language to French
"Step 4 : Selecting a language"
on page 17.
or Spanish,
see
The clock is set using a time signal provided by some TV channels.
If the clock
is incoxTect, or "-<--" appears in the display window, see "Using Manual Clock
Set" on page 21.
]_ add or disable channels manually, see "Presetting/disabling
manually" on page 25.
channels
Notes
•
If you connect the AC power cord belbre the antenna connections
are completed,
the
channeIs may be incorrectly
set. If this happens, see "Step 6 : Presetting
channels"
on
page 23.
•
Do not press any buttons
•
Auto preset starts
after you purchase
•
Auto preset can be peribrmed
the VCR power turned of_i
on the VCR or remote
automalically
the VCR.
only
when
by pressing
commander
during
you plug in the AC power
•
STOP
continuously
Auto
cord
preset.
lbr the l]rst time
Ibr 5 seconds
or more wifll
Hookups
Hookup
3
Connecting
a cable box with many scrambled
Recommended
Use this hookup
What
use
if your cable system
you can do with
• Record
What
channels
any channel
you cannot
scrambles
all or most channels.
this hookup
by selecting
the channel
on the cable box
do
• Record
with the cable box turned
• Record
one channel
oil"
while watching
another
channel
Rear of TV
VHF/UHF
_A
Match the type of
connector on your
TV: A, B, or C.
or
__NCable
box
VHF
L .......
or
B
UHF
types
B and C, no
For connector
UHF connection
is required.
VHF
VCR
.........
_C
UHF
After
you have
completed
Aider you have completed
Step 4. Select
16 Hookups
hookup...
hookup,
nga language
plug the VCR into the AC outlet
on page 17.
and see
Step 4 : Selecting a language
You can change the on-screen display
language.
Before
CZ)
you start...
• Turn on the VCR andthe
TVI
• Set the CH switch on the rear of the VCR
Oc:z
to 3 or 4, whichever channel is not used in
your area. If both are used, set the switch
to either
channel
(page 60).
-- MENU
If your TV is
connected
to the VCR using A/V
connections,
set the TV to video input.
• Press TV/VI DEO to display the VIDEO
indicator (or the VCR indicator tbr SLVN77 and SLV-N55)
window.
1
MENU
in the VCR's
OK
display
Press MEN U.
O
•
Press _/l}
Tirrler se_ / _eck
Clock sat
Turner #rese[
Advanced
options
Language
/ Idioma / Langue
Set
OK '='H_'i
SeleCt
i*,_
•
Yirrler set / check
Clock sat
Turner #rese[
Advanced
options
Language
/ Idioma / Langue
Set
SeleCt
MENU
; MENU
to move the cursor (1_) to
Language/l&oma/Langue.
Press _
Quit
*
'="H_'a
Quit
:MENU
_,_
to select the desired language, French or Spanish.
Press MENU
to exit the menu.
©
Selecting a language
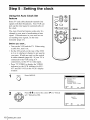
Step 5 : Setting the clock
Using the Auto Clock Set
feature
Some TV and cable channels
transmit
time
C:D
signals with their broadcasts.
Your VCR can
pick up this time signal to automatically
set
the clock.
The Auto Clock
Set t_ature
-- MENU
works only ifa
channel in your area is broadcasting
a time
signal. If broadcasters
in your area are not
yet sending
manually
Before
time signals,
(page
you
set the time
OK
slant...
• Turn on the VCR and the TV.
a cable box, turn it on.
• Set the CH switch
to either
When
using
on the rear of the VCR
to 3 or 4, whichever
your area.
- t/#/4-/_
2 I).
channel
is not used in
if both are used, set the switch
channel
(page 60).
If your TV is
connected
to the VCR using A/V
connections,
set the TV to video input.
• Press TVYVIDEO to display the VIDEO
indicator (or the VCR indicator tbr SLVN77 and SLV-N55) in the VCR's display
window.
1
2
MENU
Press MEN U.
O
@
•
res,s t_/l_ to move the cursor
Timer set ]cneek
ClOCk se[
Tuner preset
Advanced
op[io_s
Languase
] Idioma / Langue
Set
; OK _'=_a_la
Select
; •
Quit
MENU
(1_) to "Clock
MANUAL
set,
then press OK.
Select
Set
18 Settingthe clock
"AUTO
;_
;OK
MENU
Quit
Press '_/1_ to select
AUTO,
then press OK.
•
Clock set CH
Time zone:
DayEght Saving:
End
Select
Press '_/1_, to select
the item you want.
press ,*=/,-,1_ to make the setting
• Eor "Clock
OK
i._
[AUTO]
[ AUTO )
[ AUTO ]
Qt_it
Se_
; MENU
; **
Then
and press OK.
•
set CH"
Leave the setting to AUTO to have the VCR
automatically
search tbr a channel that
Clock set CH
Time zorle:
Day[ight Saving:
End
Select
OK
i._
[123[
[ AUTO [
[ AUTO [
Qt_it
Se_
; MENU
; **
carries a time signal. Press ,*,,/--I_ to select a
channel that carries a time signal. Use this
option if you know of a channel that carries
a time signal.
Most PBS member stations
broadcast a time signal. Eor the fastest
response, select your local PBS station.
• Eor "Time
zone"
Select the time zone of your area, or select
AUTO to have the VCR automatically
your time zone.
The options
set
are:
*--* Haw. (Hawaii)
set
•
saving
©
6
Press MENU
To activate
Qt_it
Se_
Clock set CH
Time zone:
DayEght Saving;
; MENU
; **
[ AUTO ]
[ AUTO ]
[NO]
time.
End
Select
MENU
OK
i._
[ AUTO ]
[Pac
]
[ AUTO ]
*--*
• Eor "Daylight
Saving"
Select YES or NO (standard time), or
AUTO to have the VCR automatically
the daylight
Clock set CH
Timezone:
DayEght Saving:
End
Select
AUTO *--* Atl. (Atlantic)
East (Eastern) *--* Cen. (Central) *--*
Mm. (Mountain)
*--* Pac. (Pacific)
Alas (Alaska)
AUTO
•
OK
i._
Qt_it
Se_
; MENU
; **
to exit the menu.
the Auto
Clock
Set function,
turn offthe
VCR.
continued
Setting the clock
Notes
• The clock cannot be set autolnatically if you do not receive a channel that carries a time
signal in your area. If"so, set _be dock manually (page 21).
• If there are only a tbw channels in your area that cant time signals_ setting the dock
automatically may take up to about 20 minutes. If nothing happens even after you wait about
20 minutes, set _he dock manually (page 21).
• If you made Hookup 3, make sure you Ieave the cable box on.
20
Setting the clock
Using Manual
Before
Clock Set
you start,,,
• Tm-n on the VCR andthe
TV_
• Set the CH switch on the rear of the VCR
to 3 or 4, whichever channel is not used in
your area.
CZ)
If both are used, set the switch
to either channel (page 60). If your TV is
connected
to the VCR using A/V
connections,
set the TV to video input.
,-- MENU
• Press TV/VI DEO to display the VIDEO
indicator (or the VCR indicator tbr SLVN77 and SLV-N55)
window.
1
MENU
in the VCR's
display
OK
Press MEN U.
O
•
Tirrler sel ] _eck
CI0CR set
Turner prese[
Advanced
options
Language
/ Idiom_ / Langue
Set
OK r=uH_li
SeleCt
i*_
Quit
;MENU
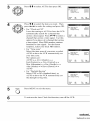
Press _/'1" to move the cursor (1_) to "Clock
set," then press OK.
MANUAL
Set
"AUTO
SeleO
:MENU
_
OK
Quit
Press _/1_ to select MANUAL, then press OK.
_'_4
End
I
_OK
EA
o2
2002
TUE !2;00,'_
continued
Setting the clock
_
Press
t/'_
to set the month.
Selecl
Er_d
5
@
ress "_ to tlash the day and press t/l_
Select
Er_l
MENU
©
22
Setting the clock
is set automatically.
Press
to start the clock.
Set
_¢¢
D °2
EA
2002
; _,*
; OK
in the same way as the day.
The day of the week
OK or MENU
: _,*
: OK
9
Set the year, hour, and minutes
20o2 sun _2oo,_
to set
the day.
@
oT
E°2
AR
;_g_
SAT
Set
12_00'_u
_ _¢¢
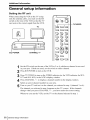
Step 6 : Presetting channels
This VCR is capable of receiving VHF
channels 2 to 13, UHF channels 14 to 69 and
unscrambled
CATV channels
1 to 125. First,
CZ)
we recommend
that you preset the receivable
channels in your area using automatic
presetting methods.
Then, if there are any
unwanted
channels,
disable
them
manually.
-- MENU
If you have already decided which channels
you wish to preset, set them directly using
manual
presetting
methods
(page 25).
.- t/ll./._-/,-_
OK
Presetting all receivable
channels automatically
Before
you
start...
• Turn on the VCR and the TV. When
a cable box, turn it on.
using
• Set the CH switch on the rear of the VCR
to 3 or 4, whichever
your area.
channel
is not used in
If both are used, set the switch
to either channel (page 60). If your TV is
connected
to the VCR using A/V
connections,
set the TV to video input.
• Press TV/VI DEO to display
the VIDEO
indicator (or the VCR indicator tbr SEVN77 and SLV-N55) in the VCR's display
window.
1
MENU
Press MENU.
O
•
Press '_/l_ to move the cursor (1_) to "Tuner
preset," then press OK.
Timer set / check
Clock set
Tuner #rese[
Advanced
options
Language
/ Idiorn_ / Langue
Set
OK I=uH_ll
Select
_
•
Quit
Artt/CaNe:
Auto presei
C_la nr_el add / erase
Guide charmel setup
End
Select
OK =::=
{*,1_
;MENU
[CABLE
Quit
Se_
]
;MENU
; **
continued
Presetting channels
3
@
Press
t/'l_
to move the cursor
(1_) to "Ant/Cable."
,N_,
• To preset cable TV channels:
•
_
Press 4-/,,,_ to select CABLE.
Ant / Cable
AuLo preset
Channel
add _ erase
Gt_de ch_nrle_ setup
S_lect
; • _,
[ CABLE
Set
1
,_
- To preset VHF and UHF channels:
•
Press 4-/,,,_ to select ANTENNA.
Ant / Cable¸
[ ANTENNA
AuLo prese_
Channel
add _ erase
Gt_de ch_nrle_ setup
End
S_lect
5
@
24
Presetting channels
preset,-- then press OK.
All
receivable
channels
are preset
ress
t1"/,!"to move
the cursor
(It") in
to numerical
"Auto
sequence. When no more receivable channels
can be found, presetting stops and the picture
from the lowest numbered channel is displayed
on the TV screen.
; OK 'i_l_
; • _,
Q_t
Set
1
MENU
,_
Presetting/disabling
Before
you
channels
start..,
manually
"-L__T"
• Turn on the VCR and the TV. When
a cable box, turn it on.
using
• Set the CH switch on the rear of the VCR
to 3 or 4, whichever
your area.
to either
channel
is not used in
If both are used, set the switch
channel
(page 60).
If your TV is
"_
(223"(2D
"C)
(2D CD
connected
to the VCR using A/V
connections,
set the TV to video input.
• Press TV/VI DEO to display
the VIDEO
indicator (or the VCR indicator tbr SLVN77 and SLV-N55) in the VCR's display
window.
"o ¢ o
oG
-- Number
buttons
-- ENTER
-- CH +/-
(Z)
Oc:
--MENU
- t/!,/*-/..*
OK
1
MENU
Press MEN U.
©
•
Press *_/l_ to move the cursor (1_) to "Tuner
preset," then press OK.
Timer se_ / _eck
CI0ek set
Tuner #rese[
Advanced
options
Language
/ Idioma / Langue
Set
OK r=uH_li
SeleCt
_
•
Quit
Ar_t/CaNe:
Auto presei
Chanr_el add / erase
Guide charmel setup
End
SeleCt
OK =::=
{*,1_
;MENU
[CABLE
Quit
Set
]
;MENU
; **
continued
Presetting channels
@
4
Press
"1Q)"_(_)"3(2
) •
'4(_)'Q 'e(.e) 1
"Q) "8(_)%(2)
'0(g)"(-..3 2
t/'_
to move the cursor
(1_) to "Channel
To preset a channel:
Press the number buttons to enter the
channel number, then press ENTER.
Press .-I_, then press OK or MENU.
add/erase,"
then press OK.
Channel to be preset
ar'd
End
_IIeesS_S
}:]
; OK
100 EARDADsEuI
Quit
MEN
MENU
O
• ca
• To disable
21
MENU
©
26
Presetting channels
a channel:
Press _,
CH then
+/to press
selectOKtheorchannel
MEN U.number.
Channel to be disabled
Step 7 : Setting up the VCR Plus+ ® system
(SLV-N88 only)
How the VCR Plus+ system works
Whenever
you want to record
a TV program,
Example
of
"PlusCode"
all you need to do is look up the "PlusCode"
number, a number assigned to each program
published
in the TV section of most
newspapers,
cable TV listings, and even TV
GUIDE magazine.
PlusCode number
Then, just enter the
of the program you want
and the VCR is automatically
programed
record that show. it's that simple.
5:30
:30
MUSiCN (2hrs)
[_
Goff (1 hr 25min ) 42060
J
m[]nDRAMA
Comedy
m SCIENCE
(lhr
AND
(2hrs) 17390
PJTC°de
TECHNOLOGY
Line-up Chart"
CABLE TV
16
_
American Movie CEassics
35
17
_
Bravo (program grid only)
54
20
_
Cable News NetW_
42
21
_
C-SPAN
28
To find the guide channel numbers, look at
the "Channel Line-up Chart" in the program
22
_
The Disney Chan ne'er//
53
25
_
The Discover_a_,_
37
guide for your area that features VCR
PlusCode numbers.
It usually looks like the
34 ESPN //7)
assigned
guide).
example
to that channel
in your program
to the right.
To set the guide channels, use the Channel
Line-up Chart to check that the guide channel
numbers
receives.
match the TV channel your VCR
For example, ifHBO is listed in the
Channel Line-up Chart as channel 33, and
your VCR receives HBO on channel 5, you
/
/
\
15rnin)73457
Example of "Channel
Setting up your VCR involves coordinating
the TV channel number (the number you turn
to on your TV or VCR to watch a pro_am)
with the guide channel (the number that is
MOVIE
SPORT
WS 9974
I6
to
How to set up your VCR
[]
[]
35
_
The
5
_
Hon_e 8_2"_
27
_
Life_
_
34
F_ta_nel
47
e
_}
29 _,_y
33
46
4s
30
_yuX_
relevision
48
38
_
&3_/rtsChannel
59
39
_
Sports Channel Amedca
70
45
_
Showtime
41
need to coordinate these numbers using the
tbllowing procedure.
If the guide and TV
channel numbers are the same, you can skip
17
_
TBS SuperStition
43
44
_
The Movie Channel
58
49
_
The Nashville Network
49
this procedure.
50
_
Turner Network Televisio n
52
USA Network
44
continued
Setting up the VCR Plus+@ system (SLV-N88 only)
"o "o "o
"Q"o "o
"o "o "o
(z)
(rE) (Z)
(Z)
-- MENU
OK
1
2
Press
MEN U.
MENU
©
@
•
Timer set ] cheek
Clock se[
Tuner preset
Advanced
op{io_s
L_nguage
_ Idiema
Set
; OK _'_la
Select
; •
Quit
MENU
ress _,/lJ" to move the cursor (_) to "Tuner
•
preset, ' then press OK.
Ant / Cable
AuLo prese[
Channel
add _ erase
G u_le channel
setup
End
Select
28
/ Langue
Setting up the VCR Plus+® system (SLV-N88 only)
; OK '_'_'
; • _,
[ CABLE
Quit
Set
]
MENU
,_
Press t_/1_ to move the cursor
channel
_
5
@
@
_
6
7
8
channel
number
that does not match the guide channel.
• If you made Hookup 1 or 2: Enter the actual
VCR), then press t_/1_.
number
• If you made Hookup 3: Enter the cable box output
or 4), then press t/l_.
steps 4 and 5 for each channel
Press OK to confirm
MENU
(1_) to "Guide
then press OK.
The upper row shows VCR Plus+ guide channels and the lower row shows
TV channels or cable box out put channels.
Press "l,,,,,/,,,_ to select the
Repeat
_
setup,"
Press MENU
number
on your TV (and
channel
(usually
2, 3,
that does not match.
the setting.
to exit the menu.
©
Setting up the VCR Plus+® system (SLV-N88 only)
Basic Operations
Playing a tape
-- _ E3ECT
-- CLEAR
•@.® .®
•Q .® .®
-- DISPLAY
"®'c_
CD
-- REPLAY
--IIPAUSE
-- COMMERCIAL
SKIP
--[:>-PLAY
--IH_FF
-- • STOP
-- _
Tttm on your TV and set it to the video channel.
Insert
a tape.
The VCR turns
oll and starts playing
automatically
if you insert a tape with its
safety tab removed.
30
Playing a tape
REW
3
Press 12:> PLAY.
_/(/"(_gr_r'_'_The display window shows the
_
playback time and playback direction.
When the tape reaches the end, it will
rewind
automatically.
Hour
Additional
tasks
To
Press
Stop play
• STOP
Pause
|| PAUSE
play
Resume
play after pause
Fast-lbrward
Rewind
Minute
|| PAUSE
the tape
the tape
Eject the tape
or E:> PLAY
_
FF during
_41
REW
stop
during
stop
A EJECT
To play a recently
watched
You can immediately
rewind
O
"o
scene
and playback
the scene you want to watch
again.
During playback, press REPLAY.
The VCR rewinds the tape about ten seconds
the counter tbr each press of the button, and restarts playback.
on
To skip playback
You can skip a portion
and restart playback.
of playback
you do not want to watch
(such as a commercial)
During playback, press COMMERCIAL
SKIP up to tbur times. The VCR skips the
tape 30 seconds on the counter tbr each press of the button, and restarts playback.
To turn off the power
while
rewinding
Press I/(_) while the tape is rewinding.
rewinding
until it reaches
(Rewind
Shut Off)
The power will turn off'but
the tape will keep
the end.
continued
Playing a tape
31
To use the time counter
Press CLEAR at the point on the tape that you want to find later. The counter in the
display window resets to "00:00" or "0:00."
'Ib search tbr the counter 0:00:00 point
automatically,
To display
see "To search
the counter
for the counter
on the TV screen,
0:00:00
point" on page 55.
press DISPLAY.
Notes
• Tapes recorded
picture quality
• While
in the LP mode on other VCRs
cannot be guaranteed.
displaying
a menu on the TV screen,
FF, _41 REW, or • STOP buttons.
• The counter resets to "00:00" or "0:00"
screen) whenever
a tape is reinserted.
• The counter
stops
counting
• When lOhourshavepassed,
count starts over again.
when
can be played
you cannot
(in the display
it comes
to a portion
back on this VCR
use _
window)
Playing a tape
I| PAUSE,
or "0:00:00"
(on the TV
with no recording.
thecounterinthedisptaywindowreturnsto"O:OO"andthe
• Whenplaybackdoesnotstartevenifyouinsertatapewithitssati_tytabremoved,
play" in the ADVANCED
OPTIONS
menu correctly
(page 57).
32
PLAY,
but the
set"Auto
Recording TV programs
_) "_
-- TV/VIDEO
-- COUNTER/
REMAIN
"o"®"®
•@ .® .®
"o"®"®
"®'_
--DISPLAY
,-- ENTER
-- SP/EP
P.
-- CH +/INPUT
-- SELECT
_C23
0
"13
-- • REC
ul
-- • STOP
Turn on your TV and set it to the video channel.
To record
Insert
ti'om a cable box, turn it on.
a tape with its safety
tab in place.
continued
Recording TV programs
33
3
4
Press CH +/to
record.
.CH
SP/EP
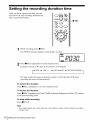
Press
C2D
EP (Extended
SP/EP
(Standard
select
to select
Play)
Play).
the channel
or line input video source you want to
the tape speed, SP or ER
provides
However,
recording
SP produces
time three
better
SLV-N77/SLV-N55
I:
5
eREC
Press
O
"REC"
•
times as long as SP
picture
and audio quality.
SLV-N88
_!1
,_,,_,,_
1111"1"-117
VIDEO
REC to start recording.
appears
in the display
window.
To stop recording
Press• STOP.
To check the remaining tape length
Press
DISPLAY.
With the display
on, press COUNTER/REMAIN
to check the
remaining
remaining
time. Each time you press COUNTEIUREMAIN,
the time counter and the
tape length appear alternately.
The white bar indicates the current location
in relation
window.
to the entire tape length.
Time counter
The remaining
Remaining
time also appears
in the display
tape length
To check the remaining tape length of a tape, set 'q_ape select" in the ADVANCED
OI_IIONS menu correctly (page 57).
34
Recording TV programs
To watch another TV program while recording
Press TV/VIDEO
to tum offthe VIDEO indicator
N77 and SLV-N55) in the display window.
(or the VCR indicator
If your TV is connected
to the VCR using A/V connections,
TV's antenna input; if not, skip this step.
Select another
channel
tbr SLV-
set the TV to the
on the TV.
To save a recording
_1_prevent accidental erasure,
offthe satkty tab as illustrated.
break
'1_
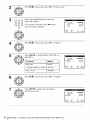
record on the tape again, cover the tab
hole with adhesive tape.
Tips
• To select a channel, you can use the number
channel number, then press ENTER.
• You can select a video
SELECT button.
• The display
infbnnafion
•
source
buttons
from the LINE
commander.
IN 1 or LINE=2 IN jacks
appears on the TV screen indicaling
wilt not he recorded
on the tape.
If you do not wmlt to walch TV while
box, make sure to leave it on.
on the remote
recording,
information
about
using
Enter
the
the INPUT
the tape, but the
O
"13
you can turn off the TV.
When
using a cable
Notes
(n
• The remaining
tape length may not be indicated
30, or tapes recorded in the LP mode.
accurately
• The
mode
•
_0
P.
display
does not appear
h may take up to one minute
a_er you press DISPLAY.
during
still (pause)
for the VCR
to calculate
Ibr short
tapes such
or slow-motion
playback.
m_d display
the relnaining
as T=20 or T_
tape
Iength
Recording TV programs
35
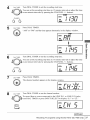
Recording TV programs using the Dial
Timer (SLV-N88 only)
The Dial Timer
function
allows you to make
your TV. Set the recording
timer to record
• STOP
up to
eight programs
that will be broadcast within a
timer
programs
turning on
month recordings
using the of
DIAL
TIMER.without
The recording
start time and recording
one minute intervals.
CHANNEL +/-
I/(D POWER
_:!_
t
R
stop time can be set at
DIAL TIMER
||
PAUSE
Before you start...
• When
using a cable box, turn it o11.
• Insert
a tape with its sat_ty tab in place.
Make
sure the tape is longer
than the total recording
time.
1
DIAL TIMER
®
Press
DIAL TIMER.
The current
date appears
in the display
window.
If the date and time are not set, "1" will appear.
See step 2 in the following
section '"1_ set the clock" to set the date and time.
A A A A _A
io-Un.mn21
DIAL TIMER
DIAL T]MER
Turn DIAL
Press
"AM"
TIMER
to set the recording
date.
DIAL TIMER.
or "PM"
and the time appear
alternately
in the display
window.
= R,'q
=g_ 11'"15
36
Recording TV programs using the Dial Timer (SLV-N88 only)
4
DIAL
TIMER Turn DIAL TIMER to set the recording start time.
_O
_ You can set the recording start time in l5 minute intervals or adjust the time
in one minute intervals by pressing the CHANNEL +/buttons.
(:5(5
_
CHANNEL
5
DIALTIMER
/ I.:lU
VIDEO IIT'IIRT
_°_
Press DIAL TIMER.
"AM" or "PM" and the time appear alternately in the display window.
WIEO
Rfq
STOP
I
[lJ
? llh'5
VIDI_
6
b"i'OP
You can set the recording stop time in 15 minute intervals or adjust the time
in one minute intervals by pressing the CHANNEL +/buttons.
I'U I-
? l . C7
<56
CHANNEL
7
DIALTIMER
VIDEO
STOP
Press DIAL TIMER.
The channel number appears in the display window.
J_!!
8
DIAL
TIMER Turn DIAL TIMER to set the channel nnmber.
_O_
O
_D
O
DIAL
TIMER Turn DIAL TIMER to set the recording stop time.
_O_
O
'_b,ecord
ti-om
asou,ce
oonnected
totheLINE
IN1or_JN
_-2!_jacks,
turn DIAL TIME['{ or press INPUT SELECT to display
LI
or L2.
0
continued
Recording TV programs using the Dial Timer (SLV-N88 only)
9
DIAL TIMER
®
Press
DIAL TIMER
"OK"
appears
to complete
in the display
the setting.
window
tbr about five seconds.
The TIMER indicator appears in the display window and the VCR stands
by for recording.
When using a cable box, leave it on.
To return to the previous step
To return to the previous step, press the CHANNEL + and - buttons on the VCR at
the same time during any of the Dial Timer settings.
To stop recording
To stop the VCR while recording, press • STOP.
To use the VCR after setting the timer
To use the VCR betbre a timer recording begins, just press I/@. The TIMER
indicator disappears from the display window and the VCR switches on. Remember
to press I/Q) to reset the VCR to the timer recording standby mode after using the
VCR.
You can also do the following tasks while the VCR is recording:
•
•
•
•
38
Reset the counter (page 32).
Display tape intbrmation on the TV screen (page 34).
Check the timer settings (page 51).
Watch another TV program (page 35).
Recording TV programs using the Dial Timer (SLV-N88 only)
To set the clock
Hold down DIAL TIMER so that the MONTE[ indicator and "I" appear in the
display window. However, if the clock has already been set, the current setting
appears.
Turn DIAL TIMER to set the month.
Press DIAL TIMER.
The DAY indicator and "1" appear in the display window.
Turn and press DIAL TIMER to set the day and then the year.
After you set the year, "AM" and "12:"
appear alternately in the display
window.
Turn and press DIAL TIMER to set the hour and minute.
When you have finished setting the time, press DIAL TIMER to start the clock.
Tips
• To cancel
a Dial Thner
setting,
press
•
STOP
on the VCR while
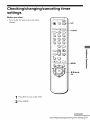
you are making
• The progl"am is recorded
in the current tape speed.
To change the tape speed,
before you complete
the setting in step 9 (page 3g).
• TO check, change, or cancel the program setting, see "Checking/changing/canceling
settings"
on page
the setting.
press
SP/EP
timer
_.
0
"O
51.
Notes
•
If eight programs
setting, "FULL"
have already been set using the VCR Plus+ system or d_e manuaI
appears in the display window for about five seconds.
timer
• If you set the cIock using the Auto Clock Set lhature,
incoming tilne signal regardless
of adjustments
made
set Auto Ctock Set correcdy.
the clock will ac!iust itself to the
with the Dial Timer. Be sure you have
•
"appears
lfyou
cannot
feature
are setting
the clock
fhr the lirst time or --:
set the clock to February
29 _l_using
to set the VCR to this day.
the Dial Timer.
• The TIMER
indica*or flashes in the display
on page 38 with no tape inserted.
• When the setting time is incorrect,
timer again froln step 1.
"Err"
window
appears
• You cannot set the tape speed to '*AUTO"
the "SPD" position in " Timer se*/check2'
when
you
in the display
using the DIAL
in the display
Please
complete
window
TIMER.
window,
use the Auto
the setting
in step 9.
To select
you
Clock
Set
in step 9
Set the
"AUTO,"
set
continued
Recording
TV programs using the Dial Timer (SLV-N88 only)
39
About
the Demonstration
Mode
The Dial Timer thnction has a Demonstration Mode that allows the user, such as a
salesperson, to enter more than eight examples of timer settings when demonstrating
the use of the Dial Timer. It cancels the FULL notice which appears if eight
programs have already been set. Do not use the Demonstration Mode tbr making
timer recordings. Doing so may cause the settings to be inaccurate.
To activate
Press
the Demonstration
l| PAUSE
the display
Mode
on the VCR while turning
window
the DIAL TIMER.
"DEMO"
appears
tbr a tkw seconds.
To cancel the Demonstration
Mode
Turn the power offand unplug the AC power cord. Although the Demonstration
Mode is canceled, the timer settings entered while using the Demonstration Mode
will remain. Be sure to manually cancel the timer settings betbre you use the Dial
Timer or any other timer method alter reconnecting the AC power cord (page 51).
40
Recording TV programs using the Dial Timer (SLV-N88 only)
in
Recording TV programs using the VCR
Plus+ ®system (SLV-N88 only)
Just enter the PlusCode
number
listed in the
TV program guide. The date, time and
channel number of that program are set
automatically.
You can preset up to eight
programs together with the DIAL TIMER
and manual timer settings at one time.
Before
you
"-_
F'
.INt_J"
®
"C)
®
CD'CZ)
"CD CD
start...
-- VCR Plus+
• Check that the VCR clock is set to the
correct time.
• Turn on the VCR and the TV and set it to
the video channel.
When
using a cable
box, turn it on.
"Q "@"C
-- Number
buttons
Q @C
• Insert a tape with its satbty tab in place.
Make sure the tape is longer
recording time.
than the total
0
"0
t_
CD
bo
uJ
Q_D CD CD
-- MENU
OK
• STOP
1
VCR
Plus+
Press the VCR Plus+ button.
,,..,
•
E_lercode
Mode
Speed
Sele_
End
_
OK
continued
Recording TV programs using the VCR Plus+® system (SLV-N88 only)
41
2
@
Press
't/'_
"4_.)"_(_.)"@
PlusCode
to move the cursor
(1_) to "Enter code."
3
number.
• Ente_a_
"7(.0"8Q_)"9Q9) If you make a mistake,
press '_
0(.9.)
enter the correct number,
'(-!) '_(0 "aQ_) Press the number buttons
and re-
to enter
the
Selecl
O
Press
't/'_
to move the cursor
_
Press
'_J"/"_
to select
MOFR,
,,,,,
Ente_oa_
wi[h [0_9]
Select
rAUVOI
Mode
[ONCE]
ONCE
EverydayMondayto
Friday
Once a week
7
Mf>FR
; • _,
End
OK
WEEKLY
_
Press
_.
f'?/°'_"k_
Press '(_"/"_ to select the tape speed,
AUTO, SP, or ER
to move the cursor
Selecl
(1_) to "Speed."
Enter co_lo
wi[h [0_O]
•
Spaed
Enl °de
Select
42
[l_Z_sl
s_e_
•
't/'_
; • _,
or
'_ WEEKLY:
Only once
[AU'roI
Q_t MENU
(1_) to "Mode."
ONCE,
To record
[ONCE]
s_e_
Er,a :OK '"
O
4
r,_"a_l,
M,o_[0_]
Recording TV programs using the VCR Plus+® system (SLV-N88 only)
: OK
: • _,
Se[
Q_tt
MENU
8
@
Press OK to contirm the setting.
To enter another setting, repeat steps 1 to 7.
Press MENU
MENU
to exit the menu.
O
t0
_
Press I/Q) to turn offthe
VCR.
The TIMER indicator appears in the display window and the VCR stands
by tbr recording.
When using a cable box, leave it on.
To stop
recording
_lb stop the VCR while recording,
press •
STOP.
_0
P.
To use the Auto Tape Speed function
When you are recording a program in the SP mode and the remaining
tape becomes
shorter than the recording time, the tape speed is automatically
changed to the EP
mode. Note that some noise will appear on the picture when the tape speed is
changed,
if you want to keep the tape speed, select SP. 'lb operate this timction, set
"'Pape select" in the ADVANCED
OFFIONS
menu correctly (page 57).
To use the VCR after setting
O
"13
(n
the timer
"lb use the VCR betbre a timer recording begins, just press I/Q). The TIMER
indicator disappears from the display window and the VCR switches on. Remember
to press I/Q) to reset the VCR to the timer recording standby mode after using the
VCR.
You can also do the tbllowing
• Reset
• Display
• Check
the counter
tape intbrmation
the timer settings
• Watch another
tasks while the VCR is recording:
(page 32).
on the TV screen
(page 34).
(page 51).
TV pro_am
(page
35).
Tip
• TO check, change
settings"
on page
or cancel
51.
the program
setting,
see "Checking/changing/canceling
timer
Note
•
If the VCR does not accept the PlusCode
The PlusCode
nmnber is incorrect.
number,
this means
ONCE, MO-FR,
or WEEKLY
was selected incorrectly.
WEEKLY
tbr a program that airs more than seven days
Correctly
set the PlusCode
number
again
that:
You cannot
ahead.
select
MO
FR or
froln step 2.
Recording TV programs using the VCR Plus+® system (SLV-N88 only)
43
Setting the timer manually
if the VCR Plus+ system is not available in
your area, tbllow the instructions
below to
set the timer to record
programs.
preset up to eight programs together with the
DIAL TIMER and the VCR plusT system at
one time.
Before
you
• Check that the VCR clock is set to the
correct time.
• Turn on the VCR and the TV and set it to
• Insert
®
"_
When
using a cable
a tape with its sat_ty
Make sure the tape is longer
recording time.
- I/_
C=)'(221
"(2221_
start,..
the video channel.
box, turn it on.
,[d_"
You can
(223
OOO
OOO
OOO
tab in place.
than the total
-- CH +/-INPUT
SELECT
CS3
Q_D C=) C=)
-- MENU
- t/l/*-/_
OK
• STOP
1
44
MENU
Press MEN U.
O
Setting the timer manually
•
Timer set ] cfleek
ClOCk se{
T_ner preset
Advanced
op[io_s
Language
] Idioma / Lan0ue
Set
; OK _'=_a_la
Select
; •
Qgtt
MENU
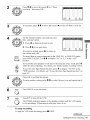
Press t_/,1_ to move the cursor (1_) to "Timer
set/check,"
If necessary,
then press OK.
press
_/'1_ to move the cursor
(1_) to the row that is to be set.
Set the channel number, start and stop time,
date, and tape speed:
1 Press _
2
to flash each item in turn.
Press _/'!" to set each item.
"1_correct a setting, press .€,,, to return to
that setting and reset.
ENPUT
SELECT
• CH
_1_record ti-om a source connected to the LINE IN 1 or LINE-2 IN jacks,
press INPUT SELECT or t/l_ to display "L 1" or "L2" in the "CH"
position.
0
_[b record the same program every day or the same day every week, press ,_
while the date is tlashing. For details, see "Daily/weekly recording" below.
press
"1_use the Auto 'Pape Speed thnction,
,_, to display "AUTO" in the
"SPD" position. For details, see "To use the Auto Tape Speed function" on
page 43.
.<577_2_ _
7
Press OK to confirm the setting.
"1_enter another setting, press t/,IJ, to select the next row and repeat step 4.
MENU
©
Press MEN U to exit the menu.
_
Press I/Q) to turn off the VCR.
The TIMER indicator appears in the display window and the VCR stands
by for recording. When using a cable box, leave it on.
To stop recording
To stop the VCR while recording, press • STOP.
continued
Setting the timer manually
45
Daily/weekly
recording
in step 4 above, press ,1_to select the recording pattern. Each time you press ,_,, the
indication changes as shown below. Press _ to change the indication in reverse
orden
MO-FR =-_ SUN'S -* MON'S -_ ..... -_ SAT'S -_ 1 month later -_ (dates count
down) -* the current date
To use the VCR after setting
the timer
"1_use the VCR before a timer recording begins, just press I/(_). The TIMER
indicator disappears from the display window and the VCR switches on. Remember
to press I/(_ to reset the VCR to the timer recording standby mode atler using the
VCR.
You can also do the tbllowing
• Reset
the counter
• Display
• Check
(page 32).
tape intbrmation
the timer settings
• Watch another
tasks while the VCR is recording:
on the TV screen
(page
34).
(page 51).
TV program
(page 35).
Tips
• To set the channel,
•
tfthel_l
program
•
tfthe
you can also use the _/_
or nmnber
buttons.
indicator appears,
the timer settings overlap.
Tocbeck,
cbm_georcanceltbe
setting, see "Checking/changing/canceling
timer settings"
on page 51.
O indicator
appears,
this means
that the VCR is currently
recording
• When you are recording
a program
in the SP mode and the remaining
thin1 the recording
dine, the tape speed is automatically
changed
to the
solne noise will appear on the picture when the tape speed is changed.
the tape speed, set "Tape select" to SP in the ADVANCED
OIYFIONS
46
Setting the timer manually
this program.
tape becomes
shorter
EP mode. Note that
I f you want to keep
menu (page 57).
Locking the VCR (Child Lock)
After you have set the timer, you can lock all
of the buttons oll the VCR so that the settings
are not canceled by mistake.
I/(_) POWER
s
0
•
STOP
To lock the VCR
When the VCR is turned on, hold down I/Q) POWER on the VCR until "LOC"
appears in the display window. '{'he VCR turns offand the TIMER indicator remains
lit if there is a timer setting. The VCR will not work except tbr timer recordings.
To unlock
_0
the VCR
P.
Hold down I/Q) POWER _
window.
The VCR is unlocked
until "LOC"
and turns on.
_1_ stop timer recording while the VCR is locked,
stops and the VCR is unlocked.
disappears
tkom the display
0
"13
press
•
STOP.
The recording
(n
Note
• The VCR will be unlocked
You stop timer
You insert
recording
when:
by pressing
•
STOP.
a tape.
The AC power
cord
is discom_ected
or power
supply
stops.
Locking the VCR (Child Lock)
47
Additional Operations
Playing/searching
at various speeds
,--E:_PLAY
L_
TRACKING
}1
--IHI-FF
+/-
-- _
REW
©
Playback options
Operation
View the picture during f_stlbrward or rewind
During lbst-fo_ward, hold down _
_
REW.
Play at high speed
• During playback, briefly press _
FF or _
REW. The tape
continues to play at high speed.
• During playback, bold down _
FF or _
REW. When you
release the button, no]_al playback resumes.
Play at twice the no]_al
speed
During playback, press x2.
Play in slow motion
During playback or pause, press I_- SLOW.
Play frame by {?anle
During pause, press _
To resume normal playback
Press _ PLAY.
48
FF. During rewind, bold down
Playing/searching
at various speeds
FF nn the remote cnmmander
Tips
• Adjust
the picture
Streaks
appear
The picture
using the TRACKING
while playing
shakes
during
+_
buttons
if:
in stow motion.
pause.
• The VCR turns oll and sta]_s playback
tbe VCR power turned of}'.
automatically
by pressing
{2z_ PLAY _
with
Notes
• The sound
is mu*ed during
• Tapes recorded
picture quality
• The picture
these opera*ions.
in _he LP mode on other VCRs
cannot be guaranteed.
may show noise
when
playing
can be played
at high speed
back on this VCR but the
in reverse.
O.
Q.
0
0
"o
u)
Playing/searching
atvariousspeeds 49
Setting the recording duration time
After you have started
recording,
have the VCR stop recording
after a specified duration.
you can
automatically
(z)
-- •
REC
(]_D (2D (2D
While recording,
The TIMER
press •
indicator
REC.
appears
in the display
window.
F'IF'I.-I I_!
I-I
IVLI.ZJ
Press •
REC repeatedly
Each press advances
to set the duration
the time in increments
0:30 --_ 1:00 ....
time.
of 30 minntes.
--_ 3:30 --_ 4:00 --_
Normal recording q
The tape counter decreases minnte by minnte to 0:00, then the VCR stops
recording and turns offautomatically.
To extend
Press
•
REC repeatedly
To cancel
Press
•
to normal
the duration
•
time.
the duration
REC repeatedly
recording
To stop while
Press
to set a new duration
until the TIMER
indicator
disappears
and the VCR returns
mode.
recording
STOP.
Note
• You cannot display
duration time.
50
tl_e current
Setting the recording duration time
tape time in the disptay
window
wl_en setting
the recording
Checking/changing/canceling
settings
Before
you
timer
start...
• Turn oll the TV and set it to the video
channel.
- i/_
"C_ CZ_'CE_
-- CLEAR
•Q .Q .Q
•Q .@.@
•Q .@.@
"Q "C:D
m=
o
(3_
=_
O
-{3
(D
CZ_ C_
-- MENU
(n
- t/ll./_-/--_
OK
Press I/(_ to turn on the VCR.
2
Press MENU.
continued
Checking/changing/canceling
timer settings 51
Press _/_, to move the cursor (1_) to "Timer set/check," then press OK.
• ff you want to change a setting, go on to the next step.
• If you do not need to change the settings,
to return to recording standby.
Press '_/,_, to move the cursor
you want to change or cancel.
press MENU,
then turn offthe
VCR
(1_) to the setting
• _1_change the setting, press '_/,,,_ to flash the
item you want to change, and press t/l_ to
change it.
• _1_cancel
the setting,
press CLEAR.
Press OK or MENU to confirm the setting, then exit the menu.
If any timer settings remain, turn offthe VCR to return to recording standby.
When
the
The program
timer
settings
at_er the first program
program
overlap
that starts first has priority
has finished,
and the second program
if the programs
listed first in the menu has priority.
P_
Program
I I
Program 2 '
I
Will be cut off
52
Checking/changing/canceling
timer settings
i
starts recording
start at the same time, the
only
Recording stereo and bilingual programs
Recording
stereo
programs
When you receive a program broadcast in stereo, press AUDIO MONITOR
to
display S'I EREO on the TV screen. You can also select LEkT, RIGHT, or MONO. If
there is noise in the stereo program,
select MONO.
The sound will be recorded in
monaural
(on both hi-fi and normal
Recording
bilingual
audio tracks)
but with less noise.
programs
Press AUDIO MONITOR to display "SAP" on the TV screen.
Audio Program)
is received, "SAP" appears on the TV screen.
selected,
the VCR records
Selecting
During
only the main
the sound
playback,
during
press AUDIO
When a SAP (Second
When MAIN is
sound.
playback
MONITOR
to select the sound you want.
To listen to
On-screen display
Display window
Stereo
HI-FI
Hi-Fi
Left channel
LEFt
Hi-Fi
Right channel
RIGHT
Hi-Fi
Monaural sound on the
nonnal audio track
MONO
No indicator
How sound
The VCR records
is recorded
on a video tape
sound onto two separate
main track along with the picture.
Monaural
tracks.
Hi-fi audio is recorded
sound is recorded
onto the
onto the normal
(n
audio
track along the edge of the tape.
Monaural sound
Normal audio track
Hi-fi audio track
_
(main track)
\
Stereo sound
(left/right channels)
Notes
• To play a tape in stereo,
you must
• When you pIay a tape recorded
AUDIO MONITOR
setting.
use the A/V connections.
in monaural,
the sound
is heard
in monaural
regardless
of the
Recording stereo and bilingual programs
53
Searching using various functions
The VCR automatically
marks the tape with
an index signal at the point where each
recording begins.
You can easily find a specific
various search functions.
C:D
point using
-- SEARCH
C_D CZ) CD
- t/1/*-/_
PLAY
To search
using the index function
(Scan and Play)
The VCR automatically
marks the tape with an index signal at the point where each
recording begins. Use these signals as references to find a specific recording.
Insert an indexedtape
2
into the VCR.
Press SEARCH.
Scan
Goto
_rKJ
PlaYpress
[ * I 01 [ * ]
[D;00;00]
Press
[t
l
[_
l
Er_d search
0;01
;30
Press "_ to scan ahead,
The VCR searches
five seconds.
press
SP
or "I,,,,,to scan backwards.
and then plays
back tbr about
1ress [2> PLAY to view that program.
If you do not press [2:> PLAY, the VCR automatically
mark, or until it reaches the end of the tape.
54
Searching
using various functions
searches
for the next index
To search
for the counter
0:00:00
point
_1_ mark a point on the tape that you want to lind later, reset the tape counter
"0:00:00."
The VCR automatically
counter.
thst-tbx_,vards
or rewinds
to the 0:00:00
to
point on the tape
Press SEARCH.
2 Press _'.
The VCR starts searching and automatically
stops at the 0:00:00 point.
To search
for a blank portion
of the tape
The VCR automatically
searches tbr the beginning
find a point you can start recording from.
of a blank portion.
YOU can easily
Press SEARCH.
Q.
Press ,_.
The VCR starts searching
va
and automatically
stops at the beginning of a blank space.
If no
blank space is fbund, the VCR reaches the end
and the tape will be ejected.
lo
Note
• Once in recording
mode, if the VCR is put in pause and then released to start the recording,
no index mm'k will be inserted.
An index mark will be inserted if the channel is changed
while VCR is put in pause.
Searching using various functions
55
Adjusting the picture (tracking)
Although the VCR automatically
adjusts the tracking
when playing a tape, distortion may occnr if the
recording is in poor condition.
adjust the tracking.
Press
TRACKING
-7/on
In this case, manually
the VCR to display
the
tracking meter. The distortion should disappear as
you press one of the two tracking buttons. To resume
automatic tracking adjustment,
eject the tape and
reinsert it.
TRACKING
2
Tracking meter
Note
• The auto tracking adjustment cam_ot be guaranteed
mode on other VCRs.
56
Adjusting the picture (tracking)
to work with tapes recorded in the LP
Changing
Press
2
menu options
MENU.
Press t_/,!"
to move
then press
options,"
(1_) to
the cursor
OK.
"Advanced
•
TapeS_lec[:
Auto play:
Auto repeat:
Aura power off;
Power save
End
Seler._
Press t/'l"
to move the cursor
to change
Press
to exit the menu.
Menu
Initial
Menu
Quit
Set
]
]
]
]
]
; MENU
; _.*
(1_) to the option to change.
Press ,4_/,,,_
MENU
OK
i.,I _
[T120
[ ON
[ OFF
[ OFF
[ OFF
the setting,
then press OK.
I>
choices
settings
are
option
indicated
in bold
Q.
print.
Set this
option
• T-120
when
o;-
to
_0
Tape select
play
a T-120
or shorter
• T- 160 when
using a T=160 length
• T 180 when
using a T-180
For details,
Auto
using
length
tape.
tape.
or longer
Iengtb tape.
o;-
see page 34.
• ON to start playback
automatically,
with its safety tab removed.
when
you insert
a tape
ul
• OFF to turn offAuto
play. You need to press 12:> PLAY to
start playback,
even if you insert a tape with its safety tab
removed.
Auto
repeat
Auto
power
• ON to play back a tape repeatedly.
the beginning
and restarts playback
• OFF
off
•
to turn offAnto
The VCR rewinds
automatically.
repeat.
1Hr to turn off the VCR automaticaIty
operalion.
• 2Hr to turn off the VCR autolnatically
operation.
• OFF
Power
save
to set no specific
a tape to
one hour
a_er the Iast
two hours aller
tbe last
time to turn oft_
• ON to turn offthe indicators
in the display window dnring
standby mode to reduce the VCR's power consumption
to a
minimum.
• OFF to turn on the indicators
VCR is stranding by.
in the display
window
while the
Changing menu options
57
Editing with another VCR
How to connect
to record on this VCR
TV
This
VCR
LINE-2
IN
(Recorder)
Other
Audio/video
VCR
(Player)
cable (not supplied)
: Signal flow
Notes
• Makesm'eyouconnecttheplugstojacksofthesanlecolor.
• I f the other VCR is a monaural
lype and connected
to this VCR's
LINE-2 IN jacks, connect
the audio plug to the AUDIO L (white)jack.
The sound is recorded
on both right and left
channels.
If you connect to the AUDIO R (red)jack,
the sound is recorded
only on the right
channel
• If you connected
this VCR to both the LINE IN and LINE
select the input correcdy
to prevent a humming noise.
OUT jacks
ofthe
other
VCR,
• You can use the LINE IN 1 jacks for editing.
If the other VCR is a monaural
type the sound
is recorded
only on the channel whose jack is connected
to the audio plug. To record on both
right and left channels,
connect the audio plugs to the AUDIO R/L jacks using a VMC910MS audio/video
cable (not supplied).
58
Editing with another VCR
Operation
Before
you
(when recording
start
on this VCR)
editing
II PAUSE
• Turn on the VCR and the TV and set
it to the video channel.
• Press INPUT SELECT or
CHANNEL
to display "LI" or
"L2" in the display window.
• Press SP/EP to select the tape speed,
SP or EP.
•
Insert a source tape with its safety tab removed into the other (playback)
Search for the point to start playback and set it to playback pause.
Insert a tape into this (recording)
and press II PAUSE.
Press •
VCR.
press the II PAUSE
VCR.
Search for the point to start recording
REC on this VCR to set it to recording
'1'o start editing,
REC
buttons
pause.
on both VCRs at the same time.
To stop editing
Press the • STOP buttons on both VCRs.
I>
o.
Q.
m=
o
Tip
• TO cut out unwanted
scene begins.
When
scenes while editing, press II PAUSE Oll this VCP. when
it ends. press II PAUSE again to resume recording.
an unwanted
Editing with another VCR
O
"0
t_
59
Additional Information
General setup information
Setting
the RF unit
When connecting the VCR to the TV using
only the antenna cable, you must set the CH
switch on the rear of the VCR so that the TV
can receive the correct signal t?om the VCR.
-- TV/VIDEO
TV
•Q .Q .Q
•@ .@.@
•Q .@.@
I/(._)POWER
(22)
CHANNEL+l-
setthe
CH switch oll the rear of the VCR to 3 or 4, whichever
channel
m your area. if both are used, set the switch to either channel.
2
Press I/Q) POWER
3
Press TV/VIDEO
to turn on the VIDEO indicator (or the VCR indicator
N77 and SLV-N55) in the VCR's display window.
Press CHANNEE
to turn on the VCR.
+/- to display
Select an active channel
5Turn
number
a channel
number
change
you selected
General setup information
you selected
in step 4 appears
when you press CHANNEL
Whenever
in the display
tbr SLV-
window.
in your area.
on your TV and set it to the channel
The channel
60
is not used
in step 1 (channel
on the TV screen.
you have made the correct
you use the VCR, set the TV to the channel
selected
3 or 4).
If the channels
setting.
in step 1.
Attaching
the external
antenna
connector
When using a 300-ohm twin lead cable tbr a
VHF/UHF
antenna, use the EAC-32 antenna
connector (not supplied)
antenna to the VCR.
to connect
300-ohm twin
lead cable
the
EAC-32 antenna
connector
supplied)
Loosen
the screws
oll the antenna
Wind the twin leads around
Retighten
Attaching
(not
connector.
the screws on the antenna
connector.
the screws.
a UHF/VHF
band mixer
When using both a 75-ohm coaxial cable and
a 300-ohm twin lead cable tbr a VHF/UHF
antenna, use the EACh66 UHF/VHF
band
separator/mixer
(not supplied)
antenna to the VCR.
to connect
300-ohm twin
the
EAC -66
UHF/VHF
band
separator/
mixer (not
supplied)
<_a_l_leadcable
t
o.
m.
o
=
o
7f-ohm
coaxial--_
o
cable
Loosen
the screws
on the mixer.
Wind the twin leads around
Retighten
Connect
the screws on the mixer.
the screws.
the 75-ohm
coaxial
cable to the mixer.
General setup information
61
Troubleshooting
If you have any questions
dealer.
_.
or problems
not covered
below,
please
consult
your nearest
Sony
Symptom
Remedy
Tbe I/Q) switch does not function.
• Connect the AC power cord secm'ely.
• Make sm'e the VCR is not locked. To unlock, hold down
1/(_ POWER on tbe VCR until "LOC" disappears.
The power is turned on but the VCR
does not operate,
• Moisture condensation has occurred. Turn the power off,
unplug the AC power cord and leave the VCR to dry lbr
over three hours.
The clock has stopped and "--:--"
appears in the display window,
• The clock stops it'the VCR is disconnected ti'om the wall
outlet fbr more than one minute. Reset the clock (and
timer).
The playback picture does not appear
on the TV screen,
• Make sure the TV is set to the channel fbr the VCR. If
you are using a monitor, set it to video input.
Tbe picture is not clear.
• Adjust the tracking witb tbe TRACKING +/ buttons.
• The video heads are dirty (see the last page of
"Troubleshooting').
Clean the video heads using the
Sony T-25CLD or T-25CLDR video head cleaning
cassette. [f these cleaning cassettes are not available in
your area, have the heads cleaned at your nearest Sony
dealer (a standard service fee will be charged). Do not
use a commercially available liquid type cleaning
cassette, as it may damage the video heads.
• The video heads may have to be replaced. Consult your
local Sony dealer tbr more intbrmation.
The picture rolls vertically during
3icture search.
• Adjust the vertical hold control on the TV or monitor.
Tbe picture has no sound.
• The tape is defhctive.
• If you made A/V connections, check tbe audio cable
connection.
A TV program does not appear on
the TV screen,
• Make sure the TV is set to the channel ibr the VCR. If
you are using a monitor, set it to video input.
• Select the correct source with the INPUT SELECT or
CH +_ buttons. Select a channeI number when recording
TV programs; select "L 1" or "L2" when recording froln
other equipment.
TV reception is poor.
• Adjust the TV antenna.
The tape starts playing as soon as it is
inselted,
• The safety tab has been removed.
cover the tab hole.
The tape is ejected when you press
• REC.
• Check that the safhty tab has not been removed.
Nothing happens when you press
• REC.
• Make sure the tape is not at its end.
0
o
.gl
tt.
._=
O
62 Troubleshooting
To record on this tape,
Symptom
Remedy
Tile tilner does not operate.
• Cbeck
• Make
that the clock
sure a tape
is set.
has been inserted.
_3
• Check
._=
E
• Make
sure the tape is not at its end.
• Make
sure a program
.=
• Make sure 3,our diner settings are past
• Check that the cable box is turned on.
o
{a
that the safety tab bas not been removed.
has been set fbr timer
recording.
the current
time.
• The clock stops if the VCR is disconnected
from the walI
ontlet lbr more than one minute.
Reset the clock m_d
k.-
timer.
• Turn
A tape cannot
The relnote
fhnction.
be inserted.
COlnmander
• Check
does
not
the power
offand
tbat a tape
unplug
tbe AC power
is not already
• Make sure you are pointing
remote sensor on the VCR.
the remote
• Replace all the batteries in the remote
new ones if they are weak.
• Make
a;:
5
sure tbe -TV / VIDFO
cord.
in tbe tape compartment.
switch
commander
at the
commander
with
is set correctly.
The tracking meter
on the screen.
does not appeal"
• The recording
condition
of the tape
tracking cannot be adjusted.
You cannot
other
• Set your TV's code number.
The code number may
chmlge when you replace the batteries oftbe remote
commander.
control
The VCR needs
TVs.
to be cleaned.
is very
poor
m_d
• Clean the cabinet, panel and controls with a dry, soil
cloth, or a soft cloth slightly moistened
with a mild
detergent
solution.
Do not use any type of solvent, sucb
as alcohol or benzine.
=Z
O
Symptoms
caused by contaminated
• Normal picture
video heads
• Rough picture
* Unclear picture
• No picture(or
black &white
O
screen appears)
initial
=
terminal
contamination
Troubleshooting63
Specifications
System
Timer section
Format
('lock
VtlS N'[SC standard
Quartz [ocked
"Iimer indication
Video recording system
Rotary head helical scanning FM system
Video heads
12-hour cycle
"limer setting
Double azimuth Ibm heads
8 programs 0nax)
Video signal
NTSU color, EIA standards
General
Tape speed
Power
EP: 11 12 minis ( _'t{, inchesls)
Power
Operating temperature
O°Cto 45°C (32°F to I 13°F)
playback only
Maximum recording/playback time
8 hrs in EP mode (with %160 tape)
Rewind time
Stor_e temperature
20°C to 60°C ( 4°F to 140°F)
Dimensions including pr_ecting parts and controls
(w/h/d)
1 rain (with %120 tape)
Tuner section
SLV-N88
Approx 430 × 96 x 259 mm
(Approx 17 x 3 _ x I0 _ inches)
L'hanne[ coverage
VtlF 2 to I3
UHF 14 to 69
SLV-N77
Approx 430 × 96 x 25I mm
(Approx 17 x 3 _ x IOinches)
CATV A-8 to A-I, A to \V, W FI to w+g4
Antenna
SLV-N55
75-ohm antemla termhlal fbr VIIF UIIF
Approx 360 × 95 × 255 mm
(Approx I4 _ × 3 _ x I0 /; inches)
Mass
Inputs and outputs
LINE IN 1 and LINE-2 IN
VIDEO IN, phono jack (1 each)
Input signah I Vp-p 75 ohms unbalanced
negative
AUDIO IN, phono jacks (2 each)
Input level: 327 mVrms
SLV-N88/SLV-N77
sync
Standard ompm: 327 mVnns
Load impedance: 47 kilohms
Output hnpedance: less than I0 kilohms
Approx 28 kg (Approx 6 lb 3 oz)
SLV-N55
Approx 2.6 kg (Approx 5 lb 12 oz)
Supplied accessories
Input impedance: more than 47 kilohms
LINE OU'I
VIDEO OUr, phono jack (1)
Output signal: I Vp-p, 75 ohms, unbalanced
negative
AUDIO OUI\ phono jacks (2)
consumption
18W
LP: 1667 mm/, ( I_{, inches/s),
Approx
requirements
120 V AC, 60 tlz
SP: 33.35 rams (I)g_ inches s)
Remote commander (1)
Size AA (R6) batteries (2)
sync
75-ohm coaxial cable with F-type connectors
Design and specifications
notice¸
ENERGY
STAR
is a US
(1)
are subject to dlange without
registered
mark
As an ENERGY STAR Partner, Sony Col_orafion has
determined that this product meets the ENERGY STAR
guidelines lbr energy efficiency
64 Specifications
Index to parts and controls
Refer to the pages
indicated
in parentheses
( ) tbr details.
Front panel
SLV-N88/SLV-N77
BE
z
z
_DD
SLV-N55
,qED[
Q.
m.
o
=2
o
a
[]
I/(I) POWER
switch (43) (45)
[]
Remote
[]
Tape compartment
[]
_ EJECT
sensor
button
(31)
[]
44
[]
12:> PLAY button .1 (31)
[]
_
[]
•
REW
(7)
(rewind)
button
FF (fast-tbiavard)
REC (record)
button
o
_qED[1
[]
•
STOP button *E (31) (59)
[]
II PAUSE
[]
DIAL TIMER
[]
CHANN
button
(31) (59)
.2 (36)
EL/TRACKING
buttons *_
(34) (56)
(31) (48)
[]
LINE-2
IN VIDEO/AUDIO
L/R jacks
(58)
button
(31) (48)
(34) (50) (59)
*l The C:> PLAY
tactile
and •
dot (SLV-N88
*2 SLV=N88 only
*3 The CHANNEL
STOP
buttons
m_d SLV-N77
F button
have a
only).
has a tactile
dot.
continued
Index to parts and controls
65
Display window
SLV-N88
SLV-N77/SLV-N55
[_
SP/EP
indicator
(34)
[_
TIMER
[_
'lZape indicator
[_
START
[_
STOP indicator
(37)
[_
DATE
(39)
[_
MONTH
indicator
(43) (45)
(34)
indicator
(36)
[_
DAY indicator
[_
YEAR
[_
Hi-Fi indicator
_]
'rime counter/clock/line/channel
indicator
66
indicator
indicator
(39)
Index to parts and controls
(39)
indicator
(39)
(53)
(32) (34) (59)
[_
VIDEO
indicator
[_
VCR indicator
(35) (60)
(35) (60)
Rear panel
SLV-N88/SLV-N77
SLV-N55
).
Q.
m=
o
[]
AC power
[]
LINE OUT AUDIO
VIDEO
[]
cord (10) (13) (15)
jacks
[]
R!AUDIO
RF IN (FROM
ANT.)
connector
(12)
o
(14) (16)
L/
(11)
LINE IN 1 AUDIO
jacks (58)
R/AUDIO
[]
RF OUT (TO TV) connector
(12) (14)
o
(16)
L/VIDEO
[]
CH 3/4 switch
(60)
continued
Index to parts and controls
67
Remote commander
_--
.Q .® .Q
•® .® .®
•® .® .®
"Q "c::_
[_
-TV / VIDEO
switch (7)
[_
A EJECT
[_
TVTVIDEO
[_
CLEAR
[_
DISPLAY
[_
SP (Standard
button (34)
[_
INPUT
[_
•
[_
mD" SLOW
[_
MEN U button
[_
II PAUSE/_
button (17) (31)
• STOP/,_, button (17) (31)
button
(31)
button
button
(8) (35)
(32) (52)
button
(34)
Play)/EP
SELECT
button
REC (record)
button
button
(Extended
Play)
(35) (59)
(34) (50)
(48)
(17) (44) (51) (57)
REW (rewind)/_
FF (t'_st-tbrward)/_
button
(31) (48)
button
(31)
(48)
N--
_CDCD
[2>- PLAY/OK
button*
(17) (31) (42)
* The [Tz_ PLAY button has a tactile dot.
IN--
68
Index to parts and controls
"CD CD
o ol
[_
I/(!) (power)
switch
(8) (43) (45)
[_
COUNTER/REMAIN
[_
AUDIO
[_
VCR Plus+ button .2 (41)
[_
Number
buttons*
[_
ENTER
button
[_
CH (channel)
[_
VOL (volume)-7
[_
SEARCH
button
(54)
[_
REPLAY
button
(31)
[_
×2 button
(48)
button
MONHOR
COMMERCIAL
(34)
button *l (53)
_(35) (42)
(35)
+
buttons *E (8) (34)
buttons
(8)
SKIP button
(31)
*_ The AUDIO MONITOR, number 5 and CH +
buttons have a tactile dot.
.2 SLV-N88 only
Q.
O
O
O
Index to parts and controls
69
Index
A
S
L
Acliusting
Language
picture
56
tracking
Advanced
56
option
Auto
12
Tape Speed
hookup
I1
Searching
at various
playback
audio
53
Stereo
Cleaning
Clock
the video
setting
heads
antenna
UHF/VHF
flame
band
mixer
61
48
48
Demonstration
Dial Timer
Mode
36
channels
25
see Editing
40
53
48
23
33
setting
53
44
41
while watching
program
35
RF channel 60
track
53
checking
51
system
recording
41
adjustment,
VCR Plus+
saving 35
stereo broadcasts
system
H
5l
Tuner presetting
using Dial Timer 36
using the VCR Plus+
Editing 58
EP mode 34
51
changing
Tracking
Adiusting
bilingual programs
53
SAP broadcasts
53
timer
E
44
using the VCR Plus+
the sound
channels
setting
canceling
23
V
Recording
55
53
daily/weekly
R
D
Hi=fi audio
by frame
skip 3 i
slow motion
Presetting
56
speeds
seIecting
connector
55
0 point
T
30
at various
32
Disabling
Dubbing.
53
adjustment
Playback
18
61
Counter
track
Timer
Picture
62
Commercial
Skip 31
Connecting
Cable TV 16
external
audio
P
27
48
Scan and Play 54
SP mode 34
I0
chart
Program)
speeds
lbr the counter
during
43
Channel line=up
Child Lock 47
Audio
lbr a blank portion
53
Monitoring
Normal
hookup
tab 35
M
N
Cable
Index
Salbty
SAP (Second
53
Monaural
(A/V)
Set t8
C
70
17
57
Antenna hookup
Audio track 53
Audio/_ideo
Auto Clock
selecting
Locking
the VCR 47
LP mode 35
another
channel
recording
system
set up 27
41
see
46
Hookup
To
1
play a tape
1 Set the TV to cbannel 3 or 4
(or to video input, if you
made A/V connections).
2 Insert a tape and press
PLAY.
If there is no
picture on your TV, press the
VCR_s TV/V[DEO
button
untiI the VCR or VIDEO
indicator appears in the
display window.
To record
Hookup
To play a tape
To play a tape
I Set the TV to channel 3 or 4
(or to video input, if you
made A/V connections).
2 Insert a tape and press
PLAY.
1 If you made A/V
connections,
set the TV to
video input. If you did not
use A/V hookup:
• Turn on the cable box.
• Set the cable box to channel
3or4.
• Set the TV to the output
channel of the cable box
(usually 2, 3, or 4).
2
a program
1 Press MENU and select
_'Timer set/check."
4 Insert a tape.
5 Press I/Q) to turn offthe
VCR.
To watch TV
1 Turn offthe VCR, or press
the VCR's TV/VIDEO
button until the VCR or
VIDEO indicator in the
display window turns oil
a tape and press
PLAY.
you
PrintedinChina
a program
1 Press MENU and select
"Timer set/check."
To
record
3
a program
I Turn on the cable
Set the cable box
chmmeI you want
3 Press MENU and
"Timer set/check
box.
2
to the
to record.
select
7
4
time, date,
Set the channel,
and tape speed.
5 Press OK.
2 Set the channeI, time, date,
and tape speed.
3 Press OK.
6 Insert a tape.
7 Press I/Q) to turn offthe
VCR.
Leave the cable box on.
4 Insmt a tape.
5 Press I/Q) to turn offtbe
VCR.
To watch
To watch
I
TV
1 Turn off your VCR, or press
the VCR's TV/VIDEO
button until the VCR or
VIDEO indicator
in the
display window turns oI'_i
2
Sony Corporation
Insert
To record
2 Set the channel, time, daie,
and tape speed.
3 Press OK.
2 Set the TV to the channel
want to watch.
Hookup2
SeIect the channel with your
cable box (if you have one)
or with your TV.
TV
Turn off'your VCR, or press
the VCR's TV/VIDEO
button until the VCR or
VIDEO indicator
in the
display window turns olE
2 Turn on your cable box.
3 Set the TV to the cable box
4
output channel (usually 2, 3,
or 4).
Set the cable box to the
chrome] you want to watch.
httpJhvww.sony.net]
AC68-01692A