1
Trinitron °CoIor TV
Operating
Instructions
KV-27S15
KV-27V15
KV-29RS15
KV-32S15
K V-32S 16
KV-32V15
KV-32V16
KV-34V15C
_c%1995 bv Sony Corporation
•
Unplug the TV from the wall outlet if you are not going
to use it for several days or more. To disconnect the cord,
pull it out by the plug• Never pull the cord itself.
For details concerning safety precautions,
leaflet "IMPORTANT SAFEGUARDS"
see the supplied
Installing
To prevent fire or shock hazard, do not
expose the unit to rain or moisture.
•
TO prevent
ventilation
•
Do not
place
internal
openings.
install
subject
heat
build-up,
do riot block
the TV in a hl_t or hulnid
to excessive
place,
dust
or mechanical
computers,
ancl similar
the
ol in a
vibration.
CAUTION
When
your
using
TV games,
TV, keep
the brightness
and contrast
products
functions
with
at low
settings. If a fixed (non-moving)
pattern
is left on the scrt_n
for long periods of time at a high brightness
or contrast
setting,
RISK OF I_LECTRIG
SHOCK
DO NOT OpEN
the image
can be permanently
imprinted
screen. These types of imprints
are not covered
warranty
because they are the result of misuse.
CAUTION
: TO REDUCE
THE RISK
OF ELECTRIC
COVER
NO USER.SERVICEABLE
REFER
SERVICING
(OR SACK)
PASTS
TO QUALIFIED
INSIDE.
SERVICE
your
SHOCK,
You are cautioned
DO NOT REMOVE
onto the
by
PERSONNEL
that any changes
expressly
approved
in this manual
authority
to operate
this equipment
Note
on
Caption
Vision
or modifications
could
(except
not
void your
for
KV-29RS15)
This television
receiver provides
display
of television
closed
captioning in accordance
with § 15.119 of the FCC rules
This symbol is intended
to alert the
presence
of uninsulated
"dangerous
within the product's
enclosure
that
sufficient
magnitude
to constitute
a
electric shock'to per'sons.
user to the
voltage"
may be of
risk of
Note
to
CATV
This reminder
attention
system
is provided
to Article
820-40
guidelines
for proper
that the cable ground
system
installer
to call the CATV system
of the NEC
installer's
that provides
grounding
and, in particular,
specifies
shall be connected
to the grounding
of the building,
as close
to the point
of cable
entry as
practical.
This symbol
is intended
to alert
the user to the
presence
of important
operating
and
maintenance
(servicing)
instructions
in the
literature
accompanying
the appliance.
Use of this television
receiver
for other
than
private
\,iewing
of programs
broadcast
on UHF or VHF or transmitted
by
cable companies
for the use of the general public may require
authorization
program
from
the broadcaster/cable
company
and/or
owner.
CAUTION
To prevent electric shock, do not use this polarized
AC plug
with an extension
cord, receptacle
or other outlet unless the
blades
can be fully inserted
to prevent
blade
exposure.
Precautions
•
Operate
•
•
Operate
the TV only on 220-240 V AC (KV-34V15C).
One blade of the plug is wider than the other for safety
the TV only
on 120 V AC (except KV_34V15C).
purposes
and will fit into the power outlet only one way.
If you are unable to insert the plug fully into the outlet,
contact VOklr dealer.
Should
tmplug
personnel
2I
Record
The model
and serial numbe?s
any liquid or solid object fall into the cabinet,
the TV and have it checked
by qualified
before
operating
it any further.
are Incated
at the rear of the
TV. Record these numbers
in the spaces provided
Refer to them whenever
you call upon your Sony
regarding
this product.
Model No.
Serial No.
Safety
•
Owner's
below.
dealer
4 Welcome!
4 Checking your model number
Getting
Started
$ Step 1: Hookup
9 Step 2: Setting up the remote
10
Step 3: Setting
(AUTO
commander
up the TV automatically
SET UP)
13 Changing
the menu language
Operations
14
Watching
the TV
15
Watching
two programs
at a time---PiP
16 Adjusting the picture (VrDEO)
17 Adjusting
screen
bright-hess
automatically
(LU_SVONDER)
18
Adjusting
the sound
(AUDIO)
19
Listening
to surround
sound
19
20
Selecting Stereo or bilingual programs
Setting the speaker switch (SPEAKER)
20
21
Setting audio out (AUDIOOUT)
Customizing
the channel number
(SURROUND)
(MTS)
buttons
(crt
CAPTION/GUIDE)
22
Setting
23
24
Displaying
Operating
video labels (VIDEOLABEL)
Caption Vision (CAFT1ONVlSlON)
video equipment
25
Operating
a cable box
Additional
Information
27
Troubleshooting
29
Specifications
30
Index
The captions
in parentheses
indicate menu names.
I
3
Thank you for purchasing
the Sony Trinitron
TV. Here are some of the features
your TV:
®Color
you will enjoy with
• Oa-screen menus that let you set the picture quality,
sound, and other settings.
• Surround system that simulates the sound quality of a
concert hall or movie theater.
• Picture-in-Picture that allows you to watch another TV
channel, video or cable image as a window picture.
• Cable box control (Cable Mouse) that allows your TV
to control channel selection on most brands of cable
boxes (KV-27VI5/32VI5/32V16 only).
• Lumisponder that automatically adjusts the brightness
of the screen (KV-27V15i32V15/32V16i34V15C only).
The instructions
in this manual are for eight models
listed below. Before you start reading, check your
model number by looking at the rear of your TV. The
KV-27S15 is the model used for illustration
purposes.
Any differences in operation are clearly indicated in the
text, for example,
"KV-27S15
only."
Instructions in this manual are based on the remote
commander. You can also use the controls on the TV if
they have the same name as those on the remote
commander.
Feature packages
/
._ .~
-I:(:ll((il
number
KV-27SI5
_v-_v_sI'1"1 I'l'l'r'l
KV-29Rs_s
I 1"1 ! [ I I I
KV'32V15
I q
t q
KV-34WSCI,I I'1
q
q
I'i'l
q
" I
I
* Refer to the supplied Cable Mouse manual for
additional information specific to its use.
4I
Getting
Started
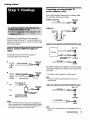
Connecting an antenna/cable
system without
a VCR
TV
If your cable company requires you to connect a cable
box, make the connection as follows:
Cable or antenna
(Rearof
VHF/UHF
Cable
Cable box
(Rear of TV)
VHF/UHF
Cable
Although you can use either an indoor antenna or
outdoor antenna with your TV, we recommend you to
connect an outdoor antenna or a cable TV system to get
better picture quality.
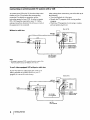
How to connect
cables
different
::_
_:_mml_
INL-_OUT
Cable box
Cable box and cable (KV-32V15/32V16/34V15C only)
types of
Cable box
The illustrations below show the examples of
connecting cable to the TV directly.
A
_)_AUX
I
(Rear of TV)
75-ohm coaxial cable
(not $uppliedl
(Rear of TV)
• VHF only
75-ohm coaxial cable
or
_)_
VHF/UHF
• VHFIUHF
or
• Cable
VHF/UHF
Pay cable TV systems use scrambled or encoded signals
requiring the cable box* in addition to the normal cable
connection.
B
• VHF only
CATV cable
TO
CONVERTER
300-ohm twin lead cable
or
(Rear of TV)
VHF/UHF
* The cable box will be supplied
by the cable company.
• UHFonly
Note
or
• VHF/UHF
C
Arltenfla connector
• You cannot watch
window picture.
the signal
through
AUX
connector
as a
7S-ohm coaxial cable
• VHF
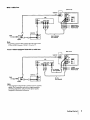
Cable and antenna (KV-32V15/32V16/34V15C only)
.m.
(Rear of I"V)
(Rear of TV)
and
CAW cable
:_),m_
AUX
EAC-66 UPI mixer
• UHF
_-
_
(not suppliedl
TO
CONVERTER
300-ohm twin lead cable
Antenna
cable
Notes
• Most VHF/UHF
combination
antermas have a signal splitter.
Remove the splitter before attaching the appropriate
connector.
• If you use the U/V mixer, snow and noise may appear in the
picture when viewing cable TV channels over 37.
VHF/UHF
Note
• Do not connect
this case.
anything
to the TO CONVERTER
Getting
connector
Started
I
in
5
Connecting
an antenna/cable
To connect
VCR to the TV, first check the model
your
TV system
with
After making these connections, you will be able to do
the following:
• View the playback of video tapes
• Record one TV program while viewing another
program
• Watch two TV programs at once using a window
picture (picture-in-picture)
number of your TV and select the corresponding
connection.
For details on connection,
see the
instruction
manual
PIP, a VCR must
making
connection,
the equipment
of your VCR.
be connected
In order
to your
disconnect
to operate
TV. Before
the AC power
a VCR
cords of
to be connected.
(RearofTV)
Without
a cable
box
VHF/UHF
VCR
AUDIO VIDEO
Cable
IN
LINE
!
?
I
_
IDEO (yellow)
AUDIO-L (white)
AUDIO-R
(red)
I
VMC-810S/820S
(not supplied)
Note
• To connect a monaural
VCR, connect tl_e audio output
VCR to AUDIO-L (mono} of VIDEO 1 IN on the TV.
To an S video equipped
VCR without
If your VCR has an S video
output
ot the
a cable box
jack, hook up as
follows and then set S VIDEO to ON on your TV
(page12). It is set to ON at the factory.
(Rear of TV)
---I
VHF/UHF
VCR
/T! r?L2=
Cable
::(_]_OUT
IN
OUT AUDIO VrDEO s VIDEO
LINE
AUDIO-L (white)
AUDIO-R (red)
(not supplied)
YC-15V/30V
1
I
RK-74A
(not supplied)
6
Getting
Started
S VIDEO
With a cable box
(RearofTV)
VHF/UHF
VCR
I
OUT
IN OIJT AUDIO VIDEO
LINE[_..
--
VIDEO (yellow)
AUDIO-L (white)
AUDIO-R (red)
--
Cable box
l
|
VMC410S/820S
(not supplied)
Splitter
Note
• To connect a monaura] VCR, connect the audio output
VCR to AUDIO-L (mono) of VIDEO 1 IN on the "IV.
To an S video equipped
of the
VCR with a cable box
(RearofTV)
VHF/UHF
VCR
---
Cable box
l
_
S-VIDEO
AUDIO-L (white)
AUDIO-R (red)
(not supplied)
I
YC-15V/30V
I
Ca_
P'_
_
OUT
RK-74A
(not supplied)
Splitter
Note
• Video signals are composed of Y (luminance) and C (chroma)
signals. The S connection sends the two signals separately
preventing degradation, and gives better picture quality
compared to conventional connection.
Getting
Started
7
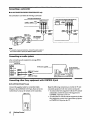
Connecting
a camcorder
• KV-27V15132S15132S16132V1
$132Vl 6134V15Conly
This connection is convenient for viewing a camcorder.
(Front of KV-32S15/32V16)
(Front of KV.27V15/32V15/32V16/34V15Q
STEREO/
AUDIO-R
(red)
(yello
VIDE' W_
Video and
audio outputs
u
(yello
VIDE w)-'-_
AUDIO-L
(white)
c_
L_
(red)
AUDIO-R
AUDIO-L
(white)
VMC-810S/820S
L
(not supplied)
Note
* To connect a monaural camcorder, connect the audio output of
the VCR to AUOIO-L (mono) of VIDEO 2 INPUT on the TV.
Connecting
an audio
system
when cora_ecting audio equipment,
more information.
(Rearof IV)
see page 20 for
RK-74A (not supplied) -Set the amplifier's
function to line input.
Line
AUDIO OUT-L (white)
.
Connecting
AUDIO OUT-R
other
• KV-27V15/32V15/32V16
+u o
(red)
Sony equipment
_
with
CONTROL S jack
only
Connect the supplied cable box controller (Cable
Mouse) to the CONTROL S OUT jack. Refer to the the
Cable Mouse's manual for details on the connection.
(RearofTV)
Make the following connections to control the TV and
connected equipment with one remote commander.
• To control other Sony equipment with the TV's remote
commander, connect the input of the equipment to
CONTROL S OUT jack on the TV.
• To control the TV with the remote commander of other
Sony equipment, connect the ou_ut of the equipment
to CONTROL S IN jack on the TV.
8
I Getting
Started
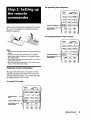
For operating
video equipment
F
c_nO c_nO c_nO
Indicates _
Insert one size AA (R6) battery (supplied) by matching
the + and - on the battery to the diagram inside the
battery compartment.
selected
Set the selector to the "_
middle position
TV_ID[_
Ci)
TV
JUMP
(lIE)(lID
(D®®
For using
the
Picture-in-Picture
feature
F
MUTING
Notes
• With normal
months.
use, the battery
should
last for approximately
• If you do not use the remote commander
six
for an extended
period of time, remove the battery to avoid possible damage
from battery leakage.
• Do not handle the remote commander roughly. Do not drop it,
step on it or let it get wet.
• Do not place the remote commander in direct sunlight,
heater, or where the humidity is high.
Using the remote
Indicates PIP selected
--
Set the selector to the
highest position.
--
_0
_0
_0
cznO c:_O _E_O
mmO G_z_l
_#_
TV
JUMP
(IED (EID (EID
near a
commander
The upper half of the remote commander has three
selectable operation modes, Each button in this area
has three different functions. You can select the mode
by sliding a selector on the left side.
For normal TV viewing
f
MUTING
f
_0
_0
_0
c::nO c:_O
Variable
area
indicator
--
I_0
c::mO
<£mO _0
Indicates MODE selected
Set the selector to the
lowest position.
TVNI_O
"_/
JUMP
C_D C_D C_D
(9®®
Getting
Started
/
g
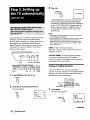
3
Press CH +.
AUTO PI_AM
"AUTO PROGRAM" appears on the screen and
the TV starts scanning and presetting channels
automatically. When all the receivable channels are
stored, "AUTO PROGRAM" disappears and the
lowest numbered channel is displayed. If the TV
receives cable TV channels, CATV is set to ON
automatically.
Notes
• If more than 90 seconds
You can set up your TV easily by using the AUTO SET
UP feature. It presets all the receivable
channels.
displayed
To set up the TV manually, see "Setting cable TV on or
off" (page12) and "Presetting channels"(page12).
number
beside
the channel
number
follow steps 2 and 3 above to perform
32V15/32V16
only)
If the TV is set to a video input, you cannot execute
AUTO SET UP. Press TV/VIDEO
or TV so that a
channel
elapse after you press a button, the
menu disappears
automatically,
• In case of using the AUX connector, preSs the TV button
remote commander first and make sure that "AUX" is
on the screeen.
on the
Then
AUTO SET LIP. (KV-
DEMO: To browse the main functions,
Press VOL + in step 3. The functions and menus are
displayed one by one.
appears.
(Front of KV-27S 15129RS 15/32S15/32S16}
FACTORY
PRESET: To restore
the factory settings
when you are confused about the TV settings,
Press CH- in step 3. The settings of picture and sound
are restored
(Front of KV-27V15132VIS/32V16134V15C)
SETUP
I_/NIDEO
i[ • I
J l'
-- VOLUME
I
'
'1'
SET UP
1
+
I
.
VOL+
--CHANNEL_
I
•
I'
CH-
I
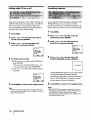
Erasing
OPOWEFI
•
to the factory
or adding
setting.
channels
I_
I'1"
CH+
After AUTO SET UP you can erase unnecessary
channels or add the channels you want. Preset channels
during the day rather than late at night, when some
channels may not be broadcasting.
POWER
Press POWER to turn the "IV on.
OPOWER
g
2
_
+ t
Press SET UP on the front of the TV.
or 4
MENU
MODE
RETURN
LOW po_ttfon_
1
The menu appears.
SETUP
UP
FACTORY
IOEMO PRESET
:
CH÷
:
CH-
Press MENU.
The main menu appears.
VOL+
AUTO SET
(2zx3
1
AUOIO
SET UP
IVIOEO
CRPIION
VISIO_
se ._Exil_
1
(cofltmued)
10
Getting
Started
To add a channel that you want
(1) Press + _ or - _, to move the cursor (b.) to ADD.
_" Press + t or - t to move the cursor (1_) to
SET UP and press RETURN.
(2) Press the 0 - 9 buttons to select the channel you
want to add and press ENTER and,
The SET UP menu appears.
_CH CAPTION/GUIDE
GH SET UP
Selected
channel
number
®®®
®®®
ERASE
®
3
SET UP and press RETURN.
The CH SET UP menu appears.
Use
€ _Jl_
Exit
_1
(3) press RETURN.
The indication "+" appears beside the channel
number, showing that the channel is added to
the preset memory.
• CABLE : ON
AUTO PROC_,_M
CH ERASE/ADD
_MENU
CH SET UP
4
CH ERASEIADO
Select
the channel
Use € _mi
Exit
Press + • or - • to move the cursor (1_) to CH
I
i_
Press + t or - _ to move the cursor (1_) to CH
ERASE/ADD and press RETURN.
The CH ERASE/ADD menu appears.
6 To erase end/or add other channels, repeat
step 5.
7
When you finish, press MENU.
Notes
5
Erase and/or add the channel you want:
To erase an unwanted
• If you erase or add a VHF or UFLF channel, the cable TV
channel with the same number is also erased or added, and
vice
channel
(1) Make sure the cursor (1_) is beside
ERASE.
(2) Press CH +/- to select
want to erase and,
you
the channel
vei<_.
• Erasing and adding channels are also available
input. (KV-32V15/32V16/34V15C
only)
for the AUX
Selected channel number
PERASE
ICH
ERASE/ADO
Select
INe channel
Use # _
Ex i I
(3) press RETURN.
The indication "-" appears beside the channel
number, showing that the channel is erased
from the preset memory.
Getting
Started
11
Setting
cable TV on or off
Presetting
If you have connected the TV to a cable TV system, set
CABLE to ON, the factory setting. If not, set CABLE to
OFF. You do not have to do this procedure if you
procedure
execute
this procedure
AUTO SET UP (page
10). Do this procedure
channels
You can preset TV channels easily by using the AUTO
PROGRAM feature. You do not have to do this
if you execute
AUTO SET UP (page
10). Do
only when you want to set it manually.
only when you want to set it manually.
1
Press MENU.
2
Press + _ or - 4 to move the cursor (1_) to
SET UP and press RETURN.
3
1
Press MENU.
2
Press + t or - 4, to move the cursor (1_)
to SET UP and press RETURN.
3
Press + • or - • to move the cursor (1_)
Press + 4,or - • to move the cursor (1_)
to CH SET UP and press RETURN.
to CH SET UP and press RETURN.
bCABLE
: ON
AUTO pROGFIAM
CH ERASE/ADO
:_t4ENU
H SET UP
-CABLE
: ON
AUTO PR(_zCl/ZM
CH ERASEtAD_
:_MENU
CH SET UP
Use
4
se €_i_
€ltifiiIExitlj
4
Set CABLE to ON or OFF:
Press + ) or - t to move
to AUTO PROGRAM
the cursor
Exil
_
(,)
and press RETURN.
(1) Make sure the cursor (1_-)is beside CABLE and
press RETURN.
If the cursor is not beside tABLE, press + t' or
- • to move the cursor and press RETURN.
(2) Press + _. or - # to select ON or OFF and, press
RETURN.
"AUTO PROGRAM" appears on the screen and the
TV starts scanning and presetting channels
automatically. When all the receivable channels are
stored, "AUTO PROGRAM" disappears and the
lowest numbered channel is displayed.
PCABLE : OFF
AUTO PROGRAM
CH ERASE/ADD
:_ENU
CH SET UP
Use
5
B_
Exit
_
Press MENU to return to the original screen.
Press MENU to return to the original
screen.
Notes
Note
• If CH SET UP appears in black, the TV is set to a video input
and you cannot select CABLE. Press TV/VIDEO or TV so that
a charmel number appears.
12
5
j GettingStarted
• If the CH SET UP menu appears in black, the TV is set to a
video input and you cannot select AUTO PROGRAM.
Press
W/VIDEO
or'IV so that a channel number appears.
• Presetting channels is also available for the AUX input. (KV32V15/32V16/34V15C
only)
Setting
S video
on or off
You can change the S VIDEO menu to ON or OFF,
1
Press TVNIDEO to select VIDEO 1.
2
Press MENU.
3
Press + • or - 4 to move the cursor (1_)
to SET UP and press RETURN.
4
• KV-29RS15134V15Conly
Press + _ or - t to move the cursor (1_)
to S VIDEO and press RETURN.
If you prefer Spanish to English, you can change the
menu language.
CH CAPT ION/GUIDE
UH SET UP
I.S VIDEO
: ON
:3MENU
ET UP
se #_
5
Exit
_i_
+_°r-#_
MODE
Low position
Press + t_or - • to select ON or OFF and
press RETURN.
1
MEN
U
RETURN
Press MENU.
The main menu appears.
CH CAPTION/GUiDE
CH SET UP
"S VIDEO
: OFF
:_MENU
SET UP
Use 0_
AUDIO
SET UP
ENGLISH
Exil
_
6
I "VIDEO
Use €l_i_Exill
Press MENU to return to the original screen.
Notes
2
Press + • or - t to move the cursor (1_) to
ENGLISH and press RETURN.
• If S VIDEO appears in black, set a video input to VIDEO 1.
• If you set S VIDEO to ON, the TV automatically receive S
video signals whenever a VCR with S video is connected.
VIDEO
AUDIO
SET UP
,E_NGLISH
Use €_
3
Exit
_i
Press + ) or - t to select ESPAI_IOL and press
RETURN.
AUDIO
AJU5 ES
"EEP_L
I VIDEO
[UsBf#i_lSalifD
4
Press MENU to return to the original
screen.
Note
• Certain parts of the ESPANOL menus remain in English.
Getting
Started
I 13
Operations
Switching
channels
quickly
between
two
Press JUMP.
The channel you watched previously appears.
JUMP
Pressing JUMP again switches back the channel.
Muting
the sound
Press MUTING.
"MUTING"
MUTING
appears on the screen.
MUTING
--
SLEEP
MODE
Low position --_
C_O c:_OC230
C_OC_O_
_3 c:_ocz_
--
DOC
JUMP
To restore the sound, press MUTING again, or press
VOL +.
0 - 9 buttons
Displaying
DISPLAY -VOL +/- --
sJ !U!
L_
--
ENTER
--
CH +/-
on-screen
information
Use this feature to check the channel number, channel
caption (if set), and MTS mode (if SAP is selected).
Press DISPLAY.
1
DISPLAY
press POWER (TV) to turn the TV on.
To cancel the display, press DISPLAY again.
2
If "VIDEO" appears on the screen, press the TV/
VIDEO or TV button so that a channel number
Setting
appears.
The TV stays on for the length of time you specify and
then shuts off automatically.
Press SLEEP repeatedly until the time (minutes)
you want appears.
Each time you press SLEEP, the time changes as
follows: 30 _ 60 _ 90 ---*OFF.
Select the channel you want:
To select a channel directly
Press the 0 - 9 buttons and then press ENTER.
To scan through channels
Press CH +/- until the channel you want appears,
®®
®®®
®
Sleep
Timer
To cancel the Sleep Timer, press SLEEP repeatedly
until "SLEEP OFF" appears, or turn the TV off.
The channel can also be selected without pressing
ENTER.
3
the
Press VOL +1- to adjust the volume.
Changing
AUX input
the
VHF/UHF
input
to the
a KV.32V15/32V16/34V15C only
Press "IV.
TV
%
VOLUME
Note
• Set the CABLE BOX/TV
14
lOPerati°ns
selector to TV.
Pressing
TV again switches
back to the previous
input.
I
Changing
mode
the window
picture
input
Press TV/VIDEO in the PIP control area to select
the input mode.
Each time you press TV/VIDEO, "TV', "VIDEO 1",
"VIDEO 2" and "VIDEO 3 (except for KV-27S15/
29RS15)" appear in sequence.
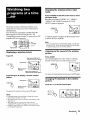
The
Picture-in-Picture
watch
both
the
(PIP)
main
picture
feature
and
allows
you
a window
to
picture
simultaneously.
Your
feature
TV must
"Connecting
(page
be connected
(_cept
to a VCR
an antenna/cable
6 and
enjoy
to
KV-32V15/32V16/34V15C).
7)
TV system
with
a VCR"
A window picture will appear in the same input mode
as the last time you used PIP.
for connections.
POSITION
FREEZE
Note
PIP
TV/VIDEO
AUDIO
SWAP
PIP
High position
Displaying
this
See
• If you use one of the connections
from page 6, your PIP input
source is a VCR. If you use one of the connections from page
7, your PIP input source is a VCR or cable box.
CH +/-
a window
Listening
picture
picture
Press PIP.
Press
Input-source mode or "IV
channel for the main picture
to the sound
of the window
AUDIO.
The
._ display
that
the window
appears
picture
for a few
sound
seconds,
is being
indicating
received.
Main pictUree "=__ l
(1W);dsi°welPi(tUrlnpu,-sourcelm(der
or TV
channel for the window
,
picture
To restore the main picture sound, press AUDIO again.
Press PIP again to display a smaller window
picture.
Changing
picture
W
channels
Press CH +/- in the
To remove
the
windo_a
} icture,
press
in the
PIP €ontrol
window
area.
PIP again.
Notes
• If the main picture is not receiving an image, the window
picture may be in black and white.
• The windo_
picture may be affected by the condition of the
main picture.
• The window picture s_und is also output h'om the
VARIABLE/FIX
AUDIO OUT jacks when you listen to it.
• In order to operate PIP, your VCR must be turned (_n (l'.w-t,/it
KV-32VI5132VI6/34V15C).
Operations
I 15
Changing
picture
the position
of the window
Press POSITION.
Each time you press POSITION, the window picture
will move counterclockwise on the screen.
Freezing
the window
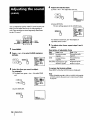
When watching TV programs, you can adjust the
quality of the picture to suit your taste.
You can adjust the picture of video input(s) as well.
These settings are stored separately from those for the
TV picture.
picture
This feature is useful when you want to write down a
recipe from a cooking program, a displayed address or
a phone number and so on,
Press FREEZE.
RESET
+0or_0_
MODE
MENU
RETURN
1
Press MENU.
2
Make sure the cursor (1_) is beside VIDEO
To restore the normal screen, press FREEZE again.
and press RETURN.
II
Swapping
pictures
the main and window
P PICTUflE
HUE
COLOR
BRleHT
SHARP
V _ENU
I DEO
Use ¢1i_
Press SWAP.
Each time you press SWAP, the images from the main
and window pictures switch places along with the
sound.
3
t
IIIIIIIIItlEIM
_#"""
IWlII""
UmlI----Exit
W
Select the item you want to adjust.
For example:
(l) To adjust brightness,
BRIGHT and,
press + t1"or - • to select
PICTURE mmamlm=
COLOR IIIII-'--='BRIGHT IIIIIIII1_,
SHARP
IVIDEO
:_NU
Us_ € _i
Exl[ ii
::.*
I
6
VIDEO
1
Note
BRIGHTNESS
• T_e ch_ra3els being received through the AUX jack cannot be
displayed as a window picture (KV-32VIS/32V16/34V15C
only).
16
(2) press RETURN.
Operations
I
4
Adjust the selected item:
(1) Press + t or - • to adjust the item and,
I
(_(_
, 6RIGHTNESS
(2) press RETURN.
The new setting
appears
in the VIDEO menu.
• KV-27V15132V15132V16134V15C
The LUMISPONDER
(_
feature adjusts
only
the brightness
of
the screen automatically
according
to the ambient
brightness. The LUMISPONDER
function
_BR
IGHT:_MENuSHARpCOLGRHuEPICTURE
_EllE'="_l
VIDEO
Use #_i
Exit
_i_
automatically
adjusts the level set by the user in the
VIDEO menu to the standard.
5
For details on each item, see "Description
adjustable items" below.
of
To adjust
3 and 4.
Description
other
items,
repeat
of adjustable
items
steps
• to
÷•or-•
_
MENU
Low position
MODE
_
RETURN
Item
Press + • to
Press
PICTURE
Increase picture
contrast and give
vivid color.
Decrease picture
contrast and give soft
color.
1
HUE
Make skin tones
become greenish.
Make skin tones
become purplish.
2
Press + • or - • to select VIDEO and press
RETURN.
COLOR
Increase color intensity.
BRIGHT
Brighten the picture.
3
Press + * or - • to select LUMISPONDER and
SHARP
Sharpen the picture.
-
Decrease color intensity.
.
Dar.ken the picture.
press RETURN.
Soften the picture.
To restore the factory settings
Press RESET while the VIDEO menu is displayed.
All the settings except for PICTURE are restored to the
factory settings.
Press MENU.
@
4
iv00
i
PI CIURE _il_
BRIGHT
SHARP
_L_ SPI_IDER
_
bLUMI
: OFF
:_ENU
Press + 4, or - • to select ON or OFF and
press RETURN.
(_
PJCTGHE
BRIGHT
SHARP llII-"--_
lVlOEO
,_ LLIMI SPOi_OER : ON
:I_Hu
Operations
17
I
4
Adjust the selected item:
(1) Press+ # or - $ to adjust the item and,
I
BASS
(2) press RETURN.
The new setting appears in the AUDIO menu.
You can adjust the quality of the TV sound to suit your
taste. You can adjust the sound of video input(s) as
well. These settings are stored separately from those
for the TV sound.
TREBLE
BAL_@ICE--"4-----
.sAssSS-----MTE:
MAIN
Sli_D
:OFF
AUDIO
SPEAKER SWITCH
NU
C:D
C:D_
RESET
Feor-t
MODE
Low position
For details on each item, see "Description
adjustable items" below.
MENU
RETURN
5
1
2
Press MENU.
To adjust other items, repeat steps 3 and 4
above,
Description
Press + • or - t to select AUDIO and press
RETURN.
of adjustable
Item
Press + • to
TREBLE
Increase the treble
response,
Increase the bass
BASS
response.
(_
'
3
SURROUNO
:OFF
Mrs:
MAIN
BALANCE ----4....
SPEAKER
SWITCH
;_NJ
BALANCE Emphasize the right
speaker's volume.
(1) To adjust bass, press + # or - • to select BASS
and,
='BASS
Selle,.,,.TREBLE
BALANCE _
(_(_
i_ole
SURROUNO SWITCH
SPEAKER
:OFF
:_ENU
18 JOperations
Press - # to
Decrease the treble
response.
Decrease the bass
response.
Emphasize the left
speaker's volume.
Note
• When SPEAKER (page 20) is OFF and AUDIO OUT (page 20)
is FIXED condition, the sound is set to mid-level and it cannot
be adjusted.
_0
(2) press RETURN.
items
To restore the factory settings
Press RESET while the AUDIO menu is displayed.
Select the item you want to adjust.
For example:
MrS:
of
MAIN
]
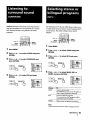
SURROUND
feature
simulates
sound
The Multichannel TV Sound (MTS) feature allows you
to enioy stereo sound or Second Audio Programs (SAP)
at your choice. The initial setting is stereo sound
(MAIN).
reproduction
with the atmosphere
of a movie theater or a concert
hall. Surround
sound is only effective for stereo
programs.
MENU
MODE
Low position
+_or-_
_
MENU
LOW position
MODE
_
RETURN
RETURN
1
Press MENU.
1
Press MENU.
2
2
Press + • or - t to select AUDIO and press
RETURN.
Press + • or - t to select AUDIO and press
RETURN.
3
Press + t or - • to select MTS and press
RETURN.
3
Press + • or - 4 to select SURROUND and
press RETURN.
TREBLE
BALAi_E
TREBLE
_
BASS
BALANCE_--,I-,---,
,SURROL_ND:OFF
MT$:
MAIN
IAUDIO
SPEAKER _ITCH
:_ENU
4
_JIA_R
BASS''--"
_.k_S:
IAUDIO
SPEAKER
_ITCH
SURROUND:OFF
:_ENU
_@
I
4
Press + t_ or - • to select MAIN, SAP, or
MONO and press RETURN.
Press ÷ ) or - • to select ON and press
RETURN.
TREBLE
BASS
BALANCE'"4""_
BURROUND:OFF
,_TS:
SAP
_eDlO
SPEAKER :SWITCH
TREBLE
BASS
BALARCE"-I
>SURROUND:ON
kITS:
MAIN
IAUDIO
SPEAKER_ITCH
_NU
1
Choose
To
MAIN
Listen to stereo sound.
The STEREO indicator on the TV lights up
while a stereO broadcast is received.
SAP
Listen to bilingual
programs.
The sound of non-SAP programs
muted when SAP is selected.
MONO
Reduce
noise
during
stereo
will be
broadcasts.
Note
• Stereo and SAP sounds are sub)ect to program sources.
Operations
I 19
I
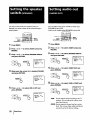
You may switch off the TV speakers when, for
example, you want to listen to the sound through a
stereo system.
You can select audio out to variable or fixed when
SPEAKER is set to OFF.
Audio out is variable when SPEAKER is set to ON.
+_or-__MENU
MODE _:_
1
+)or-t
MODE
LOW position
RETURN
Press MENU•
2
Press + t or - • to select
RETURN.
AUDIO
and press
3
Press + _ or - t to select SPEAKER SWITCH
_MENU
RETURN
1
Press MENU.
2
Press + • or - • to select AUDIO and press
RETURN.
3
Press + t or - • to select SPEAKER SWITCH
and press RETURN.
and press RETURN.
SPEAKER
='SPEAKER
_O
_
_NI TCH
:
OFF
_,o OUT
: v,_
SPEP,KER SWITCH
4
4
press + • or - t to select AUDIO OUT and
press RETURN.
Make sure the cursor (1_) is beside SPEAKER
and press RETURN.
SPEAKER
I 1
SPEAKER
_]_
_'SPEAKER
_ITCH
_Q
_
SPEAKER
: OFF
SWITCH
I
: ON
5
Press + * or - • to select VAR or FIXED and
press RETURN.
5
Press + • or - • to select ON or OFF and
press RETURN.
c_. Q_
_O
_;o OuTvAo
VAR:
_
SPEAKER : OFF
"AUDIO OUT
FIXED
::t,_ NU
SPEAKER SWJTCH
Sound output varied according to the TV
settings. You can adjust the volume, bass,
treble and balance.
FIXED: Sound output is always fixed to a certain
level. The volume, bass, treble and balance
are also fixed to the factory
20
I Operations
settings.
:1
6
Press + • or - • to select a channel guide
number button and press RETURN.
Numbers 0-9 and DISPLAY and ENTER are
available for use as a customized channel number.
Each time you press + • or - •, the channel
positions change to red in turns. The channel
number button you select will be the one you press
to call up your favorite channel.
CH CAPTION/GUIDE
I_
7
You can choose up to 12 channels, caption each
channel, and assign a specific channel number button
to each channel. This feature allows you to select your
favorite channels easily by name. For example, you can
name channel 20 "ESPN," and assign the channel
number 4 button to it.
Press + • or - • to select the channel that
you want to caption and press RETURN.
®®
ll®_
Selecl
I.use
II
Setting
captions
MODE
Low+_or-_
position
to favorite
channels
_--Ihe
.iSle]
letler.
Exit
8 .Enter the letters (up to four) to caption
channel:
/
I_'l
the
(1) Press + • or - • to select the first letter.
Each time you press + • or - •, the letter
changes as shown below and,
RETURN
MT_N
U
VIDEO
_
= I
O_-pl_-_...*-_S_--,A_-*B_-,..._-,Z*-p&_--_l_-L(blank
space)
t
1
Press TVNIDEO
2
Press MENU.
3
Press + • or - • to select SET UP and press
RETURN.
4
Press ÷ • or - • to select CH CAPTIONIGUIDE
?
or TV to select TV mode.
(2) press RETURN.
_& ' --1
and press RETURN.
(3) Repeat steps (1) and (2) to select the remaining
letters and press RETURN.
5
(_
Press RETURN again.
(_
i=_
Select
tU''
'_
a position.
Exil
=
®
ESPN
I
(continued)
Operations
! 21
9 Repeat step 5 to 7 to caption other channels.
To erase a caption
Press RESET after step 5.
Notes
• The position
number
you already
selected
appears in yellow.
• If the CH CAPTION/GUIDE
menu appears in black, the TV is
set to a video input and you cannot select CH CAPTION/
GUIDE.
• If more than 90 seconds
elapse after you press a button,
menu disappears automatically,
.
• The channel captlon/guide
feature is not available
input. (KV-32V15/32V16/34V15C
Selecting
a captioned
the
• KV.27V15132S15132S16132Vl$132V16134V15Conly
for the AUX
only)
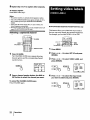
This feature allows you to label each input mode so
that you can easily identify the connected equipment.
For example, you can label VIDEO 1 [N as VHS.
channel
CD
C22)_
CH GUIDE
MODE --
÷** MODE
or-t
_
Low position
Low position -_1
000
000
1
buttons
to select
1
Press MENU.
2
Press + _ or - t to select SET UP and press
RETURN.
3
Press + 4, or - • to select VIDEO LABEL and
Press CH GUIDE.
The CHANNEL GUIDE menu appears showing
channel captions and the corresponding channel
number buttons.
press RETURN.
• VIDEO1:VIDE01
V_O_G2:VIQEQ2
VIDEO3:VIDE03
::MENU
VIDEO LABEL
Use #_Exit_
®Es_'._ ___....
(___-. ®-- --® ....
]l____®_____ ....
2
Press a channel number button,
ENT button
the DISP or
to select the channel you want.
MENU
RETURN
4
Press + • or-
t to select the input mode
you want to label and press RETURN.
To cancel the CHANNEL GUIDE menu
Press CH GUIDE again.
22
Operations
VIDEOt: VIDE01
VIDEO2:VIDEO2
VIDEO3:VIDE03
_MENU
VIDEO LABEL
1
5
Press + • or - • to select the label and press
RETURN.
"VIDEO1:VH5
VIDEO2:VIDEO2
VIOEO3:VIDEO3
:_VENU
VIDEO LABEL
Use
e m
Exit
J
i_
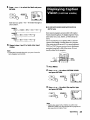
Each time you press + ,i. or - _1.,the label changes as
shown below.
•
KV-27515127Vl$I32S15132$16132V15132V161
VIDEO 1
VIDEO 1 *_
S VIDEO *_
BETA _
8 mm *_
VHS _
34V15C
LD
only
T
VIDEO 2
VIOEO 2 *_
BETA _-* 8 mm *-* VHS _
LD
BETA *-*
LD
t
VIDEO 3
VIDEO 3 _
?
6
8 mm _
VHS *_
]
Repeat steps 4 and 5 to label other input
modes.
Note
Some source programs are provided with Caption
Vision (Closed Caption). To display Caption Vision,
select either CC1, CC2, TEXTI, or TEXT2 from the
menu.
CC1 or CC2 shows you a caption, that is a printed
version of the dialog or sound effects of a program.
(The mode should be set to CC1 for most programs.)
TEXT1 or TEXT2 shows you text, that is information
presented using half to full of the screen. It is not
usually related to the program.
• If more than 90 seconds elapse after you press a button, the
menu disappears automatically.
+•or-•
_
MENU
Low position
MODE
_
RETURN
1
Press MENU.
2
Press + • or - • to select CAPTION VISION
and press RETURN.
_/TEXT
TEXT2
APT;ON
:MENU
se
3
OFF
VISI(_N
¢mExit_
Press + • or - t to select the caption type
and press RETURN.
_1
TEXT
O_F
TEXT1
TEXT2
:>MENU
€ mim Exit _
Note
• Captions may appear with a white box or another error
irLstead of a certain word. Poor reception of TV programs
also cause errors in Caption Vision.
Operations
can
I 23
VCR Manufacturer
Code numbers
Manufacturer
Code number
SONY
CANON
01, 02, 03
05
EMERSON
22,30,33
FISHER
FUNAI
10, 11, 12, 15
29
GENERAL
ELECTRIC
GOLDS'TAR
05,0_
25
HITACHI
07, 08, 36
JVC
16,35
05,06,09
MAGNAVOX
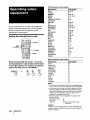
You can operate Sony or non-Sony video equipment
that has an infrared remote sensor with the supplied
remote commander. For this operation, set the
manufacturer's code number.
Setting
the manufacturer's
code
--
MODE
Low position
CODE SET
---_
M]TSUBISHI
18,19,26,27
29
MULTITECH
NEC
16, 23, 31
05,06,37
O5,O6
O5,06,O9
05,06
07,08
PANASONIC
PHILCO
PHILIPS
QUASAR
RCA
SAMSUNG
24,32
11, J.5
21
SANYO
SCOlT
SHARP
13,t4
SHINTOM
000
---
O- 9 buttons
ENTER
SYLVANIA
O5,O6,O9
SYMPHONIC
TEKNIKA
TOSHIBA
29
TOTE
28,29
20, 21
25
VISION
ZENITH
17
t.C@J/
MDP manufacturer
While pressing CODE SET, press 0 - 9 to enter
the manufacturer's
code number (see the chart
in the right column). For example, to operate a
Sony 8 mm VCR, press O, 2 and ENTER.
code numbers
Manufacturer
Code number
SONY
KENWOOD
MAGNAVOX
MARANZ
MITSUBISHI
PANASONIC
PHILIPS
PIONEER
RCA
SANYO
SHARP
YAMAHA
O4
58
52
54
51
55
52
51
51
57
56
53
Notes
• If more than one code number i_ listed, try entering them one
by one, until you come to the correct code for your equipment.
• In some rare cases, you may not be able to operate your nonSony video equipment with this remote commander. This is
because your equipment may use a code that is not provided
with this remote commander. In this case, please use the
equipment's own remote control unit.
• The code numbers for Sony equipment
factory as follows:
Beta, ED Beta VCRs
01
8 mm VCR
02
VHS VCR
are assigned
at the
03 (preset code for this remote
commader)
Caution
When you remove a battery from the remote commander, the
code may revert to 03. Reset the code each time you replace the
battery, if necessary.
24
} Operations
Operating
video
equipment
_
Video operating
VTR _
buttons
Middle position---_
_I
Use the video operating buttons on the remote
commander to operate the video equipment,
Operating a VCR
Buttons on the remote
commander
To turnon or off
PressPOWER
To ehan_e channels
To record
PressCH +/Press • and REC
Follow
simultaneously
which
these instructions
to set the manufacturer's
will enable you to operate
To play
Press •
with the pre-programmed
To stop
To fast forward
Press •
Press
example, you can set the remote
a connected Zenith cable box.
To rewind the tape
Press
To pause
To search the picture
forward and backward
Press I I
Press _
or _
playback
a connected
remote
commander.
commander
during
Operating the laser-disc
player
Buttons on the remote
commander
To play
Press •
To stop
Press II
To pause
Press I I
To resume normal playback,
press again.
To search the picture
forward and backward
Keep pressing _
or ,_1
during playback
To resume normal playback,
release the button.
To search the chapter
Press CH +/-
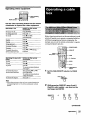
3OC
code
cable box
For
to operate
--
POWER (CABLE)
--
CODE SET
--
JUMP
--
0 - 9 buttons
--
ENTER
["P It II('i-l)
CH +/l--ul]ll--II
--
1
CABLE BOX/TV
selector
Set the CABLE BOX/TV selector to CABLE
BOX.
CABLEBOX..W
Note
• If the video equipment
corresponding
button
operate.
does not have a certain function, the
on this remote commander will not
2
While pressing CODE SET, press 6 and 8
(Zenith's code number --see chart on the
next page) and ENTER.
(continued)
Operations
I
25
3
,,,
POWER(CABLE) and the TV control
buttons (0 -9, ENTER, JUMP and CH +/-) to
operate the cable box.
®®®
®
JUMP
To operate
the TV
Set the CABLE BOX/TV selector to TV. Then use the
TV control buttons to control the TV.
For more
details
on operating
Refer to the operating
cable box.
Manufactures
the cable
instructions
and cede numbers
box
that come with the
(cable
box)
Manufacturer
Code number
JERROLD
60, 61, 62, 63, 64, 65, 73
PIONEER
SCIENTIFIC
69, 70
ATLANTA
66, 67
TOCOM
71, 72
ZENFFH
68
Notes
• If more than one code number
is listed,
try entering
them one
by one until you come to the correct code for your equipment.
• If you enter a new code number, the code number you
previously entered at that setting is erased.
• In some cases, your equipment may use a code that is not
provided with this remote commander and you may not be
able to operate your cable box with the supplied remote
commander. In this case, use the equipment's
own remote
control unit.
• When you remove a battery from the remote commander,
code may be erased. Reset the code each time you replace
battery, if necessary.
26
I Operations
the
the
Additional
Information
Only snow and noise appear on the screen
•,_ Check the CABLE setting in the SETUP
menu. (page 12)
•'_'Check the antenna/cable connections.
=,*'Make sure the channel is broadcasting
programs.
,,,t, Press TV to change the input mode. (K'V32V15/32V16/34V15C only) (page 14)
Dotted
After trying the methods below, if the problem
contact your nearest Sony dealer.
persists,
No picture (screen not lit), no sound
UseFACTORY PRESEt. (page 10)
Make sure the power cord is connected
Secure|y.
,,#-Operate with the buttons on the TV.
,,,#Insert the battery in the remote commander
with the correct polarity.
Replace the battery with a new one if it is
weak.
-'_"Check to see if the TV/VIDEO setting is
correct: when watching TV, set to TV, and
when watching video tapes, set to VIDEO.
Try another channel. It could be station
trouble.
Double images or ghosts
"_ Use a highly directional outdoor antenna or a
cable (when the problem is caused by
reflections from nearby mountains or tall
buildings).
Cannot operate menu
If the item you want to choose appears in
black, you cannot select it. Press TV/VIDEO
correctly.
Check the CABLE BOX CONTROL setting in
the SET UP menu. If it is ON, you cannot
operate AUTO SET UP or CH SET LIP.
Cannot
Poor or no picture (screen lit), good sound
-_ Use FACTORY PI_. ET. (page 10)
Adjust PICTURE in the VIDEO menu. (page
16)
,,,# Adjust BRIGHT in the VIDEO menu. (page
16)
,'#Check antenna/cable connections.
Make sure S VIDEO is set to ON in the SET
UP menu, when watching video tapes with
an S video type VCR.
SPEAKER SWITCH menu. (page 20)
No color
.
use FACTORY PRESET. (page 10)
-,)'Adjust COLOR in the VIDEO menu. (page
receive
upper
channels
(UHF)
when
using an antenna
"_ Check if CABLE is OFF in the SET UP menu,
(page 12)
•,# Use AUTO SET UP or AUTO PROGRAM
to
add receivable channels that are not presently
in TV memory. (page 10, 12)
Cannot receive any channels when using
cable "IV
Check if CABLE is ON in the SET UP menu.
(page
•'#'UseAUTO SET UP orAUTO PROGRAM
Good picture, no sound
,,,_ Use FACTORY PRESET. (page 10)
-,_ Press MUTING so that "MUTING"
di_ppea_s
from the screen. (page14)
•"#'Checkthe_
setting
intheAUDIO menu.
(page 19)
•,_ Make sure SPEAKER is set to ON inthe
lines or stripes
"#' Adjust the antenna.
,,*'Move the TV away from noise sou__-essuch
as cars, neon signs, and hair-dryers.
to
addreceivable
channelsthatarenotpresently
in TV memory. (page 10, 12)
Remote
commander
_
does
not operate
Battery could be weak. Replace a battery.
Make sure the TV's power cord is connected
securely to wall outlet.
,,_ Set the CABLE BOX/TV
selector
to TV when
operating your TV.
.,_ Are fluorescent lights too close to TV? Move
at least 3-4 feet away from TV.
16)
•-_ Black and white programs cannot be seen in
color.
Additional
Information
I 27
Commander's power, channel up/down,
channel buttons do not function
•,_ Set the CABLE BOX/TV selector to the
correct position.
Cannot select TV channels
-I_When using usethe cablebox control
(Cable Mouse), refer to the Cable Mouse's
manual.
Cannot gain enough volume when using a
(able box
-IHncrease the volume at the cablebox. Then
set the CABLE BOX/TV selector to TV
and adjust the TV's volume.
The TV needs to be cleaned
--b Clean theTV with a soft dry cloth.Never
use strong solvents such as thinner or
benzine, which might damage the finish
of the cabinet.
28
Additional
Information
Notes
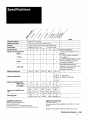
Television
Channel
American
system
VHF:
coverage
Antenna
Picture
externa!
27
14-69 / CATV:
antenna
terminal
for VIIF/UI
Trinitron
tube
27
1-125
29
32
IF
_ tube
32
I 34
Measured
diagonally
2
3
2
3
3
1 Vp-p, 75 ohms unbalanced,
negative
S video
1
1
1
1
1
Y: 1 Vp-p, 75 ohms unbalanced,
sync negative
C: 0.286 Vp-p (Burst signal), 75 ohms
Audio
2
3
2
3
3
1
1
1
l
1
of inputs/outputs
Video
Audio
Speaker
' UHF:
Hi Black Trinitron"
Screen size (in.)
Number
2-33
75-ohm
tube
TV standard
output
out
5Wx2
(W)
5Wx2
5Wx2
5Wx2
sync
500 mVrms (100% modulation),
Impedance: 47 kilohms
More than 408 mVrms at the
maximum volume setting (variable)
More than 408 mVrms {fix)
Impedance: 5 kilohms
5Wx2
a
Power
a
requirements
a
a
a
KV-32V15
KV-32V16
a= 120V, 60 Hz
b= 220 240 V, 50/60
Hz
b
KV-34VI_
Power
consumption
(W)
When in use
In standby
Dimensions
(in.I
(W/HID)
(mm)
170
170
6
6.5
664x572
x 524
x 513
661x603
x 524
6
781x714
x 613
205
6.5
801x664
x 603
26'/sx 23_/4 26!/4x22_;5 {201/SXZ_3t. _0314X2811_ (31_I_x26!/a
x 2tP/_in.)
x24_/4in,)
42.2
43
42.2
69
70
(93 lbs)
I941bs 13ozl
(93 lbs)
(152 Ibs)
(154 lbs 2 ozl
in.)
X 20:4
hi.)
Supplied accessories
Remote commander
Size AA (R6) battery
195
6
661x603
× 203/4
Mass (kg) (Ibs)
170
Optional
accessories
U/V mi_er EAC-66
Connecting cables VMC-810S/820S, VMC-720M, YC-15V/30V,
RK-74A
RM-Y121 (1)
{1)
Cable Mouse {1) (KV-27V15/32V15/32V16
i)nly)
Cable Mouse accessories
(2) {KV-27V15/32V15/32V16
I x 233/_in.)
oHly)
Design
and specifications
subject
to change
Additional
without
notice.
Information
29
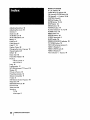
Names of controls
€ +/,t-buttons
10
CABLE BOX/TV selector 25
CH (channel) GUIDE button 22
CH (channel) +/-button
11,14
CONTROL S jack 8
DISPLAY button 14
ENTER button 11, 14
JUMP button 14
MENU button 10
MUTING button 14
Adjusting the picture 16
Adjusting the sound 18
Antenna 5
Audio out 20
AUTO SET UP 10
AUTO PROGRAM 12
Number buttons (0-9)
POWER button 10
RESET button 17
RETURN button 10
SVIDEO input jack 6
SLEEP button 14
STEREO/STAND BY indicator t9
TV/VIDEO button 10
VHF/UHF antenna terminal 5
Battery 9
Cable box S
Cable Mouse 4
Cable TV 12
Caption Vision 23
Changing the menu language
Channel caption 21
DEMO 10
Erase/Add
10
FACTORY PRESET 10
13
Hookup
without a VCR 5
with a VCR 6
Jump 14
Lumisponder
17
MTS (Multichannel TV Sound)
Muting 14
Picture-in-Picture
15
Presetting channels
Remote commander
S video 6
Watching
"iV 14
video tapes
30
[ Additional
19
12
9
SAP (Second Audio Program)
Sleeptimer 14
SPEAKER SWITCH 20
Surround
19
Video label 22
6
Information
110 14
19
VIDEO 1 IN jacks 6
VIDEO 2 INPUT jacks 8
VIDEO 3 IN jacks 6
VOL (volume) +/-buttons
14