1
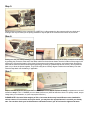
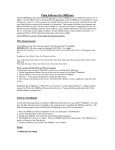
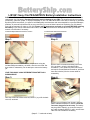
BatteryShip.com
LIS1241 Sony Clie PEG-NR70V/U Battery Installation Instructions
PLEASE NOTE: Patience and care, along with moderate technical and hand tool ability, are required for the successful
replacement of a Clie battery. Excessive force may result in damage to your PDA. The instructions below come with
no warranty, guarantee, proper, or improper assembly or use. The instructions below come with no warranty or guarantee.
By utilizing these instructions, you agree to hold Batteryship.com blameless and unaccountable for any and all damages,
problems, or personal injuries that may or may not arise by your use of these instructions. Replacing your Clie battery
may void any warranty you have on your Clie. Please read all instructions and back up your data BEFORE replacing
the battery. If your Clie is a different model number, use these instructions as a reference and consult your owner’s
manual or a technician if necessary.
Included Phillips/Flathead Screwdriver Combo
Included Plastic Flathead Screwdriver
Step 1.
Step 2.
Remove the one screw on the battery compartment using the
included Phillips screwdriver, as shown, then the cover itself. Set
them aside for reassembly. Do not attempt to remove the battery
yet.
Remove the five screws around the back of the
Clie, as shown, using the included Phillips
screwdriver. (Your model may have four screws
and require a small flathead screwdriver, which we
have also included.) Set the screws aside for
reassembly.
YOUR TOOLS MAY LOOK DIFFERENT FROM THE TOOLS
SHOWN ABOVE.
Step 3.
Step 4.
Once the screws have been removed, GENTLY pry or lift the back
cover off, as shown.
Remove your old battery from its seat, using the
plastic flathead screwdriver if needed. Leave the
connector plugged in for this step. The battery
may be glued or taped in, so remove the tape or
pry under the battery GENTLY until it comes loose.
Take care not to break the old battery.
(Steps 5 - 7 continued on back)
Step 5.
Disconnect the old battery at the connector by CAREFULLY pulling outward on the connector with your thumb and
forefinger. Be very sure that you are pulling outward on only the part of the connector that comes out, as shown.
Step 6.
Making sure that your battery is facing the right direction (connector towards the top of the Clie), connect the new battery
by pressing the connector at the end of the ribbon cable into the socket as shown. Note the location of the prongs in the
socket of the Clie and the location of the plugs for the prongs on the battery connector, and connect them accordingly.
Note that the metal connectors shown above generally go in facing up (towards the back of the Clie). Do not press too
hard or try to force the pieces together. They will fit easily when correctly aligned. Position the new battery in its seat.
Place the tape back over the battery, if applicable.
Step 7.
Replace the back of the Clie and screw the five screws back in from step 2. Replace the battery compartment cover and
screw from step 1. FULLY CHARGE your new battery before use. (Allow at least three hours. For quality control, we precharge many of our batteries, so yours may require less time.)
PLEASE NOTE: Our tools fit the majority of Clie’s, but some devices may have different screws installed for
various reasons. If our tools do not fit your device, you may have the appropriate tool in a tool kit you already
own. You can also check your local hardware or electronics store if you do not have the right tool at home.