1
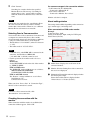
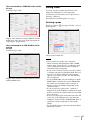
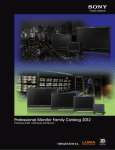
A-EA0-100-14(2)
Monitor_
AutoWhiteAdjustment
USER’S GUIDE
Version 1.2
© 2012 Sony Corporation
Table of Contents
Overview ................................................................ 3
Features .............................................................. 3
Supported Devices ............................................. 3
Computer Environment ...................................... 3
Preparation ............................................................ 4
Installing the Middleware and the Device Driver
for the Probe ..................................................... 4
Installing Monitor_AutoWhiteAdjustment ........ 4
Connecting the Monitor to the Computer .......... 5
Connecting the Probe to the Computer .............. 5
Operations .............................................................. 6
Starting Monitor_AutoWhiteAdjustment .......... 6
Setting Network ................................................. 6
Selecting the Monitor ......................................... 7
Setting Probe ...................................................... 9
Measuring Color Temperature ......................... 10
Adjusting Color Temperature
Automatically ................................................. 11
To Equalize Colors on Different Types of
Displays .......................................................... 12
Appendix .............................................................. 14
Error Messages ................................................. 14
Troubleshooting ............................................... 17
2
Table of Contents
Features
• LMD-940W (China models only) (serial number:
5000637 or later)
LMD-A series
• LMD-A240
• LMD-A220
• LMD-A170
Monitor_AutoWhiteAdjustment is software for
measuring and adjusting the color temperature and
luminance of the monitor.
The following features are built into this software:
• Measurement of color temperature and luminance of
the monitor
• Adjustment of color temperature and luminance using
the probe
Probes
i1Pro/i1Pro2 manufactured by X-Rite
CA-210, CA-310, CS-200 manufactured by Konica
Minolta
PM5639/06 manufactured by DK-Technologies
PR-655/PR670 manufactured by Photo Research
K-10 manufactured by Klein Optical Instruments
Specbos1211 manufactured by JETI
Supported Devices
Computer Environment
This software is compatible with the following
equipment (as of July, 2014):
A computer with the following specification is needed.
Overview
Monitors
BVM series
• BVM-E250
• BVM-E250A
• BVM-E170
• BVM-E170A
• BVM-F250
• BVM-F250A
• BVM-F170
• BVM-F170A
PVM series
• PVM-2541
• PVM-2541A
• PVM-1741
• PVM-1741A
• PVM-741
• PVM-740
PVM-A series
• PVM-A250
• PVM-A170
LMD series
• LMD-4251TD
• LMD-2451TD
• LMD-2451W (except for China models) (serial
number: 3000998 or later)
• LMD-2451W (China models only) (serial number:
5000164 or later)
• LMD-2051W
• LMD-1751W
• LMD-2341W
• LMD-2041W
• LMD-1541W
• LMD-941
• LMD-940W (except for China models) (serial
number: 3004727 or later)
Operating system (OS)
Microsoft Windows 7 Professional Edition or Ultimate
Edition (64 or 32-bit version), with SP1
CPU
Intel Celeron 1 GHz or higher
Memory
1 GB or more
Display
1,024 × 768 or more (Hi Color 16 bit or more)
USB port
USB 2.0 or higher
Hard disk
100 MB free space or more
Network
Internet connection
Middleware
.NET Framework 3.5 SP1 (Available from the
Microsoft website)
Note
The above computer environment does not guarantee
correct operation on all computers or operating systems.
Screen shots of windows shown in this USER’S
GUIDE are samples using Windows 7. Their
appearance may differ depending on the operating
system you use.
Overview
3
NOTICE TO USERS
© 2012, 2014 Sony Corporation. All rights reserved.
This manual or the software described herein, in
whole or in part, may not be reproduced, translated or
reduced to any machine readable form without prior
written approval from Sony Corporation.
SONY CORPORATION PROVIDES NO
WARRANTY WITH REGARD TO THIS
MANUAL, THE SOFTWARE OR OTHER
INFORMATION CONTAINED HEREIN AND
HEREBY EXPRESSLY DISCLAIMS ANY
IMPLIED WARRANTIES OF
MERCHANTABILITY OR FITNESS FOR ANY
PARTICULAR PURPOSE WITH REGARD TO
THIS MANUAL, THE SOFTWARE OR SUCH
OTHER INFORMATION. IN NO EVENT SHALL
SONY CORPORATION BE LIABLE FOR ANY
INCIDENTAL, CONSEQUENTIAL OR SPECIAL
DAMAGES, WHETHER BASED ON TORT,
CONTRACT, OR OTHERWISE, ARISING OUT OF
OR IN CONNECTION WITH THIS MANUAL, THE
SOFTWARE OR OTHER INFORMATION
CONTAINED HEREIN OR THE USE THEREOF.
Sony Corporation reserves the right to make any
modification to this manual or the information
contained herein at any time without notice. The
software described herein may also be governed by the
terms of a separate user license agreement.
• Microsoft, Windows, Windows 7 and Windows
logo are either trademarks or registered trademarks
of Microsoft Corporation in the United States and/or
other countries.
• Intel is the trademark or registered trademark of
Intel Corporation in the United States and/or other
countries.
All other company names and product names
mentioned here may be the trademarks or registered
trademarks of their respective companies.
In this manual, TM and R marks are not specified.
Preparation
Installing the Middleware and the
Device Driver for the Probe
Install the .NET Framework 3.5 SP1 (available from the
Microsoft website) to the computer.
If you are using any of the following probes, additional
software or drivers need to be installed.
i1Pro/i1Pro2
Application software supplied with i1Pro manufactured
by X-Rite, or device driver for i1Pro/i1Pro2
CA-210, CA-310
CA-SDK software provided by Konica Minolta
Device driver for CA-210, CA-310
CS-200
Device driver for CS-200 provided by Konica Minolta
PR-655/PR-670
Device driver provided by Photo Research
K-10, specbos1211
Device driver for “USB to serial” conversion chip
provided by FTDI
Installing
Monitor_AutoWhiteAdjustment
Consult your nearest Sony dealer when you use this
software.
Note
• Windows administrator privileges are needed to
install this software. Log in with an administrator
account.
• Depending on your environment, permission settings
in Windows Firewall or antivirus software may be
required. If a Windows Firewall warning is displayed,
select “Unblock” when prompted. Alternatively, set
the Monitor_AutoWhiteAdjustment to Exceptions for
Windows Firewall in Control Panel. If you are using
antivirus software, refer to the antivirus software
manual and set permission.
1
4
Preparation
Double click the
“Monitor_AutoWhiteAdjustment.exe” to start the
installer.
2
Select the language you want to use, then click
“OK”.
Connecting the Monitor to the
Computer
Two types of connections are available: LAN, which
connects your computer and monitor via a network, and
peer to peer, which connects your computer directly to
the monitor with a LAN cable.
For details, refer to the instruction manual of the
monitor.
Wait for a moment until the installation window
appears.
3
Follow the instructions displayed in the window to
install the software.
Connecting the Probe to the
Computer
Connect the probe to your computer by a USB cable,
referring to the instruction manual of the probe.
Note
• A CS-200 probe may not be recognized by this
software when connected to a computer with the
following chipset:
Intel (R) 5 Series/3400 Series Chipset Family
• When you use the PR-670 by connecting a computer,
you need to set the aperture setting of the PR-670 to 1°
in advance.
• When you connect a PM5639/06 probe to your
computer, you need to use the connection cable
manufactured by DK-Technologies, or a special serial
communication cable that can supply power to the
probe.
When the message about the license agreement
appears, read it, then select “I accept the terms of
the license agreement” to continue installation.
Connection diagram
Computer
4
When the message
“Monitor_AutoWhiteAdjustment was successfully
installed.” appears, click “Finish”.
D-Sub 9 pin
connector
(male) for
connecting
PM5639/06
1
5
D-Sub 9 pin connector (female)
5
1
USB - RS-232C
conversion cable
(not supplied)
9
The installation is complete.
6
6
9
Signal Pin number
Signal Pin number
CD
RXD
TXD
DTR
GND
DSR
RTS
CTS
GND
NC
RXD
TXD
NC
GND
NC
NC
NC
+ 5V
1
2
3
4
5
6
7
8
9
1
2
3
4
5
6
7
8
9
Power supply (USB port
of the computer, etc.)
GND
+ 5V
Preparation
5
Operations
Note
• This software cannot be used if the computer is in
sleep mode. Before using this software, make sure
automatic sleep mode is disabled. If the computer
goes into sleep mode while using this software, restart
the software and probe.
• For LMD-4251TD or LMD-2451TD, be sure to select
“2D” in “2D/3D SELECT” before performing
adjustment.
For the following models, be sure to select “2D” in
“2D/3D SELECT” and “OFF” in “3D OFFSET”
before performing adjustment.
LMD-2451TD (except for China models, serial
number: 3000624 or later)
LMD-2451TD (China models, serial number:
5000050 or later)
LMD-4251TD (except for China models, serial
number: 3100363 or later)
LMD-4251TD (China models, serial number:
5100149 or later)
If you adjust with “3D” selected inadvertently, change
the selection (as above) and perform adjustment again.
To switch between “2D”/“3D”, or to select for “3D
OFFSET”, refer to the instruction manual of the
monitor.
Note
For the PVM-A and LMD-A series, when starting auto
adjustment, User2 is selected automatically and an
adjustment result is stored. When inputting the
adjustment value to User1, copy the adjustment value of
User2 to User1 manually after auto adjustment.
Setting Network
Select the network adapter according to the connection
environment of the monitor.
1
Click “Select” for “Network Adapter”.
The Network Adapter window is displayed.
Note
Starting
Monitor_AutoWhiteAdjustment
From the “Start” menu on your computer, select “All
Programs”, “Sony Monitor Utilities”, then
“Monitor_AutoWhiteAdjustment”. The software starts
and the start-up window is displayed.
The displayed network adapter varies depending on
your environment.
2
Select the network adapter of the monitor’s
network.
Detection of the monitor starts.
Note
• Only the network adapter that shows the IP address
and subnet mask after typing “ipconfig /all” in the
command prompt, is displayed. If the network adapter
that you want to use is not displayed, check the
network setting/connection.
• If you change the properties of the selected network
adapter such as the IP address after the settings, the
settings of the network adapter will be disabled. In this
case, set the Network Adapter settings again.
6
Operations
If new monitors are detected while displaying the
Monitor List window, they are added to the window
in the order detected.
Selecting the Monitor
Selecting from the Monitor List
(recommended)
2
When you set the Network Adapter settings, the
software starts searching for a monitor that is connected
to the network, and the “Select” button in “Monitor List”
becomes active.
Select the monitor you want to adjust from the list,
then click “OK”.
Connection with the selected monitor starts.
If you click “Show ID” in the Monitor List window,
the Monitor ID is displayed on the screen of the
monitor connected to the selected network.
Note
1
Click “Select”.
The Monitor List window appears and detected
monitors are displayed in ID number order.
Before monitor detection
• For this operation, the monitor needs to be set as
follows:
BVM series
Set the NETWORK switch on the side of the monitor
to “LAN”.
PVM and LMD series
Set the “REMOTE” settings in Menu as follows:
SERIAL REMOTE: ETHERNET
CONNECTION: LAN
PVM-A and LMD-A series
Set the “Remote” settings in Menu as follows:
Serial Remote: On
Connection: LAN
• If the existence of a monitor cannot be confirmed
during a certain period of time, it will be deleted from
the Monitor List window. In this case, the monitor list
will be re-sorted in ID number order.
Selecting a monitor by its Monitor ID
You can connect with a monitor by specifying the
Monitor ID, after the Network Adapter settings are
completed and “LAN” is selected in “Connection Type”
of “Network”.
After monitor detection
1
Input a valid value (1 - 99) for “Monitor ID”.
The “Connect” button become active.
Operations
7
2
Click “Connect”.
Searching for a monitor that has the specified
Monitor ID starts. The message “Searching for
monitor. Please wait.” appears while searching.
When the monitor has been detected, connection
starts.
Note
If more than one monitor has the same Monitor ID on
the same network, this software connects with the
monitor that is detected first. Therefore, set a different
Monitor ID for each monitor on a network.
Selecting Peer to Peer connection
You can select Peer to Peer connection, if a monitor and
a computer are connected by Peer to Peer and the
selected network adapter meet the following conditions:
• Only one connected monitor is on the network.
• The IP address is “192.168.0.X” (where X is between
2 - 254).
• The subnet mask is “255.255.255.0”.
On-screen messages in the connection window
• LAN connection (X is Monitor ID)
“Connected to Monitor ID: X”
• Peer to Peer connection
“Connected to Monitor: Peer to Peer”
Monitor selection is complete.
About setting window
The setting window differs depending on the connection
type, monitor types, and setting status.
When connected to a BVM series monitor
Example
Connection Type: LAN
Setting of the monitor: Input setting for XYZ signal,
Picture Preset (D-Cine)
Note
• For BVM series, when BKM-16R is connected at the
same time, the IP address of BKM-16R
(“192.168.0.100” is default) cannot be used.
• For this operation, the monitor needs to be set as
follows:
BVM series
Set the NETWORK switch on the side of the monitor
to “PEER TO PEER”.
PVM and LMD series
The “REMOTE” settings in Menu are set as follows:
SERIAL REMOTE: ETHERNET
CONNECTION: PEER TO PEER
PVM-A and LMD-A series
The “Remote” settings in Menu are set as follows:
Serial Remote: On
Connection: Peer to Peer
When you select “Peer to Peer” in “Connection Type”,
the Peer to Peer connection is started.
Note
If the Peer to Peer connection fails, click
“Reconnection” for reconnection.
Checking the connection with the
monitor
When connection with the monitor is established, the
connection window appears. Click “OK”.
8
Operations
a Model Name: Displays the model name of the
connected monitor.
b Monitor Selection: During Peer to Peer connection,
this area is not displayed.
c Information: Format information is displayed when
the XYZ signal is input.
Picture Preset information is displayed when
“Picture Preset” is “Picture (D-Cine)”.
When connected to a PVM/LMD series monitor
Example
Connection Type: LAN
Setting Probe
If you use a probe to perform the automatic color
temperature adjustments or color temperature
measurement, you will need to select a probe and, as
necessary, calibrate it.
For details about available probes, see page 3.
Selecting a probe
When you click the
probes appears.
to the right of “Probe”, a list of
Display of the luminance setting is different from the
BVM series. Select the correct input signal from the
“Input Signal” drop-down list.
When connected to an PVM-A/LMD-A series
monitor
Example
Connection Type: LAN
Select a probe from the list.
Note
Display of the luminance setting is different from the
PVM and LMD series.
• Do not connect two probes at the same time.
• When measuring and adjusting the CRT or OLED
monitor using a probe that has a synchronous mode,
set the synchronous mode correctly, referring the
instruction manual of the probe.
• If you select CA-210 or CA-310, you need to connect
a computer and probe by USB beforehand. The error
message “CA-210 not found./CA-310 not found.”
appears if you select CA-210 or CA-310 while they
are not connected.
• To select PM5639/06, select the COM port to which
PM5639/06 is connected. If you select PM5639/06,
the window for selecting the usable serial port is
displayed. Select the COM port depending on the
connection status.
• If you select K-10 or specbos1211, a window is
displayed to show the COM port to which the selected
probe is assumed to be connected. Reselect the COM
port as necessary.
• If an error occurs because of disconnection of CA-210
or CA-310, or the COM port is not selected in the
COM port selection window of PM5639/06, K-10, or
specbos1211, Probe Setup returns to the default
(blank).
• If you select K-10, do not disconnect the probe before
quitting this software.
Operations
9
• If you select PM5639/06, do not disconnect the probe
or communication cable before quitting this software.
Before measurement
Calibration of Probe
If i1Pro/i1Pro2 or CA-210/310 is selected, it is
necessary to calibrate it.
When you select the probe and the computer detects the
probe connection, the “Calibrate” button becomes
active.
After measurement
During measurement, the measured values will be
updated every time data is received from the probe.
Therefore, the measurement intervals depend on the
performance of the probe.
When measurement starts, “Start Measuring” changes to
“Stop Measuring”. You can stop the color temperature
measurement by clicking “Stop Measuring”.
During the color temperature measurement, you cannot
change or calibrate the probe.
1
Click “Calibrate”.
A message appears if preparation for calibration is
necessary.
Prepare for calibration according to the displayed
message.
When calibration is successful, the status becomes
“Calibrated” on “Status” and the color temperature
measurement becomes enabled. Also, when the network
setting is completed, the “Adjust” button becomes
active and the automatic color temperature adjustments
are enabled.
Setting the measured value as the target
value
After measuring the color temperature, the measured
values are displayed in the text box. These values can be
used as the target values.
If “Measured Data” is selected from the “Set to” list, the
measured values are set as the target values. When you
set this again, reselect “Measured Data.”
Measuring Color Temperature
You can measure the color temperature using this
software.
Set the probe before you start measuring (page 9). After
setting the probe, “Start Measuring” becomes active.
Measuring color temperature and
luminance
When you click “Start Measuring”, color temperature
measurement starts.
10
Operations
Color Temp x y: the
measured values are
used as the target values.
Luminance Y: the measured
value, rounded to the first
decimal place, is displayed for
the target value of Highlight*1.
If the target value of Lowlight
can be specified, it is
automatically calculated from
the target value of Highlight
and input.
*1 For a PVM/LMD/PVM-A/LMD-A series monitor, if “Y
Adjustment” is checked, the measured value, rounded to the
first decimal place, is displayed as the target value of
Luminance Y.
Adjusting Color Temperature
Automatically
BVM series
Setting item
Color Temp. x
When the input signal or the input signal
setting is XYZ signal: 0.300 to 0.350
Color Temp. y
You can adjust the color temperature and luminance.
When the input signal or the input signal
setting is other than XYZ signal: 0.270 to
0.360
When the input signal or the input signal
setting is XYZ signal: 0.310 to 0.360
Note
• Before adjustment, make sure that all functions of the
Function buttons are disabled.
• To enable the automatic color temperature
adjustments for an LMD or PVM series monitor, the
monitor needs to receive a video signal.
• The accuracy of adjustment depends on the
performance of the probe or surrounding brightness.
After performing the automatic color temperature
adjustments, check visually the black level and white
level, and, if needed, adjust the contrast and brightness
manually.
Acceptable target value
When the input signal or the input signal
setting is other than XYZ signal: 0.265 to
0.350
Luminance
(Highlight)
When Picture Preset is set to other than
“Preset (D-Cine)”: 40 to 150
When Picture Preset is set to “Preset (DCine)”: 20 to 72
Luminance
(Lowlight)
When Picture Preset is set to other than
“Preset (D-Cine)”: 0.5 to 9.9
When Picture Preset is set to “Preset (DCine)”: 0.3 to 4.8
LMD, PVM, LMD-A, and PVM-A series
Setting item
Setting the target value of color
temperature and luminance
The target values of color temperature need to be set.
Setting the target value
You can set target values in three ways.
• Using the default target values
When the target values are selected from the “Set to”
list, the default values are set as the target values.
• Using the measured values of color temperature
When color temperature has been measured, the
measured values can be set as the target values. See
“Setting the measured value as the target value”
(page 10).
• Inputting values directly
Input the values as the text box.
Note
For a BVM series monitor, if “Contrast/Bright Hold On”
has been checked, the values of “Contrast” and “Bright”
set before the adjustment will be restored.
In this case, there may be a difference in the
measurement of targeted color temperature and
luminance after the adjustment.
Acceptable target value
The acceptable target value varies depending on the
monitor and setting.
Acceptable target value
LMD
series
PVM
series
LMD-A
series
PVM-A
series
Color Temp. x 0.001 to 0.999
0.265 to 0.350
Color Temp. y 0.001 to 0.999
0.270 to 0.360
Luminance
20 to 300
20 to 300
40 to 150
40 to 150
Note
• In the case of a BVM series monitor, the Lowlight
value is automatically set depending on the Highlight
input values. The Lowlight value can be changed. To
restore the Lowlight value, input the Highlight value
again.
• The “Y Adjustment” function works as follows for the
PVM, LMD, PVM-A, and LMD-A series.
– When “Y Adjustment” is checked:
Color temperature and luminance are adjusted.
Color temperature and luminance are adjusted to the
specified target value.
– When “Y Adjustment” is not checked:
Only color temperature is adjusted.
Color temperature is adjusted to the specified target
value.
Luminance retains the values before adjustment.
• When adjusting luminance for a PVM/LMD series
monitor, check “Y Adjustment”. Also, set
“CONTRAST” and “BRIGHTNESS” of
“SUBCONTROL” in the “USER CONTROL” menu
of the monitor back to the default (0).
• For the PVM-A series, the gain/bias adjustment value
and contrast/brightness adjustment value of color
temperature for User2 are adjusted.
Operations
11
• For the LMD-A series, the gain/bias adjustment value,
contrast/brightness adjustment value, and backlight
adjustment value of color temperature for User2 are
adjusted.
Setting offset values
You can set an offset for the target values. Setting offset
values enables you to compensate for the
difference between the displays. For details, see “To
Equalize Colors on Different Types of Displays”
(page 12).
When a preset item such as “D65”, etc. (other than
“Measured Data”) is selected from the “Set to” list, the
optimal setting is selected automatically depending on
the monitor being adjusted. The offset values are set for
guidance, but you can change them. Any changed values
are saved automatically.
The offset values can be reset to the default from the
Maintenance menu.
When not setting offset values
The target values will be displayed as shown below.
To change the offset values, input the values in the text
box under “Offset”, shown in the red frame of the above
picture. The calculated results of “Set to” and “Offset”
are displayed under “Target” and they are used for the
adjusted target values. When “Measured Data” is
selected from the “Set to” list, “Reference” can be
selected. Selecting the measured device from
“Reference” automatically sets an offset value
appropriate for equalizing colors on the device.
About limitation on adjusted target values
when setting offset values
The adjusted target values need to be limited even if the
offset value is set. In this case, set the limitation on the
values that are displayed under “Target”. (When the
offset values are not set, limit the values under “Set to”.)
Setting the probe
Place the probe in front of the monitor to be adjusted or
measured.
Starting adjustment
When you click “Adjust”, adjustment starts and the
target values are checked. If they are unacceptable, a
warning message appears. Modify the target values
according to the displayed message.
During adjustment, the following window appears.
Note
The target values of the color temperature are the values
displayed in the text box.
When setting offset values
When “Auto Offset” is checked, you can set offset
values.
Until adjustment completes, all operations other than the
cancel operation are invalid. If “Cancel” is clicked, the
“Adjusting Cancelled” window appears and the
automatic color temperature adjustment is canceled.
When the automatic color temperature adjustments
complete, the “Adjusting done” window appears.
To Equalize Colors on Different
Types of Displays
If you measure the color temperatures of different types
of display, such as CRT, LCD, or OLED, by using a
probe and adjust the xy chroma to the same value, the
appearance may be different. This may be caused by the
different emission spectrum of each display device.
When you adjust the target xy chroma value by adding
an offset, you can set to almost the same appearance for
12
Operations
different types of display. The following offset values
are standard*1.
When equalizing to BVM (CRT), LMD (LCD),
LMD-A (LCD)
Probe
types
When equalizing to BVM-L (LCD)
Probe
types
BVM (CRT),
LMD (LCD),
LMD-A (LCD)
BVM-L
(LCD)
BVM-E/F,
PVM, PVMA (OLED)
i1Pro/
i1Pro2
(xref, yref +0.004)
(xref, yref)
(xref - 0.006,
yref - 0.007)
CA-310*2
(xref, yref +0.004)
(xref - 0.006,
yref - 0.007)
CA-210*2
(xref, yref -0.005)
(xref - 0.006,
yref - 0.016)
Device to be measured
BVM
(CRT),
LMD
(LCD),
LMD-A
(LCD)
BVM-L (LCD)
BVM-E/F,
PVM, PVM-A
(OLED)
Device to be measured
(xref, yref) (xref, yref -0.004)
(xref - 0.006,
yref - 0.011)
CS-200*3
(xref, yref +0.004)
(xref - 0.006,
yref - 0.007)
CA-310*2
(xref, yref -0.004)
(xref - 0.006,
yref - 0.011)
PM5639/06 (xref, yref +0.004)
(xref - 0.001,
yref - 0.007)
CA-210*2
(xref, yref +0.005)
(xref - 0.006,
yref - 0.011)
PR-655/
PR-670
(xref, yref +0.004)
(xref - 0.006,
yref - 0.007)
CS-200*3
(xref, yref -0.004)
(xref - 0.006,
yref - 0.011)
K-10
(xref, yref +0.007)
(xref - 0.002,
yref - 0.004)
PM5639/06
(xref, yref -0.004)
(xref - 0.001,
yref - 0.011)
specbos
1211
(xref, yref +0.004)
(xref - 0.006,
yref - 0.007)
PR-655/
PR-670
(xref, yref -0.004)
(xref - 0.006,
yref - 0.011)
K-10
(xref, yref -0.007)
(xref - 0.002,
yref - 0.011)
specbos
1211
(xref, yref -0.004)
(xref - 0.006,
yref - 0.011)
i1Pro/
i1Pro2
*1 Appearance may be different depending on the probe type, its
individual characteristics, or the observer. The above are
reference values. For details about the LCD of the CCFL
backlight, refer to the BVM (CRT).
*2 CH00 (Konica Minolta calibration standard), D65, Univ. Sync.
*3 CH00 (Konica Minolta calibration standard), Univ. Sync.
When equalizing to BVM-E/F, PVM, PVM-A
(OLED)
Probe
types
Device to be measured
BVM (CRT),
LMD (LCD),
LMD-A (LCD)
BVM-L
(LCD)
i1Pro/
i1Pro2
(xref + 0.006, yref
+ 0.011)
(xref + 0.006, (xref, yref)
yref + 0.007)
CA-310*2
(xref + 0.006, yref
+ 0.011)
(xref + 0.006,
yref + 0.007)
CA-210*2
(xref + 0.006, yref
+ 0.011)
(xref + 0.006,
yref + 0.016)
CS-200*3
(xref + 0.006, yref
+ 0.011)
(xref + 0.006,
yref + 0.007)
PM5639/06 (xref + 0.001, yref
+ 0.011)
(xref + 0.001,
yref + 0.007)
PR-655/
PR-670
(xref + 0.006, yref
+ 0.011)
(xref + 0.006,
yref + 0.007)
K-10
(xref + 0.002, yref
+ 0.011)
(xref + 0.002,
yref + 0.004)
specbos
1211
(xref + 0.006, yref
+ 0.011)
(xref + 0.006,
yref + 0.007)
BVM-E/F,
PVM, PVMA (OLED)
Operations
13
Appendix
Error Messages
Conditions to
be displayed
Probe
disconnection
Message
Causes and remedies
Probe disconnected.
Communication with the probe becomes unavailable while performing the automatic
color temperature adjustments.
Reconfirm the connection with the probe, recalibrate the probe, then perform the
automatic color temperature adjustments again.
Hint
This alert is displayed while performing the automatic color temperature
adjustments. If you cannot communicate with the probe while measuring the color
temperature, the measurement stops and the probe is disconnected.
If the probe is disconnected during luminance sensor calibration, this alert is also
displayed and luminance sensor calibration stops.
Calibration failure Calibration error.
The calibration was not performed correctly.
Confirm that the probe can calibrate, then perform calibration again.
Network
disconnection
You cannot confirm the connection between this software and the monitor via a
network.
Set the connection with the monitor again.
Hint
This alert is displayed while performing the automatic color temperature
adjustments or calibrating the luminance sensor.
Normally you should be able to recognize network disconnection by an invalid
“Adjust” button or non-display of the IP address.
Network disconnected.
Monitor
Cannot find the monitor.
connection failure
Probe reading
value error
Invalid value error.
Please check the probe.
The value of color temperature or luminance obtained via a probe is out of the
acceptable range.
• Confirm that the probe is set correctly with the monitor to be adjusted.
• Perform the calibration again.
Adjustment does
not start
Monitor not ready.
Please check monitor status.
Possible causes include the following:
• The monitor setting was changed just before starting adjustment.
tThis error occurs when the input signal or “Picture Preset” is changed just before
starting adjustment. Do not switch channel, change the setting or input signal just
before starting adjustment.
• The monitor does not receive commands.
tCancel the monitor’s standby mode.
tTurn the Menu display off if Menu is displayed, then perform adjustment again.
Unconnected CA- CA-210 not found.
210 or CA-310
CA-310 not found.
14
Possible causes include the following:
1 There is no monitor with the desired Monitor ID on the network.
tConfirm the desired Monitor ID by clicking the “Show ID” button. For a BVM
series monitor, you can also check the monitor ID by pressing and holding the
SINGLE button of BKM-16R.
2 The monitor is not found during the connecting process. (Connection timeout)
tConfirm that the following settings of SDAP are the default. (MENU > System
Configuration > Network > Protocol Setting)
• SDAP port number is 53862
• SDAP broadcast is permitted.
• SDAP publication interval is fifteen seconds.
3 Firewall setting on your computer
tConfirm that this software’s communication is permitted in the firewall setting.
4 Network connection is not correct.
tCheck the network connection.
Appendix
This error occurs when the CA-210 or CA-310 is selected as the probe to be used,
while the computer does not recognize CA-210 or CA-310.
Confirm the following, then select the probe again.
• The driver for CA-210 or CA-310 is installed.
• CA-210 or CA-310 is connected to your computer.
Conditions to
be displayed
Message
Causes and remedies
Target value is not Target Color Temperature x
acceptable
is invalid value.
Target Color Temperature y
is invalid value.
Target Luminance Highlight
is invalid value.
Target Luminance Lowlight
is invalid value.
Target Luminance is invalid
value.
Target value that is not acceptable is set (page 11). Please set the acceptable target
value.
Default file of
Cannot read SYSTEM file.
offset value is lost Boot failed. Please read the
operation manual.
Cannot read SYSTEM file.
Initialization failed. Please
read the operation manual.
Default file of offset value has been lost for some reason. Reinstall
Monitor_AutoWhiteAdjustment.
More than one
application is
active at the same
time
Not allow several application More than one application may be active. If so, quit one application.
activity.
Mismatch of the
monitor’s state
(BVM series
monitor only)
Change monitor setting
Possible causes include the following:
1 Adjustments were performed before the application could update changes of
information after channel switching.
tDo not start adjustments immediately after the channel switching. After the
switching, please wait about a second or two, and then start adjustments.
2 Input signal changed and changes occurred to update the information, but the
adjustments started before the application updates the changes of information.
tDo not change the input signal during adjustment.
Cannot adjust the
luminance/color
temperature target
value.
Target adjustment is out of
range.
Please try from the
followings.
- [increase/decrease]
backlight*
- [decrease/increase] Y
- change (x, y)
Color temperature adjustment cannot be performed because the gain/bias value used
when adjusting is out of the acceptable range. Try one or more of the following:
• Increase or decrease the backlight setting value*
• Decrease or increase the luminance target value
• Adjust the color temperature target value
* LMD and LMD-A series only
If it is not improved, perform the calibration again.
Adjustment failed.
Please try again.
Automatic color temperature adjustment was attempted, but failed.
Confirm monitor settings or the probe position and status.
Cannot adjust
because the target
luminance is too
high.
Target luminance is too high. The target luminance is too high.
Change the target luminance To avoid this error, change the target luminance to lower value.
to a lower value.
For details about the target luminance, see page 11.
Luminance should be
targeted to less than xxx cd/
m2.
Cannot adjust
because the target
luminance is too
low.
Target luminance is too low. The target luminance is too low.
Change the target luminance To avoid this error, change the target luminance to higher value.
to a higher value.
For details about the target luminance, see page 11.
Luminance should be
targeted to more than xxx cd/
m2.
Cannot adjust
because the
current luminance
is out of range.
Current luminance is out of
range. Current luminance is
xxx cd/m2. Refer to the chart
"Acceptable target value" in
the user's guide. This can be
accessed from "Help". Click
"start measuring" and change
the current luminance to
within these values.
The current luminance is too high or low.
To avoid this error, increase/decrease the contrast or brightness adjustment value
until the measured luminance value is in proper range while measuring luminance
by using the probe.
Set the luminance manually to within the target luminance range in advance
(page 11).
Appendix
15
Conditions to
be displayed
Setting status for
black before
adjusting is in a
range of values
that cannot be
adjusted.
16
Appendix
Message
Causes and remedies
Contrast/Bright is invalid
value.
Adjustment cannot be performed because the adjustment status for black has defects.
To avoid this error, perform the following settings.
Brightness = 50, R Bias = 0. G Bias = 0, B Bias = 0
This message appears only for the PVM-A series.
Troubleshooting
The automatic color temperature
adjustments do not start
If the automatic color temperature adjustments cannot
start because of the state of the monitor, the error
message “Monitor not ready. Please check monitor
status.” is displayed (page 14). Change the monitor’s
state so that it is possible to start automatic color
adjustments using BKM-16R (for BVM series) or
Control Panel (for LMD/PVM/LMD-A/PVM-A series).
Examples of the monitor’s state which prevent
the automatic color temperature adjustments
starting (BVM series only)
• While displaying the Select Area window
• While displaying two windows
• During Picture Adj (both Auto and Manual Adjust)
• During Color Temp Adj (both Auto and Manual
Adjust)
• During capture saving and capture loading
Reinstall of
Monitor_AutoWhiteAdjustment
If one of the following error messages is displayed, this
software cannot be automatically restored. Please
reinstall the software.
• Cannot read SYSTEM file. Boot failed. Please read
the operation manual.
• Cannot read SYSTEM file. Initialization failed. Please
read the operation manual.
Appendix
17
Sony Corporation