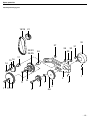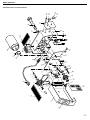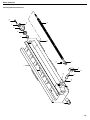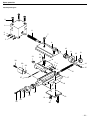
1
Contents
Foreword
Page
5
Dear Customer,
Legend
6
Description of the machine
7
Technical data
8
By purchasing your PROXXON Lathe PD 230/E, you have chosen
a good-quality, high-grade machine. The latest production and
testing methods guarantee a high level of reliability for this
machine.
Installation and setting up
8
This instruction manual covers:
Switching on the machine
8
• safety regulations
Operating the handwheels
8
• operation and maintenance
Switching on the automatic feed
8
• spare parts list
Working with the tailstock
9
Selecting the turning tool
9
Please read carefully!
9
Using this instruction manual will
Foreword
Safety regulations
Inserting the turning tool in the tool holder
Setting the spindle speeds
10
Calculating the maximum spindle speed
10
Clamping the work piece in the lathe chuck
10
Turning the jaws of the lathe chuck
10
Longitudinal turning
11
• make it easier for you to get used to the machine,
• help prevent faults occurring due to improper use and
• increase the service life of your machine.
Keep this instruction manual in an easily accessible place.
Only operate this machine if you are qualified to do so and follow
the guidelines in this instruction manual.
Face turning
11
Taper turning
11
Cutting off a work piece
11
PROXXON does not accept responsibility for the safe functioning
of the machine
Fitting change gears for thread cutting
11
• if it is handled in a manner which constitutes improper use,
Thread cutting with the turning tool
12
Thread cutting using the top slide
12
• if it is used for other purposes which are not specified in the
instruction manual,
Cutting left threads
12
• if the safety regulations are not observed.
Accessories for Lathe PD 230/E
13
Installing the centre lathe
13
Removing the centre
13
Four-jaw chuck
13
Fastening the drill chuck
13
In the interests of your safety, please always observe the safety
regulations.
Fixed steady
14
Only use genuine PROXXON spare parts.
Maintenance
14
General
14
We reserve the right to make further alterations for the purpose of
technical progress.
Setting the guide play
14
Spare parts list
15
Warranty claims are invalid if
• the machine is incorrectly operated,
• the machine has not been sufficiently maintained.
We wish you every success with your machine.
-5-
Safety regulations
IMPORTANT
• Ensure the workplace is tidy.
• Check the unit for damage before use.
• (connection cable, protective devices, etc.), have defective
parts replaced by qualified personnel.
• This unit corresponds to the pertinent safety regulations.
Repairs (e.g., replacement of the power supply lead) may only
be performed by a qualified electrician.
• Never work without the safety equipment fitted.
• Do not use electrical power tools in the rain, in damp surroundings or in the vicinity of flammable liquids or gases.
• Only use the tool when the handle is dry and free from grease.
• Avoid contact with earthed components, e.g., pipes, radiators,
ovens and refrigerators.
• Protect the connection lead from heat and sharp edges and
route it so it cannot be damaged.
• Do not remove the plug from the socket by pulling on the cable.
• Do not pick up the unit by the cable.
• Keep children and third parties away from the workplace.
• Keep tools in childsafe locations when not in use.
• Do not overload the tool.
• Do not use the tool to perform operations for which it is not suitable.
• Replace blunt tools in good time.
• Visually inspect application tools to ensure they are in good
working order and suitable for the task prior to setting up the
job.
• Fasten tools securely.
• Clean the unit thoroughly following all work.
• Disconnect the plug from the power supply when the unit is not
in use, before performing maintenance, tool replacement or
repair work.
• Only plug the unit in when the unit is switched off.
• Always wear protective goggles (danger of tool breakage).
• If necessary, wear a protective dust mask.
• Only use appropriate working clothes (no loose sleeves, ties,
jewellery).
• Wear a hair net if you have long hair.
• Only use accessories and spare parts recommended by
PROXXON.
• Observe the max. permitted rotational speed.
• If necessary, use dust extract equipment.
• Do not use the tool when you are tired or under the influence of
alcohol.
• Keep fingers away from rotating or fast moving tools
(saws, etc.).
• Keep the operation instructions in a safe place.
-6-
General safety instructions
Read and become familiar with this entire instructions manual.
Learn the tool`s applications, limitations and possible hazards.
1. KEEP GUARDS IN PLACE and in working order.
2. REMOVE ADJUSTING KEYS AND WRENCHES. Form habit of
checking to see that keys and adjusting wrenches are removed
from tool before turning it on.
3. KEEP WORK AREA CLEAN. Cluttered areas and benches invite
accidents.
4. DON'T USE IN DANGEROUS ENVIRONMENT. Don't use power
tools in damp or wet locations, or expose them to rain. Keep
work area well lighted.
5. KEEP CHILDREN AWAY. All visitors should be kept safe
distance from work area.
6. MAKE WORKSHOP KID PROOF with padlocks, master switches, or by removing starter keys.
7. DON'T FORCE TOOL. It will do the job better and safer at the
rate for which it was designed.
8. USE RIGHT TOOL. Don't force tool or attachment to do a job
for which it was not designed.
9. USE PROPER EXTENSION CORD. Make sure your extension
cord is in good condition. When using an extension cord, be
sure to use one heavy enough to carry the current your product
will draw. An undersized cord will cause a drop in line voltage
resulting in loss of power and overheating. Table 1 shows the
correct size to use depending on cord length and nameplate
ampere rating. If in doubt, use the next heavier gage. The
smaller the gage number, the heavier the cord.
Exception No. 1: The reference to the table and the table itself
may be omitted if a statement indicating the appropriate gage
and length is incorporated into the instruction.
Exception No. 2: The information regarding extension cords
need not be provided for a permanently connected tool.
10. WEAR PROPER APPAREL. Do not wear loose clothing, gloves,
neckties, rings, bracelets, or other jewelry which may get
caught in moving parts. Non-slip footwear is recommended.
Wear protective hair covering to contain long hair.
Exception: The reference to gloves may be omitted from the
instructions for a grinder.
11. ALWAYS USE SAFETY GLASSES. Also use face or dust mask
if cutting operation is dusty. Everyday eyeglasses only have
impact resistant lenses, they are NOT safety glasses.
12. SECURE WORK. Use clamps or a vise to hold work when
practical. It's safer than using your hand and it frees both
hands to operate tool.
13. DON'T OVERREACH. Keep proper footing and balance at all
times.
14. MAINTAIN TOOLS WITH CARE. Keep tools sharp and clean for
best and safest performance. Follow instructions for lubricating
and changing accessories.
15. DISCONNECT TOOLS before servicing; when changing accessories, such as blades, bits, cutters, and the like.
16. REDUCE THE RISK OF UNINTENTIONAL STARTING. Make
sure switch is in off position before plugging in.
17. USE RECOMMENDED ACCESSORIES. Consult the owner's
manual for recommended accessories. The use of improper
accessories may cause risk of injury to persons.
18. NEVER STAND ON TOOL. Serious injury could occur if the tool
is tipped or if the cutting tool is unintentionally contacted.
19. CHECK DAMAGED PARTS. Before further use of the tool,
a guard or other part that is damaged should be carefully
checked to determine that it will operate properly and perform
its intended function check for alignment of moving parts, binding of moving parts, breakage of parts, mounting, and any
other conditions that may affect its operation. A guard or other
part that is damaged should be properly repaired or replaced.
20. DIRECTION OF FEED. Feed work into a blade or cutter against
the direction of rotation of the blade or cutter only.
21. NEVER LEAVE TOOL RUNNING UNATTENDED. TURN POWER
OFF. Don't leave tool until it comes to a complete stop.
Warning
Table 1
Additional safety instructions for lathes:
For Your Own Safety Read Instruction Manual Before Operating
Lathe
a) Wear eye protection.
b) Do not wear gloves, necktie, or loose clothing.
c) Tighten all locks before operating.
d) Rotate workpiece by hand before applying power.
e) Rough out workpiece before installing on faceplate.
f) Do not mount split workpiece or one containing knot.
g) Use lowest speed when starting new.
GROUNDING INSTRUCTIONS:
1. All grounded, cord-connected tools:
In the event of a malfunction or breakdown, grounding provides a
path of least resistance for electric current to reduce the risk of
electric shock. This tool is equipped with an electric cord having
an equipment-grounding conductor and a grounding plug.
The plug must be plugged into a matching outlet that is properly
installed and grounded in accordance with all local codes and
ordinances. Do not modify the plug provided -- if it will not fit the
outlet, have the proper outlet installed by a qualified electrician.
Improper connection of the equipment-grounding conductor can
result in a risk of electric shock. The conductor with insulation
having an outer surface that is green with or without yellow stripes
is the equipment-grounding conductor. If repair or replacement of
the electric cord or plug is necessary, do not connect the equipment-grounding conductor to a live terminal. Check with a qualified electrician or service personnel if the grounding instructions
are not completely understood, or if in doubt as to whether the
tool is properly grounded.
Use only 3-wire extension cords that have 3prong grounding plugs
and 3pole receptacles that accept the tool's plug.
Repair or replace damaged or worn cord immediately.
2. Grounded, cord-connected tools intended for use on a supply
circuit having a nominal rating less than 150 volts:
This tool is intended for use on a circuit that has an outlet that
looks like the one illustrated in Sketch A in Figure 28. The tool has
a grounding plug that looks like the plug illustrated in Sketch A in
Figure 28. A temporary adapter, which looks like the adapter illustrated in Sketches B and C, may be used to connect this plug to a
2-pole receptacle as shown in Sketch B if a properly grounded
outlet is not available. The temporary adapter should be used only
until a properly grounded outlet can be installed by a qualified
electrician. The green-colored rigid ear, lug, and the like, extending
from the adapter must be connected to a permanent ground such
as a properly grounded outlet box.
Minimum gage for cord
Effective date for Table 1 changed from November 1, 1995 to
November 11, 1996
Ampere Rating
More
Than
Volts
Total length of cord in feet
120 V
25 ft.
50 ft.
100 ft.
150 ft.
240 V
50 ft. 100 ft.
200 ft.
300 ft.
Not More
Than
AWG
0
6
18
16
16
14
6
10
18
16
14
12
10
12
16
16
14
12
12
16
14
12
Not Recommended
Legend (Fig. 1)
1. Main spindle
2. Lathe chuck
3. Turning tool holder
4. Rotating centre
5. Flange surface for milling unit
6. Sleeve
7. Clamp screw for sleeve
8. Tailstock
9. Sleeve adjusting handwheel
10. Handwheel for leadscrew
11. Clamp screw for tailstock
12. Leadscrew
13. Adjusting handwheel for top slide
14. Top slide
15. Support
16. Cross-slide
17. Adjusting handwheel for cross-slide
18. Clutch switch for automatic feed
19. Drive gearbox cover with speed table
Grounding methods
20. Switch for anticlockwise rotation stop clockwise rotation
21. Main switch
22. Function display
23. Control
24. Hollow hexagon wrench
METAL SCREW
25. Open-ended wrench
COVER OF GROUNDED
OUTLET BOX
GROUNDING
PIN
26. Lathe chuck wrench
<B>
<A>
ADAPTER
<C>
GROUNDING
MEANS
GROUNDING
PIN
<D>
Fig. 28
-7-
Description of the machine
Installation and setting up
The PROXXON lathe PD 230/E is an extensible system which consists of
• solid shaft electronics for high torques over the entire speed
range
• automatic feed
• lathe chuck and
• rotating centre
for machining steel, brass, aluminium and plastics.
It can also be used for face turning, longitudinal turning and metric
as well as inch system based thread cutting.
The machine is also suitable for boring, milling work and grooving
by using the appropriate accessories.
The ribbed, grey cast iron machine bed with ground prismatic
guideways ensures vibration-free work.
Warning
To avoid injury from unexpected starting or electrical shock, do not
plug the power cord into a power source receptacle during
unpacking and assembly. This cord must remain unplugged
whenever you are working on the lathe.
If any part is missing or damaged, do not plug the lathe in until the
missing or damaged part is replaced, and assembly is complete.
To avoid electrical shock, use only identical replacement parts
when servicing grounded tools.
The standard equipment of the PROXXON Lathe PD 230/E
consists of the following parts:
• lathe complete with motor, automatic feed and three jaw chuck
with chuck wrench
• rotating centre
• tool kit
• change gear kit for thread turning
• tool holder.
Warning
This Lathe is for indoor use only. Do not expose to rain or use in
damp locations.
Do not attempt to modify this tool or create accessories not
recommended for use with this tool. Any such alternation or modification is misuse and could result in hazardous condition leading
to possible serious injury.
Technical data:
Centre distance
230 mm
52 mm
Height above support
28 mm
Holding capacity
– Inner jaws
2 - 35 mm
– Outer jaws
24 - 68 mm
Top slide adjustment
Spindle passage
Nose support on chuck side
Tool holder
Machine dimensions
Weight
Possible thread leads
60 mm
45 mm
10.5 mm
MK1/short
8x8 mm
530x260x150 mm
– by control
Feed
Sleeve motion
Sleeve for morse taper
approx. 10 kg
Power consumption
Noise emission
-8-
All naked guides and spindles must then be thoroughly oiled.
Warning
For your safety, never connect the plug to the power source
receptacle until the assembly and adjustment steps are completed,
and you have read and understood the safety and operating
instructions.
To avoid injury from accidental start, make sure the switch is in the
OFF position and the plug is not connected to the power source
receptacle before changing any parts or tools (i. e. cutter)
Switching on the machine
Important
Before switching on the machine, ensur e that the jaw chuck
wrench is not in the chuck, the jaws ar e not protruding and that
there is noone in the danger zone.
Only switch on the machine when the part to be tur ned is
clamped in the chuck, as otherwise the jaws could become loose
and cause injury.
400/1600/ and 3000 rpm
Avoid unnatural body positions. Ensure that you are standing in a
safe position and keep your balance.
25% to 100%
0.05 and 0.1 mm/revolution
30 mm
MK 1/short
1. Set selection switch 2 (Fig. 2) to "0" position.
2. Switch on main switch (1). The function display should now
illuminate.
3. Turn the selection switch (2) to the right for normal turning.
4. Turn the selection switch to the left for anticlockwise rotation.
Motor
Voltage:
All naked metal parts are supplied in a corrosion protection preservative.
0.5/0.625/0.7/0.75
0.8/1.0/1.25 and 1.5 mm
Spindle speeds
– by shifting the Vbelt
Important
When lifting the machine, ensure that the plastic cover of the
drive gearbox is closed. If it is not, the cap may br eak.
This preservative must be washed off with paraffin oil before using
for the first time.
Centre height
Cross-slide adjustment
The floor space must be even, vibration-free and stable. The
machine must be fastened to a stable work bench using the bores
provided.
115 Volt, 60 Hz,~
40 Watt
≤70 dB (A)
Warning
To avoid injury from accidental start, make sure the switch is in the
OFF position and the plug is not connected to the power source
receptacle before making any adjustments.
Important
Only switch on when the machine is stationary .
5. When you have finished working, switch off the machine again
using the main switch. Only then is the machine completely disconnected from the mains.
Warning
For your own safety, do not plug the tool into the power source
receptacle or insert the switch key, until the parts are correctly
installed and adjustments have been made.
To avoid possible injury, keep the guard in place and in working
order when operating the tool.
Additional safety instructions for lathes:
Note:
When the automatic feed is switched on, the support is pushed by
0.05 or 0.1 mm per turn depending on the gear combination.
Please note the sticker on the inside of the drive gearbox when
adjusting the feed.
The support always moves from right to left when the spindle is
turning normally (clockwise rotation) and the automatic feed is
switched on. This is also the normal feed when turning.
Of course, the support can also be moved back to the output
position automatically.
To do so, switch off the machine, slightly draw back the turning
tool and then set the switch 2 (Fig. 2) to anticlockwise rotation.
For your own safety read instruction manual before operating
lathe!
a)
b)
c)
d)
e)
f)
g)
Wear eye protection.
Do not wear gloves, necktie, or loose clothing.
Tighten all locks before operating.
Rotate workpiece by hand before applying power.
Rough out workpiece before installing on faceplate.
Do not mount split workpiece or one containing knot.
Use lowest speed when starting new.
Working with the tailstock
1. Release the clamp screw 4 (Fig. 7), push the tailstock (2) on the
guide into the required position and retighten the clamp screw.
Note:
Operating the handwheels
Important
If the support will not move easily , release screw 1 (Fig. 3) slightly.
Note:
The handwheels for the leadscrew, crossslide, top slide and tailstock sleeve produce a 1 mm feed when tur ned once.
A mount is located on the sleeve for the drill chuck or rotating centre with morse taper, size MK 1/short.
Important
Receiving tapers must always be perfectly clean.
Dirt, especially metal chips, affect the precision and can render the
sleeve and shank taper unusable.
2. To insert a tool, e.g. the centre 1 (Fig. 7), extend the sleeve
approx. 10 mm by turning the handwheel 3.
Note:
Important
If the automatic feed is switched on, manual adjustment of the
support is not possible.
1. Turn the handwheel 2 (Fig. 3) for the crossslide, the slide and
the tool holder move at right angles to the bed.
Example:
One turn of the handwheel
= 1 mm advance
= 2 mm change in diameter
2. Turn the handwheel (3) for the top slide, the top slide moves
parallel to the bed.
3. Turn the handwheel 1 (Fig. 4) for the support adjustment,
the support (2) moves lengthwise.
4. Turn the handwheel 1 (Fig. 5) for the sleeve, the sleeve moves
lengthwise.
Switching on the automatic feed
Important
Only switch on the feed when the machine is stationary .
1. Turn the switch 1 (Fig. 6) to the right.
2. Turn the switch to the left to switch off the feed.
If stiff, slightly move the handwheel of the leadscrew.
The sleeve can be clamped in any position by tightening the screw
5 (Fig. 7).
3. Insert the centre 1 (Fig. 7) and shank taper firmly into the sleeve
by hand.
The shank taper is secure and cannot be removed from the
front.
4. To release an inserted tool, turn handwheel (3) to the left to
stop.
5. Then turn approx. one further turn against the resistance. The
taper is released and can be removed.
Selecting the turning tool
Warning
Use only accessories recommended for this lathe. Follow the
instructions that accompany accessories. Use of improper accessories may cause hazards.
For your own safety, use only lathe cutters sized and recommended for this lathe. Follow the instructions that accompany the cutters.
Important
For proper turning, it is essential that:
• the correct turning tool has been selected for the appropriate
purpose
• the blade of the turning tool is sharp
Important
When the automatic feed is switched on, always ensur e that the
support or turning tool do not collide with the lathe chuck or
tailstock.
• the blade of the turning tool sits exactly in the "centre" position
• and is operated at the correct speed.
-9-
Inside turning tools (a) (Fig. 8)
Example:
• are used for interior diameter turning.
A work piece with a diameter of 20 mm is to be turned at a cutting
speed of 50 rpm.
Cutoff tools (b)
• for plungecutting grooves and cutting off work pieces.
50 x 1000
= 796/min
20 x 3.14
Thread tools (c)
• are used for cutting outer threads. Finishing or tapering tools (d)
• are used to achieve a clean surface when removing small chips.
Right side tools (e)
• are used to remove as many chips as possible in a short time
when machining towards the right, regardless of the surface
quality of the work piece.
By shifting the V-belt (Fig. 10), set to the next highest speed. In
this case, the speed is 1600 rpm. The correct speed is now set via
the controls, and here is important to note that the controls cover
a speed range of 25% to 100%, i.e. in our example, 400 rpm to
1600 rpm.
1. Release the clamp screw from the drive gearbox and open the
flap.
2. Release Vbelt tensioner 1 (Fig. 10).
Left side tools (f)
• are used to remove as many chips as possible in a short time
when machining towards the left, regardless of the surface quality of the work piece.
3. Adjust the relevant speed by shifting the Vbelt according to
Fig. 11
4. Retighten Vbelt tensioner. Note the appropriate tension of the
Vbelt. Overtensioning increases the wear of the belt and
bearing and reduces the motor power.
5. Close the drive gearbox before commencing turning work.
Inserting the turning tool in the tool holder
1. Unscrew both fastening screws 1 (Fig. 9) until the selected turning tool (3) fits into the mount.
Important
Give the turning tool as short an overhang as possible. Allowing
the tool to project too far leads to vibrations, impr ecision and an
unclean surface.
Clamping the work piece in the lathe
chuck
Warning
To avoid injury from accidental start, make sure the switch is in the
OFF position and the plug is not connected to the power source
receptacle before changing any parts or tools (i. e. cutter).
2. Insert the turning tool (3) and tighten the fastening screws (1).
3. Move the turning tool to the centre (4) and check whether the
height has been correctly adjusted.
Note:
For height deviations, small metal sheets (2) (e.g. valve sensor
gauges) must be placed beneath the complete surface.
Setting the spindle speeds
Important
Important
If work pieces are clamped in the lathe chuck using the tail stock
without a steady, the projection (Fig. 12) must not be gr eater than
three times the diameter of the material (L = 3 x D).
Note:
The normal lathe chuck has three steel jaws, which are uniformly
adjusted and centre round work pieces automatically.
In the normal position, work pieces can be clamped up to a diameter of 35 mm. After turning the jaws, it is possible to clamp up
to a diameter of 68 mm.
Always disconnect the mains plug befor e working on the drive
gearbox. Risk of injury.
1. Turn the lathe chuck 2 (Fig. 12) using the wrench (1) until the
work piece fits in the mount.
The spindle speed must be adjusted to suit the work piece
material and diameter.
Do not leave the wrench in the lathe chuck. Risk of injury .
Calculating the maximum spindle speed
The required spindle speed can be calculated when the specified
maximum cutting speed for a certain material is known.
Maximum permissible spindle speed
Cutting speed x 1000
=
Working piece diameter x 3.14
- 10 -
Important
2. Clamp the work piece tightly and remove the wrench from the
chuck.
3. Check the running of the work piece and correct if necessary.
Important
Clamping a longer work piece which has been guided thr ough the
spindle and is projecting to the left increases the risk of injury. In
this case, be particularly careful to ensure that no objects are
caught in the rotating shaft. Protect this zone separately by fuse.
Turning the jaws of the lathe chuck
Important
Remove mains plug.
Face turning
Note:
This method of working is used to turn off the face of a work
piece.
Important
Do not clamp work pieces with a diameter gr eater than 68 mm.
The clamping force of the jaws is then too small and the work
piece may become loose. Danger of accident.
1. Adjust the right side tool by approx. 2° to 3° (Fig. 15).
2. Move the cross-slide from outside inwards (to the centre) with
the turning tool.
Note:
The jaws are numbered.
1. Open the lathe chuck until the jaws are released from the
chuck. This occurs in the sequence 3, 2 and 1.
2. Turn the jaws and first insert no. 3 in one of the three guides
(Fig. 13).
3. Press jaw no. 3 in the direction of the lathe chuck centre and
simultaneously turn the chuck wrench in the "clamp" direction.
4. When the thread worm (4) has gripped jaw no. 3, insert jaw
no. 2 into the next guide (clockwise).
Important
The cutting speed from outside inwards differs considerably for
work pieces with larger diameters. Ther efore, push the crossslide slowly and sensitively.
Taper turning
The top slide (Fig. 16) is equipped with a scale and can be swivelled by 45° on either side of zero for taper turning. To do so, release
fastening screw (1), adjust top slide and then re tighten.
5. Repeat procedure described above with nos. 2 and 1.
6. Then check that all jaws are in the central position.
7. If you want to work with the inside jaw chuck again, repeat the
steps described above in the reverse order, i.e. first insert jaw
nos. 1 and 2, and then 3.
Cutting off a work piece
1. Clamp the cutoff tool at right angles in the tool holder.
Longitudinal turning
Note:
Turning parallel to the rotational axis and machining cylindrical
objects are the main uses of a lathe.
1. Select the spindle speed according to the table on your lathe.
2. Adjust the required speed by shifting the belt in the drive gearbox (see previous section).
3. Clamp a right side tool 2 (Fig. 14) in the tool holder (see previous section).
Important
Give the cutoff tool as short an overhang as possible (half of the
diameter of the work piece + 1 mm). Similarly , give the work piece
as short an overhang as possible.
Note the exact centre height of the cutoff tool. Work at low
speeds and cool blade as often as possible.
2. Sensitively move the crossslide from outside inwards (to the
centre) with the turning tool. Machining longer work pieces with
tail stock and centre
4. Switch off the automatic feed (3).
5. Move the support from the right to the left of the work piece.
6. Adjust the cutting depth using the crossslide (1).
Important
If the chuck projection is greater than three times the diameter of
the work piece, the work piece must be held at the right end by
the tailstock and centre.
Important
Before switching on the machine, manually check whether the
spindle, chuck and work piece ar e running free.
For this purpose, a centre bore must be drilled on the right side of
the work piece.
Do not allow the support or tur ning tool to collide with the lathe
chuck.
1. Face turn the right face.
7. Switch on the machine (clockwise rotation).
8. Manually feed or switch on the automatic feed (3), do not
overload the machine.
2. Insert the drill chuck (accessories) in the tailstock and clamp
the centring drill.
3. Move the tailstock with drill chuck and centring drill up to the
face of the work piece.
4. Switch on the machine and drill centre bore using the sleeve
feed.
Note:
If the top slide is not necessary, it is advisable to clamp it with the
screw 4 (Fig. 14). The turning performance is improved by eliminating play.
5. Replace the drill chuck with the rotating centre 1 (Fig. 17).
6. Insert the centre in the centre bore and clamp the tailstock (3)
securely.
7. Advance the sleeve (2) until all play is eliminated.
8. Secure the sleeve using a set screw (4).
- 11 -
Fitting change gears for thread cutting
Note:
The PROXXON Lathe PD 230/E offers You the possibillity to cut
inch system based threads as well as metric threads. You find a
label on the inside of the cover of the gearbox of the machine to
get the desired gear combination.
The PD 230/E is supplied with installed gear arm and the change
gear combination for the automatic feed of 0.05 mm/revolution. It
is only necessary to replace the change gears installed on the gear
arm for thread cutting.
1. Release the clamp screw 1 (Fig. 18) and tilt the gear arm (2)
slightly upwards to remove the toothed belt (4).
2. Remove the fastening screws (3 and 5) from the normal gears
for the automatic feed.
Note:
Note:
The grain of the leadscrew change "L" must always point to the
lathe chuck.
The set screw (1) must be clamped onto the flattened part of the
shaft.
Important
To ensure that there is sufficient play between the change gears,
always insert a strip of newspaper between the teeth when
pushing the change gears together. The thickness of the newspaper should correspond to the required tooth play.
5. Push the axle of the change gear "Z1-Z2" onto the arm so that it
contacts the leadscrew gear "L" and then tighten the fastening
screw nut (2).
6. Position the short toothed belt for the connection between the
gears "W" and "Z1" on the main spindles.
7. Push the gear arm (3) downwards and tighten the clamp screw
(4).
The number of teeth is imprinted on all change gears.
For example, if cutting a thread with a pitch of 1.0 mm, the table
on the drive gearbox will show the following data:
Thread cutting with the tur ning tool
Note:
mm
For the following operations, the work piece must be machined
completely and have the correct thread outer diameter.
It is advisable to work out a chamfer at the beginning of the
thread. The thread turning tool must be clamped at an angle of 90°
exactly.
W
Z1
Z2
L
0.5
15
15
20
40
0.625
15
15
25
40
0.7
15
15
28
40
0.75
15
15
30
40
0.8
15
15
32
40
1.0
15
15
20
20
3. Switch on the machine 2 (Fig. 20) (clockwise rotation).
1.25
15
15
25
20
4. Advance the turning tool on the cross-slide (1) and engage
feed (3).
1.5
15
15
30
20
5. Switch off the machine when the required thread length has
been reached (2).
W 15 - gear on the main spindle with 15 teeth. This gear is already
installed on the shaft and must not be replaced.
Z 1 15 - Z 2 20 - Intermediate gear for the toothed belt of the main
spindle with 15 teeth and permanently linked gear for the
leadscrew with 20 teeth.
L20 - leadscrew gear with 20 teeth. Of course all operations to cut
a inch system based thread are analogous to the described example with the metric thread! Note the different units for the thread
pitch on the labels inside the gear box cover!
1. Clamp the work piece.
2. Switch off the automatic feed and set the turning tool to the
starting position.
Important
Use the lowest speed when cutting thr eads and proceed with
utmost caution.
Important
The automatic feed must remain switched on until completion of
the thread. Disengaging between individual steps r enders further
work impossible.
Only switch over the motor switch once the lathe chuck has come
to a complete standstill. Switching over immediately incr eases
wear and reduces the service life of the motor.
6. Move back the turning tool slightly with the cross-slide.
3. Fasten the change gear "Z1-Z2" with 15/20 teeth (Fig. 19) to the
gear arm (3) using the screw (2), pulley, reduction sleeve and
nut.
7. Move the support back to the output position. To do so, switch
over the turning direction of the main spindle.
Note:
8. Advance the turning tool and repeat the steps described above
until the required thread depth is reached.
Do not yet tighten the fastening screw nut (2) (off-centre adjustment must still be possible).
The change gear "Z1-Z2" runs freely between pulley and sleeve.
The washer prevents the toothed belt from becoming detached
from the gear "Z1".
4. Release the set screw (1), remove the change gear "L40" and
replace with the change gear "L20".
- 12 -
Thread cutting using the top slide
A perfect, good-quality thread can only be cut by using the top
slide (accessories).
Advancing the thread tool is performed using the cross-slide as
described above.
However, this causes the top slide to shift by 0.025 mm to the left
and the same distance to the right.
The chip in the thread is therefore always only removed from one
side.
Once the full thread depth has been reached, a final full cut is
made by advancing slightly.
Cutting left threads
Removing the centre
8. Guide a suitable aluminium or brass rod through the main
spindle from left to right.
9. Hold the centre and release by lightly tapping the rod.
Four-jaw chuck
Note:
Round, oval, square and irregularly shaped work pieces can be
clamped as it is possible to adjust the jaws individually.
Centric or eccentric clamping is possible.
To cut left threads, the intermediate gear 1 (Fig. 21) must be installed between "Z1-Z2" and the leadscrew gear "L1".
In doing so, the turning direction of the leadscrew is reversed. The
support runs from right to left when the chuck is turning clockwise.
Unlike the threejaw chuck, centring of the work piece must be performed manually.
Important
Remove mains plug.
Installation and operation are as described above.
1. Detach the three-jaw chuck and attach the four-jaw chuck.
Accessories for Lathe PD 230/E
Note:
The following accessories are not included in the standard equipment.
Installing the centre lathe
2. Open the four jaws, clean the contact faces and clamp the
work piece lightly according to visual estimation.
3. Move the support and turning tool onto the plane surface of the
work piece.
4. Turn the chuck by hand to establish symmetrical deviations.
6. Adjust by opening one of the jaws and reset the opposite jaw
accordingly.
7. Tighten all four jaws evenly, alternating crosswise.
Note:
Important
Longer work pieces are clamped between the brad points of the
main spindle and tailstock.
In the normal clamping jaw position, only work pieces with an
edge of up to max. 30 mm long can be clamped. The maximum
length is 80 mm in the r everse position.
The work piece must have a centre bore on both faces.
Larger work pieces are not securely held. Danger of accident.
Collet chuck unit and collet chucks
An exact cylindrical work piece is only achieved if the points align
in the horizontal position.
1. Remove three fastening screws from the three-jaw chuck and
remove chuck.
2. Thoroughly clean the fit for the driving disc and centre and its fit
in the main spindle.
Note:
The collet chuck unit is especially suitable for processing round
parts with great precision. The truth of running is considerably
greater than when working with a jaw chuck.
3. Insert the centre 4 (Fig. 22) in the fit (1) of the main spindle.
4. Fit the driving disc (2) and fasten with three screws (3).
5. Push the lathe carrier 1 (Fig. 23) onto the work piece (driving
pin outwards) and tighten the fastening screw (2).
6. On the left side, insert driving pin in one of the three long holes
on the driving disc and the centre in the centre bore.
7. On the right side, attach the work piece using the tailstock and
fixed or rotating centre.
Important
Remove mains plug.
1. Remove three fastening screws from the threejaw chuck and
remove chuck.
2. Thoroughly clean the fit for the collet chuck mount 2 (Fig. 24)
and the fit in the main spindle (1).
3. Attach the collet chuck mount (2) using four fastening screws (3).
Important
When using a centre fixed to the tailstock, r egular lubrication of
the centre and centre bore is necessary to prevent the temper
from loosening.
- 13 -
Important
Always use the correct collet chuck to suit the work piece.
Chucks with an oversized diameter ar e destroyed.
4. Insert the collet chuck (6) and loosely screw in the union nut (5).
Maintenance
Important
Disconnect mains power before cleaning and maintaining unit.
Do not use compressed air when cleaning.
Important
Warning
Never tighten the union nut when ther e is no work piece inserted.
Remove the pins 4 (Fig. 24) for tightening the union nut (5) immediately after tightening.
5. Insert the appropriate work piece in the collet chuck and tighten
the union nut (5) using the tool pins (4).
Fastening the drill chuck
To avoid fire or toxic reaction, never use gasoline, naphtha, acetone, lacquer thinner, or similar highly volatile solvents to clean the
lathe.
Do not allow brake fluids, gasoline, or penetrating oils to come in
contact with the plastic parts. They contain chemicals that can
damage or destroy plastics.
Turn switch OFF and always remove plug from power source before making any adjustments or repairs.
All electrical or mechanical repairs should be done only by qualified service technicians.
1. Remove the rotating centre from the sleeve. Thoroughly clean
the grease and dirt from the shank taper and chuck bore.
When servicing use only PROXXON replacement parts. Use of any
other parts may create a hazard or cause product damage.
2. Insert the journal in the sleeve and firmly push onto the drill
chuck.
Any attempt to repair or replace electrical parts on this lathe may
create a hazard unless repair is done by a qualified service technician. Repair service is available at your PROXXON service center
(You find the address at address at the back of this manual)
Note:
Releasing the drill chuck is performed in the same way as the rotating centre.
General
Fixed steady
The steady is particularly suitable for hollowing out long work pieces with diameters up to 40 mm.
1. Release the fastening screw 4 (Fig. 25) and position retaining
plate (3) crosswise.
2. Place the steady on the bed guide and set to the required position.
3. Swivel the retaining plate (3) parallel to the steady base and
tighten fastening screw (4).
1. After use, thoroughly clean all chips from the machine using a
brush or hand brush.
2. Lubricate or oil all parts according to lubrication diagram
(Fig. 26).
A = oil / lubricate before use
B = oil / lubricate once a month
Setting the guide play
4. Release all clamp screws (1) and drive the individual retaining
jaws (2) onto the work piece
Important
The jaws (2) must only touch the work piece and must not jam.
Otherwise there is a risk of the work piece surface becoming
scratched and the motor becoming overloaded.
If the work piece is not round and smooth at the support point, it
must first be turned round.
Lubricate the jaws and work piece regularly when turning.
Note:
Regular lubrication of the guides does not prevent evidence of play
in the guides after a certain amount of time.
1. Release adjustment screw lock nuts 1 (Fig. 27) for the radial
facing slide, screw in all adjustment screws evenly until play is
eliminated and retighten the lock nuts.
2. Release adjustment screw lock nuts (2) for the longitudinal
facing slide, screw in all adjustment screws evenly until play is
eliminated and retighten the lock nuts.
3. Turn over the machine and slightly unscrew the set screw 2
(Fig. 28).
5. Check that the work piece is positioned in the steady free of
play and retighten clamp screws (1).
4. Retighten clamp screws (1) loosely.
Important
Then check whether the support can still be pushed easily .
Adjust play in handwheel.
1. Release cap nut.
2. Reset handwheel
3. Retighten cap nut.
- 14 -
Spare parts list
Assembly 00: Change gears
18/19 21
32
27
22/23
24/25
31
28
30
29
26
17
15
16
14
10
11
7
2
4
8
11 13 12
1
3
9
5/6
- 15 -
Spare parts list
Please order spare parts in writing from PROXXON Central Service
(Address on back of instruction manual)
Assembly 00: Change gears
Part No.:
Designation
34004-0001
Set screw for automatic feed
34004-0002
Nut for clamp screw
24004-0003
Gear arm
34004-0004
Set screw
34004-0005
Leadscrew Z 20
34004-0006
Leadscrew Z 40
34004-0007
Hexagon nut
34004-0008
Intermediate gear
34004-0009
Fastening screw
34004-0010
Washer
34004-0011
Fastening screw
34004-00 12
Change gear 64/16
34004-0013
Washer
34004-0014
Fastening screw
34004-0015
Washer
34004-0016
Change gear 30/16
34004-0017
Bushing
34004-0018
Toothed belt T 5 - 40
34004-0019
Toothed belt T 5 -50
34004-0021
Change gear Z 15
34004-0022
Intermediate gear Z 15
34004-0023
Intermediate gear Z 15/28
34004-0024
Intermediate gear Z 15/25
34004-0025
Intermediate gear Z 15/20
34004-0025a
Intermediate gear Z 15/32
34004-0026
Bushing
34004-0027
Nut
34004-0028
Nut
34004-0029
Clamp screw for gear arm
34004-0030
Nut
34004-0031
Fastening screw
34004-0032
Clutch
- 16 -
56
1
10
2
3
55
16
14
4
14
5
11
24
57
18
6
19
25
21 22
17
13
4
20
12
27
28
26
7
29
30
33
20
35
15
41
31
20
36
40
62
32
64
42
53
38
39
10a
52
66
27
45
65
63
50
66
49
Spare parts list
Assembly 01: Drive unit with headstock
- 17 -
Spare parts list
Please order spare parts in writing from PROXXON Central Service
(Address on back of instruction manual)
Assembly 01: Drive unit with headstock
Part No.:
Designation
Part No.:
Designation
34004-0101
Gearbox
34004-0135
Nut
34004-0102
Type plate
34004-0136
Nut
34004-0103
Retaining ring
34004-0138
Spacer sleeve (1 x plastic, 1 x metal)
34004-0104
Bearing ring
34004-0139
Screw
34004-0105
Intermediate belt pulley
34004-0140
Motor belt pulley
34004-0106
Intermediate ring
34004-0141
Set screw
34004-0107
Shank
34004-0142
Motor
34004-0110
Mat
34004-0145
Main spindle
34004-0110a
Mat, short
34004-0149
Rotary knob
34004-0111
Power supply cable
34004-0150
Set screw
34004-0112
V-belt, main spindle
34004-0151
Headstock
34004-0113
V-belt, engine
34004-0152
Screw
34004-0114
Pin
34004-0153
Rotary switch
34004-0115
Strain relief
34004-0155
Tread-cutting table
34004-0116
Screw
34004-0156
Speed table
34004-0117
Screw
34004-0157
Gearbox hinge
34004-0118
Sleeve
34004-0158
Lathe chuck (0. Fig.)
34004-0119
Plate
34004-0159
Lathe chuck spanner (0. Fig.)
34004-0120
Screw
34004-0160
Fastening screw for lathe chuck (0. Fig.)
34004-0121
Screw
34004-0161
Compl. tool kit (0. Fig.)
34004-0122
Ball bearing
34004-0162
Board (without LED)
34004-0124
Ring nut
34004-0163
LED
34004-0125
Main spindle belt pulley
34004-0164
Main switch
34004-0126
Spacer ring
34004-0165
Label
34004-0127
Main spindle bearing
34004-0166
Knurled knob
34004-0128
Screw
34004-0197
Article packaging (0. Fig.)
34004-0129
Sleeve with bearing and inner part
34004-0199
Operating instructions (0. Fig.)
34004-0130
Sleeve
34004-0131
Motor mounting plate
34004-0132
Screw
34004-0133
Nut
- 18 -
Spare parts list
2
10
19
9
20
8
11
1
3
14
12
4
6
5
7
13
16
Assembly 02: Bed with leadscrewl
- 19 -
Spare parts list
Please order spare parts in writing from PROXXON Central Service
(Address on back of instruction manual)
Assembly 02: Bed with leadscrew
Part No.:
Designation
34004-0201
Bed with ground guide
34004-0202
Leadscrew
34004-0203
Leadscrew coupling
34004-0204
Leadscrew bearing
34004-0205
Handwheel
34004-0206
Scale ring with spring
34004-0207
Handle
34004-0208
Set screw
34004-0209
Coupling pin
34004-0210
Coupling
34004-0211
Switch for feed
34004-0212
Set screw
34004-0213
Cap nut
34004-0214
Pin
34004-0216
Screw
34004-0219
Pin
34004-0220
Set screw
- 20 -
Spare parts list
Assembly 03: Support
2
1
6
3
4
7
5
8
10
11
12
32
31
13
33
34
30
3
29
4
14
28
15
5
16
17
27
18
26
25
24
19
21
23
22
20
- 21 -
Spare parts list
Please order spare parts in writing from PROXXON Central Service
(Address on back of instruction manual)
Assembly 03: Support
Part No.:
Designation
34004 - 0301
Tool carrier
34004 - 0302
Screw
34004 - 0303
Nut
34004 - 0304
Set screw
34004 - 0305
Screw
34004 - 0306
Spindle
34004 - 0307
Screw
34004 - 0308
Top slide
34004 - 0310
Scale ring with spring
34004 - 0311
Handwheel
34004 - 0312
Cap nut
34004 - 0313
Spindle nut
34004 - 0314
Handle
34004 - 0315
Screw
34004 - 0316
Spindle
34004 - 0317
Screw
34004 - 0318
Cross-slide
34004 - 0319
Plate
34004 - 0320
Set screw
34004 - 0321
Screw
34004 - 0322
Screw
34004 - 0323
Handle
34004 - 0324
Cap nut
34004 - 0325
Handwheel
34004 - 0326
Scale ring
34004 - 0327
Insert
34004 - 0328
Felt pad
34004 - 0329
Cover
34004 - 0330
Screw
34004 - 0331
Square nut
34004 - 0332
Screw
34004 - 0333
Spacer block
34004 - 0334
Set screw
- 22 -
Spare parts list
9
13
2
1
14
5
11
12
3
10
4
7
6
15
8
17
Assembly 04: Tailstock
- 23 -
Spare parts list
Please order spare parts in writing from PROXXON Central Service
(Address on back of instruction manual)
Assembly 04: Tailstock
Part No.:
Designation
34004 - 0401
Tailstock body
34004 - 0402
Sleeve
34004 - 0403
Spindle
34004 - 0404
Bearing
34004 - 0405
Guide plate with threaded hole
34004 - 0406
35 mm handwheel
34004 - 0407
Scale ring with spring
34004 - 0408
Handle
34004 - 0409
Rotating centre
34004 - 0410
Set screw
34004 - 0411
Set screw
34004 - 0412
Screw
34004 - 0413
Nut
34004 - 0414
Screw
34004 - 0415
Cap nut
34004 - 0417
Screw
- 24 -