1
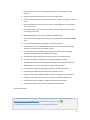
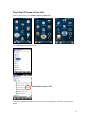
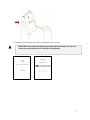
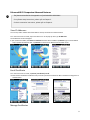
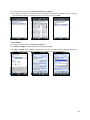
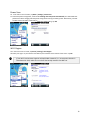
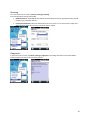
SERVICE PACK 4 SOMO® 655 Release Notes and Installation Guide Version: 1.00.04 SP4 (build 11960) 06/2014 Document # SMSP42014 Copyright Notice Copyright © 2012‐2014 Socket Mobile, Inc. All rights reserved. Socket, the Socket logo, SoMo, SocketCare, SocketScan, Connect!Agent, and Wi‐Fi Companion are trademarks or registered trademarks of Socket Mobile, Inc. Bluetooth and the Bluetooth logos are registered trademarks owned by Bluetooth SIG, Inc., U.S.A. and licensed to Socket Mobile, Inc. Wi‐Fi and the Wi‐Fi logo is a registered trademark of the Wi‐Fi Alliance. Windows Mobile is a trademark of the Microsoft group of companies. All other brand and product names are trademarks of their respective holders. The SoMo 655 includes technology licensed under European Community Registered Design Nos. 000745245‐0001, 000745245‐0002 and 000745245‐0003. Reproduction of the contents of this manual without the permission of Socket Mobile is expressly prohibited. Please be aware that the products described in this manual may change without notice. Feel free to contact Socket Mobile at: Socket Mobile, Inc. 39700 Eureka Drive Newark, CA 94560‐4808 USA www.socketmobile.com/contact Other than the above, Socket Mobile can assume no responsibility for anything resulting from the application of information contained in this manual. Please refrain from any applications of the SoMo 655 that are not described in this manual. Please refrain from disassembling the SoMo 655. Disassembly of this device will void the product warranty. You can track new product releases, software updates and technical bulletins by visiting the Socket Mobile website at: www.socketmobile.com 2
Release Notes 1) User Interface Improvements*: a.
eWFC has been renambed to Go Wi‐Fi! b.
Go Wi‐Fi! Is preinstalled c.
Added program to back date to Wireless Zero Config 2) SocketScan Plug‐in Updates: a.
Added support the 6E2/6E2Rx RFID Reader with NFC and 6P2/6P2Rx with NFC & Scan Cards. b.
Added support for the 5P Rev H CF Scan Card which has the SE‐965 Scan Engine. c.
Corrected memory overflow issue* 3) Go Wi‐Fi! Updates: a.
Improved roaming in Mixed Mode security environments. b.
More robust communications during Network Authentication phase. c.
Fixed minor issues with Hidden networks (when SSID is not broadcasted). d.
Roaming among multiple Hidden Networks is supported (controlled via Wi‐Fi Region) e.
Improved support for very large programs* f.
Eliminated infrequent lockup during resume* g.
Fixed issues when attempting to connect to non‐existent or out of range Access points* 4) Includes the Windows Embedded Handheld 6.5 Adaptation Kit Update (AKU) 6.5.3.12.24 from Microsoft, which resolves or implements the following issues: a.
Fixed remote code execution vulnerabilities in Internet Explorer caused by object handling in memory. b.
Added support for customer‐defined input Bluetooth HID queue size in Hidmdd.lib c.
Fixed a vulnerability in Internet Explorer that occurred while downloading page content with undetermined encoding from an unknown server. d.
Fixed a remote code execution vulnerability in Internet Explorer that could steal sensitive information from the user. e.
Fixed an exception that occurred when creating multiple Outlook contacts in the Contacts application. 3
f.
Fixed a remote code execution vulnerability caused by an Internet Explorer script injection. g.
Corrected the drawing of the title text in the Contacts application. h.
Corrected the handling of the uppercase conversion of a registry path string in a Turkish locale. i.
Corrected the behavior of an Alt key press when a Remote Desktop Connection (RDC) client session is ON. j.
Increased the width to ensure the correct display of time and time style in the settings for all regions and locales. k.
Added physical pages cache‐memory support for OMAP4 devices. l.
Synchronized events during a file transfer when using Ethernet and the RNDIS/USB8023 driver. m. Corrected the handling of the GID_SCROLL message in tab control. n.
Corrected the logic for the DeleteIpNetEntry function so it works when an Exchange ActiveSync connection that uses USB PPP is active. o.
Corrected the logic for the GetIpNetEntry function so it works when an Exchange ActiveSync connection that uses USB RNDIS is initialized. p.
The value of the global context switch during run time is now loaded correctly. q.
Corrected the logic for the display of the messaging application interface. r.
The Supported Time Zones list was updated to include new and updated information s.
Additional space for version information for Japan and Czech locales. t.
Corrected the ID used when displaying the beam icon for large file transfers. u.
Updated logic for displaying a Bluetooth icon on the Home screen. v.
Support for displaying new SMS message icon after restarting for Pocket PC devices. w. Changes to help prevent Data Abort errors in Mshtml.dll caused by buffer issues. x.
New build environment variable to support customized startup function. y.
Time zones for default cities in Clocks & Alarms have been updated. * Implemented in SP3 To download the latest Service Pack (SP), please log into your Support account at http://support.socketmobile.com/ and click on the green arrow . To check the SP version on your unit, see instructions below. 4
Check the SP Version of Your Unit. From the Start screen, tap on Settings | System | System Info. Tap on OS Version to view information. Service Pack version = SP4
If you need to update your SoMo with the latest Service Pack, follow the instructions for installation below. 5
Installation Guide: WARNING: You will lose all data files and applications during the upgrade process! STEP1:PowertheDevice
Socket highly recommends that you plug the SoMo 655 into an external power source using the charging cable/cradle. Alternatively, make sure the SoMo battery is adequately charged. STEP2:BackupDataontheDevice
If you have any data on the SoMo 655, please back it up to an external location before you run the update. STEP3:TransferFilesusingaMemoryCard
IMPORTANT: It is not recommended you transfer files using ActiveSync or the Windows Mobile Device Center! The directory SOMO655 containing the ROM image files must be moved to the SoMo 655 with a microSD or CF memory card that is formatted in FAT12 or FAT16. Make sure your memory card has at least 40 MB of free space. Most higher‐capacity cards are formatted by default in FAT32, which is not supported. SDHC cards are not supported in Windows Embedded Handheld. If you want to reflash from a CF card, make sure you do not have a microSD card in the microSD slot. 1. On your PC, use My Computer or Windows Explorer to locate the directory SOMO655, which contains the upgrade files. 2. Copy the SOMO655 directory to the root of your memory card. IMPORTANT: Copy the SOMO655 directory to the root of the memory card! DO NOT change the name of the folder! Good Example: F:/SOMO655 F:/Socket/SOMO655 Bad Example: Bad Example: 3. Insert the memory card into the device. STEP4:InstalltheFiles
4. Press and hold the Right Programmable Application button on your SoMo 655. 5. While holding the button, use the stylus to gently press the Reset button on the back of your SoMo 655. Keep holding the Right Programmable Application button. 6
6. An EBOOT screen will appear with a timer, counting down from 5 seconds. IMPORTANT: Keep holding the Right programmable application button until the timer reaches 0 seconds! Otherwise the installation will be aborted. 7
7. The SoMo 655 will begin to download and update the ROM image. 8. After the installation reports, “Update completed!” the Socket splash screen will appear for about 30 seconds then disappear. Socket Splash 9. The Windows Embedded Handheld splash screen will appear for about 30 seconds. 10. The Windows Welcome wizard will prompt you to set up Windows Mobile. Follow the instructions on your screen. 11. After setting up Windows Embedded Handheld, the Today screen will appear, and the SoMo 655 will be ready to use. Today 8
Enhanced Wi‐Fi Companion Advanced Features The features described in this appendix are for ADVANCED USERS ONLY. For software setup instructions, please refer to Chapter 2. For basic connection instructions, please refer to Chapter 4. View IP Addresses You can only view IP address data if the SoMo is actively connected to a WLAN network. 12. In the main screen of e‐WFC, tap on the device icon. In the pop‐up menu, tap IP Addresses. The IP Addresses screen will appear. If your network uses DHCP, the Renew and Release functions will be enabled. Tap Renew to get a new IP address and/or update related lease data. Tap Release to release the IP address from the DHCP server. Enroll Certificate 13. In the main screen of e‐WFC, tap Menu | Certificates | Enroll. Use the Personal Certificate Enrollment utility to install a personal certificate for 802.1x networks running EAP‐TLS authentication. Manage Certificates 9
14. In the main screen of e‐WFC, tap Menu | Certificates | Certificates. Use the utility to manage your root, personal and intermediate authentication certificates. To view a certificate, tap and hold the stylus on a certificate in the list. In the pop‐up menu, tap View. Trace Route 15. In the main screen of e‐WFC, tap Menu | Trace Route. 16. Tap Menu | Configure. Enter the appropriate settings and tap OK. 17. Tap Start. Tap Stop to end the trace at any time, or let the trace run until complete. A prompt will report the statistics. Tap ok. To view the full host name of any of the hops, tap on the hop in the list. 10
Ping 18. In the main screen of e‐WFC, tap Menu | Ping. 19. Tap Menu | Configure. Enter the appropriate settings and tap OK. 20. Tap Start. To end the test, tap Stop. A prompt will report the statistics. Tap ok. Statistical Graphs and Tables 21. In the main screen of e‐WFC, tap Menu | Statistics. 22. In the pop‐up menu, tap Graphs to view scrolling line graphs of the signal quality, rate, and sent and received data rates. Alternatively, tap Tables to view tables of information about the current connection. Tap on the tabs and scroll to view all the data. 11
Manage Profiles The Manage Profiles screen displays the configured networks (i.e., profiles) and allows you to rank the networks in order of priority for connection attempts. 23. In the main screen of e‐WFC, tap and hold the stylus on the radio tower icon. In the pop‐up menu, tap Manage Profiles. Alternatively, tap Menu | Settings | Manage Profiles. A list of network profiles will appear. To configure a new network profile, tap New and follow the Configure Wireless Network wizard. To search for available networks, tap Scan. Tap and hold the stylus on any profile in the list to reveal a pop‐up menu that enables you to quickly connect to, edit or delete the selected profile. If multiple profiles are listed, you can also set their order of priority by moving profiles up or down in the list. The SoMo will try to connect to the #1 ranked network, then #2 etc. until a connection is made. Profile Icons Current connection. This icon appears only when multiple profiles are listed. Signal strength of strongest AP (access point)/ad hoc radio WEP encryption, WPA (PSK), WPA (TKIP), WPA2 or 802.1x No encryption Priority ranking. Profile saved 802.11b, 802.11g, 802.11n 12
Power Save 24. In the main screen of e‐WFC, tap Menu | Settings | Power Save. For automatic power management, check the box Manage the radio power automatically. This will enable best performance when charging and best power savings when running on battery power. Alternatively, uncheck the box and use the slider to manually choose your power setting. Tap OK. Wi‐Fi Region 25. In the main screen of e‐WFC, tap Menu | Settings | Wi‐Fi Region. 26. Select your region. If your network uses 802.11d, check the box at the bottom of the screen. Tap OK. If your Wi‐Fi environment supports multiple hidden networks (i.e., access points that don’t broadcast their SSID, make sure to uncheck the box My network uses 802.11d. 13
Roaming 27. In the main screen of e‐WFC, tap Menu | Settings | Roaming. Enter the appropriate settings and tap OK. 1. Network protocol: Select Auto for the software to automatically choose the appropriate mode, select G for 802.11g or select B for 802.11b. 2. Environment AP density: Select the relative density of access points in your environment to adjust how aggressively the SoMo will roam from one access point to another. Diagnostics In the main screen of e‐WFC, tap Menu | Settings | Diagnostics. The binding information is for Socket Mobile technical support only and not for use by the end user. 14
Logging In the main screen of e‐WFC, tap Menu | Settings | Logging. The log files can be sent to Socket Mobile technical support to troubleshoot connection issues. 15