1
1 Activation· Before starting
Speed Master Watch
SPEED MASJE7i
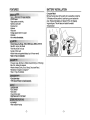
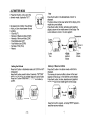
Please remove Ihe protective foil from Ihe display when you use
the speed master watch for the first time and press Ihe A, C or
o button (scund signal), until all display segments appear for a
short time. You automatically reach setting Ihe units of
measurement (metric or imperial).
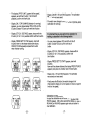
• Choose between Ihe METRIC and IMPERIAL wilh the C button.
Confirm your selection wiIh the A button, Ihe 24H blink.
• Choose between Ihe 12H and 24H display wilh the C button.
Confirm your selection wtlh the A button, Ihe seconds blink.
ALTIMETER WITH Me-me
Note: By preasing and holding tho C button you can usa
tho fast forward function In tho settings.
• Press Ihe C button to reset Ihe seconds to zero. Confirm wilh
Ihe A button, the minutes blink.
• Set the minutes with Ihe C button. Confirm with Ihe A button,
Ihe hour blink.
• Set the hours, year, month , day, weight and height as
described above. Now press Ihe 0 button, all settings is
saved.
The speed master watch can be worn like a wristwatch.
o
- 1-
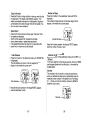
FEATURES
BATTERY INSTALLATION
SPEED MASTER
• Digital motion sensor for speed detection
• Current speed
• Target speed zone training
• Speed out zone alert
• Exercise timer
• Distance
• Step count
• Average speed, Maximum speed
• Odometer
• Km or mile unit selectable
Computer Watch
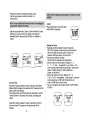
Remove the back cover of the watch with a screwdriver, install the
3.0V-battery with the positive(.) pole facing up and replace the
cover. Remove the battery and reinsert It If the LCD displays
Irregular flQures. This will clear and restart the watch's
microprocessor.
TIMETER
• Altitude Measuring Range: -999 to 9999 meter (-2999 to 29999 It)
• MaxlMin. memory for altitude
• Total Altitude Gain and Loss
• Number of Hills count
• Altitude history and graphical display (up to 8 hours record)
• Meter or Feet unit selectable
,
3V battery CR2032
• Pressure range -300 mbar to 1099.9 mbar (9.00 InHg to 31 .99 lnHg)
• Max.1 Min. memory for pressure
• Weather forecast (Sunny, Sunny Cloudy, Cloudy and Rainy)
• Temperahme in degree C or degree F
• mbar or inHg un~ selectable
CHRONOGRAPH
• Count-down timer
• 11100 second 99 laps multi-split stopwatch
WATCH
• Dual time clock
• Aulo Calendar
• CIocl< alarm
• HOIJ'Iy chime Signal
• Dig~1 clock with 121 24 format
o
E SPECIFICATIONS
• EL bacl<light
• Water resistant housing
- 2-
-3-
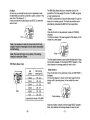
Function Button/Modes/Settings
TIME MODE
Function Buttons of the Speed Master Watch
Press the D button until you reach the
time mode, shown by "TIME".
LIGHT
Button
(B)
MODE
Button
(D)
~
'---
By pressing the C button In the time
mode, you can choose between the
sub-functions
• Time (TIME)
• Alarm (ALARM) and
• Countdown Timer (TIMER).
Time
Press the C button in
the time mode until
TIME Is displayed.
SET
(ST/SP)
Button
SELECT
(SPLIT)
Button
(C)
(A)
-- ~
TInE
(2J-~
(
TInE
~r
08 "
_...AJ::mO
(jjji)
12:0929
\ TU ID I"
In the time mode, the year is displayed in the upper segment
of the dIsplay and the weekday and date in the lower
segment.
Main Function Mode
The Speed Master watch has five main funcUon modes,
which are described further in the next chapters:
- Time Mode
- Stopwatch Mode
- Altimeter Mode
- Barometer Mode
- Pedometer Mode
The first mode displayed is the time mode. Press the D button
to switch between the different modes. The different modes
are described In sections TIME MODE, STOPWATCH MODE,
ALTIMETER MODE, BAROMETER MODE and
PEDOMETER MODE .
-4-
Setting the Tlme
Keep the A button pressed for about 3 seconds, "SETTING"
appears on the display and 24H blinks. Choose between the
12h and 24h display with the C button . Confirm your selection
WIth the A button, the seconds blink.
(jjji) -~
(l5I-~
HOLD
\ TO SET
\
2~H
- 5-
• Press the C button to reset the seconds to zero.
Confirm your selection with the A button, the
minutes blink.
Note: Start the setting procedure again to correct any wrong
settings.
Note: You can use the fast forward function in the settings by
pressing and holding the C button .
• Set the minutes with the C button. Confirm with the A button.
Set the hours, year, month, day, weight and height as
described above. Now press the D button, all settings is
saved.
"""-~
2DDB
( TU 912"
~-~
WEIGHT
(
13KG
GiJ-~
HEIGHT
ISDCM
Second Time
Keep the C button pressed for about 3 seconds, the Speed
Master Watch changes to the second time (T2 appears on the
bottom right of the display).
The setting of the second time works as described in section
"setting the time". Now press the 0 button, all settings are
saved.
Keep the C button pressed for about 3 seconds to return to
the normal time (T1 appears on the bottom right of the
display).
- 6-
Alarm
Press the C button in the time mode
until ALARM is displayed .
1El-~
(
ALARM
Setting the Alarm
• Keep the A button pressed for about 3 seconds.
"SETTING" appears on the display and minutes blink.
Set the minutes with the C button . Confirm your
selection with the A button. the hours blink.
• Set the hours with the C button .
Confirm with the A button. the month blinks.
• Set the month with the C button. Settings of 1. 2.
3 •. .. 11. 12 and - are possible . If you choose -. the
alarm sounds every month (on the set day - see the next
section. ' setting the day'). Confirm with the A
button. the day blinks.
• Set the day with the C button . Settings of 1. 2.
3. 30. 31 and - are possible. If you choose -. the alarm
sounds every day. Confirm with the A button. the
button CH IME (hourly alarm) blinks.
• You can now set the hourly alarm to ON or OFF with the
C button .
~-~
(!!!J-~
CHH1E
, OFF
CHIME
(
- 7-
ON
Countdown Timer
Bell symbol ~ displayed = hourly alarm on
Bell symbol not displayed = hourty alarm off
Press the C button in time mode until
TIMER is displayed.
Now press the D button, all settings are saved and the set
alarm is activated automatically.
The Speed Master Watch possesses a
countdown timer and a count up timer.
"
GilRt
_ .AJ:iIIO
t!!!!)-~
TInER
Basic setting 00:01 :00 (1 minute)
22:D5
Ii22 ••
Keep the A button pressed to set the countdown timer,
' SETTING" appears.
Set the minutes with the C button, confirm with the A button,
select the hours with the C button, confirm with the A button .
Activate/Deactlvate Alarm
Press the A button when the alarm time is
displayed
Alarm symbol oJ} is displayed = alarm on
Alarm symbol not displayed = alarm off
Switch off Alarm
When the alarm rings, you can switch
C or D button .
~
off by pressing the A,
r: The timer starts to count down the previously set time again
after zero is reached.
U: The timer starts to count up from zero after zero is
reached.
S: The timer stops after zero is reached .
Confirm the entry with the D button .
Activate/Deactivate Snooze Alarm
When the alarm rings, you have not press
any button.
After 30 seconds, Snooze symbol ( oJ) )
starts to blink. Snooze alarm repeats for 5
times with an intetval of 2 minutes each.
After that the alarm will sound at the same
time next day.
-8-
Rl
"
Gil -~
22:D5
, li22
~.<
For all three types of timers applies:
• Press A button - Timer starts
• Press A button again - Timer stops
• Press A button again - Timer continuous
• Keep A pressed for about 3 seconds when the
time Is stopped - timer resets to the originally set time.
• When the countdown timer reaches zero, an alarm sounds,
which ends after about 15 seconds, or can be ended by
pressing the A, Cor D button .
-9-
STOPWATCH MODE
Press the 0 button until you reach the
stopwatch mode, shown by
"CHRONO".
In stopwatch mode you can choose between
the sub functions
• CHRONO (stopwatch) and
• DATA RECALL (view data)
<EJ-~
,CHRONO
• Press A button to start I stop the stopwatch,
• Press C button to record the lap memory when the
stopwatch Is counting,
• If the stopwatch saves over 99 laps, ij will display FULL.
• To reset the stopwatch, press and hold A button to
zero .
Lap memories
Lap
Tomar
Stopwatch
Press the C button in the stopwatch
mode until CHRONO Is displayed .
CC'CC68
'-00lJ!l.6S
Giil-~
,CHRONO
a
lP
I "
--A.C:iilO
IE]
STOPWATCH
mode
Total counting time
"""l!:., ~
MEMORY
FULL
, " 0I\lSBs
Lap memory
FULL
Note: Switching between "stopwatch" and "data recall" only
works If at least 1 lap has been recorded.
99 lap times can be saved. If the lap memory
Is full, the display MEMORY FULL appears.
- 10-
H:" ~
"••
MEMORY
FULL
To recall the stopwatch memory
• Press A button to stop the stopwatch, then press
C button to enter data recall mode.
• Display show the record of BEST LAP, the icon "BEST-lRP "
will be displayed.
• Press A button to read different lap memories.
• Press C button to exit the memory reca ll mode,
- 11 -
For your reference. you can following methods to take different
measurement:
STANDARD MEASUREMENT: A-A-A
START
STOP
Press A
Press A
RECALL LAP MEMORY : C-A·A-..... .A-C-A
STOPWATCH
MODE
..
RECALL
BEST LAP
RECALL
FIRST LAP
..
Press A
RESET
Press A to stop
the stopwatch
HoldA
Press A
LAP TIME MEASUREMENT: A-C-C-A-A
Lap 2
..
START
Press C
Press A
RESET
Press C
~
Lap3
\,...."!!.!~~I
..
RESET
STOP
Hold A
Press A
- 12-
RETURN TO
STOPWATCH
MODE
RECALL
LAST LAP
D) "
"'"l _P ..AaIIO
DI"[13~
..
Press C
HoldA
lP D) "
""'-~
D11l31Jl
, ~ D33a9B
-13-
\~~~
•
ALTIMETER MODE
Press the 0 button until you are in the
altimeter mode, displayed by "ALTI".
By pressing the C button in the altimeter
mode, you can choose between the sub
functions
• Clock (ALTI)
• Memory of Maximum Altitude (H IGH)
• Memory of Minimum Altitude (LOW)
• Total Altitude Gain (UP)
• Total Altitude Loss (DOWN)
• Number of Hil ls (HILL)
• Record
--~
RLTI
Time
Press the C button in the altimeter mode until ALTI is
displayed .
The time is shown in the lower segment of the display, in the
middle the current altitude.
Press the A button, the time, temperature and graphical
display is shown in the middle segment of the display. The
current altitude is shown in the lower segment.
__- -li-.;,emperature
Current
Altitude
--~
9m
IBI3IS"
Altitude
graphical
display
Current
TIme
Setting the Altitude
Press the C button in the altimeter mode until CLOCK or ALTI
Is dlspalyed.
Keep the A button pressed for about 3 seconds, "SETTING"
appears on the display, the altimeter digits will start to flicker.
Press the C button to select and then press the A button to
confirm .
-- ~
Memory of Maximum Altitude
Press the C button in the altimeter mode until HIGH is
displayed.
The memory of maximum altitude Is shown In the lower
segment of the display, in the middle the current altitude.
Press the A button, the time, temperature and graphical
display is shown in the middle segment of the display.
9m
HOLD
H: 9652
TO SET
Current
AltItude
Press A
Keep the A button pressed - the display RESET appears reset the maximum altitude .
- 14 -
- 15-
Memory of Minimum Altitude
Total Altitude Loss
Press the C button in the altimeter mode until LOW is
displayed .
The memory of mlmlmum altitude Is shown In the lower
segment of the display, in the middle the current altitude.
Press the A button, the time, temperature and graphical
display is shown in the middle segment of the display.
Press the C button in the altimeter mode until DOWN is
displayed.
The total altitude loss Is shown In the lower segment of the
display, in the middle the current altitude.
Press the A button, the time, temperature and graphical
display is shown in the middle segment of the display.
-- ~
L:
Bm
-9
I(
)
Press A
Press A
Keep the A button pressed - the display RESET appears reset the minimum altitude.
Keep the A button pressed - the display RESET appears reset the total altitude loss.
Height
Total Altitude Gain
Press the C button In the altimeter mode until UP Is displayed .
The total altitude gain is shown in the lower segment of the
display, in the midd le the current altitude.
Press the A button, the time, temperature and graphical
display Is shown In the middle segment of the display.
- -~
I):
Bm
9561
II(
•
Press A
Keep the A button pressed - the display RESET appears reset the tota l altitude gain.
- 16-
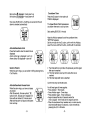
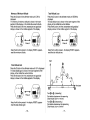
From
e to 0
, (Ascending)
Total allitude displacement for ascending
(Total Altitude Gain) = d1+d2+d3
From 0 to G , (Descending)
Total altitude displacement for descending
(Total Altitude Loss) = d5+d6+d7
- 17 -
BAROMETER MODE
Number of Hills Count
Press the C button in the altimeter mode until HILL is
Press the 0 button until you are in the
altimeter mode, displayed by"BARO".
displayed .
The number of hills Is shown In the lower segment of the
display, in the middle the current altitude.
Press the A button, the time, temperature and graphical
display is shown in the middle segment of the display.
-- ~
lIm
HILL: 3
.
)
Press A
.- - ~
BARD
By pressing the C button in the barometer mode,
you can choose between the sub func\Jons
• Time (BARO)
• Memory of Maximum Barometer (HiGH)
• Memory of Minimum Barometer (LOW)
Keep the A button pressed - the display RESET appears reset the number of hills count.
Record
Press the C button in the altimeter mode until RECORD Is
displayed.
The record is shown in the lower segment of the display, in the
middle the time. The attitude history & graphical display records
the altitude changes for the past 8 hours.
If you want to know the altitude record for a particular
during the past 8 hours, press the A button. The record time Is
shown for each particular altitude record.
Setting the Barometer
Keep the A button pressed for about 3 seconds, ·SETTING"
appears on the display, press the C button to select the
weather states and then press the A button to confirm.
Right after the weather state settlng, the barometer digits will
start to flicker.
Press the C button to select and then press the A button to
confirm.
- -~
R
_15:26
Brn
<
HOLD
TO SET
- -~
CD
'1'1'1'
Keep the A button pressed - the display RESET appears start a new altitude record.
- 18-
- 19-
Time
There are four different states:
Sunny, Sunny-doudy, Cloudy and Rainy
-
I.',',---,',
,', ,'., ..
, ,
Press the C button in the barometer mode until BARO is
displayed.
The dock is shown in the lower segment of the display, in the
middle the current atmospheric pressure.
Press the A button, the weather forecast, temperature and
time Is shown In the middle segment of the display. The
current atmospheric pressure is shown in the lower segment
,',",':":',.'.
I, ' , . _ . , ' "
-:-~I
Sunny-cloudy
t....
Sunny
1·-"'1':·
-Cloudy
Rainy
Temperature
Current
atmospheric ~_ _-.....
pressure .__ ~
Dl3~bdr
IKII"
Current
TIme
.--~
..
)0
Press A
'1'1'1'
Weather
Forecast
• The unit is capable of detecting atmospheric pressure
changes to predict the weather for the forthcoming 8 hours.
• The weather forecast is meant for the next 8 hours. It may
not necessarily reflect the current weather situation.
• The accuracy of all general pressure-based technology
weather forecast is about 70%, and therefore, cannot be held
responsible for any inconveniences so caused by an
inaccurate one.
- 20-
c:::;::; 21t
- 21 -
IB;~6
Current
1013 -/--.
lme
Current
atmospheric
pressure
Memory of Maximum Barometer
Press the C button in the barometer mode until HIGH is
displayed.
The memory of maximum barometer is shown in the lower
segment of the display, in the middle the current pressure.
Press the A button, the weather forcast, temperature and time
is shown in the middle segment of the display.
... -~
,
~
I(
Press A
Keep the A button pressed - the display RESET appears reset the maximum barometer.
Memory of Minimum Barometer
Press the C button in the barometer mode until LOW is
displayed .
The memory of minimum barometer is shown in the lower
segment of the display, in the middle the current pressure.
Press the A button, the weather forcast, temperature and time
is shown In the middle segment of the display.
Press A
Keep the A button pressed - the display RESET appears reset the minimum barometer.
- 22 -
PEDOMETER MODE
Press the D button until you reach the
pedometer mode, shown by ·PEDO".
-Cliil~
By pressing the C button in the pedometer
mode, you can choose between the sub
functions
• Speed calibration and speed alarm (ZONE)
• Total distance (ODOMETER)
• Number of steps (STEP)
• Calories, fat and BMI (CALORI E)
• Timer (TIMER)
• Daily distance (DISTANCE)
• Average speed (AVG SPEED)
• Maximum speed (MAX SPEED)
PEOO
Press the A button to tum on the pedometer, the body icon (~)
will animate. Press the A button again to stop the pedometer.
The current speed is shown in the middle segment of the
display.
Note: If in the pedometer mode the watch is keep idle for
about 5 minutes, the watch automatically changes Into the
time mode.
Speed Cal/bratlon and Speed Alarm
Press the C button in the pedometer mode unUi ZONE Is
displayed .
Setting of the speed alarm as well as calibration of the
speed for walking and running .
Note:
It does not matter If you want to only walk or run, under
all circumstances perform a calibration for walking AND
running to receive a meaningful resull
If you really only want to walk, calibrate for walking
(walking) AND running (fast walking).
In case you do not calibrate your watch, the displayed values
have only limited significance. In that case the watch falls
back on a standard calibration, which does not correspond to
your personal movement profile.
During the calibration the watch records your personal
movement profile. The steadier you walk or run, the more
exact the results wi ll be. It is also true: the longer the distance
for calibration Is, the more exact the results will be.
The speed master watch automatically perceives, based on
the calibration, whether you are walking or running during
your training, and correspondingly displays the speed, steps,
etc ..
Choose the same speed and rhythm as during calibration
when you are running and walking , to get a meaningful resu lt.
If you wore the speed master watch on the left (right) hand
during calibration, wear it also on your left (right) hand during
training.
The lower and upper limits for speed target alarm are shown
in the lower segment of the display, in the middle the currant
speed .
Current Speed
• Keep the A button pressed - the display SETTING
appears.
El~
,Ot=l
Upper
D
Km/h
Limit--~~ID~.~UD~,07'~-- 24 -
Lower Limit
• The display LOWER LIMIT (lower limit of the speed)
appears, set with the C button (0.0 to 39.0 km/h
possible), confirm with the A button.
- 25 -
• The display UPPER LIMIT (upper limit of the speed)
appears, set with the C button (1 .0 to 40.0 kmIh
possible), confirm with the A button.
• Display CALIBR. OKI and SAVE appears The ca libration
was correct and was saved.
• Display CALI . FOR RUNNING (calibration for running)
appears, you can choose between YES or NO with the
C button.Choose YES and confirm with the A button.
• Display SET CALI DISTANCE appears, choose with the
C button (0.1 to 1.0 km possible), confirm with the A button .
• Display PRESS SET TO START appears, start with
A button .Now run the chosen distance (the display
PRESS TO END appears) and press the A button
when finished running.
• The watch now changes to the display CALI FOR WALKING
(calibration for walking).
It is important that you also perform the calibration for
walking, as described In the following section:
• You can choose between YES and NO with the C
button . Choose YES and confirm with the A
button .
• Display SET CALI DISTANCE appears, choose with the
C button (0.1 to 1.0 km possible), confirm wi1h
the A button.
a.l-
~
HOLD
~
-
CiiDl~
LOWER
LIt'I IT
\~TO:....:S~ET~__ ,'\. Q[J(MH /
~
-CiiDl~
• Display PRESS SET TO START appears, start wi1h
A button.
Now walk the chosen distance (the display PRESS TO END
appears) and press the A button when finished walking.
UPPER
LIMIT
;.. ICD!( t1H /
• Display CALI. OKI and SAVE appears The calibration
was correct and was saved .
•-
(g~
CALI FOR
RUNNING?
-
(!!!!)~
SET CALI
DISTANCE
-
~
C!!!)~
PRESS
SET TO
\'---.!Y~ES~,,_-+ \~D5~KC!.!.~f..../_---+('-S~T!.!!.AR!..!...T..../_
• Finally press the 0 button, the watch changes to the
Initial position (display of current speed and lower and upper
limits for the speed).
___+
Callbratlon not Successful.
In case the calibration was not successful, the display CALI
FAILED appears. After a few seconds the display CALI FOR
RUNN ING or WALKING appears again and you can start a
new calibration.
~-~
~
PRESS
TO END
\ s:
D
- 26 -
- 27 -
Stop Calibration
Press the 0 button during calibration in case you want to stop
the calibration. The display CALI CANCEL appears. The
watch automatically changes to the initial position (display of
current speed and lower and upper limits for the speed). You
can now start a new calibration.
Speed Alarm
Keep the C button pressed while the upper and lower limits
for speed are displayed .
Alarm symbol appearsOJ} = speed alarm activated
alarm symbol ceases = speed alarm deactivated
If the speed drops below the lower limit or rises above the
upper limit, an alarm sounds (if activated!).
TOtBI Dlsl1lnce
Press the C button In the pedometer mode until ODOMETER
is displayed.
The total distance is shown in the lower segment of the
display, In the middle the current speed.
,- .,~
!S: n ,0t=::I
Total distance
+ UKm,h
\ 0: 151 /
~
,- .,~
n .Dt=::I
+ U Km,h
~ 0: ODC /
!S:
Number of Steps
Press the C button In the pedometer mode until STEP Is
displayed .
The number of steps is shown in the lower segment of the
display, in the middle the current speed .
- Giil~
!S:
Number of steps
n ,0t=::I
+ U Km,h
~~\~~I~lg2/
Keep the A button pressed - the display RESET appears reset the number of steps to zero.
Calories, Fat Bum and BMI
Press the C button in the pedometer mode until CALORIE is
displayed.
In the lower segment of the display calOries, fat bum and 8M I
are displayed (switch with the A button), in the middle the
current speed.
Calories
The metabolic rate in calories is measured automatically
when you actiVate the step count In pedometer mode. The
measured value is shown in the bottom line of the display
(C: ... ). Press and hold the A button (shown by RESET) to
reset the value to zero.
Keep the A button pressed - the display RESET appears reset the odometer to zero.
Calories -~~~.J
- 28 -
- 29 -
Fat Bum
As soon as you activate the step count In pedometer mode,
the estimated value of the bumed fat in grams is shown in the
lower line of the display (F: .).
Press and hold the A button (shown by RESET) to reset the
value to zero.
The BMI (Body Mass Index) is a measured value for the
evaluation of the body weight of humans. The BMI only gives
a rough guidance level.
The BMI is calculated by dividing the body weight In kg by the
body size in metres squared. The heart rate monitor watch
automatically calculates the BMI from the entered data.
Timer
Press the C button in the pedometer mode until TIMER Is
displayed.
The timer is shown in the lower segment of the display, in the
midd le the current speed.
Note: It is necessary to enter the correct date of birth and
weight to receive a meaningful value of calorie consumption
and fat buming.
Note: The body fat function Is only active, If the training
intensity is more than 120bpm.
- (3~
;:
C,OI:::::::I
+ Km/h
TImer -.1f"'nD02a~nl~F)
The timer starts as soon as you activate the step count. Keep
the A button pressed until the display RESET appears - timer,
daily distance and average speed are reset to zero.
BMI (Body Mass Index)
Dally Distance
Press the C button in the pedometer mode until DISTANCE is
displayed .
The covered distance is shown in the lower segment of the
display (with 2 decimal places), in the middle the current
speed .
Age
(years)
BMI normal
value (kg/m2)
19-24
19 - 24
25-34
20 - 25
35-44
21 - 26
45-54
22 - 27
-1iiiiJ~
55-64
23 - 28
;: C,DI=!
>64
24 - 29
approximate values of the BMI
+
Dally distance
Km/h
'0: D9C
Keep the A button pressed until the display RESET appears timer, daily distance and average speed are reset to zero.
- 30 -
- 31 -
Average Speed
Press the C button in the pedometer mode until AVG SPEED
is displayed .
The average speed is shown in the lower segment of the
display, In the middle the current speed .
- ~~
~ D,Ot=
tKm/h
Average Speed -~'~
AV~·~1Sj[7
Keep the A button pressed until the display RESET appears timer, daily distance and average speed are reset to zero.
Maximum Speed
Press the C button In the pedometer mode until MAX SPEED
is displayed.
The maximum speed is shown in the lower segment of the
display, In the middle the current speed.
NOTE:
Why is the displayed covered distance incorrect?
Have you performed a calibration? For optimum results the
calibration has to be performed for "walking" as well as
"running". A shuffling gait, bad shoes and varying surface can
lead to inaccurate measurements. A lower distance is
measured when dimbing steps, because the watch is
designed for even surfaces. Choose the used during
calibration speed when walking or running. Please note that
the measurements of untrained persons can be
inaccuratelirregular.
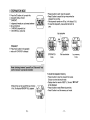
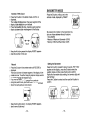
DISPLAY BACKLIGHT
The display is illuminated for about 2 seconds by pressing the
B button, so you cen read the display of Ihe speed master .
watch in darkness. A permanent illumination of the display IS
not possible. Please note that the illuminalion consumes
more power, which reduces Ihe lifespan of the battery.
'-GiiJ~
~
t
Maximum S,D8<ed----~.=...=-~ ----+
D,Ot=
Km/h
M)(: QD
Keep the A button pressed - the displey RESET appears reset the maximum speed to zero.
- 32-
- 33 -
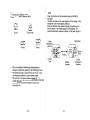
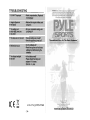
TROUBLESHOOTING
~'*'
~
"LO BATT" displayed
• Weak computer battery. Replaced
~ imrnediaely
Imlgular flgures on
the display
• Remove the computer battery and
reinsert it.
The setting (unit,
body height, time) are
not stored
• Did you complete the setting with
ST/SP/SET?
The steps are not oounted
• Have all settings been made?
• Have the pedometer turned on?
Malfunctions occur
• Are the batteries flat?
• Reset the appliance to the factory
settings by briefly removing the
batteries.
The display backlight
• Is the battery empty?
Please check the battery and
replace it if it is empty.
Note the +1- pole.
not work
(E!
"'.do c.. ,.iully ~ 0 tg.NI p;Ki16Jl If JIOlIkI*. \_ .. ,. n«
'<>t tl.I"'.",",,1#'d In ..·.,Ul~ ~ .... I~' A. ~
1,\11'01tlA,~ll
.. ,..:u
'fOU
CI)..l(t AI
.dk'5, ~tlnAi pt.ooQrurixf. ~ct.oplo!>k
ifClC!loJl"kf'<UtJ ~ Inc
'It)u n1l>a.1l1-.o cncbwl:lo ~
of~CIt'iJ:",1 r~Pl4IP'ooldwk'cI~)C'
Iholtt'" NY 1110t
1 800-4« <,(, 1 '
Art No :PYLE_SPORTS -PPDM3
\~n.~
r..ndw. gAM 10 SPl\t
IncbvqMtlolrMr~
~* "I.'Jt;).{;r;"iJ
- 34-