1
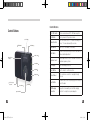
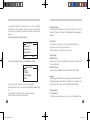
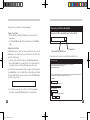
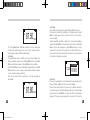
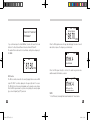
WiFi Internet Radio
iRadio
WiFi Internet Radio
Quick Start Guide
Press Select Button after each individual character is entered.
Press the Power Button for more than 3 seconds to turn on the radio. The
Press and hold Select Button (>3 seconds) to enter the completed key or
green power indicator illuminates.
passphrase.
WiFi Internet Radio
Move the WiFi / FM Radio switch on the top of the radio to WiFi.
The radio automatically scans for local WiFi network access points and
presents a list.
The Preferred Station will then start to play if the network connection is
made correctly.
Once connection is made, press Back Button to access the Main Menu
and start to explore the world of Internet Radio to the full.
Select your chosen WiFi network using the Control Wheel and press Select
FM Radio
Button.
Move the WiFi / FM Radio switch on the top of the radio to FM.
If unprotected and unsecured, the radio will connect and start to operate.
Press the Back Button to access the FM Main Menu.
If a secure network is chosen, you will be prompted to enter your network
Use the Control Wheel to navigate down to Auto Program press Select
security key or passphrase. Choose the desired option and enter your
Button.
wireless security details accordingly.
Press Select Button to delete previously stored channels and scan for new
NOTE: This security key or passphrase is found from your wireless router.
radio stations.
See your wireless router for details.
To enter the key, turn the Control Wheel anticlockwise for letters and
clockwise for numbers.
1
Promate(左对齐).indd 2-3
2
2009-12-9 8:52:39
User Manual
Content
Introduction…….......………………………………………………………… 6
Packaging and Specifications…...............................…………......……7
Packaging………………………………………………....................…….... 7
Specifications…………………………………............................………....7
Control Buttons………………………………….........................………… 9
iRadio Display Types........................................................................…11
Normal Screen..................................................................................... 11
Menu Screen....................................................................................... 11
Information Screen.............................................................................. 12
Query Screen.......................................................................................12
iRadio Menus...................................................................................... 13
Presets................................................................................................ 13
Favorites..............................................................................................13
Bookmarks........................................................................................... 13
Added Stations..................................................................................... 13
Most Popular Stations...........................................................................13
All Stations.......................................................................................... 13
Local Stations.......................................................................................14
Locations............................................................................................. 14
3
Promate(左对齐).indd 4-5
Genres................................................................................................. 14
New Stations........................................................................................ 14
Play Preferred Station..........................................................................14
Settings .............................................................................................. 14
Network Settings.................................................................................. 15
Delete Presets...................................................................................... 18
Display Settings....................................................................................18
Language............................................................................................. 18
Firmware Update.................................................................................. 18
Now Playing.........................................................................................19
iRadio Operation.................................................................................20
Basic Operation...................................................................................20
Powering On for the First Time.............................................................. 20
Normal Powering On.............................................................................21
Connecting to a Wireless Network Manually........................................... 21
Playing a Radio Station......................................................................... 25
Storing a Radio Station......................................................................... 25
Playing a Preset Station........................................................................ 27
Adding a Favorites Station.................................................................... 27
Playing a Favorites Station.................................................................... 30
Operating the FM Radio………………………………...................…...… 30
Switching to FM Radio…………………………………………....................30
Seek Mode…………………………………........................……................ 31
4
2009-12-9 8:52:39
Preset Mode...…………………………….............................................…32
Channel List………………………....................................................……32
Auto Program........................................…….…................................… 33
Tune Mode...........................................................................................34
Clear All List.........................................................................................34
RDS Function…………………………..................................................…35
Battery Level, Charging and Indicators………................….............… 37
Troubleshooting………………………………………............................... 38
Safety Warnings…………………………………......................................41
FCC Statement................................................................................... 42
Appendix A. FM Radio Menu Structure ............................................. 43
Appendix B. iRadio Menu Structure................................................... 44
Introduction
Thanks for purchasing the Promate iRadio! Now you can listen to more than
12,000 radio stations from all over the world. These stations cover all kinds
of subjects like entertainment, news, music, sports, etc. We hope you will
enjoy it to the full.
The iRadio works by using the internet to connect to a database of radio
stations, known as a portal. This portal is supplied by vTuner, the world
leader in this field. Once a specific radio station is selected on the iRadio,
a direct connection is established between the radio station itself and your
iRadio and the enjoyment begins.
To be able to use the iRadio, a broadband internet connection and a
wireless (W iFi) access point, connected to your broadband internet
(preferably via a router) is required. Before you start, make sure that
the wireless access point equipment is switched on and connected to
broadband internet. If necessary, please refer to the wireless access
equipment instructions, or contact the network service providers.
The FM radio (with RDS facility) is provided as a backup, for when a WiFi
connection is not available.
5
Promate(左对齐).indd 6-7
6
2009-12-9 8:52:39
Packaging and Specifications
Packaging
Before proceeding, check your packaging and verify the following
accessories are included, if any parts are missing, please contact your
distributor.
1. iRadio.
2. USB Charging Cable.
3. Carrying Pouch.
4. User Manual.
5. Warranty Card.
Specifications
WiFi:
1. WLAN: wireless 802.11b/g. WEP / WPA security compatibility.
2. Receive more than 12,000 radio stations worldwide, using the vTuner
portal.
3. Support Real Audio, MP3, and WMA audio formats.
4. 12 User definable preset stations.
5. User definable bookmarked stations.
7
Promate(左对齐).indd 8-9
FM:
1. Frequency range: 87.5MHz ~108MHz.
2. Supports Radio Data System (RDS).
3. 30 User definable preset stations.
Battery:
1. Built in 1500mAh Li-ion polymer battery. More than 15 hours of
continuous operation from fully charged (Power saving mode enabled).
2. Charge time about 6 hours.
3. Maximum charging current: 500mA.
4. Cycle life: more than 300 times (before reduced performance is noticed).
General:
1. Integral speaker: 2W.
2. 3.5-mm stereo earphone jack.
3. Measurements: 72.9mm*125.1mm*23.2mm (H*W*D).
4. Weight: 162.7g.
8
2009-12-9 8:52:39
Control Buttons
Control Buttons
WiFi / FM Switch
Switches mode between WiFi / FM radio reception.
Back Button
Press to go back to the previous menu.
Volume Control
Adjust the volume control. “+” means increasing the
volume, “-” means decreasing the volume.
Power Button
Power on / off the iRadio (>3 seconds).
Hold Switch
Lock all of the buttons except the WiFi / FM Switch to
avoid accidental adjustment.
Earphone Jack
Connect earphones to listen to the radio or connect to
an external speaker system.
LCD Display
Back Button
WiFi/FM Switch
Volume Control
Power/Charge
Indicator
Power Button
USB Charging
Connection
Reset Button
Control Wheel
9
Promate(左对齐).indd 10-11
LCD Display
Screen that display contents.
Hold Switch
Select Button
Press the knob to confirm selections.
Earphone Jack
Control Wheel
Turn to enter menu selections / navigate through
selections.
Reset Button
If the device fails to function properly, press the button
to reset the radio.
USB Charging
Connection
Charge the internal battery via the USB charging
connection to computer or power adapter.
Select Button
10
2009-12-9 8:52:41
iRadio Display Types
Network Settings
Scan for Networks
Edit Settings
Stored Networks
↓
Network Information
Back
Select
Normal Screen
The normal screen is the default screen generated when the unit is powered
on. It displays the station name and icons for WiFi signal strength, streaming
media format / preset number / frequency and battery status. It also displays
any additional text available for the currently selected station in a scrolling
information area.
Examples of the Normal Screen Whilst Playing:
Information Screen
Information screens are used to display messages to the user. They time out
after 5 seconds, unless they are used to indicate progress via a progress bar.
Example Information Screen:
WMA 32K
ERROR! Station list
Unavailable.
Please try again later
BBC World Service
Playing...
Menu Screen
A menu screen displays a list of options, with the currently selected option
shown highlighted.
If more than four options are available, up and down arrows are displayed on
the right hand side of the screen.
Example Menu Screen:
11
Promate(左对齐).indd 12-13
Query Screen
A query screen is used to offer the user a choice. Queries are worded so that
you can respond with a yes (Select) or a no (Back).
Example Query Screen:
Do you want to revert to
backup version of firmware
and reboot?
Back
Select
12
2009-12-9 8:52:41
iRadio Menus
The structure of the iRadio’s menus is shown in Appendix B.
Presets
Displays a list of preset stations. The preset stations are stored on the memory
of the device. Up to 12 presets can be stored within the iRadio.
Favorites
Once connected to the vTuner portal, this shows the top level menu to allow
you to navigate down to find your desired radio station.
Local Stations
According to the current location of the radio, it displays the local stations in that
country.
Locations
Choose a country and browse for a radio station in that location. Choose the
continent firstly and then the specific country.
Bookmarks
Displays a list of favorite stations that are saved as Favorites, in the vTuner
portal. Use the vTuner portal to activate the Favorites function, within your
portable iRadio! See later in this manual for personal and unique access to the
vTuner portal.
Genres
Browse for a radio station based on the genre of the stations, e.g. classic, pop,
rock, etc.
Added Stations
Stations that you can add manually to the vTuner portal. This is for stations that
are not already part of the vTuner database, but rather stations that you can
add by yourself. See later in this manual for personal and unique access to the
vTuner portal.
Play Preferred Station
Most Popular Stations
Displays a list of the most popular stations, as measured by the vTuner portal.
All Stations
13
Promate(左对齐).indd 14-15
New Stations
Locate any new stations which are recent additions to the vTuner database.
Plays the Preferred Station that you have stored.
Settings
The settings menu includes the following submenus:
Network Settings
Scan for Networks
Edit Settings
14
2009-12-9 8:52:41
Stored Networks
Network Information
Power Saving (Default is OFF)
Delete Presets
All
Selected
Display Settings
Backlight Timeout
Main Menu Timeout
Language (Default language is English)
English
Deutsch
Italian
Spanish
Portuguese
French
Firmware Update
Check For Updates
Revert To Backup
Firmware Information
Network settings will include access point selection.
Network Settings
The network settings menu allows you to control the wireless networks that the
radio can / is connected to.
15
Promate(左对齐).indd 16-17
Scan for Networks
The Scan for networks wizard takes you through the following stages:
Scan for networks – When the scan has completed, displays all visible
networks with an icon showing whether the network is secure or not.
IP settings – Allows configuration of either an Automatic (DHCP) allocated
IP address or a static IP. Automatic (DHCP) is selected by default.
IP configuration – If static IP is chosen, you can enter the IP address,
subnet mask, default gateway and DNS servers.
WEP/WPA network key entry – If the network is secure, you are prompted
to enter the relevant security key. The key is entered by rotating through the
characters. When the correct character appears on the display, select the
character and press the Select Button and continue to the next character.
After selecting the last character, press for 3 seconds on the Select Button to
complete the key entering.
When the wizard is complete, you are returned to the normal screen which
displays the connecting sequence.
Edit Settings
This allows you to edit the network settings for the network you are currently
connected to.
<Automatic (DHCP)>: Acquire the IP automatically.
<Manual (Static IP)>: Manually set the IP, subnet mask, gateway, DNS.
Stored Networks
This menu contains a list of networks that the device has previously connected
to (Max. 3).
The settings associated with each network can be edited when the device is
16
2009-12-9 8:52:41
not connected to that network. You can also choose to connect to a different
network than the one automatically chosen by the device. This means that
you do not have to go through the complete network setup (security key input
sequence).
Select a network under this menu, it will show:
Select Network
Network Name 1
Network Name 2
Network Name 3
Back
Select
Select one Network Name and press the Select Button, it will show:
Network Name
Connect
IP Settings
Security Settings
Delete
<Connect>: Connect the network to make it as currently network.
<IP Settings>: Allows you to choose either Automatic (DHCP) or Manual (Static
IP).
<Security Settings>: Enables you to enter the relevant security key.
<Delete>: Enables you to delete currently network.
17
Promate(左对齐).indd 18-19
Network Information
This displays the MAC address of the device, the SSID of the connected
network, the IP address of the device, the Network Mask, the Gateway and the
DNS server.
Delete Presets
This menu allows you to delete one or more presets from their preset list.
<All>: Allow you to delete all of the presets at once.
<Selected>: Allow you to delete the presets one by one.
Display Settings
Backlight Timeout
You have the option to select a backlight timeout of between 5 and 45 seconds
in 5 seconds increments.
Main Menu Timeout
You have the option of ON (a 30 second timeout) or OFF (Default is ON).
Language
The iRadio supports English, German, Italian, Spanish, Portuguese and French.
The default language is English. But the <All Station> menu, <Favorites> menu
and the content of these menus only support English (Default is English).
Firmware Update
Check for Updates
If you initiate an update, the device checks for a connection and whether there
18
2009-12-9 8:52:41
is a firmware update available. If both these conditions are met, a progress
screen is displayed and the firmware installed. The new firmware is flashed
to the device, and in the next restart of the radio, the new firmware version
becomes the master version.
NOTE: In the process of updating firmware, please do not power OFF. Powering
OFF during the update process may cause irreparable damage.
Revert to Backup
This allows you to change the running firmware version to the backup firmware
version, which is also stored on the device. The Master Version and Backup
Version can be switched freely.
Firmware Information
Displays the master software version, the backup version, the boot loader
version and the hardware version.
<Master Software Version>: It will show the current software loaded on the
radio.
<Backup Software Version>: It will show invalid from production, but may be
updated later.
<Loader Software Version>: It will show the default version.
Now Playing
Returns to the Now Playing menu, and displays the current station, the battery
19
Promate(左对齐).indd 20-21
level and the signal strength.
iRadio Operation
Basic Operation
Powering On for the First Time
Press the Power Button for more than 3 seconds, the green indicator bar
illuminates and the welcome screen appears. A search for local WiFi network
starts automatically.
1. The radio runs the network setup wizard, starting with a scan for available
networks locally. The result is a list of networks found. Highlight the network
you wish to connect to (using the Control Wheel) and press the Select
Button.
2. If the network is secured, you are then prompted to enter the network key or
passphrase. The Internet Radio then returns to the normal screen, where the
connection sequence takes place and then the preferred station starts to
play.
NOTE: This security key or passphrase is found from your wireless router. See
your wireless router for details.
To enter the network key, turn the Control Wheel anticlockwise for letters and
clockwise for numbers. Press the Select Button after each individual character
is entered.
Press and hold the Select Button (>3 seconds) to enter the completed key or
passphrase.
In case of difficulty, see the section below on manual network connection for
20
2009-12-9 8:52:41
more details.
Normal Powering On
When the unit is powered on normally and is still within a previously known
wireless network location, the iRadio will connect to the known network
automatically and the preferred station will start to play (If the iRadio does
NOT have a preferred station stored, then it will play whatever station was last
playing).
If there is not a known network connection present, the powering on for the first
time procedure will apply.
Settings
Networks
Delete Presets
Display Settings
Language
Back
↓
Select
Settings Screen
3. Highlight the Scan for Networks and press the Select Button.
Connecting to a Wireless Network Manually
1. Enter the Main Menu screen by press the Back Button and by turning the
Control Wheel to highlight the Settings option and press the Select Button.
Main Menu
↓
All Stations
Play Preferred stations
Settings
Now Playing
Back
Select
Main Menu Screen
2. Highlight the Networks option and press the Select Button.
21
Promate(左对齐).indd 22-23
Network Settings
Scan for Networks
Edit Settings
Stored Networks
Networks Information
Back
↓
Select
Network Settings Screen
A list of available networks is displayed when it has finished scanning and all
visible networks will have an icon showing whether the network is secured or
not.
22
2009-12-9 8:52:41
Or select WPA encryption and press the Select Button, it will show:
No Security
Key Options
WPA Passphrase
Secure
Network Security Icons
4. Select a network (Max. of 3 different networks can be stored in the radio’s
memory).
NOTE: An unsecured network may still require a level of entry authority or
payment to use it. This is typically the case at airports or hotels. Only if the
unsecured network has free and unrestricted access, will the internet radio work
correctly. A secured network simply needs the correct access key to be input, in
order to gain full access.
5. If the network is secured, you will be prompted to enter a security key. The
type of security key used depends on the security method in use on the
wireless network. Choose the security method from the menu. Highlight the
required security method and press the Select Button.
Select the WEP encryption and press the Select Button, it will show:
Key Options
WEP64 Key
WEP64 Passphrase
WEP128 Key
WEP128 Passphrase
23
Promate(左对齐).indd 24-25
Network Security Options Screen
6. Enter the security key
Network Name
WEP64 Key:
00 00 00 00 00
Security Key Entry Screen
Turn the Control Wheel clockwise and the letters F, E, D, C, B, A will appear
and anti-clock wise for the numbers 0-9. When ready, press the Select Button
to accept and move to the next character. Repeat the procedure to enter
the second character etc. When the last character in the sequence has been
entered, press the Select Button for >3 seconds in order for the key code to be
submitted. When the key code has been entered, the Internet Radio returns to
the normal screen.
If you entered incorrect characters, please press the Back Button to erase the
incorrect characters and enter the correct characters. If you want to cancel the
network key input, please press the Back Button to quit the whole operation.
If network can not be connected after entering the keys, it may be due to
24
2009-12-9 8:52:42
compatibility issues between the iRadio and the wireless network access point
(AP). Please try a different encryption method or use other wireless network
access point (AP) to evaluate.
Important Note:
1. WPA keys support 0-9, a-z, A -Z, and other ASCII characters.
2. When the last character has been entered, it is important to press the Select
Button for 3 seconds or longer, to ensure the security key is accepted.
3. If the display shows (Network Down) or (Authentication failed! Please provide
correct key). Please try again and provide correct security key.
Playing a Radio Station
1. Press the Back Button to go to the main menu, highlight All Stations and
press the Select Button.
NOTE: The All Stations option is only available when iRadio has established an
internet connection and can access the vTuner portal.
The All Stations menu allows you to search for a radio station either by the
Locations or the Genres of the station. In some cases, a list of local stations will
become available as well.
2. Select a search method and browse for the required station. Use the Control
Wheel and Back Button to navigate through the list of stations.
Storing a Radio Station
While the station is playing, press the Select Button, it will show:
25
Promate(左对齐).indd 26-27
Station Menu
Store as Preset
Set as Preferred Station
Add Bookmark
Stop
Back
Select
<Store as Preset>: When the station is playing, press the Select Button,
the station will be stored as a preset. Next time you can select the station in
<Presets>: The radio can store 12 preset stations at most. If you want to add
more than 12 stations, the radio will prompt you to replace an existing preset
accordingly.
<Set as Preferred Station>: When the station is playing, press the Select Button
to store it as the one preferred station. Any previous selection will be replaced.
This station will be the default broadcast station when you power on the radio
next time.
<Add Bookmark>: When the station is playing, press the Select Button to store
it as a bookmark. Next time you can select it from <Favorites> and then select
the station in <Bookmarks> to play it. For more details on this Favorites function
and all the extensive features available, see detailed operation of the vTuner
portal described below.
<Stop>: When the station is playing, press the Select Button, the station will be
26
2009-12-9 8:52:42
stopped. Re-select any station to resume playback again.
Playing a Preset Station
1. From the Main Menu, highlight the Presets option to view a list of all the
preset stations.
2. Use the Control Wheel to highlight the station and press the Select Button
to play.
Adding a Favorites Station
A Favorites station is a station that has been added to the radio, using the
Favorites list on the vTuner portal. To access the features of the vTuner portal,
perform the following steps:
1. Login from a PC to the CSR mini-portal on vTuner http://csr.vtuner.com
2. Locate the MAC address of your radio (the ID#). This is a unique identifier for
your product, which can not be mixed with anybody else in the world.
In order to find this unique number from within your radio, follow this procedure:
Press Back Button to get to the Main Menu--Settings--Network--Network
Information--MAC Address. Record your unique product ID# (MAC address)
here, without spaces or colons.
Sign in with your ID# From the RadioPro
Please enter the ID# for your RadioPro(more info ahout the ID#):
Type your ID# (MAC address) here.
Then press here
Create an account for yourself, by completing the page which follows:
Create Account Login
You need to log onto your personal lnternet radio website before you can use this feature.
Create a Login accout to add Favorite Stations to your
RadioPo with ID#: 0023cb000365
Typein in your Email Address, then enter in your Password twice to verify accuracy, click the register link to continue.
Please Keep track of your password since it will be used every time you log
E-Mail Address:
Password: Must be at least 6 characters
3. For the first time usage, follow the instructions on the vTuner webpage to
sign in with your unique ID# (MAC address) from your Internet Radio.
Enter Password Again:
Receive program updates and special offers
Register
27
Promate(左对齐).indd 28-29
Cancel
28
2009-12-9 8:52:42
This then allows you to login (in future) using your email address and password
only.
4. Use the vTuner webpage to browse through the many radio stations and
podcasts that it has to offer. You can listen to any broadcast by pressing the
green Play button. When you find a particularly good station, you can add it
to your Favorites list by clicking the blue Add button on the portal. The
station is added to the Favorites list on the portal website and also to the
Favorites menu upon your Internet Radio.
You can also add your own radio stations, should you happen to find any
that are not already listed in the vTuner database. To do this, use the vTuner
webpage, as follows:
My Added Stations
You can add your own stations here.
If you have found a station that is not in our list, you can add it yourself.
NOTE: Please ensure that the station you want to add can be broadcast in PC
firstly, and its audio format also should be supported by the Internet Radio. i.e.
Real Audio, WMA or MP3 format.
Playing a Favorites Station
From the Main Menu, highlight and select the Favorites option, then highlight
and select the bookmarks to access the list of favorites folders / stations from
the vTuner portal. Highlight the required option and press the Select Button to
play.
Operating the FM Radio
Switching to FM Radio
Move the WiFi / FM Switch to the FM position. The radio will respond:
My Added Stations
Enter the information for the station you would like to add.
The station will be immediately added as one of your favorites.
Station Name
(for example, http://62.168.116.98:8000/dsp)
Switch to FM Radio
Station URL
(for example, Canada, Germany, Buenos Aires)
Location
After a few seconds, the display will show:
(for example, Classical, Dance, Rock)
29
Promate(左对齐).indd 30-31
Mp3
>
Type:
30
2009-12-9 8:52:42
Seek
FM
87.50
MHz
This is the Normal Screen for FM Radio operation. This screen shows signal
strength, radio operating mode (Seek, Preset, Tune etc.) battery condition,
channel frequency and any RDS information available.
Seek Mode
The default display shows the Seek Mode. To access the Seek Mode menu
during normal radio operation, press the Back Button and turn the Control
Wheel to <Seek Mode> and press the Select Button to enter Seek Mode.
Turn the Control Wheel to search for FM stations automatically. Turn the Control
Wheel clockwise to seek in a frequency increasing direction and anti-clockwise
to seek in a frequency decreasing direction.
When the search function finds a radio station, it will stop and broadcast
automatically.
Seek
FM
31
Promate(左对齐).indd 32-33
87.80
MHz
Preset Mode
The Preset Mode is used to store the desired stations (30 stations at most).
When under the Seek Mode, Preset Mode, or Tune Mode, press the Select
Button, to enable a quick channel selection box. Turn the control wheel to
select accordingly.
Under the Seek Mode, Tune Mode, or Channel List, choose the desired stations
and press the Select Button, it will show channel selection box, turn the Control
Wheel to select a channel and press the Select Button for about 2 seconds.
System will store the station. At the same time, the station will flash twice to
show it has been stored successfully. After it has been done, system will back
to the interface of original mode, as below:
Preset
10 1.20
3.101.20MHz
4.103.00MHz
5.104.90MHz
Channel List
Channel List is generated by the Auto Program function (described below). The
Channel List will be updated each time you select Auto Program.
Channel List with pre-listening function, when move to a different radio station,
the system will play the corresponding radio programs. Select the desired radio
station and press the Select Button, the system will switch to Seek Mode and
broadcast it. If there are the same radio stations in the preset list, it will show the
32
2009-12-9 8:52:42
serial number of the station, if without the same stations, it will not show.
Auto Program
To access the Auto Program Mode menu during normal radio operation, press
the Back Button and turn the Control Wheel to <Auto Program> and press the
Select Button to enter Auto Program Mode.
The system will search the stations between 87.50MHz and 108.00MHz
automatically and will show the frequency. At the same time, it will store the
received stations (30 stations at most).
FM Menu
Preset Mode
Channel List
Auto Program
Tune Mode
During normal radio operation, press the Back Button to enter into the FM Main
Menu:
FM Menu
Channel List
Auto Program
Tune Mode
Turn the Control Wheel to <Tune Mode>, press the Select Button to enter Tune
Mode for manual tuning thereafter.
Turn the Control Wheel and the frequency will change by rate of 0.05MHz
per step. Clockwise means the frequency increases, anticlockwise means the
frequency decreases. Turn the Control Wheel to locate the radio stations that
you want to listen to.
The Auto Program interface as below:
Programing
104.80
After search is completed, it will automatically revert back to the Channel List.
The Channel List will show the number of received stations, any previously
stored stations will be replaced.
33
Promate(左对齐).indd 34-35
Clear All List
To access the Clear All List menu during normal radio operation, press the Back
Button and turn the Control Wheel to <Clear All List> and press the Select
Button to enter the Clear All List menu.
In the Clear All List menu the radio can delete all the stations in the Preset List
and Channel List.
Once selected, a screen prompt appears to confirm this action, as below:
34
2009-12-9 8:52:42
Clear All Prestored
FM Stations?
If you confirm and press the Select Button, the radio will clear all the stored
stations in the Preset List and Channel List and confirm with “Clear All”.
The radio will then revert back to the Seek Mode, starting from a frequency of
87.50MHz.
87.50
Promate(左对齐).indd 36-37
98.70
MHz
When the RDS signal becomes stronger, radio will display the name of current
radio station, in place of the frequency, as shown below:
RDS
Tune
Serious Classics
MHz
RDS Function
The RDS icon will be shown after the currently playing station receives an RDS
signal. The “RDS” icon will be displayed in the upper right side of the screen.
The RDS function will be presented gradually, as the signals become stronger.
When the RDS signal is weak, the system can only display the current program
type, such as Program Type (PTY), as below:
35
FM
RTHK 4
Seek
FM
Tune
RDS
Serious Classics
When the RDS signal strength is sufficient, the radio may provide some
additional radio text information, as below:
Tune
((( ))) RDS
RTHK 4
RTHK Radio 4 - The
music and arts channel
NOTE:
1. In the FM mode, the backlight will remain illuminated for 1 minute before
36
2009-12-9 8:52:42
entering power saving mode. When the backlight is off, rotate either the
Control Wheel or the Volume Control to restore the backlight.
2. In the process of searching stations under Seek Mode or Auto Program,
the system can only respond to the Back Button. If you want to quit
searching stations, please press the Back Button.
3. The RDS function only supports RDS information in English.
Battery Level, Charging and Indicators
The battery level status is shown by a battery symbol upon the normal screen.
Connect the supplied USB charging cable to a PC, or use power adapter
(option), to charge the iRadio.
When the USB battery charging commences, the power indicator glows red.
The battery can be charged during normal operation of the iRadio, however, if
the iRadio is operating and charging simultaneously, then the charge indicator
is yellow. When the battery is fully charged, the charge indicator goes out, or
turns green, if the radio is in use.
When the battery is running low, the battery icon flashes.
If the battery becomes critically low, the iRadio will power OFF automatically and
will not re-start until the battery is charged, or USB charging cable is applied.
NOTE: The internal battery is NOT a user replaceable part and carries a 1 year
warranty.
37
Promate(左对齐).indd 38-39
Troubleshooting
If problems occur when connecting the radio to the wireless network, please try
as follows:
1. When scanning for a WiFi network and nothing is found, please make sure
your reception area has an effective WiFi network coverage.
2. When scanning for a WiFi network, the radio may prompt you that "You
connect too many APs, please delete one and scan again." This means you
have exceeded the limit of three stored networks in memory. Please remove
one network from the Stored Networks and then scan for networks again.
3. When you have scanned for a WiFi network but still can not connect to it,
please check whether the selected network is encrypted. If it is encrypted,
please select the correct encryption method and enter the correct key to gain
access.
If still not connected, please select the Automatic (DHCP) option in the Edit
Settings from the Network Menu and then try again;
If unable to connect to a WiFi network, please set to “Disable Power Saving” in
the Power Saving option from the Network Menu and try again;
If still unable to connect, please confirm whether the Wireless Network Access
Point has firewall and MAC address filtering, if so, please stop MAC address
filtering or add the device MAC address within the AP list of allowed addresses
and try again;
If still unable to connect, please check whether the Wireless Network Access
38
2009-12-9 8:52:42
Point requires a fixed IP address (Static IP). If so, please select Manual (Static IP)
in Edit Settings from the Network Menu. Enter the correct network information;
If a connection can still not be established, please contact the network access
and network equipment suppliers.
4. When connected to the network, but not possible to get iRadio stations, it
may be:
(a) A server connection failure, please try again when the network is less busy.
(b) An unsecured but protected network with some form or registration or
payment required. This is typical of hotels and airports. It is impossible to
pass this point with the iRadio, so choose another network and try again.
(c) Interference which may be generated from other wireless equipment such
as laptops, media streamers, baby monitors, cordless telephones etc.
Additional interference can be generated from microwave ovens which
operate as similar frequencies to wireless networks. If the Internet Radio is
unable to connect or struggles to maintain a connection, simply move the
iRadio away from the potential source of interference and try again.
5. When connected to the network, and also connected to the vTuner portal, to
show Favorites and the All Stations menu, the iRadio will still not play a
specific radio station. It may be an internet connection failure, or that the
iRadio does not support the audio format of the selected radio station.
Please select another radio station accordingly.
39
Promate(左对齐).indd 40-41
The station may not be broadcasting (remember it may be located in a different
time zone).
The station may not be supported by this iRadio.
The station may not be broadcasting anymore.
The link held by the iRadio to the station is out of date.
The internet connection between the server (often located in a different country)
and the iRadio is too slow.
6. Favorites don’t work well. Sometimes come and go. Check the vTuner
website (as per earlier this manual) and confirm that the Favorites are stored
correctly.
7. Podcasts stop in the middle of the broadcast and restart from the beginning.
This is caused by a break in the connection from the radio stations website,
to the iRadio and the server connection was reset. Improve the connection
quality by getting closer to the Wireless Router or wait until your network is
less busy so the connection is not broken.
8. If you won’t use the device for a long time, please charge the battery for one
or two hours before use.
9. Product update doesn’t work. Try another Network Access Point, as not
all networks allow this update function, despite streaming the radio signals
perfectly.
40
2009-12-9 8:52:42
10. When a device error occurs, that can not be explained, please press the
Reset Button to reboot.
your iRadio switch it off at the mains immediately.
6. Caution: Do not open any covers and do not repair yourself. Qualified
personnel must carry out repair work.
Safety Warnings
Please read before usage.
1. If this iRadio has been moved from a cold place to a warm place, do not plug
it in for 2-3 hours. (e.g. from a cold car boot to a warm room). There is a
possibility that moisture may have condensed in the iRadio, this can cause
damage to your iRadio. To avoid damage please unpack your iRadio and
allow it to stand at room temperature for 2-3 hours before use. This will help
any moisture evaporate and prevent unnecessary damage to your iRadio.
7. Usage of headset or earphones with maximum volume for a long period of
time may cause hearing loss due to excessive sound pressures.
If at any time in the future you should need to dispose of this
product please note that: Waste electrical products should not be
disposed of with household waste. Please recycle where facilities
exist. Check with your Local Authority or retailer for recycling advice
(Waste Electrical and Electronic Equipment Directive).
2. Do not remove any fixed covers as this may expose dangerous voltages.
3. Never use your iRadio if it is damaged in any way. Always place your iRadio
on a flat level surface avoiding anywhere which may be subject to strong
vibration.
FCC Statement :
4. Avoid extremes of temperature, either hot or cold, place your iRadio well
away form heat sources such as radiators or gas/electronic fires.
This device complies with Part 15 of the FCC Rules. Operation is subject to the
following two conditions: (1) this device may not cause harmful interference, and
(2) this device must accept any interference received, including interference that
may cause undesired operation.
5. Do not allow your iRadio to be exposed to rain, moisture or dust. If any liquid
is split into your iRadio it can cause serious damage. If you spill any liquid into
Changes or modifications not expressly approved by the party responsible for
compliance could void the user's authority to operate the equipment.
41
Promate(左对齐).indd 42-43
42
2009-12-9 8:52:42
This equipment complies with FCC radiation exposure limits set forth for
an uncontrolled environment. End users must follow the specific operating
instructions for satisfying RF exposure compliance. This transmitter must not be
co-located or operating in conjunction with any other antenna or transmitter.
This device complies with FCC RF radiation exposure limits set forth for an
uncontrolled environment. The antenna used for this transmitter must be
installed to provide a separation distance of at least 20cm from all persons and
must not be co-located or operating in conjunction with any other antenna or
transmitter.
Appendix B
iRadio Menu Structure
Presets
List of Stored Presets
Favorites
All Stations
Play Preferred Station
Settings
Network
Now Playing
Delete Presets
Display Settings
Language
Appendix A
FM Radio Menu Structure
My_Favorites
Bookmarks
...
Added Stations
...
Most Popular Stations
...
Local Stations
...
Locations
...
Genres
...
...
New Stations
Firmware Update
Scan For Networks
Edit Settings
Seek Mode
Preset Mode
Automatic(DHCP)
Stored Networks
Manual(Static IP)
Network Information
...(list of current settings)
Power Saving
Enable Power Saving
Manually enter IP address
Disable Power Saving
Backlight Timeout
5 Seconds
Main Menu Timeout
...(in 5 second increments)
45 Seconds
English
Channel List
...(other available languages)
On
Off
FM Menu
Check For Updates
Auto Program
Revert To Backup
Firmware Information
Tune Mode
Clear All List
43
Promate(左对齐).indd 44-45
44
2009-12-9 8:52:42