1
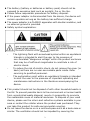
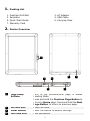
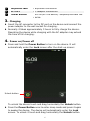
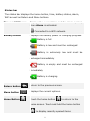
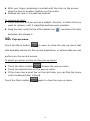
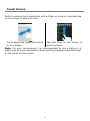
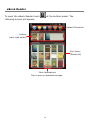
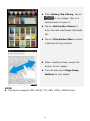
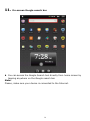
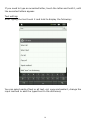
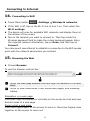
Инструкция для Prestigio MultiPad PMP3084BRU ENG FULL Перейти в карточку товара 8 800 775 98 98 л чит т нич ю н льт цию. гл т чн . Б з вы дны www.sotmarket.ru д бн я инф м ция тзывы, бз ы и т в ы , Safety Precautions Do not subject the device to severe impact or drop it from heights. Do not use the device in extreme hot or cold, dusty or damp conditions. Do not expose it to direct sunlight. Avoid using the device near strong magnetic fields. Keep the device away from water and other liquids. In the event that water or other liquids enter the device, power off the product immediately and clean the device. Do not use chemicals to clean the device in order to avoid corrosion. Clean it with a dry cloth. We are not responsible for damage or lost data caused by malfunction, misuse, modification of the device or battery replacement. Do not attempt to disassemble, repair or modify the product. This will invalidate the warranty. If the device will not be used for an extended period of time, please charge the battery at least once per month to maintain battery life. Charge the battery if: a) The battery level icon displays as empty. b) The device powers off automatically when restarted. c) There is no response when pressing keys with keys unlocked and battery full. When the device is being formatted or transferring a file, do not interrupt the connection. Otherwise, data may be corrupted of lost. When the device is used as a portable HD, please use only per the instructions. Otherwise, permanent data loss could occur. Please use and install data using the attachments/accessories provided and only according to the manufacturer’s instruction. Please refer to the information on the bottom of the device for electrical and safety information before installing data or operating the device. To reduce the risk of fire or electric shock, do not expose this device to rain or moisture. The device should not be exposed to dripping or splashing. Never place objects filled with liquids, such as vases, on the device. There is danger of explosion if the battery is replaced incorrectly. Replace only with the same or equivalent type. 1 The battery (battery or batteries or battery pack) should not be exposed to excessive heat such as sunlight, fire or the like. Please follow responsible procedures for battery disposal. If the power adaptor is disconnected from the device, the device will remain operable as long as the battery has sufficient charge. The power adaptor is a CLASS II apparatus with double insulation, and no external ground is provided. Safety symbol explanation: - - - The lightning flash with arrowhead symbol within an equilateral triangle is intended to alert the user to the presence of non-insulated ―dangerous voltage‖ within the product enclosure that may be of sufficient magnitudes to constitute a risk of electric shock. To reduce the risk of electric shock, do not remove the cover (or back) as there are no user-serviceable parts inside. Refer servicing to qualified personnel. The exclamation point within an equilateral triangle is intended to alert the user to the presence of important operating and maintenance instructions in the literature accompanying the device. This product should not be disposed of with other household waste in the EU. To prevent possible harm to the environment or human health from uncontrolled waste disposal, recycle it responsibly to promote the sustainable reuse of material resources. To dispose of your used device, please use the return and collection systems available in your area or contact the retailer where the product was purchased. They can take this product for safe environmental recycling. Do not leave the device on in a confined space such as a book case or similar. The ventilation should not be impeded by covering the 2 ventilation openings with items such as newspaper, table-cloths, curtains, etc. No open flames, such as lighted candles, should be placed on the device. Use the device in moderate climates. Listening Precautions Do not listen to your earphones or headphones at a high volume. Hearing expert advice against continuous extended play. Excessive volume through earphones and headphones can cause hearing loss. If you experience a ringing in your ears, reduce volume or discontinue use. Do not use while operating a motorized vehicle. It may create a traffic hazard and is illegal in many areas. You should use extreme caution or temporarily discontinue use in potentially hazardous situations created by obstructed hearing. Even if your headphones or earphones are the open-air type designed to let you hear outside sounds, don’t turn up the volume so high that you can’t hear what’s around you. Sound can be deceiving. Over time your hearing ―comfort level‖ adapts to higher volumes of sound. What sounds ―normal‖ can actually be loud and harmful to your hearing. Guard against this by setting the volume of your device at a safe level BEFORE your hearing adapts. To establish a safe volume level: a. Start your volume control at a low setting. b. Slowly increase the sound until you can hear it comfortably and clearly, and without distortion. Once you have established a comfortable sound level, leave it there. 3 Table of Contents Safety Precautions Listening Precautions 1. Packing List 2. Device Overview 3. Charging 4. Power on/Power off 5. Inserting a Memory Card 6. Calibration Home screen 7. Home screen bars 8. Prestigio home screen 9. Customizing the home screen 10. Pop-up menu Touch Screen eBook Reader 11. On-screen Google search bar 12. Keyboard settings 13. Memory cards and storage Connecting to Internet 14. Connecting to WiFi 15. Browsing the Web 16. Using Web Links and History 17. Managing Bookmarks Settings 18. Sound & Display settings 19. Language settings Applications 20. Transferring content from PC 21. Using applications 22. Managing applications 23. Downloading and installing applications 24. Uninstalling applications 25. Downloading content from AppsLib 26. Email Technical Specifications Disclaimer 4 1 3 5 5 6 6 7 7 8 8 9 10 11 13 14 16 19 20 22 22 22 24 25 26 26 27 28 28 28 29 30 32 33 34 35 35 1. 1. 3. 5. 7. 2. Packing List Prestigio MultiPad Earphone Quick Start Guide Warranty Card 2. AC Adapter 4. USB Cable 6. Carrying Case Device Overview 1 6 1 Page Jump Buttons 2 SD Card Slot Reset Button Mini USB Port 3 4 2 5 4 3 7 Turn to the previous/next page in eBook Reading Mode Press and hold the Previous Page Button to return to Home page. Press and hold the Next Page Button to return to previous page. Insert SD card Reset the device to default settings USB connection 5 5 6 7 Earphone Jack DC Port Power Button Earphones connection AC adapter connection Turn on/off the device; Suspend/Activate the device. 3. Charging Insert the AC connector to the DC port on the device and connect the power adapter to the wall socket for charging. Normally it takes approximately 3 hours to fully charge the device. Operating the device while charging with the AC adapter may extend the time of full charging. 4. Power on/Power off Press and hold the Power Button to turn on the device. It will automatically enter the Lock screen after the start-up screen: Unlock button To unlock the device touch and drag horizontally the Unlock button. Press the Power Button once to enter sleep mode and press it again to awake the device. The device will automatically enter the Lock screen. To unlock it touch and drag horizontally the Unlock button. 6 Press and hold the Power Button, and then tap on Power off/Standby to power off the device or to enter sleep mode. 5. Inserting a Memory Card The device supports SD/SDHC cards. To insert a SD card, place the card connector towards the device and the card label towards the rear side of the device. To remove the SD card, gently press the edge of the card to release the safety lock and pull the card out of the slot. To access the files on the memory card, select Explorer mode and tap on SD Card. 6. Calibration When using the device for the first time (or after erasing all user’s personal data) the device will automatically performs the G-sensor calibration. At the Calibration screen place the device on the flat horizontal surface and follow the on-screen instructions. If failed to do so you may notice deviations of the screen image from the device position in space later on. In this case it is recommended to calibrate the device again by touching Settings > Touch panel calibration. After successful calibration the device will enter the home screen. 7 Home screen 7. Home screen bars Your device has the resistive screen. It is operated by touching the screen surface with your finger. Status bar Widget Page scroll Page scroll Buttons panel 8 Status bar The status bar displays the home button, time, battery status, alarm, WiFi as well as Return and Menu buttons. Time and WiFi area Displays the current time and the alarm symbol, when Alarm is activated. Battery status Displays the battery power or charging progress. Connected to a WiFi network. Battery is full Battery is low and must be recharged Battery is extremely low and must be recharged immediately Battery is empty and must be recharged immediately Battery is charging Return button Return to the previous screen. Menu button Displays the current options. Home Button Touch the home button to return to the home screen. Touch and hold the home button to display recently opened items. 9 Buttons panel Applications drawer eBook Reader shortcut Settings Open the list of all applications, folders and shortcuts on the device. Open the eBook reader application. Open the settings options. Widget Home screen weather forecast widget, providing you with up-to-date weather information in a selected location. The widget displays cloudiness and local time and date for a selected city. Touch the widget to configure it. The configuration screen will appear, allowing to choose location and temperature measurements units. To change the city in the widget, touch Search City and enter the city name. As you type the device will suggest most probable city names. Choose the desired city and touch Add. Note: To obtain weather forecast your device must be connected to WIFI. For instructions on how to establish a WIFI connection, please, refer to section 12. Connecting to WIFI. 8. Prestigio home screen Prestigio home screen allows to adjust it according to the user’s preferences. Prestigio home screen is made up of five individual screens. Each room fits the physical display border and can be set to have its own shortcuts and widgets. You can move around the home screen in two ways: 1. Flick the Home screen horizontally until the desired room is displayed. 2. Touch the dots at the right and left bottom of the screen to move to the desired room of the home screen. All the space of the side screens can be used for installing applications, widgets and shortcuts. The home screen shortcuts are direct shortcuts (by touching them 10 you are directed straight to the application). You can add or remove any applications. For optimal viewing experience, the screen orientation changes automatically to portrait or landscape depending on how you hold the device. Downloaded applications may not support automatic screen orientation to portrait or landscape. To modify the default behavior, open the orientation settings by Settings Sound & displayOrientation. touching 9. Customizing the home screen To add an item to the home screen: Touch the button, choose the desired item, touch it and hold, until the home screen appears. Choose the desired shortcut on the home screen (or a desired location on the side screen), and release the item, or Touch , then Add, and choose the item you wish to add from the list. To change wallpapers: Touch , then Wallpapers, and choose the wallpaper you wish to add from the list; or Touch , then Add, and choose the wallpaper you wish to add from the list. To move an item: Touch and hold the item you want to reposition until it magnifies and becomes movable. 11 With your finger remaining in contact with the item on the screen, drag the item to another location on the screen. Release the item in the desired location. To remove an item: Touch and hold an item such as a widget, shortcut, or folder that you want to remove, until it magnifies and becomes movable. Drag the item onto the top of the delete icon , and when the item becomes red release it. 10. Pop-up menu Touch the Menu button to open or close the pop-up menu that lists available options for the current application, or actions that you can perform on the current screen. To select an option or item on the pop-up menu: Touch the Menu button to open the pop-up menu. Touch the desired item on the pop-up menu. If the menu has a scroll bar on the right side, you can flick the menu until the desired item is found. Touch the Menu button again to close the pop-up menu. 12 Touch Screen Perform various touch operations with a finger or a stylus. Intensely tap on the screen to select an item. In the page view, swipe the screen Tap and drag on the screen to to turn pages. scroll up/down. Note: For your convenience it is recommended to use a stylus or a plastic pen for touch operations. When scrolling up/down keep the finger or the stylus on the screen. 13 eBook Reader To open the eBook Reader touch following screen will appear. at the buttons panel. The Default Shortcuts History (Last read books) My Library (Books list) More Applications Tap to pop up applications page. 14 From History/My Library, tap on / to turn pages. Tap on a desired book to open it. Tap on History/My Library to enter the last read books list/books list. Tap on Title/Author/Size to select a desired sorting method. When reading a book, swipe the screen to turn pages. You can also press Page Jump Buttons to turn pages. NOTE: The device supports PDF, EPUB, TXT, FB2, HTML, PDB formats. 15 11. On-screen Google search bar You can access the Google Search tool directly from home screen by tapping anywhere on the Google search bar. Note: Please, make sure your device is connected to the Internet. 16 Keyboard controls for inserting text: 1 1 2 3 4 5 2 4 3 5 Touch to type letters into the field where the cursor appears. Based on the letters being typed, the keyboard shows suggested words under the keyboard, the most probable one highlighted in color. You can touch a suggested word to enter it into the text field. Touch once to show the uppercase keyboard for typing a capital letter. Touch twice to enable the Caps Lock mode. Touch to change back to the lowercase keyboard. Touch to show the keyboard for typing numbers, punctuation marks, and symbols other than the period. Touch to switch back to the alphabet keyboard. Touch to delete a typed character, symbol, or a space. Touch and hold to quickly delete typed text. Touch to search the input word. 17 If you need to type an accented letter, touch the letter and hold it, until the accented letters appear. Text editing: After typing the text touch it and hold to display the following: You can select parts of text or all text, cut, copy and paste it, change the input method or add the typed text to the dictionary. 18 12. Keyboard settings Touch the Menu button Settings Language & keyboardAndroid keyboard. To enable a setting, touch the setting option to select the check box ; to disable a setting, touch the setting option to clear the check box . Available keyboard settings: The device beeps when you touch a key. NOTE: To activate this item, you also need to Sound on keypress select SettingsSound & displayAudible selection. The first letter of the word in a new sentence is Auto-capitalization capitalized. Input languages Change the input language. Quick fixes Mark and correct wrong spellings and typos. Show suggestions Show suggested words as you type. If this mode is enabled, touching the spacebar or a punctuation key automatically inserts a Auto-complete highlighted word suggestion. Creating personal dictionary: The keyboard uses the default dictionary to display suggested words as you type. You can create a personal dictionary to include words not found in the main dictionary. The keyboard will also use the words that are added to your personal dictionary to make word suggestions. To add a word to the dictionary: Touch the Menu button Settings Language & 19 keyboardUser dictionary. Add. Touch the Menu button Type a desired word into the Add to dictionary text field. Touch OK. To edit a word in the dictionary: Touch the Menu button To Settings Language & keyboard User dictionary. Touch a desired word. Touch Edit. Edit the spelling of the word in the Edit word text field. Touch OK. delete a word from the dictionary: Touch the Menu button Settings Language & keyboard User dictionary. Touch a desired word. Touch Delete. 13. Memory cards and storage To check storage spaces: Touch Menu button Settings SD-card & device storage. The screen displays the total and available space on the device and on the SD card. To erase unwanted application data and to free storage space: Touch Menu button Settings ApplicationsManage applications. From the Manage applications list, touch the application whose cache or data you want to remove. In the Application info screen, touch Clear cache under Cache to 20 erase unwanted cache. To format the SD card: Touch Menu button Settings SD-card & device storage. Touch Unmount SD card to enable the Format SD card option. CAUTION: Formatting an SD card erases all data and downloaded applications, stored on it. Ensure that you back up the data that you need before formatting your SD card. Touch Format SD cardFormat SD card. To erase all data from your device: The following steps will erase all the data from your device including downloaded applications. Ensure that you back up all the required data before you proceed. Current system software and bundled applications, as well as files stored on SD-card will not be affected. Touch Menu button Settings Privacy Factory data reset. Touch OK after you read the warning. 21 Connecting to Internet 14. Connecting to WiFi Touch Menu button Settings Wireless & networks. If the WiFi is off, tap on the Wi-Fi line to turn it on. Then select the Wi-Fi settings. The device will scan for available WiFi networks and display them at the bottom of the screen. Tap on the network you want to connect to. Then tap inside the Wireless password field to make the virtual keyboard appear. Enter the required network information, tap on Done, and then tap on Connect. Your device will now attempt to establish a connection to the WiFi access point with the network parameters you entered. 15. Browsing the Web Choose Browser. To use the browser controls bar: 2 1 1 2 Touch the web page address field and type the address of the web page. Touch to view bookmarks, most visited web pages, and browsing history. Navigation on a web page Flick your finger horizontally or vertically on the screen to scroll and view desired areas of a web page. Zoom in/out a web page Move two fingers apart on the screen to zoom in. Move two fingers close together on the screen to zoom out. 22 To view the next or previous page: Touch Go to to view the previous page. and then touch Forward to view the next page. To open a new window: Touch New window. A new browser window opens and leads you to the home page. To switch between browser windows: You can open multiple browser windows to easily switch from one web page to another. Windows. On a browser window, touch Touch the web address of a desired web page. The window opens displaying the page in full screen. To find text within a web page: Find on page. When viewing a web page, touch Type the search item into the search bar. Touch the left or right arrow to go to the previous or next matching item. To copy text on a web page: You can copy and paste text from a web page to your e-mail or text. Locate the text you want to copy and then touch Select text. Position your finger at the start of the text you want to copy and then drag to the end of the text you want to copy. The copied text is highlighted in pink. Release your finger from the screen. To paste text on an e-mail or text, touch and hold the text field on a message or e-mail screen and then touch Paste on the pop menu. 23 16. Using Web Links and History To select a link on a web page: Move to a link you want on a web page. The link is framed by an orange box when you touch it. Touch the link to open the web page. Touch and hold the link to open a pop-up menu that allows you to open, bookmark, save, or copy it to the clipboard. To check the history of visited web pages: On the browser screen, touch or touch Bookmarks. Touch the History tab. Touch a web address to open the web page. Note: To check your most visited web pages, touch the Most visited tab. Allow downloading web applications: Applications downloaded from the web can be harmful. To protect your device and personal data, download applications only from trusted sources such as AppsLib. To download web applications, perform the following operations. Touch SettingsApplications. Touch Unknown sources to select the check box. When the Attention dialog box opens, touch OK. Install an application: On the browser screen, touch the application you want to download. The application details screen opens. To install the application, select either Install if item is free or Buy if it requires purchase. 24 17. Managing Bookmarks To bookmark a web page: Select the web page you want to bookmark. Touch or touch Bookmarks. The Bookmarks window opens. To . On the Bookmarks tab, touch Enter the bookmark name or edit the web address as needed. Touch OK to save the web page as a bookmark. open a bookmark: Touch or touch Bookmarks. The Bookmarks window opens. Touch the bookmark to open it in the same browser window. Touch and hold the bookmark to open the pop-up menu, allowing to open, edit the bookmark, add it as shortcut and share. 25 Settings 18. Sound & Display settings SettingsSound & Display. Touch To enable a setting, touch the setting option to select the check box ; to disable a setting, touch the setting option to clear the check box . The following sound and display settings are available: Media volume Set the device volume. Notification Set your default notification ringtone. ringtone The device plays sound when making screen Audible selection selection. SD card Select to play sound for SD card notifications. notifications Orientation By default, the screen will switch the orientation to landscape or portrait as you rotate the device. Animation The will show an animation for opening and closing windows. Brightness Drag the brightness slider horizontally or touch the desired portion of it to increase or decrease the yellow bar. The longer the yellow bar is to the right, the brighter the screen. Touch OK to confirm adjustment. Screen timeout Set how long the screen remains on after the last operation. Scroll the options and touch a preferred timeout period; to disable this feature select Never timeout. The screen automatically turns off and locks itself after an inactivity timeout selected here has passed. To turn on and unlock the screen, press the Power switch. 26 19. Language settings Set the language of the display text. Touch SettingsLanguage & keyboardSelect language. Select a language of your choice from the list that appears. Note: If you accidentally choose a wrong language, you can always change it back by finding the icon of Language & keyboard in the settings menu. 27 Applications 20. Transferring content from PC Connect the device to the PC with the USB cable provided. The device will automatically enter the USB screen. Please, follow the on-screen instructions to enable USB data transfer. The device will be automatically recognized by the PC. Please, transfer the necessary content using Windows Explorer. 21. Using applications To start using an application, select it from the list and touch once to launch it. To suspend an application and enter the home screen, press if the status bar is visible, or follow the on-screen instructions of the application. For more information on exiting or stopping an application, please, refer to Uninstalling applications section. 28 22. Managing applications You can use the Applications settings to view details about the applications installed on your phone, to manage their data and force them to stop, and to set whether you want to permit installation of applications that you obtain from web sites and email. SettingsApplications. The To manage applications touch following list will be displayed: Unknown sources Manage applications Check to permit installation of applications that you obtain from web sites, email, or other locations other than AppsLib. Warning! To protect your phone and personal data, download applications only from trusted sources, such as AppsLib. Opens a list of all the applications and other software installed on your phone, along with their 29 Running services Development sizes. By default, only downloaded applications are shown, and they are sorted in alphabetical and touch Filter to change order. Press the list to show all applications, only running applications, or only downloaded applications. Press and touch Sort by size to display applications in order by size. Touch an application to open its Application Info screen. Opens a list of services—applications or parts of applications that provide services to other applications or that run even when their main application isn’t running. Above each service, one or more gray bars show what processes the running service needs and how much memory it’s using (how much memory you would recover if you stopped the service). Depending on the service, when you touch it in the list it either opens a dialog in which you can stop it or opens its Settings screen. The Development screen contains settings that are useful for developing Android applications. 23. Downloading and installing applications The device offers 2 ways of downloading applications – from a web-site or from a PC. Allow downloading web applications: Applications downloaded from the web can be harmful. To protect your device and personal data, download applications only from trusted sources such as AppsLib. To download web applications from a web-site, perform the following operations. Touch SettingsApplications. Touch Unknown sources to select the check box. When the Attention dialog box opens, touch OK. On the browser screen, touch the application you want to download. 30 The application details screen opens. To install the application, select either Install if item is free or Buy if it requires purchase. To download web applications from your PC, perform the following operations. Connect the device to your PC via the USB-cable provided. Copy the application to the device root catalogue. Disconnect the device from your PC. Go to FilesInternal to find the downloaded application. Touch the application. The application details screen opens. To install the application, select Install. 31 24. Uninstalling applications To uninstall an application from your Multipad, perform the following operations. SettingsApplicationsManage Applications. The Touch device will open a list of installed applications. Touch the desired application. The following screen will appear: You can perform the following actions: Uninstall Touch to uninstall the application. Clear Touch to clear cache of this application. This function cache may be used when the application fails to operate correctly. Clear Touch to clear any default settings installed for this defaults application 32 Force stop 25. Touch to force close the application when it fails to stop correctly. Downloading content from AppsLib You can download free or paid applications directly from your device using the Apps Lib application marketplace. Before entering the Apps Lib make sure the WiFi connection is established. With Internet connection established, press the icon on the Home screen. Upon entering the Apps Lib you can view the list of free and purchasable applications as well as install the preferred applications. After pressing the Menu tab the device will offer the following options: My apps Settings About Exit View the list of installed applications. Update or uninstall apps. Change AppsLib account settings, Clear cache and Clear search cache. Access the AppsLib End User Licence Agreement. Exit the program. 33 26. Email You can create POP3, IMAP, and exchange e-mail accounts from web-based e-mail services on your device. Touch to open the Email. Setting up an email account: Type the e-mail address and password of the e-mail account you want to add and then touch Next. Note: If the e-mail account you want to set up is not in the device e-mail database, you will be asked to manually enter the e-mail account settings, including the e-mail server, protocol, and so on after touching Next. Enter the name for the account and the name you want displayed in outgoing e-mails and then touch Done. After creating one e-mail account, touch Add account if you need to create another e-mail account. 34 Technical Specifications Processor OS Display Supported formats Interfaces Storage capacity ARM9 Processor (Rockchip 2818) Android v2.1 (Eclair) Integrated Color 8.4" (800x600) TFT Resistive Touch-screen JPEG, BMP, MP3, WMA, WMV, AAC, WAV, TXT, AVI, GIF, PNG, OGG, 3GP, FLAC, APE, MP4, MOV, RM, MKV, FB2, PDB, RTF, PDF, EPUB, FLV WiFi (IEEE 802.11b/g) Mini USB (USB 2.0) Headset (3.5-mm mini jack) 4 GB flash memory, 1.5GB are accessible by the user Installed RAM Storage Capacity 256 MB Supported 16GB SD/SDHC Card Miscellaneous Battery Battery life Dimensions Weight Compatibility Computer Interface 2 built-in speakers Lithium Polymer battery 4000mA Music playback time: up to 7 hours Video playback time: up to 5.5 hours Book reading time: up to 6.5 hours 213 x 161 x 11 mm (L x W x H) 490 g Microsoft® Windows® XP, Vista, 7 or higher, Mac OS or Linux in mass storage mode USB 2.0 interface Disclaimer As the Prestigio products are constantly updated and improved, your device’s software may have a slightly different appearance or modified functionality than presented in this User Manual. We make every effort to ensure that the information and procedures in this user manual are accurate and complete. No liability can and will be accepted for any errors or omissions. Prestigio reserves the right to make any changes without further notice to any products herein. 35 Prestigio MultiPad PMP3084BRU ENG FULL Описание ф мл ни дит нл н з 2 мин ты Д т в в м Характеристики Отзывы з л т з з любым д бным б м нии з в ии Д т в и гл л жб т чн я дд ж и л т вин и тзывы ции и ид и