1
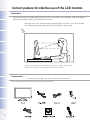
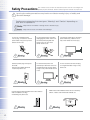
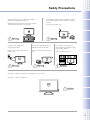
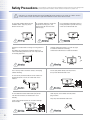
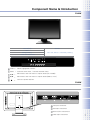
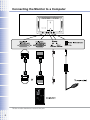
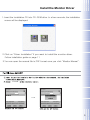
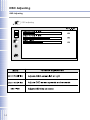
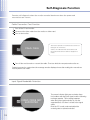
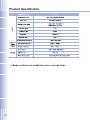
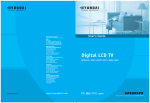
24" WIDE LCD MONITOR
Model : P240W
FCC Information
User Instructions
The Federal Communications Commission Radio Frequency Interference Statement includes the
following warning :
NOTE : This equipment has been tested and found to comply with the limits for a Class B digital
device pursuant to Part 15 of the FCC Rules.
These limits are designed to provide reasonable protection against harmful interference in are
sidential installation. This equipment generates, uses, and can radiate radio frequency energy and,
if not installed and used in accordance with the instructions, may cause harmful interference to
radiocommunications. However, there is no guarantee that interference will not occur in
a particularinstallation.
If this equipment does cause harmful interference to radio or television receptions, which can be
determined by turning the equipment off and on, the user is encouraged to try to correct the
interference by one or more of the following measures :
· Reorient or relocate the receiving antenna.
· Increase the separation between the equipment and receiver.
· Connect the equipment into an outlet on a circuit different from that to which the receiver is
connected.
· Consult the dealer or an experienced radio/TV technician for assistance.
User Information
Changes or modifications not expressly approved by the party responsible for compliance could
void the user's authority to operate the equipment.Connecting of peripherals requires the use of
grounded shielded signal cables.
1
Correct posture for efective use of the LCD monitor.
Placement
Correct placement and adjustment of the monitor can reduce eye, shoulder, and neck fatigue.
Check the following when you position the monitor.
Keep the top of the monitor screen slightly below eye level. Your eyes should
look slightly downward when viewing the middle of the screen.
Position your monitor no closer than 16 inches no further away than 30
inches from your eyes. The optimal distance is 25 inches.
Components
※ Contact the sales outlet if you wish to purchase optional extras.
Actual components may look different from the pictures below.
2
Index
Prior to use
FCC Information
1
4-6
Safety Precautions
Component Name & Introduction
7
Connection & Installation
Component Name & Introduction
Connecting the Monitor to a Camputer
Install the Monitor Driver
7
8
9 - 10
OSD(On Screen Display)screen select & control
Adjusting the Monitor Screen
11
Color adjusting
Screen adjusting
12
OSD adjusting
14
Sound
MISC
15
13
16
Additional Information
Recommendations
17
Self-Diagnosis Function
18
Troubleshooting
19
Product Specification
20
Supported mode table
21
Power Save Mode
21
※ Limited Warranty
※ Regulatory Information
This device has passed the electromagnetic wave test and may be used in any
place including residential areas.
3
Safety Precautions
The contents of this section are intended to protect the user from danger and
prevent physical accidents. Please read through the contents for proper use.
Ignoring the safety precautions may lead to accidents causing injury or fatality and
structural damage.
Cautions are categorized into two types, "Warning" and "Caution" depending on
their level of importance.
: May lead to accidents causing serious human injury
: May lead to minor accidents and damage
Do not use a danaged power
cord or plug, or connect to a loose
power outlet. Doing so may cause
electric shock or fire.
Do not pull the power cord when
unplugging the power, and do not
touch the power plug with wet
hands. Doing so may cause
electric shock or fire.
Connect the power plug to grounded
power outlets only. Failure to do so
may cause electric shock or injury.
Insert the power plug securely into
the outlet.
Insecure and unstable electrical
contact may lead to fire.
Do not bend the power cord
excessively or allow the cord to be
compressed under a heavy object.
Doing so may cause electric shock
or fire.
Do not connect more than one plug
to a single wall outlet. Doing so may
lead to fire.
Provide sufficient space between the monitor and the
wall for ventilation (cooling).
Overheating may lead to fire.
4
Make sure that the ventilation holes are not covered by
fabrics, curlains, other clothes like material, etc.
Safety Precautions
Place the monitor on a firm flat surface and be
careful when handling the monitor.
Mishandling the product may cause short circuits
and damage the product or cause injury.
Do not place candles, lighted cigarettes, or other
heat-radiating objects on the monitor or near the
monitor.
Doing so may lead to fire.
Disconnect the power when
cleaning the product.
Do not use flammable sprays or
substances near the product.
Falure to do so may cause electric
shock or fire.
Doing so may lead to explosion or
fire.
Do not place the product in a
place where the ventilation is poor
(eg. inside a cabinet).
Doing so may lead to fire.
Set the PC to match the resolution and frequency of the monitor.
24" Types - 1920 X 1200 @ 60Hz
5
Safety Precautions
The contents of this section are intended to protect the user from danger and
prevent physical accidents. Please read the contents for proper use.
Set the PC to activate power save mode (DPMS) when the monitor is not used for a while. Set the
screen saver function and select a type that maintains motion in the whole screen.
Do not insert metallic objects into the
ventilation holes. They may cause
electric shock or fire.
Do not allow children to climb onto
the product or hang on it. The
product may fall over and cause
serious injury.
Do not attempt to dismantle, repair, or
modify the product yourself. This may
cause fire or electrical fail ures.
Unplug the monitor when not using for a long period of
time.
Dust build-up on the product (near the vents) may
cause overheating and lead to fire. Use a dry soft cloth
for cleaning purposes.
Carefully unplug the monitor if you see any signs
of smoke or smell odor of burning.
Contact the manufacturer for further information.
Use a soft dry cloth to clean the monitor, and unplug
it before cleaning.
Do not spray water directly onto the product.
It may cause electrical faults or fire.
Do not use any chemical solutions on the monitor for
cleaning purposes. Do not use a wet cloth on the
monitor.
Do not install the monitor where water (rain) drops
can enter the enclosure, or where there is oil or
humidity.
Clean any dirt, dust or water from the power
plug contacts.
They may cause electrical faults or fire.
It may cause electrical faults, fire, or lead to damage
to the monilor.
6
Component Name & Introduction
P240W
GREEN
Normal(ON)
OFF
Energy saving
Cable not Connected
RED and Amber is alternately blinking
Select
Menu
Select - Select highlighted function.
Menu
Indicates OSD menu / Cancels selected menu.
▲,▼
Move with in the OSD menu or adjust values(UP, DOWN)
◀,▶
Move with in the OSD menu or adjust values(RIGHT, LEFT)
Turns the power ON/OFF
P240W
DVI Input Connector
VGA Input Connector
Stereo In/Out Connectors
Power Input Connector
7
Connecting the Monitor to a Computer
Tilt the monitor back and connect the jack
8
Install the Monitor Driver
1.Insert the Installation CD into CD-ROM drive. In a few seconds, the installation
screen will be displayed.
2.Click on “Driver Installation” If you want to install the monitor driver.
Follow installation guide on page 11
3.You can open the manual file in PDF format once you click “Monitor Manual”.
"P240W"
9
Install the Monitor Driver
For Windows 2000 / XP
1.
2.
"P240W"
RADEON 955W P240W Series
P240W Series
P240W Series
1920X1200
1920X1200
Click on the ‘OK’ button
Click on the ‘OK’ button
※ Monitor driver installation complete
10
RADEON 955W P240W Series
Click on the ‘OK’ button
Click on the ‘Yes’ button
P240W
◀/▶
11
12
13
OSD Adjusting
OSD Adjusting
OSD adjusting
14
Sound Adjusting
Sound adjusting
P
I
P
I
P
I
P
I
15
Miscellaneous
5.
Miscellaneous
colors
* This cannot be adjusted in the digital mode.
screen
* This cannot be adjusted in the digital mode.
* Only 4:3 mode operates
(800*600, 1024*768,1280*1024).
16
Recommendations
To enjoy optimal display
1. Due to the TFT-LCD monitor panel's characteristics, the optimal resolution is limited to
monitor size. Other resolution settings may decrease the display quality.
Therefore is recommended that the optimal resolution be used.
Optimal 24" re solution by screen size (type) 24" types: 1920 X 1200 @ 60Hz
2. The product may output a display of up to 1 PPM (one pixel per million) brighter or
dimmer due to technical limitations in LCD Panel manufacturing. This characteristic
does not affect the performance of the product.
Number of pixels by LCD panel size: 24" types : 6,912,000 pixels
3. Use a soft dry cloth with a special cleansing solution for cleaning the monitor.
Do not apply excessive force when cleaning the display panel. Using excessive
force may leave marks.
4. Run the "Auto" (Auto-Adjust) function when dissatisfied with the display quality.
This will enhance the quality. However, use the fine-tuning facility (phase/frequency
control) if noise remains after automatic adjustment.
5. Having the monitor display fixed images may leave after-images or unwanted marks
on the screen. Set the monitor power save mode from the PC or use a screen saver
to protect the monitor.
17
Self-Diagnosis Function
Execute self-diagnosis when the monitor remains blank even when the power and
connections are correct.
Cable Connection Test Function
Turn off the PC and monitor.
Disconnect the video cable from the monitor or video card.
Turn on the monitor.
Check Cable
This monitor provides a connection test function for
testing the PC connection.
Check if the cable has been disconnected from
the monitor when the box shown is displayed on
screen.
Turn off the monitor and re-connect the cable. Then turn both the computer and monitor on.
Contact your service center when the message remains displayed even after making the connections
correclly with a new cable.
Input Signal Bandwidth Detection
VIDEO MODE NOT
SUPPORTED
18
The power indicator light goes red when there
is a problem with the input signal, and the following
message appears. This message appears
when the input signal resolution is over the
supported limit or if there is a fault in the signal
cable.
Boot the PC in safe mode and adjust the
scanning rate to optimal resolution.
Troubleshooting
Problem
Solution
Color appears abnormal. It is in black
and white.
Reconnect the PC connecting cables.
Insert the PC's video card correctly.
Re-boot the PC.
Set the video card again after referring to the video card manual.
The displayed screen position suddenly
changes or tilts inward.
Use the screen control to adjust the displayed screen shape.
Set the resolution and/or frequency on the video card (refer to the
supported mode table).
Differences in the signal period of the video card may cause
changes in the displayed position from time to time. Use the screen
control functions to correct the displayed screen position.
Displays 16 colors only. The color has
changed after replacing the video card.
Windows ME/XP/2000: Re-set the color from the Control Panel ->
Display -> Setting Re-install the video card driver.
Power indicator lamp blinks orange.
Monitor is in Sleep Mode
Cannot control the screen with the
buttons on the front of the monitor.
Contact technical support
There are colored spots on the screen.
There may be a few colored (red, green, white, black) pixel spots
on the screen during use. This is a natural characteristic in LCD
panels. It is not a malfunction and does not affect the monitor's
performance.
The power indicator lamp is off.
Check if the power cable is intact. Reconnect the power cable correctly
if necessary.
The "Check Cable" message appears
on the screen.
Check it the connection between the PC and monitor is intact.
Reconnect the cable correctly if necessary.
The 'Out of Range' message appears on
the screen.
The output signal from the video card exceeds the monitor's
maximum resolution or frequency limit. Set the maximum resolution
and frequency to suit the product limits.
The screen appears to be sliding
downward.
Check the connection between the PC and monitor. Re-connect if
necessary.
The screen is unclear.
Run the auto-adjusting function.
The screen appears unstable and
flickers.
The screen leaves shadows.
Check it the computer or video card output resolution and
frequency is set within the limits. Re-set the screen display by
referring to the resolution information and standard supported mode
table.
The screen is too bright or dark.
Use the brightness or contrast controls to adjust the display.
The color on the screen is not uniform.
Use the color density control to set the color.
Lines appear on the screen and the
screen flickers.
Turn off any cordless phones, hair dryers, electrical drills etc. that
are in use.
Use a soft dry cloth to clean the
product.
Use a clean cloth with a special screen cleanser.
Do not scratch the monitor panel with your fingernails
or other sharp objects.
Do not use flammable substances such as benzene or
paint thinner on the product. Do not use a wet cloth.
Do not use acetone, benzene, or paint
thinner on the product.
19
Product Specification
P240W
(TYP)
(G to G)
(TYP)
(TYP)
20
Supported mode table
Resolution
Horizontal frequency (KHz)
31.47
37.86
37.50
31.47
35.16
37.88
48.08
46.88
48.36
56.46
60.02
63.98
79.97
640 X 480
720 X 400
800 X 600
1024 X 768
1280 X 1024
Vertical frequency (Hz)
60
72
75
70
56
60
72
75
60
70
75
60
75
1600 X 1200
75.00
60
1920 X 1200
74.00
60
Power Save Mode
This monitor comes with a power save function that activates when the monitor has not
been used for a while. Power consumption is reduced in power save mode, and this is
indicated by the power indicator lamp's color. Pressing a key on the keyboard or mouse
turns the monitor back on. However this function is only enabled when the monitor is
connected to a PC that has a power save function.
The power save function operates as described below.
Power save mode
Normal mode
Stand by mode
Power indicator lamp color
Green
Red and Amber is alternately blinking
Power Consumption
Max 100W
Below 10 W
21
HYUNDAI IT Service Center
USA
Hyundai IT America
(C/O AVC Tech, Inc.)
777 Mark St.
Wood Dale, IL 60191
Tel : 800-568-0060 / 630-595-0123
e-mail :
[email protected]
JAPAN
Tokuden Prosell Co., Ltd
714, Kamisano-machi,
Takasaki-shi, Gunma, Japan
100-0011
Tel : 0120-002390
e-mail : [email protected]
Tel : Total - 0049 (0) 6105 4088 211
IT - 0049 (0)180 50 70113
TV - 0049(0)180 59 13 134
e-mail :
[email protected]
Attn : Oezer Oeguen
FRANCE
SERRIB
25 rue Albert Camus BP355 90006
BELFORT Cedex
IT : +33(0)4-70-58-44-11
TV : +33(0)4-70-58-44-02
e-mail : [email protected]
Attn : Gilles Demeusy
CANADA
Seoul Computers
35 MCCLEARY COURT,
UNIT #16, CONCORD,
ONTARIO L4K 3Y9
Tel : 905-660-7968
e-mail : [email protected]
UK
RepairTech Ltd
Unit 5, Westfield Road, Southam,
Warwickshire, CV47 0JH
Tel : 0871 855 3171
e-mail :
[email protected]
Attn : John Satchwell
AUSTRALIA
Thomas Electronics ESG Pty Ltd.
3 Sheridan Close
Milperra NSW 2214, Australia
Tel : 61 2 8723 6528
e-mail : [email protected]
CZECH REPUBLIC / SLOVAKIA
SIL Eastern Europe a.s.
Tesinska 1970/56, 710 00,
Ostrava, Czech Republic
Tel : 00420 (0) 596 253 677
e-mail : [email protected]
Attn : Tomas Schneider
NEWZEALAND
Vantex Technology
Distribution Ltd
635 Great South Road,
Penrose, Auckland.
Tel : 64 9 571 0775
e-mail : [email protected]
NORWAY
A Novo
Fetveien 1
Tel : 0047 63804538
e-mail : [email protected]
Attn : Joakim Skriung
SINGAPORE
Chungco Technology Pte Ltd
55 Ayer Rajah Crescent,
#07-12 Ayer Rajah Industrial Estate,
Singapore 139949
Tel : 65 67758166
e-mail :
[email protected]
SW/FI/DE
A Novo Nordic
Nätverksgränd 11, 721 36 Västerås
Sweden
Tel : 0046 21812310
e-mail :
[email protected]
Attn : Andreas Gerhardson
MALAYSIA
CHUNGCO TECHNOLOGY SDN BHD
2-1-05. GRAND FLOOR,
HARBOUR TRADE CENTRE GAT
LEBUH, MACCALL UM.10300.
PENANG, MALAYSIA
Te l : 604-2615131 / 604-2615135
e-mail :
[email protected]
SPAIN
Seltron,S.L.
C/INDUSTRIA,44-46
Tel : 0034 (0) 902014909
e-mail : [email protected]
Attn : JL RUIZ
GERMANY / AUSTRIA / BENELUX
Hyundai IT Germany SVC
Hessenring 13B D-65546
Mörfelden-Walldorf Germany
DATA LOGIC SL
Pol Ind Mas Batlle, C/I. Iglesias
161, 43206 Reus
Tel : 0034 (0) 902141209
e-mail : [email protected]
Attn : JM Fortuny
SWITZERLAND
Pictronic AG
Aavorstadt 40, 5600 Lenzburg
Tel : 0041 (0) 62 892 96 00
e-mail : [email protected]
Attn : Thomas Correia
ITALY
Euvision SRL
Via di Grotte Portella, 6/8 00044
Frascati - Roma - Italy EU
ZI Bel Air 97800 Saints Louis
Tel : 0039 06 94293 321
e-mail : [email protected]
Attn : LUCARELLI STEFANO
LITHUANIA
"ServiceNet" UAB
Gaiziunu g. 3, Kaunas LT-50128,
Lithuania
Tel : 00370 (37) 400160
e-mail :
[email protected]
Attn : Robertas Zubrus
POLAND
Zolter Sp. z o. o
Piaseczno 05-500 ul.˙zytnia 1
Tel : 0048 (0) 22735 54 30
e-mail : [email protected]
Attn : Antoni Gorayski
SLOVENIA
E-MISIJA d.o.o.
LJUBLJANSKA CESTA 21 D
Tel : 00386 (0)18303560
e-mail : [email protected]
Attn : ZAPLOTNIK BOSTJAN
GREECE
ALMAN HELLAS LTD
ORTANSIAS 23, GR-13677
ACHARNAI, ATHENS, GREECE
Tel : 00302 (0) 102409150
e-mail : [email protected]
Attn : JOHN SPANOS
TURKEY
Multimedya
Küçükköy karayolları mah 569. Sk
no:6 k:2 GaziosmanPa¸sa Istanbul
Tel : 0090 (0) 212 479 46 46
e-mail :
[email protected]
Attn : Gürhan Bayır
CROATIA
HG Spot
Avenija Dubrovnik 46 10010 Zagreb
Tel : +385 (1) 66 11 548