1
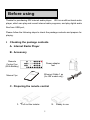
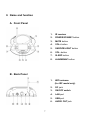
Receptor de Radio de Internet
for IRF & IRZ models
Para modelos IRF e IRZ
User's Manual
Español
(ES)
Internet Radio Receiver
English
(GB)
l Lifestyle
Enhance Your Digita
Copyright Statement
It is a criminal offence, under applicable copyright laws, to make unauthorized
copies of copyright-protected material, including computer programs, films,
broadcasts and sound recordings. This equipment should not be used for such
purposes.
FCC Compliance Statement
This device complies with Part 15 of the FCC Rules. Operation is subject to
the following two conditions:
1.
this device may not cause harmful interference, and
2.
this device must accept any interference received, including
interference that may cause undesired operation.
FCC Warning Statement
This equipment has been tested and found to comply with the limits for a
Class B digital device, pursuant to Part 15 of the FCC Rules. These limits
are designed to provide reasonable protection against harmful interference
in a residential installation. This equipment generates, uses and can emit
radio frequency energy and, if not installed or used in accordance with the
instructions, may cause interference to radio communications. However,
television reception interference can be determined by turning the
equipment off and on. The user is encouraged to correct the interference by
one or more of the following measures:
Reorient or relocate the receiving antenna
Increase the separation between the equipment and the receiver
Connect the equipment into an outlet different from that to which the
receiver is connected
Consult the dealer or an experienced radio/TV technician for help.
CAUTION
Changes or modifications not expressly approved by the party responsible
for compliance could void the user’s authority to operate the equipment.
FOR EUROPE
“The drive is in conformity with the EMC directive and
low-voltage directive.”
WEEE LOGO
Disposal of Old Electrical & Electronic Equipment (Applicable
in the European Union and other European countries with
separate collection systems)
This symbol on the product or on its packaging indicates that this product
shall not be treated as household waste. Instead it shall be handed over to
the applicable collection point for the recycling of electrical and electronic
equipment. By ensuring this product is disposed of correctly, you will help
prevent potential negative consequences for the environment and human
health, which could otherwise be caused by inappropriate waste handling of
this product. The recycling of materials will help to conserve natural
resources. For more detailed information about recycling of this product,
please contact your local city office, your household waste disposal service
or the shop where you purchased the product.
Before using ................................................................. 5
I.
II.
Checking the package contents .................................................. 5
Name and function ..................................................................... 7
Getting started .............................................................. 9
I. Setting the Network configuration ........................................... 10
II. Setting up Date and Time ......................................................... 12
III. Setting the Buffer length .......................................................... 12
Basic operation ........................................................... 13
I.
II.
Listening to the internet radio .................................................. 13
Playing from the USB port....................................................... 15
Advanced operation .................................................... 17
I.
II.
III.
IV.
V.
Recording the internet radio program ....................................... 17
Adding a radio station .............................................................. 17
Reading information ................................................................ 18
UPnP function ......................................................................... 18
Configurations ......................................................................... 18
FAQ ............................................................................ 21
Technical Specifications ............................................. 22
ENGLISH
(GB)
Table of Contents
Before using
Thanks for purchasing IRX internet audio player. IRX is a multifunctional audio
player, which can play and record internet radio programs, and play digital audio
files from USB port,
Please follow the following steps to check the package contents and prepare for
playing.
I. Checking the package contents
A. Internet Radio Player
B. Accessory
Remote
Control 1pc
(With Battery)
Power adaptor
1set
Ethernet Cable 1 pc
(for IRZ model only)
Manual 1pc
C. Preparing the remote control
1.
Pull out the isolator
2.
5
Ready to use
D. How to replace battery of remote control
When the remote control runs out of battery, you may follow the instructions to
replace the battery.
1. Open the battery cover
2. Put in CR2025 battery
( Positive pole "+" face up)
3. Put on the battery cover
Note:
The model of the battery is CR2025.
Please confirm the polarity before you insert the battery.
6
ENGLISH
(GB)
Pull out a piece of isolator, then remote control can be used.
II. Name and function
A. Front Panel
1.
IR receiver
2.
POWER/STANBY button
3.
MUTE button
4.
VOL+ button
5.
SNOOZE/LIGHT button
6.
VOL- button
7.
SLEEP button
8.
ALARM/NAP button
1.
WiFi antenna
B. Back Panel
(for IRF model only)
7
2.
DC jack
3.
ON/OFF switch
4.
LAN port
5.
USB port
6.
AUDIO OUT jack
ENGLISH
(GB)
C. Remote Control
1.
POWER : Power on/off
2.
0 ~9: Digit keys
3.
HOME: GOTO Main menu
4.
Direction keys
5.
ENTER
6.
PREV : Previous
7.
PLAY/PAUSE
8.
SNOOZE
9.
MUTE
10.
MODE : Change operation mode
(for IRP model only)
11.
12.
VOL+/LANGUAGE : SELECT MENU
LANGUAGE
8
13.
BACKLIGHT
14.
FAVORITE: go to MY FAVORITE
15.
FAVORITE+: add to MY FAVORITE
16.
ALARM/NAP: select alarm type
17.
SLEEP: select sleep type
18.
NEXT
19.
STOP
Getting started
Connect one end of the power adaptor to the DC jack; plug the adaptor into a
power outlet. Then turn on your IRX.
After the initialization, the Main menu screen will be shown.
The Main menu screen,
Note:
You can press LANGUAGE key anytime to select a menu language.
Press HOME key anytime, IRX will return to the Main menu screen.
Please follow the following steps to set up the IRX.
9
Setting the Network configuration
In order to receive the internet radio program, IRX needs to connect to the
internet. You can connect the IRX in you LAN, either by Ethernet cable or
WiFi connection.
A. Network connection
You can use an Ethernet cable to connect the LAN port of IRX and a LAN
port of your router.
Note:
Your router should be setup to be able to link to your Internet
Service Provider.
If your router supports DHCP, then IRX can get an IP address automatically.
From the Main menu, press , key to select "Configuration" item, press
ENTER or key to enter the Configuration menu. Select "Network" and
press ENTER or key to enter the IP Configuration submenu. Select
"Auto Setting(DHCP)", press ENTER or key to enable the Auto Setting.
Note:
The above steps will be abbreviated as "Configuration
Network IP Configuration Auto Setting (DHCP)" in this
manual.
Otherwise, you can set the IP address manually. From the Main menu,
select "Configuration Network IP Configuration Manual Setting
IP Address " to set the IP address. And then input the Subnet Mask,
Default Gateway, and Preferred DNS Server from the same menu screen.
Note:
Please use , keys to change the value of IP address, Subnet
Mask, Default Gateway, and Preferred DNS.
10
ENGLISH
(GB)
I.
B. Wireless connection (for IRF model only)
If your LAN supports wireless access to the internet, you can configure the
IRX for wireless connection.
From the Main menu, select "Configuration Network WiFi
Configuration ". All the available access point will be shown on the screen.
Use , key to select an access point. A key sign will be shown on the
bottom, if the access point is protected by an encryption key. Press ENTER
key to configure IRX to link to the access point.
If the access point is not key protected or the key is input already, you can
select "Direct Connection" to connect to access point. If the access point
is key protected, you have to input the key for the first time. Select "Enter
WEP/WPA" and press ENTER key to input the key.
Press , key to select a character, and use key to move to next
character.
Key sign
Note:
IRX use character selection for text entry. The character
sequence is as follows,
Move the cursor to a character, and press , key until ( )
shown. Press key to move the cursor to next character, the
previous character will be deleted.
11
There are different signs indicating the network connection status.
ENGLISH
(GB)
Connecting
Wired connection is successful
Wired connection is failed
WiFi connection is successful
WiFi connection is failed
II. Setting up Date and Time
A. Setting the Date and Time
From the Main menu, select "Configuration
Time ".
Press , key to select a field, and press ,
Press ENTER key to complete the setting.
Clock
Set Date and
key to change the value.
B. Set Time Format
From the Main menu, select "Configuration Clock Set Time
Format ".
Select "12 Hour" or "24 Hour" format for the time display.
Note:
After the first setup, IRX will adjust the time automatically once the
internet connection is successful.
III. Setting the Buffer length
IRX uses a streaming buffer for receiving audio data from internet.
From the Main menu, select "Configuration Buffer ".
You can select "2 Seconds", "4 Seconds", or "8 Seconds" for the buffer.
If the internet is busy, you may need longer buffer for smooth play.
12
Basic operation
When you turn on the power of IRX, the Main menu will be shown. Whenever
the HOME key is pressed, the Main menu will be shown.
I.
Listening to the internet radio
To start listening to internet radio program, you have to select an internet
radio station. IRX stores thousands of internet radio station information
inside. The station name can be sorted by Genre, or Country. This will
help you find a station easily.
From the Main menu, select "Radio Station/Music ". You can select
either "Genre" or "Country/Location" to sort the station name.
If you select "Genre", then IRX will list the station name by Genre. Press
ENTER key or key to open the group/subgroup. When a list of station
names shown, press , key to select your preferred station.
13
2 seconds buffer
4 seconds buffer
8 seconds buffer
Note:
When IRX is playing a radio program, you still can browse other
menu. IRX will return to the playing screen, if there is no any
key operation for 10 seconds.
From the Main menu, select "Radio Station/Music Country/Location
". IRX will sort the station name by territory and country.
Adding to My Favorite
You can press key when a list of station name shown, and then an option
menu will be shown. Please select "Add to My Favorite", and IRX will add
the station name to My Favorite list. A
sign will be shown on the
screen.
14
ENGLISH
(GB)
Press ENTER key to start playing the program from the internet radio station.
IRX will show the playing screen which contains the name and other
information of the radio program.
Note:
When IRX is playing a radio program, you can press FAVORITE+
key to add the station name to My Favorite list.
Managing My Favorite
From the Main menu select "My Favorite " or press Favorite key of
remote control, all the station names, which you added before, will be shown.
You can select a station name; press ENTER key to listen to the radio
program of the station.
If you press key after selecting a station name on My Favorite list, an
Option menu will be shown. You can Record, Delete, Shift Up, Shift
Down, Rename, or Play radio program from the selected station.
Note:
You can press the digit keys, 1, 2 …9, 0, from the remote control, IRX
will connect to the first 10 station names listed in My Favorite.
My Favorite can store up to 250 station links.
Please refer to "Advanced Operation" chapter of this manual to
Record radio program.
II. Playing from the USB port
IRX can play MP3 and WMA audio files from an USB storage device. Plug
your USB storage device into the USB jack of the IRX. IRX will detect
automatically, an USB sign will be shown on the status bar of screen.
USB sign
From the Main menu, select "USB " to open the USB device and folder or
subfolder. When a MP3 or WMA audio file name shown, you can press
15
Note:
Please DO NOT unplug the USB device when IRX is playing from the
USB device.
IRX only supports FAT32 file system for the USB storage device.
IRX will keep playing all the files, in the same folder, repeatedly.
16
ENGLISH
(GB)
ENTER or PLAY/PAUSE key to start playing the file. Press PLAY/PAUSE
key to pause the playing. Press STOP key to stop playing. Press , key
to play previous or next audio file. The screen will show the file name, file
information, and playing information.
When you select a file name and press key, an Option menu will be
shown. You can choose to Delete or Play the file.
Advanced operation
I.
Recording the internet radio program
In order to store recorded file, you should have an USB storage device
connected to the USB jack of IRX.
Press key from the internet radio station name list, an Option menu will be
shown. Choose "Record" and press ENTER key to select a recording
operation.
"Record": Start recording until STOP key is depressed.
"Record(30 Minutes)": Record for 30 minutes, and stop automatically.
The recording time can be 30, 60, 90, or 120 minutes.
When recording is started, a recording status will be shown on the right
bottom of the screen. The IRX will create a folder named mediaU in the
USB device. You can select USB from the Main menu to playback the
recorded file. (Please refer to the "Playing from the USB port" chapter of
this manual)
Note:
Please DO NOT unplug the USB device when IRX is recording.
IRX only supports FAT32 file system for the USB storage device.
II. Adding a radio station
From the Main menu, select “Service Add New Radio Station ” to edit
the IP address of an internet radio station. Press , key to select a
character, use key to move to next character, and press ENTER key to
complete the input.
17
IRX provides a link to some public information.
From the Main menu, select "Information Center
information provided.
". Select a service of
IV. UPnP function
Select "UPnP" from the Main menu to enter the UPnP function. IRX will list
all the available UPnP server in the LAN. Select a server and press ENTER
to link to the server. All the media files in the server will be listed by category.
Select a folder and press ENTER key to open Select a file and press
ENTER key to play.
Note:
IRX supports the following UPnP servers, Tversity, and Twonkey.
Please go to its web to purchase or download a server program.
Please follow its instruction to install the UPnP server in your PC.
The fire wall in your PC may block the UPnP function, please refer
to the instruction of your UPnP server for the details.
V.
Configurations
A. Setting Network parameters
Please refer to the "Setting the network configurations" section of this
manual.
B. Setting the Clock
Please refer to the "Setting the Date and Time" section of this manual.
18
ENGLISH
(GB)
III. Reading information
C. Setting an Alarm
IRX supports two alarm setting.
From the Main menu, select "Configuration Alarm Turn On(1) ".
An alarm(1) sign will be shown on the screen. Select "Set Alarm Time"
to set an alarm time. Choose "Set Alarm Sound" to select an alarm
sound. Beep, Melody, and Radio can be set as alarm sound. You can
also set the alarm time as 5, 10, 20, 30, 60, 90, 120 Minutes(NAP).
When you turn off the power, a Clock screen will be shown. An Alarm
sign and remaining time will be shown on the bottom. IRX will beep, play
a melody, or play the radio program after the time period. Press any key
can cancel the alarm. Pressing SNOOZE button or key will postpone the
alarm for 9 minutes.
You can also press ALARM/NAP key or ALARM/NAP button from the
panel to select an alarm setting.
Alarm 1 sign
Alarm 2 sign
Alarm (NAP) sign
D. Selecting a Language
IRX supports several kinds of menu language. Select "Language" and
press ENTER key to change the selection. You can also press
LANGUAGE key to change the language.
E. Setting Backlight
You can turn the backlight of the screen on or off. If you select Power
Saving, the backlight will turn to be darker few seconds later after
depressing a key.
19
You can set the sleep timer as 15, 30, 60, 90, or 120 Minutes . A Sleep
Timer sign and remaining time will be shown on the screen. IRX will be
off after the time is up.
You can also press SLEEP key or press SLEEP button from the panel to
change the sleep timer.
Sleep Timer sign
G. Selecting a buffer size
Please refer to the "Setting the Buffer Length" section of this manual.
H. Version Update
The version of the firmware will be shown. Press ENTER or key again.
The available version of firmware for upgrade will be shown. You can
select to upgrade the firmware.
I. Reset
Restore the factory default setting.
20
ENGLISH
(GB)
F. Setting Sleep Timer
FAQ
Q1:
IRF can connect to my access point with password protected.
After I
delete the password of my WiFi access point, the IRF can not connect to the
WiFi access point anymore.
Ans : If you cancel the password protection of your access point, you need to
delete the key setting in WiFi configuration of IRF. Otherwise, IRF will still
use the key to connect to the access point.
From the Main menu, select "Configuration
Configuration ".
WEP/WPA
Q2:
Network
WiFi
Choose your access point, and then select "Enter
" to delete the key input previously.
IRX can recognize an USB storage device, but it shows the content of the
device is empty.
Ans : Please confirm the file system of the USB storage device is FAT32 or not.
IRX can only supports FAT32 file system.
Q3:
My PC can connect with the WiFi access point, but IRX shows WiFi
connection is failed.
Ans: Please check that the IRX has correct password setting for the WiFi access
point. And make sure that the WiFi access point does not block the IP
address and MAC address of new device.
21
Physical Dimension
Height: 62 mm x Depth: 155.3 mm x Width: 166.3 mm
Weight
350 g
Playback Format
Audio: MP3, WMA
Remote Control
IR remote controller
Audio Out
2 channels stereo output
2 * 2W Speaker
1 Ear Phone Jack
Networking
Ethernet (10/100 Mbps) port
Transport protocols: HTTP/1.1 audio transport, MMS
Auto (DHCP), and manual setting IP address
UPnP
WiFi 802.11b/g
WiFi Security: WEP, WPA, WPA2
Extensibility
USB 2.0 Host port
Alarm / Snooze / NAP / Sleep
Power Adapter
Input:AC100V — 240V~, 50~60HZ, 0.3A Max
Output: DC +5V 2A
Language
Chinese traditional, Chinese simplified, English, French, German,
Japanese, Korean, Spanish
22
ENGLISH
(GB)
Technical Specifications
Índice
Antes de usar .............................................................. 24
I.
II.
Verificación del contenido del paquete ..................................... 24
Nombre y función .................................................................... 26
Primeros pasos ............................................................ 28
I. Preparación de la configuración de la red ................................. 29
II. Ajuste de la fecha y hora .......................................................... 31
III. Ajuste de la longitud del búfer ................................................. 32
Utilización básica ....................................................... 33
I.
II.
Escucha de la radio de Internet................................................. 33
Reproducción desde un puerto USB ......................................... 35
Utilización avanzada................................................... 37
I.
II.
III.
IV.
V.
Grabación de un programa de radio de Internet ........................ 37
Adición de una emisora ........................................................... 37
Información de lectura ............................................................. 38
Función UPnP.......................................................................... 38
Configuraciones ....................................................................... 38
Preguntas frecuentes ................................................... 41
Especificaciones técnicas............................................ 42
23
Antes de usar
Por favor siga los pasos siguientes para verificar el contenido del paquete y
prepararlo para la reproducción.
I.
Verificación del contenido del paquete
A. Reproductor de radio de Internet
B. Accesorios
Control
remoto
1 pieza (Con
batería)
Adaptador de
corriente
1 juego
Manual
1 pieza
Cable Ethernet
1 pieza (remo para el
modelo IRZ)
C. Preparación del control remote
1. Retire el aislador
2. Listo para usarse
24
ESPAÑOL
(ES)
Gracias por comprar el reproductor de audio de Internet IRX. El IRX es un
reproductor de audio multifuncional que puede reproducir y grabar programas de
audio de Internet y reproducir archivos de audio digital del puerto USB.
Retire la pieza del aislador, para que luego pueda usarse el control remoto.
D. Cómo reemplazar la batería del control remoto
Cuando el control remoto se quede sin batería, podrá seguir las siguientes
instrucciones para reemplazar la batería.
1. Abra la tapa de la batería
2. Introduzca la batería CR2025
(con el polo positivo "+" hacia arriba)
3. Introduzca la tapa de la batería
Nota:
El modelo de la batería es CR2025.
Por favor confirme la polaridad antes de insertar la batería.
25
II. Nombre y función
A. Panel delantero
2. Botón
POWER/STANDBY
3. Botón MUTE
4. Botón VOL+
5. Botón SNOOZE/LIGHT
6. Botón VOL7. Botón SLEEP
8. Botón ALARM/NAP
B. Panel trasero
1. Antena WiFi
(sólo para el modelo IRF)
2. Enchufe DC
3. Interruptor ON/OFF
4. Puerto LAN
5. Puerto USB
6. Enchufe AUDIO OUT
26
ESPAÑOL
(ES)
1. Receptor Infrarrojo
C. Control remoto
1.
POWER : Encendido y apagado
2.
0 ~9: Teclas numéricas
3.
HOME: IR al menú principal
4.
Teclas de dirección
5.
ENTER
6.
PREV : Previo
7.
PLAY/PAUSE
8.
SNOOZE
9.
MUTE
10.
MODE : Cambia el modo de
funcionamiento (sólo para el modelo IRP)
11.
VOL+/-
12.
LANGUAGE : SELECCIONA EL IDIOMA
DEL MENÚ
27
13.
BACKLIGHT
14.
FAVORITE: Ir a MY FAVORITE
15.
FAVORITE+: agregar a MY FAVORITE
16.
ALARM/NAP: elegir tipo de alarma
17.
SLEEP: elegir tipo de inactividad
18.
NEXT
19.
STOP
Primeros pasos
Después de la inicialización, se mostrará la pantalla del menú principal.
La pantalla del menú principal,
Nota:
Puede pulsar la tecla LANGUAGE cuando quiera para seleccionar
un idioma del menú.
Presione la tecla HOME cuando quiera y el IRX regresará a la
pantalla del menú principal.
Por favor siga los pasos siguientes para configurar el IRX.
28
ESPAÑOL
(ES)
Conecte un extremo del adaptador de corriente al enchufe DC; enchufe el
adaptador al tomacorriente. Luego encienda su IRX.
I.
Preparación de la configuración de la red
A fin de recibir el programa de radio de Internet, el IRX necesita conectarse a
la Internet. Puede conectar el IRX a su LAN, por cable Ethernet o por
conexión WiFi.
A. Conexión a la red
Puede usar un cable Ethernet para conectar el puerto LAN del IRX a un
puerto LAN de su enrutador.
Nota:
Su enrutador debe configurarse para poder unirse a su proveedor
de servicios de Internet.
Si su enrutador soporta DHCP, entonces el IRX podrá obtener
automáticamente una dirección IP. Del menú principal, presione las teclas
, para seleccionar el ítem “Configuration”, pulse ENTER o la tecla
para entrar al menú Configuration. Seleccione “Network” y presione
ENTER o la tecla para entrar al submenú IP Configuration. Seleccione
“Auto Setting(DHCP)”, presione ENTER o la tecla para habilitar Auto
Setting.
Nota:
Los pasos anteriores se abreviarán como “Configuration
Network IP Configuration Auto Setting (DHCP)” en este
manual.
De otro modo, usted puede fijar la dirección IP manualmente. Del menú
principal, seleccione "Configuration Network IP Configuration
Manual Setting IP Address " para fijar la dirección IP. Luego ingrese
información en Subnet Mask, Default Gateway y Preferred DNS Server de
la misma pantalla del menú.
Nota:
Por favor use las teclas , para cambiar el valor de IP address,
Subnet Mask, Default Gateway y Preferred DNS.
29
Si su LAN soporta acceso inalámbrico a la Internet, podrá configurar el IRX
para una conexión inalámbrica.
Del menú principal, seleccione “Configuration Network WiFi
Configuration”. Todos los puntos de acceso disponibles se mostrarán en la
pantalla. Use las teclas , para seleccionar un punto de acceso. Una
señal de clave se mostrará en la parte inferior, si el punto de acceso está
protegido por una clave de encriptación. Pulse la tecla ENTER para
configurar el IRX para que se una al punto de acceso.
Si el punto de acceso no está protegido por una clave o si ya se ingresó,
podrá seleccionar “Direct Connection” para conectarse al punto de acceso.
Si el punto de acceso está protegido por una clave, tendrá que ingresar la
clave por primera vez. Seleccione “Enter WEP/WPA” y presione la tecla
ENTER para ingresar la clave.
Pulse la tecla , para seleccionar un carácter y use la tecla para
moverse al siguiente carácter.
Señal de llave
Nota:
El IRX usa la selección de caracteres para la entrada de texto. La
secuencia de caracteres es como sigue:
30
ESPAÑOL
(ES)
B. Conexión inalámbrica (sólo para el modelo IRF)
Mueva el cursor a un caracter y presione las teclas , hasta
que se muestre ( ). Luego, pulse la tecla para suprimir el
carácter.
Hay señales diferentes que indican el estado de conexión de la
red.
Conectando
La conexión con cable tuvo
éxito
La conexión con cable falló
La conexión WiFi tuvo éxito
La conexión WiFi falló
II. Ajuste de la fecha y hora
C.
Ajuste de la fecha y hora
Del menú principal, seleccione "Configuration Clock Set Date
and Time ".
Pulse las teclas , para seleccionar un campo, y presione las teclas
, para cambiar el valor. Presione la tecla ENTER para completar la
configuración.
B.
Ajuste del formato de hora
Del menú principal, seleccione “Configuration Clock Set Time
Format ”.
Seleccione el formato "12 Hour” or “24 Hour” para la visualización de
la hora.
Nota:
Después de la primera configuración, el IRX ajustará la hora
automáticamente una vez que la conexión de Internet haya tenido
éxito.
31
El IRX usa un búfer simultáneo para recibir audio desde Internet.
Del menú principal, seleccione ”Configuration Buffer ”.
Usted puede seleccionar "2 Seconds", "4 Seconds", u "8 Seconds" para
el búfer. Si la Internet está ocupada, podrá necesitar un búfer más largo para
una reproducción uniforme.
32
ESPAÑOL
(ES)
III. Ajuste de la longitud del búfer
Utilización básica
Cuando active la energía en el IRX, se mostrará el menú principal. Cuando
quiera que se pulse la tecla HOME , se mostrará el menú principal.
I.
Escucha de la radio de Internet
Para empezar a escuchar el programa de radio de Internet, tiene que
seleccionar una emisora de Internet. El IRX almacena información de miles
de emisoras de Internet. El nombre de la emisora puede ordenarse por
Género o País. Esto le ayudará a encontrar fácilmente una emisora.
Del menú principal, seleccione “Radio Station/Music ”. Puede
seleccionar ya sea “Genre“ o “Country/Location“ para ordenar el nombre
de la emisora.
Si selecciona “Genre“, entonces el IRX listará el nombre de la emisora por
Género. Pulse la tecla ENTER o la tecla para un grupo o subgrupo.
Cuando se muestre una lista de nombres de estaciones, presione , para
seleccionar su emisora preferida.
33
ESPAÑOL
(ES)
Pulse la tecla ENTER para comenzar a reproducir el programa de la emisora
de Internet. El IRX mostrará la pantalla de reproducción que contiene el
nombre y otra información del programa de radio.
Búfer de 2 segundos
Búfer de 4 segundos
Búfer de 8 segundos
Nota:
Cuando el IRX esté reproduciendo un programa de radio, todavía
podrá examinar otro menú. El IRX regresará a la pantalla de
reproducción si no se utiliza ninguna tecla durante 10
segundos.
Del menú principal, seleccione “Radio Station/Music Country/Location
”. El IRX ordenará los nombres de las estaciones por territorio y país.
Adición a My Favorite
Podrá pulsar la tecla
cuando se muestre una lista con los nombres de
34
estaciones y luego se mostrará una opción del menú. Por favor seleccione
“Add to My Favorite“ para que el IRX agregue el nombre de la emisora a la
lista de My Favorite. Se mostrará una indicación
en la pantalla.
Nota:
Cuando el IRX esté reproduciendo un programa de la radio,
usted podrá pulsar la tecla FAVORITE+ para agregar el nombre
de la emisora a la lista de My Favorite.
Administración de My Favorite
Del menú principal, seleccione “My Favorite “ o pulse la tecla Favorite
del control remoto para que se muestren todos los nombres de las emisoras
que agregó anteriormente. Podrá seleccionar un nombre de emisora; pulse
ENTER para escuchar el programa de radio de la emisora.
Si presiona la tecla después de seleccionar un nombre de emisora en la
lista de My Favorite, se mostrará un menú de opciones. Podrá grabar,
eliminar, mover hacia arriba, mover hacia abajo, renombrar o
reproducir un programa de radio de la emisora seleccionada.
Nota:
Usted puede presionar las teclas numéricas 1, 2...9, 0, del control
remoto para que el IRX se conecte a los primeros 10 nombres de
emisoras que se listan en My Favorite.
Mis Favoritos puede guardar hasta 250 enlaces a estaciones.
Por favor consulte el capítulo “Utilización avanzada” de este
manual para grabar programas de la radio.
II. Reproducción desde un puerto USB
El IRX puede reproducir archivos de audio MP3 y WMA desde un dispositivo
de almacenamiento USB. Conecte el dispositivo de almacenamiento USB en
el enchufe USB del IRX. El IRX detectará automáticamente la señal del
35
dispositivo USB que se mostrará en la barra de estado de la pantalla.
Del menú principal, seleccione “USB ” para abrir el dispositivo USB y la
carpeta o subcarpeta. Cuando se muestre un archivo de audio MP3 o WMA,
usted podrá presionar la tecla ENTER o PLAY/PAUSE para empezar a
reproducir el archivo. Presione la tecla PLAY/PAUSE para pausar la
reproducción. Pulse la tecla STOP para detener la reproducción. Presione
las teclas , para reproducir los archivos de audio previos o siguientes.
La pantalla mostrará el nombre del archivo, la información del archivo y la
información de reproducción.
Cuando seleccione un nombre de archivo y presione la tecla , se mostrará
el menú de opciones. Podrá elegir en borrar o reproducir el archivo.
Nota:
Por favor, NO desenchufe el dispositivo USB cuando el IRX esté
grabando.
El IRX sólo soporta el sistema de archivos FAT32 para el
dispositivo de almacenamiento USB.
IRX se mantendrá reproduciendo todos los archivos, en la misma
carpeta, repetidamente.
36
ESPAÑOL
(ES)
Señal del dispositivo USB
Utilización avanzada
I.
Grabación de un programa de radio de Internet
Para guardar un archivo grabado, usted deberá tener conectado un
dispositivo de almacenamiento USB al enchufe USB del IRX.
Presione la tecla de la lista de nombres de emisoras de radio de Internet
para que se muestre el menú de opciones. Escoja “Record“ y presione la
tecla ENTER para seleccionar la función de grabación.
“Record”: Comienza la grabación hasta que se libere la tecla STOP.
“Record (30 minutes)”: Graba durante 30 minutos y se detiene
automáticamente.
El tiempo de grabación puede ser 30, 60, 90 ó 120 minutos.
Al empezar la grabación, se mostrará un estado de grabación en la parte
inferior derecha de la pantalla. El IRX creará que una carpeta llamada
mediaU en el dispositivo USB. Usted podrá seleccionar USB del menú
principal para reproducir el archivo grabado. (Por favor consulte el capítulo
“Reproducción de un puerto USB” de este manual)
Nota:
Por favor, NO desenchufe el dispositivo USB cuando el IRX esté
grabación.
El IRX sólo soporta el sistema de archivos FAT32 para el
dispositivo de almacenamiento USB.
II. Adición de una emisora
Del menú principal, seleccione “Service Add New Radio Station
“ para editar la dirección IP de una emisora de Internet. Presione las teclas
, para seleccionar un carácter, use la tecla para moverse al siguiente
carácter y pulse la tecla ENTER para completar la entrada.
37
III. Información de lectura
ESPAÑOL
(ES)
El IRX proporciona un enlace a alguna información pública.
Del menú principal, seleccione “Information Center “. Seleccione un
servicio de la información proporcionada.
IV. Función UPnP
Seleccione “UPnP” del menú principal para ingresar a la función UPnP. El
IRX listará todos los servidores UPnP disponibles en la LAN. Elija un
servidor y presione ENTER para vincularse al servidor. Todos los archivos de
medios en el servidor se listarán por categoría. Escoja una carpeta y
presione la tecla ENTER para abrir. Seleccione un archivo y pulse ENTER
para reproducirlo.
Nota:
El IRX soporta los servidores UPnP siguientes: Tversity y
Twonkey. Por favor, vaya a su sitio web para comprar o descargar
un programa del servidor. Por favor, siga las instrucciones para
instalar el servidor UPnP en su PC.
El cortafuego en su PC podrá bloquear la función UPnP. Por favor
refiérase a las instrucciones de su servidor UPnP para obtener
detalles.
V. Configuraciones
A. Ajuste de los parámetros de la red
Por favor consulte la sección “Ajuste de las configuraciones de red”
de este manual.
B. Ajuste del reloj
Por favor consulte la sección “Ajuste de la fecha y hora” este manual.
38
C. Ajuste de la alarma
El IRX soporta el ajuste de dos alarmas.
Del menú principal, seleccione “Configuration Alarm Turn On(1)
”. Se mostrará una señal de alarma (1) en la pantalla. Seleccione “Set
Alarm Time“ para fijar la hora de la alarma. Escoja “Set Alarm
Sound“ para seleccionar un sonido de alarma. Pueden fijarse pitidos,
melodías y radio como sonidos de la alarma. También puede fijar la hora
de la alarma como 5, 10, 20, 30, 60, 90 ó 120 minutos (NAP).
Cuando desactive la energía, se mostrará la pantalla de Reloj. Una señal
de alarma y la hora restante se mostrarán en la parte inferior. El IRX
emitirá un pitido, reproducirá una melodía o reproducirá un programa de
radio después de un período de tiempo. Pulse cualquier tecla para
cancelar la alarma. Si se presiona el botón o la tecla SNOOZE, se
pospondrá la alarma por 9 minutos.
También podrá presionar la tecla ALARM/NAP o el botón ALARM/NAP
del panel para seleccionar un ajuste de la alarma.
Señal de la alarma 1
Señal de la alarma 2
Señal de la alarma (DORMITAR)
39
D. Selección del idioma
E. Ajuste de la contraluz
Puede activar o desactivar la contraluz. Si selecciona Ahorro de Energía,
la contraluz se tornará más oscura por unos cuantos segundos después
de pulsar una tecla.
F. Ajuste del temporizador
Usted puede ajustar el temporizador a 15, 30, 60, 90 ó 120 minutos. Un
indicador del temporizador y el tiempo restante se mostrarán en la
pantalla. El IRX se apagará después de que el tiempo haya expirado.
También puede presionar la tecla SLEEP o el botón SLEEP del panel
para cambiar el temporizador.
Indicador del temporizador
G. Selección del tamaño del búfer
Por favor vea la sección “Ajuste de la longitud del búfer” de este
manual.
H. Actualización de la versión
Se mostrará la versión del firmware. Presione ENTER o la tecla
nuevo. Se mostrará la versión disponible de firmware para la
actualización. Usted podrá seleccionar en actualizar el firmware.
I. Reestablecer
Restaura la configuración predeterminada de fábrica.
40
de
ESPAÑOL
(ES)
El IRX soporta varios tipos de idiomas en el menú. Seleccione
“Language“ y pulse la tecla ENTER para cambiar la selección. También
podrá presionar la tecla LANGUAGE para cambiar el idioma.
Preguntas frecuentes
P1:
El IRF puede conectarse a mi punto de acceso protegido con
contraseña? Después de que borre la contraseña de mi punto de
acceso WiFi, el IRF ya no podrá conectarse al punto de acceso WiFi?
Resp. 1: Si cancela la protección con contraseña de su punto de acceso,
necesitará borrar la configuración de la clave en la configuración WiFi
del IRF.
Por otra parte, el IRF todavía usará la clave para conectarse
al punto de acceso.
Del menú principal, seleccione “Configuration
Network
WiFi
Configuration“. Escoja su punto de acceso y luego seleccione “Enter
WEP/WPA
P2:
” para borrar la clave que se ingresó previamente.
El IRX puede reconocer un dispositivo de almacenamiento USB, pero
muestra el contenido del dispositivo si está vacío.
Resp. 2: Por favor, confirme si el sistema de archivos del dispositivo USB es
FAT32 o no. El IRX sólo puede soportar el sistema de archivos FAT32.
P3:
Mi PC puede conectar con el punto de acceso de WiFi, pero se falla la
conexión de WiFi de las demostraciones de IRX.
Resp. 3: Compruebe por favor que el IRX tenga contraseña correcta el fijar para
el punto de acceso de WiFi. Y cerciórese de que el punto de acceso de
WiFi no bloquee el IP address y el MAC address del nuevo dispositivo.
41
Dimensión física
Altura: 62 mm x Profundidad: 155.3 mm: x Anchura: 166.3 mm
Peso
350 g
Formato de
Audio: MP3 y WMA
reproducción
Control remoto
Controlador remoto infrarrojo
Salida de audio
Salida estereofónica de 2 canales
2 bocinas de 2W
1 conector para auriculares
Sistemas de redes
Puerto Ethernet (10/100 Mbps)
Protocolos de transporte: transporte de audio HTTP/1.1 y MMS
Configuración automática (DHCP) y manual de direcciones IP
UPnP
WiFi 802.11b/g
Seguridad WiFi: WEP, WPA, WPA2
Extensibilidad
Puerto host USB 2.0
Alarma/Silenciar/Dormitar/Dormir
Adaptador de corriente Entrada: AC100V - 240V ~, 50~60HZ, 0.3A Máx
Salida: DC +5V 2A
Idioma
Inglés, alemán, francés, español, Italiano, chino tradicional, chino
simplificado, japonés y coreano
42
ESPAÑOL
(ES)
Especificaciones técnicas
Emprex website: www.emprex.com
Technical support: http://tech.emprex.com
Service Center:
UK
Email: [email protected]
Tel: 0871 855 24 19
3100554230
Version 1.0
Apr. 2008