1
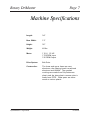
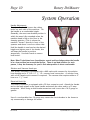
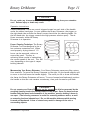
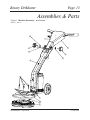
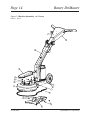
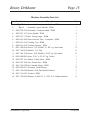
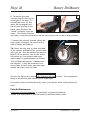
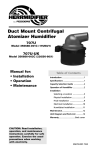
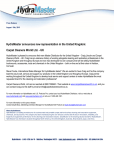
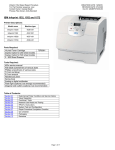
Jetless Rotary Cleaning Technology Page 2 Rotary DriMaster This page intentionally left blank HydraMaster Corporation Rotary DriMaster Page 3 11015 47th Avenue W, Mukilteo, WA 98275 Jetless Rotary Cleaning Technology Rotary Extractor Table of Contents Introduction Precautions Machine Specifications Spare Parts List Responsibilties System Operation Cleaning Information Assemblies & Parts Machine Maintenance Warranty Page 4 6 7 8 9 10 12 13 25 30 Machine Serial Number________________________ Copyright© 2005 HYDRAMASTER© Corporation Mukilteo, Washington MAN-182-073 No part of this manual may be reproduced or used in any form or by any means (i.e. graphic, electronic, photocopying or electronic retrieval systems) without the express written permission of the HYDRAMASTER© Corporation. All rights reserved. Revised October 19, 2005 HydraMaster Corporation Page 4 Rotary DriMaster Introduction **Congratulations** You now own a piece of equipment that incorporates the latest innovations in carpet cleaning technology. The Rotary Drimaster features will almost certainly increase the productivity of you and your business. With competition as strong as it is in most communities, you have invested in not only a cleaning tool, but a marketing tool that will enhance your professional image in every way. Your foresight in purchasing this patented jetless cleaning technology will be rewarded with the knowledge that you care enough to give your customer the maximum cleaning process available. Once again, congratulations to another cleaning professional who will not wait for tomorrow, and will not have to compete against the Rotary Drimaster. The competition will have to try and compete with you! An Evolution That Had To Happen Your new Rotary Drimaster has been precision engineered to bring you to the stateof-the-art in carpet cleaning. In the past, a wand technician had to supply all the pressure and motion to do the cleaning. The Rotary Drimaster weight distribution and rotary motion enable the technician to maneuver the unit easily with less fatigue and without back strain. The low profile head allows the Rotary DriMaster to clean areas where conventional methods are unable to reach. The Rotary Drimaster electric motor drives a reduction pulley, which in turn drives the rotary head assembly. Cleaning solution is injected through the center of the head assembly then channeled to the three patented solution injector bars. Soiled solution is then extracted from the carpet by the three cleaning heads and drawn through the clear plastic manifold to your cleaning system’s recovery tank. NOTE: The operating temperature and pressure of the cleaning solution as well as the vacuum power depends entirely on the type of cleaning system you use. The Rotary Drimaster will work efficiently with all types of extraction machines, portable or truckmount. 03/28/03 HydraMaster Corporation Rotary DriMaster Page 5 ♦ CAUTION ♦ The manufacturer uses this symbol throughout the manual to warn of possible injury or death. ♦ WARNING ♦ This symbol is used to warn of possible equipment damage. If you have any questions regarding the operation, maintenance, or repair of this machine. Please contact your local distributor. If your question cannot be resolved by your distributor or by the information within this manual, you may contact HydraMaster Customer Service direct using the following phone numbers. Hours Telephone Numbers Monday - Friday 8:00 am to 5:00 pm PACIFIC STANDARD TIME (425) 775-7276 Parts (425) 775-7275 Service HydraMaster Corporation 03/28/03 Page 6 Rotary DriMaster Precautions ♦ CAUTION ♦ MOVING PARTS: Never touch any part of the machine that is in motion. Severe bodily injury may result. ♦ WARNING ♦ ACID RINSE AGENTS: The increased demand for neutralizing rinse results in the need for special care when using these acid based chemicals in your equipment. The negative side of these products is the corrosive effects the acid can have on metals, including swivels, pumps, heat exchangers, etc. HydraMaster’s ClearWater Rinse has been formulated to protect vital components. HydraMaster will not warranty parts that have been damaged from using unprotected acid products that have obviously caused failures. HARD WATER PROTECTION: Failure to take appropriate measures to prevent scale build up can result in system failure and loss of warranty on affected parts. Test the water in your immediate and surrounding areas with hard water test strips. Assume all water obtained from wells is hard. If you are operating in a Hard Water Area @ 3.5 grains or more per gallon, use a water softening system. ♦ WARNING ♦ FREEZE PROTECTION: There is often little warning before a cold spell. Therefore, not protecting this equipment from freezing will result in costly down-time. Placing an electric heater in the truck or parking the truck indoors will help to insure against freezing, but should not be the primary method of freeze protection. ♦ CAUTION ♦ HOT SURFACES: During the operation of this equipment, many surfaces on the machine can become very hot. When near high pressure hoses for any reason care must be taken not to touch any hot surface. 02/12/03 HydraMaster Corporation Rotary DriMaster Page 7 Machine Specifications Length: 34" Base Width: 13" Height: 30" Weight: 48 lbs Motor: 115 V, 1/2 HP 1725 RPM Input 120 RPM Output Drive System: Belt Drive Construction: The lower and upper frame are cast aluminum, the cleaning head is machined aluminum and UHMW. The smoked cowlings are made from PolyCarbonate plastic and the clear plastic vacuum tube is made from PETG. Other parts are either metal or various plastic. HydraMaster Corporation 03/09/04 Page 8 Rotary DriMaster Spare Parts D own-time on the unit can be very expensive, because your Rotary Drimaster unit is capable of generating several hundred dollars per day. In order to minimize such down-time, it is strongly recommended by the manufacturer that you purchase and keep in your truck the parts listed below. Parts Orders To expedite your parts needs, please call your Local Distributor. In most instances, he either stocks or has access to parts through a regional service center. If further assistance is needed, contact the factory and coordinate your needs. If this becomes necessary, always indicate the method of shipment you desire, i.e. UPS, Blue Label, Air Freight, Air Express, etc. HydraMaster Parts Dept. Phone (425) 775-7276 RDM Spare Parts List PART NO DESCRIPTION 049-033 052-051 057-183 076-069 078-019 108-129 154-135 Filter, 1/4” Inline Quick Connect, 440 Female Gasket, Bar Jet Jet, Rotary Bar S/S Kit, Wand Valve Plunger Protector, Bar Jet UHMW Stabilizer Pad 03/21/2005 QTY 1 1 1 1 1 3 3 HydraMaster Corporation Rotary DriMaster Page 9 Responsibilities U pon arrival the unit should immediatley be examined and operated to ensure that it was not damaged in transit. Purchaser’s Responsibility: It is the purchaser’s responsibility to Read the Owner’s Manual and to familiarize yourself with the information contained therein. Special attention should be paid to all Cautions and Warnings. Sales Representative’s Responsibility: Acceptance of Shipment 1. If the unit shows any outward signs of damage, do not sign the delivery receipt until you have closely inspected the unit and noted any damage on the delivery receipt. 2. The salesman from whom you purchased your unit is responsible for thoroughly training you in its operation, maintenance and precautions. Training • • • • A thorough review of the operation manual with the purchaser. Instruction and familiarization in: - how to correctly operate the unit, - how to correctly clean with the unit, - where and how often to check filters, belts, etc. - how the unit’s systems work, how to troubleshoot the unit, - how to do basic repairs, safety precautions and their importance, - freezing damage and how to avoid it, - hard water damage and how to avoid it. A thorough review of the unit warranty and warranty procedures. A thorough review of hard water precautions and warnings. HydraMaster Corporation 03/28/03 Page 10 Rotary DriMaster System Operation Handle Adjustment: To adjust the handle loosen the rubber knobs on each side of the machine. Tilt the handle to a comfortable height. Generally, the most comfortable position is whith the arms fully extended when the machine head is flat on the floor in the cleaning position. (This is where the machine “hovers” directly in front of the operator and doesn’t move to either side) Hold the handle in one hand at the desired height and tighten one of the knobs, this will keep the handle in position temporarily. Use both hands to secure both knobs. Note: Most Technicians have found better control and less fatigue when the handle is in a low position just around the hip line. There is an ideal position for each person, it may be necessary for you to find what position is most comfortable. Solution and Vacuum Hook ups: Your Rotary Drimaster is equipped with a 440 male quick connect for the solution hose hookup and a 2" O.D. x 1 ½” I.D. vacuum hose connection. A solution hose with a 440 female quick connect is required. The vacuum inlet requires either a 2" hose or a 1 ½” hose. Electrical Hook Up: The Rotary Drimaster is equipped with a 50 foot extension cord. Attach the female end to the male pigtail in the upper handle and attach the other end to a 15 amp receptacle. When using a after-market extension cord it must be a 14/3 gauge or greater. ♦ CAUTION ♦ Use of a cord smaller than 14 gauge may cause the circuit breaker in the house to trip unnecesarily or damage the motor. 03/09/04 HydraMaster Corporation Rotary DriMaster Page 11 ♦ CAUTION ♦ Do not, under any circumstances, remove the ground prong from your extension cord. Serious injury or death may result. Operation instructions: Control Functions: There are control triggers located on each side of the handle under the rubber hand grips. As you operate the Rotary Drimaster, the trigger on the right-hand side controls the electric motor that drives the cleaning heads. On the left hand side, the trigger controls the high pressure solution spray. The air flows constantly while the Rotary Drimaster is in operation. Proper Cleaning Technique: The Rotary Drimaster Tool was designed to be a low moisture extraction tool. When used properly, drying times of 1-3 hours can be expected, without a second dry pass. The key to achieving these results is maintaining the correct speed of the tool. This will vary depending on the type of carpet beining cleaned. Maneuvering Your Rotary Drimaster: Your Rotary Drimaster maneuvers like a rotary floor machine. To move the Rotary Drimaster to the right, lift the handle slightly and to move to the left lower the handle slightly. The more you lift or lower the handle, the faster the Rotary Drimaster will move. To move forward and backward, position the handle so that the unit remains a stationary, then push forward or pull back. WARNING ♦ Do not operate your Rotary Drimaster on dry carpets; the friction generated by the revolving cleaning heads may damage fibers in the carpet. Once you have become familiar with the speed and movement of the machine, practice making it hover in one spot. (The hovering maneuver is useful for removing stubborn stains, as well as removing furniture indentations.) Do not tilt machine sideways while moving forward and backward. A loss of control may result in damage to the unit or surrounding objects. ♦ HydraMaster Corporation 03/28/03 Page 12 Rotary DriMaster Cleaning Information The Following Cautions Should Be Observed While Cleaning: 1. DO NOT operate your Rotary Drimaster over metal floor moldings. Damage to both the molding and the cleaning head will result. 2. DO NOT operate your Rotary Drimaster on hardwood floors. 3. DO NOT operate your Rotary Drimaster over loose or unraveled carpet seams. The cleaning head may catch and cause further damage. 4. DO NOT operate your Rotary Drimaster on concrete floors. It will develop sharp edges on the extraction heads that will damage carpet fibers. 5. DO NOT clean over the edge of a loose carpet. Instead, clean only up to the edge. Damage may occur should the extraction heads catch the loose carpet. Special Information 1. During the cleaning of some plush carpets you may notice a “pilling” effect. With a Rotary Drimaster, loose yarns form balls and are kicked aside as the cleaning heads revolve. This is normal when aggressive cleaning or even normal vacuuming takes place, as evidenced by a number of dead, loose yarns in the vacuum cleaner bag. These loose yarns, in most cases, are short staple yarns or filler yarns used to give the carpet a denser appearance. Because your Rotary Drimaster weighs approximately 46 pounds and rests on three two-inch cleaning heads, the yarns are not sucked up into the vacuum heads as they are with a vacuum cleaner or oldstyle cleaning wand. 2. The Rotary Drimaster will leave the carpet with a freshly-cleaned appearance. The carpet should be brushed or groomed after the cleaning process to remove any swirl marks left behind. 02/12/03 HydraMaster Corporation Rotary DriMaster Page 13 Assemblies & Parts Figure 1 Machine Assembly - w/o Covers D-5071 Rev C 19 2 4 15 4 19 1 9 10 12 5 13 3 HydraMaster Corporation 02/28/2005 Page 14 Rotary DriMaster Figure 2 Machine Assembly - w/ Covers D-5071 Rev C 2 1 6 11 17 16 11 7 17 14 18 11 11 8 02/28/2005 HydraMaster Corporation Rotary DriMaster Page 15 Machine Assembly Parts List Item Part Number 1 Fig. 3 & 4 2 Fig. 5 Description Qty Assembly, Base - Lower Handle - RDM 1 Assembly, Upper Handle - RDM 1 3 000-078-376 Assembly, Complete Head - RDM 1 4 000-061-131 Knob, Handle - RDM 2 5 000-010-117 Belt, Timing Large - RDM 1 6 000-041-434 Clear Vacuum Tube - Complete - RDM 1 7 000-041-414 Cowling, Top - RDM 1 8 000-041-412 Cowling, Bottom - RDM 1 9 000-143-004 Screw, 1/4"-20UNC x 1.50" Lg. Hex Head 6 10 000-174-003 Washer, 1/4" Flat 6 11 000-143-126 Screw, #10-24UNC x 0.50" Lg. Hex Head 12 000-068-650 Hose, 3/16" x 51.25" Lg. Teflon 1 13 000-057-191 Gasket, Teflon Hose - RDM 1 14 000-027-108 Cap, Grease Port - RDM 1 15 000-141-035 Rod, Handle Hinge - RDM 1 16 000-060-001 Grommet, Small Wiring 5 17 000-174-036 Washer, #10 Flat Rubber Backed 7 18 000-131-030 Trimlock, RDM 1 19 000-174-065 Washer, 0.434 I.D. x 1.00" O.D. Rubber Backed 2 HydraMaster Corporation 11 02/28/2005 Page 16 Rotary DriMaster Figure 3 Base - Lower Handle Assembly -Top View D-5505 Rev C 18 32 14 27 13 37 36 34 12 30 33 6 11 4 25 13 35 9 12 34 5 2 28 31 30 28 2 19 1 19 29 19 02/28/2005 HydraMaster Corporation Rotary DriMaster Page 17 Figure 4 Base - Lower Handle Assembly - Bottom View D-5505 Rev C 6 31 30 19 17 15 26 23 34 16 21 20 3 HydraMaster Corporation 24 10 22 33 8 02/28/2005 Page 18 Rotary DriMaster Base - Lower Handle Assembly Parts List Item Part Number Description Qty 1 000-015-785 Bracket, Axle Cross Tie - RDM 1 2 000-015-784 Bracket, Axle Support - RDM 2 3 000-154-116 Spacer, Pulley Bearing Seperator - RDM 1 4 000-156-039 Stud, Standoff M-F 1-5/16" x 1/4"-20UNC 4 5 000-141-034 Axle, Rear Wheel - RDM 1 6 000-055-156 Frame, Base - Lower Handle - RDM 1 7 000-059-020 Gear, Reduction - RDM 1 8 000-059-021 Gear, Motor - RDM 1 9 000-057-053 Gasket, 4" O.D. x 2.75" I.D. x 0.375" Thk. 1 10 000-008-050 Bearing, Reduction Gear - RDM 2 11 000-050-014 Fan, Motor - RDM 1 12 000-139-009 Ring, Snap Ring (E-Clip) x 1/2" 2 13 000-177-027 Wheel, 6" x 1.25" Wide Gray Non Marking 2 14 000-091-029 Motor, G.E. 1/2 HP - RDM - Modified 1 15 000-020-056 Bushing, Idler - Modified 1 16 000-015-875 Arm, Spring Tensioner - Rotary Drimaster 1 17 000-150-160 Shaft, Spring Tension Idler - Rotary Drimaster 1 18 000-041-405 Cover, Motor - RDM 1 19 000-143-001 Screw, 1/4"-20UNC x 0.75" Lg. Hex Head 7 20 000-094-009 Nut, 1/4"-20UNC Hex Nylock 1 21 000-094-010 Nut, 1/4"-20UNC Hex 1 22 000-010-116 Belt, Timing Small - Rotary Drimaster 1 23 000-008-047 Bearing, Idler Tensioner - Rotary Drimaster 1 24 000-143-553 Screw, 3/8"-16UNC Shoulder 1 25 000-061-005 Handle, Foam Grip - Closed End 0.75" I.D. x 3.5" Lg. 1 26 000-155-055 Spring, Torsion Idler - Rotary Drimaster 1 27 000-108-130 Protector, Motor Fan - Rotary Drimaster 1 28 000-143-132 Screw, #10-24UNC x 0.75" Lg. Hex Head 4 29 000-174-003 Washer, 1/4" Flat 4 30 000-143-166 Screw, #10-24UNC x 0.38" Lg. Hex Head 3 02/28/2005 HydraMaster Corporation Rotary DriMaster Page 19 Base - Lower Handle Assembly Parts List Item Part Number Description Qty 31 000-033-128 Clamp, 3/8" Nylon Hose 3 32 000-108-018 Protector, 3/8" Tite Bite- 90° 1 33 000-143-339 Screw, 1/4"20UNC x 0.50" Lg. Set Z/P 4 34 000-174-064 Washer, Thrust 1/2" 3 35 000-060-007 Grommet, 3/8" I.D. 1 36 000-174-001 Washer, #10 Flat 1 37 000-094-027 Nut, #10-24UNC Hex 1 HydraMaster Corporation 02/28/2005 Page 20 Rotary DriMaster Figure 5 Upper Handle Assembly D-5506 Rev - 1 15 25 14 18 13 17 26 9 11 27 21 10 19 4 3 2 16 5 28 23 12 20 24 8 6 19 21 22 4 03/28/03 HydraMaster Corporation Rotary DriMaster Page 21 Upper Handle Assembly Parts List Item Part Number Description Qty 1 000-055-163 Frame, Upper Handle - Painted - RDM 1 2 000-041-013 Plate, Back - RX Handle - Painted 1 3 000-108-012 Protector, Power Cord Relief Grip 1 4 000-143-166 Screw, #10-24UNC x 0.38" Lg. Hex Head 4 5 000-143-065 Screw, #10-24UNC x 1.75" Lg. Hex Head 1 6 000-169-058 Valve, S/S HydraMaster Solution 1 7 000-052-085 Elbow, 1/4" NPT Street 1 8 000-052-072 Nipple, 1/8" NPT Close 1 9 000-052-071 Nipple, 1/4" NPT Hex 1 10 000-052-050 Quick Connect, 440 Male w/ Viton Standard 1 11 000-052-423 Bushing, Modified Set Screw Orifice 1 12 000-049-033 Filter, 1/4" In-Line “Y” 1 13 000-108-014 Shield, Micro-Switch - RX 1 14 000-157-032 Switch, Micro - RX 1 15 000-061-004 Handle, Foam Grip - Closed End 1" I.D. 2 16 000-106-026 Plug, 1" Cap - Rx Handle 1 17 000-094-036 Nut, 1/2" NPT Pipe 1 18 000-143-048 Screw, #6-32UNC x 1.00" Lg. Pan Head 2 19 000-143-002 Screw, 1/4"-20UNC x 1.00" Lg. Hex Head 3 20 000-094-009 Nut, 1/4"-20UNC Hex Nylock 1 21 000-154-001 Spacer, 1/4" x 5/16" - S/S Solution Valve - Wand 2 22 000-052-527 Nipple, 1/4" SAE x 1/4" NPT 1 23 000-105-018 Plate, Serial I.D. RX-20 1 24 000-140-001 Rivet, 1/8" x 1/4" Aluminum 2 25 000-167-010 Trigger, Power - RX-20 1 26 000-167-009 Trigger, Chemical Solution Valve - RX-20 1 27 000-180-006 Orifice, Set Screw 0.061" 1 28 000-107-103 Trigger Pivot - RX 1 HydraMaster Corporation 03/28/03 Page 22 Rotary DriMaster Figure 6 Complete Head Assembly D-5507 Rev D 20 17 15 21 23 16 14 9 8 14 22 25 25 11 26 26 10 7 3 6 1 24 19 19 24 13 13 4 4 18 18 12 12 2 2 18 10/19/2005 13 27 5 18 2 12 18 HydraMaster Corporation Rotary DriMaster Page 23 Complete Head Assembly Parts List Item Part Number Description Qty 1 000-105-311 Plate, Bottom Assembly - RDM 1 2 000-076-069 Jet, Bar Jet Assembly - RDM 3 3 000-105-309 Plate, Top Plate Assembly - RDM 1 4 000-108-129 Protector, Bar Jet 3 5 000-041-410 Cover, Water Channel 1 6 000-154-133 Spacer, Triangle Water Channel 1 7 000-105-310 Plate, Head Assembly 1 8 000-008-051 Bearing, Teflon - Left 1 9 000-008-052 Bearing, Teflon - Right 1 10 000-059-022 Gear, 98 Tooth 1 11 000-139-028 Bearing, Vented Ring - Molycoated - RDM 1 12 000-057-183 Gasket, Bar Jet - RDM 3 13 000-154-135 Spacer, Stabilizer Pad 3 14 000-015-876 Bracket, Grease Retainer - RDM 2 15 000-154-140 Spacer, Friction Bearing - RDM 1 16 000-147-064 Seal, 3" I.D. x 1.25" Wide Nylon Vacuum 1 17 000-052-505 Zerk Fitting,1/8" MPT Grease Fitting-Straight 1 18 000-143-559 Screw, #6-32UNC x 0.56" Lg. Flat Hd Philipps 19 000-143-113 Screw, #10-24UNC x 1 1/2" Lg. Flat Hd Philipps 6 20 000-052-719 Elbow, 1/8" NPT x 1/4" Compression Tube 1 21 000-125-176 Tube, 1/4" O.D. x 0.035" Wall x 1.44" Lg. S/S - RDM 1 22 000-052-714 Compression, 1/8" NPT x 1/4" Tube 1 23 000-097-066 O-Ring, 1/16" Thk. x 3/8" O.D. 1 24 000-143-561 Screw, #10-24UNC x 1.75" Lg. Flat Head Phillips 6 25 000-143-533 Screw, #10-24UNC x 0.25" Lg. Pan Head Phillips 3 26 000-174-103 Washer, Ø0.188" I.D. x Ø0.875" O.D. x 0.125" Thk. 3 27 000-097-067 O-Ring, 1.818 O.D. x 1.612 I.D. Water Resivoir Cover 1 HydraMaster Corporation 33 10/19/2005 Page 24 Rotary DriMaster This page intentionally left blank 02/12/03 HydraMaster Corporation Rotary DriMaster Page 25 Machine Maintenance Daily Maintenance 1. Inspect the power cord for cuts, breaks, etc. Replace if damaged. 2. Inspect the vacuum chamber on and around the rotary union for debris, clean as necessary. 3. Visually inspect your Rotary Drimaster for water leaks, damage to the cleaning heads, etc. Repair as necessary. 4. Remove the in-line solution filter screen by unscrewing the 7/8 inch hex nut protruding from the back of the handle. Rinse under water to remove debris. If necessary, use a toothbrush to remove stubborn particles. 5. Check the injector bars for clogs. You may notice that the water is not even when spraying. These jets are designed to work with the vacuum. When vacuum is applied to the machine you should notice the water coming out of the injector bars and returning into the vacuum port. This is how the Drimaster technology decreases drying times and keeps the carpet from wicking. Vacuum Port Injector Bar Opening To clean the jets you can use a 0.005” feeler gauge. Insert the gauge into the injector bar opening and slide it gently side to side. If it is clogged severely you can remove the four mounting screws and remove it from the head. Rinse the assembly and reinstall. Replace the gasket as necessary. HydraMaster Corporation 03/28/03 Page 26 Rotary DriMaster 6. To remove the clear B A vacuum tube lift the front or round part of the tube. To reinstall the cover (A) first insert the rectangular end into the the opening on the frame, then (B) press the “round” end down onto the frame. This should fit firmly into place, it may be necessary to tap the top of the cover so that it seats properly. 7. Inspect the vacuum chamber where the rotary union is located. Be sure that it is clear of debris and build up. Clear area of Debris Tip: Here’s an easy way to clean the head of the vacuum chambers after you are done with your job. Set the machine so that the head is off the ground; turn off the chemical system on your machine and spray clean water for approximately one minute. This will flush the majority of debris from the machine. It may be necessary to remove fibers or other items that may wrap around the rotary union by hand. ♦ WARNING ♦ Do not over tighten the compression fitting on the rotary union. The compression fitting in the bottom plate shoud only be finger tight. Use caution when inserting the rotary union, push slowly while rocking back and forth. Periodic Maintenance Lubricating the main bearings: It is necessary to grease the bearing: Grease with one-quarter to one-half pump to eliminate/reduce noise. 01/26/04 HydraMaster Corporation Rotary DriMaster Page 27 ♦ WARNING ♦ USE (BROWN) LITHIUM BASE GREASE ONLY! Use of a Moly base or a Clay base grease may cause damage to the bearing system and void your warranty. Lithum based greases are typically a translucent brown color with a butter consitency. NEVER use a grease that it is not properly identified. NEVER use a grease that is Black, White, or Blue in appearance. NEVER use spray lubricants (e.g. WD-40). MULTIPLE PUMPS OF GREASE CAN LEAD TO THE UNIT SPITTING GREASE ONTO THE CARPET. Recomended Grease: Stalube Lithium General Purpose Greese Stalube P/N SL3310 Available at most auto parts stores. To grease: 1. Tilt the machine so that the head is off the carpet. 2. Remove the cap located on the main cover next to the clear vacuum tube. 3. Attach the grease gun to the grease zerk. While the the head is turning, slowly pump one-quarter to one-half pump of lithium grease. Belt tension and wear: The belts should be checked every 300 hours or every 6 months for proper tension and excessive wear. If excessive wear is detected the belts should be replaced immediately. The spring-loaded tensioner controls the tensioning on the large belt. While it is not necessary to adjust the belt tension the bearing, idler arm, and idler shaft need to be inspected for excessive wear to ensure proper tension. Large Belt Pivoting Nut Idler Arm Position: The idler arm should be parallel with the side of the frame. HydraMaster Corporation 03/09/04 Page 28 Rotary DriMaster ♦ CAUTION ♦ Do not overtighten the pivoting nut on the idler arm. The idler arm must be able to move for proper adjustment. To Remove the Belt: unplug the machine. Push the idler away from the belt. Remove the belt from the head then from the reduction pulley. Note: In certain cases it is possible for the belt to come off if the head is turned backwards. The tension on the smaller belt should be tensioned so that it is “taught”. This belt should feel firm and you should see about 3/8” deflection when pressing on it. To adjust; remove the top and bottom cover, loosen the four motor bolts, gently pry the motor back, and retighten the bolts. ♦ Small Belt WARNING ♦ Tighten the bolts on the motor to 6 ft lbs of torque. Overtightening may cause the threads to strip. Injector Bars and Head assembly: The bottom part of the head should be visually inspected for sharp edges or excessive wear that may damage carpet. If any damage is found the part should be replaced immediately. Cleaning the Orifice Jet: There is an orifice located on the upper handle, inline with the male quick connect. This must be cleaned once a month or as necessary. To clean, remove the male quick connect from the orifice housing, then remove the orifice using a 3/16” Allen wrench. Tip: Use a small paper clip to clear any debris from the opening. Note: If you are noticing a signifigant drop in the temperature of your machine you can use a smaller orifice jet. It is recommended to use part no. 180-018 orifice. The optional orifice is sent with all new machines or available from HydraMaster. 01/26/04 HydraMaster Corporation Rotary DriMaster Page 29 Freeze Warning and Protection Your Rotary Drimaster can sustain damage from freezing, as can any equipment that functions with the use of water. Care must be taken to potect this tool from freezing as you do you other equipment. To protect it from frreezing, simply blow compressed air through the solution quick connect with the valve open. This will blow all water from the valve, solution line, rotary union and injector bars. HydraMaster Corporation Page 30 Rotary DriMaster Warranty All components not specifically referenced in the schedule below are covered under this warranty for a period of one (1) year, excepting those parts which are considered, by HydraMaster, to be expendable in normal use, including but not limited to paint, labels and other cosmetic parts or features. Freezing of any water or chemical related component will VOID all warranties on water or chemical related components, internal or external, of this equipment. Deposits and buildup in the water or chemical systems due to hardness in the water used or chemicals which results in deposits, will VOID all warranties on affected components. All recommended maintenance must be performed by competent service personnel. Records of periodic maintenance must be kept and copies may be required to be furnished to HydraMaster before this warranty is honored. Coverage Schedule Frame, Handle .……..............3 years Motor …...............................1 year Valves, Filters, Hoses, Belts, Pulleys, Power Cords, Injector Bar, Head Assembly..1 year For service, contact the distributor where the machine was purchased. 01/26/04 HydraMaster Corporation