1
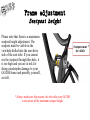
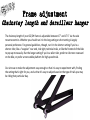
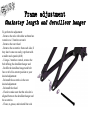
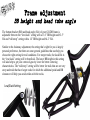
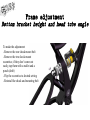
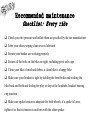
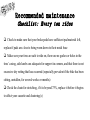
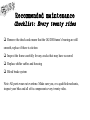
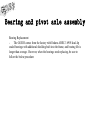
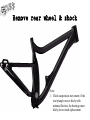
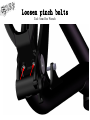
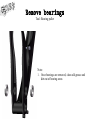
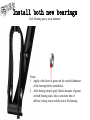
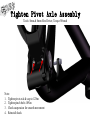
GG/DH Owner’s Manual Hell yeah! You just bought one of the first Guerrilla Gravity bikes! First things first, thank you for supporting us and supporting American manufacturing. As we’re sure you’re already aware, you’re pretty awesome. Now, we have a few important points to cover. We have structured this owner’s manual to include the information we feel is the most important for your ownership of the GG/DH to come first and have left everything the Consumer Product Safety Commission dictates we must include at the end. Table of Contents Details on the GG/DH Beta prototypes and owner expectations Frame adjustments - Seatpost height - Chainstay length and derailleur hanger - Bottom bracket height and head angle Recommended maintenance Bearing and pivot axle assembly Warranty Required CPSC info GG/DH Beta prototype details and owner expectations The GG/DH Betas are an intermediary prototype designed to be a preproduction validation. We have taken everything that we learned from the Alpha prototypes and improved the frames in regards to ease of ownership, frame strength, and its fabrication processes to eliminate imperfections. While we have taken all precautions to make sure the bikes are production quality, please keep in mind that there may be imperfections still and that’s why they are a below-cost, limited-quantity prototype batch. As Beta riders, we are looking to you for feedback on what you think can be improved. Anything on the frame is up for discussion. Our aim is to make the GG/DH a frame that performs as well as, or better than, the best frames on the market, yet is easier to maintain and own than any other. So, as you ride your GG/DH Beta, think about any ride characteristics that could be improved. And, as you maintain your bike, ask yourself if anything you’re doing could be made easier. With your feedback, we think the GG/DH will be the best downhill and park bike on the market! Frame adjustment Seatpost height Please note that there is a maximum seatpost height adjustment. The seatpost must be visible in the viewhole drilled into the non-drive side of the seat tube. If you cannot see the seatpost through this hole, it is too high and you are at risk for doing catastrophic damage to your GG/DH frame and possibly yourself, as well. *Always make sure that anyone else who rides your GG/DH is also aware of the maximum seatpost height. Seatpost must be visible Frame adjustment Chainstay length and derailleur hanger The chainstay length of your GG/DH frame is adjustable between 17” and 17.5” via the axle mount eccentrics. Whether you should run it in the long setting or short setting is largely personal preference. For general guidelines, though, run it in the shorter setting if you’re a shorter rider, like a “snappier” rear end, ride tight, technical trails, or like the frontend of the bike to pop up more easily. Run the longer setting if you’re a taller rider, prefer to ride more rearward on the bike, or prefer a more stable platform for high-speed trails. Our aim was to make the adjustment easy enough so that it is easy to experiment with, finding the setting that’s right for you, and so that it’s easy to adjust based on the type of trails you may be riding that particular day. Frame adjustment Chainstay length and derailleur hanger To perform the adjustment: - Remove the axle with either an 8mm hex wrench or a 17mm box wrench - Remove the rear wheel - Remove the eccentrics from each side; if they don’t come out easily, tap them with a mallet and a punch (drift) - Using a 2 mm hex wrench, remove the bolt affixing the derailleur hanger and - Reaffix the derailleur hanger and bolt fore or aft of its current position to your desired adjustment - Reinstall the eccentrics in the new desired adjustment - Reinstall the wheel - Check to make sure that the axle slot is aligned between the derailleur hanger and the eccentrics - Clean, re-grease, and reinstall the axle Frame adjustment BB height and head tube angle The bottom bracket (BB) and head angle (HA) of your GG/DH frame is adjustable between the “low/slack” setting with a 13.6” BB height and 63.5° HA and “tall/steep” setting with a 14” BB height and 64.2° HA. Similar to the chainstay adjustment, the setting that’s right for you is largely personal preference, but there are some general guidelines that can help you choose the right setting for trail conditions. For steeper trails, the slack HA in the “low/slack” setting will be beneficial. The lower BB height in this setting will also help to get your center-of-gravity lower for better cornering characteristics. The “tall/steep” setting will be better for trails that are not very steep and trails that have larger rocks for which the additional pedal and BB clearance will help you avoid strikes with the rocks. Low/Slack Setting Frame adjustment Bottom bracket height and head tube angle To make the adjustment: - Remove the rear shock mount bolt - Remove the two shock mount eccentrics; if they don’t come out easily, tap them with a mallet and a punch (drift) - Flip the eccentrics to desired setting - Reinstall the shock and mounting bolt Recommended maintenance Checklist: Every ride Check your tire pressure and inflate them as specified by the tire manufacturer Lube your chain, wiping clean excess lubricant Ensure your brakes are working properly Ensure all the bolts on the bike are tight, including pivot axle caps Clean your bike of mud and debris, a clean bike is a happy bike Make sure your headset is tight by holding the front brake and rocking the bike back and forth and feeling for play or slop at the headtube, headset bearing cup junction Make sure spoke tension is adequate for both wheels, if a spoke is loose, tighten it so that its tension is uniform with the other spokes Recommended maintenance Checklist: Every ten rides Check to make sure that your brake pads have sufficient pad material left, replace if pads are close to being worn down to their metal base Make sure your tires are safe to ride on, there are no gashes or holes in the tires’ casing, side knobs are adequate for support in corners, and that there is not excessive dry rotting that has occurred (especially prevalent if the bike has been sitting, unridden, for several weeks or months) Check the chain for stretching, if it is beyond 75%, replace it before it begins to affect your cassette and chainring(s) Recommended maintenance Checklist: Every twenty rides Remove the shock and ensure that the GG/DH frame’s bearing are still smooth, replace if there is stiction Inspect the frame carefully for any cracks that may have occurred Replace shifter cables and housing Bleed brake system Note: All parts wear out overtime. Make sure you, or a qualified mechanic, inspect your bike and all of its components every twenty rides. Bearing and pivot axle assembly Bearing Replacement The GG/DH comes from the factory with Enduro ABEC-3 6905 dual-lip sealed bearings with additional shielding built into the frame, and bearing life is longer than average. However, when the bearings need replacing, be sure to follow the below procedure Remove rear wheel & shock Note: 1. Check suspension movement; if the rear triangle moves freely with minimal friction, the bearings most likely do not need replacement Loosen pinch bolts Tool: 5mm Hex Wrench Remove pivot axle Tool: 8mm Hex Wrench Important: Pinch bolts must be loosened first! Note: 1. Clean the old grease and dirt off of the pivot axle and cap Remove rear triangle and spacers Note: 1. Clean old grease and dirt off of bearing spacers Remove bearings Tool: Bearing puller Note: 1. Once bearings are removed, clean old grease and dirt out of bearing areas Install both new bearings Tool: Bearing press, not a hammer! Notes: 1. Apply a thin layer of grease on the outside diatmeter of the bearing before installation. 2. After bearing install, apply liberal amounts of grease on both bearing seals- this is one more line of defense to keep water and dirt out of the bearing. Reinstall spacers, rear triangle and axle Tool: Patience; make sure everything is aligned before pushing the pivot axle through Note: 1. See orientation of pivot axle spacers, highlighted in green. Reinstall spacers, rear triangle and axle Tool: Patience; make sure everything is aligned before pushing the pivot axle through Note: 1. Apply thin layer of grease to pivot axle OD prior to installation 2. Apply linseed oil to pivot axle cap threads Tighten Pivot Axle Assembly Tools: 5mm & 8mm Hex Driver, Torque Wrench Note: 1. Tighten pivot axle & cap to 12Nm 2. Tighten pinch bolts 10Nm 3. Check suspension for smooth movement 4. Reinstall shock Warranty One-year frame warranty - For one year, we will replace a broken front or rear triangle that is the result of defective materials or workmanship - This is assumed that the failure is the result under normal riding conditions. Given that this is a prototype frame we don’t recommend hucking your meat like Bender. This will void this warranty if a failure occurs - This warranty does not cover any components on the bicycle - This warranty is void if the failure is the result of improper assembly of components or hardware. If you are unsure if components or hardware are improperly assembled, contact a GG representative before riding the bike Eight-year crash replacement - For the first eight years of the frame’s life we will provide an at-cost replacement for the front or rear triangle regardless of the situation under which the failure occurred. We still don’t recommend hucking your meat like Bender. Any injury that occurs doing something like this ain’t our fault. Ride within your abilities. - All bicycle frames have a usable life, especially ones made of aluminum, simply due to the natural aging of the materials A note on component failures - We are not responsible for any component failures attached to the bike, but we will help connect you with the proper manufacturer to rectify the issue. We do make an attempt to only provide components we are confident in, but failures do happen (and they’re not our fault). Required CPSC info • • • • Safe operation – Brakes: Squeeze them with your forefinger to stop the bike, but don’t squeeze them too hard or you may hurt yourself! And don’t use two fingers—that’s just a bad habit. – Gears: These are located next to your right brake lever. The lower lever makes it harder to pedal. The upper lever makes it easier. Yup, it’s true. – Wet weather: Riding in the wet is extremely dangerous and should be avoided at all cost. Any injury you may incur riding in the wet is your own fault for trying to have fun on a rainy day. – Night riding: Riding at night is awesome, especially on really steep trails. We recommend lights and reflectors to help prevent things from hitting you, and vice versa. Oh yeah, it’s also dangerous and not our fault if you hurt yourself doing it. – On-road: If you happen to be riding your bike on the road, always assume cars do not see you and be very, very careful. We’re not sure why you’re on the road with a GG/DH, anyway. – Off-road: Go fast, take chances, and if you get hurt, we’re sorry, but it’s not our fault and we are not liable for any injury that occurs because the gnar shred you, instead of the other way around. If your bike is less than fully assembled when you receive it, take it to a qualified mechanic. If you assemble it yourself, we assume no responsibility for improper construction leading to equipment failure or personal injury. If you’re in doubt about who is a qualified mechanic, call us and we’ll help you find one in your area. Minimum leg length – If there is less than one inch between your crotch and the top tube, the bike is too big for you. Oops. Let us know if this is the case for you. Serial number – Each Guerrilla Gravity bike has a serial number on the bottom of the bottom bracket. This number denotes the model, date of fabrication, and manufacturing location. Make a note of this number in your records in case your bike is stolen. We know this info was incredibly interesting, so thanks for hanging in there with us. … See ya in Shred Town