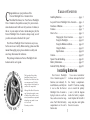
1
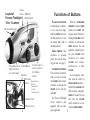
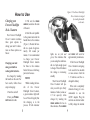
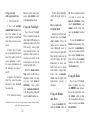
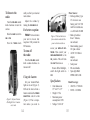
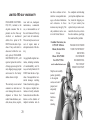
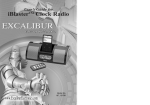
User’s Guide for
Forever FlashlightTM**
10-in-1 Lantern
Model No. H691
C
ongratulations on your purchase of the
Forever Flashlight 10-in-1 Lantern from
Excalibur Electronics, Inc. Your Forever Flashlight
10-in-1 Lantern is the perfect accessory for your next outdoor adventure and it will never let you down. At home, in
the car, in your camper or boat or storm emergency kit, the
Forever Flashlight 10-in-1 Lantern is always ready, even if
you have not used or checked it for years!
Your Forever Flashlight 10-in-1 Lantern is easy to use,
but be sure to use it safely. Before starting, please read this
manual thoroughly, paying close attention to safety and
care. Keep this manual for reference.
This package includes one Forever Flashlight 10-in-1
Lantern and its user’s guide.
The legendary King Arthur
brandished a magic sword,
Excalibur, from which we take
our company name. With this
unique weapon in his hands, he
could not be vanquished.
Although Excalibur Electronics
can’t claim the magical secrets
of Merlin, King Arthur ’s court
wizard, sometimes our patented
technology may make it seem
as if we could.
2
We make you think.
TABLE OF CONTENTS
Installing Batteries . . . . . . . . . . . . . . . . . . . . . page 3
Layout of Forever Flashlight 10-in-1 Lantern. . . .page 4
Functions of Buttons . . . . . . . . . . . . . . . . . . . . page 5
Features . . . . . . . . . . . . . . . . . . . . . . . . . . . . page 7
How to Use . . . . . . . . . . . . . . . . . . . . . . . . . . page 8
Charging the 10-in-1 Lantern. . . . . . . . page 8
Using the Flashlight. . . . . . . . . . . . . . page 12
Using the Blinker and Siren. . . . . . . . page 12
Using the Radio . . . . . . . . . . . . . . . . page 13
Specifications . . . . . . . . . . . . . . . . . . page 14
Caution. . . . . . . . . . . . . . . . . . . . . . . . . . . . . . page 15
Special Care & Handling. . . . . . . . . . . . . . . . . .page 16
Battery Information. . . . . . . . . . . . . . . . . . . . . page 17
Limited 90-Day Warranty. . . . . . . . . . . . . . . . .page 18
Installing Batteries
Your Forever Flashlight
10-in-1 Lantern requires 3 C
batteries (not included). To
install batteries, carefully turn
it over so that the Forever
Flashlight 10-in-1 Lantern is
laying its side on a soft surface, such as a towel or magazine. You’ll find the battery
compartment on the unit’s
bottom side.
3
Use a coin or screwdriver
to release and open the lid of
the battery compartment.
Install 3 C batteries, making
sure to match the polarity
(+ and -) with the diagram
inside the battery compartment. Replace the lid until it
snaps into place and tighten
the screw to secure.
SOLAR
Layout of
PANEL AM/FM
BAND SWITCH
Forever Flashlight
10-in-1 Lantern
ON/BLINK/SIREN-OFF
POWER SELECTOR TUNING KNOB
SWITCH ON-AUX.
BAT.-OFF/CHARGE
SPEAKER
EZ CRANK
HANDLE
VOLUME (SOUND
LEVEL CONTROL)
WITH SIREN
ON/OFF
RECHARGEABLE
BATTERY
COMPARTMENT
LOCATED
UNDERNEATH UNIT
EARPHONE JACK
4
DC INPUT JACK
Functions of Buttons
Slide the ON/BLINKER/
switch to SIREN
position—the SIREN will
begin to sound. Follow by
turning the VOLUME switch
clockwise to activate the
SIREN function. You can
adjust the volume by turning your VOLUME knob
clockwise for a louder
VOLUME
and counterclockwise for a softer
VOLUME.
F LASHLIGHT / LANTERN :
In a dark place or whenever you may need light,
slide the ON/OFF switch to
the ON position. To turn
the lantern OFF, slide to
the OFF position.
SIREN/OFF
CRANK HANDLE: Turn
clockwise to generate
power. For steps in charging your unit, see page 8.
VOLUME/ON/OFF/SIREN:
Turn clockwise to turn the
radio on and to increase
the VOLUME. Turn counterclockwise to decrease the
VOLUME and to turn the
radio OFF.
The Forever Flashlight
10-in-1 Lantern is also
equipped with an emergency apparatus.
5
In an emergency situation, slide the switch to
SIREN BLINKER position—
and both the BLINKER will
blink and the emergency
SIREN will sound. You can
also turn the VOLUME
switch clockwise to activate the SIREN BLINKER.
page 10.
TUNING: Turn until you
find your desired radio
station.
POWER
the
mode
for your three options to
charge this unit.
SWITCH:
This
6V DC INPUT JACK:
Connects to an AC/DC
ADAPTER (not included).
is
SELECTION
LOUD SPEAKER: This is
the speaker for the emergency siren and radio.
POWER SELECTION
Use the AUX. BAT.
switch to run on regular
batteries. Switch over to
ON and you can access the
built-in batteries. See page
8 for more information on
charging the Forever
Flashlight 10-in-1 Lantern.
SOLAR PANEL: The
Forever Flashlight 10-in-1
Lantern can easily be
charging by using the
handy SOLAR PANEL. For
more information, see
BATTERY
COMPARTis located at the bottom of the unit. See page
17 for more information.
MENT:
RECHARGEABLE BATCOMPARTMENT: See page
10 for more information
on replacing the rechargeable batteries.
TERY AND SPARE BULB
6
LIGHT OPTIONS: The
Forever Flashlight 10-in-1
Lantern has two light
options. Underneath the
flashlight cover are two
different types of bulbs to
use. You will find this
handy unit can lighten
your path with the LED
light or switch over to a
regular “kryption” bulb.
Features
Our All Forever Flashlight 10-in-1 Lantern combines an LED and
regular flashlight with a radio, an emergency unit and charging
capability all into one handy unit.
•
•
•
•
•
•
•
•
•
•
•
•
•
This model does not need an external power source. Instead
it can be recharged by spinning the built-in generator to
recharge the internal battery for optimum charging.
Super-bright LED visible for over a mile.
Additional regular white light option available.
AM/FM radio.
Loud siren and bright red blinking light for
emergency situations.
Convenient and compact for easy portable carrying.
Built-in FM telescopic antenna for better reception.
Solar Panel for charging the unit.
AC/DC input jack to utilize.
Flashlight can be pulled out and placed vertically to be used
as a camping lantern.
Battery back-up (3 C batteries, not included).
Headphones jack.
Low battery indicator.
7
Figure 1: The Forever Flashlight
10-in-1 Lantern is charged
by winding the handle
on the unit.
How to Use
Charging your
Forever Flashlight
10-in-1 Lantern
3. Pull out the CRANK
located on the side
of the unit.
HANDLE,
4. Hold the unit parallel
to the ground and wind the
handle three to five minutes
(Figure 1). Rotate the handle at a speed of approximately 120 rounds per
minute. It is recommended
to charge your Forever
Flashlight 10-in-1 Lantern
for three to five minutes
before first use or after long
periods of non-use.
Your Forever Flashlight
10-in-1 Lantern includes
three great options to
charge your unit. For directions on these options see
below:
Charging your unit
using your built-in
rechargeable batteries.
It is charged by winding
the handle on the unit. For
best results, follow these
steps in charging:
NOTES:
1. Turn the unit off.
2. Turn your POWER
knob to ON.
SWITCH
8
• While winding the handle
of
the
Forever
Flashlight 10-in-1 Lantern,
a green indicator light will
be on. This will signify that
the charging is in the
process. If both indicator
lights are on (red and
green) this indicates that
you are using the crank handle at a high enough speed
to charge. This will indicate
the voltage is increasing
steadily.
• Your Forever Flashlight
10-in-1 Lantern will provide you with up to thirty
minutes of radio (volume at
1/3 the capacity) when
charged by winding the
CRANK HANDLE for two to
three minutes. The BLINKER
and SIREN will work for
approximately ten minutes.
If the Forever Flashlight
10-in-1 Lantern is not going
to be used for two months
or more–remove both the
3 C batteries and the rechargeable battery.
9
If the unit is completely
drained of energy, it is recommended to use the
AC/DC adaptor. Plug the
unit into an electrical outlet
to fully charge the internal
• While winding the handle of the Forever Flashlight 10-in-1 Lantern, the
indicator lights will be on.
This will signify that the
charging is in the process.
battery. You can also wind
the unit again three to five
minutes.
Keep in mind if your
radio has not been in use for
a long length of time, this
will cause the battery life to
be shorter than normal even
after recharging. In this
case, recharge the battery
for three to five minutes.
Then discharge completely.
Repeat this process several
times to regain full performance of the battery.
This is not necessary, but it
is helpful in completing a
full charge.
How to replace the
Rechargeable Battery.
Simply turn off your unit
and and open your FLASHLIGHT COVER. Then simply
reach into the unit and
unplug the rechargeable
battery. Replace with a new
battery. Close the FLASHLIGHT COVER and the battery replacement process is
complete.
• If you turn the CRANK
HANDLE slowly, the batteries can not be charged properly. The recommended turn
speed would be 120 rounds
per minute.
Charging your unit
using an AC/DC
adaptor.
The Forever Flashlight
10-in-1 Lantern is a DC
charge design. You can use
10
any 6V/200mA AC/DC
adapter for charging the
unit. Simply turn off your
lantern and use your DC
INPUT JACK located at the
back of your unit and plug
into an electrical outlet.
Your built-in batteries will
be fully charged within
three hours. Make certain
voltage is compatible. Do
not charge the unit for more
than 24 hours, this may
damage the unit.
indicator light. This will
signify that the charging is
in the process.
4. Place your Forever
Flashlight 10-in-1 Lantern
in full, direct sunlight. You
must make sure that the
SOLAR PANEL is located at
the top of your unit is in full
sun. Your built-in batteries
will then charge. Five to six
hours of full sunlight will
allow the unit to charge at
approximately a 60%
charge.
Charging your unit
using your Solar Panel.
To charge the unit to full
capacity, see the section on
charging your unit by using
an AC/DC ADAPTOR on page
10.
1. Turn the unit off.
2. Turn your POWER
knob to
ON.
SELECTION SWITCH
3. When the SOLAR
option is bring used, the
Forever Flashlight 10-in-1
Lantern will display a green
11
Using your unit
with regular batteries.
1. Turn the unit off.
2. Use your
batteries as the main power
source, slide POWER switch
to the AUX.BAT position.
To turn off the flashlight,
switch the light switch to
OFF.
Your Forever Flashlight
10-in-1 Lantern includes an
ultra bright LED bulb and a
traditional white bulb. The
LED energy saving light
uses minimal power consumption when turned on.
You then can switch to the
second option and use the
traditional light bulb.
Simply turn off your unit
and and open your FLASHLIGHT COVER.
Press the
rubber cover to release the
inner flashlight cover to
retrieve the spare light bulb.
Then simply reach into the
unit and replace the bulb.
Remember to when your
bulbs burn out to match
with similar voltage bulb.
Close the FLASHLIGHT
COVER and the light bulb
replacement process is
complete.
Using the Flashlight
located at the bottom of your
unit. Open the compartment
door with a coin or a screwdriver.
BATTERY
COMPARTMENT DOOR
3. Insert three C batteries, not included. Be sure to
insert the battery with the
correct polarities (+ and -).
For more information on
the batteries, see pages 3
and 17.
Slide the POWER SELECswitch to ON. This is
important unless you want
to access your BACK-UP
BATTERIES. Then switch
your ON/BLINK/SIREN/OFF
to the ON position. This will
turn the LIGHT function on.
4. Replace the batteries
when the sound becomes
distorted or the flashlight
becomes dim.
TION
5. To utilize the back-up
Excalibur Electronics reserves the right to make technical changes without
notice in the interest of progress.
12
ON, this is important unless
you want to access your
BACK-UP BATTERIES. Then
select BLINK/SIREN at your
POWER switch. This will
turn the BLINKER function
on.
How to replace the
Flashlight Bulb.
To use the BLINKER and
simultaneously, first,
select the BLINK/SIREN at
your power switch and then
turn on the VOLUME knob.
This will turn the BLINKER
function on. Then turn on
the VOLUME knob.
SIREN
Using the Radio
Using the Blinker
and Siren
To use the BLINKER, first,
slide the POWER switch to
13
Your Forever Flashlight
10-in-1 Lantern can tune
the AM/FM radio stations.
To use the radio, first, slide
the POWER switch to ON,
this is important unless you
want to access your BACKUP BATTERIES.
To listen to the
radio:
Adjust the volume by
turning the VOLUME knob.
Turn the VOLUME control
knob clockwise to turn the
unit on.
Slide the
AM or FM.
Turn the
BAND
For better reception:
switch to
TUNING
FM/AM: Turn and rotate
your unit to locate best
reception. Fully extend the
FM antenna.
knob
To turn off
the radio:
Turn the VOLUME control
knob counter-clockwise to
turn unit off.
Using the Lantern
Figure 2: Set your Forever
Flashlight 10-in-1 Lantern
on its end.
Power Source:
• Recharge battery type:
2/3 AA size in one
battery pad: 3.6V/300
mAh Ni-Cad batteries
or a 600 mAh NI-MH
• Back-up batteries:
three C batteries,
not included.
• Hand-winding speed:
120 rpm or faster
• AC/DC 6V 200mA
adapter,
not included.
• Solar power
• EZ crank handle
• Spare light Bulb:
PMMU-0023-0104
until you find your desired
radio station.
14
Set your Lantern/Flashlight on its end (Figure 2).
Pull out the lens to form a
lantern and slide the POWER
SELECTION switch to ON
(Figure 3). This is important unless you want to
Figure 3: Pull out the lens to
form a lantern and slide the
power selection switch on.
access your BACK-UP BATThen switch your
ON/BLINK/SIREN/OFF to the
ON position. This will turn
the LIGHT function on.
TERIES.
To turn off the flashlight,
switch the light switch to
OFF.
Specifications
•
•
•
•
Outer dimension:
9.5'' x 4.5'' x 3.5''
Weight: 1.7 lbs
Maximum power
consumption: 0.6W
Voltage: 3.6V-4.0V
Band Coverage:
• AM 530 - 1710 KHz
• FM 88 - 108 MHz
15
Caution
•
Forever Flashlight 10-in-1 Lantern generates a
strong magnetic field that surrounds it. Keep the
unit at least one foot away from medical devices,
computers, magnetic storage media, or other
devices such as:
• Pacemakers
• Credit cards
• Cassette tapes
• Televisions
• Computer discs • Video tapes tube (CRT)
• Any device with a cathode ray
•
•
Do NOT attempt to point the light into the human
eye directly. This strong light may cause physical
damage to an eye.
Take out the back-up batteries and remove the
rechargeable batteries by disconnecting the battery
plug, Only if the unit will not be accessed for
a long time.
16
•
•
•
•
•
•
•
Special Care & Handling
Always turn off the flashlight when charging.
Do not charge for more than 24 hours straight. This
could damage the unit’s recharging system.
Avoid rough handling such as bumping or dropping.
Avoid extreme temperatures. For best results, use
between the temperatures of 39º F and 100º F
(4º C and 38º C).
Clean only using a slightly damp cloth. Do not use
cleaners with chemical agents.
Clean the lens with glass-cleaning products.
Do not use petroleum distillates (such as gasoline or
kerosene) or solvents such as acetone to clean
any part of the Forever Flashlight 10-in-1 Lantern.
** This product uses rechargeable batteries for energy
storage that may need to be replaced after
extended use.
17
Battery Information
•
•
•
•
•
•
•
•
•
•
•
Batteries should be installed and replaced only by an adult.
Forever Flashlight 10-in-1 Lantern uses three C batteries,
not included.
Do not mix alkaline, standard (carbon-zinc)
or rechargeable (nickel-cadmium) batteries.
Do not mix old and new batteries.
Do not use rechargeable batteries.
Remove exhausted batteries from the unit.
Do not short circuit battery terminals.
Remove batteries and store them in a cool,
dry place when not in use.
To avoid explosion or leakage, do not dispose
of batteries in a fire or attempt to recharge
alkaline or other non-rechargeable batteries.
Install batteries so that the polarity (+ and -) matches the
diagrams in the battery compartment.
Use only batteries of the same type and equivalency.
YOU CAN ALSO ORDER AN AC ADAPTER
(THE ADAPTER MODEL NUMBER IS: 1A-10014)
ONLY FOR $12.95 WITH $2.50 SHIPPING
& HANDLING. GO TO
WWW.EXCALIBURELECTRONICS.COM
OR CALL 305.477.8080 FOR MORE
INFORMATION.
This device complies with Part 15 of the FCC Rules. Operation is subject to the following
two conditions: (1) this device may not cause harmful interference, and (2) this device must
accept any interference received, including interference that may cause undesired operation.
NOTE: This equipment has been tested and found to comply with the limits for a Class B digital
device, pursuant to Part 15 of the FCC Rules. These limits are designed to provide reasonable l
interference in a residential installation. This equipment generates, uses and can radiate radio
frequency energy and, if not installed and used in accordance with the instructions, may cause
harmful interference to radio communications. However, there is no guarantee that interference
will not occur in a particular installation. If this equipment does cause harmful interference to
radio or television reception, which can be determined by turning the equipment off and on, the
user is encouraged to try to correct the interference by one or more
of the following measures:
•
Reorient or relocate the receiving antenna.
•
Connect the equipment into an outlet on a circuit different from that to
which the receiver is connected.
•
•
18
Increase the separation between the equipment and receiver.
Consult the dealer or an experienced radio/TV technician for help.
19
LIMITED
90-DAY
WARRANTY
wear and tear, inadequate
maintenance, commercial
use, or unreasonable use of
the unit. Removal of the top
panel voids all warranties.
This warranty does not cover
cost of repairs made or
attempted outside of the factory.
EXCALIBUR ELECTRONICS, INC., warrants to the
original consumer that its
products are free from any
electrical or mechanical
defects for a period of 90
DAYS from the date of purchase. If any such defect is
discovered within the warranty period, EXCALIBUR
ELECTRONICS, INC., will
repair or replace the unit free
of charge upon receipt of the
unit, shipped postage prepaid
and insured to the factory
address shown at right.
Any applicable implied warranties, including warranties
of merchantability and fitness, are hereby limited to 90
DAYS from the date of purchase. Consequential or incidental damages resulting
from a breach of any applicable express or implied warranties are hereby excluded.
Some states do not allow limitations on the duration of
implied warranties and do
The warranty covers normal
consumer use and does not
cover damage that occurs in
shipment or failure that
results from alterations, accident, misuse, abuse, neglect,
20
the complaint and including
your daytime telephone number, inside the shipping carton. If your warranty has
expired and you want an estimated fee for service, write to
the above address, specifying
the model and the problem.
not allow exclusion of incidental or consequential damages, so the above limitations
and exclusions in these
instances may not apply. The
only authorized service center in the United States is:
Excalibur Electronics, Inc.
13755 SW 119th Ave
Miami, Florida 33186
U.S.A.
Phone: 305.477.8080
Fax: 305.477.9516
PLEASE DO NOT SEND
YOUR UNIT WITHOUT
RECEIVING
AN ESTIMATE
FOR SERVICING.
WE CANNOT
STORE YOUR UNIT!
www.ExcaliburElectronics.com
Ship the unit carefully
packed, preferably
in the original
carton, and send it
prepaid, and
adequately
insured.
Include a
letter,
detailing
21
Notes
22
Notes
23
EXCALIBUR ELECTRONICS, INC.
13755 SW 119TH AVENUE,
MIAMI, FLORIDA 33186 U.S.A.
Phone: 305.477.8080
Fax: 305.477.9516
Play games live at:
www.ExcaliburElectronics.com
H691 (MA) FFlash 10in1lantern 071506 V9