1
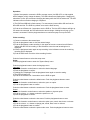
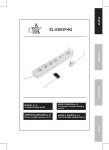
Introduction:
Micro digital video recorder (DVR) with built-in 2GB memory and extra Micro SD slot. Ideal for
portable use or setting of cameras on location. Also suitable as video player and MP3 player.
Description:
1
2
3
4
5
6
17
16
7
15
14
8
9
10
11
13
12
1. Power ON/OFF button
2. MIC (NOT IN USE)
3. Volume - button
4. Volume + button
5. ESC (escape) button
6. MODE button
7. LED indicator
8. Forward button
9. Play/Pause button
10. Rewind button
11. LED indicator
12. Micro SD card slot
13. USB port
14. Camera input
15. Loudspeaker
16. Reset button
17. Audio/Video output
Operation:
1) Before first operation connect the DVR to a power source (via USB of PC or with supplied
AC/DC adapter) to fully charge the battery. The LED indicators are flashing blue. Charging will
take about 5 hours. We recommend charging the battery while the DVR is switched off. The LED
indicators will turn off when charging is completed.
2) The DVR has 2GB built-in flash memory. For extra memory insert a Micro SD card into the
Micro SD card slot. The DVR is by default set to use the flash memory.
3) Push the on/off button for 3 seconds to turn the DVR on. The blue LED indicators will light up.
If a camera is connected, the DVR will show the camera image. A dialog box will pop up if no
camera is connected. Push the play/pause button to continue anyway to set up the DVR.
Video recording:
1) Connect a camera to the camera input.
2) Push the play/pause button to view the camera image.
3) Push the play/pause to start recording. In the upper left corner a camera icon will flash to
indicate that the DVR is recording. In the left bottom corner the total recording time is
displayed.
4) Push the play/pause button again to stop recording. In the left bottom corner the remaining
recording time is displayed.
5) Push the ESC button to exit the video recording function.
Push the forward button to select the setup menu.
Setup:
Push the play/pause button to enter the "System Setup" menu.
Push the play/pause button to enter the language menu.
Language
1) Push the forward or rewind button to select the desired language.
2) Push the play/pause to confirm.
3) A dialog box is displayed. Push the play/pause button again to save the setting.
4) The DVR will power off.
5) Push the on/off button for 3 seconds to turn the DVR on again.
Push the rewind button to select the default menu. Push the play/pause button to enter.
Default
1) Push the forward or rewind button to select the yes or no option.
2) Push the play/pause button to confirm.
Push the rewind button to select the sound menu. Push the play/pause button to enter.
Sound
1) Push the forward or rewind button to select the speaker or keytone option.
2) Push the volume - or + button to select the option on or off.
3) Push the play/pause to confirm.
Push the rewind button to select the time menu. Push the play/pause button to enter.
Time
1) Push the forward or rewind button to select the option year, month, date, hours or minutes.
2) Push the volume - or + button to change year, month, date, hours or minutes.
3) Push the play/pause button to confirm.
Push the rewind button to select the power mode menu. Push the play/pause button to enter.
2
Power mode
1) Push the volume - or + button to change to never, 30, 60 or 180 seconds.
2) Push the play/pause to confirm.
For power saving mode select the option 30, 60 or 180 seconds. If no button is pushed during the
selected period, then the DVR will go into standby mode. The blue LED indicators will be flashing
during standby mode. Push the play/pause button to activate the DVR again.
Push the rewind button to select the memory menu. Push the play/pause button to enter.
Memory
1) Push the rewind f or backward button to select the internal "flash" or external "SD" memory.
2) Push the play/pause button to confirm the use of the flash or SD memory. Push again after the
dialog box is displayed.
3) Push the volume - or + button to select work space or format. Work space will show an
overview of the capacity of the memory, used and unused. With format it is possible to erase data
if the memory is full.
4) If the option format is selected, push the play/pause button. A dialog box is displayed. Push the
volume - or + button to select OK or cancel. Push the play/pause button to confirm.
5) Push the ESC button to exit the memory menu.
6) Push ESC to exit the "System Setup" menu.
Push the forward button to select the audio menu.
Audio:
Push the play/pause button to enter the "Audio Explorer".
1) Push the play/pause button to start the music.
2) Push the forward or rewind button to select the desired music tracks.
3) Push the volume - or + button to set the volume level.
4) Push ESC to exit the audio explorer.
Note: connect the DVR to your PC with the supplied USB cable for downloading music to the
DVR.
Push the forward button to select the video menu.
Video:
Push the play/pause button to enter the video player.
1) Push the play/pause button to start the video player.
2) Push the forward or rewind button to select the desired video files.
3) Push the volume - or + button to set the volume level.
4) Push ESC to exit the video player.
Mode button
1) Push the mode button for 2 seconds to enter additional functions.
2) Push the volume - or + button to select a function.
3) Push the play/pause button to enter the function.
4) Push the volume - or + button to select an option.
5) Push the play/pause button to confirm.
6) Push ESC to exit the mode function
Note:
1) For AV output select PAL (Europe) in the TV Output functions.
2) Connect the DVR to your PC with the supplied USB cable for uploading video files to your PC.
3
Specifications:
Video compression: MPEG4
Video play support: ASF (MPEG4), AVI (DIVX, XVID), 3GP, MP4
Audio play: MP3
Built-in flash memory: 2GB
Power supply: Li-ion battery
Camera input: 3.5mm (video, audio, power 3-5VDC)
AV output: 3.5mm (video, audio)
LCD: 2.4" TFT
USB port: 2.0
Dimensions: 83.5x50.2x12.5mm
PC system requirements:
WIN98 II/ME/2000/XP
Pentium 200MHz or above
USB port
32MB memory (128MB for WIN2000) or above
20MB hard disk space
CD-ROM drive
Sound card
Declaration of conformity
We,
Nedis B.V., De Tweeling 28, 5215MC ’s-Hertogenbosch, The Netherlands
Tel.: 0031 73 599 1055, Email: [email protected]
Declare that product:
Brand: König Electronic
Model: SEC-DVRMON10
Description: Portable Digital Video Recorder
Is in conformity with the following standards:
EN 55022:2006, EN 61000-3-2:2006, EN 61000-3-3:1995+A1:2001+A2:2005,
EN 55024:1998+A1:2001+A2:2003, EN 60065:2002
and complies with the requirements of the European Union Directives 2004/108/EC
‘s-Hertogenbosch, 25-5-2009
Safety precautions:
4
To reduce the risk of electric shock, this product should ONLY be opened by an authorized
technician when service is required. Disconnect the product from mains and other equipment if a
problem should occur. Do not expose the product to water or moisture.
Maintenance:
Clean only with a dry cloth. Do not use cleaning solvents or abrasives.
Warranty:
No guarantee or liability can be accepted for any changes and modifications of the product or
damage caused due to incorrect use of this product.
General:
Designs and specifications are subject to change without notice.
All logos, brands and product names are trademarks or registered trademarks of their respective
holders and are hereby recognized as such.
Keep this manual and packaging for future reference.
Attention:
This product is marked with this symbol. It means that used electrical and electronic
products should not be mixed with general household waste. There is a separate
collection system for these products.
Copyright ©
5