1
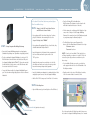
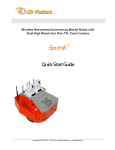
ph 408-965-3300 | fax 408-324-4840 | www.xbow.com | [email protected]
wireless sensor networks
Stargate NetBridge
Quick Start Guide
4145 North First Street
San Jose, California 95134
© 2007 Crossbow Technology, Inc. All rights reserved. Information in this
document is subject to change without notice. Crossbow is a trademark of
Crossbow Technology, Inc. Other product and trade names are trademarks or
registered trademarks of their respective holders.
Document Part Number: 7430-0049-01 Rev A
ph 408-965-3300 | fax 408-324-4840 | www.xbow.com | [email protected]
wireless sensor networks
If a Crossbow BU Series Base Station was purchased, please
follow these additional steps.
Step 2
Setup for the BU Series Base Station
and SN Series Sensor Nodes
• If you purchased a BU series base station from Crossbow,
plug its USB cable into the remaining USB slot on the
Stargate NetBridge labeled “Disk 2”.
Step 1.
• If you purchased the packaged SN series Sensor Nodes, they
Setup Stargate NetBridge Gateway
should be labeled with Unique Node ID.
• Remove the Stargate NetBridge gateway from its packaging.
(Included in the package is an optional base for upright operation).
• Insert the batteries into the battery holder compartment of
the Sensor Nodes and turn the power switch to the
“ON” position.
• The box containing the Stargate NetBridge also contains a USB
FLASH disk device. Insert this device into the bottom USB port of
the Stargate NetBridge labeled “Disk 1”. Please make sure that
the side with the electrical contacts on the USB disk mates with
the contacts inside the USB connector.
• Connect the Ethernet cable to the Stargate NetBridge Ethernet
port. The other end would typically plug into a Router or Ethernet
hub/switch.
• Spread the nodes around on your desktop or in the office
area. Make sure that the sensor nodes are resting on their
bases with antenna pointing vertically upwards.
• Insert the included power adapter into a standard electrical outlet
and plug the power connector into the Stargate NetBridge.
• Type the following URL in the address bar:
http://hostname (The hostname to can be found on the
white label located at the bottom of the unit).
• If the hostname does not bring up the MoteExplorer login
screen, refer to Chapter 2 of the Stargate NetBridge
Gateway User’s manual on how to find IP address assigned
to your gateway using the GatewayConfig tool.
• The MoteExplorer login screen will appear in the
browser. Type the default values below and click on Login.
Username: admin
Password: crossbow
NOTE: If you do not have Adobe’s Flash installed, you
will be prompted by your browser to install it. Follow the
instructions given by your browser and then retry the
above steps.
• If you installed a BU and sensor nodes, you should see
nodes appear in the node list on the left hand side of the
MoteExplorer window.
• Drag the nodes to the center of MoteExplorer’s window,
click on the network tab to show wireless links.
• Wait for Disk 1 LED to turn green, this will take 1 to 2 minutes.
Step 3.
MoteExplorer
• Open a Web browser (e.g. Internet Explorer or Mozilla Firefox)
Ethernet Cable
Base Station USB Cable [Optional, refer to step 2.]
Power Connector
USB FLASH Disk Device
More information about MoteExplorer and its features can
be found in the Stargate NetBridge Gateway User’s manual.