1
!
"##$
%
&
$#
'(
)
"##$
&
*
+
*
*
,-
.%
.) .+
.%
*)
*
)
.
)
)+/0,+
1
1
)
%
!"#$%"&'(#!)*+)&!%(#%(,#$&)#-!+*%(#%(,("%(,#$&)#-!*&,!#&++&("+*#$#!'&)#$%,!'(#%)*&"&
(&#,!#&#$#!'&)#$,!'(#"&(&#%(#&!#$&)#-! !&' #*!#!(-%#$%(./"*#$&)#-!!#""&'(##%&(("&' (*%(,
%#'#&#$ &)0%%#%&()&!)!)("
#1
23
'23(
%
'
2+3(
4+4
$ ,
+
%
5
+
6
7
'
(
+
" )
24
+
5
/
+
'(
+
'
(
'(
+
8 2
+
5
+
/
+
+
5
+
+
9 431
+
:
;
+
5
+
+
< &
1243
5
'$(
/
+
+
+
= ('%
5
+
+
%
+
%
+
> (5
2 3
+
%
+
2
3
4
23
2
3
2
3
+
23
? #
5
+
'(
+
'(
+
'(
%
@ 43
'3
1
4
%
6
+
+
/
%
5
+
$#"42
"62
!
5
+
4
%
+
+
$$)1""+
00*
* 'A00*A(
00*
'
A00*
A(
/
'A00*
0A(
'A00*
+A(
5
00*
0
00*
00*
+
/
5
00*
00*
0
5,;
%BC44
,
,
;+4
,C
4D.,
00*
0%%
E4
00*
4,C
00*
+4C&4C+4D4.
%+
4D.C4++5
.4C)40
E4C4
5
/
00*
0
00*
00*
+
00*
0
00*
00*
+
00*
00*
0
00*
00*
+
5
00*
%
00*
00*
0
A%+
+A
00*
00*
0
00*
+
00*
00*
+
00*
00*
00*
+
/
00*
00*
+
00*
00*
00*
0+%)+
%
1%CC%4+
4D.C4++
,C
).40
;0B
*;
,
)40
,
).40
1%CC%4+
,F
)4CE%%*5
F4++
F,C
%
.%C;%C
.;C.,+4
4
%0
,/FCB4)4
00*
00*
00*
+
,
%+4
1
00*
*4
%*4
F,C
%5
,+4G;4%
,C
04%
0%)%B4+
,C
F,C
%5
,+
.C,F+
,C
,+
C4&4;4+
+
+H
+H
6
+
+
6
;
6
6
+
#!'%(#%&(
5
+
'
(
%
5
+
'
(
;
%
%'%#"-!!(#*
+
1
+
-
%
%
%
+
6
+
/
F
2
3
7 ###"+&%(#$%
,!'(##$&)#-!% !&%""%-%#$&#
-!!(#*&)(*8%("%#$!7 !&!%' %"
%("%(,+#(&#%'%#"#&(*%' %"-!!(#%&)
'!$(#+%%#*(")%#()&! !#%! ! &
!#%%(&#&+%,#"#& !&%"(* "#
,!"&!#$(% &!#)&!#$&)#-!
F
5
+
+
5
6
+
+
+
'
(
:
:
+
:
+
-
%'%##%&(&)!'"%(""',
#$&(*!'"*)&!+!$&)-!!(#*-%+#$#
#)&!#$%(#$-!!(#*!"&! !%(#"'(
%(""-%#$#$&)#-!%((&(#-%!#%
&!%#%(&!+%+)&!(*%("%!#%(%"(#
%&!&(0(#%"',&!)&!(*&#
!&)%#&#%(,&#!(&!&#"#!%%(,
)!&'&!!#%(,#&#$&)#-!&!#$%,!'(#
(%)!#%&!%#%(&!$+("%"&)
#$ &%+%%#*&)$"',%((&(#-%
!#%9%+%%#*&!"',#&*&&!(*&#$!
!&(!7"#$'&(# %"+**&#&#$
&)#-!!,!"&)#$)&!'&)#$%'
+
:
6
!&"#!#!(
-
,&!('(#!#!%#"!%,$#
%
+
;
;+
B
'('8('(
C
0
+
"<""">/>#$8
/
+
;
+
;+
4
%
&(#!#&!:'()#!!
:)
+
I
#1
23
8$
*
.
C
+
=#@@"$
,(!
%
+
;+
%
+
'
(
%
+
%
F
6
%
F
6
""("'#&#$'%!&&)#&)#-!%(,!'(#
;-%("&-</=
%' &!#(#>*
)
'
2)
+3(
%
)
+
)
+
)
'2,CB%
.C,0;3(
;
)
+
,CB%
.C,0;
,CB%
.C,0;
,CB%
.C,0;
)
+
%
)
+
% !&%%&(
%+#&#$!& ((%&(
F
5,;
%G;C40
E4
+,F1%C4
E4
4;C,.4%
;,
'4;(
E4
F,,1B
.C,&+,+
%+,
%..5
,
5,;
F
E4C4
+
%5
,++45
*4144
E4
4C)+
,F
E4
+,F1%C4
4+4
%BC44)4
+4
,;
4%C4C
%0
E4
F,,1B
.C,&+,+
E4
F,,1B
.C,&+,+
+E%
%J4
.C44044
"&' %#%&(
5
+
+K
+K
6
+
+
6
;
6
6
%'%#"-!!(#*
7 ###"!%!%(#$%,!'(#("
!&%""("!#$$"%(,?###&!*!%,$#@#$
&)#-!% !&%""%-%#$&#-!!(#*&)(*8%("
%#$!7 !&!%' %"%("%(,+#(&#%'%#"#&
(*%' %"-!!(#%&!&("%#%&(&)
'!$(#+%%#*0%#*(")%#()&! !#%!
! &
%'%##%&(&)!'"*(""',
#$%'%##%&(&)!'"%(""',%(#$&)#-!
%(,!'(#$(&# *#& !&(%(!*
;%("%(,"#$=#&(* !&("+*!#%9
(,%,(("!+##&#$ !&%%&(#&#
("!#$$"%(,?###&!*!%,$#@
###&!*!%,$#
+
%
%
+
$"
$8
$9
$<
+
B
%
$?@8
'
(
,(!
%
C
+
6
4;
%
'
(
%
LIMITED HARDWARE WARRANTY
Creative Labs warrants that the product enclosed herein
to be free of defects for a period of ninety (90) days from
the date of purchase. In the event of a defect in material
or workmanship during the warranty period, Creative
Labs, at its discretion, will repair or replace the
defective product when the defective product is returned
to Creative Labs by the owner. The remedy for this
breach of warranty is limited to servicing or
replacement only and shall not cover any other
damages, including but not limited to the loss of profit,
special, incidental, consequential, and other claims.
Creative Labs specifically disclaims all other
warranties, expressed or implied, including but not
limited to implied warranties of merchantability and
fitness for a particular purpose with respect to the
defects of the products and the program license granted
herein. With respect to the use of this product, in no
event shall Creative Labs be liable for any loss of profit
or any commercial damage, including but not limited to
special, incidental, consequential, or other damages.
Some states/countries do not allow the exclusion of
limitation of liability for consequential or incidental
damages, in which case the above limitation may not
apply to you.
If the product is found to be defective, Creative Labs, at
its option, agrees to replace or repair the product at no
charge except as stated below, provided that you deliver
the product with a return material authorization (RMA)
number and a dated proof of purchase. If you ship the
product to Creative Labs, you must assume the risk of
damage or loss in profit. You must use the original
container (or the equivalent) and pay the shipping
charge.
Creative Labs may replace or repair the product with
new or reconditioned parts, and the replaced parts or
product become the property of Creative Labs. Creative
Labs warrants the repaired or replaced product to be free
from defects in material and workmanship for a period
of ninety (90) days from the return shipping date.
Before returning any product, contact Creative Labs'
Technical Support (for telephone numbers and
addresses, see the Technical Support section of this
document). If Creative Labs Technical Support verifies
that the product is defective, the Return Authorization
Department will issue an RMA number to place on the
outer package of the product. Creative Labs cannot
accept any product that does not include an RMA
number on the package.
#%&(>
+%:
;&:;
:
*)
%
K
6
:
:
6
:
6
2*3
0
C
C
##(#%&(>
LL6
L
M
N
L
K
M
*)
%
L
L
+%:;&:;
M
KL
-
HO
L
K:
H
:
K
L
6H
H
LL6
M
O
F
.
$<I
6
*
.
$<
F
C
6
6
E
6
6
I
❑ C
❑ 6
❑ 6
❑ :&
*
.
$<
F
C
6
*
%
,
/
/
!
%
K
%++4
2*3
KL
6
LL
)O
O
KL
0I
❑ 0
?@:88=:44
@":8$:44
'4)(
>8:"8:44
'&0(
"
%
F@=
"#?
4@</$@
):K
I
):K
%I
$@#$
)
*
)
%
@<#8<
;
+
I
'9#?(
9"?/==##
I
)
I
16
1):% !:A/B
2+
42
1122
>
4):4)I
%+
=89
$@@"
F
.
$<
+
*
4+/##8
*
$<
F
C
,
I
$ " L
M
$<
L
F
+
F
I
$ L
L
0KL
" 0
L
6
5
6
L
####################################################################################### $
################################################################### $
%
######################################### &
ENGLISH
%
,-
.P
1
.4
1
B
1
) .%P
.) P
4 .%
.+P )
) )
4 *
5
*
+
C6
0
1
B
4+ $
*8
1
B
4+9
1
@?
1
@?
+4
1
)9
&
1 @?
1 @? +4
1 ) <
1
"### =
&
1
"###>
+
1
B
?
.@
C
&
@
&
%
+-@
Contents
v
+
&
0 $#
+
1
B
E $#
'
"#################################### $$
.$$
0
.
$"
-
+ $"
*+################################################################### $'
F
+$8
0
,
+
$9
. $9
+$9
C
'&
+
($9
C
' ($9
+ $9
&
$9
4
$9
$9
$9
F// $9
0// $9
.
$9
* ################################################################################ $,
+################################################################ $&
+ $<
;
1
B
4+ $<
Contents
vi
ENGLISH
((")
1I
❑ //
)
)
/
❑ 3
1
)
1
B
4+
5
❑ 62"2
%
1
B
4+
1
1
B
4+K
/
K
0
1
B
4+
1
B
++
-.(P
,-
.
80
,-
,-
.
6
80
(
Creative WebCam PhotoEditor is an image editing and enhancing application that complements your
WebCam. Its many features include special effects tools and a set of templates for creating impressive
personal greetings and presentations.
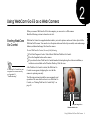
WebCam Go Control lets you take pictures or record video clips and store them in albums. And, you can
use it to download pictures you take while the camera is disconnected from the computer, export pictures
or video clips to other programs, or send them as attachments to your e-mail message. The various settings
for you to adjust so that you can optimize the quality of your pictures and video clips.
Introduction
vii
ENGLISH
&
*
1
B
4+
$=/
"9/
'$=>
(
/
Use WebCam Monitor to include a live snapshot on your Web page. Point your camera at the desired
subject, specify settings, and WebCam Monitor does the rest, including automatically uploading the
snapshots to your Web site. It can even act as a motion-detecting security system that automatically sends
an e-mail message to you when there is movement within the camera’s field of view.
(/ P(/!0P
.) 4
lets you create 360° interactive PixAround scenes, web pages, and postcards
without expensive professional equipment or additional plug-ins.
(/ (/P
.+
.%
/
8=#Q
.%
.+H
.%
R
!!
Microsoft NetMeeting is a voice communications application that includes support for international
conferencing standards and provides multi-user application sharing and data conferencing capabilities. It
supports one-way or two-way videoconferencing, so the other user can see you even if they do not have
a camera. Audio-only conversations and text chats are also supported. Two or more users can collaborate
on a document, doodle on a whiteboard, or share any Windows application in real-time over the Internet
or corporate intranet.
!
/+
Microsoft Internet Explorer is an Internet browser that features ActiveX technology, so web pages can
combine interactive ActiveX Controls, Java applets, and more to create interactive content. ActiveMovie
technology allows you to view multimedia content on the web, including MPEG audio and video.
Introduction
viii
ENGLISH
!
The README file on the CD-ROM contains information not available at the time of printing. Read the
file before you continue.
2
Minimum system requirements for WebCam Go ES:
❑ $==
)E-
.S
$##T
*)S/
.
❑ $=
)*
C%)
❑ >#
)*
/ ❑ %
;+*
/
;+*
❑ )
1S
@?:@?
+4:)
1
"###
❑ 0
$=/
=9#
9?#
❑ 0/C,)
❑ +
*S
1/
'6
(
❑ )
%
"??
J
'6
(
ENGLISH
1
For optimal performance:
❑ "##
)E-
.
$##T
*)/
.
❑ 8"
)*
C%)
❑ 0
$=/
?##
=##
❑ +
*
$=
1/
/
/
"
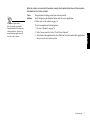
The notepad icon indicates information that is of particular importance and
should be considered before continuing.
The alarm clock icon indicates that failure to adhere to directions may result in
loss of data or damage to your system.
The warning sign indicates that failure to adhere to directions may result in
bodily harm or life-threatening situations.
Introduction
ix
1
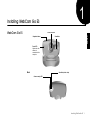
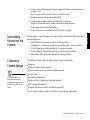
Snapshot button
ENGLISH
Focus-free Lens
Viewfinder
Front LED
Lights when the
camera is
connected to the
computer.
Back
Viewfinder (back view)
Camera-ready LED
Installing WebCam Go ES
1
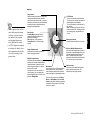
Display
U //
1
B
• As JPEG compresses an image
according to its details, colors
and compression ratio, the file
size varies according to the
picture taken.
Select button
In Setting Mode, press the button to
change the setting that affects how a
picture should be taken.
Note: WebCam Go ES switches to
Camera Mode if it is left idle for eight
seconds.
Battery-low indicator
Displayed when the battery is running low.
Self-timer Multiple-Snapshot mode
In this mode, the camera takes a series of
pictures after a specified length of time, with
a constant interval between consecutive
takes. The default delay time is eight
seconds, the total number of pictures taken
is 10, and the interval is 0.5 seconds.
Single-Snapshot mode
In this mode, the camera captures the
view in one single snapshot.
Multiple-Snapshot mode
In this mode, the camera takes a series of
pictures, with a constant interval between
consecutive takes. By default, the total
number of pictures taken is 10 and the
interval is 0.5 seconds.
If the interval is set to zero seconds, a
video is created. You can change this
interval using WebCam Go Control, or by
going into Setting Mode
On/Off button
To turn on the camera, press this button.
You can only turn it on when the camera is
disconnected from the computer.
To turn off the camera, press and hold for
two seconds.
Note: The camera will turn itself off if it is
left idle for one minute. This length of time
can be changed by using WebCam Go
Control.
Mode button
Press to switch to one of the following four
modes of the camera: single-snapshot
mode, multiple-snapshot mode, self-timer
mode or self-timer multiple-snapshot mode.
Self-timer mode
In this mode, the camera takes a picture
after a specified length of time. The
default delay time is eight seconds.
Press for two seconds to go into Setting
Mode. In Setting Mode press the Select
button to change the resolution and quality
compression of your camera. See “Taking
Pictures” on page 11.
Installing WebCam Go ES
2
ENGLISH
Image counter
Shows the remaining number of pictures that
can be taken with the camera undocked.
When the counter reaches “000,” you cannot
take any more pictures until you have cleared
the camera’s memory by downloading or
deleting the existing pictures.
U 6
• If the camera is to be
connected to the computer for
a long period of time, remove
the batteries to prevent battery
leakage.
• Make sure that you insert the
batteries in the correct
direction. If not, they may leak
and cause damage to the
camera.
• Do not mix old batteries with
new ones or batteries of
different types together.
1
B
4+
5
$<
&
%%%
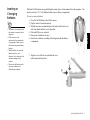
To insert or replace batteries
1. Press the On/Off button to turn off the camera.
2. Flip the camera’s head unit upwards.
3. Hold the camera in one hand and press the bottom of the back cover
with your thumb until the cover is detached.
4. Push and lift the cover outwards.
5. Remove the old batteries (if any).
6. Insert the new batteries according to the diagram inside the battery
compartment.
ENGLISH
7. Align the cover with the case and slide the cover
until it snaps back into place.
Installing WebCam Go ES
3
34&5
34&5
3!
U ;+*
'(
• You can also attach the camera
to a self-powered USB hub.
• You can connect the camera
while the computer is on.
Use the installation procedure for your operating system.
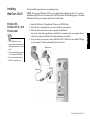
NOTE: Do not connect WebCam Go ES to your computer before installing the drivers. If you begin
installation with WebCam Go ES connected, the Add New Hardware Wizard dialog appears. Disconnect
WebCam Go ES from your computer and click the Cancel Button.
1. Insert the WebCam Go ES installation CD into your CD-ROM drive.
2. Select the drivers and applications you want to install on your computer.
3. Follow the instructions on the screen to complete the installation.
You may be asked, after an application is installed, if you want to restart your computer. Do not
restart your computer until all the drivers and applications are installed.
4. After you restart your computer, connect WebCam Go ES’s USB cable to an available USB port
on your computer. Windows automatically detects the device.
ENGLISH
USB connector
USB cable
USB port
Installing WebCam Go ES
4
3 4&5
3 4& 5
3 !
1.
2.
3.
4.
5.
Right-click the My Computer icon on your desktop.
On the menu that appears, click Properties.
On the System Properties dialog, click the Hardware tab.
Click the Device Manager button. A window appears.
Click the plus (+) sign next to the Imaging Device icon.
The entries Video Blaster WebCam Go ES (Composite), Video Blaster WebCam Go ES (Still), and
Video Blaster WebCam Go ES (WDM) are listed.
If the entries do not appear, repeat the installation procedure.
Installing WebCam Go ES
5
ENGLISH
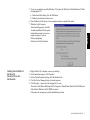
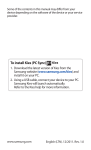
5. If you are prompted to insert the Windows CD, replace the WebCam Go ES installation CD with
the appropriate CD.
a. On the Insert Disk dialog, click the OK button.
b. Follow the instructions on the screen.
6. Place WebCam Go ES on top of your computer monitor or another flat surface.
7. When the Light Frequency
Selection dialog appears, click the
Yes button and then click the option
button that represents your power
supply frequency if you use
fluorescent lighting.
Otherwise, click the No button.
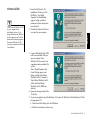
Do not connect WebCam Go ES
to your computer before
installing the drivers. If you
begin installation with WebCam
Go ES connected, the Add New
Hardware Wizard dialog appears.
Disconnect WebCam Go ES
from your computer and click the
Cancel Button.
1. Insert the WebCam Go ES
installation CD into your CDROM drive. The Digital
Signature Not Found dialog
appears, telling you that an
unknown software package has
been detected.
2. Click the Yes button. The drivers
are copied to your computer.
ENGLISH
3%666
3. Connect WebCam Go ES’s USB
cable to an available USB port
on your computer. Place
WebCam Go ES on top of your
computer monitor or another flat
surface.
Three “Digital Signature Not
Found” dialogs appear, each
telling you that Video Blaster
WebCam Go ES (Composite),
Video Blaster WebCam Go ES
(Still), and Video Blaster
WebCam Go ES (WDM) are
detected.
4. Ignore the message and click the
Yes button.
5. If you are prompted to insert the Windows CD, replace the WebCam Go ES installation CD with
the appropriate CD.
a. On the Insert Disk dialog, click the OK button.
b. Follow the instructions on the screen.
Installing WebCam Go ES
6
ENGLISH
6. When the Light Frequency Selection dialog appears, click the Yes button and then click the option
button that represents your power supply frequency if you use fluorescent lighting.
Otherwise, click the No option.
3%666
1.
2.
3.
4.
5.
Right-click the My Computer icon on your desktop.
On the menu that appears, click Properties.
On the System Properties dialog, click the Hardware tab.
Click the Device Manager button. A window appears.
Click the plus (+) sign next to the Imaging Device icon.
The entries Video Blaster WebCam Go ES (Composite), Video Blaster WebCam Go ES (Still), and
Video Blaster WebCam Go ES (WDM) are listed.
If the entries do not appear, repeat the installation procedure.
Installing WebCam Go ES
7
2
WebCam Go Control is an application that enables you to take pictures and record video clips with the
WebCam Go ES camera. You can also view the picture taken and video clips recorded, create and manage
albums, and download image files from the camera.
To start WebCam Go Control, do one of the following:
❑ + . &
*
1 1
B
❑ .
+
❑ 1
B
1
0 If WebCam Go Control does not
recognize the camera correctly,
see Appendix B,
“Troubleshooting”.
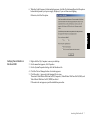
After WebCam Go Control is started, the WebCam Go
Control screen appears, displaying the view that the
camera is capturing currently.
The following sections describe the more commonly used
operations. For more details on how to use WebCam Go
Control, see “Starting WebCam Go Control Help” on
page 10.
Snap an image button
Record a video button
Using WebCam Go ES as a Web Camera
8
ENGLISH
1
1
B
4+
1
C
1. In the WebCam Go Control window, click the Live Cam button.
The current view of the camera is displayed in the Preview window.
2. To capture the image shown in the Preview window, click the Snap an image button.
Or, press the Snapshot button on the camera.
The image is captured and saved as an image file with an automatically generated file name. It is
added to the current album and its name prefixed with the still image icon
.
+
1. In the WebCam Go Control window, click the Live Cam button.
The window displays the current view of the camera.
2. To start recording a video clip, click the Record a video button.
The button starts blinking to indicate that recording is now in progress.
3. To stop the recording, click the button again. The button stops blinking.
The video clip is saved as an AVI file with an automatically generated file name. It is added to the
album and its name prefixed with the video icon
.
3
.
1. Click the Album button.
2. Select the desired album.
3. Double-click the thumbnail of the image displayed in the Thumbnail list. The image is displayed
in the Video window in its actual size.
If you are not satisfied with the result, adjust the appropriate settings in order to get the desired
result, and then capture the image again.
Using WebCam Go ES as a Web Camera
9
ENGLISH
*0(
U &F1
B
+
B
F
+
• The VFW driver is compatible
only with software that
supports Video For Windows.
7+
1.
2.
3.
4.
5.
In WebCam Go Control, click the Settings button.
Click the Camera docked settings button.
Click the scroll button until you get to the General tab.
Click the General tab.
In the Video device list, select the desired video capture device.
Note: The WDM driver gives better performance in terms of frame rate and is the recommended
choice.
ENGLISH
+
"
The Help file contains instructions on how to use WebCam Go Control to take pictures and record video
clips. It also teaches you how to change the different settings so as to achieve optimum quality for your
pictures and video clips.
To start the Help file:
1. Click the Creative logo at the top left corner of WebCam Go Control’s main window.
2. On the WebCam Go Control menu, click Help.
Using WebCam Go ES as a Web Camera
10
"
3
*0(
U 5
• The counter value decreases
by one every time a picture
taken. However, if there is
insufficient memory in the
camera, the counter drops to
“000” immediately.
• When the counter value
reaches “000”, you cannot take
any more pictures until you
have cleared the camera’s
memory by deleting existing
pictures.
• Multiple snapshot mode
consumes more battery power.
• The camera turns itself off if it
is left idle after a specified
amount of time.
1. Unplug the USB cable from the camera.
2. Press the On/Off button on the camera.
The number of images you can take is shown by the Image counter on the display.
3. To change the mode of the camera, press the Mode button:
• Single snapshot: Individual snapshots.
• Multiple snapshot: Series of successive snapshots. If the interval is set to zero (using
WebCam Go Control), a video sequence is created.
• Self timer single snapshot: Snapshot is taken after a specified length of time. Use this feature
to take pictures of yourself.
• Self timer multiple snapshot: Series of snapshots taken after a specified length of time. You
can create an AVI file from the snapshots.
After pressing the Mode button, one of the following codes is displayed representing the current
setting:
$
$E
$=#
$"#
:EV
6
8
8E
8"#
"9#
:EV
6
=
=E
=9#
9?#
:EV
6
*. “H” displayed on the camera corresponds to Medium quality in
WebCam Go Control.
Using WebCam Go ES as a Digital Camera
11
ENGLISH
1
B
4+
(I
5
$<
&
%%%
K
"3
(
%
1
B
1. In the WebCam Go Control window, click the Cam Memory button.
A thumbnail view of the pictures and audio files stored in the camera’s memory is displayed.
2. Click the Album button to display the album (if it is not already displayed).
3. From the Album list, select the album in which you want to store the picture files.
4. Select the desired files and click the Download selected image(s) button.
.
;
1
B
/ I
❑ -
❑ V
❑ ❑ 6
❑ *
:
❑ 0
'
(
❑ ./
:
❑ For more information on
downloading pictures and
customizing the camera, refer to
the Help file for WebCam Go
Control.
You can set different settings of image size and quality for each of the four camera modes.
Using WebCam Go ES as a Digital Camera
12
ENGLISH
4. Focus the camera at the desired object, using the camera’s viewfinder to verify that the object is in
the camera’s view.
Note: The object should be at least two feet (61 cm) from the camera.
5. Hold the camera steady and press the Snapshot button.
6. Continue holding the camera until the Camera busy light (red) goes out.
The picture is stored in the camera’s memory and the image counter decreased.
7. To take another picture, repeat steps 4 through 6.
8. To turn off the camera, press and hold the On/Off button for two seconds.
A
*+
❑ &B%
'=9#9?#(
),+
❑ ?
)*
/
/
ENGLISH
8
+
❑ 0
❑ +
❑ 40
/
❑ E/6
/
/
❑ */
❑ )
❑ 1
I
• Capable of capturing in excess of 72 640x480 sized still pictures (in JPEG format)
• Images are stored natively in JPEG or BMP formats
• Draws power from two AAA batteries
Note: Battery life in this mode depends on the battery type.
Two AAA alkaline batteries can last for up to 300 snapshots.
• Auto shut off after a specified length of idle time (software-configurable)
❑ 1
I
• Captures video at up to 30 frames per second at resolutions of 352 x 288, 320 x 240,
176 x 144 and 160 x 120 and up to 15 frames per second at 640 x 480
• Captures still images in 24-bit color at all resolutions up to 640 x 480
❑ %
.
;
+
*
';+*(
Technical Specifications
13
"
-+
+
❑ ;+*
1
@?
1
"###
❑ 10)
)0
0+
&
F
1
❑ 1%
❑ +
)
)
❑ )
+
'+(
From USB port or self-powered USB hub (powered by an external power source).
CMOS image sensor
9
:
❑ =9#
9?#
ENGLISH
(3
❑ 8<"
"??
❑ 8"#
"9#
❑ $>=
$99
❑ $=#
$"#
9
0
:
❑ =9#
9?#
❑ 8"#
"9#
❑ $=#
$"#
6 lux
❑ "9/
$=/
CB*
❑ 9I"I#
5;&
.
❑ W.4B
/+
Automatic (optional manual control with software)
Automatic (optional manual control with software)
/
Preset and integral to camera
8
;;3
52 degrees (horizontal)
"+;;
2 feet (61 centimeters) to infinity
(+
Universal Serial Bus port
Technical Specifications
14
B
*
%.
1
2
0I
$ 0
0/C,)
" + C
8 C
">C#!(C#!(7
9 F
ENGLISH
3
2
0
I
❑ ;
;+*
❑ %
/
;+*
❑ %
.
;+*
!
2
0
I
❑ K
;+*
;+*
*,+
C
.K
*,+
❑ C
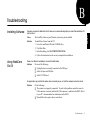
Troubleshooting
15
K
2
%
'
(
"
!
CG
K
;+*
2
0
I
$ C
" C
/
ENGLISH
!
If you select more than one
application, you will be prompted
to choose one of them when you
press the Snapshot button.
/
2
0
I
$ + + .
" .
/ +
X
+
X
.
8 ,
0
&
*
1
B
4+
'10)(
.
9 &
*
1
B
4+
'10)(
.
4
< ,
4
0
= 2,
%3
> +
1
B
:
+
? 4
+
$>
Troubleshooting
16
If a selected application is
already running, pressing the
Snapshot button will not start any
other applications. Instead, the
current running application will
be used to take a picture.
2
&
+
$=
I
$ 0
$
<
$=
" 2
.
3
8 +
1
B
:
Troubleshooting
17
ENGLISH
!
#
In our testing on a wide variety of PC motherboards with integrated Universal Serial Bus (USB) ports, we
have encountered a small number of motherboards with USB ports that do not meet the USB specification
exactly. Unfortunately, WebCam Go ES may not operate correctly with these systems.
When you run the setup program from the WebCam Go ES installation CD, the setup program
automatically checks your motherboard model and revision. If your motherboard is among those that
have failed our test procedure, the setup program will display a warning message. However, due to the
numerous brands of motherboards in the market, our test procedure is not exhaustive. So, there may be
some non-USB-compliant motherboards that will not trigger the display of the warning message.
So far, for some of the non-USB-compliant motherboards that we have tested, the motherboard
manufacturers have released new versions of motherboards or BIOS to address the problem.
If the setup program warns you that your motherboard’s USB port is incompatible, or if the camera does
not work on your system and you suspect that the problem may be related to your PC’s USB port, the
following is a list of available options:
1. Contact your PC vendor.
Your PC vendor may be able to upgrade your motherboard or its BIOS to a newer version that
addresses USB incompatibilities.
2. Use a PCI host adapter which provides USB connectors.
If you are not able to upgrade your motherboard or its BIOS, we recommend this approach.
3. Attach WebCam Go to a self-powered USB hub.
Some USB devices (such as monitors) also operate as self-powered USB hubs; you can also buy
dedicated powered USB hubs which are to be attached to your PC’s USB port. However, in some
cases, attaching a powered USB hub to a non-USB-compliant USB motherboard connector will
not solve the problem.
To look for a USB compatible product, you can visit the product search page at the official USB Web site:
http://www.usb.org/app/search/products.
Note on USB Compatibility
19
ENGLISH
+
C
Visit our online help websites for help with installation, answers to frequently asked
questions, or troubleshooting tips. Our websites hold a wealth of information as well as upto-the-minute software and driver upgrades.
To return a Creative product for a factory service,
contact the Creative Technical Support office. Once
the staff has verified the product is defective, you will
be given a Return Merchandise Authorization (RMA)
number.
NOTE: Retain your purchase receipt, as well as all
packaging and contents, until all product components
are functioning to your satisfaction. They are
required in the unlikely event you need to return the
product to Creative.
When returning a product for factory service:
• Shipment to Creative is at your expense and you
assume all risk. Ship the package through a carrier that
provides proof of delivery; insure the shipment at full
product value.
• Place the RMA number on the outside of the package.
• Use proper materials for packing the product for
shipment.
• For free repair or replacement, you must include a
copy of a dated proof of purchase (store receipt),
proving the product is still under Warranty
Creative may replace or repair the product with new
or reconditioned parts, and the faulty parts or product
will become the property of Creative.
Outside the United States
To avoid tariffs when shipping a product to Creative
Labs from outside the U.S., you must complete an
official customs form before shipping the product. To
ensure delivery, Creative may include charges for
return shipment.
47
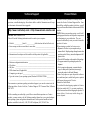
BEFORE YOU CONTACT US
Please fill out the following information and be seated at your computer.
• Model #: _____________Serial # _____________(both found on the back of the device)
• Error message on the screen and how it came about: _______________________________
_________________________________________________________________________
________________________________________________________________________
• Information on the adapter card that conflicts with the product (if applicable): __________
_________________________________________________________________________
________________________________________________________________________
• Hardware configuration information: __________________________________________
• I/O address: __________________ ___________________________________________
• IRQ line: _______________________________________________________________
• DMA channel used (if applicable): ___________________________________________
• Computer type and speed: __________________________________________________
• Type and version of your operating system; Windows 95/98/Me/NT/2000: ___________
_______________________________________________________________________
For comments or questions regarding our technical support, you can also contact us at the
following address: Creative Labs, Inc., Technical Support, 1523 Cimarron Plaza, Stillwater,
OK 74075.
If after consulting our online help, you still have an installation question on a Creative
product, you may contact us by the following numbers (please have your system hardware
and operating system configuration information and Creative product model and serial
numbers available for the call): (405) 742-6622 telephone, (405) 742-6633 fax.
ENGLISH