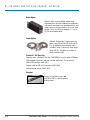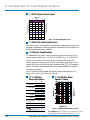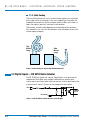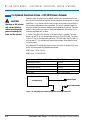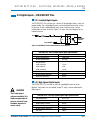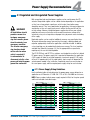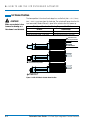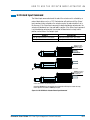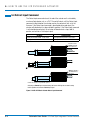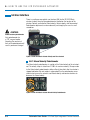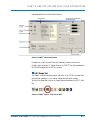
1
USER GUIDE
SmartActuator Series
Integrated Control
Rod Style Actuator & Motor
I C R S V 1 B BASIC
I C R S V 1 P PLUS I C M S V 1 P PLUS
2100-4001_04_ICR_Use
LINEAR
LINEAR SOLUTIONS
SOLUTIONS MADE
MADE EASY
EASY
Tolomatic reserves the right to change the design or operation
of the equipment described herein and any associated motion
products without notice. Information in this document is
subject to change without notice.
201503261442
Contents
List of Figures...................................................................................................iv
Health and Safety Regulations........................................................................vi
EMC Guidelines............................................................................................ vii
Proper and Safe Use of Product.................................................................... vii
1 ICR Basic and ICR/ICM Plus Product Overview....................................1-1
1.1 The SV1B Basic and SV1P Plus SmartActuators....................................1-1
1.1.1 SV1B Basic Overview...................................................................1-1
1.1.2 SV1P Plus Overview....................................................................1-2
1.1.3 ICR Options.................................................................................1-3
1.1.4 ICR Mechanical Specifications......................................................1-5
1.1.5 ICR Speed and Thrust Curves.......................................................1-6
1.1.6 RMS Thrust and Velocity Considerations.......................................1-7
1.1.7 ICR Screw Life.............................................................................1-7
1.1.8 ICR System Critical Speed............................................................1-8
1.1.9 Side Load Considerations.............................................................1-8
1.1.10 Brake Considerations.................................................................1-8
1.1.11 ICM Plus Mechanical Specs.......................................................1-8
1.1.12 ICM Plus Motor Speed vs Torque................................................1-8
2 ICR SV1B Basic - Electrical Interface, Specs & Wiring.........................2-1
2.1 Cabling and Connectors – ICR SV1B Basic Actuator..............................2-1
2.1.1 Power Cables and Pin-outs..........................................................2-1
2.1.2 I/O Cables and Pin-outs...............................................................2-2
2.1.3 Cable Routing .............................................................................2-4
2.2 Digital Inputs – ICR SV1B Basic Actuator..............................................2-4
2.2.1 Typical Wiring Connections...........................................................2-5
2.3 Digital Outputs – ICR SV1B Basic Actuator............................................2-7
2.4 Optional Electronic Brake – ICR SV1B Basic Actuator.............................2-8
2.5 Input Power – ICR SV1B Basic Actuator................................................2-9
2.6 Environmental Conditions...................................................................2-11
2.7 ICR SV1B Basic Actuator Setup..........................................................2-11
3 ICR/ICM SV1P Plus - Electrical Interface, Specs & Wiring...................3-1
3.1 Cabling and Connectors – ICR/ICM SV1P Plus......................................3-1
3.1.1 Power Cables and Pin-outs..........................................................3-1
3.1.2 I/O Cables and Pin-outs...............................................................3-2
3.1.3 Optional Communications Cable...................................................3-4
3.2 Digital Inputs – ICR/ICM SV1P Plus.......................................................3-5
Tolomatic User Guide: ICR Rod Style Integrated Control Actuator i
contents
3.2.1 Isolated Digital Inputs..................................................................3-5
3.2.2 High Speed Digital Inputs.............................................................3-5
3.2.3 Typical Wiring Connections..........................................................3-6
3.3 Analog Inputs – ICR/ICM SV1P Plus......................................................3-7
3.4 Digital Outputs – ICR/ICM SV1P Plus....................................................3-7
3.5 Input Power – ICR/ICM SV1P Plus........................................................3-9
3.6 Optional Electronic Brake – ICR/ICM SV1P Plus...................................3-11
3.7 ICR/ICM Plus Setup............................................................................3-12
3.7.1 Single Device Setup for Optional CANopen Position Control.........3-12
3.7.2 Multi-drop RS-232 (RS-232 to Optional CANopen) Setup............3-12
3.7.3 Multiple Device Setup for Optional CANopen and DeviceNet........3-14
3.8 Environmental Conditions...................................................................3-14
4 Power Supply Recommendations...............................................................
4.1 Regulated and Unregulated Power Supplies..........................................4-1
4.1.1 Power Supply Sizing Guidelines....................................................4-1
4.1.2 System Power Overloading Considerations...................................4-2
4.1.3 Suggested Power Supplies..........................................................4-3
4.1.4 Shunt Regulators.........................................................................4-4
4.1.5 Diodes........................................................................................4-4
5 How to Use the ICR SV1B Basic Actuator..............................................5-1
5.1 Enable Input Command........................................................................5-1
5.2 Home Position.....................................................................................5-2
5.3 Extend Input Command........................................................................5-3
5.4 Retract Input Command.......................................................................5-4
5.5 E-stop Input.........................................................................................5-5
5.6 Fault Output........................................................................................5-5
5.7 In-Position Output................................................................................5-5
5.8 User Interface......................................................................................5-6
5.8.1 Extend Velocity Potentiometer......................................................5-6
5.8.2 Retract Velocity Potentiometer......................................................5-7
5.8.3 Force Control Potentiometer.........................................................5-7
5.9 User Interface (SV1B Manufactured before 4-2013) .............................5-8
5.9.1 Extend Velocity Potentiometer......................................................5-8
5.9.2 Retract Velocity Potentiometer......................................................5-9
5.9.3 Force Control Potentiometer.........................................................5-9
ii
Tolomatic User Guide: ICR Rod Style Integrated Control Actuator
contents
6 How to Use the ICR/ICM SV1P Plus.......................................................6-1
6.1 Host Computer Requirements...............................................................6-1
6.1.1 Hardware Requirements..............................................................6-1
6.1.2 Operating Systems Supported......................................................6-1
6.1.3 Software.....................................................................................6-1
6.2 Install the CME 2® Software.................................................................6-2
6.2.1 Web Download Install..................................................................6-2
6.2.2 CD-ROM Install...........................................................................6-2
6.3 Start the CME 2® Software...................................................................6-2
6.3.1 Initial Communication Setup.........................................................6-2
6.4 Configure Serial Port Parameters (RS-232 and DeviceNet).....................6-3
6.5 Configure CAN Network Parameters.....................................................6-4
6.6 CME 2® User Interface and Tool Bar.....................................................6-5
6.7 ICR/ICM SV1P Plus Amplifier Files........................................................6-6
6.7.1 Loading the Amplifier Files...........................................................6-6
6.7.2 Saving Amplifier Files..................................................................6-6
6.8 Command Sources..............................................................................6-7
6.8.1 Programmable Command............................................................6-7
6.8.2 Analog Command........................................................................6-8
6.8.3 Digital Input Command................................................................6-9
6.8.4 Communication Commands.........................................................6-9
6.9 Diagnostics.......................................................................................6-10
6.9.1 Control Panel............................................................................6-10
6.9.2 Scope Tool................................................................................6-11
7Appendix.................................................................................................7-1
7.1 ICR_LMI SV1B Basic and SV1P Plus Actuator Dimensions.....................7-1
7.2 ICR_RP SV1B Basic and SV1P Plus Actuator Dimensions.......................7-2
7.3 ICM Plus Dimensions...........................................................................7-2
7.4 ICR_LMI SV1B Basic and SV1P Plus Options Dimensions......................7-3
7.5 ICR_RP SV1B Basic and SV1P Plus Options Dimensions........................7-4
7.6 ICR SV1B Basic and SV1P Plus Rod End and Switch Dimensions...........7-5
7.7 Maintenance and Inspection.................................................................7-6
7.8 Product Warranty.................................................................................7-6
7.9 Troubleshooting...................................................................................7-7
7.9.1 Troubleshooting the ICR SV1B Basic Actuator................................7-7
7.9.2 Troubleshooting the ICR/ICM SV1P Plus........................................7-8
Tolomatic User Guide: ICR Rod Style Integrated Control Actuator iii
List of Figures
Figure 1-1
Figure 1-2
Figure 1-3
Figure 1-4
Figure 1-5
Figure 2-1
Figure 2-2
Figure 2-3
Figure 2-4 Figure 2-5 Figure 2-6
Figure 2-7
Figure 2-8
Figure 2-9
Figure 2-10
Figure 2-11
Figure 2-12
Figure 2-13
Figure 2-14
Figure 2-15
Figure 2-16
Figure 3-1
Figure 3-2
Figure 3-3
Figure 3-4
Figure 3-5
Figure 3-6
Figure 3-7
Figure 3-8
Figure 3-9
Figure 3-10
Figure 3-11
Figure 3-12
Figure 3-13
Figure 3-14
Figure 3-15
Figure 3-16
Figure 3-17
Figure 3-18
Figure 3-19
iv
BN05 Ball Nut: Continuous and Peak Speed vs Thrust............................. 1-6
BN02 Ball Nut: Continuous and Peak Speed vs Thrust............................. 1-6
ICR Ball Screw Life................................................................................ 1-7
ICR System Critical Speed..................................................................... 1-8
ICM Plus Motor Speed vs Torque........................................................... 1-8
ICR SV1B Basic Actuator Standard Power Cable 3604-1641................... 2-1
ICR SV1B Basic Actuator IP65 Power Cable 3604-1649......................... 2-1
ICR SV1B Basic Actuator Standard I/O Cable 3604-1640........................ 2-3
ICR SV1B Basic Actuator IP65 I/O Cable 3604-1648.............................. 2-3
Cable Routing for Top and Side Mounted Connectors.............................. 2-4
ICR SV1B Basic Actuator Interface Circuit Diagram................................. 2-4
ICR SV1B Basic Actuator Input Source (switched) Connection.................. 2-5
ICR SV1B Basic Actuator Input Source (PNP) Connection......................... 2-6
ICR SV1B Basic Actuator Input Sink (switched) Connection...................... 2-6
ICR SV1B Basic Actuator Input Sink (NPN) Connection............................ 2-6
ICR SV1B Basic Actuator Output Interface Circuit Diagram...................... 2-7
ICR SV1B Basic Actuator Optional Electronic Brake Connection............... 2-8
ICR SV1B Basic Actuator Logic and Main Power Supplies........................ 2-9
ICR SV1B Basic Actuator Single Supply – Main Power.......................... 2-10
ICR SV1B Basic Actuator Single Supply – External Cut-off Switch for
Emergency Stop.................................................................................. 2-10
ICR SV1B Basic Actuator Setup............................................................ 2-11
ICR/ICM SV1P Plus Standard Power Cable 3604-1641........................... 3-1
ICR/ICM SV1P Plus IP65 Power Cable 3604-1649................................. 3-1
ICR/ICM SV1P Plus Standard I/O Cable 3604-1640................................ 3-3
ICR/ICM SV1P Plus IP65 I/O Cable 3604-1648...................................... 3-3
ICR/ICM SV1P Plus Optional Communications Cable............................... 3-4
ICR/ICM SV1P Plus Isolated Interface Circuit Diagram............................. 3-5
ICR/ICM SV1P Plus High Speed Digital Input Circuitry............................. 3-6
ICR/ICM SV1P Plus Source (switched) Connection................................... 3-6
ICR/ICM SV1P Plus Source (PNP) Connection......................................... 3-6
ICR/ICM SV1P Plus Sink (switched) Connection...................................... 3-6
ICR/ICM SV1P Plus Sink (NPN) Connection............................................. 3-6
ICR/ICM SV1P Plus Analog Input Circuit................................................. 3-7
ICR/ICM SV1P Plus Analog Input Typical Wiring....................................... 3-7
ICR/ICM SV1P Plus Digital Output Circuitry............................................. 3-8
ICR/ICM SV1P Plus Digital Output Sinking Wiring Diagram...................... 3-8
ICR/ICM SV1P Plus Digital Output Sourcing Wiring Diagram.................... 3-8
ICR/ICM SV1P Plus Logic and Main Power Supplies................................ 3-9
ICR/ICM SV1P Plus Single Supply – Main Power................................... 3-10
ICR/ICM SV1P Plus Single Supply – External Cut-off Switch
Tolomatic User Guide: ICR Rod Style Integrated Control Actuator
list of figures
Figure 3-20
Figure 3-21
Figure 3-22
Figure 3-23
Figure 4-1
Figure 4-2
Figure 4-3
Figure 4-4
Figure 4-5
Figure 4-6
Figure 5-1
Figure 5-2
Figure 5-3
Figure 5-4
Figure 5-5
Figure 5-6
Figure 5-7
Figure 5-8
Figure 5-9
for Emergency Stop............................................................................. 3-10
ICR/ICM SV1P Plus Optional Electronic Brake Connection...................... 3-11
ICR/ICM SV1P Plus Single Device Setup for
Optional Optional CANopen Position Control......................................... 3-12
ICR/ICM SV1P Plus Multi-drop RS-232 Setup
(RS-232 to Optional CANopen)............................................................. 3-13
ICR/ICM SV1P Plus Multiple Device Setup for
Optional CANopen/DeviceNet Operation............................................... 3-14
Maximum Load/Velocity of System without a Voltage Control Device........ 4-2
Unregulated Power Supply Configuration with Shunt Regulator................ 4-3
Regulated Power Supply Configuration with Blocking Diode and
Added Capacitance............................................................................... 4-3
Regulated Power Supply with Blocking Diode and Shunt Regulator.......... 4-3
Shunt Regulator Input Wiring Diagram.................................................... 4-4
Diode Wiring Diagram........................................................................... 4-4
ICR SV1B Basic Actuator Enable Input Command.................................... 5-1
ICR SV1B Basic Actuator Home Position................................................. 5-2
ICR SV1B Basic Actuator Extend Input Command.................................... 5-3
ICR SV1B Basic Actuator Retract Input Command................................... 5-4
ICR SV1B Basic Actuator Velocity and Force Controls.............................. 5-6
ICR SV1B Basic Actuator Extend Velocity Potentiometer........................... 5-6
ICR SV1B Basic Actuator Retract Velocity Potentiometer.......................... 5-7
ICR SV1B Basic Actuator Force Control Potentiometer............................. 5-7
ICR SV1B Basic Velocity and Force Controls (SV1B Manufactured before 4-2013)....... 5-8
Figure 5-10
Figure 5-11
Figure 5-12
Figure 6-1 Figure 6-2
Figure 6-3
Figure 6-4
Figure 6-5
Figure 6-6
Figure 6-7
Figure 6-8
Figure 6-9
Figure 6-10
Figure 6-11
Figure 6-12
Figure 6-13
Figure 6-14
ICR SV1B Basic Extend Velocity Potentiometer (SV1B Manufactured before 4-2013)... 5-8
ICR SV1B Basic Retract Velocity Potentiometer (SV1B Manufactured before 4-2013)... 5-9
ICR SV1B Basic Force Control Potentiometer (SV1B Manufactured before 4-2013)..... 5-9
Copley Motion Explorer CME 2® Shortcut Icon........................................ 6-2
Communication Wizard Device Selection Screen..................................... 6-3
Communication Wizard Serial Port Screen.............................................. 6-3
Communication Wizard Configure Serial Ports Screen............................. 6-4
Communication Wizard Configure CAN Network Screen.......................... 6-4
CME 2® User Interface Features............................................................ 6-5
CME 2® Save Amplifier Data to Disk Icon............................................... 6-6
CVM Control Program Indexer 2 Program and I/O Line States................. 6-7
CME 2® Basic Setup Operating Mode for Analog Command Source......... 6-8
CME 2® Basic Setup Operating Mode for Digital Input Command Source.6-9
CME 2® Tool Bar – Control Panel Location........................................... 6-10
CME 2® Control Panel Features........................................................... 6-11
CME 2® Tool Bar – Scope Tool Location............................................... 6-11
CME 2® Scope Tool Screen.................................................................. 6-12
Tolomatic User Guide: ICR Rod Style Integrated Control Actuator v
Health and Safety Regulations
Read completely through the applicable sections of the manual before the
equipment is unpacked, installed or operated. Pay careful attention to all of the
dangers, warnings, cautions and notes stated in the manual.
Serious injury to persons or damage to the equipment may result if the information
in the manual is not followed.
Safety Symbols
Items that are specifically marked DANGER!, WARNING!, CAUTION! or NOTE! are
arranged in a hierarchical system and have the following meaning:
DANGER!
Indicated a very hazardous situation which, if not avoided, could result in death or
serious injury. This signal word is limited to the most extreme situations.
WARNING!
Indicates a potentially hazardous situation which, if not avoided, could result in
death or serious injury.
CAUTION!
Indicates a potentially hazardous situation which, if not avoided, may result in
property damage, minor or moderate injury.
CAUTION!
Indicates hot surfaces. Avoid contact.
NOTE!
Information that requires special attention is stated here.
vi
Tolomatic User Guide: ICR Rod Style Integrated Control Actuator
health and safet y regulations
EMC Wiring Guidelines
Cable routing
It is recommended that the power and signal cables for ICR actuators be routed as
far apart as possible to minimize system noise.
NOTE! The standard cables from Tolomatic are not flex rated and have a minimum
bend radius of 3.75 inches. Any repeated flexing or excessive bending can result in
broken conductors and intermittent faults.
Shielding and grounding
When cabling the system, shielded cables are recommended. The standard cables
provided by Tolomatic have an overall shield with drain wires and the case ground
of the actuator is tied to a pin on the power connector. To minimize EMI and ensure
system reliability, all shield drain wires from all cables should be tied to a common
earth ground.
Proper and Safe Use of Product
Protection circuits and external fuses
WARNING!
The manufacturer takes no
responsibility whatsoever
if the equipment is
modified or if the
equipment is used in any
way beyond performance
specifications.
Unauthorized modifications
or changes to the
equipment are strictly
forbidden and voids all
warranties.
A fuse should be added to the input power line to protect the actuator and power
supply from any potential over current conditions that may occur. In addition, if
regenerative energy will be present (especially in vertical applications), a means
for protecting against over voltage conditions should be implemented with a shunt
regulator or sufficient bulk capacitance.
Fail Safe e-Stop Recommendations
A means for a fail safe e-stop is highly recommended to ensure equipment and
personal safety. The e-stop should provide a means to remove main power from the
actuator to cease and prevent any unwanted motion.
Device Damage Prevention
To prevent permanent damage to the device, proper care should be taken not to
exceed published voltage, current, temperature, and load ratings. In addition, proper
wiring should be verified and safety measures checked before applying power.
Tolomatic User Guide: ICR Rod Style Integrated Control Actuator vii
health and safet y regulations
Personal Safety
During normal operation the actuator can become hot, especially the motor housing.
It is highly recommended to display proper safety notices and implement proper
safety measures to prevent contact with hot surfaces. In addition, the case ground
should be tied to an earth ground to prevent the presence of case voltage.
Handling and Unpacking
When unpacking and handling the actuator, care should be taken not to drop the
actuator as this can damage the connectors, internal electronics, or knock the
actuator out of alignment. Since this is an electromechanical device, proper ESD
measures should be taken to avoid static electricity from contacting the signal and
power lines of the device.
viii
Tolomatic User Guide: ICR Rod Style Integrated Control Actuator
ICR Basic and ICR Plus Product Overview
1
1.1 The ICR SV1B Basic and ICR/ICM SV1P Plus SmartActuators
Tolomatic’s ICR rod-style SmartActuators offer all-in-one control with a controller,
drive, and motor integrated in one compact easy to use component.
Both SV1B Basic and SV1P Plus actuators provide 100% duty cycle for continuous
operation.
1.1.1 SV1B Basic Overview
Capabilities
• 2-position extend / retract
• 4 inputs, Enable, E-Stop, Fwd., Rev.
• Independent extend / retract speed
control
• 2 outputs, 24V line driver; fault,
in-position
• Mid-stroke positioning with sensors
• 24 Vdc opto-isolated inputs, NPN or PNP
• Force control / limiting
• IP65 option - For protection against
water and dust ingress
• 100% duty cycle for continuous
operation
Modes of Operation - The ICR Basic needs only a 24 or 48 Vdc power supply and
a logic device for operation.
Setup Procedure
1. Mount the ICR Basic actuator to suit the application requirements.
2. Wire the 24 or 48 Vdc power supply to the actuator. See Section 4: Power
Supply Recommendations.
3. Wire Extend, Retract, Enable, E-Stop inputs and In-Position/Fault output cables
to the desired logic device. See Section 2: ICR SV1B Basic - Electrical Interface,
Specs & Wiring.
4. Program the logic device.
5. Adjust the retract, extend and force output with a screwdriver via the controls
Tolomatic User Guide: ICR Rod Style Integrated Control Actuator 1-1
1 : I cr basic and I cr plus product overview
on the face of the motor/drive housing. See pages 5-6 and 5-7.
1.1.2 SV1P Plus Overview
Capabilities
• Indexer programming
• Stand-alone operation
• Infinite positioning
• Network communication
– Optional CANopen – DeviceNet
– RS-232 to Optional CANopen
• Stepper mode (Pulse / direction)
• Analog position mode
• 100% duty cycle for continuous operation
• 8 inputs
• 2 outputs, opto-isolated sinking / sourcing
• 24 Vdc opto-isolated input, NPN or PNP
• IP65 option - For protection against water and dust ingress
Modes of Operation
1. Stand-alone mode: Logic device or switches/sensors send commands to the
actuator via digital I/O to invoke indexer program for motion or other logic
events.
2. Communication mode: Logic device sends position commands or register
changes over RS-232, optional CANopen, or DeviceNet. Multiple actuators can
be controlled simultaneously (127 with CANopen and 63 with DeviceNet) via
daisy chain. The RS-232 port can also be used as a gateway to the optional
CANopen bus. A Microsoft® COM object library is provided to easily utilize the
1-2
Tolomatic User Guide: ICR Rod Style Integrated Control Actuator
I cr basic and I cr plus product overview : 1
power of optional CANopen through Windows® development in VB, C++, .NET,
LabView, and other programming languages.
3. Stepper mode: Logic device sends pulse/direction commands to actuator
initiating motion.
4. Analog position mode: Logic device sends 0-10 Vdc analog signal to actuator
which equates to an actual position.
Setup Procedure
The mode of operation will determine the proper wiring and cabling of the actuator.
Refer to the following sections of this manual for details on cabling, wiring and
setup procedures:
Section 3: ICR/ICM SV1P Plus - Electrical Interface, Specs & Wiring
Section 4: Power Supply Recommendations
The ICR Plus actuator utilizes Copley Controls Corporation drive and control
components and their CME 2® User Interface software for programming. Refer
to Section 6: How to Use the ICR/ICM SV1P Plus for setup and programming
details.
1.1.3 ICR Options
Mounting Options
ICR SmartActuators can be mounted to an application via tube clamps, mounting
plates, trunnion mounts, or front flange. The actuator also has threaded holes on
the underside of the actuator heads that can be used for direct mounting.
Rod End Options
Both the Basic and Plus models offer externally threaded, clevis, rod eye, and
alignment coupler rod end options.
Tolomatic User Guide: ICR Rod Style Integrated Control Actuator 1-3
1 : I cr basic and I cr plus product overview
Brake Option
Tolomatic offers a spring-applied, electronicallyreleased brake at the time of ordering for applications
with vertical orientation, heavy load requirements, and
energy savings when the actuator is not in use. Refer
to page 2-8 for the ICR Basic and page 3-11 for the
ICR Plus brake option details.
Cable Options
Tolomatic also provides 5-meter signal and
power cables for both the ICR Basic and ICR
Plus. An additional communication cable is
available in either 1-meter or 5-meter lengths
for the ICR Plus. All cables are available in
either standard or IP65.
Starter Kit - ICR Plus Only
Tolomatic offers a Starter Kit (Part No. 2180-9100) for use with optional CANopen,
USB computer connections and multi-actuator applications. The kit includes:
USB to CAN converter (3604-1627)
Adapter cable for USB to CAN converter (3604-1626)
Male terminator resistor (3604-1653)
Switches
Switches are available in reed, solid
state PNP or NPN, in normally open or
normally closed.
1-4
Tolomatic User Guide: ICR Rod Style Integrated Control Actuator
I cr basic and I cr plus product overview : 1
1.1.4 ICR Mechanical Specifications
Peak
Continuous
Maximum Thrust
BN02
BN05
Unit
Screw Type
Ball
Ball
Screw Pitch tpi
2
5
in
0.75
0.63
Screw Diameter
mm
19.1
15.9
in/rev
0.500
0.200
Screw Lead
mm/rev
12.70
5.08
lbf
21,000
6,250
Screw
Static Load N
93,413
27,801
lbf
3,400
825
Screw
Dynamic Load N
15,124
3,670
7.5
12.5
Back Drive lbf
Force* N
33.4
55.6
in/ft
0.003
0.003
Accuracy
mm/m
0.02
0.02
in
0.015
0.015
Backlash
mm
0.38
0.38
lbf
150
400
LMI 1:1
N
667
1779
lbf
142.5
360
RP 1:1
N
633.9
1601
lbf
285
720
RP 2:1
N
1267.7
3202.7
lbf
80
215
LMI 1:1
N
356
956
lbf
76
193.5
RP 1:1
N
338
860.7
lbf
152
387
RP 2:1
N
676
1721.5
in
24
24
Max Stroke
mm
609.6
609.6
9.31
7.77
Base Weight lb
LMI kg
4.22
3.52
lb
11.79
10.25
Base Weight
RP, 1:1 kg
5.35
4.65
lb
11.99
10.45
Base Weight
RP, 2:1 kg
5.44
4.74
lb/in
0.345
0.313
Weight/unit
of stroke kg/mm
0.0062
0.0056
deg F
50
50
Min temp**
deg C
10
10
deg F
122
122
Max temp**
deg C
50
50
NOTE: Performance de-rating will be necessary at ambient
temperatures greater than 25 deg. C (77 deg F)
40
40
IP rating std
IP rating option
Max Anti-Rotate
Tolerance degrees
RoHS
COMPLIANT
RoHS
COMPLIANT
65
± 0.25 to ± 1.25
RoHs Compliant Components
Approval Pending
65
* In vertical applications an
unpowered ICR actuator will
require a brake to maintain
position if the load on the
actuator exceeds this value. The
brake option must be requested
at the time the actuator is
ordered as it requires factory
installation. See page 2-8 for
the ICR SV1B Basic and page
3-11 for the ICR/ICM SV1P Plus
for brake specifications and
requirements.
**Performance de-rating will
be necessary at ambient
temperatures greater than 77°
F (25° C).
Tolomatic User Guide: ICR Rod Style Integrated Control Actuator 1-5
1 : I cr basic and I cr plus product overview
1.1.5 ICR Speed and Thrust Curves
Refer to the charts below for the continuous and peak thrust and speed capabilities
of the screw selections.
NOTE: ICR rod-style SmartActuators are designed to push guided and supported
loads and are not designed for applications that require significant side loading.
Please contact Tolomatic at 1-800-328-2174 or 763-478-8000 for details
regarding side loading capabilities.
BN05
LMI 1:1
800
0
RP 1:1
51
SPEED (mm/sec)
102
152
203
254
800
0
51
SPEED (mm/sec)
102
152
203
254
800
0
RP 2:1
SPEED (mm/sec)
51
102
3,559
PEAK
600
THRUST (lbf)
PEAK
400
400
CONTINUOUS
200
400 CONTINUOUS
PEAK
CONTINUOUS
200
2,669
48V 1,779
200
48V
890
48V
0
0
2
4
48V
48V
48V
24V
6
SPEED (in/sec)
8
THRUST (N)
600
600
10
0
24V
0
2
4
6
SPEED (in/sec)
8
10
0
24V
0
2
0
4
SPEED (in/sec)
Figure 1-1: BN05 Ball Nut: Continuous and Peak Speed vs Thrust
BN02
LMI 1:1
0
127
254
381
508
635
300
0
127
SPEED (mm/sec)
254
381
508
635
THRUST (lbf)
PEAK
100
0
127
254
2,669
1,779
CONTINUOUS
PEAK
890
100
100
CONTINUOUS
PEAK
200
200
200
300
RP 2:1
SPEED (mm/sec)
THRUST (N)
300
RP 1:1
SPEED (mm/sec)
CONTINUOUS
48V
48V
0
48V
24V
0
5
10
15
SPEED (in/sec)
20
25
48V
0
48V
24V
0
5
10
15
SPEED (in/sec)
20
25
0
48V
24V
0
5
10
0
SPEED (in/sec)
Figure 1-2: BN02 Ball Nut: Continuous and Peak Speed vs Thrust
1-6
Tolomatic User Guide: ICR Rod Style Integrated Control Actuator
I cr basic and I cr plus product overview : 1
1.1.6 RMS Thrust and Velocity Considerations
Servo motor actuator systems have two speed/thrust curves: one for continuous
duty operation and another for intermittent duty. A servo system can be selected
according to the total thrust and maximum velocity indicated by the continuous
duty curve. However, by calculating the root mean square (RMS) thrust based on
the application duty cycle, you may be able to take advantage of the higher peak
thrust available in the intermittent duty range. The RMS thrust must fall within the
continuous duty region of the motor/drive and the application maximum thrust must
fall under the peak thrust of the actuator.
Use the following formulae when calculating the RMS thrust and velocity. When
selecting an integrated servo actuator system, it is necessary to add a margin
of safety to the thrust and velocity required to move the load. The recommended
margin for servo motors is 15%.
TRMS =
VRMS =
√
sum (T i2 x t i)
sum (t i)
√
sum (V i2 x t i)
sum (t i)
Where:
TRMS = RMS Thrust
VRMS = RMS Velocity
Ti = Thrust during interval i
Vi = Velocity during interval i
ti = Time interval i
1.1.7 ICR Screw Life
The L10 expected life of a ball screw linear actuator is expressed as the linear
travel distance that 90% of properly maintained ball screws manufactured are
expected to meet or exceed. This is not a guarantee and the graph in Figure
1-3 should be used for estimation purposes only. All curves represent properly
lubricated and maintained actuators.
The underlying formula that defines this value is:
L10 =
Where:
C = Dynamic load rating (lbf)
F = Cubic mean applied load (lbf)
( CF )
3
L10 = millions of inches
BN02
254
1,000
25.4
100
2.54
10
1
BN05
0
100
200
300
THRUST (lbf)
400
.254
890
THRUST (N)
1,334
2,669
100,000
3,559
10,000
BN02
1,000
25,400
2,540
254
LIFE (millions of meters)
10,000
2,540
1,000,000 0
MAXIMUM THRUST
1,779 25,400
MAXIMUM THRUST
1,334
MAXIMUM THRUST
100,000
LIFE (millions of inches)
890
LIFE (millions of meters)
445
MAXIMUM THRUST
1,000,000 0
RP 2:1 Ratio
THRUST (N)
LIFE (millions of inches)
LMI & RP 1:1 Ratio
25.4
100
2.54
10
.254
1
BN05
0
200
400
600
THRUST (lbf)
800
Figure 1-3: ICR Ball Screw Life
Tolomatic User Guide: ICR Rod Style Integrated Control Actuator 1-7
1 : I cr basic and I cr plus product overview
1.1.8 ICR System Critical Speed
STROKE (mm)
127
27
254
381
508
635
686
BN02
24
610
MAXIMUM STROKE
18
15
12
533
CRITICAL SPEED (mm/sec)
CRITICAL SPEED (in/sec)
21
457
381
305
BN05
9
229
6
152
3
76
0
0
5
10
15
STROKE (in)
20
0
25
Figure 1-4: ICR SystemCritical Speed
1.1.9 ICR Side Load Considerations
Rod screw actuators are designed to push guided and supported loads and are not
designed for applications that require significant side loading. Contact Tolomatic for
details regarding side loading capabilities.
1.1.10 Brake Considerations
An unpowered ICR will require a brake to maintain its position if the force on the
actuator exceeds: BN02 screw - 7.5 lbf (33.4 N); BN05 screw - 12.5 lbf (55.6 N)
A brake can be used with the actuator to keep it from backdriving, typically in
vertical applications. A brake may be used for safety reasons or for energy savings
allowing the actuator to hold position when unpowered. Add SAB to the ordering
code for the optional Spring-Applied / Electronically-Released Brake. (not available
for service part ordering)
NOTE: The optional Spring-Applied / Electronically-Released Brake requires 24V
power. It has a input current rating of 0.414 Amps.
1.1.12 ICM Plus Motor
Speed vs Torque
1.1.11 ICM Plus
Mechanical Specs
RoHS
COMPLIANT
RoHs Compliant Components
Approval Pending
1.75
8
1.25
1.00
CONTIN
UOUS
0.75
TORQUE (N-m)
1.50
12
48V 0.50
4
0.25
24V
2,900
2,500
0
2,000
500
0
0
1,500
65
2.00
16
1,000
IP rating option
RoHS
COMPLIANT
PEAK
ICM
TORQUE (in-lb)
Unit
in-lb
17
Peak Torque
N-m
1.92
in-lb
8.0
Cont. Torque
N-m
0.9
lb
6.50
Base Weight
kg
2.95
deg F
50
Min temp
deg C
10
deg F
122
Max temp
deg C
50
NOTE: Performance de-rating will be necessary
at ambient temperatures greater than 25 deg.
C (77 deg F)
40
IP rating std
SPEED (RPM)
Figure 1-5: ICM Plus Motor Speed vs Torque
Test conditions: Motor operated at rated temperature mounted
to an aluminum heatsink. Aluminum heatsink: 11" x 11" x 1⁄2"
1-8
Tolomatic User Guide: ICR Rod Style Integrated Control Actuator
ICR SV1B Basic – Electrical Interface, Specs & Wiring
2.1 Cabling and Connectors - ICR SV1B Basic Actuator
CAUTION!
Reversing polarity of
the input power will
damage the actuator drive
mechanism.
2
Tolomatic cables are available in standard and IP65 classifications. When using
cables other than those provided by Tolomatic, reference the cable mating
connector style to ensure the proper cabling is supplied to the ICR actuator.
2.1.1 Power Cables and Pin-outs
Cable
tolomatic
Part no.
connector on
actuator
mating connector*
on cable
Power: Std., 5 meter
3604-1641
Conec: 3003W3PXX99A10X
Conec: 3003W3SXX99A10X*
Power: IP65, 5 meter
3604-1649
Amphenol: PT02E12-3P(027)
Amphenol: PT06E12-3S(476)
Socket contacts: Std.
NA
Conec: 131C10029X
Conec: 132C10029X
* This type of mating connection is used on Tolomatic supplied cables. Reference this type of mating connector
for customer designed cables.
PIN numbers
Std.
IP65
description
A1
A
+24-48 Vdc Power
Red
A2
B
Case / Shield Ground
Bare Wire
A3
C
Power Ground
Black
* CONEC P/N: 3003W3SXX99A10X
NORCOMP P/N: 979-015-030R121
QTY#3 OF CONEC P/N: 132C10029X
CONEC P/N: 3003W3SXX99A10X
NORCOMP P/N: 979-015-030R121
RED
A1
A2
cable wire color
BLK
A3
TIE SHIELD WIRE
TO PIN A2
A3
A2
[ 76 ] 3.0
A1
[5.0 M]
Figure 2-1: ICR SV1B Basic Actuator Standard Power Cable 3604-1641
C
RED
A
B
BLK
C
AMPHENOL P/N:
PTO6E-12-3S(476)
AMPHENOL P/N:
97-79-513-6
BEIDEN P/N:
9314
A C
B
101.6
4.00
5.0 M
Figure 2-2: ICR SV1B Basic Actuator IP65 Power Cable 3604-1649
Tolomatic User Guide: ICR Rod Style Integrated Control Actuator 2-1
2 : I C R S V 1 B B A S I C - electrical interface , S pecs & W iring
2.1.2 I/O Cables and Pin-outs
Cable
tolomatic
Part no.
connector on
actuator
mating connector*
on cable
I/O: Std., 5 meter
3604-1640
Norcomp: 171-025-103L001
Norcomp: 171-025-203L001
I/O: IP65, 5 meter
3604-1648
Amphenol: PT02E16-26P(027)
Amphenol: PT06E16-26S(476)
* This type of mating connection is used on Tolomatic supplied cables. Reference this type of mating connector
for customer designed cables.
PIN numbers
Std.
IP65
description
cable wire color
1
A
2
B
3
C
4
D
5
E
6
F
7
G
8
H
9
J
Enable
Orange/Black
10
K
E Stop
Red/White
11
L
12
M
Extend Command
Blue/White
13
N
Input Common
White/Black/Red
14
P
Retract Command
White/Red
15
R
16
S
17
T
18
U
In Position Output
Green/Black/White
19
V
Ground**
Green/Black
20
W
Fault Output
Black/White/Red
21
X
Ground**
Black/White
22
Y
+24 V Brake Power Input
Red/Black
23
Z
Ground**
Black/Red
24
a
+24 V Keep Alive
Red
25
b
Ground**
Black
Technical info.
page No.
2-5
2-5
2-7
2-8
2-9
** Signal grounds not needed for operation. Grounds on signal connector are common to ground or power
connector. It is recommended to leave thee unconnected unless specifically required for the application.
2-2
Tolomatic User Guide: ICR Rod Style Integrated Control Actuator
I C R S V 1 B B A S I C - electrical interface , S pecs & W iring : 2
NORCOMP P/N:
171-025-203L001
979-025-030R121
RED/BLK/WHT
1
ORG/GRN
2
GRN
7
[ 101.6 ]
4.00
NORCOMP P/N:
REF: 171-009-203L001
979-009-030R121
[ 38.1 ]
1.50
[ 101.6 ]
4.00
NORCOMP P/N:
171-009-203L001
979-009-030R121
3
2
5
NORCOMP P/N:
REF: 171-025-203L001
979-025-030R121
CAROL P/N:
CØ748A
WIRE TIE
PIN 1
5.0 M
Figure 2-3: ICR SV1B Basic Actuator Standard I/O Cable 3604-1640
[ 101.6 ]
4.00
NORCOMP P/N:
AMPHENOL P/N: 171-009-203L001 AMPHENOL P/N:
PTO6E16-26S(476) 979-009-030R121 PTO6E16-26S(476)
RED/BLK/WHT
ORG/GRN
GRN
A
B
G
AMPHENOL P/N:
97-79-513-8
WIRE TIE
3
2
5
NORCOMP P/N:
171-009-203L001
979-009-030R121
CAROL P/N
CØ748A
B A R
P
D UT S a N
b
E V
c Z M
W X Y L
F
K
G
H J
C
[5.0 M]
[ 101.6 ]
4.00
Figure 2-4: ICR SV1B Basic Actuator IP65 I/O Cable 3604-1648
Tolomatic User Guide: ICR Rod Style Integrated Control Actuator 2-3
2 : I C R S V 1 B B A S I C - electrical interface , S pecs & W iring
2.1.3 Cable Routing
Over time, liquid contaminants such as oil and cleaning solutions may accumulate
on the cables and in the connectors if they are an exposed type. To minimize the
introduction of contaminants into the connector, route the cables so that there is a
loop in the cable just prior to its attachment to the connector.
Two examples are shown below depending on the orientation of the connectors.
Units mounted in such a way that the connectors are on the bottom surface of the
actuator require no looping.
Top
Mount
Loop
Side
Mount
Loop
Figure 2-5: Cable Routing for Top and Side Mounted Connectors
2.2 Digital Inputs – ICR SV1B Basic Actuator
The ICR SV1B Basic actuator has a total of 8 digital inputs / 4 are spare and not
implemented. These digital inputs are opto-isolated from the actuator’s drive
circuitry and can be wired as either sinking or sourcing. All of the digital inputs have
a common return. Figure 2-6 shows the circuit diagram for the interface.
INPUT
4.7K
2K
TO INTERNAL
CIRCUITRY
INPUT COMMON
Figure 2-6: ICR SV1B Basic Actuator Interface Circuit Diagram
2-4
Tolomatic User Guide: ICR Rod Style Integrated Control Actuator
I C R S V 1 B B A S I C - electrical interface , S pecs & W iring : 2
ICR SV1B Basic Actuator Digital Input Specifications
Input Voltage Range
0 to 30 Vdc
On State Voltage Range
16 to 30 Vdc
Off State Voltage Range
0 to 5 Vdc
On State Current:
CAUTION!
The E-stop input is
software controlled; it is
highly recommended to
have an external E-stop
hardware measure to
ensure safety.
16 Vdc (minimum)
1.9 mA
24 Vdc (nominal)
3.6 mA
30 Vdc (maximum)
4.9 mA
Nominal Input Impedance (24V)
6.7K Ohm
Off State Current (maximum)
0.4 mA
Update Rate (maximum)
2 ms
ICR SV1B Basic Actuator Digital Input Functionality
signal name
description
Extend Command
Commands the actuator to move in the extend
direction. Forward is defined as extend.
Retract Command
Commands the actuator to move in the retract
direction. Reverse is defined as retract.
Enable
Enables the drive. Disabling the drive will turn off the
amplifier and engage the brake if installed.
E-stop
Emergency stop. Removal of this signal will disable
the drive and engage the brake if installed.
The remaining spare inputs and any designated inputs can be programmed at
Tolomatic for custom applications. Please consult Tolomatic for custom applications.
2.2.1. Typical Wiring Connections
+
INPUT
24V POWER SUPPLY
-
INPUT COMMON
GND
Figure 2-7: ICR SV1B Basic Actuator Input Source (switched) Connection
Tolomatic User Guide: ICR Rod Style Integrated Control Actuator 2-5
2 : I C R S V 1 B B A S I C - electrical interface , S pecs & W iring
2.2.1. Typical Wiring Connections (cont.)
+
INPUT
-
INPUT COMMON
24V POWER SUPPLY
GND
Figure 2-8: ICR SV1B Basic Actuator Input Source (PNP) Connection
+
INPUT COMMON
24V POWER SUPPLY
-
INPUT
GND
Figure 2-9: ICR SV1B Basic Actuator Input Sink (switched) Connection
+
INPUT COMMON
-
INPUT
24V POWER SUPPLY
GND
Figure 2-10: ICR SV1B Basic Actuator Input Sink (NPN) Connection
2-6
Tolomatic User Guide: ICR Rod Style Integrated Control Actuator
I C R S V 1 B B A S I C - electrical interface , S pecs & W iring : 2
2.3 Digital Outputs – ICR SV1B Basic Actuator
The ICR SV1B Basic actuator has 3 digital outputs, 2 of them are implemented. The
outputs are both sinking and sourcing and are protected against over current and
short circuit conditions. Once an over current condition is present, the output turns
off until the load is removed. The power is generated internally.
+24VDC
10
33
OUTPUT
10
Figure 2-11: ICR SV1B Basic Actuator Output Interface Circuit Diagram
ICR SV1B Basic Actuator Digital Output Specifications
Output high minimum (10 mA source), 24 V power
20 V
Output low maximum (10 mA sink)
2V
Maximum continuous current
20 mA
Fold back current
85 mA
Maximum output sink / source voltage
24 V
Update rate
2 ms
ICR SV1B Basic Actuator Digital Output Functionality
signal name
description
In Position
Output will go high when the actuator is not moving.
Fault
Output will go high when an error is present.
The spare and any designated outputs can be programmed at Tolomatic for custom
applications. Please consult Tolomatic for custom applications.
Tolomatic User Guide: ICR Rod Style Integrated Control Actuator 2-7
2 : I C R S V 1 B B A S I C - electrical interface , S pecs & W iring
2.4 Optional Electronic Brake – ICR SV1B Basic Actuator
CAUTION!
Operating an ICR actuator
with a brake installed
without providing brake
power can damage the
brake and the actuator.
Tolomatic offers an optional spring-applied, electronically-released brake that can
be used with the actuator to keep the actuator from back driving, typically in vertical
applications. It can also be used for safety reasons or for energy savings allowing
the actuator to hold position when unpowered. The drive is signaled to apply the
brake which holds the actuator’s position prior to disabling the actuator. The brake
option is not a service part and must initially be ordered with the actuator as it is
internally configured with the drive.
If a brake is installed in the actuator, a 24V power source is needed. The brake
power is on pin 22 for the standard cable and on pin Y for IP65 cable. The return
is on pin 23 for the standard cable and on pin Z for IP65 cable. See I/O Cable Pinouts on page 2-2. The controller will automatically engage / disengage the brake
using this power.
An unpowered ICR actuator will require a brake to maintain its position if the force
on the actuator exceeds the following requirements:
BN02 screw: 7.5 lbf (33.4 N)
BN05 screw: 12.5 lbf (55.6 N)
Electronic Brake Power and Specifications
Input Voltage (minimum)
21.6 Vdc
Input Voltage (nominal)
24 Vdc
Input Voltage (maximum)
26.4 Vdc
Input Current Maximum (at input voltage maximum)
0.414 Amps
Static Torque
12.5 in-lbs maximum
+
BRAKE POWER
24V POWER SUPPLY
BRAKE POWER GROUND
Figure 2-12: ICR SV1B Basic Actuator Optional Electronic Brake Connection
2-8
Tolomatic User Guide: ICR Rod Style Integrated Control Actuator
I C R S V 1 B B A S I C - electrical interface , S pecs & W iring : 2
2.5 Input Power - ICR SV1B Basic Actuator
The ICR SV1B Basic actuator has the following drive ratings:
ICR SV1B Basic Actuator Internal Drive Specifications
Current - Continuous maximum1
10 A
Current - Peak
20 A
Voltage - Nominal
24-48 V
Over Voltage
56 V
1
2
20 V
Under Voltage
3
Absolute Maximum Voltage
59 V
Logic Current Draw Maximum (24V)
0.11 A
Logic Current Draw Maximum (48V)
0.09 A
4
4
1
Continuous and peak current ratings are actual motor current and input power supply current.
Achievable continuous current will depend on temperature.
CAUTION!
2
Drive will shut down at 56V; any voltage above the absolute max voltage can result in permanent
damage.
Voltage above the absolute
maximum can result in
permanent damage to the
ICR SV1B internal drive
components.
3
Drive will turn off below this voltage.
4
Logic current for keep alive, no outputs active.
The drive and logic (keep alive) power share the same ground. The actuator’s drive
logic circuitry can be powered from the keep alive input or the main drive power.
The keep alive input voltage and the main power inputs have independent power
supplies and do not require the same voltage for operation.
FUSE
KEEP ALIVE
FUSE
+
+24-48VDC POWER
+
24 to 48VDC
-
-
24 to 48VDC
HIGH POWER
POWER SUPPLY
POWER GROUND
CASE / SHIELD GROUND
Figure 2-13: ICR SV1B Basic Actuator Logic and Main Power Supplies
Tolomatic User Guide: ICR Rod Style Integrated Control Actuator 2-9
2 : I C R S V 1 B B A S I C - electrical interface , S pecs & W iring
FUSE
+24-48VDC POWER
+
-
POWER GROUND
24 to 48VDC
HIGH POWER
POWER SUPPLY
CASE / SHIELD GROUND
Figure 2-14: ICR SV1B Basic Actuator Single Supply - Main Power
EMERGENCY STOP
EXTERNAL SWITCH
FUSE
+24-48VDC POWER
FUSE
KEEP ALIVE
+
24 to 48VDC
HIGH POWER
POWER SUPPLY
POWER GROUND
-
CASE / SHIELD GROUND
Figure 2-15: ICR SV1B Basic Actuator Single Supply - External Cut-off Switch for
Emergency Stop
2-10
Tolomatic User Guide: ICR Rod Style Integrated Control Actuator
I C R S V 1 B B A S I C - electrical interface , S pecs & W iring : 2
2.6 Environmental Conditions
ICR SV1B Basic Actuator Operating Environment
Ambient Temperature
77˚ F, 25˚ C Nominal
Operating Temperature
50-122˚ F, 10-50˚ C [de-rate performance above 77˚ F (25˚ C) ]
Storage Temperature
50-158˚ F, 10-70˚ C
Humidity
0-95% non-condensing
IP Rating
40 standard, 65 optional
2.7 ICR SV1B Basic Actuator Setup
Figure 2-16 shows the simple setup of the ICR Basic and the necessary cables and
ICR Basic Easy Setup
power source.
LOGIC DEVICE:
PLC, HMI, or PC
Signal I/O Cable
Connects to Logic Device
24V to Power Switch
Std.: 3604-1640
IP65: 3604-1648
POW SUPPL
ER S IED
OUR
CE
EXT
RET
Power Cable (To Power Source)
Std.: 3604-1641
IP65: 3604-1649
FRC
Logic Device Signals
Actuator and Sensing
Devices
Figure 2-16: ICR SV1B Basic Actuator Setup
Tolomatic User Guide: ICR Rod Style Integrated Control Actuator 2-11
2 : I C R S V 1 B B A S I C - electrical interface , S pecs & W iring
(This page intentionally left blank)
2-12
Tolomatic User Guide: ICR Rod Style Integrated Control Actuator
ICR/ICM SV1P Plus - Electrical Interface, Specs & Wiring
3.1 Cabling and Connectors - ICR/ICM SV1P Plus
CAUTION!
3
Tolomatic cables are available in standard and IP65 classifications. When using
cables other than those provided by Tolomatic, reference the cable mating
connector style to ensure the proper cabling is supplied to the ICR actuator.
Reversing polarity of the
input power will damage
the actuator’s internal
drive mechanism.
3.1.1 Power Cables and Pin-outs
Cable
tolomatic
Part no.
connector on
actuator
mating connector*
on cable
Power: Std., 5 meter
3604-1641
Conec: 3003W3PXX99A10X
Conec: 3003W3SXX99A10X*
Power: IP65, 5 meter
3604-1649
Amphenol: PT02E12-3P(027)
Amphenol: PT06E12-3S(476)
Socket contacts: Std.
NA
Conec: 131C10029X
Conec: 132C10029X
* This type of mating connection is used on Tolomatic supplied cables. Reference this type of mating connector
for customer designed cables.
PIN numbers
Std.
IP65
description
A1
A
+24-48 Vdc Power
Red
A2
B
Case / Shield Ground
Bare Wire
A3
C
Power Ground
Black
* CONEC P/N: 3003W3SXX99A10X
NORCOMP P/N: 979-015-030R121
QTY#3 OF CONEC P/N: 132C10029X
CONEC P/N: 3003W3SXX99A10X
NORCOMP P/N: 979-015-030R121
RED
A1
A2
cable wire color
BLK
A3
TIE SHIELD WIRE
TO PIN A2
A3
A2
[ 76 ] 3.0
A1
[5.0 M]
Figure 3-1: ICR/ICM SV1P Plus Standard Power Cable 3604-1641
C
RED
A
B
BLK
C
AMPHENOL P/N:
PTO6E-12-3S(476)
AMPHENOL P/N:
97-79-513-6
BEIDEN P/N:
9314
A C
B
101.6
4.00
5.0 M
Figure 3-2: ICR/ICM SV1P Plus IP65 Power Cable 3604-1649
Tolomatic User Guide: ICR Rod Style Integrated Control Actuator 3-1
3 : I C R / I C M S V 1 P P lus - electrical interface , S pecs & W iring
3.1.2 I/O Cables and Pin-outs
Cable
tolomatic
Part no.
connector on
actuator
mating connector*
on cable
I/O: Std., 5 meter
3604-1640
Norcomp: 171-025-103L001
Norcomp: 171-025-203L001
I/O: IP65, 5 meter
3604-1648
Amphenol: PT02E16-26P(027)
Amphenol: PT06E16-26S(476)
* This type of mating connection is used on Tolomatic supplied cables. Reference this type of mating connector
for customer designed cables.
PIN numbers
3-2
Std.
IP65
description
cable wire color
1
A
RS232 RX
Red/Black/White
2
B
RS232 TX
Orange/Green
3
C
Pulse
White
4
D
Direction
Orange
5
E
Reference in +
Blue
6
F
Reference in -
Blue/Black
7
G
Digital Ground
Green
8
H
Analog Ground
White/Black
9
J
In 1
Orange/Black
10
K
In 2
Red/White
11
L
In 3
Green/White
12
M
In 4
Blue/White
13
N
Input Common
White/Black/Red
14
P
In 6
White/Red
15
R
In 5
Orange/Red
16
S
In 8
Blue/Red
17
T
In 7
Red/Green
18
U
Digital Out 1+
Green/Black/White
19
V
Digital Out 1-
Green/Black
20
W
Digital Out 2+
Black/White/Red
21
X
Digital Out 2-
Black/White
22
Y
+24 V Brake Power Input
Red/Black
23
Z
Brake Power Input Ground
Black/Red
24
a
+24 V Keep Alive
Red
25
b
Ground
Black
Tolomatic User Guide: ICR Rod Style Integrated Control Actuator
I C R / I C M S V 1 P P lus - electrical interface , S pecs & W iring
: 3
NORCOMP P/N:
171-025-203L001
979-025-030R121
RED/BLK/WHT
1
ORG/GRN
2
GRN
7
[ 101.6 ]
4.00
NORCOMP P/N:
REF: 171-009-203L001
979-009-030R121
[ 38.1 ]
1.50
[ 101.6 ]
4.00
NORCOMP P/N:
171-009-203L001
979-009-030R121
3
2
5
NORCOMP P/N:
REF: 171-025-203L001
979-025-030R121
CAROL P/N:
CØ748A
WIRE TIE
PIN 1
5.0 M
Figure 3-3: ICR/ICM SV1P Plus Standard I/O Cable 3604-1640
[ 101.6 ]
4.00
NORCOMP P/N:
AMPHENOL P/N: 171-009-203L001 AMPHENOL P/N:
PTO6E16-26S(476) 979-009-030R121 PTO6E16-26S(476)
RED/BLK/WHT
ORG/GRN
GRN
A
B
G
AMPHENOL P/N:
97-79-513-8
WIRE TIE
3
2
5
NORCOMP P/N:
171-009-203L001
979-009-030R121
CAROL P/N
CØ748A
B A R
P
D UT S a N
b
E V
c Z M
W X Y L
F
K
G
H J
C
[5.0 M]
[ 101.6 ]
4.00
Figure 3-4: ICR/ICM SV1P Plus IP65 I/O Cable 3604-1648
Tolomatic User Guide: ICR Rod Style Integrated Control Actuator 3-3
3 : I C R / I C M S V 1 P P lus - electrical interface , S pecs & W iring
3.1.3 Optional Communications Cable
A communications cable is available as an option with the ICR/ICM SV1P Plus
actuator and can be used for daisy chaining a series of actuators together to a PLC,
PC, HMI, or other intelligent device.
Cable
tolomatic Part no.
Communication Cable: 1 Meter
3604-1659
Communication Cable: 5 Meter
3604-1660
1M AND 5M LENGTHS
MALE
[ 14.5 ]
Ø .57
FEMALE
[ 14.5 ]
Ø .57
M12 X 1
[ 51.3 ]
2.02
[ 46.7 ]
1.84
Figure 3-5: ICR/ICM SV1P Plus Optional Communications Cable
When cutting these cables for CANopen or DeviceNet connections, follow these
wiring guidelines.
Wiring for CANopen
Wiring for DeviceNet
3 - Black, V- (CAN Ground)
1 - Drain, Shield
4 - White, CAN High
2 - Red, V+
5 - Blue, CAN Lo
3 - Black, V- (CAN Ground)
4 - White, CAN High
5 - Blue, CAN Lo
3-4
Tolomatic User Guide: ICR Rod Style Integrated Control Actuator
I C R / I C M S V 1 P P lus - electrical interface , S pecs & W iring
: 3
3.2 Digital Inputs - ICR/ICM SV1P Plus
3.2.1. Isolated Digital Inputs
The ICR/ICM SV1P Plus actuator has a total of 8 isolated digital inputs, which are
programmable. The isolated digital inputs can be configured to be either sinking
or sourcing. All of the isolated digital inputs have a common return and are
isolated from the internal circuitry. Figure 3-6 shows the circuit diagram for the
isolated interface.
INPUT
3.92K
3K
TO INTERNAL
CIRCUITRY
INPUT COMMON
Figure 3-6: ICR/ICM SV1P Plus Isolated Interface Circuit Diagram
ICR/ICM SV1P Plus Isolated Digital Input Specifications
Input Voltage Range
0 to 26 Vdc
On State Voltage Range
10 to 26 Vdc
Off State Voltage Range
0 to 4 Vdc
On State Current:
10 Vdc (minimum)
1.5 mA
24 Vdc (nominal)
5 mA
26 Vdc (maximum)
5.5 mA
Nominal input impedance (24V)
4.8K Ohm
Off State Current (maximum)
0.4 mA
Update rate (maximum)
0.3 ms
3.2.2 High Speed Digital Inputs
CAUTION!
The E-stop input is
software controlled, it is
highly recommended to
have an external E-stop
hardware measure to
ensure safety.
The ICR/ICM SV1P Plus actuator has two high speed digital inputs for pulse /
direction. These inputs are not isolated, accept TTL levels, and are referenced to
digital ground.
ICR/ICM SV1P Plus High Speed Digital Input Specifications
Input Voltage Range
0 to 5.5 Vdc
Positive Going Threshold
3.5 Vdc
Negative Going Threshold
0.9 Vdc
Nominal Input Impedance (24V)
4.8K Ohm
Off State Current (maximum)
0.4 mA
Input Filter
100ns
Tolomatic User Guide: ICR Rod Style Integrated Control Actuator 3-5
3 : I C R / I C M S V 1 P P lus - electrical interface , S pecs & W iring
HIGH SPEED INPUT
1k
100p
Figure 3-7: ICR/ICM SV1P Plus High Speed Digital Input Circuitry
3.2.3 Typical Wiring Connections
+
INPUT
24V POWER SUPPLY
-
INPUT COMMON
GND
Figure 3-8: ICR/ICM SV1P Plus Source (switched) Connection
+
INPUT
-
INPUT COMMON
24V POWER SUPPLY
GND
Figure 3-9: ICR/ICM SV1P Plus Source (PNP) Connection
+
INPUT COMMON
24V POWER SUPPLY
-
INPUT
GND
Figure 3-10: ICR/ICM SV1P Plus Sink (switched) Connection
+
INPUT COMMON
-
INPUT
24V POWER SUPPLY
GND
Figure 3-11: ICR/ICM SV1P Plus Sink (NPN) Connection
3-6
Tolomatic User Guide: ICR Rod Style Integrated Control Actuator
I C R / I C M S V 1 P P lus - electrical interface , S pecs & W iring
: 3
3.3 Analog Inputs - ICR/ICM SV1P Plus
The ICR/ICM SV1P Plus actuator has one programmable analog input.
ICR/ICM SV1P Plus Analog Input Specifications
Input Voltage Maximum
+/- 15V
Input Voltage Full Scale (nominal)
+/- 10V
Input Impedance (nominal)
5K Ohm
Input Offset Voltage Maximum
+/- 10mV
Input Bias Current
+/- 1uA
Update Rate
62.5uS
REFIN+
-
37K
+
5.36K
REFINFigure 3-12: ICR/ICM SV1P Plus Analog Input Circuit
37K
REFIN+
SIGNAL
DAC
0V
REFIN-
Figure 3-13: ICR/ICM SV1P Plus Analog Input Typical Wiring
3.4 Digital Outputs - ICR/ICM SV1P Plus
The ICR/ICM SV1P Plus actuator has two digital outputs, which are programmable.
The outputs are opto-isolated from the drive circuitry and can be configured for
sinking or sourcing. The outputs are protected against over current and short circuit
conditions. Once an over current condition is present, the output turns off until the
load is removed.
ICR/ICM SV1P Plus Digital Output Specifications
Maximum Switched Voltage
30 V
Output low maximum (20 mA sink)
4V
Maximum continuous current
20 mA
Fold back current
80 mA
Maximum output sink / source voltage
24 V
Update rate
1 ms
Output Leakage Current
10 uA
Tolomatic User Guide: ICR Rod Style Integrated Control Actuator 3-7
3 : I C R / I C M S V 1 P P lus - electrical interface , S pecs & W iring
OUTPUT+
INTERNAL
CIRCUITRY
47
47
OUTPUT-
Figure 3-14: ICR/ICM SV1P Plus Digital Output Circuitry
+
LOAD
OUTPUT+
24V POWER SUPPLY
OUTPUT-
Figure 3-15: ICR/ICM SV1P Plus Digital Output Sinking Wiring Diagram
+
OUTPUT-
OUTPUT+
24V POWER SUPPLY
-
LOAD
Figure 3-16: ICR/ICM SV1P Plus Digital Output Sourcing Wiring Diagram
3-8
Tolomatic User Guide: ICR Rod Style Integrated Control Actuator
I C R / I C M S V 1 P P lus - electrical interface , S pecs & W iring
: 3
3.5 Input Power - ICR/ICM SV1P Plus
The ICR/ICM SV1P Plus actuator has the following drive ratings:
ICR/ICM SV1P Plus Internal Drive Specifications
Current - Continuous maximum1
10 A
Current - Peak
20 A
Voltage - Nominal
24-48 V
Over Voltage
56 V
1
2
20 V
Under Voltage
3
Absolute Maximum Voltage
59 V
Logic Current Draw Maximum (24V)
0.11 A
Logic Current Draw Maximum (48V)
0.09 A
4
4
CAUTION!
Voltage above the absolute
maximum can result in
permanent damage to the
ICR SV1P internal drive
components.
1
Continuous and peak current ratings are actual motor current and input power supply current.
Achievable continuous current will depend on temperature.
2
Drive will shut down at 56V; any voltage above the absolute max voltage can result in permanent
damage.
3
Drive will turn off below this voltage.
4
Logic current for keep alive, no outputs active.
The drive and logic (keep alive) power share the same ground. Drive logic circuitry
can be powered from the keep alive input or the main drive power. The keep alive
input voltage and the main power inputs have independent power supplies and do
not require the same voltage for operation.
FUSE
KEEP ALIVE
FUSE
+
+24-48VDC POWER
+
24 to 48VDC
-
-
24 to 48VDC
HIGH POWER
POWER SUPPLY
POWER GROUND
CASE / SHIELD GROUND
Figure 3-17: ICR/ICM SV1P Plus Logic and Main Power Supplies
Tolomatic User Guide: ICR Rod Style Integrated Control Actuator 3-9
3 : I C R / I C M S V 1 P P lus - electrical interface , S pecs & W iring
FUSE
+24-48VDC POWER
+
-
POWER GROUND
24 to 48VDC
HIGH POWER
POWER SUPPLY
CASE / SHIELD GROUND
Figure 3-18: ICR/ICM SV1P Plus Single Supply - Main Power
EMERGENCY STOP
EXTERNAL SWITCH
FUSE
+24-48VDC POWER
FUSE
KEEP ALIVE
+
24 to 48VDC
HIGH POWER
POWER SUPPLY
POWER GROUND
-
CASE / SHIELD GROUND
Figure 3-19: ICR/ICM SV1P Plus Single Supply - External Cutoff Switch for
Emergency Stop
3-10
Tolomatic User Guide: ICR Rod Style Integrated Control Actuator
I C R / I C M S V 1 P P lus - electrical interface , S pecs & W iring
: 3
3.6 Optional Electronic Brake – ICR/ICM SV1P Plus
CAUTION!
Operating an ICR actuator
with a brake installed
without providing brake
power can damage the
brake and the actuator.
Tolomatic offers an optional spring-applied, electronically-released brake that can
be used with the actuator to keep the actuator from back driving, typically in vertical
applications. It can also be used for safety reasons or for energy savings allowing
the actuator to hold position when unpowered. The drive is signaled to apply the
brake which holds the actuator’s position prior to disabling the actuator. The brake
option is not a service part and must initially be ordered with the actuator as it is
internally configured with the drive.
If a brake is installed in the actuator, a 24V power source will be needed. The brake
power is on pin 22 for the standard cable and on pin Y for IP65 cable. The return
is on pin 23 for the standard cable and on pin Z for IP65 cable. See I/O Cable Pinouts on page 2-2. The controller will automatically engage / disengage the brake
using this power.
An unpowered ICR actuator will require a brake to maintain its position if the force
on the actuator exceeds the following requirements:
BN02 screw: 7.5 lbf (33.4 N)
BN05 screw: 12.5 lbf (55.6 N)
Electronic Brake Power and Specifications
Input Voltage (minimum)
21.6 Vdc
Input Voltage (nominal)
24 Vdc
Input Voltage (maximum)
26.4 Vdc
Input Current Maximum (at input voltage maximum)
0.414 Amps
Static Torque
12.5 in-lbs maximum
+
BRAKE POWER
24V POWER SUPPLY
BRAKE POWER GROUND
Figure 3-20: ICR/ICM SV1P Plus Optional Electronic Brake Connection
Tolomatic User Guide: ICR Rod Style Integrated Control Actuator 3-11
3 : I C R / I C M S V 1 P P lus - electrical interface , S pecs & W iring
3.7 ICR/ICM Plus Setup
Caution!
When cabling multiple
actuators, be sure to use
the appropriate genders
of terminators and cable
connectors. The ICR
actuator has a female
and male communication
connector.
The ICR/ICM SV1P Plus actuator can be used as a single-drive setup for optional
CANopen position control. It can also be used in a multi-drop RS-232 (RS-232
to optional CANopen) operation or in a multi-drive setup for optional CANopen/
DeviceNet operation. The following illustrations show cabling setup examples of
each configuration.
3.7.1 Single Device Setup for optional CANopen Position
Control
In a single actuator setup for optional CANopen, the actuator operates as a CAN
node. All commands are passed on the CAN bus. The CAN Master must have a CAN
address of “0.” The actuator CAN address can be any number between 1 and 127.
Before installing the actuator as a CAN node, use the CME 2® software for setup
and configuration. The software is furnished on the CD shipped with the Tolomatic
Single Actuator Setup for CANopen
Position Control
from the Tolomatic web
ICR actuator. You
may also download CME 2® software
site at www.tolomatic.com/resources. Make these selections from the drop down
menus; Product Line: Electric Linear Motion; Resource Type: Software.
Signal I/O Cable
24V to Power Switch
Std.: 3604-1640
IP65: 3604-1648
Communication Cable To CAN Master
1m: 3604-1659
5m: 3604-1660
(or purchase appropriate flying lead
CAN/DeviceNet cable)
POW SUPPL
ER S IED
OUR
CE
CAN IN
CAN MASTER:
PLC, HMI, or PC
CAN Address = 0
(required)
Power Cable (To Power Source)
Std.: 3604-1641
IP65: 3604-1649
CAN OUT
Terminator
Male: 3604-1653
Female: 3604-1654
ACTUATOR #1
CAN Node
CAN Address = 1
(required)
Figure 3-21: ICR/ICM SV1P Plus Single Actuator Setup for optional CANopen Position
Control
3.7.2 Multi-drop RS-232 (RS-232 to optional CANopen) Setup
The RS-232 specification does not support multi-drop (multiple device) connections
as does RS-485 or CAN. However, it is possible to address multiple CAN-enabled
ICR Plus actuators from a single RS-232 port. First, an RS-232 connection is made
between a computer and actuator #1 which must have the CAN address of “0”.
Normally this address is not allowed for CAN nodes but in this case, a ctuator #1
3-12
Tolomatic User Guide: ICR Rod Style Integrated Control Actuator
I C R / I C M S V 1 P P lus - electrical interface , S pecs & W iring
: 3
will act as a CAN Master allowing the address. Next, CAN connections are made
between actuator #1, actuator #2, and so on in daisy-chain fashion until the last
actuator is addressed. The last and first actuator must have the 120 Ohm resistor
between the “CAN_H” and “CAN_L” signals to act as a line-terminator. Then, the
CAN addresses of the actuators downstream from actuator #1 are set to unique
numbers, other than “0”.
When ASCII data is exchanged over the serial port, the commands are now
preceded with the node address of the actuator. Actuator #1 converts the data into
CAN data which is then sent to all of the actuators in the chain. All actuators in the
chain appear to be connected to a single RS-232 port in the computer, hence the
reference to multi-drop RS-232.
Multi-Drop RS-232 (RS-232 to CANopen)
Power Cable (To Power Source)
Std.: 3604-1641
IP65: 3604-1649
PO SUP
WE PL
R S IED
OU
RC
E
Signal I/O Cable (To RS-232 Port)
Std.: 3604-1640
IP65: 3604-1648
CAN IN
ACTUATOR #1
CAN MASTER
CAN Address = 0
(required)
CAN OUT
POW SUPPL
ER S IED
OUR
CE
CAN IN
CAN OUT
CAN IN
MULTI-DROP RS-232 RULES
• Actuator #1 must have CAN address 0
• All actuators must have different
CAN addresses in network
Communication Cable
1m: 3604-1959
5m: 3604-1660
ACTUATOR #2
CAN Node
CAN Address = 1
(optional)
POW SUPPL
ER S IED
OUR
CE
• CAN address can be saved in flash
memory or set by digital inputs
Terminator
Male: 3604-1653
Female: 3604-1654
CAN OUT
Terminator
Male: 3604-1653
Female: 3604-1654
Communication Cable
1m: 3604-1959
5m: 3604-1660
ACTUATOR #3
CAN Node
CAN Address = 2
(optional)
• Last and first actuator must have
120 Ω terminating resistor
Figure 3-22: ICR/ICM SV1P Plus Multi-drop RS-232 Setup (RS-232 to optional CANopen)
Tolomatic User Guide: ICR Rod Style Integrated Control Actuator 3-13
3 : I C R / I C M S V 1 P P lus - electrical interface , S pecs & W iring
3.7.3 Multiple Device Setup for optional CANopen and DeviceNet
This multiple actuator setup configuration is cabled similar to the Multi-drop RS-232
setup with the addition of a CAN IN cable from actuator #1 routed to a CAN Master
Acuator
device such as aMultiple
HMI, PLC
or Setup
PC. for CANopen and DeviceNet
Signal I/O Cable
24V to Power Switch
Std.: 3604-1640
IP65: 3604-1648
Communication Cable: To CAN Master
1m: 3604-1959
5m: 3604-1660
(or purchase appropriate flying
lead CAN/DeviceNet cable)
POW SUPPL
ER S IED
OUR
CE
CAN MASTER:
PLC, HMI, or PC
CAN Address = 0
(required)
CAN IN
Power Cable (To Power Source)
Std.: 3604-1641
IP65: 3604-1649
ACTUATOR #1
CAN Node
CAN Address = 1
(required)
CAN OUT
POW SUPPL
ER S IED
OUR
CE
CAN IN
ACTUATOR #2
CAN Node
CAN Address = 2
(optional)
CAN OUT
POW SUPPL
ER S IED
OUR
CE
CAN IN
CANopen/DeviceNet Rules
• CAN Master must have CAN address 0
• CAN address can be saved in flash
memory or set by digital inputs
• All actuators must have different
CAN addresses in network
Communication Cable
1m: 3604-1959
5m: 3604-1660
CAN OUT
Terminator
Male: 3604-1653
Female: 3604-1654
Communication Cable
1m: 3604-1959
5m: 3604-1660
ACTUATOR #3
CAN Node
CAN Address = 3
(optional)
• Last actuator must have 120 Ω
terminating resistor
Figure 3-23: ICR/ICM SV1P Plus Multiple Actuator Setup for optional CANopen/DeviceNet
Operation
3.8 Environmental Conditions
ICR/ICM SV1P Plus Operating Environment
3-14
Ambient Temperature
77˚ F, 25˚ C Nominal
Operating Temperature
50-122˚ F, 10-50˚ C [de-rate performance above 77˚ F (25˚ C) ]
Storage Temperature
50-158˚ F, 10-70˚ C
Humidity
0-95% non-condensing
IP Rating
40 standard, 65 optional
Tolomatic User Guide: ICR Rod Style Integrated Control Actuator
Power Supply Recommendations
4.1 Regulated and Unregulated Power Supplies
WARNING!
All installations should
provide a means for a
hardware emergency
stop that removes power
from the actuator in an
emergency condition.
The actuator emergency
stop function should
not be relied on when
safety is required. It
is recommended to
disconnect only the + bus
power and keep the power
ground line connected.
4
Both unregulated and regulated power supplies can be used to power the ICR
actuator. Unregulated supplies can be a better choice depending on the application
as they have a larger output capacitance, which makes them better energy
absorption sources. They are a good choice for applications that require aggressive
acceleration as they can supply peak currents without faulting and will not trip
on high voltage. However, unregulated power supplies do not have over voltage
protection and care must be taken not to exceed the maximum voltage of the
actuator by using a shunt regulator, and proper fusing to prevent excessive loading
of the supply.
Regulated supplies can be used, but additional measures may need to be taken.
To prevent regenerative energy from reaching the supply, a blocking diode and
capacitor, appropriately sized for the application, should be installed. In addition,
a shunt regulator may be needed to dissipate excess energy. The shunt regulator
available from Tolomatic (see page 4-4) has the appropriate bus capacitance,
requiring only the use of a blocking diode.
The ICR SV1B Basic and SV1P Plus actuators are intended to run off of an isolated
DC power source. The power supply that is required will depend on the application.
A 48V supply will allow the actuator to operate at maximum speed. A 24V supply
will result in approximately half the rated velocity. Input current will depend on the
actuator power needed in the installation. If operating more than one actuator on
the same power supply, add the required power supply rating for each actuator.
4.1.1. Power Supply Sizing Guidelines
Use the following tables to help determine the proper power source voltage for an
application or call Tolomatic at 1-800-328-2174 or 763-478-8000 for assistance.
NOTE: Green numbers indicate power supply required in Watts for the given speed
and thrust indicated at outside margins.
BN05 - 1:1 Ratio (Required Power - Watts)
BN02 - 1:1 ratio (Required Power - Watts)
100 150 200 250 300 350 400
1
51
66
89
118 155 199 251 309
25
2
64
91
124 164 212 265 326 394
3
78
4
94
thrust (lbf)
20
40
60
80
100 120 140 150
2
26
47
70
95
123 154 186 204
51
51
4
36
66
98
132 169 208 249 271
102
116 160 210 266 329 398 473
76
6
48
86
127 170 216 263 313 339
152
142 196 255 320 390 465 546
102
8
61
109 158 210 264 319 377 406
203
5
111 170 233 300 372 448 528 613
127
10
77
133 191 251 313 376 441 475
254
6
130 198 270 345 422 503 587
152
12
94
159 226 294 363 434 506 543
305
7
150 228 308 389 472 556
178
14
113 187 262 338 415 493 572 612
356
8
171 259 346 433 519
203
16
134 217 300 383 468 552 638 681
406
9
194 290 384 476
229
18
157 248 339 430 522 613
457
206 306 404
241
20
182 281 380 479 577
508
22
209 316 423 528
559
24
237 353 467
610
9.5
222 445 667 890 1112 1334 1557 1779
thrust (N)
89
178 267 356 445 534 623 667
thrust (N)
speed
(mm/sec)
speed
(in/sec)
50
speed
(mm/sec)
speed
(in/sec)
thrust (lbf)
Tolomatic User Guide: ICR Rod Style Integrated Control Actuator 4-1
BN02 - 2:1 ratio (Required Power - Watts)
thrust (lbf)
thrust (lbf)
ICM (Required Power - Watts)
speed
(in/sec)
BN05 - 2:1 ratio (Required Power - Watts)
40
70
93
124 163 209 263 324
13
1
28
49
73
100 129 161 196 214
25
67
95
130 173 222 279 343 413
25
2
38
69
103 139 177 218 262 285
51
82
122 168 220 280 345 418 496
38
3
50
91
134 179 226 276 329 356
76
2.0
99
150 206 268 336 409 488 573
51
4
64
114 166 221 277 335 396 427
102
2.5
117 178 244 315 390 470 555 644
64
5
81
140 201 264 329 395 464 498
127
800
59
93
3.0
137 208 283 362 443 528 616 708
76
6
99
167 237 309 381 456 532 570
152
1000
70
110 154 205 260 321 387 458
3.5
158 239 323 408 495 584
89
7
119 196 275 355 436 517 600 642
178
1200
81
127 177 234 295 363 435 514
4.0
180 271 363 454
102
8
141 228 315 403 491 580 670
203
1400
93
144 200 263 331 405 485 571
4.5
204 305 403 500
114
9
165 261 356 452 548
229
4.75
216 322 424
121
10
1600 105 161 224 292 367 448 535 628
191 295 399
254
speed
(mm/sec)
speed
(in/sec)
4 : power suppl y recommendations
11
219 332 444
279
12
249
305
53
1.0
1.5
445 890 1334 1779 2224 2669 3114 3559
thrust (N)
120 160 200 240 280 300
178 356 534 712 890 1068 1246 1334
thrust (N)
Torque (in-lb)
speed
(RPM)
0.5
80
2
4
6
8
10
200
28
44
65
91
121 156 196 240
400
38
60
87
119 155 197 243 293
600
48
76
109 147 190 238 290 347
132 176 225 279 338 402
12
14
16
1800 117 179 247 322 403 491 585 686
2000 129 197 271 352 440 535 636 745
2200 142 215 295 382 477 579
speed
(mm/sec)
100 200 300 400 500 600 700 800
2400 155 233 319 413 514
2600 168 252 344 444
2800 182 271 369
0.23 0.45 0.68 0.90 1.13 1.36 1.58 1.81
Torque (N-m)
4.1.2 System Power Overloading Considerations
For applications with large load requirements, care should be taken to prevent the
system from generating adverse amounts of power, resulting in overloading and
possible failure of the actuator.
Speeds and loads that exceed the amounts indicated in the graph will require a
means to control regen energy.
Use the shunt regulator (Part No. 2180-1163) for preventing over voltage
conditions. Screw terminals are marked with “+” and “-” and should be connected
to the regulated bus (see page 4-4).
222
25
LOAD (N)
445
667
890
1112
635
VELOCITY (in/sec)
15
381
10
254
5
127
BN02
0
0
50
100
VELOCITY (mm/sec)
508
20
BN05
150
LOAD (lb)
200
250
Figure 4-1: Maximum Load/Velocity of System without a Voltage Control Device
4-2
Tolomatic User Guide: ICR Rod Style Integrated Control Actuator
power suppl y recommendations : 4
4.1.3 Suggested Power Supplies:
Switching Power Supply:
Lambda SWS600-48
Unregulated Power Supply:
International Power IP500U36
Bus Fuse:
15 Amp, 125V or equivalent or sized for application
Logic Power Fuse:
2 Amp, 125V or equivalent
FUSE
KEEP ALIVE
E-STOP
FUSE
+24-48VDC POWER
+
24 to 48VDC
UNREGULATED
POWER SUPPLY
SHUNT
REGULATOR
-
POWER GROUND
CASE / SHIELD GROUND
Figure 4-2: Unregulated Power Supply Configuration with Shunt Regulator
FUSE
KEEP ALIVE
FUSE
24 to 48VDC
REGULATED
POWER SUPPLY
DIODE
E-STOP
+24-48VDC POWER
+
CAPACITOR
-
POWER GROUND
CASE / SHIELD GROUND
Figure 4-3: Regulated Power Supply Configuration with Blocking Diode and Added
Capacitance
FUSE
KEEP ALIVE
E-STOP
DIODE
FUSE
24 to 48VDC
REGULATED
POWER SUPPLY
+
-
+24-48VDC POWER
SHUNT
REGULATOR
POWER GROUND
CASE / SHIELD GROUND
Figure 4-4: Regulated Power Supply with Blocking Diode and Shunt Regulator
Tolomatic User Guide: ICR Rod Style Integrated Control Actuator 4-3
4 : power suppl y recommendations
WARNING!
Do not reverse polarity of
the power input.
4.1.4 Shunt Regulators
Shunt regulators work with the ICR Plus and Basic actuators to prevent over voltage
conditions. The shunt regulator has screw terminals marked with “+” and “-”, which
should be connected to the regulated bus.
Shunt Regulator Specifications (2180-1163)
CAUTION!
The resistor and the heat
plate can become hot
during operation.
CAUTION!
Do not apply continuous
voltage over the trip
voltage to the regulator as
this will cause excessive
heating.
Voltage Range
24 - 80 VDC
Shunt Resistance
50 Ohms
Continuous Power Dissipation1
50 Watts
Peak Power Dissipation
800 Watts
2
1
Continuous power dissipation will vary based on installation and ambient conditions.
2
Power at nominal trip voltage.
If additional power dissipation is needed, additional regulators may be paralleled.
+24-48VDC POWER
+
SHUNT
REGULATOR
-
POWER GROUND
Figure 4-5: Shunt Regulator Input Wiring Diagram
4.1.5 Diodes
A diode with a minimum blocking voltage of 50V is suggested, with a forward
current rating of 1.5X peak current rating of the application.
ANODE
24 to 48VDC
HIGH POWER
POWER SUPPLY
+
-
CATHODE
TO SHUNT REGULATOR AND ACTUATOR (+)
TO SHUNT REGULATOR AND ACTUATOR (-)
Figure 4-6: Diode Wiring Diagram
4-4
Tolomatic User Guide: ICR Rod Style Integrated Control Actuator
How to Use the ICR SV1B Basic Actuator
5.1 Enable Input Command
5
The Enable input command allows the user to enable and disable the internal
drive mechanism with a digital signal. In the Enabled state, the actuator will hold
its current position without back-driving. When the Enable input command is
de-activated, the actuator is free to back-drive unless an electronic brake option is
installed. Using this option when the Enable input command is de-activated signals
the drive to apply the brake to the actuator, holding its position before the actuator
is disabled. Enable must be maintained for all motion.
1
Actuator receives
Enable command
from logic device
TO POWER SOURCE
Actuator holds its position without backdriving
2
Enable command
is deactivated
Actuator is free to backdrive unless an electronic brake option is installed
Figure 5-1: ICR SV1B Basic Actuator Enable Input Command
Tolomatic User Guide: ICR Rod Style Integrated Control Actuator 5-1
5 : how to use the icr sv 1 b basic actuator
5.2 Home Position
CAUTION!
Make sure actuator is free
to move for homing so a
false home is not detected.
The home position is the retract hard-stop plus a small offset [BN02 = .022" (.56mm);
BN05 = .009" (.23mm)] away from the hard-stop. The actuator will home when the first
input command (Extend or Retract) is given to the actuator after initial power-up.
Velocity and Acceleration Homing Sequence Hard Codes
VELOCITY
ACCELERATION
2 turn per inch ball screw: 3.333 in/sec
2 turn per inch ball screw: 55.5 in/sec2
5 turn per inch ball screw: 1.333 in/sec
5 turn per inch ball screw: 22.2 in/sec2
1
Actuator Receives
First Input Command
TO POWER SOURCE
2
Actuator moves into
the Retract Hard-stop Position
3
Actuator moves into
the HOME Position
Figure 5-2: ICR SV1B Basic Actuator Home Position
5-2
Tolomatic User Guide: ICR Rod Style Integrated Control Actuator
how to use the icr sv 1 b basic actuator : 5
5.3 Extend Input Command
The Extend input command extends the rod of the actuator and is activated by an
external logic device such as a PLC. Rod extension will continue until the Extend
input command is de-activated or the actuator reaches the rod extend limit set in
the firmware. If the Extend input command is deactivated during rod extension, the
actuator will decelerate to a stop and hold its position. If the Retract input command
is activated during rod extension, the actuator will decelerate to a stop, hold its
position, and activate a Fault output signal.
VELOCITY
ACCELERATION
2 turn per inch ball screw: 3.333 in/sec
2 turn per inch ball screw: 55.5 in/sec2
5 turn per inch ball screw: 1.333 in/sec
5 turn per inch ball screw: 22.2 in/sec2
1
Actuator receives
Extend command
from logic device
TO POWER SOURCE
2
Actuator begins rod extension until Extend command is deactivated or rod extension limit is met
3
Extend command is
deactivated during
rod extension
Actuator decelerates to stop and holds position
Activating a Retract input command during rod extension will bring the actuator to a stop,
hold its position and activate a Fault output signal.
Figure 5-3: ICR SV1B Basic Actuator Extend Input Command
Tolomatic User Guide: ICR Rod Style Integrated Control Actuator 5-3
5 : how to use the icr sv 1 b basic actuator
5.4 Retract Input Command
The Retract input command retracts the rod of the actuator and is activated by
an external logic device such as a PLC. The rod will retract until the Retract input
command is deactivated or the actuator reaches the rod retract limit set in the
firmware. If the Retract input command is deactivated during rod retract, the
actuator will decelerate to a stop and hold its position. If the Extend input command
is activated during rod retract, the actuator will decelerate to a stop, hold its
position, and activate a Fault output signal.
VELOCITY
ACCELERATION
2 turn per inch ball screw: 3.333 in/sec
2 turn per inch ball screw: 55.5 in/sec2
5 turn per inch ball screw: 1.333 in/sec
5 turn per inch ball screw: 22.2 in/sec2
1
Actuator receives
Retract command
from logic device
TO POWER SOURCE
2
Actuator retracts until Retract command is deactivated or rod retract limit is met
3
Retract command is
deactivated during
rod retract
Actuator decelerates to stop and holds position
Activating an Extend input command during rod retract will bring the actuator to a stop,
hold its position and activate a Fault output signal.
Figure 5-4: ICR SV1B Basic Actuator Retract Input Command
5-4
Tolomatic User Guide: ICR Rod Style Integrated Control Actuator
how to use the icr sv 1 b basic actuator : 5
5.5 E-stop Input
CAUTION:
The E-Stop input is NOT a
fail safe input.
The E-Stop input allows the user to disable the actuator for safety reasons. This
is NOT a fail safe input. Until the E-Stop input is cleared, the actuator cannot be
enabled or move in either the extend or retract mode. When the E-Stop input is
active, the Fault output is automatically activated.
5.6 Fault Output
The Fault output is a status output for the logic device indicating that a fault has
occurred in the actuator. Valid faults are for e-stop, following error, over/under
voltage, current limit and over temperature (PCB and motor).
5.7 In-Position Output
The In-Position output is a status output to the logic device indicating when the
actuator is in position. When a motion begins, the In-Position output is turned off.
When the motion is complete, the In-Position output is turned on.
ICR SV1B Basic Actuator In-Position Window Definitions
Screw description
in-position WINDOW
2 turn per inch ball screw
.0125” (.317 mm)
5 turn per inch ball screw
.005” (.127 mm)
Tolomatic User Guide: ICR Rod Style Integrated Control Actuator 5-5
5 : how to use the icr sv 1 b basic actuator
5.8 User Interface
There is no software or graphical user interface (GUI) for the ICR SV1B Basic
actuator. Instead, there are three potentiometers located on the top face of the
actuator. Controls are limited to Extend velocity, Retract velocity and Force control.
Potentiometer adjustments can be made easily and simply by the use of a small
screwdriver.
CAUTION:
Do NOT overturn potentiometers
Each potentiometer has
a 270° range of motion.
Exceeding the mechanical
limits of the potentiometer will
result in permanent damage!
Figure 5-5: ICR SV1B Basic Actuator Velocity and Force Controls
5.8.1 Extend Velocity Potentiometer
The Extend velocity potentiometer is used to set the Extend velocity of the actuator’s
rod. The velocity range is stated from 2-100% of maximum velocity. Changes made
to the Extend velocity potentiometer setting will only take effect after the actuator is
stopped and before the next motion is commanded. Turn the potentiometer screw
clockwise to increase the actuator’s rod Extend velocity and counter-clockwise to
decrease the Extend velocity.
Figure 5-6: ICR SV1B Basic Actuator Extend Velocity Potentiometer
5-6
Tolomatic User Guide: ICR Rod Style Integrated Control Actuator
how to use the icr sv 1 b basic actuator : 5
5.8.2 Retract Velocity Potentiometer
The Retract velocity potentiometer is used to set the Retract velocity of the
actuator’s rod. The velocity range is stated from 2-100% of maximum velocity.
Changes made to the Retract velocity potentiometer setting will only take effect
after the actuator is stopped and before the next motion is commanded. Turn the
potentiometer screw clockwise to increase the actuator’s rod Retract velocity and
counter-clockwise to decrease the Retract velocity.
Figure 5-7: ICR SV1B Basic Actuator Retract Velocity Potentiometer
5.8.3 Force Control Potentiometer
The Force control potentiometer is used to set the actuator’s force limit allowing
it to stop and hold (also known as push and hold) in position. The potentiometer
setting must be between 10-100% of the actuator’s capable Force output for
the setting to be activated. Settings of less than 10% disable the Force control
feature. For example, when the actuator makes contact and starts to build up
force, it keeps building force to threshold levels. At that point, the actuator stops
and holds its position.
Push force for locating is best used under low velocity [less than 3"/sec. (76mm/sec.)
recommended] conditions to give the actuator time to react.
Figure 5-8: ICR SV1B Basic Actuator Force Control Potentiometer
Tolomatic User Guide: ICR Rod Style Integrated Control Actuator 5-7
5 : how to use the icr sv 1 b basic actuator
5.9 User Interface (SV1B Manufactured before 4-2013)
There is no software or graphical user interface (GUI) for the ICR SV1B Basic
actuator. Instead, there are three potentiometers located on the front face of the
actuator. Controls are limited to Extend velocity, Retract velocity and Force control.
Potentiometer adjustments can be made easily and simply by the use of a small
screwdriver.
CAUTION:
Do NOT overturn potentiometers
Each potentiometer has
a 240° range of motion.
Exceeding the mechanical
limits of the potentiometer will
result in permanent damage!
Figure 5-9: ICR SV1B Basic Actuator Velocity and Force Controls
5.9.1 Extend Velocity Potentiometer
(SV1B Manufactured before 4-2013)
The Extend velocity potentiometer is used to set the Extend velocity of the actuator’s
rod. The velocity range is stated from 2-100% of maximum velocity. Changes made
to the Extend velocity potentiometer setting will only take effect after the actuator is
stopped and before the next motion is commanded. Turn the potentiometer screw
clockwise to increase the actuator’s rod Extend velocity and counter-clockwise to
decrease the Extend velocity.
Figure 5-10: ICR SV1B Basic Actuator Extend Velocity Potentiometer
5-8
Tolomatic User Guide: ICR Rod Style Integrated Control Actuator
how to use the icr sv 1 b basic actuator : 5
5.9.2 Retract Velocity Potentiometer
(SV1B Manufactured before 4-2013)
The Retract velocity potentiometer is used to set the Retract velocity of the
actuator’s rod. The velocity range is stated from 2-100% of maximum velocity.
Changes made to the Retract velocity potentiometer setting will only take effect
after the actuator is stopped and before the next motion is commanded. Turn the
potentiometer screw clockwise to increase the actuator’s rod Retract velocity and
counter-clockwise to decrease the Retract velocity.
Figure 5-11: ICR SV1B Basic Actuator Retract Velocity Potentiometer
5.9.3 Force Control Potentiometer
(SV1B Manufactured before 4-2013)
The Force control potentiometer is used to set the actuator’s force limit allowing
it to stop and hold (also known as push and hold) in position. The potentiometer
setting must be between 10-100% of the actuator’s capable Force output for
the setting to be activated. Settings of less than 10% disable the Force control
feature. For example, when the actuator makes contact and starts to build up
force, it keeps building force to threshold levels. At that point, the actuator stops
and holds its position.
Push force for locating is best used under low velocity [less than 3"/sec. (76mm/sec.)
recommended] conditions to give the actuator time to react.
Figure 5-12: ICR SV1B Basic Actuator Force Control Potentiometer
Tolomatic User Guide: ICR Rod Style Integrated Control Actuator 5-9
5 : how to use the icr sv 1 b basic actuator
(This page intentionally left blank)
5-10
Tolomatic User Guide: ICR Rod Style Integrated Control Actuator
How to Use the ICR/ICM SV1P Plus
6
The Tolomatic ICR/ICM SV1P Plus actuator incorporates Copley Controls Corporation
drive and control components and utilizes their software to communicate to logic
devices. References to software programs and manuals are provided where
applicable and are on the Tolomatic CD-ROM that shipped with the actuator. The
manuals and software are also available online. Web addresses are provided where
appropriate throughout this section.
6.1 Host Computer Requirements
The ICR/ICM SV1P Plus actuator is designed to be used with a host computer,
PLC or HMI device along with a power supply (see Section 4: Power Supply
Recommendations). Before installing the communication software, be sure the
supplied devices have the minimal host requirements indicated below.
6.1.1 Hardware Requirements
CPU: 400 Mhz
RAM: 128 MB
6.1.2 Operating Systems Supported
Windows®NT, 2000, XP, Vista
Notes for Windows® Vista users:
Windows® Vista is supported in the CME 2® Software supplied on the Tolomatic
CD-ROM shipped with the actuator.
On Installation in Windows® Vista: When the installer starts, a message will be
displayed stating that an unidentified program is trying to access the computer.
Click the button to allow the installer to continue, and CME 2® will be installed
properly.
Program File Storage in Windows® Vista: Other Windows® operating systems
store user data for CME 2® (ccx, ccm, files, etc.) in C:\Program Files\Copley Motion\
CME 2. Due to Windows® Vista security, user data is stored in C:\Users\Public\Public
Documents\Copley Motion\CME 2®.
6.1.3 Software Requirements
Copley Controls CME 2® (Copley Motion Explorer) software, Version 5.1 or higher.
Tolomatic User Guide: ICR Rod Style Integrated Control Actuator 6-1
6 : how to use the I C R / I C M S V 1 P P lus actuator
6.2 Install the CME 2® Software
The CME 2® software is available on the Tolomatic CD-ROM that shipped with the
ICR Plus actuator. It is also available on the Tolomatic web site.
Tolomatic Software Change History
Date
Firmware
CME 2 Software
Release
1.90
5.3
11/10/2011
3.12
6.0
2/21/2013
3.26
6.0
6.2.1 Web Download Install
1. Choose or create a folder location to download the software installation file.
2. Navigate to http://www.tolomatic.com/resources/index.cfm.
3. Make these selections; Click on product line: Electric Linear Motion; then click
on resource tab: Software.
4. Choose the ICR Plus SmartActuator Setup Software v6.0 link.
5. Click and save the Installer.zip file to the selected folder.
6. Extract the contents of the .zip file to the same location. The folder should
contain the Setup.exe file. Run the setup.exe file.
6.2.2 CD-ROM Install
1. Insert the Tolomatic CD-ROM supplied with the ICR Plus actuator. Inserting the
CD will cause the installation script to launch and a CME 2® installation screen
appears. If not, navigate to the root directory and double-click on the
Setup.exe file.
2. Respond to the prompts on the CME 2® installation screens to complete the
installation. It is recommended to accept all the default installation values.
If using Windows® Vista, reference the installation notes on page 6-1.
6.3 Start the CME 2® Software
6.3.1 Initial Communication Setup
1. Double-click the CME 2® shortcut icon on the Windows® desktop to start the
program.
Figure 6-1: Copley Motion Explorer CME 2® Shortcut Icon
6-2
Tolomatic User Guide: ICR Rod Style Integrated Control Actuator
how to use the I C R / I C M S V 1 P P lus actuator : 6
2. For initial communication set up, the Communications Wizard will prompt a
device selection of either Serial Ports or CAN Network.
Figure 6-2: Communication Wizard Device Selection Screen
3. Serial Ports should be selected for RS-232 or DeviceNet control. For these
selections, proceed to 6.4: Configure Serial Port Parameters. If CAN Network is
selected, proceed to 6.5: Configure CAN Network Parameters.
6.4 Configure Serial Port Parameters (RS-232 and DeviceNet)
One or more serial ports on a PC can be used to connect amplifiers. Use the
following instructions to add ports for amplifiers, choose baud rates for the ports,
and remove ports for amplifiers.
This procedure is also used if the amplifier is to run under DeviceNet control. For
more information on DeviceNet setup, refer to the Copley DeviceNet Programmer’s
Guide located on the CD-ROM that shipped with the ICR/ICM Plus.
1.Select Serial Port as the device (see Figure 6-2) in the Communications
Wizard (Tools/Communication Wizard) and click the Next button to open the
Communications Wizard Select Serial Ports screen.
Figure 6-3: Communication Wizard Serial Port Screen
Tolomatic User Guide: ICR Rod Style Integrated Control Actuator 6-3
6 : how to use the I C R / I C M S V 1 P P lus actuator
2. To add ports, from the Available Ports list, select the serial ports to be used for
amplifiers and click Add.
3. To remove ports from the Selected Ports list, select the serial ports and click
Remove.
4.Click Next to save selections and open the Communications Wizard Configure
Serial Ports screen.
Figure 6-4: Communication Wizard Configure Serial Ports Screen
5. From the Selected Ports list, highlight the port desired and select a Baud Rate.
Repeat for each port selected and click Finish to save changes.
6.5 Configure CAN Network Parameters
A CAN port can be used to connect the host PC to one or more amplifiers. Use the
following instructions to configure CAN Network settings.
1. In the Communications Wizard Device Selection screen select CAN Network.
Click Next to open the Communications Wizard Configure CAN Network screen.
Figure 6-5: Communication Wizard Configure CAN Network Screen
6-4
Tolomatic User Guide: ICR Rod Style Integrated Control Actuator
how to use the I C R / I C M S V 1 P P lus actuator : 6
2. Select the appropriate CAN Card, Channel, Bit Rate, and click Finish.
The CAN Card list shows the manufacturer names of all supported CAN cards
that have been connected to the PC and which drivers have been installed.
All amplifiers must be set to the same bit rate (default is 1 Mbit/s).
6.6 CME 2® User Interface and Tool Bar
The CME 2® User Interface features are illustrated in Figure 6-6 below. Screen
details will vary depending on amplifier model and mode selection.
Figure 6-6: CME 2® User Interface Features
The CME 2® Interface Tool Bar contains 11 icons. Their description and functions
are explained in the table below.
CME 2® User Interface Tool Bar Icons and Functions
Basic Setup Icon
Opens the Basic Setup Screen.
Control Panel Icon
Opens Control Panel.
Auto Phase Icon
Not required because the ICR actuator is pre-set at
Tolomatic.
Auto Tune Icon
Not required because the ICR actuator is pre-tuned
at Tolomatic.
Scope Icon
Opens the Scope window.
Tolomatic User Guide: ICR Rod Style Integrated Control Actuator 6-5
6 : how to use the I C R / I C M S V 1 P P lus actuator
CME 2® User Interface Tool Bar Icons and Functions (con’t)
Amplifier Properties Icon
Displays basic amplifier properties.
Save Amplifier Data to Disk Icon Saves contents of amplifier RAM to a disk file.
Restore Amplifier Data From
Disk
Restores an amplifier file from disk to amplifier
RAM.
Save Amplifier Data to Flash
Saves contents of amplifier RAM to flash memory.
Restore Amplifier Data from
Flash
Restores contents of flash memory to amplifier
RAM.
For complete details on the File, Amplifier, Tools and help menu choices and
functional diagram, refer to the CME 2® User Guide furnished on the CD-ROM that
shipped with the ICR Plus actuator.
6.7 ICR/ICM SV1P Plus Amplifier Files
6.7.1 Loading the Amplifier Files
The amplifier file (*.ccx) for the ICR/ICM SV1P Plus actuator is configured and
loaded by Tolomatic at the factory. The amplifier file contains setup, motor, and
tuning information allowing the actuator to operate once it is powered. The default
mode of operation is in a position mode via a program. Input 1 is predefined as
enable. Input 11 (internal) is the motor temperature switch. Digital output #4 is
predefined as the brake output.
If the actuator becomes inoperable for any reason, it can be returned to factory
defaults by copying the amplifier data. Follow steps 1 though 5 in the procedure
outlined in CME 2® User Guide, Appendix A: Copy Amplifier Data, then load the
“ICRSVIP.ccx” file provided with the ICR/ICM SV1P Plus.
IN1 = Enable
IN11 = Motor Temp Switch
6.7.2 Saving Amplifier Files
If any changes to setup, motor, or tuning have been made, a new amplifier can be
saved to the disk with the following procedure:
Click on the ‘Save amplifier data to disk’ icon on the tool bar.
Figure 6-7: CME 2® Save Amplifier Data To Disk Icon
6-6
Tolomatic User Guide: ICR Rod Style Integrated Control Actuator
how to use the I C R / I C M S V 1 P P lus actuator : 6
6.8 Command Sources
6.8.1 Programmable Command
The Indexer programming environment can be used to develop and execute
programs to operate the ICR Plus actuator. To access the Indexer 2 program, click
on the CVM (Copley Virtual Machine) Control Program button on the CME 2® main
screen to open the Indexer 2 Program and I/O Line States screens.
The Indexer 2 Program in the amplifier’s flash memory will be displayed. The
numbers of sequences which have been programmed with steps will be displayed
with a green background, as some of the sequences shown below. The I/O Line
States screen shows real-time status of the amplifier’s digital inputs and outputs.
Figure 6-8: CVM Control Program Indexer 2 Program and I/O Line States
For complete information on programming, functions, ASCII commands over serial,
homing and loading configurations from files using the indexer program, refer to the
Indexer 2 Program User Guide (Indexer_user_guide.pdf) on the Tolomatic CD-ROM
that shipped with the ICR Plus actuator.
Tolomatic User Guide: ICR Rod Style Integrated Control Actuator 6-7
6 : how to use the I C R / I C M S V 1 P P lus actuator
6.8.2 Analog Command
The ICR Plus actuator can be driven by an analog voltage signal through the Analog
Command input. The amplifier can convert the signal to a current (torque), velocity
or position mode. When using the ICR Plus actuator, select the position operating
mode. The encoder on the ICR Plus is not exposed through the connectors and
requires a factory modification in order to utilize the current and velocity mode
scaling parameters. Contact Tolomatic if current or velocity modes of operation
are required.
To program the ICR Plus actuator using the analog input as the command source:
1. In the Basic Setup screen, navigate to the Operating Mode Options screen.
2.Select Position for the Operating Mode.
3.Select Analog for the Command Source.
Figure 6-9: CME 2® Basic Setup Operating Mode for Analog Command Source
4. Refer to the CME 2® User Guide, Section 7.1: Analog Command Settings
supplied on the CD-ROM shipped with the ICR Plus actuator for complete
information on using the analog command setting parameters.
6-8
Tolomatic User Guide: ICR Rod Style Integrated Control Actuator
how to use the I C R / I C M S V 1 P P lus actuator : 6
6.8.3 Digital Input Command
A digital input can be used to command the actuator in a pulse/direction mode
similar to stepper control. This command input is received from a PLC, a motion
controller, or other pulse generating device.
To program the ICR Plus actuator using a digital input as the command source:
1. In the Basic Setup screen, navigate to the Operating Mode Options screen.
2.Select Position for the Operating Mode.
3.Select Digital Input for the Operating Mode.
Figure 6-10: CME 2® Basic Setup Operating Mode for Digital Input Command Source
4. Refer to the CME 2® User Guide, Section 7.3: Digital Position Input Settings for
complete information on using the digital position parameter settings.
6.8.4 Communication Commands
There are three interfaces that can be configured to communicate with the ICR Plus
actuator:
1. ASCII commands over RS-232
A serial port can be used to communicate with the ICR Plus actuator using
RS-232. This command can be received from a PC, PLC, HMI or other device
and can be initiated as a single-axis or multi-drop configuration.
For illustrations on setting up the ICR Plus actuator using RS-232, refer to
pages 3-12 to 3-13. For specifics on the ASCII Command Line Interface, refer
to Appendix G: ASCII Commands/Serial Control of the CME2_User_Guide.pdf
provided on the CD-ROM shipped with the ICR Plus actuator. For constructing
ASCII strings to send serially, refer to ASCII_ProgrammersGuide.pdf contained
on the same CD-ROM.
Tolomatic User Guide: ICR Rod Style Integrated Control Actuator 6-9
6 : how to use the I C R / I C M S V 1 P P lus actuator
2. Optional CANopen
Optional CANopen can be used to communicate with single or multiple ICR Plus
actuators. This command can be received from a PC, PLC, HMI or other device.
For illustrations on setting up the ICR Plus actuator using optional CANopen,
refer to page 3-14. For complete details on CANopen networks, refer to
Section 8: CAN Network Configuration on the CME2_User_Guide.pdf and the
CANopenProgrammersManual.pdf provided on the CD-ROM shipped with the
ICR Plus actuator.
3. DeviceNet
DeviceNet can be used to communicate to single or multiple ICR Plus actuators.
This command can be received from a PC, PLC, HMI or other device.
For illustrations on setting up the ICR Plus actuator using DeviceNet, refer to
page 3-14. For complete programming details and instructions, refer to the
DeviceNetProgrammersGuide.pdf provided on the CD-ROM shipped with the
ICR Plus actuator.
6.9 Diagnostics
6.9.1 Control Panel
The Control Panel is used for general status and control of the ICR Plus actuator.
Use this diagnostic tool to quickly check faults, monitor position, enable/disable, and
initiate simple moves.
To access the Control Panel, click on the Control Panel icon in the tool bar.
Figure 6-11: CME 2® Tool Bar - Control Panel Location
6-10
Tolomatic User Guide: ICR Rod Style Integrated Control Actuator
how to use the I C R / I C M S V 1 P P lus actuator : 6
Highlighted below are the Control Panel features.
Figure 6-12: CME 2® Control Panel Features
For details on using the Control Panel stats indicators, monitor channels and
functions, refer to Section 14: Control Panel on the CME 2® User Guide provided on
the CD-ROM shipped with the ICR Plus actuator.
6.9.2 Scope Tool
The Scope is used for monitoring signals and values in the ICR Plus actuator while
testing motion sequences. It can also be used for fine tuning the actuator.
To access the Scope Tool, click on the Scope Tool icon located on the CME 2® Tool
Bar.
Figure 6-13: CME 2® Tool Bar - Scope Tool Location
Tolomatic User Guide: ICR Rod Style Integrated Control Actuator 6-11
6 : how to use the I C R / I C M S V 1 P P lus actuator
Highlighted below are features of the Scope Tool.
Figure 6-14: CME 2® Scope Tool Screen
For more details on features, function generator and profile tabs, trace channels,
trigger setup, display and control loop parameters, refer to Section 15: Scope Tool
on the CME 2® User Guide provided on the CD-ROM shipped with the ICR Plus
actuator.
6-12
Tolomatic User Guide: ICR Rod Style Integrated Control Actuator
Appendix
7
7.1 ICR_LMI SV1B Basic and SV1P Plus Actuator Dimensions
ICR Plus
0.70 [17.8]
2.36 [60.0]
1.60
[40.7]
BOTTOM
VIEW
M5 x 0.8 6H
0.25 [6.3] (4)
BN02
M5-0.8
0.79 [20.0]
0.984
[25.00]
CAN Open Option
1.81
[45.9]
0.88
[22.2]
M8-1.25
0.75 [19.0]
2.00
[50.8]
56.0
[2.20]
1.06
[26.9]
1.10
[28.0]
ICR Basic
0.64
[16.3]
6.32
[160.5]
+
STROKE
BN05
BN02
3.62
[92.1]
+
STROKE
0.59
[15.0]
0.77
[19.5]
14.33
[364.0]
+
STROKE
CAN Open
Option
BN05
11.63
[295.4]
+
STROKE
7.31
[185.8]
6.31
[160.3]
1.75
[44.5]
0.28
[7.1]
3.14 [79.8]
2.09
[53.1]
0.50
[12.7]
3.94
[100.0]
0.51
[12.9]
1.56
[39.5]
Tolomatic User Guide: ICR Rod Style Integrated Control Actuator 7-1
7 : appendix
7.2 ICR_RP SV1B Basic and SV1P Plus Actuator Dimensions
1.60
[40.7]
ICR Plus RP
3.14
[79.8]
2.00
[50.8]
0.88
[22.2]
Ø1.10
[28.0]
M5 x 0.8 - 6H
0.25 [6.4]
3.94 [100.0]
2.20
[56.0]
M5 x 0.8 - 6H
0.79 [20.1]
ICR Basic RP
M8 x 1.25 - 6H
0.75 [19.1]
BN02
6.24
[158.4]
+
STROKE
BN05
3.57
[90.7]
+
STROKE
1.75
[44.5]
0.59 [15.0]
2.31
[58.7]
CAN Open
Option
0.984
[25.00]
7.3 ICM Plus Dimensions
.127 3.23
Ø.125 3.18
KEYWAY
7.31 [185.8]
0.26 [6.6]
0.70 [17.9]
1.36
[34.6]
0.06
[1.5]
Ø1.500
1.498
38.10
38.05
0.47
[11.9]
STANDARD CONNECTORS
IP65 CONNECTORS
1.22
[31.1]
2.09 [53.0]
0.50
[12.6]
7-2
4.40
[111.9]
0.430
[10.92]
KEYWAY
3.14
[79.8]
Note: The
Ø4.000
[101.60]
BOLT
CIRCLE
.500
Ø.499
12.70
12.67
3.14 [79.8]
BRAKE OPTION LENGTH
0.53
[13.5]
1.22
[31.1]
2.07
[52.6]
9.38 [238.3]
ICM is intended
to be mounted to
Tolomatic Actuators,
It does NOT have
a NEMA or IEC
standard mount.
1.03
[26.2]
0.51
[12.9]
1.56
[39.5]
0.30
[7.6]
Ø.194
[4.93]
THRU (4)
0.81 [20.6]
KEYWAY
LENGTH
1.03
[26.2]
Tolomatic User Guide: ICR Rod Style Integrated Control Actuator
appendix : 7
7.4 ICR_LMI SV1B Basic and SV1P Plus Options Dimensions
BRAKE
IP65
TRUNNION
1.00
[25.4]
BN02
7.51
[190.8]
+
STROKE
1.00
[25.4]
BN02
BN02
16.40
[416.5]
+
STROKE
14.60
[370.8]
+
STROKE
BNO5
BNO5
4.81
[122.2]
+
STROKE
11.90
[302.3]
+
STROKE
13.70
[348.0]
+
STROKE
0.53
[13.5]
2.07
[52.6]
4.00
[101.6]
3.39
[86.0]
MOUNTING
PLATE M P
0.45
[11.5]
1.22
[31.1]
4.00 3.39
[101.6] [86.0]
2.63
[66.7]
1.00
[25.4]
BNO5
MOUNTING
PLATE H M 2
1.22
[31.1]
1.03
[26.2]
1.03
[26.2]
1.00
[25.4]
TUBE CLAMP T C
TRUNNION
MOUNT T R N
Ø.563
[14.29]
4.05
[102.8]
0.45
[11.5]
Ø.4717 11.981
0.4728 12.009
Tolomatic User Guide: ICR Rod Style Integrated Control Actuator 7-3
7 : appendix
7.5 ICR_RP SV1B Basic and SV1P Plus Options Dimensions
BRAKE
2.07
[52.6]
1.00
[25.4]
1.00
[25.4]
4.00 3.50
[101.6] [88.9]
BN02
9.71
[246.6]
+
STROKE
10.93
[277.7]
Ø.22
[5.6]
MOUNTING
PLATE H M 2
BN05
7.06
[179.3]
+
STROKE
0.53
[13.5]
IP65
MOUNTING
PLATE M P
1.22
[31.1]
3.50
4.00 [88.9]
[101.6]
1.00
[25.4]
TUBE
CLAMP T C
Ø.22
[5.6]
TRUNNION
6.57
6.32
166.8
160.5
1.10 [28.0]
BN02
7.09
[180.1]
+
STROKE
CLEVIS
BN02
10.82
[274.8]
+
STROKE
BN05
4.39
[111.5]
+
STROKE
BN05
8.08
[205.2]
+
STROKE
1.06
[27.0]
4.85 [123.2]
11.99
Ø .472
.471 11.96
3.14
[79.9]
0.47
[11.9]
7-4
1.03
[26.2]
0.69
[17.5]
1.240
[31.50]
REAR CLEVIS MOUNT P C D
1.98
[50.3]
TRUNNION
MOUNT T R N
1.10
[28.0]
.500 12.70
Ø .498 12.65
Tolomatic User Guide: ICR Rod Style Integrated Control Actuator
appendix : 7
7.6 ICR SV1B Basic and SV1P Plus Rod End and Switch Dimensions
OPTIONAL Spherical Rod Eye End: SRE
Ø.945 [24.00]
36°
0.457
[11.60]
Ø.315
[8.00]
0.904
[22.95]
0.354 [9.00]
0.157 [4.00]
JAM NUT
OPTIONAL Alignment Coupler Rod End: ALC
INTERNALLY THREADED END SPECIFIED
0.15 [3.8] JAM NUT
M8 x 1.25
EXTERNALLY THREADED END SPECIFIED
1.14
[29.0]
0.15 [3.8] JAM NUT
0.75 [24.0]
M8 x 1.25
0.787
[20.0]
MET OPTION
2.79 [70.8]
2° SPHERICAL MOTION,
0.0625 [1.6] RADIAL FLOAT
0.15 [3.8] JAM NUT
Ø 1.25 [31.7]
THE ALIGNMENT COUPLER COMES WITH AN
INTERNAL THREAD. IF AN EXTERNAL
THREAD IS PREFERRED, THE ADDITION OF
THE ''MET'' OPTION IS REQUIRED.
OPTIONAL External Threaded Rod End: MET
0.394
[10.0]
0.50 0.50
[12.7] [12.7]
M8 x 1.25
0.48
[12.2]
M8 x 1.25
0.10
[2.5]
OPTIONAL Clevis Rod End: CLV
PIN Ø 0.319 [8.10] INCLUDED
0.318 [8.07]
0.237 [6.01]
0.242 [6.14]
0.51
[13.0]
0.10
1.26 [2.5]
[32.0]
0.79 SQ.
[20.0]
0.63 [16.0]
M8 - 1.25 - 6H
SWITCH DIMENSIONS
MOUNTING DIMENSIONS
_ Y - direct connect
DETECTION POINT
SOLID STATE
.31 [8]
DETECTION POINT REED
.51 [13]
ICR20
SWITCHES SIT BELOW
TUBE EXTRUSION PROFILE
197 [5000]
1.10 [27.9]
_ K - QD (Quick-disconnect) switch
M8x1
1.18 [30]
13.35 [339]
8100-9180 - QD Cable
M8x1
1.26 [32.1]
.95 [24.1]
Ø.35
[9]
Ø.28 [7]
197 [5000]
Tolomatic User Guide: ICR Rod Style Integrated Control Actuator 7-5
7 : appendix
7.7 Maintenance and Inspection
The ICR Basic and Plus SmartActuators are lubricated for the life of the actuator. No
additional lubrication is required.
Due to the Controller/Drive/Motor assembly process integral to the ICR actuator,
there are no user-serviceable components in the SmartActuator. Disassembly of the
actuator is not recommended. ICR SmartActuators should be returned to Tolomatic
for evaluation and repair.
Should the return of the actuator be necessary, call our customer service
department and ask for a Return Authorization Number. Package the product
securely and return to Tolomatic.
Tolomatic, Inc.
3800 County Road 116
Hamel, MN 55340
1-800-328-2174
763-478-8000
7.8 Product Warranty
Tolomatic, Inc. warrants all products manufactured by it to be free from defects
in material and workmanship for a period of one year from date of shipment by
Tolomatic. If, within this period, any product is proven to be defective by Tolomatic,
the product will either be repaired or replaced at Tolomatic’s option.
This warranty shall not apply to:
1. Products not manufactured by Tolomatic. Warranty of these products will
conform and be limited to the warranty actually extended to Tolomatic by its
supplier.
2. Damage to the product caused by circumstances beyond the control of
Tolomatic, such as negligence, improper maintenance, or storage.
3. This warranty shall be void in the case of: any repairs or alterations made to
the product by parties other than Tolomatic.
The foregoing warranties are exclusive and in lieu of all other express and implied
warranties. Tolomatic is not subject to any other obligations or liabilities for
consequential damages.
7-6
Tolomatic User Guide: ICR Rod Style Integrated Control Actuator
appendix : 7
7.9 Troubleshooting
7.9.1 Troubleshooting the ICR SV1B Basic Actuator
Symptom / Trouble
No response from actuator
Possible cause / resolution
1. Check power connection for proper cable connection
and bus voltage.
2. Verify that the E-stop and Enable are both active.
3. Verify that direction commands are being sent.
4. Verify that the input return is connected to signal
ground.
5. Check signal cable for proper connection and wiring.
Actuator cannot move load
1. The load is too large.
2. There is too much friction.
3. Side load is excessive.
4. Push force is set too low.
5. Power supply does not have enough current capability.
Actuator is overheating
1. Ambient temperature is too high.
2. Operation is outside of the continuous ratings.
3. Cooling is insufficient.
Actuator is operating erratically
1. Determine if there is regenerative energy.
2. Determine if push force is set too low.
3. Determine if power supply has enough current.
4. Check for irregularities in the load.
Tolomatic User Guide: ICR Rod Style Integrated Control Actuator 7-7
7 : appendix
7.9.2 Troubleshooting the ICR/ICM SV1P Plus
Symptom / Trouble
No response from actuator
Possible cause / resolution
1. Check power connection for proper cable connection
and bus voltage.
2. Verify that the Enable signal is active.
3. Verify that the drive is enabled and no faults are
present.
4. Verify that the input return is connected to signal
ground.
5. Check signal cable for proper connection and wiring.
ICR/ICM cannot move load
1. The load is too large.
2. There is too much friction.
3. Side load is excessive.
4. Power supply does not have enough current capability.
5. Current limits are set too low.
ICR/ICM is overheating
1. Ambient temperature is too high.
2. Operation is outside of the continuous ratings.
3. Cooling is insufficient.
Communication does not work
with RS232 to USB converter or
communication hangs
1. Close CME 2® and disconnect the communication cable
from the actuator.
2. Verify that all drivers for the converter are up to date.
3. Open CME 2®.
4. Wait for the “error Opening Serial Port” message and
click OK.
5. Plug communication cable into the actuator.
6. Click on the designated COM port from the main page.
7. Verify all cabling if problems persist.
ICR/ICM is operating erratically
1. Determine if there is regenerative energy.
2. Current limit is set too low.
3. Following error is set too low.
4. Determine if power supply has enough current.
5. Check for irregularities in the load.
7-8
Tolomatic User Guide: ICR Rod Style Integrated Control Actuator
Copyright © 2015 Tolomatic, Inc. All rights Reserved.
CME 2® is a registered trademark of Copley Controls Incorporated.
All brand and product names are trademarks of their respective
owners. Information in this document is believed to be accurate at
time of publication.
201503261442
3800 County Road 116, Hamel, MN 55340
Phone: 763.478.8000
Toll Free: 1.800.328.2174
Fax: 763.478.8080
Email: [email protected]
www.tolomatic.com