1
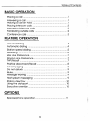
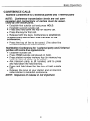
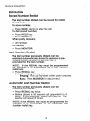
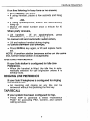
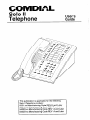
COMDlAL
SoloII
TeleDhone
This publication is applicable for the following
Solo II Telephone models:
5531 -xx Manufacturing
Code REV E and Later
5531 S-xx Manufacturing
Code REV F and Later
5432X-xx Manufacturing
Code REV A and Later
15432S-xx Manufacturing
Code REV A and Later
User’s
Guide
:’
Table of Contents
BASIC OPERATION
OPTIONS
Speakerphone
operation
~~~~,,~~~~~~..~...~~~~,~~,,~..~~.~~~~~~~~~~~~~~~
11
...
111
/
SPKR KEY
SPEUERPHOHEYOrEL51
.MUERPHOWE OH/OFF/
HANDSET CORD JACK
MONITOR
KEY . HAWOSFREE
CKL YO”ITOR,Y
. DO“OT DISTURB
II/
I
I \lI‘an
II L-ii
I
MICROPHONE
OPENING
ISPEhxE(ERPHO”E
YOULSl
LINE
PULL
OUT
DIRECTORY
KEYS-
STATION
POWER SUPPLY
TRANSFORMER
‘L’NE
’ KEYCO”FERE”C,“O
ON LEFT’
. Ew8l.E
TELEPHONE
Solo II Controls
and Indicators
POWER
CORD
Basic Operation
BASIC OPEl?ATlON
PLACING A CALL
On Hook
l
Press line key. Listen for dial tone.
l
Dial number.
l
Lift handset when party answers.
l
Hang up handset to end call.
Off Hook
l
Lift handset.
l
Press line key. (This step is not necessary if idle
line preference has been assigned to station.)
l
Listen for dial tone.
l
Dial number.
l
Hang up handset to end call.
ANSWERING A CALL
l
l
Press flashing line key. (This step not necessary if
ringing line preference is assigned and is ringing)
Lift handset
PLACING A CALL ON HOLD
l
Press. HOLD.
To return to call on hold,
l
Press flashing line key.
NOTE: Any station can retrieve held call.
HOLD RECALL - A held call will automatically
sound three tone
bursts at the station which placed it on hold after a
programmed
period of time.
:
Basic Operation
ABANDON HOLD DETECTION - If a distant party hangs up and
the host system provides disconnect
supervision, the holding
station will:
l
Drop line from hold condition
l
Turn off tine status indicator
PLACING INTERCOM CALLS
Voice Announcing
l
Lift handset.
l
Press ITCM.
l
Press station number memory key (in memory key
field) for desired station.
0 Voice announce message.
l
Wait for reply or hang up.
Tone Ringing
l
While on hook, press ITCM.
l
Press station number memory key twice.
When party answers,
l
Lift handset to talk.
ANSWERING INTERCOM CALLS
To answer a voice announced
intercom call,
l
Lift handset to talk.
or tone ringing
TRANSFERRING OUTSIDE CALLS
If the line on which the call appears is shared
by you and the station to receive the call,
l
Press ITCM.(Call is placed on hold automatically.)
l
Press station number memory key for the desired
station.
l
Voice announce the call and line number.
l
Hang up handset.
If the line on which the call appears is not
shared by you and the station to receive the
call,
l
Use host system transfer facility.
NOTE:
See TAP/Recall
discussion.
2
/:
Basic Operation
CONFERENCE CALLS
Multiline
Conference
for 2 external
parties and 1 internal
NOTE:
Conference
transmission
levels are not compensated and connections
of parties must be supervised by one inside party.
l
Establish first outside call and press HOLD.
l
Establish second outside call.
l
Press and hold down line key for second call.
l
Press line key for first call.
l
Release both line keys. Conference is established.
To selectively disconnect
one member of the
conference,
l
Press line key of line to be saved. (The other line
will automatically be disconnected.)
Multistation Conference
for 1 external party and 2 internal
parties with same line appearance
l
Establish outside call.
l
Press ITCM (outside call placed on hold).
l
Press station number memory key (in memory key
field) for desired station to be added .
l
Ask intercom party to lift handset, and to press
and hold down the held line key.
l
Press and hold down the line key of held outside
call.
l
Release line keys at your station and at intercom
called station to establish conference.
NOTE:
Sequence
of release in not important.
3
party
Feature
Operation
FEATURE OPERATION
LINE MONITORING
Handsfree dial a number,
l
Press line key.
l
Dial number.
l
Monitor call ringing.
l
Lift handset when party answers.
To activate line monitoring while on a call,
l
Press MONITOR.
. Hang up handset.
NOTE: Useful when a pafly places you on hold.
can monitor until caller’s return, then lift handset
resume con versa tion.
To cancel monitoring,
l
Lift handset to resume conversation.
-OR. Press MONITOR to disconnect.
AUTOMATIC
!
You
to
DIALING
There are 40 auto dial storage locations available in Iwo
levels of 20 locations per level. The HOLD key is used in a shift
function to get to the second level of auto dial locations.
To automatically
dial numbers,
. Press desired key (in memory key field) for auto
dial locatiyFRl -20 (level 1.
I
l
Press HOLD key then desired key for auto dial
locations 21-40 (level 2).
When party answers,
l
Lift handset.
NOTE: The station automatically
chooses the line that
was stored as part of the auto dial location.
if that
line is busy, press a line key and make the auto dial
selection again. If no line is stored, the station automaticaliy chooses the last tine that was used. If the
last line used is busy, the station automatically
selects
if the idle
the idle line preference (if one is assigned).
r.
/:
c
Feature Operation
line preference is busy or unavailable, press a line key
and make the auto dial selection again.
To program numbers,
Press ITCM.
Press SAVE. Listen for tone.
Press desired key (in memory key field) for
autodial ltc&ons l-20 (level 1). Tone will stop.
s
Press HOLD key, then memory key for auto dial
locations 21-40 (level 2).
If specific line is to be used, press that line key.
Dial number sequence to be stored (up to 32
digits).
l
Press dial pad to store digits 1-9, 0, #, and ++.
l
Press HOLD to store pause if required.
l
Press TAP to store hookswitch flash if required.
Press SAVE and repeat procedure from auto dial
key selection for each number to be stored.
Press MONITOR to end programming.
Record level 1 autodial ID on the index card and
record level 2 autodial ID on the pull-out directory.
STATION SPEED DIALING
To speed dial numbers,
l
Press desired keypad key for speed dial locations
1-9, & 0. (If on line listening to dial tone, press
HOLD key and then dial desired keypad key 1-9,
& 0.
NOTE: Refer to the note given in the Automatic Dialing
discussion
concerning
automatic
line choice by the
station.
To program numbers,
l
Following same steps given for Automatic Dialing
using the keypad keys 1-9, & 0 as speed dial
locations.
l
Record speed dial ID on station pull-out directory.
5
Feature
Operation
REDIALING
Saved Number Redial
lhe last number dialed can be saved for redial
at anytime.
To save number,
0 Press SAVE, during or after the call.
To dial saved number,
l
Press HOLD key.
l
Press SAVE key.
When party answers,
l
Lift handset.
To cancel,
l
Press MONITOR.
Last Number Redial
The last number previously dialed can be
redialed automatically
stored to replace a previously stored number. A special key is
provided for the last number.
NOTE: If the RED/AL key must be programmed
for autodial,
it is unavailable
as a last number
redial key.
l
Press REDIAL key.
l
Listen for ringing or bus tone.
Ringing: Pick up K andset when party answers.
Busy: Press MONITOR to disconnect.
Automatic Last Number Redial
The last number previously dialed can be
redialed repeatedly.
l
Press REDIAL key twice.
l
Station places a 20 second call (equivalent to 5
rings). If not answered, station will hang up. Sequence will repeat IO times).
MOTE: if the RELYAL key must be programmed
autodial
it is unavailable
as an automatic
number redial keys
for
h3sf
Feature
If on line listening to busy tone or no answer,
l
Press REDIAL key twice.
l
If using handset, pause a few seconds and hang
UP.
-ORl
If using speakerphone,
station will automatically
hang up.
l
Station will redial number once a minute for IO
minutes.
When party answers,
(If on speakerphone,
press
l
Lift handset.
MONITOR key or station will hang up.)
To cancel call and automatic
redial action,
l
Lift and replace handset during ringing.
To cancel between call attempts,
l
Press REDIAL key again, or lift and replace handset.
NOTE: If anofher station becomes active on the same
line, further redial action is suspended.
IDLE LINE PREFERENCE
If your Solo station is configured
for Idle line
Preference,
l
When the handset is lifted, the idle line is automatically selected for call origination unless it is
already busy.
RINGING LINE PREFERENCE
If your Solo II telephone
is configured
for ringing
line preference,
l
An incoming call ringing on any line can be
answered without first pressing the line key.
TAP/RECALL
If your system has been configured
for tap,
l
Press TAP to generate a timed “Hookswitch
Flash” for accessing PBX, Centrex, and custom
calling services.
Operation
Feature
Operation
If your system has been configured
for recall,
l
Press TAP to disconnect (as if you had hung up),
and obtain a new dial tone for another call.
NOTE: System
not for both.
can be configured
for recall or tap, but
POSITIVE DISCONNECT/RECALL
l
l
If the hookswitch in the handset cradle is pressed
and released while the handset is off-hook, a
timed disconnect of the active line is performed.
This feature retains the dial tone recall feature for
use on stations
where
the TAP key is
programmed to provide a “TAP” feature.
When the handset is hung up after a call is completed, positive disconnect prevents false ringback from the host system.
ALL-CALL PAGING
For voice announce
paging to all Solo stations
on the intercom link via the station speaker,
l
Press ITCM.
l
Lift handset.
NOTE: Station disconnects
if handset is not Med.
l
Press ALL-CALL key (this is the station number
memory key (in memory key field) for your station.)
l
Make announcement.
l
Hang up handset.
DO NOT DISTURB
To silence your ringer and block incoming
voice announcing,
l
Press MONITOR (monitor light turns on).
NOTE:
The incoming call will still flash the line key
light.
To cancel do not disturb,
l
Press MONITOR again (monitor light turns off).
Feature Operation
MUTE
To prevent other party from hearing,
l
Press MUTE (monitor light flutters).
l
Press MUTE again to resume
(monitor light turns off).
conversation
MESSAGE WAITING
For internal system messaging, the message
betweenSolo
stations, waiting light of one station is controlled
by another station designated
as the Message Center by programming.
NOTE:
The message waiting light is located directly
above the HOLD key.
To turn station message waiting light on,
l
Press +# (idle intercom line automatically selected
for use).
l
Press station number memory key (in memory key
field) for called station. (Calling station automatically disconnects.)
To turn message waiting light off,
l
Press +Ktwice.
l
Press station number memory key (in memory key
field) for called station. (Calling station automatically disconnects.)
HOST SYSTEM MESSAGING
(Only Available on 5432X and 5432s Module)
l
The message waiting light (located above the
HOLD key)may be controlled by action taken at
the host system message desk. Signals from a
conventional PBX system using 90 volt signalling
are detected on the tip and ring leads of the
programmed
line. Signals from a host system
using 10 volt messaging are detected on a
separate pair provided in the power jack (optional).
NOTE: All messaging
schemes
will light the same
message waiting light.
Verify the scheme used on
your
installation
to determine proper message pick
up procedure.
9
Feature
Operation
STATION DIRECTORY
A pull-out shelf contains a paper station directory card which can be used to store identifications as follows:
l
Level 2 autodial identification for locations 21-40.
l
Speed dial identification locations for locations 1-O.
NOTE: The identification
for the level 1 auto dial locations l-20 should be placed on the station index card
(located between
the memory keys) along with the
identification
of station select key.
USING THEDATAPORT
(Auxiliary jack located on back edge of station)
The Solo Ii is equipped
with a dataport/auxiliary
jack. This jack is a standard RJl 1 configured
modular jack, and is connected
directly across
line 2, This dataport
is not controlled by the Solo II
hookswitch.
It is used to connect adjunct devices
such as modems and devices such as modems
and data terminals to the line. Some adjunct
devices can be operated
on the line at the same
time that the Solo II is off-hook on the same line,
while others cannot.
Refer to the manual associated with the device for details.
EXECUTIVEOVERRIDE(Of Privacy)
If your Solo station is configured
for Executive
Override of Privacy, you can break into a conversation on an outside line or the interom line.
l
Press lighted line or intercom key.
l
Join in-progress call.
10
OPTIONS
SPEAKERPHONE OPERATION
NOTE:
A speakerphone
can be identified
by the
microphone
opening on the front right-hand
edge of
the housing (refer to the illustration
provided
in the
front of this manual).
PLACING A CALL
l
Press line key.
l
Dial number or press memory key.
When party answers,
l
Speak toward the station.
ANSWERING A CALL
l
Press line key.
l
Speak toward the set.
ENDING A CALL
l
Press SPKR.
SWITCHING FROM HANDSET TO SPEAKERPHONE
l
Press SPKR.
l
Hang up handset.
SWITCHING FROM SPEAKERPHONE TO HANDSET
l
Lift handset.
11
Thb manual b
been dewloped
bv Comdiol Corporation
(the ‘Cornpaw?
and is intended for the use
of its customers and service personnel. The inforination
in this markal
is subject to cha
8 without
notice. While every effort has been made to eliminate enors, the Company
disclaims liobl7 Itv for any
diiiuttiis
arising from the interpretation
of the information
contained
herein. The information
contained
herein &es not ~urwrt to cowr ail ctetnik or vorintions in nnuinmant
nor to nrovirb fnr
every possible contlngencyrt6”be
met in connection
with imtollation. operation,
or maintenance.
should further information
be desired, or should partkxlar
problems arise which are not covered
SUffiiienttY for the purchasefs
purposes. contact
Comdiil,
Customer Service Department,
P.O. Box
7266, Chorlottesvllle, VA 22906.
1
COMDIAL
Charlottesville, Virginia 22906-7266
Printed
in U.S.A.
GCA
70-l 22.01
8/W