1
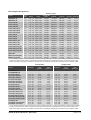
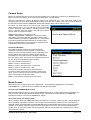
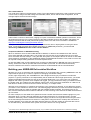
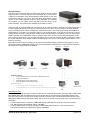
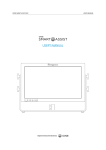
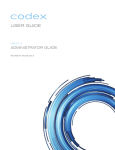
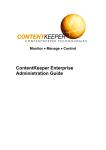
ALEXA
XR Module Workflows
W H I T E
3 July 2013
P A P E R
Introduction
Most of the big Hollywood features that were shot in ARRIRAW were recorded on Codex recorders. The
technology used by Codex, its reliability, smooth workflow and their reputation led us to engage in a close
partnership, to create a more powerful integrated recording module for the ALEXA. The fruit of this
collaboration is the ALEXA XR Module which, for the first time, allows uncompressed in-camera ARRIRAW
recording. This not only makes for a smaller and lighter ARRIRAW camera package, it also simplifies setup
and operation and enables a faster, more reliable and more versatile workflow on set.
This document provides an introduction to the workflows related to the ALEXA XR Module.
Changes
This is a revision of the first ALEXA XR Module Workflows white papers that were published on March 6 and
27. The first revision contained changes to the Capture Drive Format Overview and some performance test
results for the three example workflows. This revision adds a paragraph about metadata in the camera setup
and corrects some information for the single dock setup.
Table of Contents
Introduction ....................................................................................................................... 2
Changes ............................................................................................................................. 2
Table of Contents ............................................................................................................. 2
The XR Module .................................................................................................................. 3
The XR Capture Drive ....................................................................................................... 3
SxS Camera Adapter for SxS PRO Cards ....................................................................... 3
ARRIRAW T-Link Output .................................................................................................. 3
Recording Format Overview ..................................................................................... 4
Camera Setup .................................................................................................................... 5
Production Metadata ................................................................................................ 5
Media Access .................................................................................................................... 5
Uncompressed ARRIRAW Recording ...................................................................... 5
The Codex Virtual File System (VFS) ....................................................................... 5
The Codex Platform .................................................................................................. 7
Compressed ProRes or DNxHD Recording ............................................................. 7
Building your ARRIRAW Deliverables Workflow ........................................................... 7
Single Dock Setup .................................................................................................... 8
Dual Dock Setup ....................................................................................................... 9
Codex Vault ............................................................................................................ 10
Accessing UDF Volumes (XR Capture Drives and SxS PRO cards) ..................... 11
Scaling your Workflow ................................................................................................... 11
More Information ............................................................................................................ 11
ALEXA XR Module Workflows - White Paper
Page 2 of 11
The XR Module
All ALEXA XT cameras come with the XR Module, which was co-developed with Codex. The XR Module is a
camera side panel that replaces the popular SxS Module and thereby completes the selection of formats that
are available for in camera recording. Also being available as an upgrade for all classic ALEXA cameras, the
XR Module is another manifestation of the modular upgradeability that ARRI built into the ALEXA design
from the very beginning.
1
The XR Module allows in-camera ARRIRAW, ProRes, and DNxHD recording up to 120 fps onto the
exceptionally fast XR Capture Drives. Removing the need for the external recorder makes shooting
ARRIRAW easier and faster than ever before. The camera package becomes more compact, solid, and
lighter. There are no more cables to worry about and less configuration that needs to be done. ProRes and
1
DNxHD recording on XR Capture Drives provides significantly longer recording times, while it is also
possible to continue using SxS PRO cards in the XR Module, with an SxS adapter from ARRI.
The XR Capture Drive
Capturing 120 fps of uncompressed ARRIRAW data requires a throughput of almost 850 MB per second.
Clearly, this calls for something much faster than SxS PRO cards. The XR Capture Drives by Codex are
equipped with highly reliable solid-state drive technology in a small and rugged aluminum housing. They
share the same mechanical interface as the Codex Onboard S Capture Drives (60 fps max) and Transfer
2
Drives (2x capacity, not for recording) and can be accessed using the standard Codex docking stations .
3
As with SxS PRO cards, you can record different frame rates, codecs, resolutions, or aspect ratios on the
same Capture Drive. The ALEXA formats the drives with different file systems for ARRIRAW recording and
compressed recording. Therefore, compressed ProRes or DNxHD clips and uncompressed ARRIRAW
footage cannot be recorded on the same drive.
SxS Camera Adapter for SxS PRO Cards
With the optional SxS Adapter, it is also possible to keep using SxS PRO cards for ProRes and DNxHD
recording in the modes that were available from the SxS module, except for simultaneous output to two
cards (dual recording).
ARRIRAW T-Link Output
ALEXA XT cameras and cameras that are updated with an XR Module will no longer output ARRIRAW via
T-Link. The Codex Platform can generate other file formats directly from the ARRIRAW data on a Capture
Drive (see Media Access below). Parallel recording of an editing proxy in addition to ARRIRAW data
therefore has become redundant. ALEXA cameras with an SxS Module continue to offer T-Link output.
1
2
3
DNxHD recording is temporarily unavailable on cameras with an XR Module (ALEXA XT or upgrades from classic models).
Cameras with an SxS Module and cameras with an XR Module are running on two different software branches.
Classic cameras running ALEXA SUP 7.0.2 therefore are not affected.
ARRI has not validated the Codex Onboard S Capture Drives for use in ALEXA XR upgraded or ALEXA XT cameras, but the OBS
Capture Drives have been tested by Codex.
To record and play back footage in 4:3 or 16:9 aspect ratio, the camera needs to be switched to the according sensor mode.
ALEXA XR Module Workflows - White Paper
Page 3 of 11
Recording Format Overview
XR Capture Drive
fps
Output
File Size per Data Rate
2
Frame
@ 24 fps
2
Data Volume
2
Rec Time
Rec Time
Aspect
Ratio
Range
ARRIRAW 2.8K
4:3
0.75 – 48
2880 x 2160
9.33 MB
1.79 Gbit/s
806 GB/h
35 min
17 min
ARRIRAW 2.8K
16:9
0.75 – 120 2880 x 1620
7.00 MB
1.34 Gbit/s
605 GB/h
47 min
9 min
ProRes 4444 2K
4:3
0.75 – 48
2048 x 1536
2.19 MB
425 Mbit/s
195 GB/h
70 min
35 min
ProRes 4444 2K
16:9
0.75 – 60
2048 x 1152
1.66 MB
320 Mbit/s
146 GB/h
93 min
37 min
Format
ProRes 4444 HD
2
1
Pixels
@ 24 fps
@ 24 fps @ max fps
16:9
0.75 – 60
1920 x 1080
1.44 MB
280 Mbit/s
128 GB/h
107 min
21 min
ProRes 422 (HQ) 2K
4:3
0.75 – 48
2048 x 1536
1.44 MB
280 Mbit/s
130 GB/h
105 min
52 min
ProRes 422 (HQ) 2K
16:9
0.75 – 60
2048 x 1152
1.09 MB
210 Mbit/s
98 GB/h
140 min
56 min
ProRes 422 (HQ) HD
16:9
0.75 – 120 1920 x 1080
0.95 MB
185 Mbit/s
85 GB/h
160 min
32 min
ProRes 422 2K
4:3
0.75 – 48
2048 x 1536
0.96 MB
190 Mbit/s
87 GB/h
158 min
31 min
ProRes 422 2K
16:9
0.75 – 60
2048 x 1152
0.72 MB
140 Mbit/s
65 GB/h
211 min
42 min
ProRes 422 HD
16:9
0.75 – 120 1920 x 1080
0.63 MB
125 Mbit/s
57 GB/h
241 min
48 min
ProRes 422 (LT) 2K
4:3
0.75 – 48
2048 x 1536
0.66 MB
130 Mbit/s
63 GB/h
228 min
45 min
ProRes 422 (LT) 2K
16:9
0.75 – 60
2048 x 1152
0.49 MB
100 Mbit/s
45 GB/h
305 min
61 min
ProRes 422 (LT) HD
16:9
0.75 – 120 1920 x 1080
0.44 MB
90 Mbit/s
40 GB/h
347 min
69 min
ProRes 422 (Proxy) 2K
4:3
0.75 – 48
2048 x 1536
0.29 MB
60 Mbit/s
27 GB/h
513 min
102 min
ProRes 422 (Proxy) 2K
16:9
0.75 – 60
2048 x 1152
0.22 MB
45 Mbit/s
20 GB/h
687 min
137 min
ProRes 422 (Proxy) HD
16:9
0.75 – 120 1920 x 1080
0.19 MB
40 Mbit/s
18 GB/h
780 min
156 min
3
16:9
0.75 – 60
1920 x 1080
1.83 MB
350 Mbit/s
159 GB/h
85 min
34 min
16:9
0.75 – 120 1920 x 1080
0.91 MB
175 Mbit/s
79 GB/h
170 min
34 min
16:9
0.75 – 120 1920 x 1080
0.60 MB
115 Mbit/s
52 GB/h
255 min
51 min
DNxHD 444
DNxHD 175x/185x/220x
DNxHD 115/120/145
1
2
3
3
3
The fps range is divided into regular speed (0.75 – 60 fps) and high speed (60 – 120 fps) mode. Switching modes requires a reboot.
ProRes is a variable bit rate codec. The actual file size, data rate and resulting storage requirements vary with the image content.
DNxHD recording is temporarily unavailable on cameras with an XR Module. DNxHD 444 is planned for a future software update.
32 GB SxS PRO
Format
fps Range
1
64 GB SxS PRO
Recording
Time
Recording
Time
fps Range
1
Recording
Time
Recording
Time
@24 fps
@ max fps
@ 24 fps
@ max fps
4:3 ARRIRAW 2.8K
–
–
–
–
–
–
16:9 ARRIRAW 2.8K
–
–
–
–
–
–
0.75 – 30
9 min
7 min
0.75 – 48
19 min
9 min
2
0.75 – 40
12 min
7 min
0.75 – 60
25 min
10 min
2
0.75 – 40
14 min
8 min
0.75 – 60
29 min
11 min
0.75 – 40
14 min
8 min
0.75 – 48
28 min
14 min
2
0.75 – 60
19 min
7 min
0.75 – 60
38 min
15 min
2
0.75 – 60
21 min
8 min
0.75 – 120
43 min
8 min
0.75 – 48
21 min
10 min
0.75 – 48
43 min
21 min
2
0.75 – 60
28 min
11 min
0.75 – 60
57 min
11 min
2
0.75 – 60
32 min
13 min
0.75 – 120
65 min
13 min
0.75 – 48
30 min
15 min
0.75 – 48
61 min
31 min
2
0.75 – 60
41 min
16 min
0.75 – 60
82 min
16 min
2
0.75 – 60
46 min
18 min
0.75 – 120
93 min
18 min
0.75 – 48
68 min
34 min
0.75 – 48
139 min
69 min
2
0.75 – 60
92 min
36 min
0.75 – 60
186 min
36 min
2
0.75 – 60
104 min
41 min
0.75 – 120
211 min
41 min
0.75 – 60
12 min
5 min
0.75 – 60
24 min
9 min
0.75 – 60
24 min
9 min
0.75 – 120
48 min
9 min
0.75 – 60
36 min
14 min
0.75 – 120
72 min
14 min
4:3 ProRes 4444 2K
2
16:9 ProRes 4444 2K
16:9 ProRes 4444 HD
4:3 ProRes 422 HQ 2K
2
16:9 ProRes 422 HQ 2K
16:9 ProRes 422 HQ HD
4:3 ProRes 422 2K
2
16:9 ProRes 422 2K
16:9 ProRes 422 HD
4:3 ProRes 422 (LT) 2K
2
16:9 ProRes 422 (LT) 2K
16:9 ProRes 422 (LT) HD
4:3 ProRes 422 (Proxy) 2K
2
16:9 ProRes 422 (Proxy) 2K
16:9 ProRes 422 (Proxy) HD
16:9 DNxHD 444
3
16:9 DNxHD 175x/185x/220x
16:9 DNxHD 115/120/145
1
2
3
3
3
The fps range is divided into regular speed (0.75 – 60 fps) and high speed (60 – 120 fps) mode. Switching modes requires a reboot.
ProRes is a variable bit rate codec. The actual file size, data rate and resulting storage requirements vary with the image content.
DNxHD recording is temporarily unavailable on cameras with an XR Module. DNxHD 444 is planned for a future software update.
ALEXA XR Module Workflows - White Paper
Page 4 of 11
Camera Setup
Without an external device to mount and no extra cables to run, rigging the camera for an ARRIRAW shoot
takes no longer than setting up the recording for SxS cards. It is that simple.
With an integrated XR module, all settings need to be configured only once, and some settings are
completely gone, as they were automated or became redundant. As a matter of fact, all you need to do is set
the internal recording mode to ARRIRAW, load an XR Capture Drive and be ready to shoot.
Of course, you also need to set up time code, ASA rating,
white balance and so on, but that also goes for recording
ProRes. Changing frame rates or switching between 16:9
and 4:3, however, does not require a trip into the recorder's
menus, which is a great time saver.
ARRIRAW recording is configured under
'MENU > RECORDING > INTERNAL', which was named
'SxS Cards' previous to SUP 8.0. The menu controls if the
camera records uncompressed ARRIRAW, or a compressed
format like ProRes (later also DNxHD) on the XR module.
ProRes or DNxHD files can be recorded on Capture Drives
or SxS PRO cards with an SxS adapter.
Production Metadata
The camera offers a small set of general production
metadata. This data is usually needed, or at least very
helpful, when the recorded footage will be organized by the
editors. Rather than making the data wrangler add this
information for every take, when the footage is transferred
from the capture drive, the camera can automatically do that
for him, once the meta data has been entered.
The most important information is:
MENU > Project > Camera index
MENU > Project > Production info > Production
MENU > System > System time + date
Entering all production info can be somewhat timeconsuming. When more than one ALEXA is used for the
shoot, you can copy the info from one camera to another
with a user setup on an SD card under
MENU > User setups > Save/Load current setup.
Media Access
Depending on the recording mode of the XR Module – uncompressed ARRIRAW or compressed
ProRes/DNxHD – a capture drive is formatted with different file systems.
Uncompressed ARRIRAW Recording
When the XR Module is set to uncompressed ARRIRAW recording, an XR Capture Drive is initialized as a
Codex volume, which offers 455 GB of storage space. This allows for 47 minutes of 16:9 ARRIRAW
recording at 24fps or 9 minutes of ARRIRAW at 120fps.
The Codex Virtual File System (VFS)
When a Capture Drive with ARRIRAW footage is loaded on a computer, it shows up like a regular external
drive. Operating underneath, however, is the Codex Virtual File System (VFS). The VFS can present, for
example, readily processed DPX files, MXF/DNxHD and/or QuickTime/ProRes proxies next to the original
ARI files on the Codex volume. Except for the recorded data on the drive, none of these additional files
actually exist. It's only when these files are requested, that they are generated, on-demand, and on the fly.
Hence the term "virtual".
ALEXA XR Module Workflows - White Paper
Page 5 of 11
The file formats, file naming and directory structure that will be presented by the VFS are fully configurable
through the Codex Platform software. This makes the VFS a highly flexible tool for providing exactly the
material you require, when you want it, without redundant processing and storage overhead on your drives.
The default VFS configuration for the output of only ARRIRAW files uses the following file path:
<Extension>/<Roll>/<Shot>/<Shot>.<TC Frames>.<Extension>
ALEXA XR Module Workflows - White Paper
Page 6 of 11
The Codex Platform
You could call it Codex's universal remote control. The Codex Platform software is used to operate recorders
or their docks, manage recorded footage and metadata, select, add or edit the VFS configuration, and to
manage capture drives and mass storage.
Codex offers a number of documents, ranging from quick overviews to detailed operation instructions. Three
documents that will give you a good overview of the basic software functions are the Main Tab Guide, the
Storage Tab Guide and the VFS (Virtual File System) Guide. This and more information is available at
http://www.codexdigital.com/support/media-stations.
Once you understand the main concept, you can proceed with other in-depth guides covering the whole
setup. To see what the Codex file workflow looks like in an ARRIRAW production, you should read
"Processing ARRIRAW with the Codex Transfer Station".
Compressed ProRes or DNxHD Recording
When an ALEXA is set to record ProRes 2K/HD or DNxHD, an XR drive is initialized as a UDF volume,
which offers 229 GB of storage space. This equals over 100 minutes of 16:9 ProRes 4444 in 2K or three
1
hours of ProRes 422 HQ at 24 fps . Using the UDF file system on XR Capture Drives as well as on SxS PRO
cards maintains compatibility to the established ALEXA ProRes/DNxHD workflows. Thus, little to no time will
be required to adapt existing workflows to the XR Capture Drives.
As with SxS PRO cards, an XR Capture Drive containing ProRes 2K/HD or DNxHD clips can be accessed
directly, without the need for (but also without the benefits of) the VFS. The file names and directory
structure created on the drives or cards are the same for old SxS Module and the new XR Module.
Building your ARRIRAW Deliverables Workflow
Whether you are on a production with a small budget or on a big feature film, recording ARRIRAW to the XR
Capture Drives opens up a number of options for managing the camera footage.
A basic, light weight setup, with a MacBook Pro and a Single Dock will get you started on small scale
projects. To get the performance and dependability that is needed to endure larger productions, you should
replace the MacBook with a Mac Pro and go for the Codex Dual Dock. If you can't bring your rigged DIT
Magliner and need to go with a more compact and rugged, yet high-performance setup, you should consider
the Codex Vault. On a feature film with different camera units, there could be a combination of a Mac Pro &
Dual Dock for studio work and a Vault for location shooting – or multiple Vaults.
Although some consistency in workflows is important, every production is different, so it is difficult to present
you with the "one workflow to rule them all". The following pages therefore just show some basic examples of
workflow setups that you could put together with the available Codex hardware. This should give you an
idea, how the data travels from location to editorial or to the screening room and how the data can be backed
up or archived.
For each example, we also state some speed test results. Please note that these results highlight only one
parameter which, by itself, does not represent the overall performance of a particular setup in real life
conditions. Obviously, there is a difference between copying one drive in a single test and running the entire
set of data management tasks for ten drives on a daily basis. Using the Vault or a setup with a Dual Dock
therefore delivers much more than just faster transfer speed. It's also the number of processes that can be
run simultaneously, that decides which system outruns the others over a long distance.
1
The reason for the reduced storage space is that currently, only one SSDs inside the XR Capture Drive is utilized for recording.
ALEXA XR Module Workflows - White Paper
Page 7 of 11
Single Dock Setup
The Single Dock USB3 accepts one XR Capture Drive, Codex Capture
Drive or Transfer Drive at a time. It connects to a computer via USB 3.0
and comes with the basic version of the Codex Platform software (Mac
only). A license for full VFS configuration options is available directly from
Codex. The Single Dock USB3 can be ordered from ARRI or Codex.
A MacBook Pro with USB 3.0 and Thunderbolt, a Single Dock and RAID-protected storage could be a lightweight setup for backing up ARRIRAW footage to e.g. a RAID and shuttle disks. With the basic Codex
Platform software, the VFS is limited to output .ARI files and Codex shot lists in a fixed file structure.
Providing debayered image formats, audio or, for example CDL data requires an upgrade to the full version
of the software. We do recommend, however, that deliverables will be created on another machine, as just
the backing up of footage will consume a considerable amount of time with this setup.
Available functions:
Copy Capture Drives to external storage
Checksum verification
Generate .ARI files for post production
Clear the data from the recording media
Optional features:
Codex full VFS license, to enable VFS configuration
Codex Offloader option, for verified copies to external drives
Performance Test
We ran speed tests in Mac OS X 10.8.2 on a Retina MacBook Pro 2.3 GHz Intel i7 with 8 GB / 1600 MHz
DDR3 RAM. The Mac was connected via USB 3.0 to a Codex Single Dock. The files were written to a 6TB
Western Digital My Book Thunderbolt Duo Disk, with a reported write speed of about 230 MB/s (Black Magic
Design Disk Speed Test). We timed each transfer using a simple copy command without verification.
• A full XR Capture Drive containing ARRIRAW footage (455 GB) took about 49 minutes to transfer.
The .ARI files were generated at approx. 160 MB/s.
• A full XR Capture Drive containing ProRes footage (229 GB) took about 26 minutes to transfer.
The QuickTime files was transferred at approx. 150 MB/s.
Important Note
This setup will provide basic access to the ARRIRAW files and may be sufficient for small scale projects with
a predictable amount of footage. However, the hardware was not designed for processing large amounts of
data. Therefore, we do not recommend using a lightweight setup like this for a deliverables workflow on a
longer production that shoots several hours of footage per day.
ALEXA XR Module Workflows - White Paper
Page 8 of 11
Dual Dock Setup
The Dual Dock offers two slots for loading XR Capture Drives, Codex
Capture Drives or Transfer Drives. The dock needs to be connected to
a Mac Pro workstation using Serial Attached SCSI (SAS) for the data
channel and USB 2.0 for control. The Dual Dock ships with the basic
version of the Codex Platform software. Once hardware and software
are installed, you can obtain a free upgrade to the full version of the
Codex software. The Dual Dock is available from ARRI or Codex.
A Mac Pro with an internal RAID and a Dual Dock can be used to transfer .ARI files to the internal storage or
to clone Capture Drives from one slot to Transfer Drives in the other. Cloning creates a verified, identical
copy of a Capture Drive, which maintains the VFS with all options. The VFS can generate deliverables on
shuttle disks or, if the Mac is connected to post e.g. via 10 Gig Ethernet, it can act as a file server for direct
footage access through a network share. Codex offers a storage option, that allows you to turn the internal
RAID of the Mac into a 6TB Codex volume. Capture drives then can be cloned to the internal RAID. If the
Mac is used as a file server, this can save disk space, as the VFS can generate all files on-demand. Adding
the Codex Offloader option further enables verified copies of the VFS on connected external disks or LTO
tapes for archiving.
Depending on the amount of footage per day, the internal RAID storage provides enough space for a few
shoot days worth of ARRIRAW footage. This gives a production some buffer to confirm that the material is
OK before the storage needs to be cleared.
Available functions:
Clone Capture Drives to transfer drives, maintaining the VFS
Checksum verification
Generate files for review, edit and post
Clear the data from the recording media
Optional Features:
Codex Storage option, to keep footage in the VFS
Codex Offloader option, for verified copies to external drives or LTFS tape
Performance Test
We ran speed tests in Mac OS X 10.6.8 on a Mac Pro 2x 2.26 GHz Quad-Core Intel Xeon with 14 GB / 1066
MHz DDR3 RAM. Mac and Dual Dock were connected with the ATTO Express SAS H680 interface card.
The files were written on a SAN over a Fibre Channel connection with a reported write speed of about 360
MB/s (Black Magic Design Disk Speed Test). We timed each transfer using a simple copy command without
verification.
• A full XR Capture Drive containing ARRIRAW footage (455 GB) took about 40 minutes to transfer.
The .ARI files were generated at approx. 190 MB/s.
• A full XR Capture Drive containing ProRes footage (229 GB) took about 11 minutes to transfer.
The QuickTime files was transferred at approx. 360 MB/s.
ALEXA XR Module Workflows - White Paper
Page 9 of 11
Codex Vault
The Codex Vault is a modular, location-based media
management system, which works as a standalone unit with
an easy to use touchscreen interface. The base unit, Vault S
Process, offers media ports for Codex Capture Drives and
Transfer Drives, SxS cards, 1.8" and 2.5" SSD drives and –
depending on configuration – other camera media. External
drives can be connected via SAS, eSATA and USB 3.0. The
Vault is available directly from Codex.
The Vault can be used to clone the contents from a Datapack
or Capture Drive to one or more Codex Transfer Drives, or an
internal storage. With an optional dual-LTO-5 module, it is
also possible to create incremental archives of the camera
footage, directly on location.
The Vault an be used to clone Codex Capture Drives to one or more Transfer Drives, or an optional RAID
protected internal storage. Cloning creates a verified, identical copy of a Capture Drive and maintains the
VFS with all options. The Vault can generate a wide range of deliverable formats and even allows synching
audio that was brought in from an external sound recorder. You can expand the Vault with a storage option,
to get 7 TB of internal RAID protected storage, and an archive option, to get two LTO5 drives for automated
offloading to LTO tape (Linear Tape File System).
The storage option should provide enough space for a few shoot days worth of ARRIRAW footage – of
course, depending on the amount of footage per day. This gives a production some buffer to confirm that the
material is OK before the internal storage needs to be cleared.
Functions:
Copy Capture Drives to internal storage
Clone Capture Drives to transfer drives, maintaining the VFS
Checksum verification
Generate files for review, edit and post
Clear the data from the recording media
Product detailed production reports
Optional Features:
Vault S Storage option, to keep footage in VFS temporarily
Vault S Archive, for automated verified archiving to LTFS tape
Performance Test
We ran a speed test on our Codex Vault, running UI version 2012.r2.2900.
A full XR Capture Drive containing ARRIRAW footage (455 GB) was cloned to the internal storage in 11
minutes. Generating .ARI files on an attached SAS RAID took about 25 minutes.
ALEXA XR Module Workflows - White Paper
Page 10 of 11
About the Vault
The Vault is designed to simplify and standardize workflows. It guides the operator through all necessary
media management tasks with a simple and intuitive user interface. The configuration of these tasks is done
by an expert user (admin), before a Vault is sent off to a production. This admin could be a workflow
supervisor, who knows which deliverables will be required, or a rental technician, who has been briefed
accordingly.
As an example, the configuration of the Vault's 'Generate task' controls, which file formats will be created,
which image dimensions, text overlays (burn-ins), and output color space the files will have, how they will be
named, and which directory structure they will be put in.
During production, the operator simply needs to follow the pre-configured, standardized workflow. All
complexity that results from the versatility of file-based workflows is taken off his/her mind by the expert
user's configuration. Once a Vault is prepped, it therefore can be operated by anyone who is thorough about
his/her work. Unless the operator is handed administrative access, it is not possible to deviate from the predefined workflow. This makes the entire process very safe, which typically contains the following steps:
• Unload a Capture Drive from the camera and replace it with an empty drive.
• Take the camera footage to the Vault and run all media management tasks.
• Start over.
• Archive the day's footage, e.g. to LTO tape.
• Create a daily report sheet.
• Wait for OK from post production before clearing footage from the internal storage.
nd
This is probably as close as we can get back to the original job of the 2 AC or clapper loader.
Accessing UDF Volumes (XR Capture Drives and SxS PRO cards)
XR Capture Drives or SxS PRO cards containing ProRes or DNxHD footage are formatted using the UDF file
system. They can be accessed without going through the Codex Platform software and VFS, using e.g. the
Single Dock (for XR Capture Drives) or standard ExpressCard/34 card readers (for SxS PRO cards) such as
the Sonnet Qio E3 eSATA reader, the Sonnet Echo Pro ExpressCard/34 Thunderbolt adapter, or a built-in
ExpressCard/34 reader. These readers can be found in several PC notebooks and some of the older 15 and
17 inch MacBook Pro models.
QuickTime/ProRes or MXF/DNxHD clips therefore are accessible directly from a Windows machine, a Linux
machine or a Mac whereas ARRIRAW files need to be accessed through the Codex VFS, which is only
available on a Mac.
Scaling your Workflow
To overcome a situation where you will be faced with more footage than a setup can handle, the obvious
solution is to add a second setup. Sometimes, it may be more beneficial to combine setups including a
Single Dock and a Dual Dock or a Dual Dock and a Vault, and to use the different feature-sets to distribute
the workload.
Sometimes (not even related to the amount of footage) higher efficiency may be gained by splitting tasks
between location and post production. One example would be creating multiple deliverables for editorial,
dailies projection, streaming on the web, iPad, etc., which can be done more efficiently using a dedicated
dailies tool. Archiving to LTO tape also does not necessarily need to happen on location, especially if
postproduction is close by and possibly connected over e.g. 10 Gig Ethernet.
More Information
For more information about the ARRI ALEXA, please visit http://www.arri.com/alexa.
For more information about Codex products and workflows, please visit http://www.codexdigital.com.
If you have comments or questions about this document, please send us an email to [email protected].
Please note that all data is subject to change without notice.
ALEXA XR Module Workflows - White Paper
Page 11 of 11