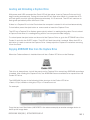
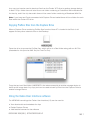
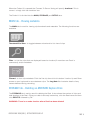
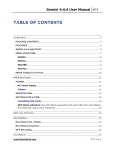
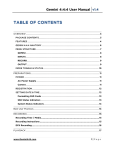
1
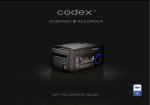
CAPTURE DRIVE DOCK [USB-3]
CDX-75112
GETTING STARTED GUIDE
CAPTURE DRIVE DOCK [USB-3] - GETTING STARTED GUIDE v2.1
PAGE 1
Safety Warnings
Please observe any warnings and follow all instructions.
l
Do not use this equipment near water and clean only with a dry cloth.
Install in accordance with the manufacturer’s instructions.
l Do not install near any heat sources such as radiators, heat registers, stoves, or other equipment (including amplifiers) that produce heat.
l Do not expose to excessive vibration, or drop this product.
l Do not defeat the safety purpose of the polarised or grounding-type plug. A polarised plug has two blades with one wider than the other. A grounding-type plug has two blades and a third grounding prong. The wide blade, or the third prong, is provided for your safety.
l If the provided plug does not fit into your outlet, consult an electrician for replacement of the obsolete outlet.
l Protect the power cord from being walked on or pinched, particularly at plug ends, convenience receptacles, and the point where they exit from the equipment.
l Only use accessories specified by the manufacturer.
l Unplug this equipment during lightning storms or when not in operation for long periods of time.
l Refer all servicing to qualified service personnel. Servicing is required when the equipment has been damaged in any way, such as power-supply cord or plug is damaged, liquid has been spilled or objects have fallen into the equipment, has been exposed to rain or moisture, does not operate normally, or has been dropped.
l To reduce the risk of fire or electric shock, do not expose equipment to rain or moisture.
l To avoid electrical shock, do not attempt to open this equipment. Refer servicing to qualified personnel only.
l
Caution! The surfaces of docked Capture Drive media can get hot during standard use.
Disclaimer
Codex products are continually developed to remain at the forefront of the industry, and as such the information
in this guide is subject to change without notice. Whilst Codex endeavour to ensure that all documentation
provided is correct at the time of writing, this document is not guaranteed to be error-free.
Codex does not assume responsibility for issues or losses due to misinterpretation of the information in this
document, errors in this document, or incorrect configuration or installation of the equipment described herein.
Please report any errors found in this document to [email protected]
Support and Servicing
For assistance with your Capture Drive Dock (USB-3) please contact [email protected]
CAPTURE DRIVE DOCK [USB-3] - GETTING STARTED GUIDE v2.1
PAGE 2
Contents
Introduction............................................................................................................................................................... 4
Installation................................................................................................................................................................. 4
Specification............................................................................................................................................................. 4
Software.................................................................................................................................................................... 4
Hardware................................................................................................................................................................... 4
Licensing................................................................................................................................................................... 5
Finder Preferences.................................................................................................................................................. 5
Loading and Unloading a Capture Drive............................................................................................................ 6
Copying ARRIRAW files from the Capture Drive............................................................................................. 6
Copying ProRes files from the Capture Drive................................................................................................... 7
Using the Codex User Interface software......................................................................................................... 7
MAIN tab - Viewing metadata.............................................................................................................................. 8
STORAGE tab - Deleting an ARRIRAW Capture Drive.................................................................................... 8
SETUP tab - Adding licences............................................................................................................................... 9
Deleting a ProRes Capture Drive......................................................................................................................... 9
Firmware Upgrade Process................................................................................................................................... 9
Support Software................................................................................................................................................... 10
Troubleshooting...................................................................................................................................................... 10
CAPTURE DRIVE DOCK [USB-3] - GETTING STARTED GUIDE v2.1
PAGE 3
Capture Drive Dock [USB-3] - Getting Started
Introduction
The Capture Drive Dock (USB-3) is an integral part of your file-based workflow. Capture Drives
recorded with a Codex Onboard S Recorder or on the ARRI Alexa XT can be loaded in the Dock,
and the Digital Camera Negative files can be copied. These files will be either ARRIRAW (.ari) or
ProRes (.mov) [only with the XT] depending on the recorded format.
Installation
Specification
Hardware: Any Apple Mac computer with a USB3 port.
The recommended specification is as follows:
Retina MacBook Pro 15”
CPU – 2.7GHz Quad Core Intel Core i7
RAM – 16GB, 1600MHz DDR3L
HDD – 500MB free space
Display – 2880x1800
Operating System: Apple Mac OS X Snow Leopard or Lion 10.6.2 or higher.
Software
Go to codexdigital.com/software to register and download software. There are installation
instructions available from this webpage.
Under the section ‘Capture Drive Dock (USB-3)’ download the latest Software Pack and install all
software that this contains.
Important Note: Do not connect the Dock to your computer until you have installed all required
software and restarted your computer.
Hardware
After installing the software and restarting your computer, connect power to the Dock. Connect
the Dock to a USB 3.0 port on your computer, then insert a Capture Drive.
Use only the supplied USB 3.0 cable and power supply.
CAPTURE DRIVE DOCK [USB-3] - GETTING STARTED GUIDE v2.1
PAGE 4
12V POWER
USB 3.0 CONNECTION
STATUS LED
EJECT
Licensing
The default licence for the software allows you copy Digital Camera Negative files (ARRIRAW or
ProRes, depending on what format was recorded). There are additional licenced features that
can be added to allow metadata management, transcoding with the Codex Virtual File System
(VFS), and verified backups using the Codex Disk and Tape Offloader.
Contact Codex for details if you would like to add any of these licenced features to your system.
If you have additional feature licences it is recommended to go to codexdigital.com/support for
full documentation. Here you can download guides that describe using the Codex software for
common workflows.
Finder Preferences
For ease of use it is recommended to set up the Finder Preferences so that External disks are
shown on the Desktop:
CAPTURE DRIVE DOCK [USB-3] - GETTING STARTED GUIDE v2.1
PAGE 5
Loading and Unloading a Capture Drive
With power and USB connected the Dock LED will be amber. Insert a Capture Drive and it will
begin loading automatically. During this time the LED will flash blue. When it is loaded the LED
will flash green, and this typically takes approximately 10-15 seconds. The LED will continue to
flash green periodically when the Dock is idle.
If there is a Capture Drive in the Dock when the computer is started it will not load automatically.
To load either press the eject button or remove and re-insert the Capture Drive.
The LED on a Capture Drive flashes green quickly when it is reading/writing data. Do not unload
a Capture Drive when it is reading/writing as this can compromise data integrity.
To unload press the eject button on the end of the Capture Drive or go to the STORAGE tab of the
Codex UI and click the EJECT button. The LED will flash blue while it unloads. When the LED is
solid blue it is safe to remove the Capture Drive. Always eject the Capture Drive before removing
it from the Dock.
Copying ARRIRAW files from the Capture Drive
When the Codex software is installed there will be a Codex VFS drive on the Desktop:
This drive is always there, but will be empty until a Capture Drive containing ARRIRAW recordings
is loaded. After loading the Capture Drive, the ARRIRAW files are available to be copied from the
Codex VFS drive.
The ARRIRAW files are in the following folder structure in the Codex VFS drive:
<Reel>/<Clip>/<Width>x<Height>/<Clip>.<FrameCount>.ari
For example:
Copy the top level Reel folder (A001R20Z in the above example) to another storage device to
back-up the image data.
CAPTURE DRIVE DOCK [USB-3] - GETTING STARTED GUIDE v2.1
PAGE 6
Any copy tool can be used to back-up files from the Codex VFS drive to another storage device.
In each <Clip> folder there will also be an xml folder containing a CodexShot XML metadata file
for the clip, and if the clip has audio there will be a wav folder containing a Broadcast WAV file.
Note: if you have two Docks connected with Capture Drives loaded there will be a folder for each
Reel within the Codex VFS drive.
Copying ProRes files from the Capture Drive
When a Capture Drive containing ProRes files from the Alexa XT is loaded in the Dock it will
appear like any other external drive on the Desktop:
Open the drive to access the ProRes files, which will be in a Reel folder along with an ALE file
(metadata for Avid) and an XML file (for Final Cut Pro):
Copy the top level Reel folder (A002R20Z in the above example) to another storage device to
back-up the image data. Any copy tool can be used to back-up files from the Capture Drive to
another storage device.
Using the Codex User Interface software
For ARRIRAW recordings the Codex User Interface (UI) can be used to:
• View thumbnails and metadata for clips
• Delete Capture Drives
• Add feature licences for the software
CAPTURE DRIVE DOCK [USB-3] - GETTING STARTED GUIDE v2.1
PAGE 7
When the Codex UI is opened the ‘Connect To Server’ dialog will specify localhost. This is
correct – simply click the checkbox icon.
The Codex UI is divided into the MAIN, STORAGE, and SETUP tabs:
MAIN tab - Viewing metadata
The MAIN tab is used for viewing clip thumbnails and metadata. The following functions are
available:
Thumbnail/List View - to toggle between a thumbnail or list view of clips.
Filter - to limit the clips that are displayed based on location (if more than one Dock is
connected), and/or metadata.
Filecard - to view clip metadata. Click the first clip then click this button. Use the Up and Down
arrows on your keyboard to move between clips. The Log Note field contains details of any
issues detected during recording.
STORAGE tab - Deleting an ARRIRAW Capture Drive
The STORAGE tab is mainly used for deleting the Reel. It also shows the number of clips and
total duration of the Reel. Once your data is securely backed-up, click the Reel name and then
click DELETE, followed by OK.
WARNING: There is no undo function after a Reel has been deleted!
CAPTURE DRIVE DOCK [USB-3] - GETTING STARTED GUIDE v2.1
PAGE 8
SETUP tab - Adding licences
The SETUP tab is used for adding feature licences to the software. Click the i button to get
details of the System Key which is needed for Codex to generate additional feature licences.
Licences can be requested from: https://www.codexdigital.com/licence-request
Deleting a ProRes Capture Drive
There are two SSDs inside a Capture Drive. When the Capture Drive is formatted on the Alexa XT
for recording ProRes only one drive is used, and this is formatted with a UDF filesystem.
After securely backing up the ProRes files it is recommended to use the Disk Utility application in
Mac OS X to reformat the UDF drive with a FAT partition.
When this is re-inserted into the Alexa XT the user will then be asked to reformat the Capture
Drive in the camera with the appropriate filesystem.
Appendix
Firmware Upgrade Process
Follow these steps to upgrade to the latest software and firmware:
1. Download the Capture Drive Dock (USB-3) Software Pack including new software and firmware upgrade files from www.codexdigital.com/software.
2. Install the Codex Server software.
3. Open System Preferences->Codex.
4. Click the padlock symbol to unlock the Preference Pane.
5. Click Stop Server.
6. Insert a Capture Drive, wait for the Dock LED to turn blue and click the Refresh button so the Firmware Info of the Dock is shown, for example USB 3.0 Dock 1.6.0.
7. Click Upgrade... and select the new firmware file, for example xferdock_v107.fw, then click Open. (This file is located in /Library/Application Support/Codex)
8. Click Continue to proceed with the firmware upgrade.
9. Wait for the Firmware Upgrade Complete message to be displayed.
10. Click OK and then click the Start Server button to restart the Codex Server software.
CAPTURE DRIVE DOCK [USB-3] - GETTING STARTED GUIDE v2.1
PAGE 9
Support Software
There are some third party software packages that may be of use:
ARRIRAW Converter (http://www.arri.com/camera/digital_cameras/tools.html)
GlueTools (http://www.gluetools.com/)
Da Vinci Resolve (http://www.blackmagicdesign.com/uk/products/davinciresolve)
These applications provide different options, but all provide a means of viewing and playing
ARRIRAW (.ari) files natively.
Troubleshooting
The Dock has a Status LED that can help with troubleshooting. The table below describes the
meaning of the different Status LED modes:
LED colour
Amber
Blue
Green
Red
Red
LED state
Constant
Constant
Constant
Constant
Flashing
Description
USB and Power is connected, Capture Drive is not inserted
USB3.0 and Power is connected, Capture Drive is inserted
USB2.0 and Power is connected, Capture Drive is inserted
USB connected, but not Power. Capture Drive is not inserted
USB connected, but not Power. Capture Drive is inserted
Course of action
Insert Capture Drive
No action required
Connect to a USB 3.0 port on your computer
Connect Power
Connect Power
Capture Drives also have an LED that shows the status and can help with troubleshooting.
The table below describes the meaning of the LED modes:
LED colour
Blue
Blue
Green
Green
Red
LED state
Flashing
Constant
Flashing
Constant
Constant
Description
Capture Drive is loading or unloading
Capture Drive is not loaded, and is safe to remove
Capture Drive is loaded and idle
Capture Drive is being read or written
Capture Drive has failed to load
Course of action
Wait for loading/unloading to complete
Remove or reload Capture Drive
No action required
Do not eject drive until reading/writing is finished
Restart computer and try again
If you are asked to provide an issue report go to System Preferences->Codex and select
‘Generate issue report…’ and email this to [email protected]
For further assistance with your Dock please contact [email protected]
CAPTURE DRIVE DOCK [USB-3] - GETTING STARTED GUIDE v2.1
PAGE 10
Notes
CAPTURE DRIVE DOCK [USB-3] - GETTING STARTED GUIDE v2.1
PAGE 11
24 hour support line +44 7985 467 665
LONDON OFFICE 60 POLAND STREET LONDON ENGLAND W1F 7NT UK TEL +44 207 292 6918
LOS ANGELES OFFICE 3450 CAHUENGA BOULEVARD WEST UNIT 103 LOS ANGELES CA 90068 TEL +1 323 969 9980
CODEXDIGITAL.COM [email protected]
Capture Drive Dock [USB-3] Getting Started Guide v2.1 CDX-75112. E & OE. Codex Digital reserve the right to alter the specification at any time and without prior notice.
© Copyright
Codex Digital
Limited.STARTED
October 2013.
other trademarks used are the property of their respective owners.
CAPTURE DRIVE
DOCK [USB-3]
- GETTING
GUIDEAllv2.1
PAGE 12