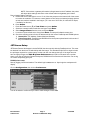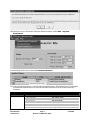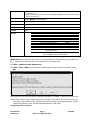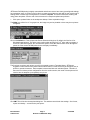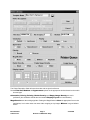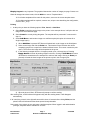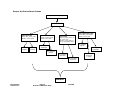
1
Connecting Codonics Horizon to
Philips JetStream
JetStream
Prerequisites:
♦
♦
♦
♦
♦
♦
JETStream Remote Desktop Version 2.5.1
Service login on JETStream
DICOM or DICOM Lite option on Horizon
o Philips Horizon SF configurations do not include DICOM.
o Philips Horizon Ci configurations include DICOM.
Network information assignment for the Horizon (IP address, subnet and gateway if required)
Appropriate cabling, included with Horizon imager
If printing from AutoQuant, Syntegra, 4Dmspect, IDL or any add-on application which requires
AppHook, the Horizon must also have the PostScript option.
o Codonics driver CD, which ships with the Horizon operating system software. Look for an
envelope labeled Codonics License Agreement.
These instructions detail the DICOM printer setup for Horizon on the JETStream Remote Desktop. Please
refer to the documentation shipped with the Horizon for unpacking and media loading details. These
instructions begin with a printer which has been powered up and cleaned.
Horizon Setup
Insert the correct Cat 5 network cable on the back of the printer:
Use the straight-through cable (blue cable provided by Codonics) if the Horizon and the
JetStream are part of a larger network.
Use the crossover cable (gray cable provided by Codonics) if the Horizon will be connected
directly to the Jetstream.
Determine the IP address to be used by the JETStream:
On a large network, obtain network address information from the site’s System Administrator.
If directly connected or on an isolated network, choose an unused address that differs only in the
last section (octet). For example, if the IP address of the Jetstream is 192.9.200.10, the Horizon
could use 192.9.200.50, as long as no other device on the isolated network is also assigned this
IP.
NOTE: The JetStream IP address can be determined by opening a command window (Start
Run) and then typing:
cmd <Enter>
ipconfig <Enter>.
Install the imager’s IP address. Be aware that upon completion of this task the imager will reboot:
A. Press and hold the left arrow button (
) while pressing the Menu button. Release both buttons.
B. Press the down arrow ( ↓ ) to the Network Settings menu, and press Enter.
C. Press the down arrow ( ↓ ) to the Addresses… menu and press Enter.
D. Using the up and down arrows, ( ↑ ↓ ) enter the first octet of the IP address. Use the right arrow
to move to the next octet and repeat the process. Continue through the rest of the IP address.
E. If subnet and gateway information are required, use the right arrow (
) to move to the Subnet
line, and install the subnet address using the same procedure as the IP. Use the right arrow to
continue to the Gateway address.
F. When all addresses are complete, press Enter, then press Menu. This step will initiate an
imager reboot. This process takes about 5 minutes.
Erica Sommer
Codonics Inc.
Page 1
Horizon to JETStream Setup
4/10/2006
NOTE: If the subnet or gateway information is illegal based on the IP address, the printer
will delete these settings and return to the default subnet and gateway upon reboot.
Run an Imager Status Test Print:
G. Ensure that the red Alert light is not on. If it is, follow the prompts on the bottom half of the screen
to resolve the condition. For instance, ensure that the receive trays are inserted properly and that
at least one media is installed in the imager. (TIP: Use one of 8x10 film, A or A4-size DV Paper,
if available, for this test.)
H. Press Online.
I. Press the Down-Arrow ( ↓ ) to Test Prints and press Online.
J. Select the currently-loaded media size and type. Press Enter.
K. Select Imager Status from the menu, and press Enter.
L. Leave the Copies default set to 1 and press Enter. This step will initiate the teste print.
M. Check the resulting printout for the IP address and for the correct PostScript and DICOM options:
1) NetworkInfo
IP Address, Subnet Mask and Gateway
2) PrinterFeatureInfo: PostScript and DICOM will be the top two options listed in this section if
they are enabled on the Horizon.
JETStream Setup
JETStream Remote Workspace includes DICOM, but does not ship with the PostScript driver. This must
be obtained from the driver CD which ships with the imager. The standard Philips Service login includes
the privileges required for a printer setup, but the end user can change this login. If the login does not
have enough privileges, the Edit
System Preferences menu will be truncated. Also note that
when a user logs off from the Remote Workspace, DICOM and Print Services will shut down. Do not log
out if there are pending print jobs.
DICOM printer setup
Start by logging into the workstation. The default login is PMSService. Upon login the workspace will
display.
Click on Configuration, then click on Preferences:
You will be asked to confirm that you want to make changes. Press Yes:
Erica Sommer
Codonics Inc.
Page 2
Horizon to JETStream Setup
4/10/2006
After pressing Yes, the JETStream Preference Editor will display. Select Edit
Preferences:
System
In the resulting screen, look for the section Installed Printers.
Input the information as follows. If a field contains a dropdown menu, JETStream will give you the option
to expand the dropdown when you click into that field. Each name must be unique in the first 5
characters:
Setting
Name
Erica Sommer
Codonics Inc.
Value
Type
14x17 Blue Film
14x17 Clear Film
8x10 Blue Film
8x10 Clear Film
US Letter (A size) Color Paper
European Letter (A4 size) Color Paper
14x17 DirectVista Paper (grayscale only)
Page 3
Horizon to JETStream Setup
Name
Blu_14x17_Hrzn
Cl_14x17_Hrzn
Blu_8x10_Hrzn
Cl_8x10_Hrzn
A_Color_Hrzn
A4_Color_Hrzn
DVP_14x17_Hrzn
4/10/2006
US Letter (A size) DirectVista Paper
(grayscale only)
European Letter (A4 size) DirectVista
Paper (grayscale only)
A_DVPaper_Hrzn
A4_DVPaper_Hrzn
Type
Select DICM from the dropdown.
Spool Directory
Let JETStream enter this value. Do not change it.
Color Mode
Grayscale: Mono1 Color: Color
IP Address
Enter the printer’s IP address as determined earlier.
Port No.
104
AE-Title
Media Type
14x17 DV Film Blue Base
14x17 DV Film Clear Base
8x10 DV Film Blue Base
8x10 DV Film Clear Base
14x17 DV Paper (grayscale)
A-Size DV Paper (grayscale)
A4-Size DV Paper (grayscale)
A-Size CV Paper (color)
A4-Size CV Paper (color)
Bracketing Print (various
contrasts/gammas)
AET to use
14x17-dvfb
14x17-dvfc
8x10-dvfb
8x10-dvfc
14x17-dvp
a-dvp
a4-dvp
a-cvp
a4-cvp
SpecialBracket
See Page C-2 of the Horizon User Manual
for a complete list of pre-set AE titles.
IMPORTANT! After entering the values above, click on the blank line beneath the new entry. Make sure
the * appears in the leftmost column of the blank line. Do not skip this step.
Click File
Return to User Preferences
Click File
NO.
Exit
YES. If there had been a mistake and you want to remove the changes, select
After clicking Yes you will be prompted to restart the workspace. Click Yes or changes will not be saved.
Repeat this process for each media size and type to be printed. For instance, if a site will be printing on
color paper, large format blue film, small format clear film and large format grayscale paper, you will
repeat these steps four times. Use the appropriate AE title for each setup.
Configuring Printer Templates
Erica Sommer
Codonics Inc.
Page 4
Horizon to JETStream Setup
4/10/2006
JETStream DICOM printing is highly customizable and allows users to have many preconfigured settings
for each printer setup. A common use for this is to create several layouts, each with its own custom set of
settings. Each of these layout configurations is called a Template. This section discusses creating and
using printer templates. See the end of this document for a sample template setup scheme.
1. Click open a patient folder on the workspace desktop. Select a printable image.
The Print icon will be live. If it is grayed out, the image may not be printable or there may be no printers
configured.
Click on the Print icon. This will open the Printer Selection dialog box. By default, the first line is for
rd
Windows-based printers. This is the correct option when printing from a 3 party add-on program or
for the EP-1000 series printer. Do not delete this option. Press the down arrow to scroll through the
printer list if the correct DICOM printer does not display immediately.
The first time you select each printer you will be prompted to enter a Template Name. JETStream
suggests a name based on the printer name entered earlier, but this name may be changed. Use no
spaces or special characters. Each template is associated with one individual printer. Therefore, if
there are four Horizon printer configurations from the earlier section, then each of those printers will
need to have its template (or templates) set up here.
Click OK. This will invoke the template dialog box. This window controls both the settings – like format,
copies and density – as well as the print queue.
Erica Sommer
Codonics Inc.
Page 5
Horizon to JETStream Setup
4/10/2006
The Printer Description fields will never be active and are just for reference.
Set the Film Size, Medium and Appearance options for the appropriate choices based on the media
size and type.
Orientation, Priority, Polarity, Border Density and Empty Image Density are user’s
preference (but orientation should take the intended Display Layout into consideration.)
Magnification sets the scaling algorithm. Setting the Magnification to None is appropriate for true-size
applications, but in other cases can cause either cropping or tiny images. Bilinear is a good default
choice.
Erica Sommer
Codonics Inc.
Page 6
Horizon to JETStream Setup
4/10/2006
Display Layout is very important. The graphics illustrate the number of images per page. Choose one.
When all changes have been made, click the disk icon next to Template Name.
If no further templates will be made for this printer, save over the current template name.
If multiple templates will be required, create a new, unique name describing the configuration,
such as 14x17_4-Up.
Printing
1. At this point you have the following options: Print, Cancel, or Add More.
A. Select Print to send the current image to the printer. In the example above, it will print with one
image on a 2x2 multiformat page.
B. Select Cancel to cancel printing altogether. The template will be preserved if it was saved in
step 11.
C. Select Add More to add another image to a multiformat print (this option is irrelevant for a
single-image layout.)
1) When Add More is pressed JETStream will switch back to the image on the WorkSpace.
2) Select a new image and click the Print icon. This time the Printer Selection box will be
completely grayed out, except for the bottom left-hand corner. This corner controls the print
queue. The most recent image will be deposited in the queue.
3) In the following example there are 3 images queued up for a 4-image layout. Pressing
Empty Queue will clear all pending images in this box. Clicking on Add More will cause
JETStream to switch back to the workspace to select a final image. Clicking on Print (not
pictured) will send the three images to the printer to print in the 4-image layout.
4) When the sheet is filled, JETStream will prompt to confirm sending.
After clicking Print, a DOS window will appear briefly with the sending status. It will disappear
automatically.
If all is well, the printer’s Active light will start to blink about 10 seconds after clicking Print, and the
printer’s KDU will indicate that the sheet queued shortly thereafter.
Select each of the printers in turn and create a default template. When logged in with administrative
privileges, templates will be available for all users.
Erica Sommer
Codonics Inc.
Page 7
Horizon to JETStream Setup
4/10/2006
Advanced Templating
Template values are frequently modified after a template is established. If a print is sent using modified
values not saved in the currently-selected template, JETStream will automatically save these values in a
temporary template, and this new template will be the currently-selected template the next time the Print
icon is selected. The modified settings can then be saved as a permanent template by pressing the disk
icon and giving the new settings a name.
For example, if we took our 14x17_4-Up template and made it a 9-up, sent a page of 9 images but did not
save the new template name, when we click Print again the temporary template will be in the Template
Name dropdown box. To preserve this new format, click the disk icon. To go back to the previous
template, select it from the dropdown box.
As noted earlier, multiple templates can be saved for each printer. This makes it easy for users to
configure their common preferences without having to pick through a bunch of settings prior to each print.
Setting up Printing for Add-on Programs
Printing from add-on applications such as AutoQuant or 4DM Spect require configuring a PostScript
printer. To do so, exit the JETStream Remote Desktop by pressing the Windows icon on the keyboard,
and selecting Settings
Printers. Follow the directions found on the Horizon driver CD.
After printer configuration is complete, re-enter the JETStream Remote Desktop, select an image and
select Print.
Add-on Programs
To set up printing from an add-on program follow the standard Windows driver installation procedure. The
printer must have a valid PostScript feature activation key.
Printing from Add-on programs
1. Add-on programs currently use the Windows printing service.
Click the Print icon, and from Printer Selection click Windows
OK.
This will invoke the Hardcopy Builder:
A. Advanced contains printed site information which can be turned on or off, similar to an
annotation.
B. Preview opens up a Print Preview window.
C. Print will open the standard Windows print dialog box and all normal Windows printing features.
Note that standard Windows printing rules apply at this point; default media and etc. need to be
set up per user:
Erica Sommer
Codonics Inc.
Page 8
Horizon to JETStream Setup
4/10/2006
Anonymizing Feature
JETStream has a neat feature for when an image needs to be printed without its identifying data called
De-Identify. Click the De-Identify icon to strip an image of the patient name. Use this when sending
images to Codonics Technical Support:
Erica Sommer
Codonics Inc.
Page 9
Horizon to JETStream Setup
4/10/2006
SAMPLE JETSTREAM SETUP SCHEME
JETStream Remote Workspace
Installed Printers
14x17 blue film
Name: Blu_14x17_Hrzn
AE title: 14x17-dvfb
3x3
template
3x4
template
8x10 clear film
Name: Cl_8x10_Hrzn
AE title: 8x10-dvfc
Color paper
Name: A_Color_Hrzn or
A4_Color_Hrzn
AE title: a-cvp (USA) or
a4-cvp (European letter)
1x1 template
portrait
1x1 template
landscape
1x1 template
portrait
3x4 template
landscape
3x4 template
landscape
2 copies
1x1 template
landscape
3x3 template
landscape
Horizon
Erica Sommer
Codonics Inc.
Page 10
Horizon to JETStream Setup
14x17 grayscale paper
Name: DVP_14x17-Hrzn
AE title: 14x17-dvp
4/10/2006