1
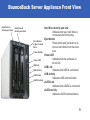
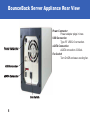
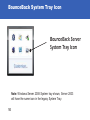
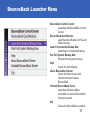
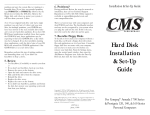
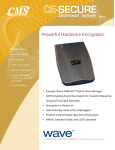
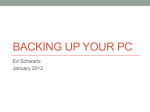
BounceBack Server Solution
Reference Guide
Contents
Introduction...............................................................
System Requirements...............................................
Initial Setup................................................................
BounceBack Server Appliance Front View................ BounceBack Server Appliance Rear View.................
Removing and Installing a Hard drive.......................
BounceBack Control Center .....................................
BounceBack Server System Tray Icon......................
BounceBack Server System Tray Menu....................
Backup Strategies.....................................................
Disaster Recovery.....................................................
CMS Support............................................................
510337.0
2
3
4
5
6
7
8
10
11
12
13
16
Introduction
Introduction
Welcome to the BounceBack Server Solution User
manual, this guide will explain all the functionality of your
new BounceBack Server Solution backup system. The
BounceBack Server Solution comes preconfigured so that
all you need to do is attach it to your computer, install the
software, and perform the initial full system backup of your
server.
2
System Requirements
System Requirements
Supported Operating Systems
• Windows Server 2003 R2 32 and 64 bit Editions
• Windows Foundation Server 2008
• Windows Server 2008 32 and 64 bit Editions
• Windows Server 2008 R2 32 and 64 bit Editions
Supported Databases
• Microsoft SQL Server 2005
• Microsoft SQL Server 2008
Hardware
• USB 2.0 or greater
• eSATA
3
Initial Setup
4
• Plug power cord into power supply.
• Plug power plug into BounceBack Server appliance.
• Plug power cord into wall socket.
• Select either USB or eSATA data cable.
• Plug data cable into BounceBack Server appliance.
• Plug data cable into computer.
• Turn On Power button on BounceBack Server appliance.
• Windows will automatically configure your new
BounceBack Server appliance.
• Software installation (see BBQuickStart.chm guide on your software CD).
• Run your first Full System backup.
• Remove hard drive B and replace with your spare hard drive.
BounceBack Server Appliance Front View
Hard Drive A
Activity and Link
Hard Drive B
Activity and Link
Press Button
to Eject a Hard
Drive
Power Button
Power LED
USB Link
USB Activity
eSATA Link
eSATA Activity
Hard Drive Activity and Link
Indicates that your hard drive is
connected and functioning.
Eject Button
Press button and pull lever to re-
move a hard drive from the enclo-
sure.
Power LED
Indicates that the enclosure is turned On.
USB Link
Indicates that USB is connected.
USB Activity
Indicates USB communication.
eSATA Link
Indicates that eSATA is connected.
eSATA Activity
Indicates eSATA communication.
5
BounceBack Server Appliance Rear View
Power Connector
Power adapter plugs in here.
USB Connection
Type “B” USB 2.0 connection.
eSATA Connection
eSATA connection 3.0Gb/s.
Fan Switch
Turn On/Off enclosure cooling fan.
Power Connector
USB Connector
eSATA Connector
Fan Switch
6
Removing and Installing a Hard Drive
When rotating hard
drives always remove
drive B
To remove a hard drive:
• Press Eject Button.
• Pull lever forward.
• Pull hard drive from
enclosure as shown.
To replace a hard drive:
• Slide drive into appliance until it stops.
• Push lever up until it snaps into the Eject
Button.
• When rotating hard drives
always remove drive B.
Note: Hard Drives can be installed or removed without turning off the system.
7
BounceBack Control Center
Add Backup Tab
Backup Tab
Help
Information
Register
8
Restore Tab
Options Tab
Edit a Backup Tab
BounceBack Control Center
Backup Tab
Manually start your backup sets from this tab.
Restore Tab
Restore files and folders from this tab. See page 13 for Full Disaster Recovery options.
Add Backup Tab
Create new custom backup sets from this tab.
Edit Backup Tab
Edit or schedule your backup sets from this tab.
Option Tab
Access the global options for BounceBack on this tab.
Help
Access the User guide from this button.
Information
This button will give you details about BounceBack.
Register
This button will take you to the CMS registration site.
9
BounceBack System Tray Icon
BounceBack Server
System Tray Icon
Note: Windows Server 2008 System tray shown, Server 2003
will have the same icon in the legacy System Tray.
10
BounceBack Launcher Menu
BounceBack Control Center
Launches the BounceBack Control Center.
BounceBack QuickRestore
Launches QuickRestore for file and folder recovery.
Launch Incremental Backup Now
Launches an incremental backup.
Run Full System Backup Now
Reruns the full system backup.
Help
Opens the User Manual.
About BounceBack Server
Opens the About screen with
version information about BounceBack.
Uninstall BounceBack Server
Launches the BounceBack
uninstaller to remove BounceBack from your system.
Exit
Closes the BounceBack Launcher.
11
Backup Strategies
CMS recommends running a full system backup to a dedicated eSATA
or USB direct attached 2-drive RAID 1 (mirrored) storage device such as the
BounceBack Server appliance for backup purposes. At least 1 spare drive is
recommended to be used for off-site storage. The recommended process is to take
the hard drive from the second slot (HDD B) of the BounceBack Server appliance
off site every night. The spare hard drive that was previously off site can then be
inserted in the empty slot (HDD B).
Never remove the hard drive from slot 1 (HDD A) of the BounceBack Server
appliance. This will help prevent accidentally overwriting the master recovery hard
drive. BounceBack Server appliance will automatically create a clone of the hard
drive in the (HDD A) slot onto the hard drive in the (HDD B) slot every time a hard
drive is inserted into the (HDD B) slot.
Best Practice: Make sure that the USB and eSATA devices are positioned after the
internal hard drive in the boot order sequence of the BIOS.
Using this strategy will provide the end user with a redundant local storage device
that has the ability to create as many spare drives as required for off-site storage
and recovery.
12
Disaster Recovery Methods
The advantage BounceBack Server has over competing backup software
applications is the ability to rapidly recover from a hard drive failure or operating system corruption. A server administrator or user can simply restart
a failed server from the USB or eSATA attached storage device. All data
and applications from the last backup will be running and available. This will
enable a business to be functional again in the time it takes to restart the
server. The server administrator can then schedule a time to perform data
recovery on the failed internal system drive. The recovery tools BounceBack
offers are: Full System Recovery, QuickRestore (files and folders).
Full System Recovery: BounceBack creates a copy of your internal
hard drive onto a direct attached storage device. With this functionality,
BounceBack offers three methods to complete a full system recovery: Drive
Swap, Rescue Disk, and Instant Server Recovery.
Drive Swap: A server administrator can take a drive out of the
external enclosure and mount it inside the server. See the Advanced Server Restore Technique on page 15 for servers that are running 13
internal RAID configuration.
Disaster Recovery Methods
Rescue Disk: A rescue disk is provided with the boxed version of BounceBack Server. A CD can be ordered separately for customers who purchase a downloaded version of BounceBack Server. The res-
cue disk provides the functionality to start from the CD and copy the contents from the attached backup hard drive onto the internal hard drive. The server can then be restarted from the internal drive.
Instant Server Recovery: When started from the direct attached backup device, BounceBack will pop up a message with two buttons: Continue or Restore. The Continue button allows the server to continue operating externally. The Restore button will clone the external hard drive back on the internal hard drive. The server can then be restarted and run from the internal drive.
14
Disaster Recovery Methods
QuickRestore: BounceBack stores data in native file format. Use the built-in
QuickRestore or Windows Explorer to perform file and folder level restoration
only. These options will not restore the operating system or applications.
Advanced Server Restore Techniques: The Rescue Disk and Instant
Server Recovery can be used to copy a direct attached storage device onto
an internal RAID configuration. The internal RAID drives must be prepared
using the server configuration tool provided by the server manufacturer. Once
prepared, a restore can be successfully completed.
Best Practice: The Rescue Disk and Instant Server Recovery will format and
partition the destination drive effectively deleting all data. CMS recommends
performing a full system recovery onto a new hard drive. The failed or corrupt
hard drive can then be used for granular data recovery.
15
CMS Support
What do I do if I need more help?
• Access CMS online support at:
www.cmsproducts.com/support
• E-mail CMS Support at:
[email protected]
• Clicking the Help button in BounceBack will bring up the User manual.
16