1
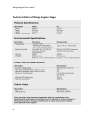
WINGS ENGINE STAGE User Guide Wings Engine Stage English Version Table of Contents Introduction ................................................................................................ 1 Operating conditions and technical data ............................................................ 3 Technical Data of Wings Engine Stage .................................................................... 4 Front and Rear Views and ports ................................................................... 5 Wings Engine Quick Start ............................................................................. 8 Wings Engine Desktop ............................................................................... 10 Displaying test images ............................................................................... 13 Sound interface ......................................................................................... 16 Display Settings ......................................................................................... 19 Loading and saving EDID for outputs .......................................................... 21 Touch screen calibration ‐ Touchside ......................................................... 24 Shortcuts ................................................................................................... 26 Wings Settings ........................................................................................... 29 Settings ‐ Useful Programs ......................................................................... 32 Settings ‐ Administrator ............................................................................. 34 Using a uEye camera .................................................................................. 35 Defining EDID for live video inputs ............................................................. 37 Wings Engine Backup Manager .................................................................. 38 Starting the Backup Manager ............................................................................... 38 Creating a new snapshot ...................................................................................... 39 Selecting a snapshot ............................................................................................. 40 Changing the snapshot name or description ........................................................ 40 Freezing a snapshot (disallowing modifications) .................................................. 41 ii Table of Contents Locking a snapshot ............................................................................................... 41 Deleting a snapshot .............................................................................................. 42 Backup Manager Administration .......................................................................... 42 TeamViewer Support Module .............................................................................. 44 Trouble shooting ....................................................................................... 45 Documentation Status ............................................................................... 46 AV Stumpfl contacts .................................................................................. 47 iii Introduction Wings Engines by AV Stumpfl constitute high‐performance, high‐reliability hardware for multidisplay shows. They incorporate our experience and that of our users. They are based on Windows 7 Embedded and have been provided with selected compo‐ nents that ensure optimal configuration. All Wings Engines are distinguished by the following features: Operating system and show data on SSD guarantee highest performance and re‐ liability. High‐performance graphics card with two or four display outputs (DUAL or QUAD), additional output for control monitor A special desktop allows fast access to the most important functions. See Wings Engine Desktop. Generation of test images on all outputs facilitates alignment of video projectors or displays. See Displaying test pictures. The support module TeamViewer allows remote access for remote maintenance and troubleshooting. The configuration is protected, i.e. you are able to make changes but the de‐ fined configuration can be restored at any time using the Backup Manager. Cer‐ tainly you can also save and load your own configurations for particular applica‐ tions. Configurations can also be "frozen", i.e. you can make changes but the de‐ fined configurations is restored again after a restart. See also Wings Engine Ba‐ ckup Manager. There are three different models with two or four display outputs each: Wings Engine Play ...the base model for shows and installations Wings Engine Install ...as above, but with live video input Wings Engine Stage ...the top model for highest demands with regard to per‐ formance and sturdyness. 1 Wings Engine Play/Install Note: Please note that the dual models cannot be extended by means of external dongles. Detailed information on the features of the various models can be found in a table in the Wings AV Suite Help pages. 2 Operating conditions and technical data In order to guarantee proper operation make sure that the following operating condi‐ tions prevail for the Wings Engine. Important note: When you receive your server, place it in the environment where you will install it. Leave the server in its shipping crate at its final destination for 12 hours and do not connect it to the power supply! This resting period prevents thermal shock and condensation. Ambient temperature An ambient temperature range of 21°C (69.8°F) to 23°C (73.4°F) is optimal for server reliability. At 22°C (71.6°F) it is easy to maintain a safe relative humidity level. Operat‐ ing in this temperature range provides a buffer if the environmental support systems fail. Relative Humidity Ambient relative humidity levels between 45% and 50% are the most suitable for data processing operations in order to Prevent corrosion Provide an operating time buffer in the event of environmental control system failure. Help avoid failures caused by the intermittent interference from static discharg‐ es that occur when relative humidity is too low. Airflow Considerations Ensure unobstructed airflow through the chassis Ensure that air enters at the front of the server housing and exits at the back. Ensure that ventilation openings, such as cabinet doors, for both the inlet and exhaust of the server provide minimum open area of 460 cm² (71.3 in²) each. Take care to prevent recirculation of exhaust air within a rack or cabinet. Manage cables to minimize interfering with the server exhaust vent. 3 Wings Engine Play/Install Technical Data of Wings Engine Stage 4 Front and Rear Views and ports 1. USB 2.0 interface 2. USB 3.0 interfaces 3. Air intake with illumination; changes upon system start and indicates the status‐ es of Wings Vioso. 4. Touch display (1280 x 800) for system operation; the image signal is also applied to the monitor output allowing a larger monitor with up to 1920 x 1200 pixels to be connected. 5. Switch for activating and deactivating the system. Reset the system by pressing the button for 5 seconds. 5 Wings Engine Play/Install 1. Display outputs A to D as DVI‐D (Wings Engine Stage DUAL only has two outputs A and B) 2. Balanced audio outputs MAIN 1‐2 in the form of XLR‐m sockets 3. Digital S/P‐DIF audio output MAIN 1‐2 as Cinch socket 4. Unbalanced audio output LINE 1‐2 as stereo jack 5. Headphone output PHONES 1‐2 as stereo jack 6. Microphone input MIC 1 as XLR‐f‐socket; Attention: before you connect dy‐ namic microphones make sure phantom power is software‐disabled. See Sound interface of Wings Engine Stage. 7. Live video inputs DVI IN 1 and 2; both analog and digital signals can be applied 8. Balanced audio inputs LINE 1‐2 as stereo jacks (sleeve = ground, ring = minus, tip = plus) 9. Live video inputs 3G‐SDI 1 and 2 10. Serial interface RS232 11. Framelock 0 and 1 as identical sockets for the synchronization of several Wings Engine Stage units; to be used as In and Out; Note: No LAN connections must be plugged into these RJ45 sockets as this may cause damage. 6 Front and Rear Views of Wings Engine Stage 12. Genlock input for synchronization with an overriding time clock. 13. Socket (II) for mains connection of 100 to 264 Volt AC and 47 to 63 Hz 14. Two‐step power switch for power supply via powerCON socket (I) or IEC socket (II); switch is illuminated when on. 15. powerCON output for mains supply of other devices; mind the total power con‐ sumption of max. 16 A (max. of 3 Wings Engines)! 16. powerCON input (I) for mains supply with optionally available powerCON cable. 17. eSATA interface for connection of external hard disks; Note: only for connection with the devices off; hot plugging not guaranteed! We cannot be held respon‐ sible for any damage! 18. FireWire 400 interface 19. USB 2.0 interfaces 20. LAN connection 21. DVI‐D connector for control monitor; the signal of the front touch display is ap‐ plied. Max. resolution 1920 x 1200 pixels and 60 Hz. 7 Wings Engine Quick Start The Wings Engine is pre‐installed and pre‐configured and allows very quick starting. 1. Using the power cable or the optionally available powerCON cable, hook up the Wings Engine power supply (7 or 5) with the mains supply. 2. Connect keyboard and mouse to the USB ports (4) at the front or back. 3. Connect the control monitors or displays for the show to DISPLAY A to D OUT (2) and, optionally, an additional control monitor to MONITOR OUT (1). 4. Connect your audio system to port MAIN 1‐2 or LINE 1‐2 (3). 5. Using switch (6) switch the power supply unit to II when you are using the standard cable and to I when you are using a powerCON cable. 8 Wings Engine Stage Quick Start 6. Start the Wings Engine via pushbutton (8). Following this the desktop will be displayed. 7. With Wings Vioso being the central presentation tool, click the icons to start the corresponding applications. After starting up Wings you can create a multidis‐ play project and design a show. See Creating a multidisplay show via one com‐ puter in the help topics. If Wings Visos is to start up automatically after starting the Wings En‐ gine click followed by clicking Wings Vioso and place a checkmark next to Start Wings on System Startup. There are various options for loading and starting certain shows. See Global Options ‐ Program start in the help topics. 8. Basic alignment of the video projectors is possible via the Wings Engine test im‐ age generator by clicking test images. ‐ on the desktop. See also Displaying 9 Wings Engine Desktop Wings Engines features a clearly structured and functional desktop that comprises buttons for the most important functions. Use the three large icons Wings Touch, Wings Vioso and Wings Avio to start the Wings AV Suite applications with the same names. If windows are open and cover up the large icons you can start the applications via the small icons in the bottom right corner of the task bar or use the following shortcuts: Wings Touch Windows key + T Wings Vioso Windows key + W Wings Avio Manager Avio‐Service menu Wings Engine Settings Audio Settings Windows key + M Windows key + S Windows key + Ctrl Windows key + A Graphics settings Windows key + G NVidia Manager Windows key + N 10 Wings Engine Desktop Desktop Windows key + D Center mouse on desktop File Explorer Windows key + O Windows key + E Mozilla Firefox Pocket calculator Windows key + F Windows key + C Mousing over the Help symbol shortcuts. on the desktop displays a list of The other buttons have the following functions: ? ...opens the Wings Engine manual as PDF. Mousing over this symbol displays a list of shortcuts. Avio Service ...opens the Avio Service menu. See Wings Avio Service in the Wings Vioso help topics. Explorer ...opens Windows Explorer. Alignment ...shows a test image which can be configured in accordance with your requirements. See also Displaying test images. Settings ...offers shortcuts for all the most important dialogs and the Wings op‐ tions for master and slave mode and for Task manager, Restart and Shutdown. See Settings ‐ Shortcuts and Settings ‐ Wings Vioso. Eject USB Devices ...for safely removing external drives. After clicking the but‐ ton a list of external drives is displayed that can be removed by clicking Eject. 11 Wings Engine Play/Install Network Cards ...specifies the Media Engine's IP address and the subnet mask if there is a network connection. Click to change the IP address and the subnet mask. 12 Displaying test images The Wings Engine features a test image generator which allows various test images at suitable resolution to be displayed at all outputs without requiring Wings Vioso. This is how the test image generator can be used: 1. On the left desktop side click be displayed. , following which a test image will 2. In order to set up the test image in accordance with your requirements click button Pattern Settings at the top, following which another dialog pops up: 3. This dialog allows configuration of the test image as follows: Choice between black or white grid lines Draw Lines ...produces a grid with the specified grid division. The grid di‐ vision can optionally be entered in lines (number of lines) or in pixels (dis‐ tance between the lines in pixels). 13 Wings Engine Play/Install Draw Center Circle ...produces a center circle. Draw Full Ellipse ...produces an ellipse which touches the edges of the image. Draw Crosses ...produces diagonal lines in the overlap areas specified be‐ low. Entries can optionally be made in % or in pixels. Draw Background ...produces grayscale or color stripes in the back‐ ground. Below you will find a few examples: Grid with ellipse and circle as well as diagonals in the overlap areas on the left and right. 14 Sound interface of Wings Engine Stage Grayscale with simplest grid Primary and secondary colors, as well as white and black stripes 4. To terminate the test image generator click the small cross at the top right cor‐ ner or press the Esc key. 15 Wings Engine Play/Install Sound interface The built‐in sound interface consists of a Motu MicroBook II with balanced outputs and DSP for effect editing, such as parametric EQx, compressor, FFT and phase analy‐ sis, as well as an oscilloscope. The CueMix FX software certainly also features a mixer which enables live microphone or LINE 1‐2 feeds, for example. The audio signal is available at sturdy Neutrik connectors. Only the guitar signal is not supplied. The names specified below the sockets correspond to those used in the driver dialog and the software CueMix FX: balanced audio outputs MAIN 1‐2 in the form of XLR‐m sockets digital S/P‐DIF audio output MAIN 1‐2 as Cinch socket unbalanced audio output LINE 1‐2 as stereo jack headphone output PHONES 1‐2 as stereo jack microphone input MIC 1 as XLR‐f‐socket; Note: before you connect dynamic microphones make sure phantom power is off. 5. In the Settings click Audio Settings. 6. Right‐click tab Channel and click the Phantom; the blue LED must be off (see arrow). balanced audio inputs LINE 1‐2 as stereo jacks (sleeve = ground, ring = minus, tip = plus) 16 Sound interface of Wings Engine Stage A detailed description of the CueMix FX software is available in a PDF file in the Wings Vioso help system under Sound interface of Wings Engine Stage. Audio output under Global Options ‐ Sound cards WDM or Sound cards ASIO depending on the preferred driver (the ASIO driver does not offer asynchronous sound). Sampling rate and quantization can be adjusted in the Wings Vioso Project Op‐ tions ‐ Output. For faultless operation the audio output configuration must def‐ initely be identical both in the Wings Vioso Project Options and under Settings ‐ Volume Settings. In the dialog Sound displayed highlight the output in use and click Properties. 17 Wings Engine Play/Install On tab Advanced under Default Format enter the same values as in the Wings Vioso Project Options ‐ Output , e.g. 16 bits, 44100 Hz. 18 Display Settings Wings Engine Stage features a clearly structured dialog that contains all the important functions for managing the connected displays. 1. Click on and on EDID Manager and the following dialog appears: 2. The following functions are available here: Display identification ...Click on Front to show all the connected displays and click on A toD on the corresponding display. Once a green checkmark appears along with the name of the display the device has been detected. The green checkmark appears also when an EDID file has been loaded but no display is connected. A loaded EDID is always a guarantee for a stable display assignment. 19 Wings Engine Play/Install Resolution ...for setting the required resolution. Available resolutions de‐ pend on the loaded EDID. Refresh Rate ...for setting the required refresh rate. Available refresh rates depend on the loaded EDID. Color ...for setting the required color depth. Available color depths de‐ pend on the loaded EDID. EDID Management ...for saving and loading EDIDs (Extended Display Identification Data), which are essential for secure and faultless opera‐ tion. An EDID should always be loaded to guarantee a stable display as‐ signment. In the delivery state, a standard EDID is loaded offering a varie‐ ty of different modes, which usually works in most cases. Further infor‐ mation is available at Saving and loading EDID for outputs. 3. After you have made the required modifications you click Apply Changes. While the changes are applied the displays will be flickering and it may take a few sec‐ onds until the required changes have been made. Further functions such as rotation of displays can be found in the NVidia Control Center. See also Settings ‐ Shortcuts. 20 Loading and saving EDID for outputs To ensure that the display allocation remains the same when motors and projectors are connected and disconnected you should save the EDID of the display device and load it to the graphics card. As an alternative, you can also load the supplied standard EDIDs. Wings Engine Stage offers the following functions for this: Loading EDID Saving EDID Please note that the image on the monitor will start flickering and disappear briefly upon executing functions Load, Unload or Reset. In this case you just need to wait until the normal image has reappeared. By clicking Reset you can load the suitable standard EDID for your monitor or projector. Usually, this works quite well. Loading EDIDs 1. To start with, do not connect any displays. Only one control monitor may be connected to port MONITOR OUT. Start the Wings Engine. Click and open the EDID Manager. 21 Wings Engine Play/Install 2. Click Load for the desired display and select the suitable EDID file by double‐ clicking it. The following options are available: If you want to use a Standard EDID select a Display X [email protected] for a Full HD monitor, for example. The modes for lower resolutions are contained in this EDID. Please note that this EDID file may contain presets that are not supported by your device. Any previously saved EDID of a device can usually be found in folder C:\AVStumpfl\EDID\My EDIDs. 3. Disconnect the display unless you have already done so and click Yes, proceed. Wait until the message appears that the EDID has been loaded and that you can connect the display. You do not need to connect the displays until the EDIDs for all displays have been loaded. 4. Proceed likewise for all the remaining displays and load the desired EDIDs. Following this reconnect the monitors and projectors. 22 Loading and saving EDID for outputs Now you can connect and disconnect displays or projectors without the system react‐ ing to it and without giving reasons for changing the display assignment. Since the system now no longer reacts to disconnected displays, dialogs may appear on monitors that are no longer connected, which however have previously been closed on this monitor. In such a case you need to reconnect the missing monitors or projectors. Saving EDIDs 1. To start with, do not connect any displays. Only one control monitor may be connected to port MONITOR OUT. Start the Wings Engine. Click and open the EDID Manager. 2. If displays A to D have a green checkmark EDIDs have been loaded that need to be removed to start with. For Display A click Unload and confirm disconnection of the display by clicking Yes, proceed. If you want to use more than just one type of device and want to save several EDIDS you repeat these steps for dis‐ plays B to D. 3. No connect your monitors or projectors whose EDIDs need to be saved to ports A to D. With identical devices you just need to connect one device and save one EDID. Now the green checkmarks appear and the denominations of the con‐ nected devices. 4. To save the EDID of the device, click on Save. In the file dialog enter a name for the EDID and click Save. 5. Repeat this process for other types of devices if you are using different devices. After saving the EDID you can load them to the graphics card. See Loading EDID. Please note that you can sync the display outputs in Wings Vioso in order to prevent tearing.. Information on how to proceed can be found in the Wings Vioso help files in chapter: Multidisplay Shows ‐ Adjusting the graphics output synchronization. 23 Touch screen calibration ‐ Touchside The front display of Wings Engine Stage has been provided with a touch screen. This touch screen can be calibrated using the program Touchside. Proceed as follows: Click and Settings and open the program Touchside. Click on tab Tools. 24 Touch screen calibration Click Linearization following which a program is started which displays 25 calibration points one after the other. Calibrate the touch screen by precisely pressing the calibra‐ tion points. 25 Shortcuts On the left desktop side click to open a dialog that allows access to virtually all relevant Wings Engine configuration dialogs. NVidia Control Center ...opens the Nvidia configuration dialog for setting reso‐ lution, synchronization as well as saving and reading of EDID for Wings Engine Stage. 26 Settings - Shortcuts Display Settings ..Display Settings ...opens the dialog for graphics output con‐ figuration and the EDID properties. MOTU CueMix Fx ...opens the sound card dialog. Volume Settings ...opens the Windows dialog for the sound properties. Network Settings ...opens the Windows dialog for the existing network cards. Date/Time Settings ...opens the Windows dialog for setting date and time. Language Settings ...opens the Windows dialog for regional and language op‐ tions. uEye Cockpit ...opens a window that allows the video image of the uEye camera to be enlarged to adjust sharpness and aperture. uEye Camera Manager ...opens the configuration dialog for uEye‐cameras. Touchside ...opens the tool for touch panel calibration (only Wings Engine Stage). Network sharing of the media drive Select Share Drive D to share the media drive on the network. User name for sharing and password are “Wings”. A special feature of Wings Engine Stage is the illuminated front grid which can be configured at Front Light Configuration: Demo Modes 1 and 2 allow a color change which can be disabled again by click‐ ing Default. RGB Test tests the front LEDs and changes over between white, red, green and blue. Intensity enables you to adjust brightness or switch off illumination altogether, which may be quite useful for stages and darker environments. If the Wings Engine Stage is used as a slave, the slave status is indicated in different colors: 27 Wings Engine Play/Install Green ...network connection established, idling condition, everything OK. Blue ...slave is playing a multidisplay presentation and is in Play or Pause mode. Yellow ...slave is active, e.g. file transfer. Red ...Error. Network connection not ok. The checkboxes in the title bar have the following functions: Show Black On Displays ...turns the desktop background black. Show GUI ...shows the Wings Engine user interface. After unchecking this box you can reactivate the interface via the little monitor icon right desktop corner. 28 at the top Wings Settings At the left desktop side click and, in the dialog popping up, click on Wings Settings at the top. Here you can define the options for the Wings program start. They differ for master and slave mode, i.e. by choosing the correct start mode the appropriate configuration is loaded automatically. Master/Slave Settings ...defines whether Wings Vioso starts in Master or Slave mode for Multidisplay shows. Check box Run at Startup to start Wings automat‐ ically in the specified mode after starting up. At Startup Delay you can enter the 29 Wings Engine Play/Install delay time for starting Wings after starting up the system. A delay may be useful if the Wings Engine is to establish connections and internal services beforehand. Field Master & Slave allows separate settings for master and slave mode. Moreover, by clicking and selecting the checkboxes under Default you can enter the parameters that are to apply for a normal startup by clicking the desktop icons. The entries made at Autostart are applied if Wings is started automatical‐ ly at the system start. At Master you can make the following entries: At Startup Options you can choose whether a project and which one is to be opened automatically: No Action opens only the Wings Vioso program window Show startup options ... opens the dialog box for selecting projects, tem‐ plates and Project Wizards. Open last project opens the project edited last. Open following project ...opens the specified project. Wait for slave connections ... is an important function for automatic multidis‐ play presentations. At Timeout you can specify the maximum period the master is to wait for the slaves. Data transfer to the slaves is to start as soon as the connection to the slaves has been established but at the latest after the timeout has expired. This period should allow the slaves to safely establish a connection with the master. Transfer Project to Slaves transfers the project to the slaves after the timeout period specified above has expired. If a slave within the network is not active, the project is still transferred to all other slaves. This function can only be se‐ lected if Wait for Slave Connections has been enabled. Transfer media files to slaves ... as above, but only the corresponding media files required by a slave are transferred, i.e. only the data minimum is trans‐ ferred. If a slave within the network is not active, all other slaves are still sup‐ plied with data. This function can only be selected if Wait for Slave Connections has been enabled. Autoplay Timeline Remote Index automatically starts the presentation in the timeline with the specified remote index at the position marker with remote in‐ dex 1. If the specified timeline and the position marker with the remote index 1 are not available this action cannot be performed. 30 Settings - Useful Programs Enable Device Ports ensures that the device ports are enabled for a project to be auto‐started after the Wings Platinum start‐up. See also Enable Device Ports in the Wings Vioso help system Adjust Sound Card Assignment makes sure that the current allocation of sound card outputs is not altered by Windows, e.g. due to faulty sound card detection. Trigger Scheduler ...for enabling and disabling the Trigger Scheduler (...available with Pro Licenses and up, not supported by additional licenses): Disable disables the Trigger Scheduler. Enable always enables evaluation of conditions and executes the triggers that fulfil these conditions. See also Trigger functions. See also Trigger functions in the help topics. Restore last exit state restores the setting that was active when the pro‐ gram was exited last. Under Slave you can select the following options: After choosing Slave in the dialog above you can enter the Master IP ad‐ dress at Master IP Address. If you enable Backup master IP address, you can specify a second master as backup. Should the first master fail, the slaves will automatically link up with the back‐up master. Show Log Files ...shows the content of the Wings log file.. The settings below under Master or Slave correspond to the Wings Op‐ tions. See Global Options ‐ Program start and NetworkProgram start and Netzwork in the Wings help topics. Saving and loading the settings The settings can be written directly to the INI file by clicking Save Settings so that they are taken over by Wings. Click Reload Settings to read the settings made in the Wings Options. This is usually done automatically when the dialog is opened, making any manual loading usually unnecessary. 31 Wings Engine Play/Install Settings ‐ Useful Programs When you click in the bottom left Desktop corner followed by clicking on Useful Programs in the top of the dialog that pops up, you can use the buttons to start a number of useful programs: LUA Development Tools …opens the LUA Development Tools in order to write Avio scripts. 32 Settings - Useful Programs TeamViewer ...opens the dialog for remote support and maintenance. Clicking and checking the box next to Run at Startup starts TeamViewer along with the system and allows access at any time via the Internet. Ultra VNC …starts Ultra VNC to allow remote support on the LAN. When Ultra VNC is active, you can remote control the Wings Engine in the Avio Manager. Notepad++ …opens the text editor Notepad++. Firefox …opens the web browser Mozilla Firefox. 7‐Zip …opens the archiving program 7Zip. VLC Player …opens the VLC media player. Media Info …opens the Media Info tool. This tool can also be opened by right‐ clicking a media file in Windows Explorer. Calculator ....opens the Windows calculator. BlueScreenView …opens the analytical tool for system crashes. CPU‐Z …opens a hardware analysis tool. Crystal Disk Mark …opens a hard disk analysis tool which is also suitable for SSDs. DPC Latency Checker …opens an analytical tool for driver latency determina‐ tion. Video Card Stability Test …opens the graphics card test program. Prime95 …opens the CPU and RAM test program. Process Explorer …opens the process monitor for monitoring system processes. 33 Settings ‐ Administrator On the desktop, click on in the bottom left corner and, at the top of the dialog on Administrator. This will open a service dialog which is only accessible to support staff. 34 Using a uEye camera If you want to use a uEye camera for Vioso calibration proceed as follows: 1. Connect your uEye camera to the network and the Wings Engine. 2. Click era Manager. , followed by clicking on Settings and open the uEye Cam‐ 3. At the top of the field the camera is displayed with an exclamation mark. This indicates that its address is in a different address range. 35 Wings Engine Play/Install 4. Click Automatic ETH configuration and the IP address is adjusted to the address range used. In the completion message click OK and close the uEye Camera Manager. The camera is now ready for use. Before you start the Vioso calibration you should adjust sharpness and portion using the uEye Cockpit as the large‐size window allows easier and more accurate settings. 1. Click shortcut uEye‐Cockpit and button Live video in the dialog box popping up. 2. At the top left corner click Open camera for the camera image to be displayed. With a new camera or new software you may have some firmware update load‐ ed onto the camera. 3. If the image does not show the required resolution and size click Camera prop‐ erties and select tab Size. 4. At Profile choose the required resolution. Bear in mind that a higher resolution causes a lower frame rate and makes the calibration take longer. 5. Click tab AWB and select Off to disable automatic white balance. Close the pro‐ perties dialog by clicking Close. 6. Now you can adjust sharpness and portion. You can now continue with a Vioso calibration. See Camera‐based calibration in the Wings Vioso help system. 36 Defining EDID for live video inputs Any desired EDID can be saved for DVI inputs. This ensures that the source supplies the defined resolution, provided it is able to do so. 1. Connect the display or projector whose EDID you want to read out to the video input card. 2. Click tor. 3. Click , followed by clicking on Shortcuts and open the EDID Edi‐ Read EDID to read the EDID information of the display unit. 4. This is the opportunity to check and, if applicable, modify the EDID. If the source is to supply only one particular resolution, you should remove all other resolu‐ Save to save the modified EDID. You can get tions from the EDID. Click back to it again any time later on. 5. Now click Write EDID to DELTA‐dvi to load the EDID of the video input card. If the card features two inputs you need to enter the corresponding input in the following dialog. 6. Now disconnect your display unit from the video input card and connect your video source. If this is a computer, all the resolutions contained in the EDID should now be selectable provided the computer is able to handle them all. Otherwise, the intersection of resolutions is used. 37 Wings Engine Backup Manager In Wings Engine Backup Manager various system conditions, so‐called “snapshots” can be saved. This means that you can make your system settings and then create a back‐ up version. You can create various snapshots with different settings and quickly change over between the snapshots. It is also possible to “freeze” a system condition to ensure that any modifications are undone at the next system start and the settings correspond to the “frozen” condition. Starting the Backup Manager During the booting process and after displaying the bios info for three seconds the list for selecting the Backup Manager appears: Select the Wings Engine Backup Manager and press Enter following which the Backup Manager is opened. 38 Wings Engine Backup Manager The system initially comes with two snapshots. A First Child which cannot be edited and corresponds to the factory setting. Derived from the First Child is the AV Stumpfl Engine Factory Image, which is the first editable snapshot. Creating a new snapshot Use Create New Snapshot to create a new snapshot. The new snapshot must refer to an existing snapshot. 39 Wings Engine Play/Install Selecting a snapshot By selecting the Use buttons you can choose the snapshot to be used. At the system start a Boot Manager showing the selected entry and the Backup Manager are dis‐ played. Should you have selected a snapshot with child snapshots you are asked whether you want to create a copy of the selected snapshot or whether you want to delete all child snapshots. Changing the snapshot name or description By right‐clicking the snapshot description or name you can change the description or name. 40 Wings Engine Backup Manager Freezing a snapshot (disallowing modifications) Snapshots can be frozen by clicking the Freeze checkbox. This means that any modifi‐ cations in the frozen snapshot are made undone at a restart. During a Wings Engine restart the Backup Manager is started first to resume the frozen condition and only then is the system frozen again. To quit this condition you need to abort the restart in the Backup Manager and then "defreeze" the snapshot (by unchecking the box Freeze. For permanent installation this Freeze function may be quite useful to ensure that the system always starts with the same settings. Locking a snapshot By selecting the Lock button you can lock a snapshot. After entering a password this snapshot can no longer be selected or deleted. The snapshot can only be unlocked again by clicking the Lock button and entering the password. A locked snapshot can be recognized by the red button . Attention: The snapshot can also be unlocked by entering the administrator password, which is “AVStumpfl” as delivered. It is therefore advisable to change the administra‐ tor password as described in the manual in item Backup Manager Administration. 41 Wings Engine Play/Install Deleting a snapshot Use Delete to delete snapshots that are no longer needed. If there are any snapshots that refer to the snapshot to be deleted the child snapshots will be deleted as well. Backup Manager Administration Click Manage System Images to open the administration view. Click Import New System Image to import new system images delivered by AV Stumpfl. Also the GUID of the Backup Manager and the operating system can be changed here. Attention: Changing the GUID may prevent the system from starting correctly. 42 Wings Engine Backup Manager The administration view is password‐protected. As delivered the password is “AVStumpfl”. The password can be changed after clicking the toothed wheel. 43 Wings Engine Play/Install TeamViewer Support Module Click TeamViewer to start the TeamViewer Support Module. It allows access to the Backup Manager by AV Stumpfl after providing the TeamViewer ID to the support person. This function can only be used with a working internet connection. Network Settings Click Network Settings to define the network settings for the Backup Manager. These network settings refer to the Backup Manager and may differ from your system set‐ tings. 44 Trouble shooting If Wings Engine does not start up try starting it in secure mode: 1. Start the Wings Engine and hit the F8 key whenever the display on the control monitor changes. 2. If the next step is a Boot Device query both SSDs must be displayed and the smaller XLR_EX060BB (57241 MB) be selected. Press Enter and immediately af‐ ter that F8, following which the Advanced Boot Options will be displayed. 3. Start by clicking Option Last Known Good Configuration (advanced) and press Enter. If this does not lead to the required success you can also try out other op‐ tions. If the problem cannot be solved turn to our support. 45 Documentation Status Last reviewed: 16.06.2014 Software versions Wings Vioso: 5.5 Wings Touch: 1.1.8 Wings Avio Manager: 1.1.8 Wings Avio Service: 1.1.8 Wings Engine GUI: 1.2.6 Wings Engine Light Controller: 1.2.0 Wings Engine Backup Manager: 1.2.6 46 AV Stumpfl contacts Should there be any questions which cannot be answered in the help section, please tell us about this. If you encounter any problems using Wings Vioso, please use the Support Function. If you have any questions or would like to make any suggestions you can reach us on the phone from Monday to Thursday from 8.00 to 12.00 and from 13.00 to 16.30 and on Fridays from 8.00 to 12.00 (UTC+1). Outside these hours we can offer fee‐based emergency support: Our emergency hotline is available every day between 8 am and 10 pm (UTC+1) at +43 7249 42811‐900. However, we would like to point out that we charge EUR 30,00 net for every 15‐minutes. Please bear in mind that we may not be able to answer your call immediately. In order to ensure that we can return your call as soon as possible and offer best‐possible support we are asking you to leave a message with your Company name Name Telephone number Dongle or customer number on the answering machine and we will call you within one hour. AV Stumpfl GmbH Mitterweg 46 A‐4702 Wallern Tel.: +43 7249 42811 Fax: +43 7249 428114 E‐mail: [email protected] Internet: http://www.AVstumpfl.com 47 Wings Engine Play/Install Camera‐based calibration for multidisplay projection was developed by our partner VIOSO: VIOSO GmbH Ronsdorferstr. 77a D‐40233 Düsseldorf Tel. +49 211 544 75 33 ‐ 0 Fax: +49 211 544 75 33 ‐ 33 E‐Mail: [email protected] Internet: www.vioso.com For some functions we work as a licensee for the following companies: For the Timestretching Functions we use: DIRAC Time Stretch/Pitch Shift technology licensed from The DSP Dimension http://www.dspdimension.com Developed and (c) 2005 Stephan M. Bernsee For decoding and encoding MPEG and H.264 videos and for Video‐DVD functionality we use codecs and software by MainConcept 48 , Copyright 2003 ‐ 2009 MainConcept AG