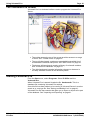
1
IP Office
Voicemail Installation & Administration
Manual
40DHB0002USAW Issue 7 (03/27/2002)
Page ii
Contents
Voicemail.......................................... 4
Overview............................................................. 4
Voicemail Lite ..................................................... 5
Voicemail Pro ..................................................... 6
Voicemail Pro Components ................................ 7
Integrated Messaging Service (IMS) .................. 8
IMS Limitations................................................. 8
IMS Components.............................................. 9
Number of Simultaneous Voicemail Users ....... 10
User, Group and Mailbox Names ..................... 10
Language Support ............................................ 11
The Voicemail Console..................................... 12
Voicemail Lite Installation............. 13
Pre-Installation Requirements .......................... 13
Voicemail Lite Installation ................................. 14
Voicemail Pro Installation ............. 15
Pre-Installation Requirements .......................... 15
Voicemail Pro Installation ................................. 17
IMS Client Installation....................................... 18
IP Office Manager
Configuration ................................. 19
IP Office Configuration ..................................... 19
System Configuration ....................................... 20
User Configuration............................................ 21
User Source Number Configuration ................. 22
Hunt Group Configuration................................. 23
Hunt Group Queuing ...................................... 24
Routing User Calls to Voicemail ....................... 25
Voicemail Reception......................................... 26
Transfer Calls to Voicemail............................... 26
Voicemail Email Integration .............................. 27
Using Voicemail to Give Error Messages ......... 28
Accessing Voicemail Remotely.... 29
Overview of Remote Access ............................ 29
Access Voicemail from Another Extension....... 29
Access from Any Extension for All Users ......... 29
Access from Any Extension for a Specific
User .................................................................. 30
Access from a Trusted Extension..................... 30
Accessing Voicemail from an External
Location ............................................................ 30
Direct Access from a Trusted External
Location ............................................................ 30
Hunt Groups................................... 31
Hunt Group Voicemail ...................................... 31
Accessing Hunt Group Voicemail Using a
Short Code ..................................................... 31
Accessing Hunt Group Voicemail Using
Voicemail Ringback........................................ 31
Out of Hours Operation .................................... 32
Hunt Group Queuing ........................................ 32
Using Voicemail Pro ...................... 33
Voicemail Installation & Administration Manual
IP Office
Overview of Voicemail Pro ............................... 33
The Voicemail Pro Screen................................ 34
Starting Voicemail Pro ...................................... 34
Toolbar Icons.................................................... 35
Start Points ....................................................... 36
Adding a Start Point ....................................... 37
Short Code Start Points ................................. 37
Editing a Start Point ....................................... 37
Deleting a Start Point ..................................... 37
Default Start Points........................................... 38
Actions.............................................................. 39
Adding an Action ............................................ 39
Editing an Action ............................................ 39
Deleting an Action .......................................... 39
Connections...................................................... 40
Adding a Connection...................................... 40
Deleting a Connection.................................... 40
Saving and Making Live ................................... 41
Importing and Exporting ................................... 41
Including Other Files......................................... 41
Viewing As Text................................................ 41
System Preferences ......................................... 42
Voicemail System Preferences ...................... 42
Campaign System Preferences ..................... 42
MAPI System Preferences ............................. 42
Using Queued and Still Queued Start
Points................................................................ 43
Using a Callback Start Point............................. 44
User Defined Variables..................................... 44
System Variables.............................................. 45
Wave Editor ...................................................... 45
Voicemail Pro Actions ...................46
Overview of Actions.......................................... 46
Available Actions .............................................. 47
Standard Action Tabs ....................................... 48
General Tab ................................................... 48
Entry Prompts Tab ......................................... 48
Specific Tab ................................................... 48
Reporting Tab ................................................ 49
Results Tab .................................................... 49
Start Point Action.............................................. 49
Module Action................................................... 49
Basic Actions .................................................... 50
Generic Action................................................ 50
Menu Action ................................................... 50
Goto Action .................................................... 51
Disconnect Action .......................................... 51
Home Action................................................... 51
Module Return Action..................................... 51
Mailbox Actions ................................................ 52
Get Mail Action............................................... 52
Leave Mail Action........................................... 52
Listen Action................................................... 52
Voice Question Action.................................... 53
Campaign Action............................................ 53
Page ii
40DHB0002USAW Issue 7 (03/27/2002)
Page iii
Configuration Actions ....................................... 54
Edit Play List Action........................................ 54
Record Name Action ...................................... 54
Play Configuration Menu Action ..................... 55
Telephony Actions ............................................ 56
CLI Routing Action ......................................... 56
Transfer Action ............................................... 56
Whisper Action ............................................... 57
Call List Action ............................................... 58
Assisted Transfer Action ................................ 58
Miscellaneous Actions ...................................... 59
eMail Action.................................................... 59
Open Door Action........................................... 59
Alarm Set Action............................................. 59
Clock Action ................................................... 60
Post Dial Action .............................................. 60
Condition Actions.............................................. 61
Test Condition Action ..................................... 61
Set User Variable Action ................................ 61
Test User Variable Action............................... 61
Queue Actions .................................................. 62
Queue ETA Action.......................................... 62
Queue Position Action.................................... 62
Voicemail Pro Modules ................. 63
Introduction to Modules .................................... 63
Creating a Module ............................................ 63
Adding a Module to a Start Point...................... 63
Importing and Exporting Modules ..................... 64
Running a Module Directly from a Short
Code ................................................................. 64
Running a Module Directly from an External
Call ................................................................... 64
Automatic Voice Recording .............................. 73
Manual Voice Recording .................................. 74
PhoneManager Pro .......................................... 74
Integrated Messaging System
(IMS).................................................75
Using IMS Administration ................................. 75
Synchronise Mailbox ...................................... 75
Mailbox Properties ......................................... 76
Setting up a New User ................................... 76
IMS Server Configuration ................................. 77
System Settings ............................................. 77
Path Setting.................................................... 77
Email Settings ................................................ 77
Miscellaneous Procedures ............................... 78
Changing the IMS Server’s Computer
Name.............................................................. 78
Optimising Performance on PCs running
NT .................................................................. 78
IMS Client Does Not Start-up/Connect
When PC Boots Up ........................................ 78
Mailbox User Controls ...................79
Overview........................................................... 79
Automatic Message Deletion............................ 79
Telephony Operation Mode .............................. 80
IP Office Mode.................................................. 81
Intuity Commands............................................. 82
Visual Voice...................................................... 83
Glossary of Terms..........................84
Index ................................................85
Conditions Editor........................... 65
Conditions......................................................... 65
Using the Conditions Editor .............................. 66
Starting the Conditions Editor......................... 66
Adding a Condition ......................................... 66
Adding Elements to a Conditions ................... 66
Editing Elements and Conditions ................... 67
Changing a Condition's Logical Setting.......... 67
Deleting Elements and Conditions ................. 67
Available Condition Elements........................... 68
Calendar......................................................... 68
Week Planner................................................. 68
Condition ........................................................ 68
Compare......................................................... 68
Voicemail Pro Campaigns............. 69
Introduction to Campaigns................................ 69
Campaign Web Access .................................... 69
Adding, Modifying & Deleting Campaigns ........ 70
Customer Prompts ......................................... 70
Customer Menu.............................................. 71
Campaign Identification.................................. 71
Accessing a Campaign..................................... 72
Campaign Preferences..................................... 72
Voice Recording ............................ 73
Overview of Voice Recording ........................... 73
Voicemail Installation & Administration Manual
IP Office
Page iii
40DHB0002USAW Issue 7 (03/27/2002)
Voicemail
Page 4
Voicemail
Overview
This documents covers the installation and administration of voicemail on
IP Office. Currently that includes the following:
• Voicemail Lite
This voicemail server program is supplied on the IP Office
Administrators CD. It doesn't require a license and can be run on a run
on low specification networked PC.
• Voicemail Pro
This voicemail program requires an IP Office license key to run. It
builds on Voicemail Lite by offering a high degree of customization for
any mailbox. Voicemail Pro consists of both a server program and a
client for administration of the server.
• IMS: Integrated Messaging System:
Included with Voicemail Pro software but requires its own IP Office
license key. Works with a customer's Microsoft Exchange server to
provide synchronized voicemail and email operation.
• Mailbox Modes
The controls and options available to the mailbox users vary according
to the type of voicemail installed, the type of phone they are using and
the mode of operation setup by the System Administrator. See
"Mailbox User Controls" on page 79.
Note: The IP Office can only interact with one voicemail server at any time.
If more than one voicemail server is installed on a network this may cause
problems.
Voicemail Installation & Administration Manual
IP Office
Page 4
40DHB0002USAW Issue 7 (03/27/2002)
Voicemail
Page 5
Voicemail Lite
Voicemail Lite provides is provided on the IP Office Administrator's CD.
Key features are:
• Runs on Pentium 166MHz, Windows 9x networked PC or higher.
• Does not require a license key.
• Maximum Message Length = 60 seconds:
The Voicemail Lite is restricted to a maximum message length of 60
seconds for any message.
• Maximum of 4 Simultaneous Users (2 on IP 401)
See "Number of Simultaneous Voicemail Users" on page 10.
• Supports basic voicemail email.
• Runs as a server program only (Voicemail Pro runs as a service on
Windows NT/2000 platforms).
• Supports basic mailbox customization :
• Pin code
• Ringback
• Reception
• Voicemail On/Off
• Email address
• Voicemail email on/off
Voicemail Installation & Administration Manual
IP Office
Page 5
40DHB0002USAW Issue 7 (03/27/2002)
Voicemail
Page 6
Voicemail Pro
Voicemail Pro is a licensed version of voicemail for IP Office. It builds on
Voicemail Lite in a number of ways:
• Support for more than 4 simultaneous voicemail users (maximum 2
only on IP401).
• By default each user and hunt group still receives the standard
voicemail feature. However voicemail behavior can be individually
customized.
• Defaults to Intuity mailbox mode within North, South and Central
America.
• Customization can also be applied to the defaults for all users and hunt
groups and to access via custom short codes.
• The maximum recordable length of messages can be changed from
the fixed 60 second limit of Voicemail Lite.
• Automatic call recording (Voice Recording) for selected Users, Hunt
Groups and CLI's allows the automatic recording of calls. This is setup
through the Manager application.
• Campaigns allow a sequence of messages to be played to a caller and
the caller's response to those question (spoken and/or telephone key
presses) are recorded. The sets of response can then be accessed
and action by call agents.
• Integrated Messaging System (IMS) adds sophisticated voicemail to
email integration.
• Support for full Visual Voice operation on Avaya 20 Series display
telephones.
Voicemail Installation & Administration Manual
IP Office
Page 6
40DHB0002USAW Issue 7 (03/27/2002)
Voicemail
Page 7
Voicemail Pro Components
Voicemail Pro consists of a number of software components.
• IP Office Feature Key Server
Required for validation of the Voicemail Pro, ports and IMS licenses.
• Voicemail Pro Server
Runs on the Server PC and provide voicemail facilities to the IP Office.
• Voicemail Pro Service
On Windows NT4 and 2000 the Voicemail Pro Server installs as a
Service. This provides greater reliability and resilience.
• Voicemail Pro Client
This is the interface used to configure the Voicemail Pro server. It can
be installed on a different PC from the Voicemail pro server PC if
required but typically it is run on the same PC.
• IMS Server & Administration Tool
IMS (Integrated Messaging System) provides sophisticated voicemail
and email integration between the Voicemail Pro Server and Microsoft
Exchange. IMS consists of a number of components.
• IMS Voice Service, Gateway Service and Database Service
These are installed onto the Voicemail Pro Server PC.
• IMS Administration Tool
Installs onto the Voicemail Pro Server PC.
• IMS Client Package
Each IMS user requires an IMS client installed on their PC.
• Campaign Web Component
If the Voicemail Pro Server PC is also running a web server, web
pages can be used to access campaign messages.
The following additional components may be required for certain functions:
• Web Server (Xitami, Microsoft IIS or PWS)
A web server running on the Voicemail Pro Server PC allows agents to
access campaign messages through their web browser (MSIE 5 or
higher, not Netscape). Note that this requires their PC to have
multimedia sound facilities.
• MAPI Client (Outlook 97/98/2000, Outlook Express)
If the PC onto which the Voicemail Pro Server is installed has a
working MAPI compliant email program, then mailbox users can make
use of basic voicemail email features.
• Exchange Server
IMS requires access to a Microsoft Exchange Server.
Voicemail Installation & Administration Manual
IP Office
Page 7
40DHB0002USAW Issue 7 (03/27/2002)
Voicemail
Page 8
Integrated Messaging Service (IMS)
IMS allows users to deal with voicemails through their normal email
interface (Microsoft Outlook or Exchange). Voicemails can still be handled
conventionally using the telephone.
Voicemails are presented with a special icon in the users email inbox.
When a voicemail is opened, a special form appears which enables the
user to play back the message on their telephone. The voicemail itself
remains on the voicemail server.
When a voicemail is read, forwarded or deleted, either from the email or by
using the phone, its status is reflected in both the mailbox and the email
inbox.
•
•
Playing Messages Through the PC
Normally IMS plays the voicemail messages through the PC user's
telephone. IMS can be set up to send the voicemail messages as wave
files which are played using the PC's sound capabilities. However this
creates a heavy load on the network and servers and so is not
recommended. Typically one minute of speech requires the transfer of
a 1MB file across the network.
Network and Exchange Server Knowledge
Installation of IMS requires access to the customers Exchange server
and to other critical components of their network. The installation
should only be performed by an installer with good knowledge of
Exchange Server and Microsoft network setup. The installation should
also only be performed in conjunction with the customer's network
manager.
IMS Limitations
IMS is designed to work in a system that comprises one IP Office and one
Microsoft Exchange Server. It can be used in a system with more than one
telephone systems so long as that system has centralized voicemail using
just one voicemail server.
IMS cannot be used to:
• Save a voicemail.
• Compose a new voicemail.
• Reply to a voicemail.
• Add comments to a forwarded voicemail.
• Mark a voicemail as urgent.
Voicemails should not be placed in Public Folders.
Windows 95/98 client PC's must connect to the IMS Server PC using
TCP/IP. Win 95/98 clients who do not use TCP/IP are not supported.
Voicemail Installation & Administration Manual
IP Office
Page 8
40DHB0002USAW Issue 7 (03/27/2002)
Voicemail
Page 9
IMS Components
IMS comprises of the following components.
• IP Office
One of the IP400 Office series of telephone systems.
• Voicemail Pro
Provides voicemail services to the IP Office extension users.
• IMS Server
This actually consists of three services installed on the Voicemail Pro
Server PC:
• IMS Voice Service
• IMS Gateway Service
It interacts with the Voicemail Pro Server, the Exchange Server
and the IMS Clients.
• IMS Database Service
It stores the current known status of voicemail messages and
mirrors that status in both user's email and voicemail mailboxes.
• Microsoft Exchange Server
The customers MS Exchange server.
• IMS Administration Tool
This tool is used to maintain the association of voicemail mailboxes to
email mailboxes.
The following additional components are required on the user PC's.
• Microsoft Exchange or Outlook
Microsoft Exchange Client or Outlook 97 or higher.
• IMS Client
Installed on each email user’s PC. It adds a form to their Outlook or
Exchange program that lets them handle voicemails.
Voicemail Installation & Administration Manual
IP Office
Page 9
40DHB0002USAW Issue 7 (03/27/2002)
Voicemail
Page 10
Number of Simultaneous Voicemail Users
All connections between the voicemail server (Pro or Lite) and the IP Office
are via the LAN using data channels. The maximum number of data
channels that can be used for voicemail operation at any moment are
shown below.
IP Office
IP 401
IP 403
IP 406
IP 412
•
•
Data
Channels
2
18
24
100
Maximum for
Voicemail Lite
2
4
4
4
Maximum for
Voicemail Pro
2
10
20
30
Voicemail Pro Licenses
The actual number of ports available on Voicemail Pro is controlled by
license keys entered through the Manager application.
• The Voicemail Pro license enables 4 ports (2 on IP 401).
• Additional Voicemail Pro licenses can be added to enable further
ports up to the maximum shown above.
Data Channels
The IP Office may support a higher number of data channels. The
figures shown above are the maximum that can be simultaneously
used for voicemail operation.
• Data channels can be used for other purposes. This may reduce
the number available for voicemail at any time.
User, Group and Mailbox Names
The voicemail server creates mailboxes based on the user and hunt group
names entered in the IP Office Manager application. Whenever either the
voicemail server or the Control Unit restart, new mailboxes are created for
any new names found.
This method of operation has the following consequences:
• WARNING: Mailboxes are based on names
For all users and groups, if their name is changed, they may no longer
be associated with their former mailbox and any associated Voicemail
Pro start points.
• WARNING: Voicemail is case sensitive
Voicemail is case sensitive. If a mailbox or start point name is entered
incorrectly within a Manager or Voicemail Pro, the intended operation
will not occur and the call may be disconnected.
Voicemail Installation & Administration Manual
IP Office
Page 10
40DHB0002USAW Issue 7 (03/27/2002)
Voicemail
Page 11
Language Support
The voicemail system provides prompts to callers and mailbox users based
on the Locale setting set through the Manager application's System form.
Individual users can be assigned their own Locale for which Voicemail will
then provide prompts (if the matching language is installed and supported).
This is done either through the Manager application's User form or through
the language choice on some telephones (refer to the appropriate
telephone User Guides).
Language
Danish
Dutch
English (UK)
English (US)
French (Standard)
French (Canadian)
Finnish
German
Hungarian
Italian
Japanese
Norwegian
Portuguese (Standard)
Portuguese (Brazilian)
Spanish
Spanish (Latin)
Swedish
•
•
Locale
Lite
dan
nld
eng
enu
fra
frc
fin
deu
hun
ita
jpn
nor
ptg
ptb
esp
eso
swe
Yes
Yes
Yes
Yes
Yes
–
Yes
Yes
–
Yes
–
Yes
Yes
–
Yes
–
Yes
Pro IP Office
Mode
Yes
Yes
Yes
Yes
Yes
Yes
Yes
Yes
Yes
Yes
Yes
Yes
Yes
Yes
Yes
Yes
Yes
Pro Intuity
Mode
–
–
Yes
Yes
–
–
–
–
–
–
–
–
–
Yes
–
Yes
–
Default Language
If a prompt is not available in the indicated language, voicemail will
default to either English (UK) or English (US).
Support Countries
The availability of a language as voicemail prompts does not
necessarily indicate support for IP Office in a country that speaks that
language. Contact your local Avaya office for details of which countries
support IP Office.
Voicemail Installation & Administration Manual
IP Office
Page 11
40DHB0002USAW Issue 7 (03/27/2002)
Voicemail
Page 12
The Voicemail Console
Voicemail Lite installs as a server program on all operating systems.
Voicemail Pro installs as a server program on Windows 95/98 (on Windows
NT or 2000 it installs as a service).
When installed as a server program, the program must be running for
voicemail to operate. The program provides a console window that allows
you to see messages between the voicemail server and the IP Office. The
nature of the messages may be useful in diagnosing problems.
The console provides a number of commands. These commands only
affect the display of messages within the console window and do not alter
the voicemail server operation in any way.
• Freeze
Halt the display of further messages. This is the default condition of
the console when started.
• Run
Start the display of messages.
• Clear
Clear the display of messages.
• Campaigns
Displays messages relating to campaigns. Voicemail Pro only.
Voicemail Installation & Administration Manual
IP Office
Page 12
40DHB0002USAW Issue 7 (03/27/2002)
Voicemail Lite Installation
Page 13
Voicemail Lite Installation
Pre-Installation Requirements
Check the following requirements before installing the voicemail software
onto the voicemail server PC. The software is installed from the IP Office
Administrator CD.
PC
The PC used as the voicemail server should be:
• A Windows 9x or Windows NT4 or higher PC.
• A Pentium 166MHz or higher.
• A 100Mbps network card is strongly recommended.
• It is strongly recommended that the server PC is dedicated to this task
and is located in a non-public area.
Network
The PC should be configured and tested for TCP/IP networking.
• We strongly recommend that it is directly connected to an IP Office
LAN port.
• The PC should have a fixed IP address. Whilst PC's in a DHCP
network usually retain the same IP address between reboots this is not
guaranteed.
• If the IP Office is acting as a DHCP server, in default it will use
addresses up to 192.168.42.200 for DHCP, leaving higher
addresses free for devices that require fixed IP addresses.
Disk Space
The Voicemail Server installation requires 250MB of disk space, however
you should note that recorded messages consume an additional 1MB of
disk space per minute.
• For a small office, you can expect to require at least 200 minutes of
message recording space, ie. 200 MB.
• For a busy environment you can expect to require at least 1,000 minutes
of message recording space, ie. 1Gbyte.
Email Connection
If the Voicemail Server PC has a MAPI compliant email client program, that
program can be used for voicemail email functions. Email connectivity
should first be tested by sending an email direct from the email client
program on the Voicemail Server PC.
• Outlook 97/98 supports MAPI.
• Outlook Express can be configured to enable MAPI.
• Note: The sending of voicemail .wav files across the network creates a
high loading on the network and network servers.
Voicemail Installation & Administration Manual
IP Office
Page 13
40DHB0002USAW Issue 7 (03/27/2002)
Voicemail Lite Installation
Page 14
Voicemail Lite Installation
1.
2.
3.
4.
5.
6.
7.
8.
Ensure that there are no other versions of Voicemail Server already
installed on the PC.
• After uninstalling any existing versions, always reboot the PC
before proceeding to install the new version.
• Uninstalling an old version will not delete existing messages and
greetings.
Ensure that the date and time on the server PC are correct. Once
installed, the Voicemail Server acts as the time source for the IP Office.
Run setup from the IP Office Administrators CD and follow the
instructions. Select Voicemail from the list of installable components.
• Be careful about deselecting other items as this will trigger their
removal if already previously installed.
Add a shortcut to the vmlite.exe file (C:\Program Files\Avaya\IP
Office\Voicemail Server\vmlite.exe) to the PC StartUp folder. Then
restart the PC.
Following the restart, the IP Office Voicemail Lite server should be
visible on screen or in the Taskbar. For details of the Voicemail
Console screen see "The Voicemail Console" on page 12.
At any extension, dial *17 (the default short code to access the
extensions Voicemail), you should hear the voicemail server respond.
Minimize the Voicemail Lite Server program.
• Do not close the Voicemail Lite Server program as that stops the
voicemail server and all voicemail operation.
You can now proceed with configuring the IP Office to use the
Voicemail Server, see "IP Office Manager Configuration" on page 19.
• Note: The default IP Office configuration normally allows
immediate voicemail operation for all users and hunt groups.
Voicemail Installation & Administration Manual
IP Office
Page 14
40DHB0002USAW Issue 7 (03/27/2002)
Voicemail Pro Installation
Page 15
Voicemail Pro Installation
Pre-Installation Requirements
Check the following requirements before attempting to install Voicemail
Pro. The software is installed from the IP Office Voicemail Pro CD.
General
• If not already installed, an IP Office Feature Key Server must be
installed. This can be installed onto the same PC as the Voicemail Pro
Server.
• License for Voicemail Pro and licenses for additional ports required.
• License for IMS if being installed.
• IP Office Voicemail Pro CD.
PC
• Windows 9x or higher PC. For maximum reliability Voicemail Pro
should be installed as a service on an NT4 (with Service Packs 4, 5
and 6a) or Windows 2000 PC.
• Voicemail Only: Pentium 200 with 128MB RAM.
• Voicemail with IMS and/or Campaigns: Windows NT/2000
Pentium 300 with 256MB RAM.
• A 100Mbps network card is strongly recommended.
• The PC must have multimedia sound capabilities for the playing and
recording of prompts.
• The server PC must be dedicated to this task and located in a secure
area.
Network
The PC should be configured and tested for TCP/IP networking.
• We strongly recommend that it is directly connected to an IP Office
LAN port.
• The PC should have a fixed IP address. Whilst PC's in a DHCP
network usually retain the same IP address between reboots this is not
guaranteed.
• If the IP Office is acting as a DHCP server, then in default it uses
addresses 192.168.42.1 to 192.168.42.200 for DHCP clients. This
leaves addresses up to 192.168.42.254 free for devices that
require fixed IP addresses.
Disk Space
Full installation requires 1GB of disk space. Typical installation requires
approximately 160MB of disk space. However you should note that
recorded messages consume an additional 1MB of disk space per minute.
• For a small office, you can expect to require at least 200 minutes of
message recording space, ie. 200 MB.
• For a busy environment you can expect to require at least 1,000
minutes of message recording space, ie. 1Gbyte.
Voicemail Installation & Administration Manual
IP Office
Page 15
40DHB0002USAW Issue 7 (03/27/2002)
Voicemail Pro Installation
Page 16
Web Server Operation
If web browser access to campaigns is required, one of the following web
servers must be installed on the PC before Voicemail Pro. Note that both
the Microsoft web server products run as services and require Voicemail
Pro to also run as a service (ie. an NT or Windows 2000 installation of
Voicemail Pro).
• Xitami Web Server
• Microsoft IIS Web Server
• Microsoft Personal Web Server.
Basic Email Connection (Voicemail Email)
For basic voicemail email operation, the Voicemail Server PC must also
have installed a MAPI compliant email client program. Email connectivity
should have been tested by sending an email from Voicemail Server PC
using the MAPI client program.
• Outlook 97/98 supports MAPI.
• Outlook Express can be configured to enable MAPI.
Advanced Email Connection (IMS)
• Email Server:
• MS Exchange 5 & 5.5
• An Exchange User account for user ‘IMSAdmin’ will need to as
part of IMS installation.
• Must be a member of the same NT Domain as Voicemail Pro
Server.
• A list equating Exchange User account names with and voicemail box
users.
• Email Client: An NT Domain User named ‘IMSAdmin’ is created
during installation. Exchange Client or Outlook must be configured and
working for user ‘IMSAdmin’.
IMS Client PC's:
• Hardware:
The minimum recommended hardware for NT/2000 is a Pentium 100
with 32 Mb RAM. For Windows 95/98/ME is a Pentium 100 with 24 Mb
RAM.
• Operating system: Either;
• Windows NT4 with Service packs 4, 5, 6a or Windows 2000.
Where a PC is outside of the Exchange server’s domain it will
need NT4 Service Pack 6a or Windows 2000.
• Windows 95/98/ME clients must use TCP/IP networking.
• Network configuration:
Users must be members of an NT Domain.
• Email Client:
MS Exchange Client, Outlook 97, 98 or 2000.
Voicemail Installation & Administration Manual
IP Office
Page 16
40DHB0002USAW Issue 7 (03/27/2002)
Voicemail Pro Installation
Page 17
Voicemail Pro Installation
The following process is for a typical Voicemail installation Pro.
1. Ensure that no previous version of Voicemail server is already installed
on the PC.
• After uninstalling any existing voicemail server, always reboot the
PC. Uninstalling does not remove any existing messages and
greetings.
2. Run Manager and enter the licenses for Voicemail Pro and any
additional voicemail ports. If IMS is also being installed enter the
license for IMS also. Upload the new configuration to the telephone
system.
3. Reload the IP Office configuration into Manager and check that the
status of the licenses have changed to valid.
4. Ensure that the date and time on the server PC are correct. Once
installed, the Voicemail Server acts as the time source for the IP Office.
5. Insert the Voicemail Pro CD. The installation wizard should auto-start.
6. Select the type of installation required:
• Client Install
Installs just the Voicemail Pro client program and the IMS Client
installation package.
• Custom Install
Allows selection of which components to install.
• Typical Install
Installs all components of Voicemail Pro and IMS.
• Voicemail Pro
Installs the minimum required for voicemail operation. In addition
to the selected installation language prompts, either English UK or
English US prompts are installed.
• Note: On Windows NT/2000, the Voicemail Pro Server is
automatically installed as a service.
7. If the Campaign Web Component is being installed, you will be
prompted for the Web Server type, location of the web server's HTML
root and the CGI bin directories.
8. Windows NT/2000: If installing the Voicemail Pro Server, you will need
to enter the user account that the Voicemail Pro service should use.
9. Unless there are specific reasons to do otherwise accept the displayed
program folder.
10. A summary of those items about to be installed is displayed. You can
use the < Back control to return to the previous screens and alter the
selection if required. Otherwise click on Next > to begin the installation
of files.
11. IMS Installation: If IMS is being installed, then following the file
copying, you will be taken through the tabs of the Integrated
Messaging Server control panel (see "IMS Server Configuration" on
page 77).
• Select the Logging Level required.
• Enter the name of the PC on which the software is installed (the
installation process should have auto-detected the name).
• Select the Email Setting for the service. The email account used is
IMSAdmin.
• The installation process will attempt to verify the license for IMS
before starting the service.
12. Windows 95/98: Add a shortcut to C:\Program Files\Avaya\IP
Office\Voicemail Pro\Vm\vmprov5.exe to the PC's StartUp folder.
Voicemail Installation & Administration Manual
IP Office
Page 17
40DHB0002USAW Issue 7 (03/27/2002)
Voicemail Pro Installation
Page 18
13. If upgrading from an existing Voicemail Lite, the Voicemail Lite
message, name and greeting folders can be manually copied to
equivalent Voicemail Pro folders.
14. Restart the PC.
15. You can now proceed with configuring the IP Office to use the
Voicemail Server, see "IP Office Manager Configuration" on page 19.
• Note: The default IP Office configuration normally allows
immediate voicemail operation for all users and hunt groups.
16. If the Voicemail Pro client was installed, you can use this to alter the
voicemail pro preferences, see "System Preferences" on page 42.
17. If IMS was installed, you can now configure IMS operation, see "Using
IMS Administration" on page 75 and begin installing IMS clients.
Note:
• Mailbox Mode: If installed on a PC with North, South or Central
America regional settings, the Voicemail Pro will default to Intuity
mailbox mode. It will also set the automatic message deletion time to
30 days.
IMS Client Installation
The IMS client must be installed onto every PC from which the user intends
to use IMS.
1. During IMS installation, the IMS Client installer IMS Client.exe is
copied to the folder C:\Program Files\Avaya\IP Office\Voicemail
Pro\IMS\Client (and a shortcut added to the PC desktop). Copy this
file (approximately 10.8MB) to a location where it can be accessed
when logged on at the various user PC's onto which you want to install
the IMS Client.
2. For each user, access and start IMSClient.exe from the user's PC.
3. Enter the user's extension number and the name of the Voicemail
Sever PC.
Voicemail Installation & Administration Manual
IP Office
Page 18
40DHB0002USAW Issue 7 (03/27/2002)
IP Office Manager Configuration
Page 19
IP Office Manager Configuration
IP Office Configuration
The default configuration for IP Office allows almost immediate voicemail
operation once the voicemail server is running. The IP Office default
settings are:
• Voicemail running on a PC accessed using a broadcast address
(255.255.255.255) from the IP Office.
• Voicemail on for each user and hunt group on the IP Office.
• No Voicemail Code set for any mailboxes. Until a code is entered for
a mailbox, it can only be accessed from the user's own extension.
• No Voicemail Email or Voicemail Help operational.
• No Voicemail Reception for user mailboxes.
• Whilst hunt group mailboxes are created and used by default, there is no
default method for accessing them. A method for accessing each hunt
group mailbox should be programmed. See "Hunt Group Voicemail" on
page 31.
A range of settings and controls are accessible through the IP Office
Manager Application to configure the voicemail operation. The following
sections details those settings and controls.
Voicemail Installation & Administration Manual
IP Office
Page 19
40DHB0002USAW Issue 7 (03/27/2002)
IP Office Manager Configuration
Page 20
System Configuration
The IP Office must be configured to recognize which PC is acting as its
Voicemail Server. The IP Office is configured via the Manager application
and these settings can be found in the Voicemail tab of the System
configuration form.
• Voicemail Type: Default = PC
Select PC for Voicemail Lite and Voicemail Pro operation.
• Voicemail Destination: Default = Blank
Not currently used.
• Voicemail IP Address: Default = 255.255.255.255
Enter the IP address of the PC on which the voicemail server is
running. This may left set to 255.255.255.255 (a broadcast address)
if there is only one voicemail server on the network.
• Voicemail Password/Confirm Password : Default = Blank
Only used by Voicemail Pro. Leave blank for Voicemail Lite. For
Voicemail Pro, if you set a password here, the same password must
be entered in the Voicemail System Preference, see "Voicemail
System Preferences" on page 42.
Voicemail Installation & Administration Manual
IP Office
Page 20
40DHB0002USAW Issue 7 (03/27/2002)
IP Office Manager Configuration
Page 21
User Configuration
The following options are configured via the Voicemail tab for each
individual User within Manager.
• Voicemail Code: Default = Blank
A code (1-7 digits) used by the Voicemail Server to validate access to
this User's Voicemail box. This is required when users retrieve
Voicemail messages remotely, ie. from another user's extension or from
an external telephone, eg. a mobile. If remote access is attempted and
a Voicemail Code has not been configured the message "Remote
access is not configured on this mailbox" will be played.
• Confirm Voicemail Code:
The Voicemail Code must be retyped to ensure it has been correctly
entered.
• Voicemail Email: Default = Blank
When a new message is received, the WAV file created can be sent to
an email account either by user selection or according to the set
Voicemail Email Mode (see below). See "Voicemail Email Integration"
on page 27.
• Note: The sending of .wav files across a network creates a high
loading on the network and networks servers. A one-minute
message requires a 1MB .wav file.
• Voicemail Reception: Default = Blank
When connected to a User's Voicemail the caller can press 0 to be
transferred to either an internal number, eg. Reception or to an external
number, eg. a mobile. Enter here the telephone number to be used. The
User should announce this facility in their greeting message, eg. "John
Smith is not available today, you may leave a message or press 0 for
Reception".
• Note: That is a "blind" transfer and if "reception" is busy, with no call
queuing configured, the caller will have no further options and will
be put through to voicemail again.
• Voicemail On: Default = On
Controls if Voicemail is available for this extension.
• Voicemail Help: Default = Off
When retrieving Voicemail messages users can be given a recorded
message helping them to use the Voicemail facility. Standard IP Office
mailbox mode only.
• Voicemail Ringback: Default = Off
If enabled and a new message has been received, the Voicemail server
will call the User's extension to attempt to deliver the message each
time the telephone is put down. Voicemail will not ring the extension
more than once every 30 seconds.
• Voicemail Email Mode: Default = Off
Controls the method of operation of Voicemail Email above.
• Off: Voicemail messages or notifications are not automatically sent.
• Copy: A copy of the message is sent to the email account.
• Forward: Voicemail messages are sent to the email account and
deleted from the Voicemail server.
• Alert: Notification that a new Voicemail message has been received
is sent to the email account.
Voicemail Installation & Administration Manual
IP Office
Page 21
40DHB0002USAW Issue 7 (03/27/2002)
IP Office Manager Configuration
Page 22
User Source Number Configuration
This tab in the User form gives a list of Dial In Source Numbers. Several of
these numbers can relate to voicemail operation.
• Telephone Number: Default = V plus own extension number
Right-click within the Telephone Number box and select Add.
• V = Voicemail access
To allow a User to collect Voicemail without being prompted for their
Voicemail Code, prefix the number with a "V", eg. V201, or
V0468312333. By default, each user is configured with their
extension as a "trusted location" which enables them to dial *17
(default) from their own extension to collect Voicemail messages.
• H = Voicemail Ringback for a Hunt Group
To instruct the Voicemail Server to call the user when a new
message has arrived for a Hunt Group prefix the Hunt Group name
with a "H", eg. HSales
• P = Voicemail Ringback to any location
To instruct the voicemail server to call the user at a location other
than their own extension when a new message is received, prefix
the number with a "P", eg. P01232123456. This facility is only
available when using Voicemail Pro through which the user must
have a Callback start point setup.
Voicemail Installation & Administration Manual
IP Office
Page 22
40DHB0002USAW Issue 7 (03/27/2002)
IP Office Manager Configuration
Page 23
Hunt Group Configuration
The following options can be configured via the Voicemail tab of the Hunt
Group form in Manager.
• Voicemail Code: Default = Blank
A security code (1-7 digits) used by the Voicemail Server. This is
required when users retrieve Voicemail messages for this Hunt Group
remotely, ie. from an extension not a member of the Hunt Group or from
an external telephone, eg. a mobile.
• Confirm Password:
The Voicemail Code must be retyped to ensure it has been correctly
entered.
• Voicemail Email: Default = Blank
When a new message is received, the WAV file created can be sent to
an email account. Enter the email address to be used by the Voicemail
Server. This address is passed to the MAPI interface on the Voicemail
Server, see "Voicemail Email Integration" on page 27.
• Note: The sending of .wav files across a network creates a high
loading on the network and networks servers. A one-minute
message requires a 1MB .wav file.
• Voicemail On: Default = On
Each Hunt Group can use Voicemail to collect group related
messages. Use this option to turn this feature on or off.
• Voicemail Help: Default = Off
When retrieving Voicemail messages users can be given a recorded
message helping them to use the Voicemail facility - "For help at any
time press 8." This option will turn this facility on or off.
• Voicemail Email mode: Default = Off
If a Voicemail Email address has been entered above, select one of the
following modes:
• Off: Voicemail messages or notifications are not automatically sent.
• Copy: A copy of the message is sent to the email account.
• Forward: Voicemail messages are sent to the email account and
deleted from the Voicemail server.
• Alert: Notification that a new Voicemail message has been received
is sent to the email account.
Voicemail Installation & Administration Manual
IP Office
Page 23
40DHB0002USAW Issue 7 (03/27/2002)
IP Office Manager Configuration
Page 24
Hunt Group Queuing
Additional the Queuing tab for a Hunt Group contains the following
options:
•
•
•
Queuing On
: Default = On
If selected (default) queuing will be available for this Hunt Group.
Queuing Limit: Default = Blank
This features sets the number of calls that will be held in the queue at
any one time. If this number is exceeded the caller will receive the busy
tone or be passed to Voicemail (if operational).
Queue Ring Time: Default = 10 seconds
This facility defines the time (in seconds) before the caller is placed in
the queue.
An additional option in the Hunt Group tab control the interaction of
queuing and the overflow group.
• Overflow Time: The Overflow Time will allow the use of both the
queuing and overflow facilities. This feature defines the time (in
seconds) the caller will be held in the queue before being passed to the
Overflow Group. If all extensions in the Overflow Group are also busy
the caller will be returned to the queue. If an Overflow Time is not
specified calls will be passed directly to the Overflow Group and the
queuing facility will not be used.
Voicemail Installation & Administration Manual
IP Office
Page 24
40DHB0002USAW Issue 7 (03/27/2002)
IP Office Manager Configuration
Page 25
Routing User Calls to Voicemail
If a user has voicemail switched on, call will be automatically routed to
Voicemail if either:
1. The extension is busy and Call Waiting has not been enabled.
2. The user has Do Not Disturb set or the extension is not answered
within the No Answer Time as set in the Manager program (default 15
seconds).
• Exception: Callers calling from 20 Series display telephones are
not automatically routed to voicemail. They must press •VMAIL to
leave a message.
The caller will hear the standard greeting message. A user can record their
own standard greeting message if required.
When new messages are received, the user's telephone call display or IP
Office PC application will be updated to show the number of new messages
waiting.
If Voicemail Ringback is enabled, the Voicemail Server will ring the user’s
extension to attempt to deliver new messages after the user next uses the
telephone.
All messages are stored until they have been listened to and then are
automatically deleted after a set time (default 36 hours if installed in IP
Office mode, 30 days if installed in Intuity mode) unless they are manually
saved by the user.
At any stage whilst listening to Voicemail messages the user can ask for
online help by pressing 8.
A user can turn Voicemail and Voicemail Ringback on or off via Phone
Manager or using the default short codes as follows:
• *18 - To turn Voicemail on
• *19 - To turn Voicemail off
• *48 - To turn Voicemail ring back on
• *49 - To turn Voicemail ring back off
Voicemail Installation & Administration Manual
IP Office
Page 25
40DHB0002USAW Issue 7 (03/27/2002)
IP Office Manager Configuration
Page 26
Voicemail Reception
After a caller has been routed to voicemail, the mailbox user may wish
them to have the option of transferring to another number, for example,
reception, an assistant or an external number such as the user’s mobile.
To do this, using Manager the number required should be entered
Voicemail Reception box in the User's Voicemail tab. The user should
record a new greeting message informing callers that if they can press 0 to
transfer to that number.
Transfer Calls to Voicemail
The facility to transfer a call directly to a user’s voicemail is available using
the eConsole or Phone Manager applications. For users not using these
applications a short code can be created.
For example:
• Short Code: *201
• Telephone Number: "#Extn201" (include quote marks)
• Line Group ID: 0
• Feature: VoicemailCollect
Note: When creating short codes for use with Voicemail, the ? indicates
"collect Voicemail" and the # indicates "deposit Voicemail". The telephone
number entry must also be enclosed by quote marks as shown above.
Voicemail Installation & Administration Manual
IP Office
Page 26
40DHB0002USAW Issue 7 (03/27/2002)
IP Office Manager Configuration
Page 27
Voicemail Email Integration
Voicemail messages are stored on the Voicemail Server PC as .WAV files
and these files can be sent to an email account.
This feature uses the MAPI interface of the email client on the voicemail
server PC. Microsoft provides Windows Messaging/Microsoft
Exchange/InBox free as part of Windows and these all have a MAPI
interface.
• Note: Voicemail Email is separate from IMS operation.
• Note: The sending of .wav files across a network creates a high
loading on the network and networks servers. A one-minute message
requires a 1MB .wav file.
If you can send a message via one of these clients from the Voicemail
Server PC, then the Voicemail Server will also be able to. Use this to check
that the problem is with the email on the PC as opposed to the Voicemail
Server application. The MAPI interface is not activated until there is an
email to be sent. Outlook 97/98 also works with MAPI. Outlook Express has
a configuration option to enable MAPI.
The User's Voicemail tab in Manager is used to set the target email
address and the default mode of operation (Off, Copy Forward or Alert).
See "User Configuration" on page 21. Users accessing their mailbox using
standard IP Office Mailbox mode can change the mode of email operation
and select to send individual messages via email. See "IP Office Mode" on
page 81.
Voicemail Installation & Administration Manual
IP Office
Page 27
40DHB0002USAW Issue 7 (03/27/2002)
IP Office Manager Configuration
Page 28
Using Voicemail to Give Error Messages
Voicemail can be used to give out messages when certain numbers are
dialed. For example, if users are barred from making international calls,
rather than giving users the busy tone a recording similar to "International
calls are not permitted" could be played instead. The following example
could be used:
1. Create a user that will allow you to record the message and give this
user a Voicemail Code, eg.
• Name: Barred
• Full Name: Internal calls error message
• Extension: 403
2. Use a short code to access the user's voicemail to enable you to record
the message, eg.
• Short Code: *95
• Telephone Number: "?Barred" (include quote marks)
• Line Group ID: 0
• Feature: VoicemailCollect
3. Record a new greeting message for the above user, eg. "International
calls are not permitted" and save as a Continuous Loop.
4. Create a short code so that when a user dials an international call they
will be played the error message, eg.
• Short Code: 00N
• Telephone Number: "#Barred" (include quote marks)
• Line Group ID: 0
• Feature: VoicemailCollect
Voicemail Installation & Administration Manual
IP Office
Page 28
40DHB0002USAW Issue 7 (03/27/2002)
Accessing Voicemail Remotely
Page 29
Accessing Voicemail Remotely
Overview of Remote Access
By default a user can access voicemail from their own extension (using
*17).
Their mailbox cannot be accessed from any other location, internal or
external, until a Voicemail Code has been set for the mailbox. This is done
through the User’s configuration form in the Manager program.
Once a Voicemail Code has been set, the mailbox can be accessed from
other locations (see following sections) and the caller will be prompted to
enter the code.
If direct access is required the location can be setup as a 'trusted location'.
The caller will then not be required to enter the Voicemail Code. Note: This
requires that the incoming call provides a matching CLI.
Access Voicemail from Another Extension
1. Dial the extension whose mailbox is required.
2. When diverted to voicemail, press 8 during the voicemail greeting.
3. If not calling from a 'trusted location', enter the Voicemail Code when
requested.
Access from Any Extension for All Users
To use this facility a short code must be created.
For example:
• Short Code: *98
• Telephone Number: ?Anonymous (note no quote marks)
• Line Group ID: 0
• Feature: VoicemailCollect
Any user can now dial *98 from any extension. They will be prompted for
their mailbox number (extension number) and Voicemail Code.
Voicemail Installation & Administration Manual
IP Office
Page 29
40DHB0002USAW Issue 7 (03/27/2002)
Accessing Voicemail Remotely
Page 30
Access from Any Extension for a Specific User
To use this facility a short code must be created.
For example:
• Short Code: *90
• Telephone Number: "?Extn201" (include quote marks)
• Line Group ID: 0
• Feature: VoicemailCollect
The user ('Extn201' in this example) can now dial *90 from any extension
and then enter their Voicemail Code to access their voicemail messages.
Access from a Trusted Extension
If a user regularly accesses their voicemail messages from another
extension, this extension number can be set up as a "trusted location".
For example in the Source Numbers tab of the User’s form for extension
214, add an entry V204. Now when the user, Extn214, dials *90 from
extension 204 they will not be prompted for their Voicemail Code.
See "User Source Number Configuration" on page 22.
Accessing Voicemail from an External Location
If users wish to access their Voicemail messages when away from the
office an Incoming Call Route can be used for this facility. The Incoming
Call Route must be set up with the destination as Voicemail.
Direct Access from a Trusted External Location
If a user regularly accesses their mailbox from the same external location,
that number can be set up as a "trusted location". In the Source Numbers
tab of the User form in the Manager program add an entry V followed by
the telephone number, eg. V01923 383838.
When the users dials the number set up as the Incoming Call Route to
Voicemail from the "trusted location", they will not be prompted for their
mailbox number or Voicemail Code. See "User Source Number
Configuration" on page 22.
Note: This requires that the incoming call provides a matching CLI.
Voicemail Installation & Administration Manual
IP Office
Page 30
40DHB0002USAW Issue 7 (03/27/2002)
Hunt Groups
Page 31
Hunt Groups
Hunt Group Voicemail
If voicemail for a hunt group is on (the IP Office default) calls to the hunt
group will be automatically routed to voicemail if all available extensions
have been rung for the number of seconds defined in the IP Office's No
Answer Time parameter (15 seconds default).
• IMPORTANT: Access to hunt group voicemail
By default there is no indication when a hunt group mailbox contains
messages and no direct access method to a hunt group's mailbox.
These must be enabled individually for each hunt group using the
methods shown below.
Accessing Hunt Group Voicemail Using a Short Code
To access messages for a Hunt Group, a short code can be created:
For example:
• Short Code: *99
• Telephone Number: "?Sales" (include quote marks)
• Line Group ID: 0
• Feature: VoicemailCollect
Members of the Sales hunt group can now dial *99 from their own
extensions to access hunt group messages.
To use this short code for access from an extension that is not a member of
the hunt group, a Voicemail Code should be configured for the group.
Accessing Hunt Group Voicemail Using Voicemail Ringback
Voicemail Ringback for a hunt group can be achieved by entering the hunt
group name as a "trusted location" in a user's Source Numbers tab. See
"User Source Number Configuration" on page 22.
For example, enter HSales. When a new message is received by the Sales
hunt group, the voicemail server will ring the user and present the new
messages that have been received by the hunt group.
To use this short code for access from an extension that is not a member of
the hunt group, a Voicemail Code should be configured for the group.
Voicemail Installation & Administration Manual
IP Office
Page 31
40DHB0002USAW Issue 7 (03/27/2002)
Hunt Groups
Page 32
Out of Hours Operation
You may only require Voicemail during the evenings or at weekends but not
during normal office hours. This is possible by using Hunt Groups, which
can be switched into different operational modes automatically by using
timebands or manually by dialing short codes to place a Hunt Group into
Night Service or Out of Service mode.
When a Hunt group is in Night Service or Out of Service mode, the caller
will get "Busy" or if Voicemail is available played the Out of Hours greeting
or alternatively all calls will be forwarded to the Fallback Group if selected.
Each Hunt group has a Time Profile option and if configured is only
considered active during the time period defined. Outside the time period
the caller will get "Busy" or if Voicemail is available played the Out of Hours
greeting or alternatively all calls will be forwarded to the Night Service
Fallback Group if selected.
It is thus possible to forward one Hunt Group to a different Hunt Group
when out of hours operation is required. The Fallback Group can then ring
different extensions and if required go onto Voicemail if the call is
unanswered.
Hunt Group Queuing
If enabled, a call will be held in a queue when all extensions in the Hunt
Group are busy.
The Queue Ring Time defines the number of seconds the caller will hear
the ringing tone before being played the "You are in a queue greeting".
The caller will then be placed on hold for 20 seconds and then played the
"You are still in a queue greeting". Again the caller is on hold for a further
20 seconds and then played the still queued message again. This
sequence is repeated until the call is put through to the first available
extension.
This is the default queuing sequence used for Voicemail Lite and Voicemail
Pro. Using Voicemail Pro you can define custom actions and prompts for
the queuing sequence. See "Using Queued and Still Queued Start Points"
on page 43.
Voicemail Installation & Administration Manual
IP Office
Page 32
40DHB0002USAW Issue 7 (03/27/2002)
Using Voicemail Pro
Page 33
Using Voicemail Pro
Overview of Voicemail Pro
This section details using the Voicemail Pro client to control and alter the
operation of the Voicemail Pro sever.
• Default Operation
The default operation for Voicemail Mail Pro is to provide voicemail for
all users and hunt groups and so essentially emulate Voicemail Lite
operation. An except is that in North, South and Central America users
are defaulted to Intuity mailbox mode.
• Voicemail Pro is used to program alternative actions for those users
and hunt groups who require facilities differing from those provided by
a standard mailbox. It can also be used to program a series of
voicemail actions triggered by the dialing of a short code.
Relevant Sections:
• Using Voicemail Pro
This section covers the concept and usage of the Voicemail Pro client.
• Voicemail Pro Actions
Covers the individual actions that can be used within a Voicemail Pro
callflow. See "Voicemail Pro Actions" on page 46.
• Voicemail Pro Modules
Covers how pre-programmed sequences of actions can be used to
simplify Voicemail Pro programming. See "Voicemail Pro Modules" on
page 63.
• Conditions Editor
Covers the Conditions Editor which allows voicemail operation to alter
according to factors such as time, date, day, etc. See "Conditions
Editor" on page 65.
• Voicemail Pro Campaigns
Covers the creation and operation of Voicemail Pro Campaigns. See
"Voicemail Pro Campaigns" on page 69.
Voicemail Installation & Administration Manual
IP Office
Page 33
40DHB0002USAW Issue 7 (03/27/2002)
Using Voicemail Pro
Page 34
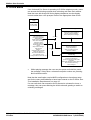
The Voicemail Pro Screen
Voicemail Pro is a windows interface used to program the Voicemail Pro
Server.
• The toolbar across the top of the screen provides access to a range
of icons. See "Toolbar Icons" on page 35.
• The top left-hand panel contains an expandable/contractible list of
customizable voicemail start points. See "Start Points" on page 36.
• The bottom left-hand panel contains a library of voicemail modules.
See "Voicemail Pro Modules" on page 63.
• The right-hand panel contains information relevant to whatever is
currently selected in either of the left-hand panels.
Starting Voicemail Pro
From the Start menu, select Programs. Select IP Office and the
Voicemail Pro.
When Voicemail Pro is started it loads the file Vmdata.mdb. This is a
database file containing Voicemail Pro settings.
Once this file has been edited, to be used by a Voicemail Server it must be
saved as a .vmp type file. See "Saving and Making Live" on page 41.
Voicemail Pro also has controls that allow you to export or import all or part
of the database. See "Importing and Exporting" on page 41.
Voicemail Installation & Administration Manual
IP Office
Page 34
40DHB0002USAW Issue 7 (03/27/2002)
Using Voicemail Pro
Page 35
Toolbar Icons
The Voicemail Pro screen provides the following icons. Note that these may
be grayed out according to which area of the Voicemail pro screen is
currently active.
• Save as: See "Saving and Making Live" on page 41.
•
Save & Make Live: See "Saving and Making Live" on page 41.
•
Cut: Removes currently highlighted text and copies it to the Windows
clipboard.
•
Copy: Copies currently highlighted text to the Windows clipboard.
•
Paste: Pastes the contents of the Windows clipboard to the current
cursor position if appropriate.
•
Add Start Point: See "Adding a Start Point" on page 37.
•
Edit Start Point: See "Editing a Start Point" on page 37.
•
Delete Start Point: See "Deleting a Start Point" on page 37.
•
Preferences: See "System Preferences" on page 42.
•
User Defined Variables: See "User Defined Variables" on page 44.
•
Conditions Editor: See "Conditions Editor" on page 65.
•
Campaigns: See "Voicemail Pro Campaigns" on page 69.
•
Connection: See "Connections" on page 40.
•
Basic Actions: See "Basic Actions" on page 50.
•
Mailbox Actions: See "Mailbox Actions" on page 52.
•
Configuration Actions: See "Configuration Actions" on page 54.
•
Telephony Actions: See "Telephony Actions" on page 56.
•
Miscellaneous Actions: See "Miscellaneous Actions" on page 59.
•
Condition Actions: See "Condition Actions" on page 61.
•
Queue Actions: See "Queue Actions" on page 62.
Voicemail Installation & Administration Manual
IP Office
Page 35
40DHB0002USAW Issue 7 (03/27/2002)
Using Voicemail Pro
Page 36
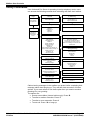
Start Points
Voicemail Pro consists of a number of start points. When the Voicemail
Server receives a call, it looks for a matching start point and if it finds one it
then provides a series of actions linked to that start point. If no match is
found then it provides standard voicemail functions to the call.
The left-hand panel contains an expandable and collapsible list of start
points. These can be start points for individual users, hunt groups, shorts
code and defaults start points.
Specific Start Points: This folder contains the start points for users,
groups and short codes.
•
Users: This folder contains start points setup for individual users.
•
•
Collect: Used when the user rings voicemail.
•
Leave: Used for calls to the user that are redirected to voicemail
•
Callback: Used when voicemail rings a user to inform them of
messages in the user's mailbox, see "Using a Callback " on page 44.
•
•
This is the start point for an individual user. If can be expanded to
show the different start points set up for the user.
Groups: This folder contains start points setup for hunt groups.
•
This is the start point for a particular group. It can be expanded to
show the different start points setup for the group.
•
Collect: Used when someone accesses the group's mailbox.
•
Leave: Used for calls to the hunt group that are redirected to
voicemail.
•
Queued & Still Queued: See "Using Queued and Still Queued
Start Points" on page 43.
Short Codes: This folder contains any start points setup for
particular short codes.
•
An individual short code on the IP Office. Note that this requires a
matching special Short Code to be setup in Manager, see "Short
Code Start Points" on page 37.
Default Start Points: Rather than set up individual start points for every
user and group, you can also program actions against the default start
points. These will then be used for all calls received by the Voicemail
Server that don't match a specific start point. See "Default Start Points" on
page 38.
Modules: Modules are reusable sets of actions. They allow you to
create a sequence of actions that you can then use within any other start
point's call flow. Any changes to the module will affect all the start points
using that module. This simplifies the programming of actions if a number
of start points use the same sequence of actions. Using modules also
reduces the size of the call flow. See "Voicemail Pro Modules" on page 63.
Voicemail Installation & Administration Manual
IP Office
Page 36
40DHB0002USAW Issue 7 (03/27/2002)
Using Voicemail Pro
Page 37
Adding a Start Point
1. Either click on Users, Groups or Short Codes and then
, or rightclick the mouse on Users, Groups or Short Codes and select Add.
2. Select the name that matches the user name of the user or group on the
telephone system or enter the short code (see additional short code note
below).
3. For users and groups you can also select the types of start points that
you want to added. Tick the boxes for the user or group start points
required.
Short Code Start Points
Short code start points require the Telephone Number entry of the
matching short code in the Manager application to be set up in a particular
way.
For example, if a Start Point for short code *88 is setup, the settings for
short code *88 in the Manager application must be as follows:
• Short Code: *88
• Telephone Number: "#ShortCodes.*88" (include quote marks)
• Feature: VoicemailCollect
Editing a Start Point
1. In the left-hand panel, either click on the start point to edit and then on
or right-click on the start point and then select Edit.
2. You can now edit the name and for users and groups you can change
the entry points. Note that deselecting an existing entry point will delete
all existing actions associated with it.
Deleting a Start Point
1. In the left-hand panel, either click on the start point to delete and then on
or right-click on the start point and then select Delete.
Voicemail Installation & Administration Manual
IP Office
Page 37
40DHB0002USAW Issue 7 (03/27/2002)
Using Voicemail Pro
Page 38
Default Start Points
The default start points can be used to create a sequence of actions that
will be applied to all suitable calls unless a specific start point exists
•
Collect:
Used when a caller attempts to access a mailbox.
•
Leave:
Used when a caller is redirected to voicemail.
•
Callback:
Used when the voicemail calls a user to inform them about messages in
a mailbox. See "Using a Callback " on page 44.
•
Queued & Still Queued:
Used for callers queuing for a hunt group. See "Using Queued and Still
Queued Start Points" on page 43.
When a default start point is used, the following actions will automatically
recognize who the presumed user is and access the matching mailbox for
that user (unless the action specifies another mailbox):
• Get Mail Action
• Leave Mail Action
• Play Configuration Menu
• Listen Action
• Record Name Action
• Edit Play List Action
The following actions will automatically recognize who the presumed user is
and then use that user's Voicemail Reception settings (unless the action
specifies another mailbox):
• Transfer Action
• Assisted Transfer Action
• Whisper Action
Voicemail Installation & Administration Manual
IP Office
Page 38
40DHB0002USAW Issue 7 (03/27/2002)
Using Voicemail Pro
Page 39
Actions
Once a start point has been created, you can add actions to it and create
connections between the actions. The sequence of actions associated with
a start point is shown in the right-hand panel when you click on the start
point.
• Results & Connections:
Each action can have a number of results (true, false, no answer, busy).
The types of results depend of the type of action, most actions having
just a 'Next' result. Each result can be used as a connection point to
another action, see Connections.
• Modules:
A set of actions and connections can be combined and reused as a
module, see "Voicemail Pro Modules" on page 63.
• Available Actions:
For a list of actions and their function see "Voicemail Pro Actions" on
page 46.
Adding an Action
1. Select the start point to which you want to add an action and then click
on the right-hand panel.
2. Either:
• From the menu bar select Action, then the action type required and
then the action required.
• From the toolbar, click on the icon for the action type required and
then on the action required.
3. The cursor changes to show that you have selected an action to add.
4. Click on the point in the right-hand panel where you want the action
added.
5. You can now edit the action and add connections to the action.
Editing an Action
1. Either double-click on the action in the right-hand panel or right-click on
the it and select Properties.
2. The action's properties appear as a number of tabs. See "Standard
Action Tabs" on page 48.
Deleting an Action
1. Click on the action to delete.
2. Either select Edit and then Delete or right-click and then select Delete.
Voicemail Installation & Administration Manual
IP Office
Page 39
40DHB0002USAW Issue 7 (03/27/2002)
Using Voicemail Pro
Page 40
Connections
To use the actions added to a start point they must be connected. The
sequence of the connections determines how the call is then routed
through voicemail.
Each action can have a number of results (True, False, No Answer,
Busy). The types of results depend of the type of action:
• Most actions just have a Next result, ie. a single connection to the
next action.
• Other actions may have two results, eg. True or False, depending on
some check performed by the action. Each of these results represent
a connection point for different following actions.
• Some actions may have multiple results. For example the Assisted
Transfer action has results for Next, No Answer, Busy and No
Answer Timeout. Each of these results represents a connection
point for different following actions.
• Results for which a connection to a following action has not been set
either disconnect the call or, if it came from a hunt group queue,
transfer it back to the queue.
• Within modules, all connection should end in another action or in a
Module Return action.
Adding a Connection
1. Click on the
icon. Click and drag the cursor from the action you want
at the start of the connection to the action you want at the end of the
connection.
2. If the start action has several results, ensure that you drag the cursor
from the result required.
Deleting a Connection
Note: Deleting an action will also delete any connections attached to that
action.
1. Click on the connection to delete. It should display as red.
2. Either select Edit and then Delete or right-click and then select Delete.
Voicemail Installation & Administration Manual
IP Office
Page 40
40DHB0002USAW Issue 7 (03/27/2002)
Using Voicemail Pro
Page 41
Saving and Making Live
The settings edited by Voicemail Pro are stored in a database file
(Vmdata.mdb). In order to be used by the Voicemail Server they must be
saved as a Root.vmp in the voicemail server folder.
•
Save as:
Saves the database as a .vmp file with the name you specify. That file
can then be copied to other systems.
•
Save & Make Live:
Saves the settings as Root.vmp in the voicemail server folder. The
folder location is set through Preferences, see "Voicemail System
Preferences" on page 42.
Importing and Exporting
The File | Import or Export command allows you to import or export a
whole set of Voicemail Pro settings or just individual modules.
This process involves two types of file. A database file (.mdb) contains a
full set of Voicemail Pro settings. A module file (.mod) contains one or
several modules.
When exporting modules to a module file, you will be prompted to select
which module to export. Similarly when importing modules from a module
file you will again be prompt for which modules to import. Note that if a
module of the same name already exists that module will be overwritten.
When importing a database file, the existing database is overwritten.
However a backup copy of is saved in the folder DB Backup.
• Note: Importing and exporting does not include prompts. These must be
moved as separate items or re-recorded.
Including Other Files
In some special circumstances it may be necessary to include the settings
of a existing .vmp file into the Voicemail Pro settings. This is done using the
File | Include option. After changing the included file settings ensure that
you select Update.
• Note: If included files are used, the Voicemail Pro database contains
only a pointer to the name and location of the files and not the actual
files. Therefore the included file should not be moved or renamed. We
strongly recommend that any file to be included is placed in the same
folder as Root.vmp before being included.
Viewing As Text
The File | View as Text option display the Voicemail Pro Modules and Start
Points as a text file. This may be necessary for support calls and
diagnostics.
Voicemail Installation & Administration Manual
IP Office
Page 41
40DHB0002USAW Issue 7 (03/27/2002)
Using Voicemail Pro
Page 42
System Preferences
Pressing F9 or clicking on the
menu.
icon displays the System Preferences
Voicemail System Preferences
• Voicemail Password:
This must match the Voicemail Password configured on the IP Office.
See "System Configuration" on page 20.
• Voicemail Server Directory:
Indicates the location of the voicemail server program. This is the folder
to which the file Root.vmp is saved when the Save & Make Live
command is used.
• Voicemail Server Speech Directory:
Indicates the location of the folders containing the libraries of speech
prompt.
• Max. Message Time:
Sets the maximum length in seconds of any message.
• Default Telephony Interface:
Controls how the mailbox access appears to users. Can be switched
between IP Office and Intuity. See "Telephony Operation Mode" on page
80.
• Note: If the Regional Setting of the server onto which Voicemail Pro
is installed is within North, South or Central America then Voicemail
Pro defaults to Intuity mailbox operation.
• Play Advice on Call Recording:
Used with recording live calls. When enabled, this feature plays a
message to callers advising them that their call is being recorded. See
"Voice Recording" on page 73.
Campaign System Preferences
This tab is used to indicate where campaign information and messages
should be stored.
• Remote Campaign Directory:
Use this field to browse for the directory in which campaign files should
be stored.
MAPI System Preferences
If the voicemail server is running on a PC that has a MAPI client program
installed, then the voicemail server is able to use that client to provide email
services. If the network manager requires a particular MAPI profile to be
used then that is set through this tab.
• MAPI Profile:
Allows the voicemail server to sign on to MAPI using a particular profile
name if necessary.
• MAPI Password:
This is the password for the specified profile.
Voicemail Installation & Administration Manual
IP Office
Page 42
40DHB0002USAW Issue 7 (03/27/2002)
Using Voicemail Pro
Page 43
Using Queued and Still Queued Start Points
The voicemail server can support the use of group queuing through the
Queued and Still Queued start points for calls to a group.
To do this the group must first have queuing enabled. Within the Manager
application queuing is set through the Hunt Group's Queuing tab.
• Queuing On:
Switches use of queuing on.
• Queuing Limit:
Sets the number of calls that can be in the queue at any time.
Additional calls will go direct to the hunt group's mailbox (or its Leave
start point if that has been configured).
• Queue Ring Time:
Defines the time in seconds before the caller is placed in the queue.
The default is 10 seconds.
When a call arrives for a group that has queuing in operation and all
members of the group are busy, the following events take place:
• The caller hears ringing for the Queue Ring Time period. They are
then passed to the groups Queued start point on the voicemail server
and follows any actions set there.
• If the caller remains in the queue after this, they hear hold music (if
installed) or ringing for the next 20 seconds.
• The caller is then passed to the group's Still Queued start point on
the voicemail server and follows any actions set there.
• If the caller remains in the queue after this, they hear hold music or
ringing again for 20 seconds and are then are passed to the group's
Queued start point again.
• The system continues to alternate between the Queued and Still
Queued start points.
Voicemail Installation & Administration Manual
IP Office
Page 43
40DHB0002USAW Issue 7 (03/27/2002)
Using Voicemail Pro
Page 44
Using a Callback Start Point
Users can have notification of new messages in their mailbox sent to a
number a number of their choice (this is a different function from Voicemail
Ringback which will ring their own extension when next used). The number
is set by entering it, preceded by a P, in the user's Source Numbers tab in
the Manager application.
For this setting to be used, either the Default Callback start point or the
User Callback start point must be setup with the actions required.
User Defined Variables
Pressing F8 or clicking on the
icon display the User Defined Variables
menu.
You can create user variables, the value of which can be set through the
Set User Variable action. See "Set User Variable Action" on page 61.
The sequence of actions presented to a call can also be branched
according to the value of the variable using a Test User Variable action.
See "Test User Variable Action" on page 61.
Example:
• Using the User Defined Variables menu, create a variable called
reception.
• Create a short code start point that connects to a Set User Variable
action that sets the variable reception to open. Create another short
code start point to set reception to closed. Create the matching short
codes on the telephone system.
• For calls using another start point, you can now use the Test User
Variable action to test whether the value of reception is open. The
action has true and false results which you can link to the appropriate
following actions, eg. transferring calls to the reception desk or to a
mailbox.
Voicemail Installation & Administration Manual
IP Office
Page 44
40DHB0002USAW Issue 7 (03/27/2002)
Using Voicemail Pro
Page 45
System Variables
A number of system variables exist which can be used to perform tasks.
For example, $NAM can be used to speak the users name within an
actions entry prompt. The system variables can also be checked by
Compare element in a conditions and thus branch the call flow according
variables value, see "Voicemail Pro Modules" on page 63.
• $NAM
Holds that name of the user (blank for short codes).
• $CLI
Holds the CLI of the caller.
• $RES
Holds the results of an action. For example a Generic action could be
used to specify a result of "Fred". The $RES variable received by the
following action would then hold the value "Fred".
• $VAR
A general variable which can hold amongst other things DTMF key
sequences.
• $KEY
Holds the last DTMF key series entered.
• $SAV
Holds the last saved result. This can be entered using the following entry
in a Generic action, Save:<value>, for example Save:$KEY or
Save:1234.
Wave Editor
The Wave Editor is used by Voicemail Pro to select, record and play
prompts. It can be used to select existing prompts or to record new
prompts.
• To select a prompt:
Enter the name of the prompt or use the
button to browse to the
required file. Useful files are:
• en\MC_00 - Plays a bleep.
• en\MC_01 - Plays 1 second of silence.
• Entering 1234.wav will play "one two three four" (unless a file called
1234.wav has been recorded).
• To record a new prompt:
Enter the name required for the prompt file. Then use the recording
controls to record/re-record the prompt.
• Using system variables:
Some system variable can be played as prompts. For example,
• $NAM - Plays the user name.
• $CLI - Speaks the caller's CLI.
• $RES - Plays the current result if it is a .wav file.
• $VAR - Plays the variable as a list of digits.
The format used by Voicemail Pro is WAV file, mono, 8117 samples per
second, 16 bits per sample.
Voicemail Installation & Administration Manual
IP Office
Page 45
40DHB0002USAW Issue 7 (03/27/2002)
Voicemail Pro Actions
Page 46
Voicemail Pro Actions
Overview of Actions
Once a Start point has been added, it can be linked to an action. Each
action can have one or several results, depending on the type of action,
and each result can be linked to a subsequent action. In this way you can
build up a call flow.
Double-clicking on an action displays its properties. These appear as a
series of tabbed menus. Many actions share the same standard tabs (see
"Standard Action Tabs" on page 48) but each usually also has a Specific
tab that contains options unique to that Action's function.
• Using Modules
Modules are reusable sets of actions. They allow you to create a
sequence of actions that you can then use within any other start
point's call flow. Any changes to the module will affect all the start
points using that module. This simplifies the programming of actions if
a number of start points use the same sequence of actions. Using
modules also reduces the size of the call flow. See "Voicemail Pro
Modules" on page 63.
Voicemail Installation & Administration Manual
IP Office
Page 46
40DHB0002USAW Issue 7 (03/27/2002)
Voicemail Pro Actions
Page 47
Available Actions
The available actions are:
•
Start Point Action - The first action in any sequence.
•
Generic Action - Direct entry of text commands.
•
Menu Action - Branch according to touch tone selection.
•
Goto Action - Go to another start point.
•
Disconnect Action - Disconnect the call.
•
•
Home Action - Return to the start point.
Module Return Action - Return to the start of a module.
•
Get Mail Action - Collect messages in a mailbox.
•
Leave Mail Action - Leave message in a mailbox.
•
Listen Action - Record to a mailbox.
•
Voice Question Action - Record response to a prompt.
•
Campaign Action - Access a campaign.
•
Edit Play List Action - Re-record a prompt.
•
Record Name Action - Re-record a mailbox name.
•
Play Configuration Menu Action - Alter user or group settings.
•
CLI Routing Action - Route on a CLI match.
•
•
Transfer Action - A blind transfer.
Whisper Action - Screened transfer.
•
Call List Action - Transfer to a user selected choice.
•
Assisted Transfer Action - A non-blind transfer.
•
eMail Action - Email a recording.
•
Open Door Action - Open and/or close a door relay.
•
Alarm Set Action - Set an alarm call time.
•
Clock Action - Play the time to the caller.
•
Post Dial Action - Play a recording to an extension.
•
Test Condition Action - Test whether a condition is true or false.
•
Set User Variable Action - Set a variable to a particular value.
•
Test User Variable Action - Test the value of a variable.
•
Queue ETA Action - Play the callers expect time to answer.
•
Queue Position Action - Play the callers position in a queue.
•
Module Action - An inserted module of actions.
Voicemail Installation & Administration Manual
IP Office
Page 47
40DHB0002USAW Issue 7 (03/27/2002)
Voicemail Pro Actions
Page 48
Standard Action Tabs
Each action including the start points has a number of tabs. These are
displayed by either double-clicking on an action or start point in the righthand panel or right-click on it and select Properties.
Each action's properties consist of a number of tabs containing information
about the action. The number and type of tabs varies between different
types of action, this section details those tabs that are common to all action.
For details of any tab specific to an action, see "Available Actions" on page
47.
General Tab
The General tab provides the following options:
• Token Name:
The name to display within the sequence of actions.
• Description:
Use this field to enter a brief description or notes about why the action is
being used or other information that may be needed.
• Pin:
Each action can be protected by a PIN number entered here. The PIN
number can include the voicemail code of the presumed user. This is
done by entering a $ symbol. For example, entering $ would force the
caller to dial their voicemail code, entering 104$ would force the caller to
dial 104 followed by their voicemail code.
Entry Prompts Tab
The Entry Prompts tab allows you to create a message that will be played
to the caller when they reach this action. The message can consist of
several prompts.
•
Add Prompt:
Add a prompt to the play list. The record dialogue that then appears
allows you to either select an existing recorded prompt or specify the file
name for and then make a new prompt. See "Wave Editor" on page 45.
•
Edit Prompt:
Edit the details of the currently highlighted prompt.
Delete Prompt:
•
Delete the currently highlighted prompt from the play list (the actual
prompt file is not deleted).
•
Move Prompt:
Move the position of the currently highlighted prompt in the play list.
• Allow prompts to be interrupted by Tones:
Allow the caller to press tone keys to make selections during the playing
of the actions entry prompts.
Specific Tab
The contents of this tab vary according to the type of action.
Voicemail Installation & Administration Manual
IP Office
Page 48
40DHB0002USAW Issue 7 (03/27/2002)
Voicemail Pro Actions
Page 49
Reporting Tab
The Reporting tab provides information that is then used to classify the call
details within the reports produced by the CCC products (a separate
product from Voicemail Pro).
• Flag the current call has been answered by Voice Mail:
The system user may not want the CCC to report a call as answered
until it has reached a certain action within the sequence of actions. For
example, to not regard a call as answered until the caller has left a
message, made a selection from a menu or has been transferred to a
user or group.
• Request to call back the current caller:
If this option is selected, the CCC will keep a record of the caller's CLI if
provided. This is then used within the CCC product to arrange a callback
call by an agent.
• Send reporting information:
If selected, this option allows various bits of information to be associated
with the call. The information is set in the Group name, Topic and
Annotation fields. The CCC product uses that information within its call
reports.
Results Tab
This tab shows the results available from an action. For the majority of
actions the results are fixed and appear grayed out, ie. they cannot be
changed.
For some actions the results are variable.
Start Point Action
This action represents the start point for a sequence of action.
For details of the default tabs see "Standard Action Tabs" on page 48, this
section details only tabs and settings specific to this type of action.
Module Action
This action represents an inserted module of actions. It may have
results depending on whether the Module Return action has been used
within the module. See "Voicemail Pro Modules" on page 63.
Voicemail Installation & Administration Manual
IP Office
Page 49
40DHB0002USAW Issue 7 (03/27/2002)
Voicemail Pro Actions
Page 50
Basic Actions
These actions are chiefly used to control the routing of a call between
actions.
Generic Action
This action can be used to simply play a prompt to the caller through its
Entry Prompts tab.
For details of the default tabs see "Standard Action Tabs" on page 48.
This action can be used to enter custom commands for the voicemail
server. This should only be done under direct guidance from Avaya.
Menu Action
This action allows to you specify telephone touch tones for which you
want to create connections to following actions.
For details of the default tabs see "Standard Action Tabs" on page 48, this
section details only tabs and settings specific to this type of action.
• Touch Tones: Use the check boxes to indicate the touch tones for
which you will be setting up following actions. Note that you can only
have a maximum of 15 in use at any time.
•
Add a Sequence of Tones: You can add a sequence of tones to the
menu. If you do add a sequence ensure that you also select its tick box
before clicking on OK. Note that key sequences must be unique, if 5 is
selected no other sequence begin with 5 can be used.
• ? - Any Digit:
The ? character can be used to represent any digit. For example
123??? can be used for any six digit string starting with 123.
• $ - Any Sequence of Digits:
The $ character can be used to match any sequence of digits. Key
press entry is ended either by the caller pressing # or the timeout set
below occurring.
• Wait for a key press for up to: This option can be used to perform a
timeout action if no suitable key match is entered.
Voicemail Installation & Administration Manual
IP Office
Page 50
40DHB0002USAW Issue 7 (03/27/2002)
Voicemail Pro Actions
Page 51
Goto Action
Takes the caller to another start point. Note: Though you can connect
this action to a following action, the connection will not be used.
For details of the default tabs see "Standard Action Tabs" on page 48, this
section details only tabs and settings specific to this type of action.
• Specific Tab:
• Please Select a node to go to: Click on
to browse for the start
point. You can also browse the available call variables. You can also
type the name of the start point directly.
• For short codes the browse method does not work. Instead enter
"Short Code.xxx" where xxx is the short code key sequence.
Disconnect Action
This action disconnects the caller.
For details of the default tabs see "Standard Action Tabs" on page 48, this
section details only tabs and settings specific to this type of action.
Home Action
Returns the caller to the start point.
For details of the default tabs see "Standard Action Tabs" on page 48, this
section details only tabs and settings specific to this type of action.
• General Tab: The PIN option is not used for this action. See "General
Tab" on page 48.
Module Return Action
This action is used within modules only. If creates a connection point
from the module to subsequent actions within any action plans that use the
module. A module can use several Module Return actions if necessary.
This action has no properties.
Voicemail Installation & Administration Manual
IP Office
Page 51
40DHB0002USAW Issue 7 (03/27/2002)
Voicemail Pro Actions
Page 52
Mailbox Actions
These actions relate to the leaving and collecting of messages from a
mailbox.
Get Mail Action
Access the messages in the caller's mailbox or the specified mailbox.
The caller then has access to the standard mailbox features setup for that
mailbox.
The caller can press 0 to exit the mailbox and continue to any following
action.
For details of the default tabs see "Standard Action Tabs" on page 48, this
section details only tabs and settings specific to this type of action.
• Specific Tab:
• Caller's mailbox: The mailbox matching the start point of the call.
• Mailbox: Select or enter the name of the target mailbox.
Leave Mail Action
Allow the caller to leave a message in the start point's mailbox or in a
specified mailbox.
The caller can press 0 to exit the mailbox and continue to any following
action.
For details of the default tabs see "Standard Action Tabs" on page 48, this
section details only tabs and settings specific to this type of action.
• Specific Tab:
• Caller's Mailbox: The mailbox matching the start point of the call.
• Mailbox: Select or enter the name of the target mailbox.
Listen Action
Allow the caller to leave a message in the start point's mailbox or in a
specified mailbox. However unlike a Leave Mail action the mailbox's
greeting is not played and the caller cannot press 0 to exit the mailbox.
For details of the default tabs see "Standard Action Tabs" on page 48, this
section details only tabs and settings specific to this type of action.
• Specific Tab:
• Caller's Mailbox: The mailbox matching the start point of the call.
• Mailbox: Select or enter the name of the target mailbox.
Voicemail Installation & Administration Manual
IP Office
Page 52
40DHB0002USAW Issue 7 (03/27/2002)
Voicemail Pro Actions
Page 53
Voice Question Action
This action allows you to create a play list where the caller hears a
sequence of prompts and their responses are recorded.
If the play list is completed, a single file containing the recorded responses
is created. That file can then be placed into a specified mailbox or passed
to an eMail action.
For details of the default tabs see "Standard Action Tabs" on page 48, this
section details only tabs and settings specific to this type of action.
• Specific Tab:
•
Add a Prompt: Add a prompt to the play list. The record dialogue
that then appears allows you to either select an existing recorded
prompt or specify the file name for and then make a new prompt.
•
Record a Response: Specify the length of the recorded repsonse.
•
•
Edit: Edit the settings of the currently highlighted item.
Delete: Deletes the currently highlighted item from the play list.
This does not delete the actual prompt file.
•
Shuffle: Move the currently highlighted item within the play list.
• Send recording to mailbox: Specifies a mailbox into which the
recorded file of responses it placed. If no mailbox is specified the file
can be passed to an "eMail Action" on page 59.
Campaign Action
This action can be used to either route a caller into a campaign or to
allow an agent to access any messages left for a campaign. See
"Voicemail Pro Campaigns" on page 69.
For details of the default tabs see "Standard Action Tabs" on page 48, this
section details only tabs and settings specific to this type of action.
• Specific Tab:
• Please select a campaign: Displays a list of the available campaigns
from which a selection can be made.
• Leave campaign information: Select if the action should start the
campaign to collect the caller's responses.
• Pick up campaign information: Select if the action should start
playing back the response left by callers to the campaign.
Voicemail Installation & Administration Manual
IP Office
Page 53
40DHB0002USAW Issue 7 (03/27/2002)
Voicemail Pro Actions
Page 54
Configuration Actions
These actions allow the caller to alter the settings of a user or hunt
group mailbox.
Edit Play List Action
This action allows the caller to re-record a specified prompt file held on
the voicemail server PC. This allows users to re-record prompts other than
those for their own mailbox.
For details of the default tabs see "Standard Action Tabs" on page 48, this
section details only tabs and settings specific to this type of action.
• Specific Tab:
• File path: Specific which prompt file the action accesses for rerecording.
Record Name Action
This action allows the caller to re-record the mailbox name of their
mailbox or a specified mailbox.
For details of the default tabs see "Standard Action Tabs" on page 48, this
section details only tabs and settings specific to this type of action.
• Specific Tab:
• Caller's mailbox: The mailbox matching the start point of the call.
• Mailbox: Select or enter the name of the target mailbox.
Voicemail Installation & Administration Manual
IP Office
Page 54
40DHB0002USAW Issue 7 (03/27/2002)
Voicemail Pro Actions
Page 55
Play Configuration Menu Action
This action allows various user or hunt group settings to be altered.
Because of the nature of this action it should always be protected by a PIN
code in its General tab.
The options given when a caller accesses this action are:
• For a user:
• 1 - Edit forwarding number.
• 2 - Edit follow me number.
• 3 - Set call forwarding.
• 4 - Set voicemail.
• 5 - Set do not disturb.
• 6 - Edit voicemail code.
• 7 - Edit voicemail reception.
• 8 - Set voicemail email mode.
• 9 - Edit voicemail callback number.
• For a hunt group:
• 1 - Set voicemail.
• 2 - Edit voicemail code.
• 3 - Set voicemail email mode.
• 4 - Set service mode.
For details of the default tabs see "Standard Action Tabs" on page 48, this
section details only tabs and settings specific to this type of action.
• Specific Tab:
• Caller's mailbox: The mailbox matching the start point of the call.
• Mailbox: Select or enter the name of the target mailbox.
Any changes made using this type of action are written to a file called
"AuditTrail.txt" on the Voicemail Server PC. The file includes the time, date,
details of the change and the CLI of the caller making the change.
Voicemail Installation & Administration Manual
IP Office
Page 55
40DHB0002USAW Issue 7 (03/27/2002)
Voicemail Pro Actions
Page 56
Telephony Actions
These actions relate to telephony functions such as call transfers.
CLI Routing Action
This action has two results for which connections to following actions
can be made. The results are True and False, based on whether the
caller's CLI matches that specified by the action.
For details of the default tabs see "Standard Action Tabs" on page 48, this
section details only tabs and settings specific to this type of action.
• Specific Tab:
• Does the current CLI match the following number: Enter the
required CLI number against which the caller's CLI is checked.
Transfer Action
This action transfers the caller to the extension that matches the
mailbox selected. This is a blind transfer; if the call returns to the voicemail
server again (for example if unanswered) it will be treated as a new call.
More advanced transfers are done using either a Call List Action or
Assisted Transfer Action.
For details of the default tabs see "Standard Action Tabs" on page 48, this
section details only tabs and settings specific to this type of action.
• Specific Tab:
• Mailbox: Enter or select the target mailbox whose extension you
want rung.
Voicemail Installation & Administration Manual
IP Office
Page 56
40DHB0002USAW Issue 7 (03/27/2002)
Voicemail Pro Actions
Page 57
Whisper Action
This action is play a recording to an extension. That extension can then
either accept or reject the call. Normally the recording played is the result of
a preceding Voice Question action though a Listen action can also be
used.
The Whisper action can be connected to a number of following actions
according to whether the call is answered, rejected, gets busy or gets no
answer.
For details of the default tabs see "Standard Action Tabs" on page 48, this
section details only tabs and settings specific to this type of action.
• Specific Tab:
• Play recording to: The extension that is rung with the caller's
recording.
• Source of transfer: Select the number to display on the target
phone.
• Description: Enter a call description to display on the target phone.
• No answer timeout: Sets how long the voice mail server should wait
for an answer before following the No Answer connection. The
whisper action will not go to the target extension voicemail.
• Prompts played before the recording/Prompts played after the
recording: These prompts are played to the target extension when
they answer the call. The prompts played after the caller's recording
should include the instruction "Press 1 to accept or hang up to reject".
Voicemail Installation & Administration Manual
IP Office
Page 57
40DHB0002USAW Issue 7 (03/27/2002)
Voicemail Pro Actions
Page 58
Call List Action
This action allows the caller to indicate to whom they want to be
transferred. If selected the caller can be restricted to selecting an extension
within a particular group. The transfer in this case is not blind, if
unanswered the action can link to actions for no answer, busy and no
answer timeout.
For details of the default tabs see "Standard Action Tabs" on page 48, this
section details only tabs and settings specific to this type of action.
• Specific Tab:
• Transfer to group: If you want to restrict the caller to a particular
group you can enter the group here.
• Prompt user with a list of group members: Select if you want the
voicemail server to list the group members for the caller.
• Source of transfer: Select the number to display on the target
phone.
• Description: Enter a call description to display on the target phone.
• No answer timeout: Sets how long the voice mail server should wait
for an answer before following the No Answer connection.
Assisted Transfer Action
This action transfers the caller to a specific mailbox's extension. The
caller hears either silence or music on hold if installed. The transfer is not
blind, if the call receives busy or no answer then it returns to follow the
appropriate connection.
For details of the default tabs see "Standard Action Tabs" on page 48, this
section details only tabs and settings specific to this type of action.
• Specific Tab:
• Mailbox: Enter or select the target mailbox whose extension you
want rung.
• Source of transfer: Select the number to display on the target
phone.
• Description: Enter a call description to display on the target phone.
• No answer timeout: Sets how long the voice mail server should wait
for an answer before following the No Answer connection.
Voicemail Installation & Administration Manual
IP Office
Page 58
40DHB0002USAW Issue 7 (03/27/2002)
Voicemail Pro Actions
Page 59
Miscellaneous Actions
These actions do not fit into a single category.
eMail Action
This action is used to send a recording to a specific email address.
For details of the default tabs see "Standard Action Tabs" on page 48, this
section details only tabs and settings specific to this type of action.
• Specific Tab:
• Send email to: The email address of the recipient.
• Subject: The subject line for the email.
• Content: Text to be placed in the email.
• Attach file to email: The recorded file to be attached to the email. If
just $ is entered then the action will use the recording collected by a
preceding Leave Mail action (see page 52) or Voice Question action
(see page 53).
Open Door Action
This action activates either of the door entry relays provided on the IP
Office. You can option to have the action open the relay, close the relay or
open and then close the relay after five seconds.
For details of the default tabs see "Standard Action Tabs" on page 48, this
section details only tabs and settings specific to this type of action.
• Specific Tab: Contains the door relay options.
Alarm Set Action
This action prompts the caller to specify the time at which they want an
alarm call and to record a message for the alarm call. The voicemail server
will then call the user at that time. A user can setup multiple alarms to occur
a different times. Once an alarm has occurred it is deleted.
For details of the default tabs see "Standard Action Tabs" on page 48, this
section details only tabs and settings specific to this type of action.
Voicemail Installation & Administration Manual
IP Office
Page 59
40DHB0002USAW Issue 7 (03/27/2002)
Voicemail Pro Actions
Page 60
Clock Action
This action plays the current time on the Voicemail Server PC. A short
code can then be used to have this action replace users making external
calls to a 'speaking clock' service.
For details of the default tabs see "Standard Action Tabs" on page 48, this
section details only tabs and settings specific to this type of action.
Post Dial Action
This action can be used to play a recording to an extension. If the IP
Office has an office loud-speaker extension then this action can play
messages to that extension.
For details of the default tabs see "Standard Action Tabs" on page 48, this
section details only tabs and settings specific to this type of action.
• Specific Tab:
• Post the following action: To play a recording, enter
"(-)mywavs\hello" (substitute the appropriate file path and file name
for the .wav file you want played). To play the file in a continuous loop
enter "(L)mywavs\hello".
• To extension: Enter or select the extension to which the call should
be made. The voicemail server will attempt to make the call every 5
minutes for the next hour until successful.
Voicemail Installation & Administration Manual
IP Office
Page 60
40DHB0002USAW Issue 7 (03/27/2002)
Voicemail Pro Actions
Page 61
Condition Actions
These actions are used to create branches in the call routing according
to whether a value is true or false.
Test Condition Action
This action has following connections for true and false. Conditions are
set through the Conditions Editor, see page 65.
• Specific Tab:
• Return the results of the following condition: Allows a selection to
be made from the conditions currently setup.
Set User Variable Action
This action sets a variable to a particular value. Other call flows may
then use the Test User Variable action to check whether the variable has a
particular value. Note: The variable must first be created using the User
Defined Variable menu, see "User Defined Variables" on page 44.
For details of the default tabs see "Standard Action Tabs" on page 48, this
section details only tabs and settings specific to this type of action.
• Specific Tab:
• Assign the following user variable: The name for the user variable.
• With the following value: The value of the variable.
We strongly recommend that this action type is followed by another action
(if necessary a Disconnect action), whose entry prompt confirms to the
caller that the value has been set.
In some situations, such as where the Set User Variable action is
accessed by the user dialing a shortcode, if the user hangs-up too quickly
the variable may not actually be set. Having a following action with a
confirmation message encourages users not to hang up too quickly.
Test User Variable Action
This action has true and false connections that are followed according
to whether a user variable matches a particular value. The Set User
Variable action can be used in other calls to set the value of the variable.
• Specific Tab:
• This action will return "TRUE" if the following variable: The name
of the user variable to be checked.
• Matches the value below: The value of the variable that will return a
true result.
Voicemail Installation & Administration Manual
IP Office
Page 61
40DHB0002USAW Issue 7 (03/27/2002)
Voicemail Pro Actions
Page 62
Queue Actions
These actions are associated with hunt group queues and so are not
available to user and short code start points.
Queue ETA Action
This action plays the caller their expected time to answer (ETA) . The
ETA is based on the average of the last 20 calls in the previous hour. No
ETA is calculated if less than 5 calls have been answered in the previous
hour.
For details of the default tabs see "Standard Action Tabs" on page 48, this
section details only tabs and settings specific to this type of action.
• Entry Prompts Tab: This tab should include any prompts to play to the
caller before they hear their ETA. See "Entry Prompts Tab" on page 48.
• Specific Tab: This tab may include any further prompts to be played to
the caller after they hear their ETA.
Queue Position Action
This action plays the caller their position within the queue of calls for the
group.
For details of the default tabs see "Standard Action Tabs" on page 48, this
section details only tabs and settings specific to this type of action.
• Entry Prompts Tab: This tab should include any prompts to play to the
caller before they hear their position. See "Entry Prompts Tab" on page
48.
• Specific Tab: This tab may include any further prompts to be played to
the caller after they hear their position.
Voicemail Installation & Administration Manual
IP Office
Page 62
40DHB0002USAW Issue 7 (03/27/2002)
Voicemail Pro Modules
Page 63
Voicemail Pro Modules
Introduction to Modules
Modules are reusable sets of actions. They allow you to create a sequence
of actions that you can then use within any start point's call flow. Any
changes to the module will affect all the start points using that module. This
simplifies the programming of actions if a number of start points use the
same sequence of actions. Using modules also reduces the size of the call
flow.
• In order to create connections from a module to other actions within
the start point using the module, you must use Module Return
actions within the module, see page 51.
Creating a Module
1. Click on Modules and then
, or right-click on Modules and select
Add.
2. Enter a name.
3. You can now add actions and connections to the module in the same
way as for any start point.
4. In order to create connections from a module to other actions you must
use the Module Return action within the module, see page 51.
Adding a Module to a Start Point
1. Select the start point to which you want to add the module action and
then click on the right-hand panel.
2. Click and drag the module required from the left-hand panel to the righthand panel.
Voicemail Installation & Administration Manual
IP Office
Page 63
40DHB0002USAW Issue 7 (03/27/2002)
Voicemail Pro Modules
Page 64
Importing and Exporting Modules
Modules can be imported and exported. See "Importing and Exporting" on
page 41.
Running a Module Directly from a Short Code
You can use Modules directly in conjunction with short codes. The short
code must call the name of the module.
For example, the short code below will run the module named Special
when the user dials *97. The service that the user receives will depend
upon the actions within the module.
• Short Code: *97
• Telephone Number: "Special" (include quote marks)
• Line Group ID: 0
• Feature: VoicemailCollect
Running a Module Directly from an External Call
A module can applied directly to an incoming (external) call. This is done
within the Manager application. Within the appropriate IncomingCallRoute
entry, set the Destination to the module name prefixed with "VM:".
For example, entering VM:AutoAttend would route the call to a module
called AutoAttend. Note that the maximum entry length is 15 characters.
• Note: In theory this method could be applied to any start point (for
example VM:Extn204.LEAVE) except for the Manager 15 character
entry limitation.
Voicemail Installation & Administration Manual
IP Office
Page 64
40DHB0002USAW Issue 7 (03/27/2002)
Conditions Editor
Page 65
Conditions Editor
Conditions
Pressing F6 displays the Conditions Editor.
Conditions are constructed from a set of basic elements. These elements
can be combined within a single condition to create complex rules. For
example the Week Planner can be used to define a companies standard
working hours, and then combined with the calendar to define exception
days such as public holidays.
Within the voicemail call flow, conditions can be checked by a Test
Condition action and, according to whether the condition is currently true
or false, callers can be routed to different actions. See "Test Condition
Action" on page 61.
Logic settings can be applied to both the whole condition and to the
elements in a condition. These can alter when a condition is true or false.
• AND (x+)
The condition is true when all the elements are true, ie. both A and B
are true.
• OR (x||)
The condition is true when either A or B is true.
• NOT (x!)
This logic element can be used to reverse the value (eg. return false
when true) of individual elements or of the whole condition.
Voicemail Installation & Administration Manual
IP Office
Page 65
40DHB0002USAW Issue 7 (03/27/2002)
Conditions Editor
Page 66
Using the Conditions Editor
Use the following controls to create and edit conditions.
Starting the Conditions Editor
Either:
icon.
• From the toolbar click on the
• Press F6.
• From the menu bar select Administration and then Conditions Editor.
Adding a Condition
1. Click on the
icon.
2. Enter the name for the condition and then click on OK.
3. You can now add elements to the condition and alter the properties of
those elements.
Adding Elements to a Conditions
A condition can consist of multiple elements, including several elements of
the same type.
,
,
or
1. Click on the element drop-down list (shown as
the toolbar).
2. Click on the type of element required.
3. Click on the condition to which you want to add the element.
4. You can now edit the element's settings.
Voicemail Installation & Administration Manual
IP Office
in
Page 66
40DHB0002USAW Issue 7 (03/27/2002)
Conditions Editor
Page 67
Editing Elements and Conditions
1. Click on the Condition or Element and then on
.
2. Alternatively for elements you can double-click on the element.
3. The elements or condition's properties are displayed for you to edit.
Changing a Condition's Logical Setting
1. Click on the logic setting drop-down list, shown as x+ (AND), x|| (OR) or
x! (NOT) in the toolbar.
2. Click on the logic setting required.
3. Click on the condition or element to which the logic setting should be
applied.
Deleting Elements and Conditions
1. Click on the condition or element you want to delete and then on
Voicemail Installation & Administration Manual
IP Office
.
Page 67
40DHB0002USAW Issue 7 (03/27/2002)
Conditions Editor
Page 68
Available Condition Elements
The following elements are available to be used within conditions.
Calendar
The Calendar element is used to indicate which days of the year
return true or false. Double-clicking on a particular day will either select or
deselect it.
Selected days are shown with a shaded background, eg.
. Note that
indicates weekend days but not whether the day is selected.
The element returns 'true' if the current day is a selected day.
Week Planner
The Week Planner element is used to set which time periods during a
normal week return 'true'. It consists of an entry for each day of the week
and a start and end time for the 'true' period on each day.
Condition
The Condition element is used to combine the value of an already
existing condition. When selected the element displays a list of the other
conditions from which to select.
Compare
The Compare element is used to compare system variables against
each other or against a value you enter.
System variables accessible by Conditions are listed in "System Variables"
on page 45.
Voicemail Installation & Administration Manual
IP Office
Page 68
40DHB0002USAW Issue 7 (03/27/2002)
Voicemail Pro Campaigns
Page 69
Voicemail Pro Campaigns
Introduction to Campaigns
Pressing F7 or clicking on
displays the Campaign Wizard. This is used
to create, modify and delete campaigns.
Campaigns are a series of questions and answers. Callers to a campaign
hear the questions and give their response, either spoken or through the
telephone keypad.
Call processing agents accessing the campaign hear the caller's answers
which they can then transcribe into a database or other records.
Campaign Web Access
If the Voicemail Server PC is also a web server, then during installation of
Voicemail Pro it is possible to also install a Campaign Web Component.
This allows access to play and change the status of campaign messages
through a web browser.
• Browser Requirements:
The user must have Microsoft Internet Explorer 5.0 or higher (not
Netscape). Their PC must also have multimedia sound capabilities. The
user must also have a mailbox on the voicemail system. The name of
their mailbox is requested when the user browses the campaign
messages.
• Browsing Address:
During installation of the Campaign Web Component, the root address
of the web server is requested. A folder called "campaign" is then added
to that root. The web address for browsing will normally be set up as a
link from a page within a company intranet rather than typed directly by
users.
• http://<server address>/campaign/campcgi.html
• Note that access must be via http: and not network file routing.
Voicemail Installation & Administration Manual
IP Office
Page 69
40DHB0002USAW Issue 7 (03/27/2002)
Voicemail Pro Campaigns
Page 70
Adding, Modifying & Deleting Campaigns
Pressing F7 or clicking on
displays the Campaign Wizard. This allows
you to select the required activity.
• Create a new Campaign:
This option takes you through a series of campaign wizard menus to set
the campaigns settings.
• Modify an existing Campaign:
This option displays a list of existing campaigns from which you can
select the one you wish to modify. You will then be taken through the
campaign wizard menus for the campaign settings.
• Delete an Existing Campaign:
This option displays a list of existing campaign from which you can then
select the campaign to delete.
Customer Prompts
This menu is used to set the sequence of questions played to callers and to
record their responses.
•
Add action: Add a new campaign action. The options for a
campaign action are then displayed.
•
Edit action: Edit the currently highlighted campaign action.
•
Delete action: Deletes the currently highlighted campaign action
•
Move action: Moves the position of an action in the sequence of
campaign actions.
The
and
commands give you access to the options for a campaign
action.
• Play a prompt to the customer: If selected this option indicate that the
action is a prompt played to the caller. You can then specify which
prompt to play or create a new prompt.
• Allow the customer to input information: If selected, this option
indicates that the action should record the caller's response.
• What type of input do you want: This option sets whether the
voicemail server should Record voice or Record key presses.
• Please enter the maximum recording length: Sets the maximum
length of recording before the next action.
• Please enter the maximum number of key presses: Sets the
maximum number of key presses to record before the next action.
• Please enter a unique name that will describe the input: A name
to associate with the action. Note: The name should be a single word
with no spaces.
• The following prompt will be played to an agent when the above
data is reviewed: This option allows you to select or create a prompt
that is played to agents before hearing the caller's response.
Voicemail Installation & Administration Manual
IP Office
Page 70
40DHB0002USAW Issue 7 (03/27/2002)
Voicemail Pro Campaigns
Page 71
Customer Menu
After completing the sequence of questions and responses, the caller can
be offered a menu of options.
• Please select the prompt to be played after the customer has made
their recordings: You can select or create a prompt that is then played
to callers after completing the sequence of questions and answers. The
prompt should inform the customer of which actions selected from the
list below they can use.
• Please select which options will be available to the customer after
the above prompt has been played: Click on the tick boxes to select
which options will be available to the customer. The customer then
needs to press the corresponding key.
• Save the Campaign (and then quit): Saves the callers responses
and then disconnects the caller.
• Play back response to the Campaign: Plays back the customers
responses to them and then repeats this customer menu.
• Restart the whole Campaign: Delete the customers responses and
restarts the sequence of questions and answers.
• Quit the Campaign (without saving): Disconnects the customer
without saving their responses.
•
Move options: You can move the currently highlighted option so
that the key presses associated with the options differ.
Campaign Identification
This menu is used to set a park location for the campaign and to name the
campaign.
• Where should this Campaign be parked…: This field can be used to
enter a park slot number for the campaign. This number can be
programmed under a DSS key. That key can then be used by agents to
access the campaign. If the DSS key also incorporates a BLF lamp, that
lamp is lit when new campaign messages are left.
• The name of the Campaign is: This is the name of the campaign.
Voicemail Installation & Administration Manual
IP Office
Page 71
40DHB0002USAW Issue 7 (03/27/2002)
Voicemail Pro Campaigns
Page 72
Accessing a Campaign
A campaign can be accessed in a number of ways:
• Using the Campaign Action:
The Campaign action is used to route calls into a campaign ~ after those
calls have been routed to an appropriate start point on the voicemail
server. The actions properties set whether the call is treated as a caller
to the campaign or an agent processing the campaign messages. See
"Campaign Action" on page 53.
• Using the Park Slot Number:
Set through the Campaign Identification menu, this number can be
programmed under a DSS key. That key can then be used by agents to
access the campaign. If the DSS key also incorporates a BLF lamp, that
lamp is lit when new campaign messages are left.
• Through a Web Browser:
See "Campaign Web Access" on page 69.
Using the first two methods above, when an agent accesses the messages
waiting in a campaign, they have a number of telephone controls:
• 1 - Go to the start of the call.
• 2 - Rewind.
• 3 - Stop processing the message.
• 4 - Mark call as processed and delete.
• 5 - Mark call as processed and save.
• 7 - Previous response.
• 8 - Start of response.
• 9 - Next response.
• # - Fast forward.
• 0 - Pause
• * - Rewind.
Campaign Preferences
The location used to store the campaign messages and other information is
set through the System Preferences. See "System Preferences" on page
42.
Voicemail Installation & Administration Manual
IP Office
Page 72
40DHB0002USAW Issue 7 (03/27/2002)
Voice Recording
Overview of Voice Recording
Voice Recording
Overview of Voice Recording
Voicemail Pro provides a number of methods for triggering the recording of
a call.
Note that call recording uses the conference facility and so is subject to the
conference restrictions of the IP Office system.
•
Warning Callers about Voice Recording
For some installations, it may be a requirement that call parties are
advised that their call is about to be recorded. This is done by
switching on the Play Advice on Call Recording option found in the
Voicemail Pro System Preferences. See "Voicemail System
Preferences" on page 42.
Automatic Voice Recording
Voicemail Pro provides automatic voice recording of incoming and/or
outgoing calls. It can be set to record all calls or a set proportion of calls, for
example 1 in every 10 incoming calls.
Most of the settings and controls for automatic voice recording are
accessed through the IP Office Manager application. In each case you can
select what proportion of incoming and/or outgoing calls should be
recorded and the time period during which Voice Recording should operate.
• Users:
Voice Recording for an individual user is set through the Voice
Recording tab of the User form. The recorded calls are saved into the
user's mailbox.
• Hunt Groups:
Voice Recording for an hunt groups is set through the Voice
Recording tab of the Hunt Group form. The recorded calls are saved
into the hunt groups mailbox.
• Account Code/CLI Matching:
Voice Recording can also be provided to calls that match a particular
CLI or account code. This is set through the Voice Recording tab of the
Account Code form. The recorded calls are saved into the mailbox of
the user receiving the call.
Voicemail Installation & Administration Manual
IP Office
Page 73
40DHB0002USAW Issue 7 (03/27/2002)
Voice Recording
Manual Voice Recording
Manual Voice Recording
Voicemail Pro allows the short code feature "CallRecord" to be used to
record calls. Short codes using this feature do not need a matching short
code start point within the Voicemail Pro configuration.
To record your own calls
The following is an example short code. It can be created as a user short
code or as a system short code. In either case it will record into the mailbox
of the user of the short code. To use the short code, place the call on hold,
dial 895, the call is automatically reconnected and recording begins.
• Short Code: *95
• Telephone Number: Blank
• Line Group ID: 0
• Feature: CallRecord
To record other calls
The following is an example short code for recording a call involving a
specified extension. You do not have to be in conference with or part of the
call in order to use this short code.
• Short Code: *96*N#
• Telephone Number: N
• Line Group ID: 0
• Feature: CallRecord
PhoneManager Pro
PhoneManager Pro can also be used to trigger the recording of a call. The
Record option in the PhoneManager Pro's Functions menu is enabled by
the installation of Voicemail Pro.
Voicemail Installation & Administration Manual
IP Office
Page 74
40DHB0002USAW Issue 7 (03/27/2002)
Integrated Messaging System (IMS)
Integrated Messaging System (IMS)
Using IMS Administration
IMS Administration controls the associations between email and voicemail
user accounts.
To start IMS Administration:
1. Logon as a domain user with local administrator rights.
2. Select Start | Program | IP Office | IMS Administration.
3. The left-hand window should show IMS Sites (ie. PC's on which an
IMS Service is running). If the window is blank it indicates that no
computer running IMS Server could be found.
4. Select a site and then click on + to expand the tree.
5. Click on IMS Associations. This updates the IMS Administration
program with the settings of the IMS service. It also displays a list of
the voicemail mailboxes on that Voicemail Pro server.
6. Clicking on Settings to view the general settings for the site.
• Send Wave File
Controls whether voicemails are transmitted as wave files along
with the email notification message. Note: The sending of .WAV
files across a network creates a high loading on the network and
networks servers. A one-minute message requires a 1MB .WAV
file.
• Send Attached
Specifies that the wave file is attached to the email. This allows the
recipient to copy the wave file for use elsewhere.
• Send Embedded
Specifies that the wave file is embedded in the email. This method
does not allow the user to copy the wave file for use elsewhere.
Synchronise Mailbox
The Synchronize mailbox button is used to force the system to check that
a user’s messages within email match those messages in their voicemail
box. During normally operation use of this control should not be required.
1. Display the list of users in the Administration program.
2. Select the user to be synchronized
3. Click on the Synchronize mailbox button.
Voicemail Installation & Administration Manual
IP Office
Page 75
40DHB0002USAW Issue 7 (03/27/2002)
Integrated Messaging System (IMS)
Mailbox Properties
User accounts that have an association have an enabled icon (head with
red collar) and the corresponding email address shown. To edit the
association double-click on a User’s Voice Mailbox number.
There are two tabs associated with each mailbox; Mailbox Settings and
User Properties.
• Mailbox Settings
This tab enables the email Address, NT Account and Voice Mailbox
associations to be set.
• User Properties
This tab allows the default system parameters for sending messages
as .WAV files to be overridden for each user.
• Send Wave File
This is normally grayed out.
• Override Message Parameters
If checked then the Send Wave File box can be checked as well,
enabling the individual user to have messages sent as wave files.
Note: The sending of .wav files across a network creates a high
loading on the network and networks servers. A one-minute
message requires a 1MB .wav file.
Setting up a New User
1.
2.
3.
Double click on the user’s Voice mailbox number. The Mailbox
Settings tab will have the Voice Mailbox name filled in and the email
Address and Primary NT Account fields blank.
Click on the ‘Associated email Address’ Change button. A list of the
available email users will be shown, select the email user address to
be associated with the Voice Mailbox name and click on OK.
Click on the Primary NT Account button to display a list of the
available NT User accounts. If User accounts are not shown check that
the correct domain name is shown in the Domain box. Select the NT
User to be associated with the Voice Mailbox name and click on OK.
• The Permissions section of the Mailbox Settings tab will not
normally need to be changed. It is provided to cater for the case
where more than one Exchange user is required to access the
mailbox. This arrangement must be set-up in Exchange
Administration to allow it to work.
• To allow additional users to have access to the voicemails
associated with this email box click on the Add button. Select the
user from displayed list and click on OK. The additional user will
be added to the IMS User Permissions list. Ensure that the
Access tick box is ticked.
Voicemail Installation & Administration Manual
IP Office
Page 76
40DHB0002USAW Issue 7 (03/27/2002)
Integrated Messaging System (IMS)
IMS Server Configuration
The configuration settings for the various IMS Servers can be accessed
through Integrated Messaging Server under Settings | Control Panel.
System Settings
This tab contains the Logging Level settings for the IMS Gateway Service
and the IMS Voice Service. Four levels of logging are available, the default
being None. Normally logging is only required is some IMS problems are
being experienced that require diagnosing.
• Logging Level:
• None: No information is logged.
• Some: Limited information is logged.
• Most: The same as Some plus extra critical details
• All: All information is logged.
Path Setting
This tab contains the settings for the paths to the IMS Database Service
and the IMS Voice Service. Typically these are both installed on the same
PC as the Voicemail Pro Server.
The computer names can either be entered directly or by using the Browse
buttons provided.
Email Settings
This tab specifies settings related to the email system.
• Transmit Wave File:
Specifies whether .wav files of voicemail messages should be sent
within the message emails file as well. The sending of .wav files across
a network creates a high loading on the network and networks servers.
A one-minute message requires a 1MB .wav file.
• Attach wave file to message
This allows the recipient to copy the .wav file for use elsewhere.
• Embed wave file in message
This method does not allow the user to copy the .wav file for use
elsewhere.
• Account Details:
This specifies the email account used by for IMS email messages.
Select Browse to display a list of available email accounts.
Voicemail Installation & Administration Manual
IP Office
Page 77
40DHB0002USAW Issue 7 (03/27/2002)
Integrated Messaging System (IMS)
Miscellaneous Procedures
Changing the IMS Server’s Computer Name
It may at sometime be necessary for a System Administrator to change the
Computer Name of the PC running the IMS Server software. As far as the
Server PC is concerned this would be carried out in the normal manner.
However each IMS Client would then need to be re-configured to take
account of the server’s change of name, otherwise a connection will not be
able to be established between the server and the clients.
To change the target IMS Server computer name on a client PC use the
following procedure:
1. From the Start Menu, select Run and enter DCOMCNFG. PCs running
NT must be logged on with Local Administrator rights.
2. In the Applications tab, select IMS System Server and click on the
Properties button.
3. Select the Location tab. Change the computer name in the text box at
the bottom of the tab. Click the OK button and then click on the OK
button to close the configuration utility.
4. It should not be necessary to re-boot the PC. It will be necessary to
close Outlook and re-open it to test that the IMS client can connect to
the IMS server.
Optimising Performance on PCs running NT
If the operation of IMS Server or Client appears to be slow on a PC running
Windows NT, check that in the Default Protocols tab of DCOMCNFG that
Connection Oriented TCP/IP is at the top of the list.
1. Select Start and then Run. Enter DCOMCNFG. PCs running NT must
be logged on with Local Administrator rights.
2. Check that in the Default Protocols tab that Connection Oriented
TCP/IP is at the top of the list.
3. Click on the OK button and then click on the OK button to close the
configuration utility.
WARNING: Do not use DCOMCNFG to set the IP port range on NT. If
this is done IMS will not work. When Outlook is run an error message
will be displayed with information on how to fix the problem. This will
normally need to be carried out by an Administrator, as it requires
editing the registry.
IMS Client Does Not Start-up/Connect When PC Boots Up
If you find that the IMS Client does not start-up, connect or it hangs Outlook
when it is started up at the same time as other applications you need to set
the default COM security to none.
1. Select Start and then Run. Enter DCOMCNFG. PCs running NT must
be logged on with Local Administrator rights.
2. Select the Default Properties tab. Set the Default Authentication
level to (none).
3. Click on the OK button and then click on the OK button to close the
configuration utility.
4. You will be prompted to re-boot the machine.
Voicemail Installation & Administration Manual
IP Office
Page 78
40DHB0002USAW Issue 7 (03/27/2002)
Mailbox User Controls
Mailbox User Controls
Overview
The IP Office supports a number of methods for users to control their
mailbox and messages once they have entered the mailbox.
• Standard IP Office Mailbox Mode
This is the default mode for Voicemail Lite. It is also the default mode for
Voicemail Pro outside the United States. See "IP Office Mode" on page
81.
• Intuity Mailbox Mode
This is the default mode for the Voicemail Pro in North, South and
Central America. See "Intuity Commands" on page 82.
• Visual Voice
This mode is only available to Avaya 20 Series display telephones. See
"Visual Voice" on page 83.
• PhoneManager
The PhoneManager application allows a user to switch voicemail and
voicemail ringback on/off. PhoneManager Pro also provides full visual
access to the user's voicemail and allows them to be played back and
controlled through their PC. Refer to the PhoneManager Users Guide for
details.
Automatic Message Deletion
Messages are automatically deleted from the voicemail server after being
played (including via the users IMS email client) unless set as saved by the
mailbox user.
The default delay before deletion is 36 hours if installed in IP Office mailbox
mode, 30 days if installed in Intuity mailbox mode.
If Voicemail Email is being used, it can be set to delete the message from
the voicemail server after having forwarded it to the email address specified
for the voicemail mailbox.
Voicemail Installation & Administration Manual
IP Office
Page 79
40DHB0002USAW Issue 7 (03/27/2002)
Mailbox User Controls
Telephony Operation Mode
All users should be made aware that messages are automatically deleted
from the server after being played unless they set the message as saved.
All users can use the following default short codes:
• Access their mailbox from their own extension: *17
• Turn voicemail on: *18
• Turn voicemail off: *19
• Turn voicemail ringback on: *48
• Turn voicemail ringback off: *49
Once a user has entered their mailbox, the Voicemail Pro Server supports
two sets of mailbox controls.
• IP Office
This is the default mode used and matches the features of Voicemail
Lite. See "IP Office Mode" on page 81.
• Intuity
Intuity is a mailbox interface used on a range of Avaya voicemail
systems. See "Intuity Commands" on page 82.
The prompts provided to a mailbox user are determined by the user's
Locale setting as set through the Manager application. Note that on some
phones the user can change their language setting themselves (refer to the
appropriate User Guide). For languages supported see "Language
Support" on page 11.
To select the mailbox operation mode:
Note: If the Regional Setting of the server onto which Voicemail Pro is
installed is "English (United States)", then Voicemail Pro defaults to Intuity
mailbox operation.
1. Start Voicemail Pro and select the current voicemail configuration file.
2. Select Administration and then Preferences.
3. Select Default Telephony Operation and set this to either IP Office or
Intuity as required.
4. Select OK.
5. From the File menu use Save & Make Live to save the configuration
change.
Voicemail Installation & Administration Manual
IP Office
Page 80
40DHB0002USAW Issue 7 (03/27/2002)
Mailbox User Controls
IP Office Mode
If the Voicemail Pro Server is operating in IP Office telephony mode, users
can access the following controls when collecting mail from their mailbox.
Note that user with Avaya 20 Series display telephones use the display
controls rather than voice prompts. Refer to the appropriate User Guide.
Login
Enter mailbox
and password
3. Edit Greeting
Review normal greeting 1
Review out of hours greeting 2
Review 'queued' message 3
Review 'still queued' message 4
Mailbox
Play old messages 1
Play saved messages 2
Edit greeting 3
Delete current message 4
Save current message 5
Forward to email 6
Forwarding options 6
Repeat last message 7
Help 8
Skip current message 9
Fast forward #
Rewind *
Call back sender (internal) **
Direct all to email *01
Send email notification *02
Turn email use off *03
Change mailbox access code *04
Hunt Group
User
3. Edit Greeting
Voicemail Pro
Only
Listen to greeting 1
Record new greeting 2
Save new greeting 3
Save new greeting as loop 4
Return to mailbox 8
6. Forwarding
Forward to email 1
Forward to extension(s) 2
Foward to extension(s) with header
message 3
(follow each extension number with # and
then a final # to finish entry)
Save message 4
•
Whilst playing message the user can also press and hold 0 to pause
the message. If they have a voicemail reception number set, pressing
0 will call that number.
Note that the email option require MAPI configuration to have been setup
and for the users email address to have been entered on the IP Office. See
"Pre-Installation Requirements" on page 15.
If a user calls their own extension and is directed to voicemail to leave a
message, they can press 8 during the initial voicemail greeting to switch to
collecting messages.
Voicemail Installation & Administration Manual
IP Office
Page 81
40DHB0002USAW Issue 7 (03/27/2002)
Mailbox User Controls
Intuity Commands
If the Voicemail Pro Server is operating in Intuity telephony mode, users
can access the following controls when collecting mail from their mailbox.
Login
Enter mailbox
and password
1. Record
#. Addressing
Record Message 1
Enter Address #
Cancel Address *3
Approve Address ##
1. Editing
##. Delivery
Stop/Start 1
Rewind 2
Playback 23
Delete *3
Approve #
Activity Menu
Record 1
Receive 2
Greetings 3
Personal 5
Scan 7
Send #
2. Receive
1. Reply
Receive messages 2
Skip header 0
Pause/Resume 3
Restart 2
Replay Header 23
Reply or forward 1
Backup 5s 5
Advance 6
Save & skip to next category *#
Hold in current category & skip **4
Erase and skip *3
(Undelete **8)
Save and skip #
Reply without original 16
Reply with original 19
Forward with comment at start 2
Forward with comment at end 3
Send new message to someone else 4
Call sender 0
0. Manage Greetings
Replay 0
Review Status 2
Re-Record 1
Delete *3
Save #
3. Greetings
Listen to greeting 0
Create, change or delete 1
Scan all 2
Activate greeting 3
5. Personal Options
Password 4
Re-record name 5
Address before/after record 6
Accept call answer 71
1. Edit Greetings
Listen 0
Record start/stop 1
Review status 2
Approve #
Delete *3
4. Password
Enter new password #
7. Scan Messages
Headers and messages 1
Headers only 2
Messages only 3
5. Name
Record name 1
Confirm #
Callers leaving messages in the mailbox can press # after completing their
message rather than hanging up. They will then hear a number of further
options. If you want callers to use those option then you need to mention
pressing # in your greeting.
The options are:
• Access own mailbox (internal callers only): Press *R
• Transfer to another extension: Press *T
• Transfer to cover extension: Press 0
• To end call: Press **S or hang-up.
Voicemail Installation & Administration Manual
IP Office
Page 82
40DHB0002USAW Issue 7 (03/27/2002)
Mailbox User Controls
Visual Voice
Visual Voice is available on Avaya 20 Series telephones. It is accessed by
pressing •VOICE on the telephone and then selecting from the displayed
options.
• Voicemail Lite
This only supports a limited set of Visual Voice controls:
• LISTEN
Gives direct access to the user's voicemail. They then need to use
the standard voicemail controls.
• MESSAGE
Allows the user to leave a message directly in a mailbox they specify.
• Voicemail Pro
This supports the full set of Visual Voice controls. It does not provide
spoken prompts as all controls appear on the telephone display.
• LISTEN
Gives direct access to the user's voicemail. Display the number of
messages and provides display controls for message handling.
• MESSAGE
Allows the user to leave a message directly in a mailbox they specify.
• GREETING
Allows the user to play and change their greeting.
• PASSWORD
Allows the user to change their mailbox access code.
•
Leaving Messages
When a 20 Series display telephone user calls an extension that does
not answer and has voicemail on, they are not automatically routed to
voicemail. They must press •VMAIL to leave a message.
Voicemail Installation & Administration Manual
IP Office
Page 83
40DHB0002USAW Issue 7 (03/27/2002)
Glossary of Terms
Glossary of Terms
Assisted Transfer
A call transferred from voicemail, which if it returns
again to voicemail, will return to the previous
position.
Blind Transfer
A call transferred from voicemail which if it returns
again to voicemail, will be treated as a new call.
Call Flow
A general term for a sequence of actions used to
determine what facilities are offered to a caller.
MAPI
Messaging Application Programming Interface Part of Microsoft's Window's Open Service
Architecture (WOSA). Allows programs and
devices to send emails via email clients if those
clients support MAPI.
Presumed User
Some actions presume who the user associated
with a call is from factors such as the original
target extension or mailbox of the call. This allows
those action to be used in modules without having
to specify the mailbox on which they should act.
Standard Voicemail
Also called Voicemail Lite. Provides basic
voicemail operation for the telephone system. The
Voicemail Pro Server contains all the same
functions as Voicemail Lite.
Trusted Location
A number that has been entered into the user's
Source Numbers as a location from which they
want to access their mailbox without being asked
to enter their voicemail code. This can be an
internal extension or an external number.
Voicemail Installation & Administration Manual
IP Office
Page 84
40DHB0002USAW Issue 7 (03/27/2002)
Index
Index
$
$CLI 45
$KEY 45
$NAM 45
$RES 45
$SAV 45
$VAR 45
A
Access Code 55
Accessing Voicemail
Group 31
Remote Access 29
Account Code
Voice Recording 73
Action
Adding 39
Call List 58
Editing 39
Module Return 63
Actioning campaign
messages 72
Actions 39, 47
Assisted Transfer 58
Campaign 53
CLI Routing 56
Clock 60
Configuration Menu 55
Deleting 39
Description 48
Disconnect 51
Edit Play List 54
eMail 59
General tab 48
Generic 50
Get Mail 52
Goto 51
Home 51
Leave Mail 52
Listen 52
Menu 50
Module 49
Module Return 51
Name 54
Open Door 59
Pin 48
Play Configuration Menu
55
Play List 54
Post Dial 60
Prompts tab 48
Question 53
Queue ETA 62
Queue Position 62
Record Name 54
Reporting tab 49
Results tab 49
Set User Variable 61
Start Point 49
Tabs 48
Test Condition 61
Browsing
Campaign 69
Compare element 68
Condition element 68
Delete 67
Editing 67
Elements 68
Logic Settings 67
Start editor 66
Test Condition Action 61
Week Planner element
68
Configuration
Group 23
PBX 20
Queuing 24
Source Number 22
User 21
Configuration Menu Action
55
Connections 13
Adding 40
Delete 40
Results 40
Customer Menu 71
Customer Prompts 70
C
D
Test User Variable 61
Transfer 56
Voice Question 53
Whisper 57
Add
Action 39
Conditions 66
Connection 40
Elements 66
Module 63
Prompt 45
Start Points 37
VMP files 41
Advice on Call Recording
42, 73
Actions 59
Alarm Set Action 59
Assisted Transfer Action
58
Audix Intuity 80, 82
B
Calendar element 68
Call Forwarding 55
Call List Action 58
Callback 36, 38
Callback Number 55
Callback Start Point 44
Campaign 69
Action messages 72
Calls to 72
Customer Menu 71
Customer Prompts 70
Name 71
Park Slot 71
Web access 69
Campaign Action 53
Campaign Directory 42
Campaigns
Campaign Action 53
Capacity 15
Channels 13
CLI
Voice Recording 73
CLI Routing Action 56
Clock Action 60
Code 23
Collect 36, 38
Collecting Messages
Group 31
Remote Access 29
Compare 68
Condition Action 61
Condition element 68
Conditions 65
Add a condition 66
Adding elements 66
Calendar element 68
Voicemail Installation & Administration Manual
IP Office
Data Channels 13
Database
Export 41
Import 41
Date 14
Default No Answer Time
20
Default Start Points 36
Default Telephony
Interface 42
Default Telephony
Operation 80, 82
Delete
Action 39
Condition 67
Connection 40
Element 67
Start Point 37
Description 48
Destination 20
DHCP 13
Disconnect Action 51
Disk space 15
Disk Space 13
Do Not Distrub 55
E
Edit
Action 39
Start Point 37
Edit Play List Action 54
Editing
Conditions 67
Elements 67
Elements 65, 68
Adding 66
Delete 67
Editing 67
Logic Settings 67
Email 13, 16, 21, 23
eMail Action 59
Email Mode 55
Actions 48
Entry Prompts tab 48
ETA 62
Export 41
F
File
Import or Export 41
Include 41
Save & Make Live 41
Save as 41
View as Text 41
Files
.WAV 8
Fixed IP 13
Follow Me Number 55
Forwarding Number 55
G
General tab 48
Generic Action 50
Get Mail Action 52
Goto Action 51
Group 20
Queuing 24
Service Mode 55
Voice Recording 6, 73
Group Configuration 23
Group Ringback 22
Groups 31, 36
H
Hangup Action 51
Hard Disk Space 13
Help 21, 23
Home Action 51
Hunt Group
Service Mode 55
Voice Recording 6, 73
Hunt Group Configuration
23
Hunt Groups 31
I
Icon
Enabled Looking 76
Icons 35
IIS Web Server 16
Import 41
Include 41
Install 17
Installation 14
Integral 20
Internet Server 16
Intuity 42, 80, 82
IP Address 13, 20
IP Office 42, 80
Page 85
40DHB0002USAW Issue 7 (03/27/2002)
Index
L
Leave 36, 38
Leave Mail Action 52
Line 20
Listen Action 52
Logging Levels 77
Logic Settings 65, 67
M
Mailbox Code 55
Mailbox Settings 76
MAPI 13, 16
Max Message Time 42
mdb files 41
Menu Action 50
Message capacity 15
Message storage 25
Message Time 42
Microsoft Web Server 69
mod files 41
Module
Add to Start Point 63
Create 63
Module Return 63
Module Return Action 51
Modules 36
Export 41
Import 41
Module Action 49
Module Return Action 51
N
Name
Action 48
Campaign 71
Token 48
Name Action 54
Network 13
New messages 25
number of users 13
O
Off 21
On 21, 23, 24
Open Door Action 59
Operating system 13
Outlook 16
Outlook Express 16
Overflow Time 24
P
Park Slot 71
Park Slot Number 72
Password 20
MAPI 42
Voicemail 42
PBX 20
PC 13, 20
PC Requirements 15
Pentium 13
Personal Web Server 16
Pin 48
Platform 15
Play advice on Call
Recording 42
Play Advice on Call
Recording 73
Play Configuration Menu
Action 55
Play List Action 54
Position 62
Post Dial Action 60
Preferences 42
MAPI 42
Remote Campaign
Directory 42
Voicemail 42
Processor 15
Profile 42
Prompts 45
Prompts tab 48
Q
Question Action 53
Queue ETA Action 62
Queue Position Action 62
Queue Ring Time 32
Queued 36, 38
Queued Start Point 43
Queuing 24, 32
Queuing On 24
R
RAM 15
Reception 21, 26
Record Key Press 70
Record Name Action 54
Record Voice 70
Remote Access 29
Remote Campaign
Directory 42
Reporting tab 49
Results
Connections 40
Results tab 49
Return Action 51
Ring Time 24
Ringback 21
Group 22, 31
Root.vmp 41
Route calls to a campaign
72
S
Saving messages 25
Server Directory 42
Service Mode 55
Set User Variable 61
Short Codes 36
Start Points 37
Simultaneous Users 13
Source Number
Configuration 22
Space 13, 15
Specific Start Points 36
Speech Directory 42
Speed 13, 15
Start
Conditions Editor 66
Voicemail Pro 34
Start Point
Voicemail Installation & Administration Manual
IP Office
Add Module 63
Start Point Action 49
Start Points 36
Adding 37
Callback 44
Default Start Points 38
Deleting 37
Editing 37
Queued 43
Still Queued 43
StartUp Folder 14
Still Queued 36, 38
Still Queued Start Point 43
Storing messages 25
Synchronise Mailbox 75
System Preferences 42
MAPI 42
Remote Campaign
Directory 42
Voicemail 42
System Variables 45, 68
Playing as prompts 45
Voicemail Reception 21,
26, 55
Voicemail Ringback 21
Group 31
Voicemail Server Directory
42
Voicemail Server Speech
Directory 42
Voicemail Type 20
W
Wave Editor 45
Wave Files
Send Attached 75
Send Embedded 75
Web access 69
Web Server 16
Week Planner element 68
Whisper Action 57
Windows 13
Wizard
Campaign 69
X
T
Telephony Interface 42
Test Condition Action 61
Test User Variable 61
Text file 41
Time 14
Token Name 48
Toolbars 35
Transfer Action 56
Trusted Locations 22
Type 20
Xitami 16
Xitami Web Server 69
U
Update 41
Upgrading 14
User 21
Source Numbers 22
Voice Recording 6, 73
User Defined Variables 44
User Properties 76
User Variable 61
Users 36
V
Variables
Compare 68
System Variables 45, 68
User Defined 44
View as Text 41
Vmdata.mdb 34, 41
vmp files 41
VMP files 41
Voice Question Action 53
Voice Recording 73
Voice Recording Service 6
Voicemail Code 23, 55
Voicemail Destination 20
Voicemail email 16
Voicemail Email 21, 23
Voicemail Email Mode 55
Voicemail Help 21, 23
Voicemail On 21, 23
Voicemail Password 42
Page 86
40DHB0002USAW Issue 7 (03/27/2002)
Index
This page is intentionally blank.
Voicemail Installation & Administration Manual
IP Office
Page 87
40DHB0002USAW Issue 7 (03/27/2002)
Index
Performance figures and data quoted in this document are typical, and
must be specifically confirmed in writing by Avaya before they become
applicable to any particular order or contract. The company reserves the
right to make alterations or amendments to the detailed specifications at
its discretion. The publication of information in this document does not
imply freedom from patent or other protective rights of Avaya, or others.
Intellectual property related to this product (including trademarks) and
registered to Lucent Technologies has been transferred or licensed to
Avaya.
This confidential document is the property of Avaya and without its prior
written consent may not be disclosed to a third party nor copied.
Any comments or suggestions regarding this document should be sent
to "[email protected]".
© Copyright 2002 Avaya
Avaya
Sterling Court
15 - 21 Mundells
Welwyn Garden City
Hertfordshire
AL7 1LZ
England
Tel: +44 (0) 1707 392200
Fax: +44 (0) 1707 376933
Email: [email protected]
Web: http://www.avaya.com
Voicemail Installation & Administration Manual
IP Office
Page 88
40DHB0002USAW Issue 7 (03/27/2002)