1
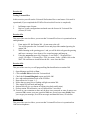
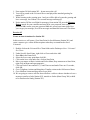
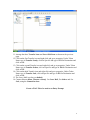
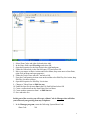
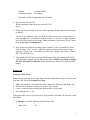
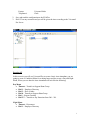
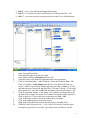
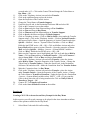
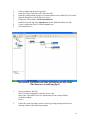
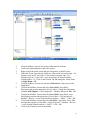
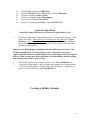
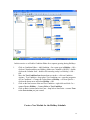
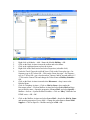
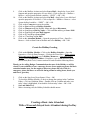
Voicemail Pro Configuration/Exercises Configuration These exercises assume your IP Office system consists of the following configurations: The VTec Cordless Telephone to station 207 The SciTec Telephone to station 208 The Avaya Digital 5420 to Station 201 The Avaya Digital 1416 to Station 202 The Avaya Digital 1408 to Station 203 The Avaya IP 1616 to Station 221 Extn207 Extn208 Extn201 Extn202 Extn203 Extn205 Extn206 Extn221 Cliff Jodie Sue Al Josh Lindy Jim Sandy Cliff Albertson Jodie Winter Sue Melstrom Al Gamble Josh Lien Lindy Plumer Jim Krista Sandy Weiss Hunt Groups Name Support Orders Extension 301 300 Extension List 201 Sue 205 Lindy 206 Jim 1 Exercise # 1 Testing Voicemail Pro In this exercise you will run the Voicemail Professional Server and ensure Voicemail is operational (If you completed the IP Office Exercises this Exercise is completed). 1. 2. In Manager open License. Retrieve system configurations and make sure the license for Voicemail Pro (4 Ports) is Valid. Exercise # 2a This part of the exercise allows you to test that Voicemail Pro Server is operational on an analog handset. 1. 2. 3. 4. From station 201 dial Station 208 – do not answer the call. You will be passed to the Voicemail Server and played the standard greeting for station 208. While listening to the greeting press 1 and you will be able to bypass the greeting and leave a message, leave about a five-second message and hang-up. Using the start menu open: My Computer / Local Disk C: / Program Files / Avaya / IP Office / Voicemail Pro / VM / Accounts / Jodie – double click on the WAV file and listen to it and Delete the file > now close the files. Exercise # 2b This part of the exercise you will program Ring Back notification on station 208. 1. Open Manager and click on User. 2. Click on Jodie 208 and select the Voicemail tab. 3. Check the Voicemail Ringback square and click OK. 4. Save and send translations back to the IP Office. 5. Repeat Exercise 2a steps 1 – 3. 6. Notice that you now have a flashing red light on station 208. 7. Take station 208 off hook and hang-up. 8. Station 208 will give you bursts of ringing (ring back notification). 9. Pick up station 208 and notice you are connected to Voice Mail. 10. You are at your extension so enter only #, there is no password so enter #, enter a new password 14#, reenter your new password 14#, now record your name (Jodie) Now you can get your message, Press 2 for messages and then 0 to listen, *3 to delete. Exercise # 2c This part of the exercise allows you to test that Voicemail Pro Server is operational on 1400 series telephones. 2 1. From station 201 dial station 202 – do not answer the call 2. You will be passed to the Voicemail Server and played the standard greeting for station 202. 3. While listening to the greeting press 1 and you will be able to bypass the greeting and leave a message, leave about a five-second message and hang-up. 4. Notice station 202 has a red light for messages, from station 202 press the Message Button enter # for your extension and enter # for your password, enter a new password 14#, reenter your new password 14#, now record your name (AL). Now you can get your message, Press 2 for messages and then 0 to listen and *3 to delete. Exercise # 3 Create an Auto Attendant for Station 201 In this exercise we will create a User Start Point for Sue Melstrom (Station 201) and create a menu to give callers different options when they are transferred to Sue’s Voicemail. 1. Double click on the Voicemail Pro Client folder on the Desktop or Start / Voicemail Pro Client. 2. Under Specific Start Points, right click on Users and select Add. 3. Enter Sue in the Name field. 4. Select the Leave entry point then click OK. 5. Click on the leave icon under Sue, click on Start Point 6. Move your mouse to Basic Actions and Select Menu, Drop menu next to Start Point, right click on Menu and open properties 7. Click on Touch-Tones and tick 1,2,3 and Time out and make Time out 15 seconds, click OK. 8. Go to Telephony Actions and bring three Transfer actions to the field next to Menu. 9. Go to Mailbox actions and drop down Leave Mail. 10. We are going to create a call flow that will allow a caller to choose whether to leave a message, transfer to Josh (Station 203), transfer to Orders (Hunt Group 300) or hold to be transferred to Sandy (Station 221). 3 11. Arrange the three Transfer icons and Leave Mail icon as shown on the previous page. 12. Click on the first Transfer icon and right click and go to properties, Under Token Name type in Transfer Sandy, click on Specific and type in 221 for Destination and click on OK. 13. Click on the second Transfer icon and right click and go to properties, Under Token Name type in Transfer Orders, click on Specific and type in 300 for Destination and click on OK. 14. Click on the third Transfer icon and right click and go to properties, Under Token Name type in Transfer Josh, click on Specific and type in 203 for Destination and click on OK. 15. The Leave Mail icon leave as default. 16. Connect Next to Menu, Timeout to Sandy, 1 to Leave Mail, 2 to Orders and 3 to Josh, using the Connection icon. Create a WAV file to be used as an Entry Prompt 4 1. 2. 3. 4. 5. Select Short Codes and right click and select Add. In the Name field enter Recordings and select OK. Open the Properties for the Start Point in the right hand pane. Under the General tab, in the Pin field enter 1234 and select OK. Move your mouse to Basic Actions and Select Menu, drop menu next to Start Point, right click on Menu and open properties. 6. Under the Touch Tones tab tick 1 and select OK. 7. From the Configuration Actions icon on the toolbar select Edit Play List Action, drop Edit Play List next to Menu. 8. Open the Properties for Edit Play List Action. 9. Change to Token Name to Edit Sue.wav 10. Under the Specific tab enter Sue in the File Path field and select OK 11. Create a connection from the Start Point (Next) to Menu. 12. Create another connection from 1 to Edit Sue.wav 13. Save and make live. In this part of the exercise you will create a Short Code in Manager that will allow you to Record your greeting from any Telephone. 1. In the Manager program, create the following System Short Code Short Code *80 5 Feature Telephone Number Voicemail Node Recordings Save and send the configuration to the IP Office 2. On any extension, dial *80 When requested to enter the access code dial 1234 Press 1 3. Follow the same procedures used to record a greeting message and record a message as follows: “Hi, this is Sue Melstrom, I’m away from the office to leave me a message dial 1, to place an Order dial 2, to transfer to Josh please dial 3, if you have a rotary telephone your call will be transferred to Sandy, thank you and have a great day. (Press 2 when done, to save the recording press 3). 4. Now we need to assign the greeting to Sue’s mailbox. In the Voicemail Pro Client click on Users > Sue > Leave > right click on Menu and select Properties > Entry Prompts > Green Cross > click on the open file icon > double click on Sue > Close > OK > Save & Make Live. 5. From station 201 dial *08 or touch the DND button. Now from Station 208 call 201 and test the three transfer options and time out action. (Make sure you have stations 201, 203, 205 and 221 connected). When finished from station 201 touch the DND button. Exercise # 4 Using the Clock Action In this exercise you will create a new Short Code Start Point that will give Users the time from the (IVR Server) Voicemail Pro Client. 1. 2. 3. 4. Right click on Short Codes and select Add > Start Point Name type in Clock > OK. From the Miscellaneous Actions icon create a Clock Action Create a connection between the Start Point and the Clock Action Save and make live > Yes In this part of the exercise you will create a System Short Code that will access the Clock Start Point. 1. In Manager, create the following System Short Code: Short Code 123 6 Feature Telephone # 2. 3. Voicemail Node Clock Save and send the configuration to the IP Office Dial 123 on any extension and you will be given the time according to the Voicemail Pro Server. Exercise # 5 In this exercise you will use Voicemail Pro to create a basic Auto Attendant, you are going to create a Condition Editor for working hours and also create a Day and Night Menu, When you are done the Auto Attendant will look like the following: Day Menu Timeout – Transfer to Support Hunt Group Dial 1 – Employee Directory Dial 3 – Place a Order Dial 0 – Transfer to Support Hunt Group Dial * - Repeat Greeting Dial 2?? – Transfer to any Extension from 200 – 299 Night Menu Timeout – Disconnect Dial 1 – Employee Directory 7 1. 2. 3. 4. 5. 6. 7. 8. 9. 10. Dial 3 – Leave Voice Mail in the Support Hunt Group Dial 2?? – Go directly into the Voice Mail boxes for Extensions 200 – 299 Dial *7 – Any user can call in remotely and retrieve their Voice Mail messages Open Voicemail Pro Client. Under Modules right click and select Add. In the Name field enter Attendant and select OK. Using the mouse click inside the right hand pane of the application. Click on Condition Editor > Add Condition > Name the Condition Test > OK Click on Calendar > Week Planner drag down to Test and left click on your mouse > double click on Week Planner and put a tick mark on Monday – Friday and make the Start Time 08:00 and End Time 17:00 and Click OK > Click on the logic options (X+) and click on OR (Xll) and then click the Week Planner > OK. Click on Condition Actions > Click on the Test Condition and drag and drop by the Start Point > Right Click on the Test Condition Icon and click on properties > Click on Specific > Click on the down arrow and select Test > OK. Click on the Basic Actions icon on the toolbar and select Menu. Click in the right hand pane to place the Action. Right click on the Menu action and select Properties (or double click). Under the Touch Tones tab tick 1, 3, 0 & * now Click on the Green plus sign > for Sequence type in 2?? select OK > put a check mark on Timeout and for 8 11. 12. 13. 14. 15. 16. 17. 18. 19. 20. 21. 22. 23. 24. 25. 26. 27. seconds make it 15 > Click on the General Tab and change the Token Name to Day Menu > OK. Click on the Telephony Actions icon and select Transfer. Click in the right hand pane to place the Action. Open the Properties of the Transfer Action. Change the Token Name to Transfer Support Under the Specific tab, in the Destination field enter 301 and select OK. Click on the Connector icon on the toolbar. Click on Next under the Start Point and drag to Test Condition. Click on True and Drag to Day Menu. Click on Timeout under the Menu and drag to Transfer Support. Click on 0 under the Menu and drag to Transfer Support. Click on Telephony Actions > Click on Dial by Name > drop under the Transfer Support action > Click on the Telephony Actions > Click on Assisted Transfer > drop next to Dial by Name > Open the properties of Assisted Transfer and select Specific > Mailbox > browse > System Defined Variables > Click on “$Key” Holds the last DTMF series > OK > OK > Click on Mailbox Actions and select Leave Mail and drop next to Assisted Transfer > Open the properties of Leave Mail and select Specific > Mailbox > browse > System Defined Variables > Click on “$Key” Holds the last DTMF series > OK > OK Make sure the Connector icon is high lighted and Click on 1 and drag to Dial by Name > Click on True and drag to Assisted Transfer > Click on No Answer > drag to Leave Mail > Click on Busy and drag to Leave Mail. Click on the Telephony Actions icon and select Transfer > place the Action under Dial by Name > Open the Properties of the Transfer Action > Change the Token Name to Transfer Orders > Under the Specific tab, in the Destination field enter 300 and select OK > Make the Connection from 3 to Transfer Orders. Make the Connection from * to Day Menu. Click on the Telephony Actions icon and select Transfer > place the Action under Transfer Orders > Open the Properties of the Transfer Action > Change the Token Name to Transfer to Extension > Under the Specific tab >Destination > browse > System defined variables select “$KEY” > OK > (If you want the Caller to hear where the call is being transferred to Click on Notify Caller of Transfer to Target) > OK. Connect 2?? To Transfer to Extension. Click on the Save & Make Live icon on the toolbar. Exercise # 6 Creating a WAV file to be used as an Entry Prompt for the Day Menu In this exercise you will record a message to be played in the Auto Attendant to inform callers of the options available for the Day Menu. 1. Select Short Codes and click on Recording. 9 2. 3. 4. 5. 6. 7. 8. 9. Click on Menu and open its Properties. Under the Touch Tones tab tick 2 and select OK. From the Configuration Actions icon on the toolbar create a Edit Play List Action. Open the Properties for Edit Play List Action. Change the Token Name to Edit Attendant.wav Under the Specific tab enter Attendant in the file Path field and select OK. Create a connection from 2 to Edit Attendant.wav Save and make live. This exercise you will Record your greeting for the Day Menu (The Menu was created on page 5) 1. On any extension, dial *80. Dial 1234 when requested to enter the access code. Note in the Voicemail Pro Server console that you have entered Short Codes.Recordings. Press 2. 2. Follow the same procedures used to record a greeting message and record a message similar to the following example: 10 “Welcome to Badger Communications, If you know the extension please dial it now, for the employee directory dial 1, to place a order dial 3, to speak to the operator dial 0, if you have a rotary phone stay on the line and your call will be transferred, to repeat this message please press *, thank you and have a good day” In this part of the exercise you will configure the Attendant Start Point to play Attendant.wav as the Entry Prompt for the Menu Action. 1. 2. 3. 4. 5. 6. Under the Attendant Start Point open the Properties for the Day Menu. Under the Entry Prompts tab select the “Add a Prompt” icon (green cross) Click on the Open icon. Select Attendant from the WAVs folder and click on the Open button Select Close and then OK. Save and make live. Setup the External Call Routing For this exercise, we will set Lines 1 & 2 to go to the auto-attendant just created by altering the default Incoming Call Route for voice calls and we will also make a short code to access VM:Attendant so we can call directly into Voice Mail without making a incoming call. 1. In Manager, click on lines and program lines 1 & 2 to Incoming Group ID 0 and only lines 1 & 2 have Outgoing Group ID 0 (change lines 3 & 4 to Incoming and Outgoing Group ID to 1). Line Number 01 Incoming Group ID 0 Outgoing Group ID 0 11 02 03 04 2. 3. 4. 5. 0 1 1 0 1 1 In the Configuration Tree click on Incoming Call Route (5), Click on 0 > Line Group ID 0 > Destination > 200 Main > Change to (you will have to type this) VM:Attendant for Destination > OK. Make a new system short code: Short Code: *90 Feature: Voicemail Collect Telephone Number “Attendant” Save and send the configuration (Reboot Mode Immediately) to the IP Office unit. Make a incoming call > Press 3 and you should be transferred to the Orders Hunt Group – 300 (make sure phones are connected to extensions 205& 206) Enabling Group Message Waiting Indication Hunt group message waiting to an individual user is configured by adding the group’s name to the user’s Source Numbers. To configure group message waiting indication for a user: 1. Receive the IP Office system’s configuration within Manager. 2. Locate the user (Extensions 205 & 206) and double-click the entry to view their settings. 3. Click the Source Numbers tab. 4. Right-click on the panel and select Add. 5. In the Source Number field, enter H followed by the group name. For our example that would be HOrders. 6. Click OK. 7. Send the configuration back to the IP Office system. 8. Stations 205 & 206 will have a message indication, to receive the information dial *17 and Hunt Group 300 > enter your password to listen to the message. In this exercise we are going to make the Night Attendant Night Menu Timeout – Disconnect Dial 1 – Employee Directory Dial 3 – Leave Voice Mail in the Support Hunt Group Dial 2?? – Go directly into the Voice Mail boxes for Extensions 200 – 299 Dial *7 – Any user can call in remotely and retrieve their Voice Mail messages 12 1. 2. 3. 4. 5. 6. 7. 8. 9. Click on the Basic Actions icon on the toolbar and select Menu. Click in the right hand pane to place the Action. Right click on the Menu action and select Properties (or double click). Under the Touch Tones tab tick 1 & 3 now Click on the Green plus sign > for Sequence type in 2?? select OK > Click on the Green plus sign > for Sequence type in *7 select OK > put a check mark on Timeout and for seconds make it 15 > Click on the General Tab and change the Token Name to Night Menu > OK. Click on the Basic Actions icon and select Disconnect > drop it next to the Night Menu. Click on the Mailbox Actions and select Leave Mail > drop below Disconnect and open the properties of Leave Mail > Change the token name to Leave Mail Support > Click on Specific > Mailbox and type in 300 > OK. Click on the Mailbox Actions and select Leave Mail > drop below Leave Mail Support and open the properties of Leave Mail > Click on Specific > Mailbox > Browse > select System defined variables > “$KEY” > OK > OK. Click on the Mailbox Actions and select Get Mail > drop below Leave Mail and open the properties of Get Mail > Click on Specific > Mailbox > Browse > select System defined variables > “$KEY” > OK > OK. Click on the Connector icon on the toolbar. 13 10. 11. 12. 13. 14. 15. Click on False and Drag to Night Menu. Click on Timeout under the Night Menu and drag to Disconnect. Click on 1 and drag to Dial by Name. Click on 3 and drag to Leave Mail Support. Click on 2?? and drag to Leave Mail. Click on *7 and drag to Get Mail > Save and Make Live Create the Night Menu (You will be using a different way, to make the Night Menu.wav file) 1. Click on the Night Menu > Open the Properties > Click on Entry Prompts > Click on the Green Plus > Please select a file or enter a new file name type in Night Menu.wav > Use which media device? Select Telephony Handset > Extension, type in 201 and click on the Record Icon (Red Circle). Answer station 201 and record the following Menu: Thank you for calling Badger Communications our office hours are 8 am to 5 pm Monday through Friday, if you would like to leave a message for one of our employees please dial their extension number now, for the employee directory please dial one, if this is a emergency please dial three or call back during normal working hours, thank you and have a good evening. 2. 3. Click on the Stop Icon (Green Square) Close > OK > Save and Make Live To check the Night Menu, we have to change the settings in the Condition Editor > Click on Condition Editor > Double click on Week Planner > Change today’s time to end for one hour ago > Save and Make Live. Creating a Holiday Schedule 14 In this exercise we will add a Condition Editor for a separate greeting during Holidays 1. 2. 3. 4. Click on Condition Editor > Add Condition > for a name type in Holiday > OK > click on Calendar and drop on Holiday (Make sure Calendar is OR Xll) > double click on the Calendar Icon > double click on today (today is a Holiday) > OK > OK. Move the Test Condition Icon down about two inches > click on Condition Actions > Test Condition > drop where Test Condition was > open the properties of Test Condition* > Change the Token Name to Holiday > click on Specific > click on the down arrow and select Holiday > OK. Click on the line between Next and Test Condition > right click and click Cut > connect Next to Holiday > Connect False to Test Condition. Click on Basic Actions and select Goto > drop below Start Point > connect True to the Goto Action you just created. Create a New Module for the Holiday Schedule 15 1. 2. 3. 4. 5. 6. 7. 8. Right click on Modules > Add > Name the Module Holiday > OK. Click on the Basic Actions icon on the toolbar and select Menu. Click in the right hand pane to place the Action. Right click on the Menu action and select Properties (or double click). Under the Touch Tones tab tick 1 & 3 now Click on the Green plus sign > for Sequence type in 2?? select OK > Click on the Green plus sign > for Sequence type in *7 select OK > put a check mark on Timeout and for seconds make it 15 > Click on the General Tab and change the Token Name to Holiday Schedule > OK. Click on the Basic Actions icon and select Disconnect > drop it next to the Holiday Menu. Click on Telephony Actions > Click on Dial by Name > drop under the Disconnect action > Click on Mailbox Actions and select Leave Mail and drop next to Dial by name > Open the properties of Leave Mail and select Specific > Mailbox > browse > System Defined Variables > Click on “$Key” Holds the last DTMF series > OK > OK Click on the Mailbox Actions and select Leave Mail > drop below Dial by Name and open the properties of Leave Mail > Change the token name to Leave Mail Support > Click on Specific > Mailbox and type in 300 > OK. 16 9. 10. 11. 12. 13. 14. 15. 16. 17. 18. Click on the Mailbox Actions and select Leave Mail > drop below Leave Mail Support and open the properties of Leave Mail > Click on Specific > Mailbox > Browse > select System defined variables > “$KEY” > OK > OK. Click on the Mailbox Actions and select Get Mail > drop below Leave Mail and open the properties of Get Mail > Click on Specific > Mailbox > Browse > select System defined variables > “$KEY” > OK > OK. Click on the Connector icon on the toolbar. Click on Next and Drag to Holiday Schedule. Click on Timeout under the Holiday Menu and drag to Disconnect. Click on 1 and drag to Dial by Name > Click on True and drag to Leave Mail. Click on 3 and drag to Leave Mail Support. Click on 2?? and drag to Leave Mail. Click on *7 and drag to Get Mail. Click on the Attendant Module > Open the properties of Goto > Specific > Browse > click on Start Point or Module and select Holiday > OK > OK. Create the Holiday Greeting 1. Click on the Holiday Module > Click on the Holiday Schedule > Open the Properties > Click on Entry Prompts > Click on the Green Plus > Please select a file or enter a new file name type in Holiday Menu.wav > Use which media device? Select Telephony Handset > Extension > type in 201 and click on the Record Icon (Red Circle). Answer station 201 and record the following Menu: Thank you for calling Badger Communications because of the Holiday we will be closed, if you would like to leave a message for one of our employees please dial their extension number now, for the employee directory please dial one, if this is a emergency please dial three or call back during normal working hours, thank you and have a great day. 2. 3. 4. 5. Click on the Stop Icon (Green Square) Close > OK. To check the Holiday Module, we have to change the settings in the Condition Editor > Click on Condition Editor > Double click on Calendar and make sure today’s date is highlighted, if not double click on today’s date > OK > OK. Save and Make Live. Make a incoming call, the Holiday Schedule should answer. Creating a Basic Auto Attendant With a 30 second delayed Auto Attendant during the Day 17 Go to the Attendant Module and Delete the Test Condition, Holiday & Goto > Connect Next to the Day Menu Save & Make Live In Manager change Short Code *90 to 698 Create a New User: Name: Test Day Extension: 400 Voicemail tab > Remove the check mark for Voicemail On (off) Forwarding Tab Check: Forward Unconditional Forward Hunt Group Calls Forward Internal Calls Forward Number enter – 698 > OK > Make it a H323 Extension Create a New Hunt Group Name: Extension: Day 198 Extension List: 400 Test Day Voicemail Tab Remove the check Voicemail On (off) Incoming calls ring at 200 Main Hunt Group (201, 202, 203, 207, 208 & 221) Hunt Group 200 Overflow Time (secs): 30 (gives the Main Group 6 rings to answer calls, five seconds equal one ring) Overflow Group List: Day Make a Incoming call and the Day Auto Attendant will answer in 30 seconds Creating a Basic Auto Attendant 18 With Auto Attendant working Immediately at Night Voice Mail Pro Create your Module for your Night Menu and label your Module Night You created your transfer options in the Attendant Menu, copy the following actions from the Attendant Menu and paste them in the Night Menu – Night Menu, Disconnect, Dial by name – Assisted Transfer – Leave Mail, Leave Mail Support, Leave Mail and Get Mail Once you have pasted them in the Night Menu you can delete the Night Menu, Disconnect, Leave Mail Support, Leave Mail and Get Mail from the Attendant Menu Now make the Connections from: o Start Point to Night Menu o Timeout to Disconnect o 1 to Dial By name, True to Assisted Transfer, No Answer & Busy to Leave Mail o 3 to Leave Mail Support o 2?? To Leave Mail o *7 to Get Mail Save and Make Live In IP Office, create a New Short Code: Code: 699 Feature: Voicemail Collect Telephone Number: “Night” Once you saved this Short Code you should be able to dial 699 and hear your Night Greeting Create a New User: Name: Extension: Test Night 302 Voicemail Tab – Remove the check Voicemail On (off) Forwarding Tab Check: Forward Unconditional Forward Hunt Group Calls Forward Internal Calls Forward Number enter – 699 OK – Make this User a H323 Extension - OK Create a New Hunt Group: Name: Night 19 Extension: 199 Extension List: 302 Test Night Voicemail Tab: Remove the check Voicemail On (off) Queuing Tab: Remove the check for Queuing On (off) Incoming calls ring at 200 Main Hunt Group Hunt Group 200 Main Fallback Tab Night Service Fallback Group = Night Goto User 201 Sue Melstrom Button Programming Tab: Add to Button 5: Advanced > Set > Set HuntGroup Night Service Action Data: 200 Main Save your configuration To Activate Night Service touch the Button Labeled HGNS+ 200 on Extension 201 and your Auto Attendant will answer incoming calls Immediately Adding the Holiday Greeting By adding a Test Condition to the Night Module you will be able to connect the Holiday schedule with a Goto action within the Night Module In the Voicemail Pro Client, click on the Night Module Remove the connection between the Start Point and the Night Menu Click on Condition Actions and select > Test Condition > drop the Test Condition below the Start Point Open the Properties of the Test Condition and click on the Specific tab and Select Holiday from the drop down tab – OK Connect the Start Point to the Test Condition From the Test Condition connect False to the Night Menu Click on Basic Actions and select – Goto – drop below the Test Condition Open the properties of the Goto and select the Specific tab > Go to a specific node > Start point or module > Select Holiday From the Test Condition - connect True to Goto 20 Now go to the Condition Editor and double click on the Holiday Calendar and make today a Holiday – Save and Make Live To test the Holiday Schedule put Hunt Group 200 in Night Service and make a incoming call 21