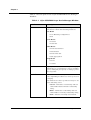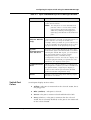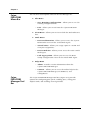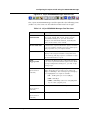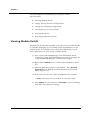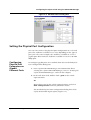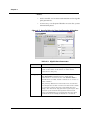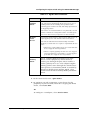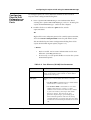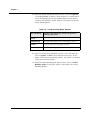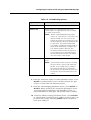
1
Cajun
P550/P880 Manger
User Guide
March 2001
Cajun P550/P880 5.1 Manager User Guide
Copyright 2001 Avaya Inc. ALL RIGHTS RESERVED
The products, specifications, and other technical information regarding the products contained
in this document are subject to change without notice. All information in this document is
believed to be accurate and reliable, but is presented without warranty of any kind, express or
implied, and users must take full responsibility for their application of any products specified in
this document. Avaya disclaims responsibility for errors which may appear in this document,
and it reserves the right, in its sole discretion and without notice, to make substitutions and
modifications in the products and practices described in this document.
Avaya, Cajun, CajunDocs, OpenTrunk, P550, and CajunView are trademarks of Avaya Inc.
Microsoft, Windows, and Internet Explorer are registered trademarks, and Windows NT is a
trademark of Microsoft Corporation in the U.S. and/or other countries.
OpenView is a trademark of Hewlett-Packard Company.
Netscape and Netscape Navigator are registered trademarks of Netscape Communications
Corporation in the United States and other countries.
3Com is a registered trademark and PACE is a trademark of 3Com or its subsidiaries.
Adobe is a registered trademark of Adobe Systems Incorporated.
Cisco is a registered trademark of Cisco Systems Incorporated.
ALL OTHER TRADEMARKS MENTIONED IN THIS DOCUMENT ARE PROPERTY OF THEIR
RESPECTIVE OWNERS.
Table of Contents
Preface — vii
The Purpose of this Guide . . . . . . . . . . . . . . . . . . . . . . . . . . . . . . . vii
Who Should Use this Guide . . . . . . . . . . . . . . . . . . . . . . . . . . . . . vii
Organization of this Guide . . . . . . . . . . . . . . . . . . . . . . . . . . . . . . vii
Chapter 1 — Overview of the Cajun P550/P880 Manager 1-1
Chapter 2 — Configuring the Cajun Switch Using
the P550/P880 Manager 2-3
Overview of the Cajun P550/P880 Manager . . . . . . . . . . . . . . . . 2-3
Starting the Cajun P550/P880 Manager . . . . . . . . . . . . . . . . . . . . 2-3
From HP OpenView Network Node Manager (NNM) . . . . . . 2-4
Overview of the Cajun P550/P880 Manager Window . . . . . . . . . 2-4
Device Manager Tab . . . . . . . . . . . . . . . . . . . . . . . . . . . . . . . . . . . 2-5
Switch Port Colors . . . . . . . . . . . . . . . . . . . . . . . . . . . . . 2-7
Cajun P550/P880 Menu Bar . . . . . . . . . . . . . . . . . . . . . . 2-8
Cajun P550/P880 Manager Tool Bar . . . . . . . . . . . . . . . 2-8
Saving the Running Configuration . . . . . . . . . . . . . . . . . . . . . . . 2-10
Accessing the Cajun Switch Web Agent . . . . . . . . . . . . . . . . . . . 2-11
Setting Device Attributes . . . . . . . . . . . . . . . . . . . . . . . . . . . . . . 2-11
Viewing Device Information . . . . . . . . . . . . . . . . . . . . . . . . 2-11
Modifying Device Information . . . . . . . . . . . . . . . . . . . . . . 2-12
Working with VLANs . . . . . . . . . . . . . . . . . . . . . . . . . . . . . . . . . 2-13
Assigning a Port to a VLAN . . . . . . . . . . . . . . . . . . . . . . . . . 2-13
Viewing Port Assignments . . . . . . . . . . . . . . . . . . . . . . . . . . 2-14
Working with Hunt Groups (Link Aggregation) . . . . . . . . . . . . 2-14
Hunt Group Considerations . . . . . . . . . . . . . . . . . . . . . . . . . 2-14
Hunt Groups in the Cajun P550/P880 Manager . . . . . . . . . 2-15
Creating a Hunt Group . . . . . . . . . . . . . . . . . . . . . . . . . . . . 2-15
Viewing Hunt Group Members . . . . . . . . . . . . . . . . . . . . . . 2-16
Adding a Port to a Hunt Group . . . . . . . . . . . . . . . . . . . . . . 2-17
Deleting a Hunt Group . . . . . . . . . . . . . . . . . . . . . . . . . . . . 2-18
Redistributing Hunt Group Learned Addresses . . . . . . . . . . 2-18
Overview of the Switch Representation . . . . . . . . . . . . . . . . . . . 2-19
Viewing Module Details . . . . . . . . . . . . . . . . . . . . . . . . . . . . 2-20
Setting the Physical Port Configuration . . . . . . . . . . . . . . . . 2-21
Configuring Physical Port Parameters
on Gigabit Ethernet Ports . . . . . . . . . . . . . . . . . . . . . . . 2-21
Cajun P550/P880 Manager User Guide
v
Configuring Physical Port Parameters
on Fast Ethernet Ports . . . . . . . . . . . . . . . . . . . . . . . . . 2-25
Setting the Switching Configuration . . . . . . . . . . . . . . . . . 2-29
Configuring Port VLAN Parameters . . . . . . . . . . . . . . . 2-29
Configuring Non-VLAN Switch Port Parameters . . . . . 2-32
Viewing Power System Statistics . . . . . . . . . . . . . . . . . . . . . 2-33
Viewing Fan Status . . . . . . . . . . . . . . . . . . . . . . . . . . . . . . . 2-35
Resetting Temperature Status . . . . . . . . . . . . . . . . . . . . . . . 2-36
Setting Port Parameters . . . . . . . . . . . . . . . . . . . . . . . . . . . . . . . 2-38
Setting the Port Speed . . . . . . . . . . . . . . . . . . . . . . . . . . . . . 2-38
Enabling a Port . . . . . . . . . . . . . . . . . . . . . . . . . . . . . . . . . . 2-39
Disabling a Port . . . . . . . . . . . . . . . . . . . . . . . . . . . . . . . . . . 2-40
Setting a Port to Half-Duplex . . . . . . . . . . . . . . . . . . . . . . . 2-40
Setting a Port to Full-Duplex . . . . . . . . . . . . . . . . . . . . . . . 2-40
Enabling Port Auto-Negotiation . . . . . . . . . . . . . . . . . . . . . 2-41
Disabling Port Auto-Negotiation . . . . . . . . . . . . . . . . . . . . . 2-41
Configuring IP Routing . . . . . . . . . . . . . . . . . . . . . . . . . . . . . . . 2-42
Using SMON . . . . . . . . . . . . . . . . . . . . . . . . . . . . . . . . . . . . . . . 2-44
vi
Cajun P550/P880 Manager User Guide
Preface
Welcome to Cajun P550/P880 Manager. This chapter provides an
introduction to this guide. It includes the following sections:
■
The Purpose of this Guide - A description of the goals of
the guide.
■
Who Should use this Guide - The intended audience of
this guide.
■
Organization of this Guide - A brief description of the
subjects contained in the various sections of this guide.
The Purpose of this Guide
This guide contains the information needed to use
Cajun P550/P880 Manager efficiently and effectively.
Who Should Use this Guide
This guide is intended for use by network managers familiar with
network management and its fundamental concepts.
Organization of this Guide
This guide is structured to reflect the following conceptual
divisions:
■
Preface - This section describes the guide’s purpose,
intended audience, and organization.
■
Overview of the Cajun P550/P880 Manager - Provides a
brief overview of the Cajun P550/P880 Manager.
■
Configuring the Cajun Switch Using the P550/P880
Manager - Describes viewing and updating system
information, assign VLANs to ports, and configure hunt
groups using the Cajun P550/P880 Manager.
Cajun P550/P880 Manager User Guide
vii
viii
Cajun P550/P880 Manager User Guide
1
Overview of the
Cajun P550/P880 Manager
The Cajun P550/P880 Manager allows you to the manage your
Cajun switch network, including the Cajun P880, P550, and P220
switches. The Cajun P550/P880 Manager provides the following
benefits:
■
Java-based Implementation - The Cajun P550/P880
Manager allows you to manage your Cajun switches
anywhere you can access an IP connection to your network.
■
Platform Integration - The Cajun P550/P880 Manager
integrates into HP OpenView Network Node Manager.
■
Enhanced Learning Curve - The Cajun P550/P880
Manager uses screens from the Cajun Switch Web Agent,
facilitating the learning curve often involved in using
multiple applications to manage a switch network. Because
the software reuses screens from the Web Agent, you use
familiar screens to manage your switch network.
The Cajun P550/P880 Manager application allows you to view and
change configuration settings of the switch. The Cajun P550/P880
Manager provides a visual representation of the switch and a list of
the switch’s modules and ports. Using these tools, you can set basic
switch information, assign ports to Virtual LANs (VLANs), and set
up hunt groups (also referred to as Link Aggregation Groups
(LAG)).
The Cajun P550/P880 Manager also provides IP Routing
capabilities using screens taken directly from the Cajun Switch
Web Agent.
You can select a switch port by selecting the ports shown in the
visual representation or by expanding the hierarchy of switch,
module, and port icons in the list. You can then select options from
the Tools menu to obtain information about the switch or to
configure device settings.
If SMON is installed, you can also launch the Device SMON
application from the Cajun P550/P880 Manager to view switch,
port, and VLAN statistics.
Cajun P550/P880 Manager User Guide
1-1
Chapter 1
1-2
Cajun P550/P880 Manager User Guide
2
Configuring the Cajun Switch
Using the P550/P880 Manager
Overview of the Cajun P550/P880 Manager
This chapter provides the following information:
■
Starting the Cajun P550/P880 Manager
■
Overview of the Cajun P550/P880 Manager Window
■
Saving the Running Configuration
■
Accessing the Cajun Switch Web Agent
■
Setting Device Attributes
■
Working with VLANs
■
Working with Hunt Groups (Link Aggregation)
■
Overview of the Switch Representation
■
Setting Port Parameters
■
Configuring IP Routing
■
Using SMON
Starting the Cajun P550/P880 Manager
The following section describes how to start Cajun P550/P880
Manager from HP OpenView Network Node Manager (NNM).
* Note: To receive alarms, also referred to as traps, from the
switch, you must set an SNMP community string on
the switch to point to the CajunView system that
receives the traps.
Cajun P550/P880 Manager User Guide
2-3
Chapter 2
From HP OpenView Network Node Manager (NNM)
To start Cajun P550/P880 Manager from HP OpenView NNM:
1. Start HP OpenView.
2. Double-click the Internet icon to open the network map.
3. Select a Cajun device (P550, P880, or P220).
OR
Select Edit > Find to locate the device on the network map.
4. Select Tools > Avaya> Device Manager.
OR
Right-click the switch and select Avaya > Device Manager.
The Cajun P550/P880 Device Manager window opens
(Figure 2-1, later in this chapter).
Overview of the Cajun P550/P880 Manager
Window
The Cajun P550/P880 - Avaya Device Manager window consists of
up to three tabs:
■
Device Manager Tab
■
Routing Manager Tab
■
SMON Tab
From the Device Manager tab, you can select ports from modules of
the switch and drag them to the Virtual LANs area of the window to
quickly assign virtual switch ports to VLANs. The Full View area
displays the visual representation of your Cajun P880, P550, or P220
switch. The tool bar provides a convenient way to configure ports.
The Device Manager tab opens by default.
The Routing Manager tab (Layer 3 switches only) provides a list of
IP management topics that launch screens directly from the Cajun
Switch Web Agent. Refer to "Configuring IP Routing", later in this
chapter, for more information about the Routing Manager tab.
2-4
Cajun P550/P880 Manager User Guide
Configuring the Cajun Switch Using the P550/P880 Manager
The SMON (if SMON is installed) tab provides access to the device
SMON application. For more information about SMON, refer to the
appropriate SMON user guide.
Device Manager Tab
When you start the Cajun P550/P880 Manager, the Device Manager
tab opens by default (Figure 2-1).
* Note: You can resize the Full View and Web Agent view by
dragging the panel divider.
Figure 2-1. Cajun P550/P880 Manager Window
(Device Manager Tab Information shown)
Cajun P550/P880 Manager User Guide
2-5
Chapter 2
Table 2-1 lists the parts of the Cajun P550/P880 Device Manager
Window:
Table 2-1. Cajun P550/P880 Avaya Device Manager Window
Window Part
Description
Menu Bar
Displays the Cajun P550/P880 Manager menus.
The menus contain the following functions:
File Menu
• Save Running Configuration
• Exit
View Menu
• Tool Bar
• Status Bar
Tools Menu
• Device Information
• Virtual LANs
• Device Web Site
• Link Aggregation
Help Menu
• About
• Content
Tool Bar
Displays a list of icons that allow you to display
information or set parameters, such as enabling
a port, setting the port speed, or setting a port to
auto-negotiate.
Switch Tree
Breaks down the device by its modules and
ports. Expanding module icons causes port icons
to display.
The switch icon at the top of the tree may be one
of the following colors:
• Green - Switch has connectivity and was
added with valid read-write community
string.
• Blue - Switch has connectivity and was
added with a read-only community string.
• Red - Switch is currently unreachable.
2-6
Cajun P550/P880 Manager User Guide
Configuring the Cajun Switch Using the P550/P880 Manager
Table 2-1. Cajun P550/P880 Avaya Device Manager Window
Window Part
Description
Full View
Displays a visual and interactive representation
of the current switch.
Note: You may have to resize the Full View
panel in order to see the entire switch
representation. Resize the Full View
window by clicking and dragging the
right edge panel divider of the Full View
pane.
Switch Port
Colors
Detail View
(48-Port Module
Only)
Zooms in on a portion of the switch
representation to provide an expanded view of a
port connector on a 48-port module. For
example, when you click on a port connector on
a 48-port module, the Detail View shows a closeup representation of the physical port group.
System
Information/Virt
ual LAN Area
Provides screens taken directly from the Cajun
Switch Web Agent and Virtual LANs tool. When
viewing the Switch Web Agent, you can launch
the System Information, Power System,
Temperature Status, and Hunt Group
Configuration screens. You can also display and
configure physical switch port parameters. The
VLAN tree also displays in this pane.
VLAN Pull-Down
Menu
Allows you to select a VLAN to see which ports
are assigned to it. When you select a VLAN from
the pull-down list, assigned ports display as
yellow in the switch representation (Default
port-based VLANs assignments only).
Status
Displays a label for components when you pass
the cursor over them.
Switch ports display in four colors:
■
Yellow – The port is connected to the selected VLAN, but is
not plugged in.
■
Blue (outline) – The port is selected.
■
Green – The port is connected and enabled with a link.
■
Gray (colorless) – The port is connected to the selected
VLAN, but is currently disabled, or the port is not connected
to the selected VLAN.
Cajun P550/P880 Manager User Guide
2-7
Chapter 2
Cajun
P550/P880
Menu Bar
The are four menu options from the Device Manager tab:
■
2-8
—
Save Running Configuration - Allows you to save the
running configuration file.
—
Exit - Allows you to exit from the Cajun P550/P880
Manager.
■
View Menu - Allows you to view or hide the Tool and Status
bars.
■
Tools Menu
■
Cajun
P550/P880
Manager Tool
Bar
File Menu
—
Device Information - Allows you to access the System
Information screen of the switch Web Agent.
—
Virtual LANs - Allows you assign a port to a VLAN and
view port assignments.
—
Device Web Site - Allows you to access the entire switch
Web Agent.
—
Link Aggregation - Allows you to access the Hunt
Group Configuration screen of the Switch Web Agent.
Help Menu
—
About - Provides version information about the
Cajun P550/P880 Manager.
—
Content - Allows you to access the online help for the
Cajun P550/P880 Manager, VLANMaster, and
ConfigMaster.
The Cajun P550/P880 Manager Tool Bar (Figure 2-2) provides
options for configuring port speed, enabling ports, setting port
duplex mode, and enabling auto-negotiation.
Cajun P550/P880 Manager User Guide
Configuring the Cajun Switch Using the P550/P880 Manager
Figure 2-2. Cajun P550/P880 Manager Tool Bar Icon
The Cajun P550/P880 Manager tool bar provides the following icons
(Table 2-2). The icons are described in order from left to right.
Table 2-2. Cajun P550/P880 Manager Tool Bar Icons
Icon
Description
Device
Information
Launches the System Information dialog box of
the Cajun Switch Web Agent. In the System
Information dialog box, you can view and
change basic switch information, including the
name and location of the switch.
Device Web Site
Launches the Cajun Switch Web Agent, in which
you can configure VLANs, protocols, switch ports
and properties, for your Cajun Switch.
Virtual LANs
Displays the Virtual LANs tree menu, which
displays all configured VLANs. Using this view,
you can drag and drop a port to a VLAN to assign
the default VLAN for a port.
Link
Aggregation
Launches the Hunt Group Configuration dialog
box of the Cajun Switch Web Agent. In the Hunt
Group Configuration dialog box, you can set up
hunt groups.
10/100/1000
Allows you to change the port speed of a 10/100
Mbps (megabits per second) port to either 10
Mbps or 100 Mbps. The actual port speed displays
as a highlighted icon. Options include:
(Port must be
selected)
• 10 – 10 Megabits per second (Mbps)
• 100 – 100 Mbps
• 1000 – 1000 Mbps (this icon is highlighted
if you select a gigabit port)
Port Enable
Allows you to enable a selected port.
(Port must be
selected)
Port Disable
Allows you to disable a selected port.
(Port must be
selected)
Cajun P550/P880 Manager User Guide
2-9
Chapter 2
Table 2-2. Cajun P550/P880 Manager Tool Bar Icons
Icon
Description
Half Duplex
Allows you to set port duplex mode to Half
Duplex. For information about port duplexing,
refer to the Cajun ConfigMaster User Guide.
(Port must be
selected)
Full Duplex
(Port must be
selected)
AutoNegotiation
Enable
Allows you to set port duplex mode to Full
Duplex. For information about port duplexing,
refer to the Cajun ConfigMaster User Guide.
Allows you to enable auto-negotiation for the
port. For information about auto-negotiation,
refer to the Cajun ConfigMaster User Guide.
(Port must be
selected)
AutoNegotiation
Disable
Allows you to disable auto-negotiation for the
port. For information about auto-negotiation,
refer to the Cajun ConfigMaster User Guide.
(Port must be
selected)
Saving the Running Configuration
On a Cajun switch, configuration parameters are stored in a
startup.txt file located in the switch’s Non-Volatile Random Access
Memory (NVRAM). When the switch is started, the startup.txt file
runs and stores configuration parameters in volatile RAM as a
running configuration. As you configure switch ports in
Cajun P550/P880 Manager, your changes are recorded to the
volatile running configuration. To ensure that your changes are
saved in a more permanent location, save your running
configuration to your start-up configuration.
As you work in Cajun P550/P880 Manager, frequently save your
running configuration to your start-up configuration by selecting
File > Save Running Configuration.
CAUTION
2-10
When making configuration changes to the switch, explicitly
save changes by copying the running configuration to the
startup configuration to ensure that the changes persist after
the switch is restarted. When running a redundant
supervisor configuration, you must also synchronize the
CPUs in order for both CPUs to have the same configuration.
Cajun P550/P880 Manager User Guide
Configuring the Cajun Switch Using the P550/P880 Manager
Accessing the Cajun Switch Web Agent
The Web-based interface of the Cajun Switch is accessible from the
Tools menu and the tool bar of Cajun P550/P880 Manager. To access
the Cajun Switch Web Agent:
■
Select Tools > Device Web Site.
Or
■
Click Device Web Site in the Cajun P550/P880 Device
Manager tool bar.
The Welcome to Cajun Switch Management web page opens. Refer
to the Cajun P550/P220 Switch Operations Guide for more information
about the Cajun P550, P220, and P880 switches.
Setting Device Attributes
From the Cajun P550/P880 Manager, you can view and set
attributes of your switches using familiar screens of the Cajun Web
Agent for the Cajun P880, P550, or P220 Switch Release 4.0 or
greater.
Viewing Device Information
You can view information about a device including:
■
Version Number - Version number of the firmware
■
Name - Name assigned to the device
■
Location - Location of the device
■
Contact – System administrator assigned to the device
■
Active Alarms – Number of active alarms. Click Active
Alarms to view Active Alarm table.
Cajun P550/P880 Manager User Guide
2-11
Chapter 2
To view device information:
1. Start Cajun P550/P880 Manager. Refer to "Starting the Cajun
P550/P880 Manager" earlier in this chapter.
2. Select Tools > Device Information.
Or
From the tool bar, click Device Information.
The System Information dialog box of the Cajun switch
displays in the right side of the Cajun P550/P880 - Avaya
Device Manager window.
* Note: Use the panel divider to resize the System
Information dialog box and view system
information.
Modifying Device Information
To modify device information:
1. Start Cajun P550/P880 Manager. For information about
starting the Cajun P550/P880 Manager, refer to “Starting the
Cajun P550/P880 Manager” earlier in this chapter.
2. Select Tools > Device Information.
Or
From the tool bar, click Device Information. The System
Information dialog box of the Cajun switch displays in the
right side of the Cajun P550/P880Device Manager window.
* Note: Use the panel divider to resize the System
Information dialog box and view system
information.
3. In the Name field, enter a new name for the switch.
4. In the Location field, enter the new location of the switch.
5. In the Contact field, enter the name of the system
administrator who manages the switch.
6. Click APPLY to save changes or CANCEL to restore previous
settings.
2-12
Cajun P550/P880 Manager User Guide
Configuring the Cajun Switch Using the P550/P880 Manager
Working with VLANs
Using the Cajun P550/P880 Manager, you can assign ports to VLANs
and view VLAN assignments.
Assigning a Port to a VLAN
To assign a port to a VLAN:
1. Start Cajun P550/P880 Manager. For information about
starting the Cajun P550/P880 Manager, refer to “Starting the
Cajun P550/P880 Manager” earlier in this chapter.
2. In the Cajun P550/P880 Manager window, select Tools >
Virtual LANs.
Or
Click Virtual LANs in the tool bar.
The Virtual LANs list opens in the System Information and
Virtual LAN area (Figure 2-3).
Figure 2-3. Virtual LAN List
3. In the switch representation or from the switch tree, select a
port.
4. Drag and drop it to a VLAN in the Virtual LANs list.
Cajun P550/P880 Manager User Guide
2-13
Chapter 2
5. When you are prompted to confirm the changes, click OK to
save changes or CANCEL to restore the current VLAN
assignment.
Viewing Port Assignments
To view ports assigned to a specific VLAN, from the VLAN pull-down
menu located above the System Information and Virtual LANS area
(Figure 2-3), select the VLAN for which you want to view port
assignments. All enabled ports connected to the selected VLAN
display as yellow (connected to a selected VLAN but not plugged in)
or green (connected and enabled with a link) in the switch
representation.
Working with Hunt Groups (Link Aggregation)
Link Aggregation (Hunt Groups) allow you to aggregate multiple
switch ports into a single group, effectively combining the
bandwidth into a single connection.
* Note: In this document, link aggregation is referred to as hunt
groups.
For example, if you connect three gigabit ports each on a pair of
switches into a hunt group, the aggregated connection will have six
gigabits of available bandwidth (full- duplex).
Hunt groups also provide fault tolerance. If a port in a hunt group
fails, the remaining ports continue to forward the traffic on the link.
Hunt Group Considerations
Before creating a hunt group, consider the following points:
2-14
■
The switches do not have a link discovery protocol. When
creating a hunt group, you have to verify that the ports in a
group on one switch are physically connected to the ports in
that group on the other switch.
■
If one end of a connection is in a hunt group, the other end
of the connection should also be a hunt group. Otherwise,
the forwarding behavior of the hunt group is unpredictable.
■
You should disable the ports in a hunt group until both ends
of the link are configured.
Cajun P550/P880 Manager User Guide
Configuring the Cajun Switch Using the P550/P880 Manager
■
All ports in a hunt group must be the same speed.
■
Packets arriving on different fabric ports within the switch
have more evenly balanced loads.
■
Hunt groups do not load share if the source and destination
traffic and the hunt group ports are on the same fabric port.
Most I/O modules divide their ports evenly across two fabric
ports. For 10-port and 12-port I/O modules, all ports use a
single fabric port.
■
The first port assigned to a hunt group becomes the flood
port. It can not be changed unless the flood port is disabled.
Hunt Groups in the Cajun P550/P880 Manager
Using the Cajun P550/P880 Manager, you can launch the Hunt
Group Configuration dialog box of the Cajun Switch Web Agent. In
this dialog box, you can complete any of the following tasks:
■
Creating a Hunt Group
■
Viewing Hunt Group Members
■
Adding a Port to a Hunt Group
■
Deleting a Hunt Group
■
Redistributing Hunt Group Learned Addresses
For information about the Hunt Group Configuration dialog box
and associated tasks, refer to “Using VLANs, Spanning Tree, and
Hunt Groups (Layer 2 and Layer 3)” in the Cajun P550/P220 Switch
Operations Guide.
Creating a Hunt Group
To create a hunt group:
1. Start Cajun P550/P880 Manager. For information about
starting the Cajun P550/P880 Manager, refer to "Starting the
Cajun P550/P880 Manager" earlier in this chapter.
2. Select Tools > Link Aggregation.
Or
From the tool bar, click Link Aggregation.
Cajun P550/P880 Manager User Guide
2-15
Chapter 2
3. The Hunt Group Configuration dialog box opens in the
System Information and Virtual LAN pane (Figure 2-4).
Figure 2-4. Hunt Group Configuration Dialog Box
4. Click CREATE. The Create Hunt Group dialog box opens.
5. In the Name field, enter a name for the end of the hunt
group.
6. From the Load Sharing pull-down menu, select Enable to
enable load sharing.
7. Click APPLY to save your changes, or CANCEL to restore
previous settings.
Viewing Hunt Group Members
To view hunt group members:
1. Start Cajun P550/P880 Manager. For information about
starting the P550/P880 Manager, refer to "Starting the Cajun
P550/P880 Manager", earlier in this chapter.
2. Select Tools > Link Aggregation.
Or
From the tool bar, click Link Aggregation.
The Hunt Group Configuration dialog box opens in the
System Information and Virtual LAN pane (Figure 2-4).
2-16
Cajun P550/P880 Manager User Guide
Configuring the Cajun Switch Using the P550/P880 Manager
3. In the Members column, double-click the highlighted
number of the Hunt Group you want to view. The Hunt
Group Members dialog box opens, displaying the name and
ID number of the hunt group.
Adding a Port to a Hunt Group
To add a port to a hunt group:
1. Start Cajun P550/P880 Manager. For information about
starting the Cajun P550/P880 Manager, refer to "Starting the
Cajun P550/P880 Manager" earlier in this chapter.
2. Right-click on the port to be added to the hunt group.
3. Select Switching Configuration from the pull-down menu.
The Switch Port Configuration dialog box opens in the
System Information pane (Figure 2-5).
Figure 2-5. Switch Port Configuration Dialog Box
4. Select the appropriate Hunt Group from the Hunt Group pulldown menu.
* Note: You may have to scroll down to the Hunt Group
field.
5. Click APPLY to save your changes, or CANCEL to restore
previous settings.
Cajun P550/P880 Manager User Guide
2-17
Chapter 2
Deleting a Hunt Group
To delete a hunt group:
1. Start Cajun P550/P880 Manager. For information about
starting the cajun P550/P880 Manager, refer to "Starting the
Cajun P550/P880 Manager" earlier in this chapter.
2. Select Tools > Link Aggregation.
Or
From the tool bar, click Link Aggregation.
The Hunt Group Configuration dialog box opens in the
System Information and Virtual LAN pane (Figure 2-4).
3. From the Name field, select a hunt group you want to
delete.
4. Click DELETE to delete the hunt group.
CAUTION
You do not receive a confirmation message. To recreate a
hunt group, refer to "Creating a Hunt Group", earlier in this
chapter.
Redistributing Hunt Group Learned Addresses
Redistribute the hunt group learned addresses if you notice that a
particular link has learned too many of the busiest ports.
Redistributing learned addresses causes Media Access Control
(MAC) addresses to be redistributed among the hunt group ports.
1. Start Cajun P550/P880 Manager. For information about
starting the Cajun P550/P880 Manager, refer to "Starting the
Cajun P550/P880 Manager" earlier in this chapter.
2. Select Tools > Link Aggregation.
Or
From the tool bar, click Link Aggregation.
The Hunt Group Configuration dialog box opens in the
System Information and Virtual LAN pane (Figure 2-4).
3. From the Name field, select a hunt group you want to
redistribute.
2-18
Cajun P550/P880 Manager User Guide
Configuring the Cajun Switch Using the P550/P880 Manager
4. Click REDISTRIBUTE to redistribute the hunt group
learned addresses.
Overview of the Switch Representation
The switch representation, displayed in the Full View field of the
Cajun P550/P880 - Avaya Device Manager window, provides an
interactive, visual representation of a Cajun P880, P550, or P220
switch. Ports are depicted in four possible states:
■
Yellow – The port is enabled, but not plugged in.
■
Blue (outline) – The port is selected.
■
Green – The port is connected and enabled with a link.
■
Gray (colorless) – The port is connected to the selected
VLAN, but is currently disabled, or the port is not connected
to the selected VLAN.
The switch representation displays in a small scale in the Full View
area of the Cajun P550/P880 - Avaya Device Manager window. You
can display a larger view of the switch representation by dragging
the panel dividers that make up the left and right sides and the
bottom of the Full View area. Enlarging the Cajun P550/P880 Avaya Device Manager window does not increase the size of the
switch representation.
When you have increased the size of the Full View area to enlarge
the switch representation, you can click a port to cause the state of
the port to display on the tool bar. Once you select a port in the
representation, you can configure the port using commands
provided in the menus or the tool bar. If switch port settings are
changed on the switch or by another means while the
Cajun P550/P880 Manager window is open, refresh the page to
display the changes.
Cajun P550/P880 Manager User Guide
2-19
Chapter 2
You can complete the following tasks using the switch
representation:
■
Viewing Module Details
■
Setting the Physical Port Configuration
■
Setting the Switching Configuration
■
Viewing Power System Statistics
■
Viewing Fan Status
■
Resetting Temperature Status
Viewing Module Details
Through the switch representation, you can view the module details
of a module belonging to a read-only switch and add notes to the
module details of a module if the switch was added with a readwrite community. To view and set module details:
1. Start Cajun P550/P880 Manager. For information about
starting the Cajun P550/P880 Manager, refer to "Starting the
Cajun P550/P880 Manager" earlier in this chapter.
2. Right-click a module in the switch representation or device
tree.
3. From the pull-down menu of the module, select Module
Properties. The Module Details dialog box of the switch
opens (Figure 2-6).
4. In the Notes field, enter a brief description of the module.
* Note: You may have to scroll to see the Notes field.
5. Click APPLY to save changes or CANCEL to close the dialog
box and restore previous settings.
2-20
Cajun P550/P880 Manager User Guide
Configuring the Cajun Switch Using the P550/P880 Manager
Figure 2-6. Module Details Dialog Box
Setting the Physical Port Configuration
You can view and set the physical port configuration of a selected
port. The attributes available to set vary depending on the type of
port you select. For example, the attributes available to set for a
gigabit port differ from the attributes available to set for a 10/100
Mbps port.
Configuring
Physical Port
Parameters on
Gigabit
Ethernet Ports
To configure gigabit ports for a module from the Detailed Physical
Port Configuration dialog box:
1. Start Cajun P550/P880 Manager. For information about
starting the Cajun P550/P880 Manager, refer to "Starting the
Cajun P550/P880 Manager" earlier in this chapter.
2. In the Full View field, double-click a port in the switch
representation.
Or
Right-click a port in the switch representation, and select
Port Configuration from the pull-down menu.
The Detailed Physical Port Configuration dialog box of the
Cajun Switch Web Agent opens (Figure 2-7).
Cajun P550/P880 Manager User Guide
2-21
Chapter 2
* Notes:
•
Refer to Table 2-3 for more information on the Gigabit
port parameters.
•
If necessary, use the panel divider to resize the system
information panel.
Figure 2-7. Detailed Physical Port Configuration Dialog Box
Table 2-3. Gigabit Port Parameters
Parameter
Definition
Name
A user-assigned name for this port (possibly a drop
name or the name of the station or other device
connected to the port).
Category
Allows you to select either User Port or Service Port.
The User Port is intended for use with switch
connections to end user nodes. The Service Port is
intended for use with switch connections to servers or
other switches.
The primary difference between the User and Service
Port designation is that a Service Port allows the switch
to generate both log messages and alarm messages
(traps). The User Port only generates log messages. This
prevents your network management station from
being overwhelmed by port up/down messages that
result from users turning workstations on and off.
2-22
Cajun P550/P880 Manager User Guide
Configuring the Cajun Switch Using the P550/P880 Manager
Table 2-3. Gigabit Port Parameters
Parameter
Definition
Flow
Control
Mode
Determines if IEEE 802.3z pause control is used on this
port. The pause mechanism allows the port to stop a
sending station from sending more packets if the
receiving port’s buffers are full. This helps prevent lost
or dropped packets.
This feature is recommended for use primarily on end
station connections. Using this feature on trunk ports
can cause unnecessary congestion on the network.
Remote
Fault
Detect
Proprietary mechanism to detect remote link errors on
Cajun gigabit ports. The default value is Disabled.
The remote fault detection functionality should be
enabled (on both ends of a Cajun to Cajun link) in two
cases:
• When two Cajun gigabit ports are connected that
do not support auto-negotiation.
• When a Cajun gigabit port that does not support
auto-negotiation is connected to a Cajun gigabit
port that does support auto-negotiation.
PACE
Priority
Mode
PACE™ Priority Mode determines if the port
detects 3Com’s proprietary PACE format as
packets pass through the port. PACE enables a
packet’s priority to be set at the adapter. Higher
priority packets move through the switch before
lower packets. PACE Priority Mode is enabled by
default. To disable PACE Priority Mode, select
Disable from the PACE Priority Mode pull-down
menu.
3. In the Name field, enter a port name.
4. To configure an end-station port, a port located at the
periphery of your network, from the Category pull-down
menu, select User Port.
Or
To configure a trunk port, select Service Port.
Cajun P550/P880 Manager User Guide
2-23
Chapter 2
5. From the Flow Control Mode pull-down menu, select Enable
to use flow control to prevent buffer overflows.
* Note: Disable this feature only when flow control is
causing congestion in other areas of the
network.
6. From the PACE Priority Mode pull-down menu, select
Enable to use PACE Priority Mode to detect 3Com’s
proprietary PACE format.
7. From the Remote Fault Detect pull-down menu, select
Enable to detect remote link errors.
* Notes:
•
The remote fault detection functionality should be
enabled (on both ends of a Cajun to Cajun link) in
two cases. The first case is when two Cajun gigabit
ports are connected that do not support
auto-negotiation. The second case is when a Cajun
gigabit port that does not support auto-negotiation is
connected to a Cajun gigabit port that supports autonegotiation. If two gigabit ports that support autonegotiation are connected, you should enable autonegotiation.
•
Auto-negotiation and remote fault detection cannot
be enabled concurrently. Auto-negotiation must be
disabled to enable remote fault detection. When autonegotiation is enabled, remote fault detection is
automatically disabled.
•
For GMAC1 gigabit modules, auto-negotiation is
always disabled.
8. Click APPLY to save your changes, or CANCEL to restore
previous settings.
2-24
Cajun P550/P880 Manager User Guide
Configuring the Cajun Switch Using the P550/P880 Manager
Configuring
Physical Port
Parameters on
Fast Ethernet
Ports
To configure ports for a Fast Ethernet module in the Detailed
Physical Port Configuration dialog box:
1. Start Cajun P550/P880 Manager. For information about
starting the Cajun P550/P880 Manager, refer to "Starting the
Cajun P550/P880 Manager" earlier in this chapter.
2. Double-click a Fast Ethernet port in the switch
representation.
Or
Right-click a Fast Ethernet port in the switch representation,
and select Port Configuration from the pull-down menu.
The Detailed Physical Port Configuration dialog box of the
Cajun Switch Web Agent opens (Figure 2-7).
* Notes:
•
Refer to Table 2-4 for more information on the Fast
Ethernet (10/100) parameters.
•
If necessary, use the panel divider to resize the system
information panel.
Table 2-4. Fast Ethernet (10/100) Port Parameters
Parameter
Definition
Name
A user-assigned name for this port (possibly a drop
name or the name of the station or other device
connected to the port).
Category
Allows you to select either User Port or Service
Port:
• The User Port is intended for use with switch
connections to end user nodes.
• The Service Port is intended for use with
switch connections to servers or other
switches. The Service Port allows the switch
to generate both log messages and alarm
messages (traps). The User Port only
generates log messages, preventing your
network management station from being
overwhelmed by port up/down messages that
result from users turning workstations on and
off.
Cajun P550/P880 Manager User Guide
2-25
Chapter 2
Table 2-4. Fast Ethernet (10/100) Port Parameters
Parameter
Definition
Speed Mode
Allows you to select the speed of the port manually
(to either 10 or 100 Mbps).
Note: If auto-negotiation is enabled, this setting
is ignored.
Duplex Mode
Allows you set the port duplex mode (half- or fullduplex).
Note: If auto-negotiation is enabled, this setting
is ignored.
Flow Control
Mode
Determines whether flow control is used on this
port. For half-duplex links, active backpressure
jams the sending Ethernet channel until the port’s
buffers can receive more packets. This prevents lost
or dropped packets.
For full-duplex links, IEEE 802.3z pause control
allows the port to stop a sending station from
sending more packets if the receiving port’s buffers
are full.
For TX and FX ports, there is an additional option
for Enable with Aggressive Backoff. This option
limits the size of the bursts.
Flow Control is recommended for use primarily on
end-station connections. Using flow control on
trunk ports can cause unnecessary congestion on
the network.
2-26
Auto
Negotiation
Mode
Allows you to set the port to auto-negotiate a speed
and duplex mode. Auto-negotiation works best
when the connection on the other end of the link is
set to auto-negotiate as well. If you set a port to
auto-negotiate, and the connection is not
successful, set the port speed and duplex mode
manually.
Auto
Negotiation
Speed/Duplex
Advertisement
Determines what information the port advertises
when it starts auto-negotiating. In most cases,
10/100 and Half/Full are the best settings, but
there may be cases when you want to autonegotiate one parameter, while keeping the other
fixed.
Cajun P550/P880 Manager User Guide
Configuring the Cajun Switch Using the P550/P880 Manager
Table 2-4. Fast Ethernet (10/100) Port Parameters
Parameter
Definition
Rate Limit
Mode
Prevents the switch from overwhelming the output
buffer on lower-speed ports by placing a threshold
on the percentage of port traffic that can be flooded
packets (unknown unicasts and multicasts). You
can optionally include known multicast packets in
this percentage to further decrease the possibility of
the port’s output buffer being overwhelmed.
Rate Limit Rate
Determines the percentage of a port’s forwarded
traffic that can be unknown unicast and multicast
(flooded). Lower this value if the port has overflow
problems.
Rate Limit
Burst Size
Determines the limit of packets allowed in a single
burst. Accepted values are 1 to 2048. For Fast
Ethernet ports, set this value lower than 1024
(output buffer capacity). Lower this value if the
port has overflow problems.
PACE Priority
Mode
PACE Priority Mode determines if the port
detects 3Com’s proprietary PACE format as
packets pass through the port. PACE enables a
packet’s priority to be set at the adapter.
Higher priority packets move through the
switch before lower packets. PACE Priority
Mode is enabled by default. To disable PACE
Priority Mode, select Disable from the PACE
Priority Mode pull-down menu.
3. In the Name field, enter a port name.
4. If this is an end-station port, from the Category pull-down
menu, select User Port. For trunk ports, select Service Port.
5. From the Speed Mode pull-down menu, select a speed (10
Mbps or 100 Mbps) if you want to set the port speed
manually. If you set the port to auto-negotiate, this setting is
ignored.
* Note: This feature is only available for 10/100 TX
ports.
6. From the Duplex Mode pull-down menu, select a mode
(Half-duplex or Full-duplex) if you want to set the port’s
duplex mode manually. If you set the port to auto-negotiate,
this setting is ignored.
Cajun P550/P880 Manager User Guide
2-27
Chapter 2
7. From the Flow Control Mode pull-down menu, select Enable
if you want the port to use Flow Control to prevent buffer
overflows.
* Note: Disable this feature only when flow control is
causing congestion in other areas of the
network.
8. From the Auto Negotiation Mode pull-down menu, select
Enable.
* Note: This feature is only available for 10/100 TX
ports. It works best when the port or device on
the other end of the connection auto-negotiates
as well. If you are having problems autonegotiating connections, set the modes
manually from the command line interface. For
example: set port auto 7/3 enable.
9. From the Auto Negotiation Speed Advertisement and Auto
Negotiation Duplex Advertisement pull-down menus, set
Speed and Duplex Advertisement, respectively. The
switch sends these values to the device on the other end of
the connection at the start of the auto-negotiating process. In
general, the defaults are best, but there may be situations
when you want to fix one setting, but allow the other setting
to auto-negotiate.
* Note: This feature is only available for 10/100 TX
ports.
10. From the Rate Limit Mode pull-down menu, select Enable
if you want this port to limit the number of unknown unicast
and multicast (flooded) packets it tries to forward.
11. From the Rate Limit Rate pull-down menu, select the
percentage of a port’s traffic that can be unknown unicast
and broadcast packets. Lower this value if the port is having
overflow problems.
12. From the Rate Limit Burst Size pull-down menu, select a
packet limit for the number of packets allowed in a single
burst. Valid values are 1 to 2048. For Fast Ethernet ports, set
this value lower than 1024 (the output buffer’s capacity). Set
this value lower if the port is experiencing overflow
problems.
2-28
Cajun P550/P880 Manager User Guide
Configuring the Cajun Switch Using the P550/P880 Manager
13. From the Pace Priority Mode pull-down menu, select
Enable to use PACE Priority Mode to detect 3Com’s
proprietary PACE format.
14. Click APPLY to save your changes, or CANCEL to restore
previous settings.
Setting the Switching Configuration
You can view and set the switching configuration, including port
VLAN parameters and non-VLAN switch port parameters, for a
selected port.
* Note: If you change switch port settings from the Cajun switch
Web Agent or other means while Cajun P550/P880
Manager is running, to view changes in
Cajun P550/P880 Manager, refresh the page.
Configuring
Port VLAN
Parameters
Port VLAN parameters determine how a particular port’s traffic is
flooded to VLANs when tagged and untagged packets are received
on the port. For more detailed information and examples of setting
port VLAN parameters, refer to the Cajun P550/P220 Switch Operations
Guide. To configure port VLAN parameters in the Switch Port
Configuration dialog box:
1. Start Cajun P550/P880 Manager. For information about
starting the Cajun P550/P880 Manager, refer to "Starting the
Cajun P550/P880 Manager" earlier in this chapter.
2. Right-click a port in the switch representation in the Full
View field.
3. From the Port pull-down menu, select Switching
Configuration. The Switch Port Configuration dialog box of
the Cajun switch Web Agent opens (Figure 2-5).
* Note: If necessary, use the panel divider to resize the
system information panel.
4. From the Port VLAN pull-down menu in the Switch Port
Configuration for Port dialog box, select a VLAN as the
VLAN assignment for the port. All untagged frames arriving
on this port are assigned to the specified VLAN. The port still
assigns incoming tagged packets to the VLAN indicated by the
tag.
Cajun P550/P880 Manager User Guide
2-29
Chapter 2
5. From the Trunk Mode pull-down menu, select the option
(excluding Clear) to indicate that the port is a trunk and to
select the appropriate VLAN trunking format if the port is
connected to another switch. Table 2-5 describes the VLAN
Trunk Mode options:
Table 2-5. VLAN Trunking Mode Options
VLAN Mode
Applies the following format to packets
entering this port:
Clear
No VLAN tag. This is the default setting.
IEEE-802.1Q
The IEEE 802.1Q Ethernet VLAN tagging scheme.
3Com
The proprietary 3Com tagging scheme.
Multi-layer
A Cisco VLAN tagging scheme.
6. From the Frame Tags pull-down menu, select whether you
want to Ignore or Use received Frame VLAN tags. If you
ignore VLAN tags on incoming frames, the frames are bound
to the port’s default VLAN.
7. From the VLAN Binding pull-down menu, select a VLAN
Binding Type for this port. Table 2-6 describes the VLAN
Binding Options.
2-30
Cajun P550/P880 Manager User Guide
Configuring the Cajun Switch Using the P550/P880 Manager
Table 2-6. VLAN Binding Options
Option
Definition
Static
Assigns VLAN membership manually.
Bind to All
Binds this port to all VLANs known to the
switch. This is an appropriate mode for switchto-switch connections.
Note: When a tagged IEEE 802.1Q packet
arrives on a port that is set to bind to all
and the VLAN does not exist on the
switch, the packet is forwarded on to the
VLAN assigned to the port default VLAN
for that port. To prevent unintended
forwarding of unknown VLAN traffic to
the port’s default VLAN, configure the
port default VLAN to Discard. The
automatic VLAN creation feature does
not work if the port’s default VLAN is
the discard VLAN, because the switch
does not learn for this VLAN.
Bind to Received
Binds this port to any VLAN it receives traffic
from.
Note: If Automatic VLAN Creation is enabled,
the port binds to previously unknown
VLANs, and a VLAN entry is added to
the switch VLAN table. If Automatic
VLAN Creation is disabled, the port does
not bind to any VLAN unknown to the
switch.
8. From the Automatic VLAN Creation pull-down menu, select
Enable to automatically create a VLAN each time the port
receives a frame from an unknown VLAN.
9. From the VTP Snooping pull-down menu, select Enable or
Disable. When enabled, the switch port participates in the
Cisco VTP protocol and allows VTP Snooping to run a a
reduced number of trunk port. The default value is Enable.
10. From the Allow Learning pull-down menu, select Disable
to stop the port’s learning of new addresses. This feature can
be useful for security. Selecting Enable allows the port to
learn new addresses.
Cajun P550/P880 Manager User Guide
2-31
Chapter 2
11. From the Hunt Group pull-down menu, select a hunt
group for which this port will be a member. Refer to the
Cajun P550/P220 Switch Operations Guide for more information
on hunt groups.
12. From the Spanning Tree pull-down menu, select to Enable
or Disable spanning tree protocol on this port.
13. From the Fast Start pull-down menu, select to Enable or
Disable. When enabled, Fast Start mode ports begin
forwarding traffic without waiting for the spanning tree
negotiation to complete. Fast start eliminates the waiting
time of listen and learn states. Ports immediately enter the
forward state.
14. From the Known Mode pull-down menu, select to Enable
or Disable. Selecting Enable suppresses the packets with
unknown unicast destination addresses flooded to the port.
For example, if a known end-station or file server is
connected to the port, there’s no need to flood unknown
unicasts to the port. You must manually enter a static MAC
address for the station actually attached to the port.
15. From the 3Com Mapping Table pull-down menu, select the
3Com Mapping Table to specify how many incoming
tagged frames from 3Com equipment are mapped to Avaya
VLANs. The default is 3ComDefault.
16. From the Mirror Port pull-down menu, select Enable to
display the Mirror Port.
* Note: This is a Fast Ethernet only option.
17. Click APPLY to save your changes, or CANCEL to restore
previous settings.
Configuring
Non-VLAN
Switch Port
Parameters
To configure non-VLAN switch port parameters:
1. Start Cajun P550/P880 Manager. For information about
starting the Cajun P550/P880 Manager, refer to "Starting the
Cajun P550/P880 Manager" in this chapter.
2. Right-click a port in the switch representation in the Full
View field.
3. From the Port pull-down menu, select Switching
Configuration. The Switch Port Configuration dialog box of
the Cajun Switch Web Agent opens (Figure 2-5).
2-32
Cajun P550/P880 Manager User Guide
Configuring the Cajun Switch Using the P550/P880 Manager
4. From the Allow Learning pull-down menu, select Disable to
stop the port’s learning of new addresses. This feature can be
useful for security. Selecting Enable allows the port to learn
new addresses.
5. From the Hunt Group pull-down menu, select a hunt group
for which this port will be a member. Refer to the
Cajun P550/P220 Switch Operations Guide for more information
on hunt groups.
6. From the Spanning Tree pull-down menu, select to Enable or
Disable spanning tree protocol on this port.
7. From the Fast Start pull-down menu, select to Enable or
Disable. When enabled, Fast Start mode ports begin
forwarding traffic without waiting for the spanning tree
negotiation to complete. Fast start eliminates the waiting
time of listen and learn states. Ports immediately enter the
forward state.
8. From the Known Mode pull-down menu, select to Enable or
Disable. Selecting Enable suppresses the packets with
unknown unicast destination addresses flooded to the port.
For example, if a known end-station or file server is
connected to the port, there’s no need to flood unknown
unicasts to the port. You must manually enter a static MAC
address for the station actually attached to the port.
9. Click APPLY to save your changes, or CANCEL to restore
previous settings.
Viewing Power System Statistics
You can view power system statistics for the switch. To display the
power system statistics:
1. Start Cajun P550/P880 Manager. For information about
starting the Cajun P550/P880 Manager, refer to "Starting the
Cajun P550/P880 Manager" earlier in this chapter.
2. In a Cajun P550 or Cajun P880 switch representation, rightclick the power supply of the switch and select
Power Properties.
Or
In a Cajun P220 switch representation, right-click in the
blank area of the chassis and select Power Properties.
Cajun P550/P880 Manager User Guide
2-33
Chapter 2
The Power System dialog box of the Cajun Switch Web Agent
opens (Figure 2-8).
* Note: If necessary, use the panel divider to resize the
system information panel.
Figure 2-8. Power System Dialog Box
3. Use Table 2-7 to review your power system statistics:
Table 2-7. Power System Statistical Parameters
2-34
Parameter
Definition
Power Supply
Identifies the power supply.
Status
Identifies whether or not the power
supply is detected.
Type
Describes the type of power supply
detected.
Total System Power
Displays the total system power in Watts.
Current Power
Available
Displays the current power available.
Cajun P550/P880 Manager User Guide
Configuring the Cajun Switch Using the P550/P880 Manager
Viewing Fan Status
You can view the fan status of the switch. To display the fan status:
1. Start Cajun P550/P880 Manager. For information about
starting the Cajun P550/P880 Manager, refer to "Starting the
Cajun P550/P880 Manager" earlier in this chapter.
2. In a Cajun P880 switch representation, right-click on the
blank area of the chassis to the left of modules three to
eight.
Or
In a Cajun P550 switch representation, right-click on the
panel with the handle to the left of the module.
Or
In a Cajun P220 switch representation, right-click in the
blank area of the chassis.
3. From the pull-down menu, select Fan Status. The Cooling
System dialog box of the Cajun Switch Web Agent opens
(Figure 2-9).
* Note: If necessary, use the panel divider to resize the
system information panel.
Figure 2-9. Cooling System Dialog Box
4. Ensure that all the individual components are operational by
checking the Status column for each component.
Cajun P550/P880 Manager User Guide
2-35
Chapter 2
* Note: If a component’s status is non-operational, power down
the switch and contact your service representative to
diagnose the failing unit.
Resetting Temperature Status
You can view and reset the temperature status of the switch. To
display the temperature status:
1. Start Cajun P550/P880 Manager. For information about
starting the Cajun P550/P880 Manager, refer to "Starting the
Cajun P550/P880 Manager" earlier in this chapter.
2. In a Cajun P880 switch representation, right-click on the
blank area of the chassis to the left of modules three to
eight.
Or
In a Cajun P550 switch representation, right-click on the
panel with the handle to the left of the module.
Or
In a Cajun P220 switch representation, right-click in the
blank area of the chassis.
3. Select Temperature Status from the pull-down menu. The
Temperature System dialog box of the Cajun Switch Web
Agent opens (Figure 2-10).
* Note: If necessary, use the panel divider to resize the
system information panel.
4. Use Table 2-8 to set the threshold values.
5. Click APPLY to save temperature values.
2-36
Cajun P550/P880 Manager User Guide
Configuring the Cajun Switch Using the P550/P880 Manager
Figure 2-10. Temperature System Dialog Box
Table 2-8. Temperature Threshold Parameters
Threshold
Defines...
High Shutdown
Temperature
(Layer 2)/High
Warning
Temperature
(Layer 3)
The value in degrees Celsius that when passed
causes the switch to send a trap to the network
management station and triggers a shutdown.
By default, this value is 50 degrees Celsius. For
the Layer 3 CPU sensor, the default value is 100
degrees Celsius.
Upper Warning
Temperature
The value in degrees Celsius that when passed
causes the switch to send a warning that the
temperature is approaching the high
temperature threshold. By default, this value is
45 degrees Celsius. For the Layer 3 CPU sensor,
the default value is 85 degrees Celsius.
Lower Warning
Temperature
The value in degrees Celsius that when passed
causes the switch to send a warning that the
temperature is approaching the low
temperature threshold. By default, this value is
5 degrees Celsius.
Low Shutdown
Temperature
(Layer 2)/
Low Warning
Temperature
(Layer 3)
The value in degrees Celsius of how low the
temperature must drop on the switch to reset
the warning and high thresholds. This value
prevents the switch from sending traps
continually if the temperature is hovering
around the threshold value. By default, this
value is 0 degrees Celsius.
Cajun P550/P880 Manager User Guide
2-37
Chapter 2
Setting Port Parameters
You can use the tool bar to set the following port parameters:
■
Setting the Port Speed
■
Enabling a Port
■
Disabling a Port
■
Setting a Port to Half-Duplex
■
Setting a Port to Full-Duplex
■
Enabling Port Auto-Negotiation
■
Disabling Port Auto-Negotiation
* Note: After selecting one of these icons in the tool bar, apply
and cancel buttons appear to the right of the icons.
Setting the Port Speed
The tool bar provides three icons that represent potential port speeds
of 10, 100, or 1000 Megabits Per Second (Mbps). The available port
speed displays in a white circle. The other port speeds display in
icons that use a gray circle to show that they are untrue for the port.
You can set the port speed, for example, of a 10/100 Mbps port to 10
or 100 Mbps. The current port speed has a dark gray border around
the circle, giving the impression of a depressed button.
* Note: After selecting one of these icons in the tool bar, apply
and cancel buttons appear to the right of the icons
(Figure 2-11).
2-38
Cajun P550/P880 Manager User Guide
Configuring the Cajun Switch Using the P550/P880 Manager
Figure 2-11. Device Manger Window (with apply and cancel
buttons shown)
To set the port speed:
1. Start Cajun P550/P880 Manager. For information about
starting the Cajun P550/P880 Manager, refer to "Starting the
Cajun P550/P880 Manager" earlier in this chapter.
2. In the switch representation, select a port.
3. In the Cajun P550/P880 Device Manager tool bar, click 10 or
100.
4. Click apply to save the new port speed, or cancel to restore
previous settings (Figure 2-11).
Enabling a Port
The Enable port icon is represented as a port with a check mark.
Hold the cursor over the icon to display the icon name: Enable. To
enable a port:
1. Start Cajun P550/P880 Manager. For information about
starting the Cajun P550/P880 Manager, refer to "Starting the
Cajun P550/P880 Manager" earlier in this chapter.
2. In the switch representation, select the port to enable.
3. In the Cajun P550/P880 Device Manager tool bar, click
Enable Port.
4. Click apply to enable the port, or cancel to restore previous
settings (Figure 2-11).
Cajun P550/P880 Manager User Guide
2-39
Chapter 2
Disabling a Port
The Disable port icon is represented as a port with an X. Hold the
cursor over the icon to display the icon name: Disable. To disable a
port:
1. Start Cajun P550/P880 Manager. For information about
starting the Cajun P550/P880 Manager, refer to "Starting the
Cajun P550/P880 Manager" earlier in this chapter.
2. In the switch representation, select the port to disable.
3. In the Cajun P550/P880 Device Manager tool bar, click
Disable Port.
4. Click apply to disable the port, or cancel to restore previous
settings (Figure 2-11).
Setting a Port to Half-Duplex
The Half-Duplex icon is depicted as a white arrow, pointing to the
right, inside a blue circle. Hold the cursor over the icon to display
the icon name: Half Duplex. To set port duplexing to half-duplex:
1. Start Cajun P550/P880 Manager. For information about
starting the Cajun P550/P880 Manager, refer to "Starting the
Cajun P550/P880 Manager" earlier in this chapter.
2. In the switch representation, select the port.
3. In the Cajun P550/P880Device Manager tool bar, click Half
Duplex.
4. Click apply to set port duplexing to half-duplex, or cancel to
restore previous settings (Figure 2-11).
Setting a Port to Full-Duplex
The Full-Duplex icon is depicted as two white arrows, one pointing
to the right and one pointing to the left, inside a blue circle. Hold the
cursor over the icon to display the icon name: Full Duplex. To set
port duplexing to full-duplex:
1. Start Cajun P550/P880 Manager. For information about
starting the Cajun p550/P880 Manager, refer to "Starting the
Cajun P550/P880 Manager" earlier in this chapter.
2. In the switch representation, select the port.
2-40
Cajun P550/P880 Manager User Guide
Configuring the Cajun Switch Using the P550/P880 Manager
3. In the Cajun P550/P880 - Avaya Device Manager tool bar,
click Full Duplex.
4. Click apply to set port duplexing to full-duplex, or cancel to
restore previous settings (Figure 2-11).
Enabling Port Auto-Negotiation
The Auto Negotiate Enable icon is depicted as a handshake with a
check mark. Hold the cursor over the icon to display the icon name:
Auto Negotiate Enable. To enable auto-negotiation for a port:
1. Start Cajun P550/P880 Manager. For information about
starting the Cajun P550/P880 Manager, refer to "Starting the
Cajun P550/P880 Manager" earlier in this chapter.
2. In the switch representation, select the port.
3. In the Cajun P550/P880 - Avaya Device Manager tool bar,
click Auto Negotiate Enable.
4. Click apply to enable auto-negotiation, or cancel to restore
previous settings (Figure 2-11).
Disabling Port Auto-Negotiation
The Auto Negotiate Disable icon is depicted as a handshake with an
X. Hold the cursor over the icon to display the icon name: Auto
Negotiate Disable. To disable auto-negotiation for a port:
1. Start Cajun P550/P880 Manager. For information about
starting the Cajun P550/P880 Manager, refer to "Starting the
Cajun P550/P880 Manager" earlier in this chapter.
2. In the switch representation, select the port.
3. In the Cajun P550/P880 - Avaya Device Manager tool bar,
click Auto Negotiate Disable.
4. Click apply to disable auto-negotiation, or cancel to restore
previous settings (Figure 2-11).
Cajun P550/P880 Manager User Guide
2-41
Chapter 2
Configuring IP Routing
In Layer 3 switches, such as the Cajun P550 and P880 switches,
capabilities that once were provided by additional hardware, such as
bridges, switches, and hubs, are now provided as virtual
configurations inside the router. You can emulate bridging
capabilities inside the chassis of Layer 3 switches through Virtual
Local Area Networks (VLANs). The ability to emulate bridging
hardware through a virtual means is referred to as IP Routing.
In the Cajun P550/P880 Manager, you can configure IP routing for
Layer 3 switches in Routing Manager.
To view the Routing Manager, select the Routing Manager tab from
the P550/P880 - Avaya Device Manager window. The Routing
Manager window opens (Figure 2-12).
* Note: The left pane of the Routing Manager window is blank
until you expand the tree in the left panel and make a
selection.
Figure 2-12. Routing Manager
Routing Manager provides IP configuration and display dialog boxes
from the Cajun Switch Web Agent. The left side of the Routing
Manager tab contains the IP routing features list from the Cajun
Switch Web Agent. When you expand a folder and select a page in
the left side of the Routing Manager tab, the Cajun Switch Web
2-42
Cajun P550/P880 Manager User Guide
Configuring the Cajun Switch Using the P550/P880 Manager
Agent page is retrieved from the switch and displayed in the right
side of the Routing Manager tab. In the status bar of the Routing
Manager Tab, the icon depicting a connection between a computer
and a switch indicates when the Cajun Switch Web Agent dialog
box has finished loading. When a Cajun Switch Web Agent page
loads, the status bar displays the message: Communication
Succeeded.
For more information about IP routing protocols refer to the
appropriate chapter in the Cajun P550/P220 Switch Operations Guide.
Cajun P550/P880 Manager User Guide
2-43
Chapter 2
Using SMON
For more information about using SMON, refer to the appropriate
documentation:
2-44
■
Cajun P120 Device SMON User Guide
■
Cajun P330 Device SMON User Guide
■
Cajun P550/P880 Device SMON User Guide
Cajun P550/P880 Manager User Guide
Index
Numerics
10/100/1000
tool bar icon 2-9
3Com
VLAN trunking mode 2-30
3ComMapping Table 2-32
A
About
Help menu 2-8
active alarms
viewing 2-11
active backpressure 2-26
Allow Learning
configuring 2-31, 2-33
Auto Negotiation Mode
Fast Ethernet port parameters 2-26
Auto Negotiation Speed/Duplex Advertisement
Fast Ethernet port parameters 2-26
Automatic VLAN Creation
configuring 2-31
Auto-Negotiation Disable
tool bar icon 2-10
Auto-Negotiation Enable
tool bar icon 2-10
B
Bind to All
VLAN binding options 2-31
Bind to Received
VLAN binding options 2-31
C
Cajun P550/P880 Device Manager
overview 1-1
starting from HP OpenView NNM 2-4
tool bar icons 2-9
Cajun P550/P880 Device Manager Window
detail view 2-7
full view 2-7
menu bar 2-6
Cajun P550/P880 Manager User Guide
parts of 2-6
status 2-7
switch list 2-6
system information/Virtual LAN area 2-7
tool bar 2-6
VLAN pull-down menu 2-7
Cajun P550/P880 Manager Window 2-19
Routing tab 2-42
tool bar 2-8
Cajun P550/P880 Manager window 2-5
Cajun P550/P880 Manager Window screen
Device Manager Tab 2-5
Cajun switch Web Agent 2-9, 2-11
Category
Fast Ethernet port parameters 2-25
gigabit port parameters 2-22
Clear
VLAN trunking mode 2-30
colors
switch ports 2-7
configuring 2-32
3Com Mapping Table 2-32
Allow Learning 2-31, 2-33
Automatic VLAN Creation 2-31
Fast Ethernet ports 2-25
Fast Start 2-32, 2-33
Frame Tag 2-30
gigabit module ports 2-21
High Shutdown Temperature 2-37
High Warning Temperature 2-37
Hunt Group 2-32, 2-33
IP routing 2-42
Known Mode 2-33
known mode 2-32
Low Shutdown Temperature 2-37
Low Warning Temperature 2-37
Lower Warning Temperature 2-37
Mirror Port 2-32
non-VLAN switch ports 2-32
physical port parameters, gigabit ports 222
Port VLAN 2-29
port VLAN parameters 2-29
1
service port 2-23
Spanning Tree 2-32, 2-33
Trunk Mode 2-30
Upper Warning Temperature 2-37
user port 2-23
VLAN Binding 2-30
VTP Snooping 2-31
Content
Help menu 2-8
Cooling System dialog box 2-35
creating
hunt group (link aggregation group) 2-15
Current Power Available
power system statistical parameters 2-34
D
deleting
hunt group (link aggregation group) 2-18
Detailed Physical Port Configuration dialog
box 2-22
Device Information
tool bar icon 2-9
Tools menu 2-8
device information
modifying 2-12
viewing 2-11
Device Manager tab
menu bar 2-8
Device Manager Window
with apply and cancel buttons shown 2-39
Device Web Site
tool bar icon 2-9
Tools menu 2-8
disabling
port auto-negotiation 2-41
ports 2-40
Duplex Mode
Fast Ethernet port parameters 2-26
E
enabling
port auto-negotiation 2-41
ports 2-39
Exit
File menu 2-8
F
fan status
viewing 2-35
Fast Ethernet port parameters 2-25
Auto Negotiation Mode 2-26
Auto Negotiation Speed/Duplex Advertisement 2-26
Category 2-25
Duplex Mode 2-26
Flow Control Mode 2-26
Name 2-25
Pace Priority Mode 2-27
Rate Limit Burst Size 2-27
Rate Limit Mode 2-27
Rate Limit Rate 2-27
service port 2-25
Speed Mode 2-26
user port 2-25
Fast Ethernet ports
configuring 2-25
Fast Start
configuring 2-32, 2-33
File menu 2-6, 2-8
Exit 2-8
Save Running Configuration 2-8
Flow Control Mode
Fast Ethernet port parameters 2-26
gigabit port parameters 2-23
Frame Tag
configuring 2-30
Full Duplex
tool bar icon 2-10
full-duplex
setting port 2-40
G
gigabit module
configuring ports 2-21
configuring service port 2-23
configuring user port 2-23
gigabit port parameters
Category 2-22
Flow Control Mode 2-23
Name 2-22
remote fault detect 2-23
gigabit ports
physical port parameters 2-22
GMAC1
auto-negotiation 2-24
H
Half Duplex
2
Cajun P550/P880 Manager User Guide
tool bar icon 2-10
half-duplex
setting port 2-40
help
online 2-8
Help menu 2-6, 2-8
About 2-8
Content 2-8
High Shutdown Temperature
configuring 2-37
High Warning Temperature
configuring 2-37
Hunt Group
configuring 2-32, 2-33
hunt group 2-14
consideration 2-14
creating 2-15
deleting 2-18
redistribuing learned addresses 2-18
viewing 2-16
Hunt Group Configuration screen 2-16
I
icons
10/100/1000 2-9
Auto-Negotiation Disable 2-10
Auto-Negotiation Enable 2-10
Device Information 2-9
Device Web Site 2-9
Full Duplex 2-10
Half Duplex 2-10
Link Aggregation 2-9
Port Disable 2-9
Port Enable 2-9
Virtual LANs 2-9
IEEE-802.1Q
VLAN trunking mode 2-30
IP routing
configuring 2-42
K
Known Mode
configuring 2-32, 2-33
L
LAG 2-14
LAN binding options
Bind to All 2-31
Link Aggregation 2-8
tool bar icon 2-9
link aggregation
redistributing learned addresses 2-18
link aggregation group 2-14
considerations 2-14
creating 2-15
deleting 2-18
viewing 2-16
Low Shutdown Temperature
configuring 2-37
Low Warning Temperature
configuring 2-37
Lower Warning Temperature
configuring 2-37
M
MAC addresses 2-18
menus
Device Manager tab 2-8
File 2-6, 2-8
Help 2-6, 2-8
Tool 2-8
Tools 2-6
View 2-6, 2-8
Mirror Port
configuring 2-32
modifying device information 2-12
Module Details dialog box 2-21
Multi-layer (Cisco)
VLAN trunking mode 2-30
N
Name
Fast Ethernet port parameters 2-25
gigabit port parameters 2-22
non-VLAN switch port
configuring 2-32
non-VLAN switch port parameters
Allow Learning 2-33
Fast Start 2-33
Hunt Group 2-33
Known Mode 2-33
Spanning Tree 2-33
O
online help 2-8
P
PACE Priority Mode
3
Cajun P550/P880 Manager User Guide
Fast Ethernet port parameters 2-27
physical port parameters
gigabit ports 2-22
port
assigning to a VLAN 2-13
port assignments
viewing 2-14
port auto-negotiation
disabling 2-41
enabling 2-41
port colors
switch representation 2-19
Port Disable
tool bar icon 2-9
Port Enable
tool bar icon 2-9
port parameters
Fast Ethernet 2-25
setting 2-38
port speed 2-9
setting 2-39
Port VLAN
configuring 2-29
Port VLAN parameters
3Com Mapping Table 2-32
Allow Learning 2-31
Automatic VLAN Creation 2-31
Fast Start 2-32
Frame Tag 2-30
Hunt Group 2-32
Known Mode 2-32
Mirror Port 2-32
Port VLAN 2-29
Spanning Tree 2-32
Trunk Mode 2-30
VTP Snooping 2-31
port VLAN parameters
configuring 2-29
ports
disabling 2-40
enabling 2-39
Power Supply
power system statistical parameters 2-34
Power System dialog box 2-34
power system statistical parameters 2-34
Current Power Available 2-34
Power Supply 2-34
Status 2-34
Type 2-34
power system statistics
viewing 2-33
R
Rate Limit Burst Size
Fast Ethernet port parameters 2-27
Rate Limit Mode
Fast Ethernet port parameters 2-27
Rate Limit Rate
Fast Ethernet port parameters 2-27
redistributing learned addresses 2-18
remote fault detect
gigabit port parameters 2-23
Routing Manager screen 2-42
Routing tab 2-42
running configuration
saving 2-10
S
Save Running Configuration
File menu 2-8
saving the running configuration 2-10
screens
Cajun P550/P880 Manager Tool Bar Icons
2-9
Cajun P550/P880 Manager Window 2-5
Cooling System 2-35
Detailed Physical Port Configuration 2-22
Device Manager Window (with apply and
cancel buttons shown) 2-39
Hunt Group Configuration Dialog box 216
Module Details 2-21
Power System 2-34
Routing Manager 2-42
Temperature System 2-37
Virtual LAN List 2-13
service port
Fast Ethernet port parameters 2-25
setting
port parameters 2-38
port speed 2-39
port to full-duplex 2-40
port to half-duplex 2-40
SMON tab 2-44
software version 2-8
Spanning Tree
configuring 2-32, 2-33
Speed Mode
4
Cajun P550/P880 Manager User Guide
Fast Ethernet port parameters 2-26
starting Cajun P550/P880 Manager
from HP OpenView NNM 2-4
Static
VLAN binding options 2-31
Status
power system statistical parameters 2-34
switch attributes 2-11
switch icon
color 2-6
switch port colors 2-7
switch representation 2-19
port colors 2-19
view module details 2-20
switch representation (full view field) 2-19
switch system information 2-9
switch Web Agent 2-11
T
tab
Routing 2-42
SMON 2-44
temperature status
resetting 2-36
Temperature System dialog box 2-37
temperature threshold parameters 2-37
High Shutdown Temperature 2-37
High Warning Temperature 2-37
Low Shutdown Temperature 2-37
Low Warning Temperature 2-37
Lower Warning Temperature 2-37
Upper Warning Temperature 2-37
temperature thresholds 2-37
The purpose of this manual 2-vii
tool bar 2-8
10/100/1000 2-9
Auto-Negotiation Disable 2-10
Auto-Negotiation Enable 2-10
Device Information 2-9
Device Web Site 2-9
Full Duplex 2-10
Half Duplex 2-10
icons 2-9
Link Aggregation 2-9
Port Disable 2-9
Port Enable 2-9
Virtual LANs 2-9
Tools menu 2-6, 2-8
Device Information 2-8
Device Web Site 2-8
Link Aggregation 2-8
Virtual LANS 2-8
Total System Power 2-34
power system statistical parameters 2-34
Trunk Mode
configuring 2-30
Type
power system statistical parameters 2-34
U
Upper Warning Temperature
configuring 2-37
user port
Fast Ethernet port parameters 2-25
V
View menu 2-6, 2-8
view module details
switch representation 2-20
viewing
fan status 2-35
hunt group (link aggregation group) 2-16
port assignments 2-14
power system statistics 2-33
temperature status 2-36
viewing device information 2-11
viewing port status 2-19
viewing VLAN assignments 2-14
Virtual LAN List screen 2-13
Virtual LANs
tool bar icon 2-9
Tools menu 2-8
Virtual LANs list 2-9
VLAN
assigning a port 2-13
viewing assigned ports 2-14
VLAN Binding
configuring 2-30
VLAN binding options 2-31
Bind to Received 2-31
Static 2-31
VLAN trunking mode options 2-30
VLAN trunking modes
3Com 2-30
Clear 2-30
IEEE-802.1Q 2-30
Multi-layer (Cisco) 2-30
5
Cajun P550/P880 Manager User Guide
VTP Snooping
configuring 2-31
W
Web Agent 2-11
6
Cajun P550/P880 Manager User Guide