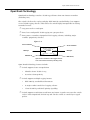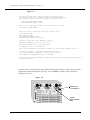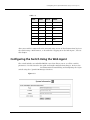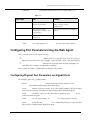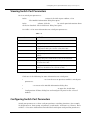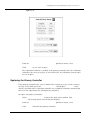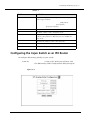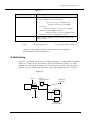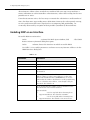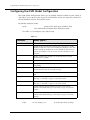
1
Cajun™ P550/P220™
Switch Operation
Guide Version 4.0
Cajun P550/P220 Switch Operation Guide - Version 4.0
© Copyright LUCENT TECHNOLOGIES 1999 ALL RIGHTS RESERVED
Produced in USA, November 1999
The products, specifications, and other technical information regarding the products contained in this document are subject to
change without notice. All information in this document is believed to be accurate and reliable, but is presented without warranty of
any kind, express or implied, and users must take full responsibility for their application of any products specified in this document.
Lucent disclaims responsibility for errors which may appear in this document, and it reserves the right, in its sole discretion and
without notice, to make substitutions and modifications in the products and practices described in this document.
Lucent, Cajun, CajunDocs, OpenTrunk, P550, P220 and CajunView are trademarks of Lucent Technologies.
Microsoft, Windows, Windows NT, Windows 95, Windows 98, and Internet Explorer are trademarks or registered trademarks of
Microsoft Corporation in the U.S. and/or other countries.
OpenView is a trademark of Hewlett Packard Company.
Netscape and Netscape Navigator are registered trademarks of Netscape Communications Corporation in the United States and
other countries.
3Com is a registered trademark and PACE is a trademark of 3Com or its subsidiaries.
Adobe is a registered trademark of Adobe Systems Incorporated.
Bay Networks and System 5000 are registered trademarks of Nortel Networks.
Cisco Catalyst 5000 is a registered trademark of Cisco Systems Incorporated.
ALL OTHER TRADEMARKS MENTIONED IN THIS DOCUMENT ARE PROPERTY OF THEIR RESPECTIVE OWNERS.
Contents
Preface
Documentation Feedback . . . . . . . . . . . . . . . . . . . . . . . . . . . . . . . . . . . . . . . . . . . . . . . . . . . . . xiv
Online Documentation . . . . . . . . . . . . . . . . . . . . . . . . . . . . . . . . . . . . . . . . . . . . . . . . . . . . . . . xiv
Installing Online Documentation and Help Files . . . . . . . . . . . . . . . . . . . . . . . . . . . . . . . . xv
Installing the Lucent HTTP Documentation Server . . . . . . . . . . . . . . . . . . . . . . . . . . . xv
Starting the Lucent HTTP Web Server . . . . . . . . . . . . . . . . . . . . . . . . . . . . . . . . . . . . . xv
Entering the Server Location at the Switch . . . . . . . . . . . . . . . . . . . . . . . . . . . . . . . . . xvi
Adding the Document Files to an Existing Server . . . . . . . . . . . . . . . . . . . . . . . . . . . . xvi
Downloading an Updated CajunDocs CD from the Internet . . . . . . . . . . . . . . . . . . . xvii
Conventions . . . . . . . . . . . . . . . . . . . . . . . . . . . . . . . . . . . . . . . . . . . . . . . . . . . . . . . . . . . . . . xvii
Using Note, Caution, and Warning . . . . . . . . . . . . . . . . . . . . . . . . . . . . . . . . . . . . . . . . . . xvii
Audience . . . . . . . . . . . . . . . . . . . . . . . . . . . . . . . . . . . . . . . . . . . . . . . . . . . . . . . . . . . . . . . . . xviii
Overview of The Contents . . . . . . . . . . . . . . . . . . . . . . . . . . . . . . . . . . . . . . . . . . . . . . . . . . . xviii
Related Documents . . . . . . . . . . . . . . . . . . . . . . . . . . . . . . . . . . . . . . . . . . . . . . . . . . . . . . . . . . xix
Lucent Documents . . . . . . . . . . . . . . . . . . . . . . . . . . . . . . . . . . . . . . . . . . . . . . . . . . . . . . . xix
Reference Documents . . . . . . . . . . . . . . . . . . . . . . . . . . . . . . . . . . . . . . . . . . . . . . . . . . . . . xix
Terminology . . . . . . . . . . . . . . . . . . . . . . . . . . . . . . . . . . . . . . . . . . . . . . . . . . . . . . . . . . . . . . . xx
Contacting Lucent Technologies . . . . . . . . . . . . . . . . . . . . . . . . . . . . . . . . . . . . . . . . . . . . . . . . xx
Chapter 1 — Cajun P550 Switch Overview
Switch Description . . . . . . . . . . . . . . . . . . . . . . . . . . . . . . . . . . . . . . . . . . . . . . . . . . . . . . . . . .1-1
Hardware Overview . . . . . . . . . . . . . . . . . . . . . . . . . . . . . . . . . . . . . . . . . . . . . . . . . . . . . . . . .1-1
Chassis . . . . . . . . . . . . . . . . . . . . . . . . . . . . . . . . . . . . . . . . . . . . . . . . . . . . . . . . . . . . . . . . .1-1
Modules . . . . . . . . . . . . . . . . . . . . . . . . . . . . . . . . . . . . . . . . . . . . . . . . . . . . . . . . . . . . . . .1-2
Layer 2 Supervisor Module . . . . . . . . . . . . . . . . . . . . . . . . . . . . . . . . . . . . . . . . . . . . . .1-2
Layer 3 Supervisor Module . . . . . . . . . . . . . . . . . . . . . . . . . . . . . . . . . . . . . . . . . . . . . .1-3
Media Modules . . . . . . . . . . . . . . . . . . . . . . . . . . . . . . . . . . . . . . . . . . . . . . . . . . . . . . .1-4
Layer 3 and Layer 2 Fast Ethernet Modules . . . . . . . . . . . . . . . . . . . . . . . . . . . . . . . . .1-4
Layer 3 and Layer 2 Gigabit-Speed Modules . . . . . . . . . . . . . . . . . . . . . . . . . . . . . . . .1-5
Cajun P550 Switch Features . . . . . . . . . . . . . . . . . . . . . . . . . . . . . . . . . . . . . . . . . . . . . . . . . . .1-5
Crossbar Switch Fabric . . . . . . . . . . . . . . . . . . . . . . . . . . . . . . . . . . . . . . . . . . . . . . . . . . . .1-6
Cajun Routing Overview . . . . . . . . . . . . . . . . . . . . . . . . . . . . . . . . . . . . . . . . . . . . . . . . . . . . .1-7
Compatibility with the Layer 2 Switch . . . . . . . . . . . . . . . . . . . . . . . . . . . . . . . . . . . . . . . .1-7
Routing with Layer 2 and Layer 3 Modules . . . . . . . . . . . . . . . . . . . . . . . . . . . . . . . . . . . .1-7
Virtual Bridging Functions . . . . . . . . . . . . . . . . . . . . . . . . . . . . . . . . . . . . . . . . . . . . . . . . .1-8
VLAN Functions . . . . . . . . . . . . . . . . . . . . . . . . . . . . . . . . . . . . . . . . . . . . . . . . . . . . . . . . .1-9
Hunt Groups . . . . . . . . . . . . . . . . . . . . . . . . . . . . . . . . . . . . . . . . . . . . . . . . . . . . . . . . . . 1-10
OpenTrunk Technology . . . . . . . . . . . . . . . . . . . . . . . . . . . . . . . . . . . . . . . . . . . . . . . . . . 1-11
Spanning Tree Models . . . . . . . . . . . . . . . . . . . . . . . . . . . . . . . . . . . . . . . . . . . . . . . . . . . 1-12
Extensive Fault Tolerance . . . . . . . . . . . . . . . . . . . . . . . . . . . . . . . . . . . . . . . . . . . . . . . . .1-13
Buffer and Queue Management . . . . . . . . . . . . . . . . . . . . . . . . . . . . . . . . . . . . . . . . . . . . 1-14
Web-Based Management . . . . . . . . . . . . . . . . . . . . . . . . . . . . . . . . . . . . . . . . . . . . . . . . . 1-14
Cajun P550/P220 Switch Operation Guide
iv
Smart Agent . . . . . . . . . . . . . . . . . . . . . . . . . . . . . . . . . . . . . . . . . . . . . . . . . . . . . . . . 1-15
Cajun P550 Switch Modules . . . . . . . . . . . . . . . . . . . . . . . . . . . . . . . . . . . . . . . . . . . . . . .1-15
Chapter 2 — Overview of the P220 Gigabit Switch Family
Overview . . . . . . . . . . . . . . . . . . . . . . . . . . . . . . . . . . . . . . . . . . . . . . . . . . . . . . . . . . . . . . . . . .2-1
Switch Features . . . . . . . . . . . . . . . . . . . . . . . . . . . . . . . . . . . . . . . . . . . . . . . . . . . . . . . . . . . . .2-2
Crossbar Switch Fabric . . . . . . . . . . . . . . . . . . . . . . . . . . . . . . . . . . . . . . . . . . . . . . . . . . . .2-2
Virtual Bridging Functions . . . . . . . . . . . . . . . . . . . . . . . . . . . . . . . . . . . . . . . . . . . . . . . . .2-4
VLAN Functions . . . . . . . . . . . . . . . . . . . . . . . . . . . . . . . . . . . . . . . . . . . . . . . . . . . . . . . . .2-4
Hunt Groups . . . . . . . . . . . . . . . . . . . . . . . . . . . . . . . . . . . . . . . . . . . . . . . . . . . . . . . . . . . .2-5
OpenTrunk Technology . . . . . . . . . . . . . . . . . . . . . . . . . . . . . . . . . . . . . . . . . . . . . . . . . . .2-5
Dual Layer Spanning Trees . . . . . . . . . . . . . . . . . . . . . . . . . . . . . . . . . . . . . . . . . . . . . . . . .2-7
Buffer and Queue Management . . . . . . . . . . . . . . . . . . . . . . . . . . . . . . . . . . . . . . . . . . . . .2-8
Web-Based Management . . . . . . . . . . . . . . . . . . . . . . . . . . . . . . . . . . . . . . . . . . . . . . . . . .2-9
Smart Agent . . . . . . . . . . . . . . . . . . . . . . . . . . . . . . . . . . . . . . . . . . . . . . . . . . . . . . . . .2-9
RMON for Traffic Analysis . . . . . . . . . . . . . . . . . . . . . . . . . . . . . . . . . . . . . . . . . . . . . .2-9
Chapter 3 — Configuring the Cajun P550 Switch (Layer 2 & Layer 3)
Terminal Settings . . . . . . . . . . . . . . . . . . . . . . . . . . . . . . . . . . . . . . . . . . . . . . . . . . . . . . . . . . .3-1
Configuring the Supervisor Module Using the CLI . . . . . . . . . . . . . . . . . . . . . . . . . . . . . . . . .3-1
Configuring the Switch Using the Web Agent . . . . . . . . . . . . . . . . . . . . . . . . . . . . . . . . . . . . .3-5
Logging In to the Web Agent . . . . . . . . . . . . . . . . . . . . . . . . . . . . . . . . . . . . . . . . . . . . . . .3-6
Setting Up User Accounts . . . . . . . . . . . . . . . . . . . . . . . . . . . . . . . . . . . . . . . . . . . . . . . . . .3-6
Configuring Port Parameters Using the Web Agent . . . . . . . . . . . . . . . . . . . . . . . . . . . . . . . . .3-7
Configuring Physical Port Parameters on Gigabit Ports . . . . . . . . . . . . . . . . . . . . . . . . . . .3-7
Configuring Physical Port Parameters on Fast Ethernet Ports . . . . . . . . . . . . . . . . . . . . . .3-9
Using the All Ports Configuration Dialog Box . . . . . . . . . . . . . . . . . . . . . . . . . . . . . . . . . 3-12
Viewing Switch Port Parameters . . . . . . . . . . . . . . . . . . . . . . . . . . . . . . . . . . . . . . . . . . . . 3-13
Configuring Switch Port Parameters . . . . . . . . . . . . . . . . . . . . . . . . . . . . . . . . . . . . . . . . . 3-13
Configuring Port VLAN Parameters . . . . . . . . . . . . . . . . . . . . . . . . . . . . . . . . . . . . . . . . . 3-16
Configuring VTP Snooping . . . . . . . . . . . . . . . . . . . . . . . . . . . . . . . . . . . . . . . . . . . . . . . . 3-18
Configuring Non-VLAN Switch Port Parameters . . . . . . . . . . . . . . . . . . . . . . . . . . . . . . . 3-19
Examples of Switch Ports Settings for Various VLAN Connection Types . . . . . . . . . . 3-20
Configuring Fast Start Mode . . . . . . . . . . . . . . . . . . . . . . . . . . . . . . . . . . . . . . . . . . . . 3-21
Using the All Ports Configuration Dialog Box . . . . . . . . . . . . . . . . . . . . . . . . . . . . . . . . . 3-22
Setting Up SNMP Communities . . . . . . . . . . . . . . . . . . . . . . . . . . . . . . . . . . . . . . . . . . . . 3-23
Changing the Console Serial Port Settings . . . . . . . . . . . . . . . . . . . . . . . . . . . . . . . . . . . . 3-24
Configuring the Serial Console Port as a TTY Console . . . . . . . . . . . . . . . . . . . . . . . . 3-25
Connecting a Modem . . . . . . . . . . . . . . . . . . . . . . . . . . . . . . . . . . . . . . . . . . . . . . . . . 3-25
Configuring the Serial Console Port as a PPP Console . . . . . . . . . . . . . . . . . . . . . . . . 3-26
Regaining Configuration Access to the PPP Serial Port Console . . . . . . . . . . . . . . . . . 3-27
Configuring Dial-Up Networking . . . . . . . . . . . . . . . . . . . . . . . . . . . . . . . . . . . . . . . . 3-28
Using Dial-Up Networking with a PPP Serial Port Console . . . . . . . . . . . . . . . . . . . . 3-29
Configuring the IP Interface for the PPP Console . . . . . . . . . . . . . . . . . . . . . . . . . . . . 3-30
Configuring a Static Route for the PPP Console . . . . . . . . . . . . . . . . . . . . . . . . . . . . .3-30
Hardware Requirements for Routing . . . . . . . . . . . . . . . . . . . . . . . . . . . . . . . . . . . . . . . . 3-31
Configuring IP Routing on the Switch . . . . . . . . . . . . . . . . . . . . . . . . . . . . . . . . . . . . . . . 3-31
Minimum IP Routing Configuration Requirements . . . . . . . . . . . . . . . . . . . . . . . . . . 3-31
v
Cajun P550/P220 Switch Operation Guide
Routing Configuration Quickstart . . . . . . . . . . . . . . . . . . . . . . . . . . . . . . . . . . . . . . . .3-31
Configuring System Information . . . . . . . . . . . . . . . . . . . . . . . . . . . . . . . . . . . . . . . . . . . . . . 3-32
Entering General System Information . . . . . . . . . . . . . . . . . . . . . . . . . . . . . . . . . . . . . . . 3-33
Enabling SNTP . . . . . . . . . . . . . . . . . . . . . . . . . . . . . . . . . . . . . . . . . . . . . . . . . . . . . . . . . 3-33
Setting Summer Time Hours . . . . . . . . . . . . . . . . . . . . . . . . . . . . . . . . . . . . . . . . . . . . . . .3-34
Setting Recurring Summer Time Hours . . . . . . . . . . . . . . . . . . . . . . . . . . . . . . . . . . . 3-34
Setting One-Time Summer Time Hours . . . . . . . . . . . . . . . . . . . . . . . . . . . . . . . . . . . 3-37
Setting the System Clock . . . . . . . . . . . . . . . . . . . . . . . . . . . . . . . . . . . . . . . . . . . . . . . . . 3-39
Setting the Temperature System . . . . . . . . . . . . . . . . . . . . . . . . . . . . . . . . . . . . . . . . . . . . 3-39
Displaying the Power System Statistics . . . . . . . . . . . . . . . . . . . . . . . . . . . . . . . . . . . . . . . 3-40
Displaying Cooling System Statistics . . . . . . . . . . . . . . . . . . . . . . . . . . . . . . . . . . . . . . . . . 3-40
Configuring Redundant Hardware . . . . . . . . . . . . . . . . . . . . . . . . . . . . . . . . . . . . . . . . . . 3-41
Installing Redundant Hardware . . . . . . . . . . . . . . . . . . . . . . . . . . . . . . . . . . . . . . . . . 3-42
Replacing the Primary Controller . . . . . . . . . . . . . . . . . . . . . . . . . . . . . . . . . . . . . . . .3-43
Replacing an Element . . . . . . . . . . . . . . . . . . . . . . . . . . . . . . . . . . . . . . . . . . . . . . . . .3-44
Performing a System Reset . . . . . . . . . . . . . . . . . . . . . . . . . . . . . . . . . . . . . . . . . . . . . . . . 3-45
Managing Configuration Files . . . . . . . . . . . . . . . . . . . . . . . . . . . . . . . . . . . . . . . . . . . . . . . . .3-45
Viewing Your Running Configuration . . . . . . . . . . . . . . . . . . . . . . . . . . . . . . . . . . . . . . . 3-46
Viewing Your Startup Configuration . . . . . . . . . . . . . . . . . . . . . . . . . . . . . . . . . . . . . . . . 3-46
Viewing Your Script Execution Log File . . . . . . . . . . . . . . . . . . . . . . . . . . . . . . . . . . . . . .3-46
Copying Configuration Files . . . . . . . . . . . . . . . . . . . . . . . . . . . . . . . . . . . . . . . . . . . . . . .3-46
Copying Running Configuration to Startup Configuration . . . . . . . . . . . . . . . . . . . . 3-47
Copying Files . . . . . . . . . . . . . . . . . . . . . . . . . . . . . . . . . . . . . . . . . . . . . . . . . . . . . . . . . . . 3-47
Viewing the Status of a TFTP Transfer . . . . . . . . . . . . . . . . . . . . . . . . . . . . . . . . . . . . 3-50
Chapter 4 — Configuring IPX Routing (Layer 3)
Overview . . . . . . . . . . . . . . . . . . . . . . . . . . . . . . . . . . . . . . . . . . . . . . . . . . . . . . . . . . . . . . . . . .4-1
IPX Overview . . . . . . . . . . . . . . . . . . . . . . . . . . . . . . . . . . . . . . . . . . . . . . . . . . . . . . . . . . . . . .4-1
IPX Datagram Structure . . . . . . . . . . . . . . . . . . . . . . . . . . . . . . . . . . . . . . . . . . . . . . . . . . .4-2
Configuring the Cajun Switch as an IPX Router . . . . . . . . . . . . . . . . . . . . . . . . . . . . . . . . . . .4-3
Configuring IPX Interfaces . . . . . . . . . . . . . . . . . . . . . . . . . . . . . . . . . . . . . . . . . . . . . . . . .4-4
Creating IPX Static Routes . . . . . . . . . . . . . . . . . . . . . . . . . . . . . . . . . . . . . . . . . . . . . . . . .4-6
Deleting IPX Static Routes . . . . . . . . . . . . . . . . . . . . . . . . . . . . . . . . . . . . . . . . . . . . . . . . .4-7
Modifying IPX Static Routes . . . . . . . . . . . . . . . . . . . . . . . . . . . . . . . . . . . . . . . . . . . . . . . .4-7
Creating IPX Static Services . . . . . . . . . . . . . . . . . . . . . . . . . . . . . . . . . . . . . . . . . . . . . . . .4-7
Deleting IPX Static Service . . . . . . . . . . . . . . . . . . . . . . . . . . . . . . . . . . . . . . . . . . . . . . . . .4-8
Modifying IPX Static Services . . . . . . . . . . . . . . . . . . . . . . . . . . . . . . . . . . . . . . . . . . . . . . .4-9
Monitoring Switch Performance Using IPX . . . . . . . . . . . . . . . . . . . . . . . . . . . . . . . . . . . .4-9
Examining IPX Global Statistics . . . . . . . . . . . . . . . . . . . . . . . . . . . . . . . . . . . . . . . . . . . . .4-9
Searching the IPX Route Table . . . . . . . . . . . . . . . . . . . . . . . . . . . . . . . . . . . . . . . . . . . . . 4-10
Examining the IPX Route Table . . . . . . . . . . . . . . . . . . . . . . . . . . . . . . . . . . . . . . . . . . . . 4-11
Examining IPX Route Table Statistics . . . . . . . . . . . . . . . . . . . . . . . . . . . . . . . . . . . . . . . .4-12
Searching the IPX Service Table . . . . . . . . . . . . . . . . . . . . . . . . . . . . . . . . . . . . . . . . . . . . 4-12
Examining the IPX Service Table . . . . . . . . . . . . . . . . . . . . . . . . . . . . . . . . . . . . . . . . . . .4-13
Examining IPX Service Table Statistics . . . . . . . . . . . . . . . . . . . . . . . . . . . . . . . . . . . . . . . 4-14
Cajun P550/P220 Switch Operation Guide
vi
Chapter 5 — Configuring IPX RIP Protocol (Layer 3)
Overview . . . . . . . . . . . . . . . . . . . . . . . . . . . . . . . . . . . . . . . . . . . . . . . . . . . . . . . . . . . . . . . . . .5-1
Configuring IPX RIP Interfaces . . . . . . . . . . . . . . . . . . . . . . . . . . . . . . . . . . . . . . . . . . . . . . . . .5-1
Creating and Modifying IPX RIP Filters . . . . . . . . . . . . . . . . . . . . . . . . . . . . . . . . . . . . . . . . . .5-2
Interpreting IPX RIP Interface Statistics . . . . . . . . . . . . . . . . . . . . . . . . . . . . . . . . . . . . . . . . . .5-5
Chapter 6 — Configuring IPX SAP Protocol (Layer 3)
Overview . . . . . . . . . . . . . . . . . . . . . . . . . . . . . . . . . . . . . . . . . . . . . . . . . . . . . . . . . . . . . . . . . .6-1
Configuring IPX SAP Interfaces . . . . . . . . . . . . . . . . . . . . . . . . . . . . . . . . . . . . . . . . . . . . . . . .6-1
Creating IPX SAP Filters . . . . . . . . . . . . . . . . . . . . . . . . . . . . . . . . . . . . . . . . . . . . . . . . . . . . . .6-2
Creating IPX SAP Name Filters . . . . . . . . . . . . . . . . . . . . . . . . . . . . . . . . . . . . . . . . . . . . . .6-2
Creating IPX SAP Network Filters . . . . . . . . . . . . . . . . . . . . . . . . . . . . . . . . . . . . . . . . . . . .6-5
Interpreting IPX SAP Interface Statistics . . . . . . . . . . . . . . . . . . . . . . . . . . . . . . . . . . . . . . . . . .6-7
Chapter 7 — Configuring IP Routing (Layer 3)
Overview . . . . . . . . . . . . . . . . . . . . . . . . . . . . . . . . . . . . . . . . . . . . . . . . . . . . . . . . . . . . . . . . . .7-1
Configuring IP Global Routing . . . . . . . . . . . . . . . . . . . . . . . . . . . . . . . . . . . . . . . . . . . . . . . . .7-1
Creating an IP Interface . . . . . . . . . . . . . . . . . . . . . . . . . . . . . . . . . . . . . . . . . . . . . . . . . . .7-2
Enabling IP Routing . . . . . . . . . . . . . . . . . . . . . . . . . . . . . . . . . . . . . . . . . . . . . . . . . . . . . .7-4
Assigning IP Interfaces to the VLAN . . . . . . . . . . . . . . . . . . . . . . . . . . . . . . . . . . . . . . . . . .7-5
IP Multinetting . . . . . . . . . . . . . . . . . . . . . . . . . . . . . . . . . . . . . . . . . . . . . . . . . . . . . . .7-7
Configuring Access Lists . . . . . . . . . . . . . . . . . . . . . . . . . . . . . . . . . . . . . . . . . . . . . . . . . . .7-8
Creating Standard Access Rules . . . . . . . . . . . . . . . . . . . . . . . . . . . . . . . . . . . . . . . . . .7-9
Creating Extended Access Rules . . . . . . . . . . . . . . . . . . . . . . . . . . . . . . . . . . . . . . . . . 7-10
Activating Access Lists . . . . . . . . . . . . . . . . . . . . . . . . . . . . . . . . . . . . . . . . . . . . . . . . . . . 7-13
Creating IP Static Routes . . . . . . . . . . . . . . . . . . . . . . . . . . . . . . . . . . . . . . . . . . . . . . . . . . 7-14
Creating Static ARP Entries . . . . . . . . . . . . . . . . . . . . . . . . . . . . . . . . . . . . . . . . . . . . . . . . 7-14
Creating a BOOTP/DHCP Server Entry . . . . . . . . . . . . . . . . . . . . . . . . . . . . . . . . . . . . . . . 7-15
IP Multicast . . . . . . . . . . . . . . . . . . . . . . . . . . . . . . . . . . . . . . . . . . . . . . . . . . . . . . . . . . . . . . . 7-15
Configuring IGMP . . . . . . . . . . . . . . . . . . . . . . . . . . . . . . . . . . . . . . . . . . . . . . . . . . . . . . . 7-16
Enabling the IGMP Global Configuration . . . . . . . . . . . . . . . . . . . . . . . . . . . . . . . . . . 7-16
Modifying IGMP Interfaces . . . . . . . . . . . . . . . . . . . . . . . . . . . . . . . . . . . . . . . . . . . . . 7-17
Configuring DVMRP . . . . . . . . . . . . . . . . . . . . . . . . . . . . . . . . . . . . . . . . . . . . . . . . . . . . . 7-18
Configuring the DVMRP Global Configuration . . . . . . . . . . . . . . . . . . . . . . . . . . . . . 7-18
Modifying DVMRP Interface Information . . . . . . . . . . . . . . . . . . . . . . . . . . . . . . . . . . 7-19
Monitoring Switch Performance Using IP Statistics . . . . . . . . . . . . . . . . . . . . . . . . . . . . . . . .7-21
Displaying Global IP Routing Statistics . . . . . . . . . . . . . . . . . . . . . . . . . . . . . . . . . . . . 7-21
Searching the IP Routing Table . . . . . . . . . . . . . . . . . . . . . . . . . . . . . . . . . . . . . . . . . . 7-25
Examining the IP Routing Table Statistics . . . . . . . . . . . . . . . . . . . . . . . . . . . . . . . . . 7-26
Searching the IP ARP Cache . . . . . . . . . . . . . . . . . . . . . . . . . . . . . . . . . . . . . . . . . . . . 7-26
IP Multicast Statistics . . . . . . . . . . . . . . . . . . . . . . . . . . . . . . . . . . . . . . . . . . . . . . . . . . . .7-27
Displaying IGMP Global Statistics . . . . . . . . . . . . . . . . . . . . . . . . . . . . . . . . . . . . . . . .7-27
Examining IGMP Interface Statistics . . . . . . . . . . . . . . . . . . . . . . . . . . . . . . . . . . . . . .7-28
Displaying the Multicast Group Table . . . . . . . . . . . . . . . . . . . . . . . . . . . . . . . . . . . . . 7-30
Displaying the IGMP Local Multicast Forwarding Cache . . . . . . . . . . . . . . . . . . . . . . 7-31
Displaying DVMRP Global Statistics . . . . . . . . . . . . . . . . . . . . . . . . . . . . . . . . . . . . . . 7-32
Examining DVMRP Interface Statistics . . . . . . . . . . . . . . . . . . . . . . . . . . . . . . . . . . . . 7-33
vii
Cajun P550/P220 Switch Operation Guide
Displaying DVMRP Neighbor Router(s) . . . . . . . . . . . . . . . . . . . . . . . . . . . . . . . . . . . 7-34
Displaying DVMRP Routing Table Statistics . . . . . . . . . . . . . . . . . . . . . . . . . . . . . . . .7-35
Displaying the DVMRP Route Table . . . . . . . . . . . . . . . . . . . . . . . . . . . . . . . . . . . . . .7-36
Displaying the DVMRP Upstream Routers . . . . . . . . . . . . . . . . . . . . . . . . . . . . . . . . . 7-37
Displaying the DVMRP Designated Forwarder(s) Table . . . . . . . . . . . . . . . . . . . . . . . 7-37
Displaying the DVMRP Downstream Dependent Router(s) . . . . . . . . . . . . . . . . . . . . 7-38
Displaying the DVMRP Multicast Forwarding Cache . . . . . . . . . . . . . . . . . . . . . . . . . 7-39
Configuring VRRP . . . . . . . . . . . . . . . . . . . . . . . . . . . . . . . . . . . . . . . . . . . . . . . . . . . . . . . . . .7-42
Enabling VRRP . . . . . . . . . . . . . . . . . . . . . . . . . . . . . . . . . . . . . . . . . . . . . . . . . . . . . . . . . 7-43
Enabling VRRP on an Interface . . . . . . . . . . . . . . . . . . . . . . . . . . . . . . . . . . . . . . . . . . . . . 7-43
Creating a VRRP Virtual Router . . . . . . . . . . . . . . . . . . . . . . . . . . . . . . . . . . . . . . . . . . . . 7-43
Configuring VRRP Authentication . . . . . . . . . . . . . . . . . . . . . . . . . . . . . . . . . . . . . . . . . . 7-44
Displaying VRRP Statistics . . . . . . . . . . . . . . . . . . . . . . . . . . . . . . . . . . . . . . . . . . . . . . . . 7-44
Configuring IRDP . . . . . . . . . . . . . . . . . . . . . . . . . . . . . . . . . . . . . . . . . . . . . . . . . . . . . . . . . . 7-45
Enabling IRDP on an Interface . . . . . . . . . . . . . . . . . . . . . . . . . . . . . . . . . . . . . . . . . . . . .7-46
Adding an IRDP Interface . . . . . . . . . . . . . . . . . . . . . . . . . . . . . . . . . . . . . . . . . . . . . . . . .7-48
Deleting an IRDP Interface . . . . . . . . . . . . . . . . . . . . . . . . . . . . . . . . . . . . . . . . . . . . . . . . 7-48
Configuring LDAP . . . . . . . . . . . . . . . . . . . . . . . . . . . . . . . . . . . . . . . . . . . . . . . . . . . . . . . . . .7-48
Configuring LDAP Settings . . . . . . . . . . . . . . . . . . . . . . . . . . . . . . . . . . . . . . . . . . . . . . . . 7-48
Viewing LDAP Statistics . . . . . . . . . . . . . . . . . . . . . . . . . . . . . . . . . . . . . . . . . . . . . . . . . . 7-50
Configuring an IP Helper Address . . . . . . . . . . . . . . . . . . . . . . . . . . . . . . . . . . . . . . . . . . . 7-50
Creating an IP Helper Address . . . . . . . . . . . . . . . . . . . . . . . . . . . . . . . . . . . . . . . . . . 7-51
Deleting an IP Helper Address . . . . . . . . . . . . . . . . . . . . . . . . . . . . . . . . . . . . . . . . . . 7-52
Modifying an IP Helper Address . . . . . . . . . . . . . . . . . . . . . . . . . . . . . . . . . . . . . . . . . 7-52
Chapter 8 — Configuring the RIP Routing Protocol (Layer 3)
Overview . . . . . . . . . . . . . . . . . . . . . . . . . . . . . . . . . . . . . . . . . . . . . . . . . . . . . . . . . . . . . . . . . .8-1
Configuring the Switch Using the RIP Routing Protocol . . . . . . . . . . . . . . . . . . . . . . . . . . . . .8-1
Configuring RIP for the Switch . . . . . . . . . . . . . . . . . . . . . . . . . . . . . . . . . . . . . . . . . . . . . .8-1
Modifying RIP Interfaces . . . . . . . . . . . . . . . . . . . . . . . . . . . . . . . . . . . . . . . . . . . . . . . . . . .8-2
Creating Trusted RIP Neighbors . . . . . . . . . . . . . . . . . . . . . . . . . . . . . . . . . . . . . . . . . . . . .8-3
Interpreting RIP Statistics . . . . . . . . . . . . . . . . . . . . . . . . . . . . . . . . . . . . . . . . . . . . . . . . . .8-4
Chapter 9 — Configuring the OSPF Routing Protocol (Layer 3)
Overview . . . . . . . . . . . . . . . . . . . . . . . . . . . . . . . . . . . . . . . . . . . . . . . . . . . . . . . . . . . . . . . . . .9-1
Configuring OSPF . . . . . . . . . . . . . . . . . . . . . . . . . . . . . . . . . . . . . . . . . . . . . . . . . . . . . . . . . . .9-1
Configuring the OSPF Global Configuration . . . . . . . . . . . . . . . . . . . . . . . . . . . . . . . . . . .9-2
Creating OSPF Areas . . . . . . . . . . . . . . . . . . . . . . . . . . . . . . . . . . . . . . . . . . . . . . . . . . . . . .9-3
Deleting OSPF Areas . . . . . . . . . . . . . . . . . . . . . . . . . . . . . . . . . . . . . . . . . . . . . . . . . . . . . .9-3
Modifying OSPF Areas . . . . . . . . . . . . . . . . . . . . . . . . . . . . . . . . . . . . . . . . . . . . . . . . . . . .9-4
Modifying OSPF Interfaces . . . . . . . . . . . . . . . . . . . . . . . . . . . . . . . . . . . . . . . . . . . . . . . . .9-4
Creating OSPF Virtual Links . . . . . . . . . . . . . . . . . . . . . . . . . . . . . . . . . . . . . . . . . . . . . . . .9-5
Deleting OSPF Virtual Links . . . . . . . . . . . . . . . . . . . . . . . . . . . . . . . . . . . . . . . . . . . . . . . .9-6
Modifying OSPF Virtual Links . . . . . . . . . . . . . . . . . . . . . . . . . . . . . . . . . . . . . . . . . . . . . .9-7
Creating OSPF Summaries . . . . . . . . . . . . . . . . . . . . . . . . . . . . . . . . . . . . . . . . . . . . . . . . .9-7
Deleting OSPF Summaries . . . . . . . . . . . . . . . . . . . . . . . . . . . . . . . . . . . . . . . . . . . . . . . . .9-8
Modifying OSPF Summaries . . . . . . . . . . . . . . . . . . . . . . . . . . . . . . . . . . . . . . . . . . . . . . . .9-8
Monitoring Switch Performance Using OSPF Statistics . . . . . . . . . . . . . . . . . . . . . . . . . . . . . .9-8
Cajun P550/P220 Switch Operation Guide
viii
Displaying OSPF Statistics . . . . . . . . . . . . . . . . . . . . . . . . . . . . . . . . . . . . . . . . . . . . . . . . . .9-8
Displaying OSPF Links . . . . . . . . . . . . . . . . . . . . . . . . . . . . . . . . . . . . . . . . . . . . . . . . . . . 9-10
Displaying OSPF Neighbors . . . . . . . . . . . . . . . . . . . . . . . . . . . . . . . . . . . . . . . . . . . . . . . . 9-10
Searching the OSPF Link State Database . . . . . . . . . . . . . . . . . . . . . . . . . . . . . . . . . . . . . 9-12
Viewing LSA Details . . . . . . . . . . . . . . . . . . . . . . . . . . . . . . . . . . . . . . . . . . . . . . . . . . . . . 9-15
Chapter 10 — Configuring AppleTalk Routing (Layer 3)
Overview . . . . . . . . . . . . . . . . . . . . . . . . . . . . . . . . . . . . . . . . . . . . . . . . . . . . . . . . . . . . . . . . . 10-1
AppleTalk Routing Overview . . . . . . . . . . . . . . . . . . . . . . . . . . . . . . . . . . . . . . . . . . . . . . . . . 10-1
Configuring AppleTalk Routing . . . . . . . . . . . . . . . . . . . . . . . . . . . . . . . . . . . . . . . . . . . . . . . 10-2
Enabling AppleTalk Global Routing . . . . . . . . . . . . . . . . . . . . . . . . . . . . . . . . . . . . . . . . . 10-2
Creating an AppleTalk Routing Interface . . . . . . . . . . . . . . . . . . . . . . . . . . . . . . . . . . . . . 10-3
Editing AppleTalk Interfaces . . . . . . . . . . . . . . . . . . . . . . . . . . . . . . . . . . . . . . . . . . . . . . .10-4
Deleting an AppleTalk Interface . . . . . . . . . . . . . . . . . . . . . . . . . . . . . . . . . . . . . . . . . . . . 10-5
Creating an AppleTalk Static Route . . . . . . . . . . . . . . . . . . . . . . . . . . . . . . . . . . . . . . . . . 10-6
Editing AppleTalk Static Routes . . . . . . . . . . . . . . . . . . . . . . . . . . . . . . . . . . . . . . . . . . . . 10-7
Deleting an AppleTalk Static Route . . . . . . . . . . . . . . . . . . . . . . . . . . . . . . . . . . . . . . . . . 10-7
Creating an AppleTalk NBP Filter . . . . . . . . . . . . . . . . . . . . . . . . . . . . . . . . . . . . . . . . . . . 10-7
Editing an AppleTalk NBP Filter . . . . . . . . . . . . . . . . . . . . . . . . . . . . . . . . . . . . . . . . . . . . 10-8
Adding or Deleting Interfaces to NBP Filter . . . . . . . . . . . . . . . . . . . . . . . . . . . . . . . . . . . 10-9
Creating an AppleTalk Zone Filter . . . . . . . . . . . . . . . . . . . . . . . . . . . . . . . . . . . . . . . . . . 10-9
Editing an AppleTalk Zone Filter . . . . . . . . . . . . . . . . . . . . . . . . . . . . . . . . . . . . . . . . . .10-10
Adding or Deleting Interfaces to a Zone Filter . . . . . . . . . . . . . . . . . . . . . . . . . . . . . . . .10-11
Viewing AppleTalk Statistics . . . . . . . . . . . . . . . . . . . . . . . . . . . . . . . . . . . . . . . . . . . . . . . . .10-11
Viewing AppleTalk Global Statistics . . . . . . . . . . . . . . . . . . . . . . . . . . . . . . . . . . . . . . . .10-11
Viewing the AppleTalk Interface Statistics Table . . . . . . . . . . . . . . . . . . . . . . . . . . . . . .10-13
Viewing the AppleTalk Route Table . . . . . . . . . . . . . . . . . . . . . . . . . . . . . . . . . . . . . . . .10-14
Viewing AppleTalk Route Table Statistics . . . . . . . . . . . . . . . . . . . . . . . . . . . . . . . . . . . .10-15
Viewing the AppleTalk ARP Cache Table . . . . . . . . . . . . . . . . . . . . . . . . . . . . . . . . . . . .10-15
Viewing the AppleTalk Zone Table . . . . . . . . . . . . . . . . . . . . . . . . . . . . . . . . . . . . . . . . .10-16
View AppleTalk Zone Table Statistics . . . . . . . . . . . . . . . . . . . . . . . . . . . . . . . . . . . . . . .10-17
Viewing the AppleTalk NBP Table . . . . . . . . . . . . . . . . . . . . . . . . . . . . . . . . . . . . . . . . .10-17
Chapter 11 — Monitoring and Configuring the Forwarding Cache (Layer 3)
Overview . . . . . . . . . . . . . . . . . . . . . . . . . . . . . . . . . . . . . . . . . . . . . . . . . . . . . . . . . . . . . . . . . 11-1
Configuring the Fowarding Cache . . . . . . . . . . . . . . . . . . . . . . . . . . . . . . . . . . . . . . . . . . 11-1
Monitoring the Forwarding Cache Statistics . . . . . . . . . . . . . . . . . . . . . . . . . . . . . . . . . . . . . .11-3
Displaying Frame Fowarding Statistics . . . . . . . . . . . . . . . . . . . . . . . . . . . . . . . . . . . . . . . 11-3
Searching the Routing Cache for an Entry . . . . . . . . . . . . . . . . . . . . . . . . . . . . . . . . . . . . 11-4
Displaying the Forwarding Cache . . . . . . . . . . . . . . . . . . . . . . . . . . . . . . . . . . . . . . . . . . . 11-5
Chapter 12 — Using VLANs, Spanning Tree, and Hunt Groups (Layer 2 and
Layer 3)
Overview . . . . . . . . . . . . . . . . . . . . . . . . . . . . . . . . . . . . . . . . . . . . . . . . . . . . . . . . . . . . . . . . . 12-1
VLAN Operation . . . . . . . . . . . . . . . . . . . . . . . . . . . . . . . . . . . . . . . . . . . . . . . . . . . . . . . . . . . 12-1
Ingress Rules . . . . . . . . . . . . . . . . . . . . . . . . . . . . . . . . . . . . . . . . . . . . . . . . . . . . . . . . . . . . . . . . . . . . . . . . . . . 12-1
Forwarding Rules . . . . . . . . . . . . . . . . . . . . . . . . . . . . . . . . . . . . . . . . . . . . . . . . . . . . . . . . . . . . . . . . . . . . . . . 12-2
ix
Cajun P550/P220 Switch Operation Guide
Egress Rules . . . . . . . . . . . . . . . . . . . . . . . . . . . . . . . . . . . . . . . . . . . . . . . . . . . . . . . . . . . . . . . . . . . . . . . . . . . 12-2
Port-Based VLANs . . . . . . . . . . . . . . . . . . . . . . . . . . . . . . . . . . . . . . . . . . . . . . . . . . . . . . . 12-2
Creating and Implementing VLANs . . . . . . . . . . . . . . . . . . . . . . . . . . . . . . . . . . . . . . . . . . . . 12-3
VLAN Considerations . . . . . . . . . . . . . . . . . . . . . . . . . . . . . . . . . . . . . . . . . . . . . . . . . . . .12-3
Creating a VLAN . . . . . . . . . . . . . . . . . . . . . . . . . . . . . . . . . . . . . . . . . . . . . . . . . . . . . . . .12-3
Configuring VLAN Parameters . . . . . . . . . . . . . . . . . . . . . . . . . . . . . . . . . . . . . . . . . . . . .12-4
Creating 3Com Mapping Tables . . . . . . . . . . . . . . . . . . . . . . . . . . . . . . . . . . . . . . . . . . . . 12-5
Assigning Ports To VLANs . . . . . . . . . . . . . . . . . . . . . . . . . . . . . . . . . . . . . . . . . . . . . . . . .12-6
Using Spanning Tree Setup and Monitoring . . . . . . . . . . . . . . . . . . . . . . . . . . . . . . . . . . . . . 12-6
Spanning Tree Bridge Options . . . . . . . . . . . . . . . . . . . . . . . . . . . . . . . . . . . . . . . . . . . . .12-7
Managing Spanning Trees . . . . . . . . . . . . . . . . . . . . . . . . . . . . . . . . . . . . . . . . . . . . . . . . .12-7
Configuring Spanning Tree Bridge Ports . . . . . . . . . . . . . . . . . . . . . . . . . . . . . . . . . . . . . 12-9
Disabling Spanning Tree Mode for the Port . . . . . . . . . . . . . . . . . . . . . . . . . . . . . . . . . .12-11
Using Hunt Groups to Aggregate Bandwidth between Switches . . . . . . . . . . . . . . . . . . . . .12-11
Hunt Group Considerations . . . . . . . . . . . . . . . . . . . . . . . . . . . . . . . . . . . . . . . . . . . . . .12-12
Configuring Hunt Groups . . . . . . . . . . . . . . . . . . . . . . . . . . . . . . . . . . . . . . . . . . . . . . . .12-12
Viewing Hunt Group Members . . . . . . . . . . . . . . . . . . . . . . . . . . . . . . . . . . . . . . . . . . . .12-13
Adding Ports to a Hunt Group . . . . . . . . . . . . . . . . . . . . . . . . . . . . . . . . . . . . . . . . . . . .12-14
Chapter 13 — Tuning Your Switch Performance (Layer 2 & Layer 3)
Overview . . . . . . . . . . . . . . . . . . . . . . . . . . . . . . . . . . . . . . . . . . . . . . . . . . . . . . . . . . . . . . . . . 13-1
How Queues Work . . . . . . . . . . . . . . . . . . . . . . . . . . . . . . . . . . . . . . . . . . . . . . . . . . . . . . . . . 13-1
Managing Buffers and Queues . . . . . . . . . . . . . . . . . . . . . . . . . . . . . . . . . . . . . . . . . . . . . . . . 13-2
Chapter 14 — Managing Address Forwarding Tables (Layer 2 & Layer 3)
Overview . . . . . . . . . . . . . . . . . . . . . . . . . . . . . . . . . . . . . . . . . . . . . . . . . . . . . . . . . . . . . . . . . 14-1
Configuring the Address Forwarding Table . . . . . . . . . . . . . . . . . . . . . . . . . . . . . . . . . . . . . . 14-1
Configuring the Age Timer and Super Age Timer . . . . . . . . . . . . . . . . . . . . . . . . . . . . . . 14-1
Controlling Reconfiguration of Address Table Sizes . . . . . . . . . . . . . . . . . . . . . . . . . . . . .14-2
Searching the Switch Address Forwarding Table . . . . . . . . . . . . . . . . . . . . . . . . . . . . . . . . . . 14-4
Adding Entries to the Address Forwarding Table Manually . . . . . . . . . . . . . . . . . . . . . . . . . . 14-6
Chapter 15 — Managing Intelligent Multicasting (Layer 2 & Layer 3)
Overview . . . . . . . . . . . . . . . . . . . . . . . . . . . . . . . . . . . . . . . . . . . . . . . . . . . . . . . . . . . . . . . . . 15-1
Introduction . . . . . . . . . . . . . . . . . . . . . . . . . . . . . . . . . . . . . . . . . . . . . . . . . . . . . . . . . . . . . . 15-1
Layer 3 Dynamic Intelligent Multicasting . . . . . . . . . . . . . . . . . . . . . . . . . . . . . . . . . . . . . 15-2
IGMP Snooping . . . . . . . . . . . . . . . . . . . . . . . . . . . . . . . . . . . . . . . . . . . . . . . . . . . . . . 15-2
LGMP Server . . . . . . . . . . . . . . . . . . . . . . . . . . . . . . . . . . . . . . . . . . . . . . . . . . . . . . . . 15-3
Layer 2 Dynamic Intelligent Multicasting . . . . . . . . . . . . . . . . . . . . . . . . . . . . . . . . . . . . . 15-3
LGMP Client . . . . . . . . . . . . . . . . . . . . . . . . . . . . . . . . . . . . . . . . . . . . . . . . . . . . . . . . 15-3
CGMP Snooping . . . . . . . . . . . . . . . . . . . . . . . . . . . . . . . . . . . . . . . . . . . . . . . . . . . . . 15-3
Pruning Dynamic Sessions, Client Ports, and Router Ports . . . . . . . . . . . . . . . . . . . . 15-3
Configuring Global Intelligent Multicasting . . . . . . . . . . . . . . . . . . . . . . . . . . . . . . . . . . . . . .15-4
Displaying Router Ports . . . . . . . . . . . . . . . . . . . . . . . . . . . . . . . . . . . . . . . . . . . . . . . . . . . . . 15-6
Configuring Static Router Ports . . . . . . . . . . . . . . . . . . . . . . . . . . . . . . . . . . . . . . . . . . . . . . . 15-6
Searching for Intelligent Multicast Sessions . . . . . . . . . . . . . . . . . . . . . . . . . . . . . . . . . . . . . .15-7
Deleting a Multicast Session Client Port . . . . . . . . . . . . . . . . . . . . . . . . . . . . . . . . . . . . . .15-8
Cajun P550/P220 Switch Operation Guide
x
Creating a Static Multicast Session . . . . . . . . . . . . . . . . . . . . . . . . . . . . . . . . . . . . . . . . . . . . . 15-9
Deleting Static Multicast Sessions . . . . . . . . . . . . . . . . . . . . . . . . . . . . . . . . . . . . . . . . . .15-10
Creating Static Client Ports . . . . . . . . . . . . . . . . . . . . . . . . . . . . . . . . . . . . . . . . . . . . . . .15-11
Deleting Static Client Ports . . . . . . . . . . . . . . . . . . . . . . . . . . . . . . . . . . . . . . . . . . . . . . .15-11
Configuring IGMP Snooping (Layer 3 only) . . . . . . . . . . . . . . . . . . . . . . . . . . . . . . . . . . . . .15-11
Configuring the LGMP Server . . . . . . . . . . . . . . . . . . . . . . . . . . . . . . . . . . . . . . . . . . . . . . .15-12
Modifying the LGMP Server Display per VLAN . . . . . . . . . . . . . . . . . . . . . . . . . . . . . . .15-14
Configuring/Viewing an LGMP Client . . . . . . . . . . . . . . . . . . . . . . . . . . . . . . . . . . . . . . . . .15-15
Modifying LGMP Clients Per VLAN . . . . . . . . . . . . . . . . . . . . . . . . . . . . . . . . . . . . . . . .15-17
Configuring/Viewing CGMP Snooping . . . . . . . . . . . . . . . . . . . . . . . . . . . . . . . . . . . . . . . . .15-18
Chapter 16 — Monitoring the Cajun Switch (Layer 2 & Layer 3)
Overview . . . . . . . . . . . . . . . . . . . . . . . . . . . . . . . . . . . . . . . . . . . . . . . . . . . . . . . . . . . . . . . . . 16-1
Interpreting Front Panel LED Displays . . . . . . . . . . . . . . . . . . . . . . . . . . . . . . . . . . . . . . . . . . 16-1
Checking Temperature Status and Configuring Thresholds . . . . . . . . . . . . . . . . . . . . . . . . . . 16-2
Checking Active Alarms . . . . . . . . . . . . . . . . . . . . . . . . . . . . . . . . . . . . . . . . . . . . . . . . . . . . . 16-3
Viewing the Active Alarm Table . . . . . . . . . . . . . . . . . . . . . . . . . . . . . . . . . . . . . . . . . . . . 16-3
Using the Event Subsystem . . . . . . . . . . . . . . . . . . . . . . . . . . . . . . . . . . . . . . . . . . . . . . . . . . 16-3
Configuring the Protocol Event Log . . . . . . . . . . . . . . . . . . . . . . . . . . . . . . . . . . . . . . . . . 16-4
Viewing the Event and Shutdown Logs . . . . . . . . . . . . . . . . . . . . . . . . . . . . . . . . . . . . . . 16-5
Viewing Event Statistics . . . . . . . . . . . . . . . . . . . . . . . . . . . . . . . . . . . . . . . . . . . . . . . . . . 16-6
Setting Log Size . . . . . . . . . . . . . . . . . . . . . . . . . . . . . . . . . . . . . . . . . . . . . . . . . . . . . . . . . . . .16-7
Configuring Event Notification . . . . . . . . . . . . . . . . . . . . . . . . . . . . . . . . . . . . . . . . . . . . . . . . 16-9
Chapter 17 — Analyzing Network Performance Using RMON and Ethernet
Statistics (Layer 2 & Layer 3)
Overview . . . . . . . . . . . . . . . . . . . . . . . . . . . . . . . . . . . . . . . . . . . . . . . . . . . . . . . . . . . . . . . . . 17-1
Viewing Statistics . . . . . . . . . . . . . . . . . . . . . . . . . . . . . . . . . . . . . . . . . . . . . . . . . . . . . . . . . . 17-1
Setting Up a Mirror Port . . . . . . . . . . . . . . . . . . . . . . . . . . . . . . . . . . . . . . . . . . . . . . . . . . . . . 17-6
Chapter 18 — Downloading New Operational Code to the Switch (Layer 2 &
Layer 3)
Overview . . . . . . . . . . . . . . . . . . . . . . . . . . . . . . . . . . . . . . . . . . . . . . . . . . . . . . . . . . . . . . . . . 18-1
Upgrading from a Previous Version . . . . . . . . . . . . . . . . . . . . . . . . . . . . . . . . . . . . . . . . . . . . 18-1
Saving the Previous Configuration . . . . . . . . . . . . . . . . . . . . . . . . . . . . . . . . . . . . . . . . . . . . . 18-2
Downloading the Image . . . . . . . . . . . . . . . . . . . . . . . . . . . . . . . . . . . . . . . . . . . . . . . . . . . . . 18-2
Selecting the Image for Reboot . . . . . . . . . . . . . . . . . . . . . . . . . . . . . . . . . . . . . . . . . . . . . . . . 18-4
Resetting the Switch . . . . . . . . . . . . . . . . . . . . . . . . . . . . . . . . . . . . . . . . . . . . . . . . . . . . . . . . 18-4
Appendix A — FCC Notice
A-1
Appendix B — Supported MIB Groups
MIBs Supported by Layer 2 and Layer 3 Switches . . . . . . . . . . . . . . . . . . . . . . . . . . . . . . . . . B-1
xi
Cajun P550/P220 Switch Operation Guide
IPX Interface MIBs . . . . . . . . . . . . . . . . . . . . . . . . . . . . . . . . . . . . . . . . . . . . . . . . . . . . . .
The Novel MIB is not currently supported . . . . . . . . . . . . . . . . . . . . . . . . . . . . . . . . .
Private IPX Interface MIBs . . . . . . . . . . . . . . . . . . . . . . . . . . . . . . . . . . . . . . . . . . . . .
Prominet MIB . . . . . . . . . . . . . . . . . . . . . . . . . . . . . . . . . . . . . . . . . . . . . . . . . . . . . . . . . .
IEEE 802.3 MAU Management . . . . . . . . . . . . . . . . . . . . . . . . . . . . . . . . . . . . . . . . . . . . .
IEEE 802.3 Statistics Group . . . . . . . . . . . . . . . . . . . . . . . . . . . . . . . . . . . . . . . . . . . . . . .
Bridge MIB . . . . . . . . . . . . . . . . . . . . . . . . . . . . . . . . . . . . . . . . . . . . . . . . . . . . . . . . . . . .
SNMPv2 . . . . . . . . . . . . . . . . . . . . . . . . . . . . . . . . . . . . . . . . . . . . . . . . . . . . . . . . . . . . . .
RMON . . . . . . . . . . . . . . . . . . . . . . . . . . . . . . . . . . . . . . . . . . . . . . . . . . . . . . . . . . . . . . . .
MIBs Supported by the Layer 3 Switch . . . . . . . . . . . . . . . . . . . . . . . . . . . . . . . . . . . . . . . . .
RIP Version 1.0 and 2.0 . . . . . . . . . . . . . . . . . . . . . . . . . . . . . . . . . . . . . . . . . . . . . . . . . .
Standard MIB . . . . . . . . . . . . . . . . . . . . . . . . . . . . . . . . . . . . . . . . . . . . . . . . . . . . . . .
Private MIB . . . . . . . . . . . . . . . . . . . . . . . . . . . . . . . . . . . . . . . . . . . . . . . . . . . . . . . . .
OSPF Version 2.0 . . . . . . . . . . . . . . . . . . . . . . . . . . . . . . . . . . . . . . . . . . . . . . . . . . . . . . .
Standard MIB . . . . . . . . . . . . . . . . . . . . . . . . . . . . . . . . . . . . . . . . . . . . . . . . . . . . . . .
Private MIB . . . . . . . . . . . . . . . . . . . . . . . . . . . . . . . . . . . . . . . . . . . . . . . . . . . . . . . . .
VRRP . . . . . . . . . . . . . . . . . . . . . . . . . . . . . . . . . . . . . . . . . . . . . . . . . . . . . . . . . . . . . . . . .
Standard MIB . . . . . . . . . . . . . . . . . . . . . . . . . . . . . . . . . . . . . . . . . . . . . . . . . . . . . . .
Private MIB . . . . . . . . . . . . . . . . . . . . . . . . . . . . . . . . . . . . . . . . . . . . . . . . . . . . . . . . .
IGMP . . . . . . . . . . . . . . . . . . . . . . . . . . . . . . . . . . . . . . . . . . . . . . . . . . . . . . . . . . . . . . . . .
Standard MIB . . . . . . . . . . . . . . . . . . . . . . . . . . . . . . . . . . . . . . . . . . . . . . . . . . . . . . .
Private MIB . . . . . . . . . . . . . . . . . . . . . . . . . . . . . . . . . . . . . . . . . . . . . . . . . . . . . . . . .
IP Interface . . . . . . . . . . . . . . . . . . . . . . . . . . . . . . . . . . . . . . . . . . . . . . . . . . . . . . . . . . . .
IP Version 4.0 and Services . . . . . . . . . . . . . . . . . . . . . . . . . . . . . . . . . . . . . . . . . . . . . . . .
Standard MIB . . . . . . . . . . . . . . . . . . . . . . . . . . . . . . . . . . . . . . . . . . . . . . . . . . . . . . .
Private MIB . . . . . . . . . . . . . . . . . . . . . . . . . . . . . . . . . . . . . . . . . . . . . . . . . . . . . . . . .
IP Forwarding/Route Table . . . . . . . . . . . . . . . . . . . . . . . . . . . . . . . . . . . . . . . . . . . . . . . .
Standard MIB . . . . . . . . . . . . . . . . . . . . . . . . . . . . . . . . . . . . . . . . . . . . . . . . . . . . . . .
Private MIB . . . . . . . . . . . . . . . . . . . . . . . . . . . . . . . . . . . . . . . . . . . . . . . . . . . . . . . . .
DVMRP . . . . . . . . . . . . . . . . . . . . . . . . . . . . . . . . . . . . . . . . . . . . . . . . . . . . . . . . . . . . . . .
Standard MIB . . . . . . . . . . . . . . . . . . . . . . . . . . . . . . . . . . . . . . . . . . . . . . . . . . . . . . .
Private MIB . . . . . . . . . . . . . . . . . . . . . . . . . . . . . . . . . . . . . . . . . . . . . . . . . . . . . . . . .
AppleTalk . . . . . . . . . . . . . . . . . . . . . . . . . . . . . . . . . . . . . . . . . . . . . . . . . . . . . . . . . . . . .
Standard MIB . . . . . . . . . . . . . . . . . . . . . . . . . . . . . . . . . . . . . . . . . . . . . . . . . . . . . . .
Private MIB . . . . . . . . . . . . . . . . . . . . . . . . . . . . . . . . . . . . . . . . . . . . . . . . . . . . . . . . .
IP Access List . . . . . . . . . . . . . . . . . . . . . . . . . . . . . . . . . . . . . . . . . . . . . . . . . . . . . . . . . . .
Policy Capability MIB for LDAP . . . . . . . . . . . . . . . . . . . . . . . . . . . . . . . . . . . . . . . . . . . .
B-1
B-1
B-1
B-1
B-2
B-2
B-2
B-2
B-2
B-2
B-2
B-2
B-2
B-3
B-3
B-3
B-3
B-3
B-3
B-3
B-3
B-3
B-3
B-4
B-4
B-4
B-4
B-4
B-4
B-4
B-4
B-4
B-5
B-5
B-5
B-5
B-5
Index
Cajun P550/P220 Switch Operation Guide
xii
Preface
This guide explains how to configure and operate the Lucent P550, P550R, P220G, and
P220FE Cajun switches. The P220 Cajun switch family contains Layer 2 functionality
only, while the P550 contains both Layer 2 and Layer 3 functionality. Therefore, all
references to Layer 2 functionality apply to both the P220 Cajun switch family, as well as
the P550 Layer 2 switches.
This guide also includes information on downloading new operational code to your
switch. For detailed information on the command line interface, refer to Cajun P550/P220
Command Line Interface Reference Guide.
Documentation Feedback
If you have comments about the technical accuracy or general quality of this document
please contact us at:
[email protected]
Please cite the document title, part number, and page reference,
if appropriate.
Online Documentation
Lucent Technologies maintains copies of all technical documentation on the corporate
web server. To access online documentation, including HTML and PDF documents, use
Netscape Navigator version 4.5 or above or Internet Explorer version 3.x or above and
enter the URL:
http://pubs.lucentctc.com/
Cajun P550/P220 Switch Operation Guide
xiv
Preface
Installing Online Documentation and Help Files
Certain resources used by the Web Agent are located off the switch to preserve switch
memory. Setting up a help server location for the switch allows the switch to access:
❒ Online documentation
❒ Bitmaps used as part of the interface (logo, wallpaper)
❒ Online help files for the Web Agent
There are two ways to provide this information to the switch:
❒ Install the Lucent HTTP documentation server (available on the Lucent user
documentation CD, CajunDocs)
❒ Add the files to an existing web server on your network
Installing the Lucent HTTP Documentation Server
Lucent provides HTTP server software that you can install to provide access to
documentation and online help directly from the switch. The server must be running a
Win32 compatible operating system (for example, Windows 95, Windows 98, or
Windows NT).
To install the server, you must perform one of the following:
❒ Run the Setup program from the CajunDocs CD-ROM
❒ Click on the latest released version of the CajunDocs CD from the Lucent
Publications web site (http://pubs.lucentctc.com/cdrom/cajundocs.html) and
double-click setup.exe. This extracts the server and the online help system to the
server machine and drive.
Starting the Lucent HTTP Web Server
To run the Lucent HTTP server:
1. Click on your Win32/NT Start Menu.
2. Select the CajunDocs program group and select document server from that
program group.
The Lucent document server will launch. To access this server from a Web browser you
need to set a server location on the switch, as specified in the next section.
xv
Cajun P550/P220 Switch Operation Guide
Preface
Entering the Server Location at the Switch
To set the location of the documentation server:
1. Launch your Web browser and connect to your switch.
2. Enter your user name and password at the respective prompts and click Login.
3. In the System Configuration section of the Web Agent window, click Server
Location. The Online Help Configuration dialog box opens.
4. In the HTTP Server Location field, enter the host name or IP address of the
HTTP server followed by the server name with a port designation of :2010 (for
example, for a host named phantom, enter: http://phantom:2010).
If you decide to install your online help on a Web server other than the Lucent
HTTP server bundled on the CajunDocs CD-ROM, then specify the URL without a
port number if your Web server runs on port 80 (for example,
http://www.abc-company.com). If your Web server does not run on port 80, you
need to add the port number (for example, http://host/path:port).
Note: The default port number for HTTP is port 80. The default port number for
telnet is 126.
Adding the Document Files to an Existing Server
If you decide to install your online help on a Web server other than the Lucent HTTP
server bundled on the CajunDocs CD-ROM, transfer the help subdirectory to that Web
server and enter the URL for that web server in the Server Location field.
For example, if you transfer the CajunDocs help directory to your company server
(http://www.abc-company.com) you would need to:
1. Install the online help and documentation from the CajunDocs CD to a Windows95
or NT node in your network.
2. Transfer the entire help subdirectory located in C:\CajunDocs to the root directory
of your Web server.
3. Launch your browser and connect to your switch.
4. Enter your user name and password at the respective prompts and click Login.
5. In the System Configuration section of the Web Agent window, click Server
Location. The Online Help Configuration dialog box opens.
6. In the HTTP Server Location field, enter the server location (for example,
http://www.abc-company.com).
7. In the HELP Directory Location field, enter the directory name of your help
files. For example, help.
Cajun P550/P220 Switch Operation Guide
xvi
Preface
Note: The default for the help directory is help. You do not need to change this
unless you changed the name of your help directory prior to transferring it to
your Web server.
Downloading an Updated CajunDocs CD from the Internet
The server and help files are available on the Internet. To download update your
CajunDocs CD:
1. Launch a web browser and go to the CajunDocs Installer Web page at:
http://pubs.lucentctc.com/cdrom/cajundocs.html
2. Click the latest version CajunDocs CD-ROM installer to download into the
directory you previously created.
For more information on this product, refer to the online documentation that comes on
your CajunDocs CD-ROM or refer to http://pubs.lucentctc.com to review the online
documentation there.
Conventions
This document uses the following conventions:
Convention
Represents
Examples
User Input
User entered text.
To create a new password, type store
password owl
Boldface
Text
System
Output
Menu command,
keyword to be acted
upon, or button
name.
From the Interface pull-down menu,
select Default.
Text displayed by the
system.
If you attempt the find the physical
location of port 30, the system displays
Click Cancel to cancel the installation.
Unit 2 Port 2
Using Note, Caution, and Warning
Note: Provides additional information about a procedure or topic.
CAUTION:Indicates a condition that may damage hardware or software.
WARNING:Indicates a condition that may cause bodily injury or death.
xvii
Cajun P550/P220 Switch Operation Guide
Preface
Audience
This guide is intended for:
❒ Network manager or administrator
❒ Hardware installer
Overview of The Contents
This guide contains the following chapters:
Chapter 1, P550 Cajun Switch Overview — Provides an overview of your P550
switch and theory of operation.
Chapter 2, P220 Cajun Switch Family Overview — Provides an overview of your
P220G or P220FE switch and theory of operation.
Chapter 3, Configuring the Cajun Switch — Explains how to perform the initial
configuration of your switch, create users, and configure ports.
Chapter 4, Configuring IPX Routing — Explains how to configure IPX routing and
interpret IPX statistics.
Chapter 5, Configuring IPX RIP Protocol — Explains how to configure IPX RIP.
Chapter 6, Configuring IPX SAP Protocol — Explains how to configure IPX SAP.
Chapter 7, Configuring IP Routing — Explains how to configure your switch for IP
routing and interpret IP routing statistics.
Chapter 8, Configuring RIP Routing — Explains how to configure your switch for
RIP routing.
Chapter 9, Configuring the OSPF Protocol — Explains how to configure Open
Shortest Path First (OSPF) on your Cajun Switch. In addition, this chapter also provides
information on OSPF statistical displays.
Chapter 10, Configuring AppleTalk — Explains how to configure AppleTalk
parameters and view AppleTalk statistics.
Chapter 11, Monitoring and Configuring the Forwarding Cache (L3 Only) —
Explains how to interpret and monitor forwarding operations that occur in the address
cache of the multilayer media modules.
Chapter 12, Using VLANs, Spanning Tree, and Hunt Groups — Provides detailed
information on how to optimize bandwidth usage on your network.
Cajun P550/P220 Switch Operation Guide
xviii
Preface
Chapter 13, Tuning Your Switch Performance — Shows how to use your switch’s
buffer management features to optimize traffic throughput through the switch fabric.
Chapter 14, Managing Address Forward Tables — Provides information on how to
manage the address forwarding tables in your switch.
Chapter 15, Managing Intelligent Multicasting — Provides information on how to
configure and manage intelligent multicast sessions on your switch.
Chapter 16, Monitoring the Cajun Switch — Explains how to use the Web Agent to
assess your switch’s current operational status.
Chapter 17, Analyzing Network Performance Using RMON and Ethernet
Statistics — Provides information on how to interpret the statistics counter values
displayed in your switch.
Chapter 18, Downloading New Operational Code to the Switch — Provides
information on how to update the operational code on your switch.
Appendix A, FCC Notice — Provides the FCC notice statement.
Appendix B, MIB Groups — Provides information on the supported MIB groups.
Index
Related Documents
This section provides information on supporting documentation, including:
❒ Lucent Documents
❒ Reference Documents
Lucent Documents
The following documents provide additional information on Lucent products:
P500 Manager User’s Guide, which describes the installation and use of Lucent’s
Java-based, multiswitch element management system.
Reference Documents
The following documents supply related background information:
❒ Internetworking with TCP/IP Volume I — 3rd Edition, Douglas E. Comer, ISBN
0-13-216987-8.
xix
Cajun P550/P220 Switch Operation Guide
Preface
❒ Internet Routing Architectures — Cisco Press, Bassam Halabi
❒ Routing in the Internet — Christian Huitema, ISBN 0-13-132192-7
❒ Interconnections: Bridges and Routers — Radia Perlman, ISBN 0-201-56332-0
Terminology
Throughout the book, the term Layer 2, often followed by the abbreviation L2, is used to
indicate switching capabilities. For example, the name, Layer 2 Supervisor Module,
indicates a supervisor module that enables switching.
The terms, Multilayer and Layer 3, often followed by the abbreviation L3, refer to the
combined ability to switch and route. For example, the name, Multilayer Supervisor
Module, indicates a supervisor module that provides switching and routing capabilities.
Contacting Lucent Technologies
For information about Lucent Data Networking products and services, please consult the
Lucent World Wide Web site at http://www.lucent.com/dns.
If you have any questions, please call Technical Support at 1-800-237-0016, press 0 at
the prompt, then dial ext. 73300. If you are an international customer, please call
Technical Support at 1-813-217-2425.
Cajun P550/P220 Switch Operation Guide
xx
Preface
xxi
Cajun P550/P220 Switch Operation Guide
1
Cajun P550 Switch Overview
Switch Description
The Cajun P550 switch is a family member of Gigabit Ethernet switching products from
Lucent Technologies Corporation, and supports:
❒ More bandwidth
❒ Elimination of bottlenecks
❒ Better manageability
❒ Routing
❒ Dependable multimedia support
Hardware Overview
The P550’s hardware features includes:
❒ Chassis
❒ Modules
Chassis
The switching fabric is non-blocking and provides 22.88 Gbps switching throughput
(45.76 Gbps aggregate bandwidth). The chassis features include (Figure 1-1):
❒ Seven slots (six payload slots)
❒ Up to 288 10/100Base-TX ports (autosensing)
❒ Up to 60 100Base-FX ports
❒ Up to 24 gigabit-speed Ethernet ports
Cajun P550/P220 Switch Operation Guide
1-1
Cajun P550 Switch Overview
Figure 1-1. Cajun Switch
Attach serial
port cable here
Attach
Ethernet cable
here
Modules
The chassis modules include:
❒ Layer 3 Supervisor Module or Layer 2 Supervisor Module
❒ Layer 3 and Layer 2 Fast Ethernet Modules
❒ Layer 3 and Layer 2 Gigabit-Speed Modules
Layer 2 Supervisor Module
The Supervisor Module features include:
❒ PowerPC 860 Reduced Instruction Set Computer (RISC) processor
❒ Memory: 4 MB Flash, 16 MB DRAM, 128 KB NVRAM
❒ Real-time clock
❒ Out-of-band console: 10Base-T & RS-232
❒ RMON support
❒ Simple Network Management Protocol (SNMP) management agent
❒ Dot matrix display
The supervisor module is responsible for address learning, address cache management,
and spanning tree management.
1-2
Cajun P550/P220 Switch Operation Guide
Cajun P550 Switch Overview
Layer 3 Supervisor Module
The Layer 3 supervisor module features include:
❒ PowerPC 750 (RISC) processor
❒ Memory: 4 MB Flash, 64 MB DRAM, 128 KB NVRAM, 512 KB cache, with
multiple memory configurations:
Table 1-1. Multiple Memory Configuration
DIMM/SIMM
Number of
Modules
Total Memory
32 MB
1
32 MB
32 MB
2
64 MB
64 MB
1
64 MB (V3.0 or higher)
64 MB
2
128 MB (V3.0 or higher)
❒ Real-time clock
❒ Out-of-band console: 10/100Base-T & RS-232
❒ RMON support
❒ Simple Network Management Protocol (SNMP) management agent
❒ Dot matrix display
The supervisor module is responsible for address learning, address cache management,
and spanning tree management.
In addition, the Layer 3 supervisor module:
❒ Implements system management functions and management interfaces.
❒ Uses standard routing protocols and maintains routing table and caches.
❒ Provides 1.5 million packets per second of hardware-based routing for packets that
arrive on Layer 2-only media modules.
❒ Supplies software-based routing for packets that are not routed in hardware.
❒ Supports implementation of AppleTalk, and DECnet, that are not implemented in
hardware.
The Layer 3 supervisor module requires a faster CPU and more memory. Also unlike the
Layer 2 supervisor, the Layer 3 supervisor is part of the path that some packets take
through the system. To accomplish this, the Layer 3 supervisor requires faster data
transfer to and from the switching fabric.
Cajun P550/P220 Switch Operation Guide
1-3
Cajun P550 Switch Overview
Figure 1-2 illustrates a conceptual diagram of the Layer 3 supervisor module’s functions.
Figure 1-2. Layer 3 Supervisor Module Conceptual Operation
Wirespeed Routing
Highin Hardware
Speed
ManageSoftware-based
Access
ment
Routing
To /
InterSystem
From High-speed
faces
CPU
management
Switch
Fabric
Routing Table and
Cache Management
Multilayer Supervisor Conceptual Diagram
Media Modules
All Layer 2 and Layer 3 media modules have full non-blocking performance.
Bridging and routing are performed on the input side of each media module.
Each media module features:
❒ IEEE 802.3z full-duplex flow control - This allows the switch ports to send a
pause command before input buffers overflow. Half-duplex ports support active
backpressure (jamming).
❒ VLAN trunking or non-tagged access modes - This allows the switch ports to
interoperate with popular tagged trunking schemes used by large networking
vendors.
❒ Priority Queuing and Class of Service - These features allow you to prioritize
traffic between particular stations or sets of stations to support jitter-sensitive
applications. Supported class of service types: 3Com PACE CoS, IEEE 802.1p CoS.
Layer 3 and Layer 2 Fast Ethernet Modules
The Layer 2 (L2) and Layer 3 (L3) Fast Ethernet modules include:
❒ 20-Port 10/100Base-TX Ethernet Module (L2 support), with 20 RJ-45 Ports 10/100, HDX/FDX
❒ 10-Port 100Base-FX Ethernet Module (L2 support), with 10 Fast Ethernet Ports Fiber, 1300 nM, HDX/FDX
1-4
Cajun P550/P220 Switch Operation Guide
Cajun P550 Switch Overview
❒ 12-Port 10/100Base-TX Ethernet Module (L2/L3 support), with 12 RJ-45 Ports 10/100, HDX/FDX
❒ 10-Port 100Base-FX Ethernet Module (L2/L3 support), with 10 Fast Ethernet Ports
- Fiber, 1300 nM, HDX/FDX
❒ 48-Port 10/100Base-TX Ethernet Module (L3 support), with 48 RJ-71 Ports 10/100, HDX/FDX
Layer 3 and Layer 2 Gigabit-Speed Modules
The Layer 2 (L2) and Layer 3 (L3) Gigabit Ethernet modules include:
❒ 2-Port, Full-Duplex 1000Base-SX module (L2 support) 850 nM optics
❒ 2-Port, Full-Duplex 1000Base-LX module (L2 support) 1300 nM optics
❒ 2-Port, Full-Duplex 1000Base-SLX module (L2 support) 10 Km with 1300nM
optics
❒ 4-Port, Full-Duplex 1000Base-SX-F module (L2 support) 850 nM optics
❒ 2-Port, Full-Duplex 1000Base-SX-F module (L2/L3 support) 850 nM optics
❒ 2-Port, Full-Duplex 1000Base-LX-F module (L2/L3 support) 1300 nM optics
Cajun P550 Switch Features
The section includes:
❒ Crossbar Switch Fabric
❒ Cajun Routing Overview
❒ Virtual Bridging Functions
❒ VLAN Functions
❒ Hunt Groups
❒ OpenTrunk Technology
❒ Dual Layer Spanning Trees
❒ Buffer and Queue Management
Cajun P550/P220 Switch Operation Guide
1-5
Cajun P550 Switch Overview
Crossbar Switch Fabric
The crossbar switch matrix provides low latency, high throughput packet switching using
a crossbar architecture (Figure 1-3).
Figure 1-3. Crossbar Architecture
Port 1
1.76 Gb/s
22.88 Gb/s
Port 2
Port 1
1.76 Gb/s
Port 2
Crossbar
Port 13
Port 13
Crossbars are more scalable than shared memory architectures. Architecturally, you can
add more capacity simply by adding more switch elements. By comparison, shared
memory switches have an inherent maximum upper boundary in throughput that
makes high-density, single-backplane gigabit switches impractical. With a crossbar
architecture you increase the number of gigabit ports in your network and the
architecture scales to meet your needs.
The crossbar supports:
❒ 13 fabric ports (two per I/O module slot, plus one for the Supervisor Module).
❒ 1.76 Gbps (in and out) on each fabric port.
❒ 22.88 Gbps total capacity, 45.76 Gbps total backplane capacity.
❒ Under-subscribed switching fabric in most configurations (two connections per I/O
module slot, plus one for the supervisor module).
❒ Single copy replication - When possible, input frames destined for output multiple
switch ports pass through the crossbar only once and are copied by the crossbar to
each destination.
❒ Hardware-assisted multicast pruning - The switch only forwards to appropriate
destination switch ports.
1-6
Cajun P550/P220 Switch Operation Guide
Cajun P550 Switch Overview
Cajun Routing Overview
The Cajun switch is an IP and IPX router with virtual interfaces. Virtual interfaces are
mapped to physical ports or VLANs. Layer 3 IP traffic is routed between the virtual
interfaces.
Ports become members of VLANs by assignment or by rules. Multiple VLANs can share a
single trunk port. In contrast, multiple physical ports can be associated with a single
VLAN. In all cases, traffic that arrives and leaves the same VLAN is bridged, not routed.
This section provides additional information that includes:
❒ Compatibility with the Layer 2 Switch
❒ Routing with Layer 2 and Layer 3 Modules
Compatibility with the Layer 2 Switch
The switch is completely backwards compatible with all of the Layer 2 media modules
currently supported in the Cajun switch. Traffic from the Layer 2 media module is routed
by sending that traffic to the routing engine on the Layer 3 supervisor module. The
supervisor module routes all traffic from Layer 2 media modules in software as described
in the section, “Routing with Layer 2 and Layer 3 Modules”.
Note: Layer 2 traffic that does not require routing is bridged independently of the
Layer 3 traffic based on the MAC address or VLAN information.
Routing with Layer 2 and Layer 3 Modules
When the Cajun switch is configured with a mix of Layer 2 and Layer 3 modules, IP and
IPX routing is performed by the Layer 3 media module or the Layer 3 supervisor module
using special ASICs present on those modules. These ASICs contain an address cache
(forwarding table) that can hold a maximum of 20,000 address cache entries. The entries
consist of packet addressing information and next hop information that enable the
switch to effectively route the packets to their destination.
The Layer 3 supervisor also maintains a master routing table. The master routing table
contains up to 24,000 entries. This routing table enables the supervisor module to keep
track of which entries are in each address cache. As a result, each time a change occurs
in the master routing table, the Layer 3 supervisor module updates the appropriate
address caches. For example, if a unicast route is removed from the master routing table,
then all matching entries in forwarding tables are removed as well.
Cajun P550/P220 Switch Operation Guide
1-7
Cajun P550 Switch Overview
Consequently, when you connect a Cajun switch to the network, it begins to receive
frames from the network and builds a master routing table in the supervisor module and
forwarding tables in each media module based on those frames.
This process creates three distinct results:
❒ All known (learned) traffic from Layer 3 modules that requires routing is routed
directly in hardware by the Layer 3 media module without a need to traverse the
switching fabric to get to the supervisor module’s software routing function.
❒ All unknown (not learned) traffic from Layer 3 modules must first be sent to the
Layer 3 supervisor module, where information on the frame is added to the
supervisor module’s master routing table and added to the appropriate address
caches of Layer 3 media modules.
❒ Since Layer 2 modules have no routing capability, packets that are received by a
Layer 2 module and require routing are routed by sending the packet to the Layer
3 supervisor module. The routing engine on the supervisor module then performs
the routing operation for the Layer 2 modules and sends the packet back through
the switching fabric to the destination port.
Figure 1-4 shows a conceptual example of how traffic is routed in a Cajun switch.
Figure 1-4. Layer 2/3 Routing with Cajun Switch
L2/L3
Supervisor
L2/L3
Supervisor
L2/L3
Supervisor
L2/L3 I/O Module
L2/L3 I/O Module
L2/L3 I/O Module
L2 I/O Module
L2/L3 I/O Module
L2 I/O Module
Between
B e t w e e nL2
L 2 I/O
I / O MModules
odules
Between
B e t w e e n L L3
3 I / OI/O
M o dModules
ules
Between
B e t w e e n L 2L2
a n dand
L 3 I /L3
O MI/O
o d u Modul
les
Virtual Bridging Functions
The switch design supports:
❒ Up to 24,000 MAC addresses in the switch address forwarding table - This feature
allows the switch to store forwarding information for hosts in very large networks.
❒ Segmented address tables qualified by address and VLAN membership - This
feature allows the same host to appear on different VLANs on different ports.
1-8
Cajun P550/P220 Switch Operation Guide
Cajun P550 Switch Overview
❒ Optional per-VLAN spanning tree - This isolates loop control to smaller domains, so
spanning trees converge faster after a topology change. Otherwise, packets are
forwarded to the port’s default VLAN.
VLAN Functions
A VLAN (Virtual LAN) is a logical group of hosts on a local area network (LAN) that
communicate as if they were on the same wire, even though they are physically on
different LAN segments throughout a site.
Virtual LANs provide network managers with two significant capabilities:
❒ The ability to segment traffic in a flat switched network. This helps prevent traffic
from being forwarded to stations where it is not needed.
❒ The ability to ignore physical switch locations when creating workgroups. VLANs
are logical constructions and can traverse physical switch boundaries.
The switch hardware supports Layer 1, Layer 2, and Layer 3 VLANs. The switch-based
VLANs have the following characteristics:
❒ Frames classified as they enter the switch using Layer 1 (Port-based).
❒ Explicitly-tagged VLAN packets are forwarded based on the information in the
packet.
❒ VLANs define a set of ports in a flooding domain. Packets that need to be flooded
are sent only to ports participating in that VLAN (Figure 1-5).
Cajun P550/P220 Switch Operation Guide
1-9
Cajun P550 Switch Overview
Figure 1-5. flooding Domain
Virtual Bridging
Virtual
Bridging
Function
Virtual
Bridging
Function
Virtual
Bridging
Function
Function
Frame Classification
Function
Port
Hunt Groups
Hunt groups (also known as link aggregation) aggregate bandwidth from multiple ports
so they act as one high-bandwidth switch port. The concept used is borrowed from the
world of telephony, where incoming calls to a single phone number are routed to the
first available line. Hunt groups allow you to create multi-gigabit pipes to transport traffic
through the highest traffic areas of your network.
A hunt group provides:
❒ Inter-operation with other vendor’s equipment (for example, Cisco’s Etherchannel
and Sun’s Quad Adapter).
❒ Shared traffic load.
❒ Destination address-based traffic sorting, which keeps packets in the right order.
❒ Fault tolerance. If a port in a group fails, the remaining ports in the group pick up
the traffic load.
❒ Support for any number of same-speed connections in a group.
❒ Faster recovery from link failure: If a port in the group fails, the remaining ports
can carry the load. Recovery not limited by spanning tree convergence time
(convergence time is the time the network takes to resume steady-state forwarding
after spanning tree reconfiguration).
❒ Up to ten groups per switch.
1-10
Cajun P550/P220 Switch Operation Guide
Cajun P550 Switch Overview
OpenTrunk Technology
OpenTrunk technology translates VLAN-tagged frames from one format to another
(including CoS).
The switch is delivered as a plug-and-play IEEE 802.1D standard bridge, but supports
several VLAN tagging schemes. This makes the switch highly interoperable in existing
networks because:
❒ Any port can be a trunk port.
❒ Ports have configurable VLAN tagging on a per-port basis.
❒ Ports process a number of popular VLAN tagging schemes, including major
vendors’ proprietary schemes.
Figure 1-6. Open Trunk Technology
3Com LinkSwitch
3Com LinkSwitch
P550
Multilayer
IEEE 802.1Q
Multilayer
IEEE 802.1Q
OpenTrunk translates VLAN-tagged frames
from one format to another (including CoS)
Open Trunk Technology features include:
❒ Switch supports frame encapsulation
•
Identifies frame VLAN via tag
•
Associates frame priority
❒ Switch supports multiple tagging formats
•
IEEE 802.1Q standard draft document
•
A major vendor’s multi-level tagging scheme
•
3Com VLAN Tag and PACE priority signalling
❒ Switch supports translation to and from any format. A packet can enter the switch
with a 3Com SuperStack II VLAN tag and exit the switch as a multi-layer tagged
packet.
Cajun P550/P220 Switch Operation Guide
1-11
Cajun P550 Switch Overview
Figure 1-7. Trunking Translation
•“C lea r”
•IEE E
80 2 .1 Q
•M u ltila ye r
•3C om
Fra m e Form a t:
“N o rm al” - E th erne t
or 8 0 2.3 w ith va lid
CRC
T ra n sla tio n F u nctio n
F ra m e
F o rm at:
T ra n sla tio n F u nctio n
Trunking Translation:
F ra m e
F o rm at:
•“C lea r”
•IEE E
80 2 .1 Q
•M u ltila ye r
•3C om
Spanning Tree Models
Spanning trees are an IEEE 802.1 standard which provides distributed routing over
multiple LANs connected by bridges.
There are three spanning tree models:
❒ Single IEEE 802.1D spanning tree
❒ Spanning tree per VLAN
❒ Optimized “per-VLAN” spanning trees using a scalable, two-layer spanning tree
approach
Note: All models interoperate with legacy IEEE 802.1D bridges and switches.
Dual layer spanning trees provide two very important capabilities:
❒ Smaller spanning tree domains means much faster convergence during spanning
tree reconfiguration.
❒ Per-VLAN operation enables you to use more of the available bandwidth when you
have redundant links. A particular link can be blocked on one VLAN, but still
forward packets on another.
1-12
Cajun P550/P220 Switch Operation Guide
Cajun P550 Switch Overview
Figure 1-8. Spanning Tree
Single 802.1D Spanning Tree
One Spanning Tree
Longer convergence
One path to and from root for all VLANs
Improper configuration
can shut down Trunk Links
Multi-LevelSpanning
SpanningTree
Tree
Multi-layer
Backbone terminates 802.1D STP
Smaller STP Domains
Quicker Convergence
VLAN Load Balancing
Interoperates w/ existing Bridge/Routers
Extensive Fault Tolerance
The Cajun P550 switch is designed as a backbone switch. You can install the switch in
your network’s core without creating a single point of failure.
Extensive fault tolerance features include:
❒ N+1 power. Power supplies share the power supply load. If a power supply fails,
the remaining supply or supplies assume the load automatically and the switch
management system warns you of the failure.
❒ Hot-swappable power supplies, fans, and modules - Each can be changed from the
switch front panel, without powering down the switch.
❒ Redundant switch links (using spanning tree and hunt groups).
❒ Front-loadable cables, modules, power, supplies and fans.
❒ Redundant switch matrix and switch controller modules.
Cajun P550/P220 Switch Operation Guide
1-13
Cajun P550 Switch Overview
Buffer and Queue Management
Adding gigabit speeds to existing networks means that there can be a huge disparity
between link speeds. For example, anything more than a 1% load on a gigabit link could
easily overwhelm a 10 Mb/s Ethernet link.
Without queue and buffer management, gigabit links might only move congestion in a
network, rather than relieving it. The switch employs the following buffer and queue
management techniques:
❒ Configurable active backpressure:
•
Half-duplex ports use active backpressure to jam input ports when their frame
buffers are full.
•
Full-duplex links use IEEE 802.3z pause control frames to pause traffic when
buffers are full.
❒ Packed frame buffers for optimal memory utilization. The memory management
allows virtually 100% utilization of buffer memory.
❒ Two Class of Service priority queues that provide flexible queue management
algorithms to meet application requirements.
❒ Large buffer space:
•
512 KB per gigabit port.
•
128 KB additional for outbound 10/100 ports.
❒ Configurable queue depth for each of two prioritized packet queues.
❒ Configurable priority threshold.
Web-Based Management
Web-based management allows you to manage switches from any station connected to
your network.
The switch offers a command line interface and a rich set of web-based management
features:
❒ Reduced Instruction Set Computing- based (RISC) Supervisor provides high-speed
VLAN, RMON, and network management support.
❒ Web Agent: Built-in SNMP and HTML-based agent, compatible with popular Web
browsers, provides top-to-bottom switch management.
1-14
Cajun P550/P220 Switch Operation Guide
Cajun P550 Switch Overview
Smart Agent
Smart Agent, the software for the Supervisor Module, has the following features:
❒ Built-in support for Simple Network Management Protocol (SNMP) and HTML
❒ Out-of-band from 10Base-T or RS-232
❒ In-band from a defined VLAN
❒ Powerful alarm and event logging subsystem
❒ Point and click interface with Netscape Navigator V3.0 or later or Microsoft
Internet Explorer V3.0 or later
Cajun P550 Switch Modules
The Layer 2 and Layer 3 supervisor and media modules implement wire speed routing
and bridging in Application-Specific Integrated Circuits (ASICs). One set of ASICs
supports a gigabit-per-second’s worth of traffic (any combination of Layer 2 and Layer
3). The routing and bridging ASICs can process 1.5 million packets per second, which is
just slightly more than a gigabit’s worth of minimum-sized Ethernet frames.
Note: All Layer 3 modules interoperate with the Layer 2 modules.
Cajun P550/P220 Switch Operation Guide
1-15
Cajun P550 Switch Overview
1-16
Cajun P550/P220 Switch Operation Guide
2
Overview of the P220 Gigabit
Switch Family
The information in this chapter applies to both the P220G and P220FE switches, unless
specified otherwise.
Overview
The P220 switch family supports the requirements of the next wave of networking:
❒ More bandwidth
❒ Elimination of bottlenecks
❒ Better manageability
❒ Dependable multimedia support
The P220 switch family offers an unrivaled combination of capacity and Class of
Service/Quality of Service (CoS/QoS) features. The system satisfies the demanding
requirements of the bandwidth-starved campus backbone and high-performance
workgroup environments.
The P220G switch has the following features:
❒ Seven fixed gigabit-speed Ethernet ports
❒ Optional Expander module
•
Four 10/100BaseBase-TX ports (autosensing)
•
Two 100Base-FX ports
•
One 1000Base-SX
•
1000Base-LX
•
One 1000Base-SLX
Cajun P550/P220 Switch Operation Guide
2-1
Overview of the P220 Gigabit Switch Family
The P220FE switch has the following features:
❒ 24 10/100Base-TX ports
❒ One Gigabit Ethernet port
❒ Optional Expansion modules:
•
Four 10/100Base-TX ports (autosensing)
•
Two 100Base-FX ports
•
One 1000Base-SX
•
One 1000Base-LX
•
One 1000Base-SLX
Switch Features
This section describes the following switch features:
❒ Crossbar Switch Fabric
❒ Virtual Bridging Functions
❒ VLAN Functions
❒ Hunt Groups
❒ OpenTrunk Technology
❒ Spanning Tree
❒ Buffer and Queue Management
❒ Web-Based Management
Crossbar Switch Fabric
The crossbar switch matrix provides low latency, high throughput packet switching using
a crossbar architecture (Figure 2-1).
2-2
Cajun P550/P220 Switch Operation Guide
Overview of the P220 Gigabit Switch Family
Figure 2-1. Crossbar Architecture
Port 1
1.76 Gb/s
22.88 Gb/s
Port 2
Port 1
1.76 Gb/s
Port 2
Crossbar
Port 13
Port 13
Crossbars are more scalable than shared memory architectures. Architecturally, you can
add more capacity simply by adding more switch elements. By comparison, shared
memory switches have an inherent maximum upper boundary in throughput that
makes high-density, single-backplane gigabit switches impractical. With a crossbar
architecture you increase the number of gigabit ports in your network and the
architecture scales to meet your needs.
The P220G crossbar supports:
❒ Nine fabric ports running at full line rate.
❒ 1.76 Gbps (in and out) on each fabric port.
❒ 31.68 Gbps total capacity.
❒ Under-subscribed switching fabric.
❒ Single copy replication. When possible, input frames destined for output on
multiple switch ports pass through the crossbar only once and are copied by the
crossbar to each destination.
❒ Hardware-assisted multicast pruning. The switch forwards only to appropriate
destination switch ports.
The P220FE crossbar supports:
❒ Five fabric ports running at full line rate.
❒ 1.76 Gbps (in and out) on each fabric port.
Cajun P550/P220 Switch Operation Guide
2-3
Overview of the P220 Gigabit Switch Family
❒ 17.6 Gbps total capacity.
❒ Single copy replication. When possible, input frames destined for output on
multiple switch ports pass through the crossbar only once and are copied by the
crossbar to each destination.
❒ Hardware-assisted multicast pruning. The switch forwards only to appropriate
destination switch ports.
Virtual Bridging Functions
The switch design supports:
❒ Over 24,000 Media Access Control (MAC) addresses in the switch address
forwarding table. This feature allows the switch to store forwarding information for
hosts in very large networks.
❒ Segmented address tables qualified by address and Virtual LAN (VLAN)
membership. This feature allows the same host to appear on different VLANs on
different ports.
❒ Optional per-VLAN spanning tree. This isolates loop control to smaller domains, so
spanning trees converge faster during reconfiguration.
VLAN Functions
A VLAN (Virtual LAN) is a software defined group(s) of hosts on a local area network
(LAN) that communicate as if they were on the same wire, even though they are
physically on different LAN segments throughout a site.
VLANs provide network managers with two significant capabilities:
❒ The ability to segment traffic in a “flat” switched network. This helps prevent traffic
from being forwarded to stations where it is not needed.
❒ The ability to ignore physical switch locations when creating workgroups. VLANs
are logical constructions and can traverse physical switch boundaries.
The P220 switch supports Layer 1, port-based VLANs, which have the following
characteristics:
❒ Frames classified as they enter the switch using Layer 1 (Port-based).
❒ Explicitly tagged VLAN packets are forwarded based on the information in the
packet. (See OpenTrunk Technology on page 2-5 for more information.)
❒ Up to 1000 VLANs. VLANs define a set of ports in a flooding domain. Packets that
need to be flooded are sent only to ports participating in that VLAN.
2-4
Cajun P550/P220 Switch Operation Guide
Overview of the P220 Gigabit Switch Family
Hunt Groups
Hunt groups (also known as link aggregation) aggregate bandwidth from multiple ports
so they act as one high-bandwidth switch port. The concept used is borrowed from the
world of telephony, where incoming calls to a single phone number are routed to the
first available line. Hunt groups allow you to create multi-gigabit pipes to transport traffic
through the highest traffic areas of your network.
A hunt group provides:
❒ Shared traffic load.
❒ Destination address-based traffic sorting, which keeps packets in the right order.
❒ Fault tolerance. If a port in a group fails, the remaining ports in the group pick up
the traffic load.
❒ Support for any number of same-speed connections in a group.
❒ Faster recovery from link failure: If a port in the group fails, the remaining ports
can carry the load. Recovery not limited by spanning tree convergence time
(convergence time is the time the network takes to resume steady-state forwarding
after spanning tree reconfiguration).
❒ Up to ten hunt groups per switch.
OpenTrunk Technology
OpenTrunk technology translates VLAN-tagged frames from one format to another
(including CoS).
The P220 switch is delivered as a plug and play IEEE 802.1D standard bridge, but
supports several VLAN tagging schemes. This makes the switch highly interoperable in
existing networks because:
❒ Any port can be a trunk port.
❒ Ports have configurable VLAN tagging on a per-port basis.
❒ Ports process a number of popular VLAN tagging schemes, including major
vendors’ proprietary schemes (Figure 2-2).
Cajun P550/P220 Switch Operation Guide
2-5
Overview of the P220 Gigabit Switch Family
Figure 2-2. Tagging Schemes
3Com LinkSwitch
3Com LinkSwitch
P220FE
P220G
Multilayer
IEEE 802.1Q
Multilayer
OpenTrunk translates VLAN-tagged
frames from one format to another,
including CoS
IEEE 802.1Q
OpenTrunk technology has the following features:
❒ Switch supports frame encapsulation:
•
Identifies frame VLAN via tag
•
Associates frame priority
❒ Switch supports multiple tagging formats:
•
IEEE pre-standard format based on 802.1Q draft document
•
A major vendor’s multi-layer tagging scheme
•
3Com® VLAN Tag and PACE priority signalling
❒ Switch supports translation to and from any format. A packet can enter the switch
with a 3Com SuperStack II VLAN tag and exit the switch as a multi-layer tagged
packet (Figure 2-3).
2-6
Cajun P550/P220 Switch Operation Guide
Overview of the P220 Gigabit Switch Family
Figure 2-3. Trunking Translation
•“Clear”
•IEEE
802.1Q
•Multilayer
•3Com
Frame Format:
“Normal” - Ethernet
or 802.3 with valid
CRC
Translation Function
Frame
Format:
Translation Function
Trunking Translation:
Frame
Format:
•“Clear”
•IEEE
802.1Q
•Multilayer
•3Com
Dual Layer Spanning Trees
Spanning trees are an IEEE 802.1 standard which provides distributed routing over
multiple LANs connected by bridges.
There are three spanning tree models:
❒ Single IEEE 802.1D spanning tree
❒ Spanning tree per VLAN
❒ Optimized “per-VLAN” spanning trees using a scalable, two-layer spanning tree
approach
Note: All models interoperate with legacy IEEE 802.1D bridges and switches.
Dual layer spanning trees provide two very important capabilities:
❒ Smaller spanning tree domains means much faster convergence during spanning
tree reconfiguration.
❒ Per-VLAN operation enables you to use more of the available bandwidth when you
have redundant links. A particular link can be blocked on one VLAN, but still
forward packets on another.
Cajun P550/P220 Switch Operation Guide
2-7
Overview of the P220 Gigabit Switch Family
Figure 2-4. Spanning Tree
Single 802.1D Spanning Tree
One Spanning Tree
Longer convergence
One path to and from root for all VLANs
Improper configuration
can shut down Trunk Links
Multi-LevelSpanning
SpanningTree
Tree
Multi-layer
Backbone terminates 802.1D STP
Smaller STP Domains
Quicker Convergence
VLAN Load Balancing
Interoperates w/ existing Bridge/Routers
Buffer and Queue Management
Adding gigabit speeds to existing networks means that there can be a huge disparity
between link speeds. For example, anything more than a 1% load on a gigabit link could
easily overwhelm a 10 Mb/s Ethernet link.
Without queue and buffer management, gigabit links might only move congestion in a
network, rather than relieving it. The switch employs the following buffer and queue
management techniques:
❒ Configurable active backpressure:
•
Half-duplex ports use active backpressure to jam input ports when their frame
buffers are full.
•
Full-duplex links use IEEE 802.3z pause control frames to pause traffic when
buffers are full.
❒ Packed frame buffers for optimal memory utilization. The memory management
allows virtually 100% utilization of buffer memory.
❒ Two Class of Service priority queues that provide flexible queue management
algorithms to meet application requirements.
2-8
Cajun P550/P220 Switch Operation Guide
Overview of the P220 Gigabit Switch Family
❒ Large buffer space:
•
512 KB per gigabit port.
•
128 KB additional for outbound 10/100 ports.
❒ Configurable queue depth for each of two prioritized packet queues.
❒ Configurable priority threshold.
Web-Based Management
Web-based management allows you to manage switches from any station connected to
your network.
The switch offers a command line interface to set up connection, and a rich set of
web-based management features:
❒ Reduced Instruction Set Computing- based (RISC) Supervisor provides high-speed
VLAN, RMON, and network management support.
❒ Web Agent: Built-in SNMP and HTML-based agent, compatible with popular Web
browsers, provides top-to-bottom switch management.
Smart Agent
Smart Agent, the software for the Supervisor Module, has the following features:
❒ Built-in support for Simple Network Management Protocol (SNMP) and HTML
❒ Out-of-band from 10Base-T or RS-232
❒ In-band from a defined VLAN
❒ Powerful alarm and event logging subsystem
❒ Point and click interface with Netscape Navigator V3.0 or later or Microsoft
Internet Explorer V3.0 or later
RMON for Traffic Analysis
RMON (Remote Monitoring) for traffic analysis has the following features:
❒ Four groups implemented in hardware
❒ Configurable mirror destination per switch fabric port
Cajun P550/P220 Switch Operation Guide
2-9
Overview of the P220 Gigabit Switch Family
2-10
Cajun P550/P220 Switch Operation Guide
3
Configuring the Cajun P550
Switch (Layer 2 & Layer 3)
This chapter and its procedures are common to both Layer 2 and Layer 3 configuration.
Included in this chapter:
❒ Terminal Settings
❒ Configuring the Supervisor Module Using the CLI
❒ Configuring the Switch Using the Web Agent
❒ Configuring Port Parameters Using the Web Agent
❒ Configuring System Information
❒ Managing Configuration Files
Terminal Settings
To complete initial switch setup, you need a PC with a serial line connection. It must
have the following terminal settings to communicate with the switch (Table 3-1).
Table 3-1. Terminal Settings
Baud Rate
Stop Bits
Data Bits
Flow
Control
Parity
9,600
1
8
Xon/Xoff
None
Configuring the Supervisor Module Using the CLI
To connect to the Web Agent, you must first use the serial command line interface (CLI)
to give the supervisor module an IP address and a subnetwork mask.
Cajun P550/P220 Switch Operation Guide
3-1
Configuring the Cajun P550 Switch (Layer 2 & Layer 3)
To configure the supervisor module using the CLI:
1. Attach a serial cable from your PC’s serial port to the serial port of the supervisor
module front panel (refer to Figure 3-1) using a 9-pin straight-through
male-to-female serial cable (refer to “Switch Features,” earlier in this guide for
pinout information).
2. Run a terminal emulation program (HyperTerminal, for example) on the attached
PC. Ensure that the terminal settings match those listed in Table 3-1.
3. Power up the switch by turning on the power supplies. In the terminal emulation
program, the switch displays the following startup messages:
Booting the operational system, please wait ....
Initializing
Initializing
Initializing
Initializing
Initializing
the
the
the
the
the
file subsystem ... done
event subsystem ... done
agent subsystem ... done
platform ... done
switch subsystem ... done
Starting up threads ...
Periodic Task
Event
Network Interface
Switch Interface
Telnet Processes
Ping Process
Module Manager
Address Table Aging
Multicast Pruning
Front Panel Display
Download
Fans Poller
Power Supplies Poller
VTP Snooping
Redundant Controller/Element Poller Task
Command Line Parser
Powering up modules
Module 1 Powered
Waiting for power cycle to complete (The 17 second power cycle option)
Module 2 Powered
Initializing the module subsystem ... done
System initialization complete.
Configuring system from Startup Config file [/nvram/startup.txt] ... done
Boot process complete - system is now operational.(3.0->4.0 conversion)
Creating Startup Config file [/nvram/startup.txt] ... done
Copyright © 1999, All rights reserved by Lucent Technologies Corporation
This software is furnished under a license and may be used in accordance
with the terms of such license and with the inclusion of the above
copyright notice. This software or any other copies thereof may
3-2
Cajun P550/P220 Switch Operation Guide
Configuring the Cajun P550 Switch (Layer 2 & Layer 3)
not be provided or otherwise made available to any other person.
No title to and ownership of the software is hereby transferred.
Contains software developed by:
Epilogue Technology Corporation
Copyright (c) 1988 - 1996 Epilogue Technology Corporation
TEC Technically Elite Concepts, Inc.,
Copyright (c) 1994 by Technically Elite Concepts, Inc.,
Hermosa Beach, California, U.S.A.
ISI Integrated Systems, Inc.
Copyright 1991 - 1995, Integrated Systems, Inc.
All other trademarks used herein are the property of their respective
owners.
Lucent Technologies Cajun Switch Agent v4.0.0
Press Ctrl-P for previous command, Ctrl-N for next command,? for help.
Login:
Note: Information you enter at the Login and Password prompts is case sensitive.
4. At the Login prompt, enter root. The password prompt displays.
Password:
5. At the Password prompt, enter root as the default password. The command line
interface prompt displays.
6. Enter the command enable.
7. Enter the command configure. This changes the command mode to configure
mode so that you can use the setup command.
8. Enter the command setup. This initiates a series of queries. Answer each query as
follows:
a. When prompted to change the super user password, press Enter to accept the
default answer of Yes.
b. Enter your old password. The system then prompts you for a new password.
The default password is root.
c. Enter your new password, then re-enter the new password to verify your
choice.
d. Enter the IP address for the switch manager’s Ethernet console.
e. Enter the subnet mask for the network’s IP address.
f. Enter the default gateway for the switch.
Figure 3-1 illustrates an example setup command session.
Cajun P550/P220 Switch Operation Guide
3-3
Configuring the Cajun P550 Switch (Layer 2 & Layer 3)
Figure 3-1. Layer 2/Layer 3 CLI Setup Command Display
Welcome to Switch Setup. The brief series of questions that
follows will help you to configure this switch. After completing
this process, you will be able to manage the switch using:
- the switch-based HTTP server
- the Element Management System.
Text in [] is the default answer for each questions. To accept
the default, press ENTER.
Would you like to change the super user password [Yes]? Y
Old Password: xxxx
New Password: xxxx
Re-type New Password: xxxx
User password changed succesfully
What do you want the switch manager's console
Ethernet IP Address to be [0.0.0.0]? 10.0.0.1
What is the subnet mask for your network's
IP address [0.0.0.0]? 255.255.255.0
What is the IP address of the default gateway for this network segment [0.0.0.0]?
You can now connect to the switch using the front-panel
out-of-band 10Base-T connection. This allows you to log in
using either the embedded web agent or the EMS.
See the Installation and Operation guides for instruction on establishing additional IP
network connections.
Connect to the system with an out-of-band connection using the 10Base-T port on the
supervisor module front panel for Layer 2 or 10/100Base-T port on the supervisor
module for Layer 3.
Figure 3-2. Cajun P550 Switch
Attach serial
port cable here
Attach
Ethernet cable
here
3-4
Cajun P550/P220 Switch Operation Guide
Configuring the Cajun P550 Switch (Layer 2 & Layer 3)
Table 3-2. Pinouts for 10Base-T Crossover Patch Cables
Pin #
Color
Pin #
Color
1
WO
3
WG
2
O
6
G
3
WG
1
WO
4
B
4
B
5
WB
5
WB
6
G
2
O
7
WBr
7
WBr
8
Br
8
Br
After your switch is connected to the network using an out-of-band connection, log in to
the switch using a Web browser, as described in “Logging In to the Web Agent”, later in
this chapter.
Configuring the Switch Using the Web Agent
The switch includes an embedded HTTP server that allows you to set all the switch’s
parameters. Use this interface for quick and simple configuration changes. Refer to the
Cajun P550 Manager User Guide for information on monitoring and configuring the Cajun
switch using the Cajun P550 Manager interface.
Figure 3-3. Cajun P550 Switch Web Agent Application
Cajun P550/P220 Switch Operation Guide
3-5
Configuring the Cajun P550 Switch (Layer 2 & Layer 3)
Logging In to the Web Agent
Although the Web Agent supports any frames-capable browser, the system has been
qualified with the following browsers:
❒ Netscape Navigator 4.5 or later
❒ Microsoft Internet Explorer 3.0 or later
To log in to the Web Agent:
1. Start your browser.
2. In the Location field, enter the URL of the switch you want to manage
(for example: http://127.255.255.0). Remember that each interface to the
supervisor module (console or inband) has a separate IP address. For Layer 3, this
location can be that of any of the router interfaces.
3. Press Enter. The login window opens.
4. Click Login. The Username/Password dialog box opens.
5. Enter a valid user name. The default super user name is root.
6. Enter a valid password. The default password is root. The Web Agent window
opens. (Figure 3-3)
Note: Change the root password for the system as soon as possible to optimize
security.
Setting Up User Accounts
User accounts set up in the system allow you to access both the command line interface
and the Web Agent.
To add a user to this interface:
1. Log in to the switch from your Web browser, using a user name with administrator
privileges. The default login of user root, password root has this authority. The
Web Agent application window opens.
2. In the System Configuration section of the Web Agent window, select User
Logins. The User Account Management dialog box opens.
3. Click Add User. The Add User Account dialog box opens.
4. In the User Name field, enter a user name for the account.
5. In the Password field, enter a password for the account.
6. In the Re-enter Password field, re-enter the same password.
3-6
Cajun P550/P220 Switch Operation Guide
Configuring the Cajun P550 Switch (Layer 2 & Layer 3)
7. From the Access Type pull-down menu, select an access type (Table 3-3).
Table 3-3. User Account Access Levels
User Level
Can
Cannot
User (READ_ONLY)
View switch configuration
settings and statistics.
View user accounts and community
strings. Change switch
configurations.
Manager
(READ_WRITE)
View and set switch
configuration settings, and
view statistics.
View user accounts and community
strings.
Administrator
(ADMINISTRATOR)
View and set all switch
parameters.
N/A
8. Click APPLY save your changes, or CANCEL to restore previous settings.
Configuring Port Parameters Using the Web Agent
The system has two levels of port settings:
❒ Physical port parameters - Allows you to set up rules that guide the system’s
physical layer interaction (for example, enable/disable, speed, auto-negotiation).
❒ Switch port parameters - Allows you to specify how the port participates in
switching (for example, VLAN mode, trunking).
The sections that follow explain how to configure these ports.
Configuring Physical Port Parameters on Gigabit Ports
To configure ports on a gigabit module:
1. In the System Configuration section of the Web Agent window, select Modules
& Ports. The Module Information dialog box opens.
2. In the Ports column, click the number (2 or 4 for gigabit modules) for the module
you want to configure. The Physical Port Configuration dialog box opens.
3. Click Enable to enable a port, or if the check box is enabled, click Enable if you
want to disable the port.
4. Click APPLY to save your settings, or CANCEL to restore previous settings.
5. In the Name field, click the port name to set additional parameters. The Detailed
Physical Port Configuration dialog box opens.
Cajun P550/P220 Switch Operation Guide
3-7
Configuring the Cajun P550 Switch (Layer 2 & Layer 3)
Refer to Table 3-4 for more information on the Gigabit port parameters.
6. In the Name field, enter a port name.
7. If this is an end-station port, from the Category pull-down menu, select User
Port. For trunk ports, select Service Port.
8. From the Flow Control Mode pull-down menu, select Enable to use flow control
to prevent buffer overflows. Disable this feature only when flow control is causing
congestion in other areas of the network.
9. From the Pace Priority Mode pull-down menu, select Enable to recognize and
use 3Com’s PACE priority mechanism.
10. From the Remote Fault Detect pull-down menu, select Enable to detect remote
link errors.
Notes:
•
The remote fault detection functionality should be enabled (on both ends of a
Cajun to Cajun link) in two cases. The first case is when two Cajun gigabit ports
are connected that do not support auto-negotiation. The second case is when a
Cajun gigabit port that does not support auto-negotiation is connected to a
Cajun gigabit port that does support auto-negotiation. If two gigabit ports that
support auto-negotiation are connected, you should enable auto-negotiation.
•
Auto-negotiation and remote fault detection cannot be enabled concurrently.
Auto-negotiation must be disabled in order to enable remote fault detection.
When auto-negotiation is enabled, remote fault detection is automatically
disabled.
•
For GMAC1 gigabit modules, auto-negotiation is always disabled.
11. Click APPLY to save your changes, or CANCEL to restore previous settings.
Table 3-4 describes the gigabit port parameters:
Table 3-4. Gigabit Port Parameters
Parameter
Definition
Name
A user-assigned name for this port (possibly a drop name or the
name of the station or other device connected to the port).
Category
Allows you to select either User Port or Service Port. The User
Port is intended for use with switch connections to end user
nodes. The Service Port is intended for use with switch
connections to servers or other switches.
The primary difference between the User and Service Port
designation is that a Service Port allows the switch to generate
both log messages and alarm messages (traps). The User Port
only generates log messages. This prevents your network
management station from being overwhelmed by port up/down
messages that result from users turning workstations on and off.
3-8
Cajun P550/P220 Switch Operation Guide
Configuring the Cajun P550 Switch (Layer 2 & Layer 3)
Table 3-4. Gigabit Port Parameters (Continued)
Parameter
Definition
Flow Control
Mode
Determines if IEEE 802.3z pause control is used on this port.
The pause mechanism allows the port to stop a sending station
from sending more packets if the receiving port’s buffers are full.
This helps prevent lost or dropped packets.
This feature is recommended for use primarily on end station
connections. Using this feature on trunk ports can cause
unnecessary congestion on the network.
Port PACE Priority
Determines if the port detects 3Com’s copyrighted PACE format
as packets pass through the port. PACE allows a packet’s priority
(higher priority packets move through the switch faster) to be
set at the adapter.
Remote Fault
Detect
Proprietary mechanism to detect remote link errors on Cajun
gigabit ports. The default value is Disabled.
The remote fault detection functionality should be enabled (on
both ends of a Cajun to Cajun link) in two cases:
• When two Cajun gigabit ports are connected that do not
support auto-negotiation.
• When a Cajun gigabit port that does not support
auto-negotiation is connected to a Cajun gigabit port that
does support auto-negotiation.
Configuring Physical Port Parameters on Fast Ethernet Ports
To configure ports on a Fast Ethernet module:
1. In the System Configuration section of the Web Agent window, select Modules
& Ports. The Module Information dialog box opens.
2. In the Ports column, click the number for the module you want to configure (for
example, 12 for 100Base-TX). The Physical Port Configuration dialog box opens.
3. Click the Enable check box to enable a port, or if the check box is enabled, click
the Enable check box if you want to disable the port.
4. Click APPLY to save your changes, or CANCEL to restore previous settings.
5. In the Name field, click the port name to set additional parameters. The Detailed
Physical Port Configuration dialog box opens.
Refer to Table 3-5 for more information on the Fast Ethernet (10/100) parameters.
6. In the Name field, enter a port name.
7. If this is an end-station port, from the Category pull-down menu, select User
Port. For trunk ports, select Service Port.
Cajun P550/P220 Switch Operation Guide
3-9
Configuring the Cajun P550 Switch (Layer 2 & Layer 3)
8. From the Speed Mode pull-down menu, select a speed (10 Mb/s or 100 Mb/s) if
you want to set the port speed manually. If you set the port to auto-negotiate, this
setting is ignored. (This feature is only available for 10/10 TX).
9. From the Duplex Mode pull-down menu, select a mode (Half-duplex or
Full-duplex) if you want to set the port’s duplex mode manually. If you set the port
to auto-negotiate, this setting is ignored.
10. From the Flow Control Mode pull-down menu, select Enable if you want this
port to use Flow Control to prevent buffer overflows. Disable this feature only
when flow control is causing congestion in other areas of the network.
11. From the Auto Negotiation Mode pull-down menu, select Enable. (This feature
is only available for 10/10 TX).
Note: This feature works best when the port or device on the other end of the
connection auto-negotiates as well. If you are having problems with
auto-negotiating connections, try setting the modes manually using the
command line interface. For example, set port auto 7/3 enable.
12. From the Auto Negotiation Speed Advertisement and Auto Negotiation
Duplex Advertisement pull-down menus, set Speed and Duplex
Advertisement, respectively. The switch sends these values to the device on the
other end of the connection at the start of the auto-negotiating process. In general,
the defaults are best, but there may be situations when you want to fix one setting,
but allow the other setting to auto-negotiate. (This feature is only available for
10/10 TX).
13. From the Rate Limit Mode pull-down menu, select Enable if you want this port
to limit the number of unknown unicast and multicast (flooded) packets it tries to
forward.
a. From the Rate Limit Rate pull-down menu, select the percentage of a port’s
traffic that can be unknown unicast and broadcast packets. Lower this value if
the port is having overflow problems.
b. From the Rate Limit Burst Size pull-down menu, select a packet limit for
the number of packets allowed in a single burst. Valid values are 1 to 2048. For
Fast Ethernet ports, set this value lower than 1024 (the output buffer’s
capacity). Set this value lower if the port is experiencing overflow problems.
14. From the Pace Priority Mode pull-down menu, select Enable if you want this
port to recognize and use 3Com’s PACE priority mechanism.
15. Click APPLY to save your changes, or CANCEL to restore previous settings.
3-10
Cajun P550/P220 Switch Operation Guide
Configuring the Cajun P550 Switch (Layer 2 & Layer 3)
Table 3-5 describes the Fast Ethernet port parameters:
Table 3-5. Fast Ethernet (10/100) Port Parameters
Parameter
Definition
Name
A user-assigned name for this port (possibly a drop name or the
name of the station or other device connected to the port).
Category
Allows you to select either User Port or Service Port.
• The User Port is intended for use with switch connections to
end user nodes.
• The Service Port is intended for use with switch connections
to servers or other switches. The Service Port allows the
switch to generate both log messages and alarm messages
(traps). The User Port only generates log messages,
preventing your network management station from being
overwhelmed by port up/down messages that result from
users turning workstations on and off.
Speed Mode
Allows you to select the speed of the port manually (to either 10
or 100 Mb/s). If auto-negotiation is enabled, this setting is
ignored.
Duplex Mode
Allows you set the port duplex mode (half- or full-duplex). If
auto-negotiation is enabled, this setting is ignored.
Flow Control Mode
Determines if flow control is used on this port. For half-duplex
links, active backpressure jams the sending Ethernet channel
until the port’s buffers can receive more packets. This prevents
lost or dropped packets.
For full-duplex links, IEEE 802.3z pause control allows the port
to stop a sending station from sending more packets if the
receiving port’s buffers are full.
For TX and FX ports, there is an additional option for Enable
with Aggressive Backoff. This option limits the size of the bursts.
Flow Control is recommended for use primarily on end-station
connections. Using this flow control on trunk ports can cause
unnecessary congestion on the network.
Auto Negotiation
Mode
Allows you to set the port to auto-negotiate a speed and duplex
mode. Auto-negotiate works best when the connection on the
other end of the link is set to auto-negotiate as well. If you set a
port to auto-negotiate, and the connection is not successful, set
the port speed and duplex mode manually.
Auto Negotiation
Speed/Duplex
Advertisement
Determines what information the port advertises when it starts
auto-negotiating. In most cases, 10/100 and Half/Full are the
best settings, but there may be cases when you want to
auto-negotiate one parameter, while keeping the other fixed.
Cajun P550/P220 Switch Operation Guide
3-11
Configuring the Cajun P550 Switch (Layer 2 & Layer 3)
Table 3-5. Fast Ethernet (10/100) Port Parameters (Continued)
Parameter
Definition
Rate Limit Mode
Prevents the switch from overwhelming the output buffer on
lower-speed ports by placing a threshold on the percentage of
port traffic that can be flooded packets (unknown unicasts and
multicasts). You can optionally include known multicast packets
in this percentage to further decrease the possibility of the port’s
output buffer being overwhelmed.
Rate Limit Rate
Determines the percentage of a port’s forwarded traffic that can
be unknown unicast and multicast (flooded). Lower this value if
the port has overflow problems.
Rate Limit Burst Size
Determines the limit of packets allowed in a single burst.
Accepted values are 1 to 2048. For Fast Ethernet ports, set this
value lower than 1024 (output buffer capacity). Lower this
value if the port has overflow problems.
Port PACE Priority
Determines if the port detects 3Com’s proprietary PACE format
as packets pass through the port. PACE allows a packet’s priority
(higher priority packets move through the switch before lower
priority packets) to be set at the adapter.
Using the All Ports Configuration Dialog Box
The All Ports Configuration dialog box allows you to apply the same parameter settings
to all switch ports for P220 switches and in a module for the P550 using a single
command.
To set all ports in a module:
1. In the System Configuration section of the Web Agent window, select Modules
& Ports. The Module Information dialog box opens.
2. In the Ports column, click the number for the module you want to configure (for
example, 10 for 100Base-FX). The Port Configuration dialog box opens.
3. Click All Module Switch Ports Configuration. The All Ports Configuration
dialog box opens.
4. Set port parameters as described beginning in “Configuring Physical Port
Parameters on Gigabit Ports” and/or “Configuring Physical Port Parameters on Fast
Ethernet Ports”, earlier in this chapter.
5. Click APPLY to save your changes, or CANCEL to restore previous settings.
3-12
Cajun P550/P220 Switch Operation Guide
Configuring the Cajun P550 Switch (Layer 2 & Layer 3)
Viewing Switch Port Parameters
To view switch port parameters:
1. In the System Configuration section of the Web Agent window, select Modules
& Ports. The Module Information dialog box opens.
2. In the Switch Ports column, click the number for switch port information about
the desired module. The Switch Ports dialog box opens.
3. Use Table 3-6 for more information on switch port parameters:
Table 3-6. Switch Port Parameters
Parameter
Definition
Links
Opens associated dialog boxes.
Port
Displays the port associated with the selected module.
Name
Displays the port name and opens the Switch Port
Configuration dialog box for the selected module.
Port VLAN
Displays the port VLAN for the selected module.
VLAN Classification
Displays the port VLAN classification for the selected
module.
Trunk Mode
Displays the port’s trunk mode for the selected module.
Hunt Group
Displays the hunt group of which the port is a member for
the selected module.
STAP Mode
Displays whether the spanning tree algorithm protocol is
enabled or disabled for the selected module.
MAC Address
Displays the port’s MAC address for the selected module.
4. Click one of the following for more information on switch ports:
•
Next/Previous Module - to view the next or previous module’s switch port
parameters.
•
Modules - to return to the Module Information dialog box.
•
All Module Switch Ports Configuration - to open the Switch Port
Configuration All Ports dialog box and configure all ports for the selected
module.
Configuring Switch Port Parameters
Switch port parameters set how each port performs switching functions (for example,
VLAN parameters, hunt group assignments, trunk mode, and frame tag scheme). Refer
to Table 3-7 for more information on individual switch port configuration parameters.
Cajun P550/P220 Switch Operation Guide
3-13
Configuring the Cajun P550 Switch (Layer 2 & Layer 3)
To configure switch port parameters:
1. In the System Configuration section of the Web Agent window, select Modules
& Ports. The Module Information dialog box opens.
2. From the Model Number column, locate the module for which you want to
configure ports. Click the Switch Ports column next to the selected module. The
Switch Ports dialog box opens.
3. In the Name column, click the name for the port you want to configure. The
Switch Port Configuration dialog box opens.
Figure 3-4. Switch Port Configuration Dialog Box
Refer to “Configuring Port VLAN Parameters” and “Configuring Non-VLAN Switch
Port Parameters”, later in this chapter, for your specific configuration needs.
3-14
Cajun P550/P220 Switch Operation Guide
Configuring the Cajun P550 Switch (Layer 2 & Layer 3)
Table 3-7 describes Switch Port configuration parameters:
Table 3-7. Switch Port Configuration Parameters
Parameter
Definition
Port VLAN
Specifies the VLAN assignment for this port.
Trunk Mode
Select the trunk mode.Allows you to define
the port as a trunk and allows you to select
the appropriate VLAN trunking format if the
port is connected to another switch. Refer to
Table 3-8 for more information on trunk
mode options.
Frame Tags
Select whether to ignore or use received
Frame VLAN tags. If you ignore VLAN tags
on incoming frames, the frames are bound to
the port’s default VLAN. The default value is
Use.
VLAN Binding
Select the port’s outgoing VLAN binding
type. Refer to Table 3-9 for more information
on VLAN binding options.
Automatic VLAN
Creation
Select to enable or disable the ability to
automatically create a VLAN each time the
port receives a frame from an unknown
VLAN. The default value is Disable.
VTP Snooping
Select to enable or disable VTP Snooping on
this port. The default value is Disable.
Allow Learning
Select to enable or disable the port’s learning
of new addresses. The default value is
Enable.
Hunt Group
Select a hunt group for which this port will
be a member. The default value is None.
Spanning Tree Mode
Select to enable or disable spanning tree
protocol on this port. The default value is
Enable.
Note: For the Cajun P220 switch, you
will be unable to modify this
feature on the CPU switch port.
Fast Start
Select to enable or disable fast start on this
port. The default value is Disable.
Note: For the Cajun P220 switch, you
will be unable to modify this
feature on the CPU switch port.
Cajun P550/P220 Switch Operation Guide
3-15
Configuring the Cajun P550 Switch (Layer 2 & Layer 3)
Table 3-7. Switch Port Configuration Parameters (Continued)
Parameter
Definition
Known Mode
Select to enable or disable known mode. The
default value is Disable.
3Com Mapping Table
Select how incoming tagged frames from
3Com equipment are mapped to Lucent
VLANs. The default value is 3ComDefault.
Mirror Port
Displays whether the mirror port is enabled
or disabled. This is a Fast Ethernet only
option.
Configuring Port VLAN Parameters
Port VLAN parameters determine how a particular port’s traffic is flooded to VLANs
when tagged and untagged packets are received on the port. See the examples later in
this section for recommendations on settings for particular trunk port connections.
Refer to “VLAN Operation”, in Chapter 12, for more information on creating VLANs.
Refer to “Viewing Switch Port Parameters”, earlier in this chapter, for information on
accessing the Switch Port dialog box.
To configure port VLAN parameters:
1. From the Port VLAN pull-down menu in the Switch Port Configuration for Port
XX dialog box, select a VLAN as the VLAN assignment for this port. This causes all
untagged frames arriving on this port to be assigned to the specified VLAN. The
port will still assign incoming tagged packets to the VLAN indicated by the tag.
2. From the Trunk Mode pull-down menu, select the option (excluding Clear) to
indicate that the port is a trunk and to select the appropriate VLAN trunking format
if the port is connected to another switch.
Table 3-8. describes the VLAN Trunking Mode options:
Table 3-8. VLAN Trunking Mode Options
3-16
VLAN Mode
Applies the following format to packets entering
this port:
Clear
No VLAN tag. This is the default setting.
IEEE-802.1Q
The IEEE 802.1Q Ethernet VLAN tagging scheme.
Multi-layer
A widely available proprietary VLAN tagging scheme.
3Com
3Com’s VLAN tagging scheme.
Cajun P550/P220 Switch Operation Guide
Configuring the Cajun P550 Switch (Layer 2 & Layer 3)
3. From the Frame Tags pull-down menu, select whether you want to Ignore or
Use received Frame VLAN tags. If you ignore VLAN tags on incoming frames, the
frames are bound to the port’s default VLAN.
4. From the VLAN Binding pull-down menu, select a VLAN binding type for this
port.
Table 3-9 describes the VLAN Binding Options.
Table 3-9. VLAN Binding Options
Option
Definition
Static
Assigns VLAN membership manually, using the VLAN Switch
Ports page described in “Creating and Implementing VLANs”, in
Chapter 12.
Bind to All
Binds this port to all VLANs known to the switch. This is an
appropriate mode for switch-to-switch connections.
If you use 3Com Mapping Tables, this setting is ignored.
Note: When a tagged IEEE 802.1Q packet arrives on a
port that is sat itot al-19(l)-6 anc th( V)-7LsAN
o6(at -25exo6((is)0(at -25on)-18(n-12( th)22(e )25(c)-15wt)21(itc)61(h)-27(,)
VL64(AN )-25 f92(o6(rs)07t )-25tthatpno68rs o6(( )-25po68rs)07evt(n-12at )-2
wang nn(w)-9(n)6eVl-13(L-248(AN )25trMa)-7ff(i)-10(c)-14( )25to( th64(e)-7(
VL64(AN )-25 otD is T61(h)-27(eaun-12
Binds this port to inot)6m(atca)16(
VL97(ANi t)30)-25(VL64(ANca)-8rs)
(r)13(e)5(ef)65(vo)1
5. From the Automatic VLAN Creation pull-down menu, select Enable to
automatically create a VLAN each time the port receives a frame from an unknown
VLAN.
Note: This feature does not create entries in 3Com Mapping Tables. Refer to
“Creating 3Com Mapping Tables”, in Chapter 12, for more information on
3Com Mapping Tables.
6. Click APPLY to save your changes, or CANCEL to restore previous settings.
Cajun P550/P220 Switch Operation Guide
Note:
3-17
Configuring the Cajun P550 Switch (Layer 2 & Layer 3)
Configuring VTP Snooping
VTP is a Layer 2 protocol developed by Cisco to maintain VLAN configuration
consistency among its switches. this protocol only runs over trunk ports that have
enabled either Cisco ISL or IEEE 802.1Q tagging. VTP Snooping allows a Cajun switch to
synchronize its VLAN configuration with that of a Cisco switch running VTP in the same
network. VLAN additions, deletions, and name changes made on the network’s Cisco
VTP server will be automatically updated on Cajun switches that have VTP Snooping
enabled and have connectivity to the Cisco VTP server. VLAN changes made on a Cajun
switch are not automatically updated on any other switch.
Note: VTP Snooping is enabled by default. You would only need to change VTP
Snooping port settings if you wanted to disable its ability to learn VLAN
changes on the network’s Cisco VTP server.
To configure switch port VTP Snooping parameters:
1. In the System Configuration section of the Web Agent, click Modules and
Ports. The Module Information dialog box opens.
2. In the Switch Ports column, click on the Switch Ports link for the module
which you want to enable VTP snooping. The Switch Ports dialog box for that
module opens.
3. In the Name column, click the port on which you want to enable VTP Snooping
switch wide. The Switch Port Configuration dialog box opens for that port.
4. From the Trunk Mode pull-down menu, select either IEEE 802.1Q or
Multi-layer to match the trunk mode setting of the switch port of the switch port
at the other end of the link.
5. From the VTP Snooping pull-down menu, select Enable. This is disabled by
default.
6. Click APPLY to save your changes, or CANCEL to restore previous settings.
7. In the Switching Parameters section of the Web Agent window, click VTP
Snooping. The VTP Snooping Configuration dialog box opens.
3-18
Cajun P550/P220 Switch Operation Guide
Configuring the Cajun P550 Switch (Layer 2 & Layer 3)
8. Use Table 3-10 to configure your switch VTP Snooping parameters.
Table 3-10. VTP Snooping Parameters
Parameter
Definition
VTP Snooping State
Select to enable or disable the VTP snooping protocol
globally for the switch. The default value is Disabled.
Domain Name
Enter the name associated with the Cisco VTP domain. The
default is Null.
Note: The domain name is automatically learned
within approximately five minutes from a
Cisco VTP switch provided both the Domain
Name is Null and the VTP Snooping State is
enabled on the Cajun switch.
Configuration Revision Number
Displays the VTP snooping configuration revision number
associated with the last successful VTP configuration
update on the Cajun switch.
Updater Identity
Displays the IP address of the Cisco switch that initiated the
configuration update.
Update Timestamp
Displays the date and time that the Cisco switch initiated
the configuration update.
9. Click APPLY to save your changes, or CANCEL to restore previous settings.
Configuring Non-VLAN Switch Port Parameters
To configure Non-VLAN switch port parameters:
1. In the Switch Port Configuration dialog box, from the Allow Learning
pull-down menu, select Disable to stop the port’s learning of new addresses. This
feature can be useful for security. Selecting Enable allows the port to learn new
addresses.
For example, you can set this parameter to Disable, then add a static MAC address
entry for this port.
2. From the Hunt Group pull-down menu, select a hunt group for which this port
will be a member. Refer to “Using Hunt Groups to Aggregate Bandwidth between
Switches”, in Chapter 12, for more information on hunt groups.
3. From the Spanning Tree pull-down menu, select to Enable or Disable spanning
tree protocol on this port.
Cajun P550/P220 Switch Operation Guide
3-19
Configuring the Cajun P550 Switch (Layer 2 & Layer 3)
4. From the Fast Start pull-down menu, select to Enable or Disable. When
enabled, Fast Start mode ports begin forwarding traffic without waiting for the
spanning tree negotiation to complete. Fast start eliminates the waiting time of
listen and learn states. Ports immediately enter the forward state.
5. From the Known Mode pull-down menu, select to Enable or Disable. Selecting
Enable suppresses the packets with unknown unicast destination addresses flooded
to this port. For example, if a known end-station or file server is connected to the
port, there’s no need to flood unknown unicasts to that port. You must manually
enter a static MAC address for the station actually attached to the port.
6. From the 3Com Mapping Table pull-down menu, select an assignment to
specify how incoming tagged frames from 3Com equipment are mapped to Lucent
VLANs. Refer to “Creating 3Com Mapping Tables”, in Chapter 12, for more
information on 3Com Mapping Tables.
7. Click APPLY to save your changes, or CANCEL to restore previous settings.
Examples of Switch Ports Settings for Various VLAN Connection Types
Use Table 3-11 through Table 3-13 for recommended switch port settings for each
connection type.
Note: Automatic VLAN Creation and VTP Snooping must not be enabled at the
same time.
Table 3-11. Example 1. Trunk to Cisco Catalyst 5000TM
3-20
Parameter
Recommended Setting
Port VLAN
Default - causes untagged packets to be assigned to the
default VLAN.
Trunk Mode
Multi-layer - causes the port to send frames using the
multi-layer format.
VLAN Binding
Bind to All - binds the port to all VLANs known to the
switch.
Automatic VLAN
Creation
Enable (Disable if using VTP Snooping) - causes the
switch to learn new VLAN IDs that arrive at the port, and then
bind the port to these VLANs.
VTP Snooping
Enable - cause the switch to update its VLANs as they are
created, deleted, or changed on the Catalyst.
Cajun P550/P220 Switch Operation Guide
Configuring the Cajun P550 Switch (Layer 2 & Layer 3)
Table 3-12. Example 2. Trunk to 3Com SuperStackTM
Parameter
Recommended Setting
Port VLAN
Default - This parameter is ignored when using 3Com
VLANs.
Trunk Mode
3Com - Allows the switch to read the incoming VLAN tags.
VLAN Binding
Static - This parameter is ignored when using 3Com VLANs.
Automatic VLAN
Creation
Disable - This parameter is ignored when using 3Com VLANs.
Table 3-13. Example 3. Trunk to Bay Networks System 5000TM
Parameter
Recommended Setting
Port VLAN
Default - Causes untagged packets to be assigned to the
default VLAN.
Trunk Mode
IEEE-802.1Q - Causes the port to send frames using the
IEEE-802.1Q format. This assumes that you have configured
the Bay Networks switch to use IEEE-802.1Q VLAN tagging as
well.
VLAN Binding
Bind to All - Binds the port to all VLANs known to the
switch.
Automatic VLAN
Creation
Enable - Causes the switch to learn new VLAN IDs that arrive
at the port, and then bind the port to these VLANs.
Configuring Fast Start Mode
Fast Start mode causes ports to begin forwarding traffic without waiting for the spanning
tree negotiation to complete.
Examples of situations where you may want to set a port to Fast Start mode are:
❒ End-station ports that do not need to participate in the full spanning tree
negotiation
❒ Loop-free topologies that do not need spanning tree protocol to resolve redundant
connections
To enable Fast Start for ports on a module associated with a selected bridge:
1. In the System Configuration section of the Web Agent window, click Modules
& Ports. The Module Information dialog box opens.
2. In the Switch Ports column, click on the switch port number listed for the
selected module. The Switch Ports dialog box opens.
Cajun P550/P220 Switch Operation Guide
3-21
Configuring the Cajun P550 Switch (Layer 2 & Layer 3)
3. To set Fast Start mode on individual ports, in the Name column, click the port
name for the selected module. The Switch Port Configuration dialog box opens.
Or
To set Fast Start mode on all ports in a module, click All Module Switch Port
Configuration. The Switch Port Configuration on All Ports dialog box opens.
4. From the Fast Start pull-down menu, select Enable to enable Fast Start mode on
the selected module ports.
5. Click APPLY to save your changes, or CANCEL to clear your selection.
Using the All Ports Configuration Dialog Box
The All Ports Configuration dialog box allows you to apply the same parameter settings
to all switch ports in a module using a single command.
To set all switch ports in a module using a single command:
1. In the System Configuration section of the Web Agent window, select Modules
& Ports. The Module Information dialog box opens.
2. In the Ports column, click the number of ports listed for the module you want to
configure (for example, 10 for 100Base-FX). The Physical Port Configuration dialog
box opens.
3. Click All Module Ports Configuration at the bottom of the dialog box. The All
Ports Configuration dialog box opens.
4. Select the port on which you want your changes to occur.
5. Set port parameters for the selected ports, as described in “Viewing Switch Port
Parameters”, earlier in this chapter.
6. Click APPLY to save your changes, or CANCEL to restore previous settings.
3-22
Cajun P550/P220 Switch Operation Guide
Configuring the Cajun P550 Switch (Layer 2 & Layer 3)
Setting Up SNMP Communities
SNMP communities are the SNMP values that an SNMP manager uses to manage the
switch. SNMP Version 2c is supported.
Table 3-14. SNMP Communities Parameters
Parameter
Definition
Community String
This string serves as a password that you enter at the
network management station. It provides the level of
access to the switch that you specify on this page.
IP Address
Allows you to send SNMP responses only to a station
with any or a particular IP address.
Access
Helps provide security when you use SNMP to
manage the network from a single workstation. Refer
to Table 3-15 for more information on Access options.
The default value is Read-Write.
Security Level
Allows you to select the security level for this
community string. Refer to Table 3-16 for more
information on security level options. The default
value is Normal.
Trap Receiver
Allows you to enable or disable the transmission of
traps to the selected IP address. The default value is
Disable.
To set SNMP communities:
1. In the System Configuration section of the Web Agent window, select SNMP
Administration. The SNMP Community Management dialog box opens.
2. Click CREATE. The Create SNMP Community dialog box opens.
3. In the Community String field, enter a community name.
4. From the IP Address pull-down menu, select Any for any IP address or Specific
and enter an IP Address in the appropriate fields.
Cajun P550/P220 Switch Operation Guide
3-23
Configuring the Cajun P550 Switch (Layer 2 & Layer 3)
5. From the Access pull-down menu, select a level for this community (Table 3-15).
Table 3-15. Access Levels
Access Level
Manager Can...
Manager Cannot...
Read-Only
View switch configuration settings
and statistics.
View community strings.
Change switch
configurations.
Read-Write
View and set switch configuration
settings, and view statistics.
View community strings.
Read-Write with
Security Level Set
to admin
View and set all switch parameters,
including community table.
N/A
None
Do nothing. This selection allows
you to disable a string without
deleting it.
Access any switch
features.
6. From the Security Level pull-down menu, select a security level for this
community string (Table 3-16).
Table 3-16. SNMP Security Levels
Option
Allows Access to...
normal
All switch configuration and reporting functions.
admin
All switch configuration and reporting functions, including
access to community configuration.
7. From the Trap Receiver pull-down menu, select Enable.
8. Click APPLY to save your changes, or CANCEL to restore previous settings.
Changing the Console Serial Port Settings
You can use the Web Agent to change the communications settings for the serial port
connection on the front panel of the Layer 3 supervisor module.
Initially, the switch’s console port is configured as a TTY Console to support a TTY
connection. The Layer 2 and Layer 3 supervisor modules allow you to reconfigure the
console serial port as a PPP Console to support a dial-in PPP connection using a modem.
Note: As a PPP console, you can change only the switch’s baud rate and flow control
parameters. The flow control parameters are limited to None or Xon/Xoff.
3-24
Cajun P550/P220 Switch Operation Guide
Configuring the Cajun P550 Switch (Layer 2 & Layer 3)
Configuring the Serial Console Port as a TTY Console
To configure the console serial port as a TTY Console:
1. In the System Configuration section of the Web Agent window, select Console
Configuration. The Console Configuration dialog box opens.
2. Click TTY for your console type and click SELECT. The Console Port
Configuration dialog box opens.
3. Use Table 3-17 to set your console serial port settings:
Table 3-17. Console Serial Port Options
Option
Default
Available Settings
Baud Rate
9600
300, 1200, 2400, 4800, 9600, 19200, 38400,
57600, 115200
Flow Control
Xon/Xoff (TTY)
None, Xon/Xoff (TTY)
Data Bits
8
7 or 8
Parity
None
Odd, Even, or None
Stop Bits
1
1 or 2
4. Click APPLY to save your changes, or CANCEL to restore previous settings.
Connecting a Modem
In order to use the serial console port as a PPP console, you must connect a modem to
the switch. When you use the specified serial cable and connectors, the switch will
convert the normal DCE interface to a DTE interface that is used by modems.
When the switch is configured for PPP mode, it will periodically send the modem config
string from the serial console port. This will synchronize the baud rates between the
modem and the console port and configure the modem to operate with the switch’s DTE
interface.
The switch does not use any output signals except for TXD. It uses the DTR (converted to
DSR by the specified cable and connectors) input connected to the modem DCD output,
to detect that the modem is connected. It supports XON/XOFF flow control (or none).
To connect a modem:
1. Attach a DB25M-RJ45 (P/N 38210003)connector to the modem.
2. Attach the DB9M-RJ45 MDCE connector to the switch’s serial console port on the
front panel of the switch.
Cajun P550/P220 Switch Operation Guide
3-25
Configuring the Cajun P550 Switch (Layer 2 & Layer 3)
Figure 3-5. Typical Connection Between the Switch and a Modem
Typical Connection between Cajun
Switch and Modem
DB25 M - RJ45
P/N 38210003
Pin
Pin
Pin
Pin
pin
2 - TXD
3 - RXD
7 - GND
8 - DCD out
20 - DTR in
Pin 2 - TXD
Pin 3 - RXD
Pin 4 - DTR in
Pin5 - GND
pin 6 - NC
DB9M - RJ45
MDCE
Modem
Cajun Switch
Configuring the Serial Console Port as a PPP Console
You can reconfigure the console serial port as a PPP Console to support a dial-in PPP
connection using a modem.
Note: The lack of an IP address for the PPP serial interface causes the switch to
immediately return to sending the modem configuration string. Typing TTY
will re-access the CLI login prompt.
To configure the console serial port as a PPP console:
1. In the System Configuration section of the Web Agent window, select Console
Configuration. The Console Configuration dialog box opens.
2. Click PPP for your console type and click Select. The Console Port Configuration
dialog box opens.
3. Use Table 3-17 to change your console port settings.
Note: The only parameters you can change as a PPP console is baud rate and
flow control. The flow control settings are limited to None or Xon/Xoff.
3-26
Cajun P550/P220 Switch Operation Guide
Configuring the Cajun P550 Switch (Layer 2 & Layer 3)
4. In the Modem Init Cmd field, enter your modem initialization command.
The default modem configuration string is AT&D0S0=1.
Table 3-18. Modem Configuration String Parameters
Parameter
Definition
&D0
Disable DTR
S0=1
Auto-answer mode (one ring)
CD follows carrier
Depends on modem
E0
Disable local echo
Software Flow Control
(Receive and Transmit)
Depends on modem
5. Click APPLY to save your changes, or CANCEL to restore previous settings.
Note: If you misconfigure your PPP serial console port, you can regain CLI access to
correct the configuration parameters. For more information, refer to
“Regaining Configuration Access to the PPP Serial Port Console”.
Safety Tip: To successfully dial-in with PPP to the switch, you must also configure an IP
address and interface for the PPP Serial Interface (Serial-Console). Refer to
“Configuring the IP Interface for the PPP Console”, later in this chapter for
more information.
Regaining Configuration Access to the PPP Serial Port Console
If the PPP serial port console is configured incorrectly, the command line interface (CLI)
becomes temporarily unavailable for reconfiguration.
To regain access to the CLI when the console port is in PPP mode:
1. In the console window, enter TTY. The CLI login prompt displays. It may be
necessary to press Enter several times to see the login prompt. You may see the
modem init command string.
2. At the Login prompt, enter your user name. The password prompt displays.
3. At the Password prompt, enter your password. The Cajun CLI prompt displays.
4. Enter the PPP configuration commands necessary to start PPP. Refer to
“Configuring the Serial Console Port as a PPP Console”, earlier in this chapter, and
“Creating an IP Interface”, in Chapter 7, for more information on PPP
configuration commands.
Cajun P550/P220 Switch Operation Guide
3-27
Configuring the Cajun P550 Switch (Layer 2 & Layer 3)
5. After you complete your configuration settings, enter exit at the CLI prompt to
reinvoke the modem control software and exit CLI mode.
Note: You do not need to exit from CLI if the serial port console has been
configured as a TTY console, or if you do not intend to re-attempt
connecting using PPP.
Configuring Dial-Up Networking
To configure your PC for dial-up networking with a PPP serial port console:
1. From My Computer, double-click Dial-Up Networking. The Dial-Up
Networking dialog box opens.
Note: You must have dial-up networking installed on your PC.
2. Double-click Make New Connection to configure your modem. The Make New
Connection wizard opens.
3. In the Type a name for the computer you are dialing field, enter a
connection name for the computer you are dialing.
4. From the Select a Modem pull-down menu, select your modem and click
Configure. The Modem Properties dialog box opens.
5. Click the Connection tab. The Connection tab opens.
6. In Connection preferences, select the following:
•
From the Data bits pull-down menu, select 8.
•
From the Parity pull-down menu, select None.
•
From the Stop bits pull-down menu, select 1.
7. Click Advanced. The Advanced Connection Settings dialog box opens.
8. In Use flow control, click Software (XON/XOFF).
9. Click OK to close the dialog box. The Modem Properties dialog box re-opens.
10. Click the Options tab. The Option tab opens.
11. In Connection control, click Bring up terminal window after dialing and
click OK. The Modem Properties dialog box closes and the wizard continues.
12. In the wizard dialog box, click Next and enter the telephone number you are
calling.
13. Click Next. The wizard reports that you have successfully configured a modem.
3-28
Cajun P550/P220 Switch Operation Guide
Configuring the Cajun P550 Switch (Layer 2 & Layer 3)
14. Click Finish. The wizard closes and the newly configured connection displays in
your Dial-Up networking program group.
15. Right-mouse click on your new connection and select Properties. The Properties
dialog box opens.
16. Click the Server Types tab and de-select all advanced options except TCP/IP.
17. Click TCP/IP Settings. The TCP/IP settings dialog box opens.
18. Click Specify an IP Address and enter the IP address of the serial port interface.
19. Click Server assigned name server addresses.
20. De-select Use IP header compression and Use default gateway on remote
network.
21. Click OK to close the TCP/IP dialog box.
22. Click OK to close the new connections properties dialog box.
Using Dial-Up Networking with a PPP Serial Port Console
To use TCP/IP applications (Telnet, HTTP, and SNMP) over your PPP serial port interface:
1. From My Computer, double-click Dial-Up Networking. The Dial-Up
Networking program group opens.
2. Double-click on the PPP modem previously created. The Connect To dialog box
opens.
3. Enter your password and click Connect. A Pre-Dial Terminal Screen opens.
When the modem has successfully connected, a Post-Dial Terminal Screen opens.
4. In the Post-Dial Terminal screen, login using your CLI user name and
password. It may be necessary to enter several carriage returns to view the Login
prompt.
5. At the CLI prompt, go to configuration mode and enter set console transfer
PPP. ASCII characters display below the CLI prompt. This is typical while the
switch attempts to connect via PPP.
6. In the Post-Dial Terminal screen, click Continue (F7). PPP verification
completes and the Connected To dialog box displays a message that the modem
connection has been successfully established.
Cajun P550/P220 Switch Operation Guide
3-29
Configuring the Cajun P550 Switch (Layer 2 & Layer 3)
Configuring the IP Interface for the PPP Console
To configure the PPP console with an IP address and mask:
1. Configure your console serial port as a PPP Console. See “Connecting a Modem”,
earlier in this chapter.
2. Connect your modem cable to the Cajun’s serial port.
3. From the IP Configuration section of the Web Agent, click Interfaces. The IP
Interfaces dialog box opens.
4. Click CREATE. The Add IP Interface dialog box opens.
5. From the VLAN pull-down menu, select Serial-Console. This specifies the
interface for the PPP console.
6. In the Network Address field, enter the IP address to be associated with the PPP
console port.
Note: If you do not enter a name for this interface, the IP address is used as the
interface name.
7. In the Mask field, enter the network mask IP address (for example,
255.255.255.0).
8. Click APPLY to save your changes, or CANCEL to restore previous settings.
Configuring a Static Route for the PPP Console
To configure a PPP Console static route:
1. Configure your console serial port as a PPP Console. Refer to “Connecting a
Modem”, earlier in this chapter.
2. From the IP Configuration section of the Web Agent window, click Static
Routes. The IP Static Routes dialog box opens.
3. Click CREATE. The Add IP Static Routes dialog box opens. This allows you to
define a static route for the PPP console.
4. In the Network Address field, enter the IP address to be associated with the PPP
console port.
5. In the Mask field, enter the network mask IP address.
6. In the Next-Hop Address field, enter the IP address of the gateway associated
with this static route.
7. Click APPLY to save your changes, or CANCEL to restore previous settings.
3-30
Cajun P550/P220 Switch Operation Guide
Configuring the Cajun P550 Switch (Layer 2 & Layer 3)
Hardware Requirements for Routing
To configure your switch as an IP/IPX router, you must first configure your Cajun switch
with the following hardware:
❒ Layer 3 supervisor module (mandatory)
❒ Layer 3 media modules (optional) including:
•
2-Port Gigabit Ethernet module
•
10-Port 100-Base-F module
•
12-Port 10/100-Base-T module
Configuring IP Routing on the Switch
The Cajun P550 Switch with Integrated Routing combines scalable wire speed IP Layer 3
switching (routing) with 10/100/1000 Ethernet Layer 2 switching (bridging) in a
high-capacity chassis-based system. The product emphasizes traditional,
standards-compliant IP operation and ample capacity to avoid bottlenecks.
For more detailed information on Cajun P550 Switch routing operations, refer to
“Routing with Layer 2 and Layer 3 Modules”, in Chapter 1.
Minimum IP Routing Configuration Requirements
The configuration process for the Cajun P550 Switch with integrated routing has the
following minimum requirements for using IP routing:
❒ IP routing must be globally enabled.
❒ At least one routing protocol must be enabled (RIP, OSPF) if communication
between routers is necessary.
❒ Determine which interfaces need to have IP routing enabled.
❒ If you plan to expand your current network, create VLANs (subnets) to address
your network configuration.
❒ Assign an IP address, subnet mask, routing protocol, and multicast routing protocol
to each IP interface you configure.
Routing Configuration Quickstart
This section provides an overview of the LAN router configuration operation. For more
information on these configuration steps, see the sections referenced after each step.
Cajun P550/P220 Switch Operation Guide
3-31
Configuring the Cajun P550 Switch (Layer 2 & Layer 3)
To configure the switch as a LAN router:
1. Create a IP interface for each subnet. Refer to “Creating and Implementing
VLANs”, in Chapter 12.
2. Create or assign a VLAN to the IP interface. Refer to “Assigning IP Interfaces to the
VLAN”, in Chapter 7.
3. Bind ports to the VLANs assigned to the IP interfaces. Refer to “Viewing Switch
Port Parameters”, earlier in this chapter.
4. Assign an IP address and subnet mask to the VLAN. Refer to “Assigning IP
Interfaces to the VLAN”, in Chapter 7.
5. Specify how the router will communicate with other routers. Refer to “Assigning IP
Interfaces to the VLAN”, in Chapter 7, to configure OSPF and RIP parameters.
Configuring System Information
The System Information section of the Web Agent allows you to configure general
system information and settings, such as:
❒ Entering General System Information
❒ Enabling SNTP
❒ Setting Summer Time Hours
❒ Displaying the Power System Statistics
❒ Displaying Cooling System Statistics
❒ Configuring Redundant Hardware
❒ Performing a System Reset
❒ Viewing Your Running Configuration
❒ Viewing Your Startup Configuration
❒ Viewing Your Script Execution Log File
❒ Copying Configuration Files
❒ Copying Files
3-32
Cajun P550/P220 Switch Operation Guide
Configuring the Cajun P550 Switch (Layer 2 & Layer 3)
Entering General System Information
The system allows you to enter general system identification information from the Web
Agent. Use these fields to uniquely identify each switch:
❒ Switch name
❒ Device location
❒ Device contact
To change these values:
1. In the System Information section of the Web Agent window, click General. The
System Information dialog box opens (Figure 3-6).
Figure 3-6. General System Information Dialog Box
2. In the Name field, enter a name for the switch.
3. In the Location field, enter the location for the switch (for example, floor and
closet location).
4. In the Contact field, enter information about the person who should be
contacted in the event of a problem.
5. Click APPLY to save your changes, or CANCEL to restore previous settings.
Enabling SNTP
The Simple Network Time Protocol (SNTP) ensures that you can automatically
synchronize time on all computers, switches, and other devices connected to your Cajun
P550 Switch. By enabling SNTP, you ensure that all devices connected to your switch
reflect the same time.
Cajun P550/P220 Switch Operation Guide
3-33
Configuring the Cajun P550 Switch (Layer 2 & Layer 3)
When you enable SNTP, you are required to set your time zone and the rule or dates of
Summer Time Hours followed by your location. For information about setting your time
zone, refer to “Setting One-Time Summer Time Hours”. For information about setting
Summer Time Hours, refer to “Setting Summer Time Hours”.
To enable SNTP:
1. In the System Information section of the Web Agent window, click System
Clock. The System Clock dialog box opens.
2. In the Clock Options section, click Simple Network Time Protocol (SNTP).
The SNTP Client Configuration dialog box opens.
3. From the Enable State pull-down menu, select Enable.
4. In the Server IP Address field, enter the IP address of the switch for which you
enable SNTP.
5. Click Apply. SNTP is enabled for the switch.
Setting Summer Time Hours
Summer Time Hours, also referred to as Daylight Savings Time (DST), is the strategy of
moving clocks ahead to provide greater amounts of daylight in the afternoon and to
standardize time with other parts of the world. In many parts of the world, the Summer
Time Hours algorithm is based on a standardized rule. For example, in the Western
hemisphere, the rule used by most locations in Canada, Mexico, and the United States is
to set clocks forward by one hour at 2:00 a.m. on the first Sunday in April and back an
hour at 2:00 a.m. on the first Sunday in October annually. Many countries in Europe
and Asia follow similar rules. The offset, or amount of time by which the clock is set
forward or backward, varies from country to country.
Many parts of the world follow a one-time change of Summer Time Hours. When you
configure the switch for these locations, you reset the clock by specifying a scheduled
time and date.
Note: If you upgrade the Cajun P550 or P220 switch from a previous version, your
local time settings are saved as Greenwich Mean Time values. Ensure that you
change the Summer Time Hours Algorithm before you set the clock.
Setting Recurring Summer Time Hours
To set recurring Summer Time Hours:
1. In the System Information section of the Web Agent window, click System
Clock. The System Clock dialog box opens.
3-34
Cajun P550/P220 Switch Operation Guide
Configuring the Cajun P550 Switch (Layer 2 & Layer 3)
2. In Clock Options, click Summer Time Hours Algorithm. The Summer Time
Hours Configuration box opens.
3. From the Enable State pull-down menu, select Enable.
4. In the Offset cell of the Value column, enter the reset value for the clock in
minutes.
For example, if you intend to reset the clock forward or backward by one hour,
retain the default value of 60 minutes.
5. Click Recurring.
Note: The Web Agent enables you to select the boxes next to both Recurring and
One-time Summer Time Hours. However, the option to set both Recurring
and One-time hours is not provided.
6. Use Table 3-19 for information about configuring Summer Time Hours.
Table 3-19. Recurring Summer Time Hours Configuration
Parameter
Definition
Recurring
Select if Summer Time Hours is defined by a rule such as
Daylight Savings Time (DST). All Start and End fields
associated with Recurring Summer Time Hours provide the
default values for Daylight Savings Time.
When you select recurring Summer Time Hours, you
indicate the time, in hours and minutes, on a specified day,
week, and month that Summer Time Hours begin and end.
Start
Specifies the start of Summer Time Hours.
End
Specifies the end of Summer Time Hours.
Week
Select the week during which you want recurring Summer
Time Hours to start or end. The selected week should
reflect the day on which Summer Time Hours start. For
example, if Summer Time Hours start on the first Sunday
in April, select the First week. Options include:
• First - First week of the month, the default Start value,
when Daylight Savings Time starts in the Western
hemisphere.
• Second - Second week of the month.
• Third - Third week of the month.
• Fourth - Fourth week of the month.
• Last - Remaining days of the month that form the last
week of the month. Last is specified as the default End
value, denoting when Daylight Savings Time ends in
the Western hemisphere.
Cajun P550/P220 Switch Operation Guide
3-35
Configuring the Cajun P550 Switch (Layer 2 & Layer 3)
Table 3-19. Recurring Summer Time Hours Configuration
Parameter
Definition
Day
Select the day of the week when you want recurring
Summer Time Hours to start or end. Options are based on a
seven-day week and include:
• Sunday - the default Start and End values. In the
Western hemisphere, DST starts on the first Sunday in
April and ends on the last Sunday in October.
• Monday
• Tuesday
• Wednesday
• Thursday
• Friday
• Saturday
Month
Select the month when recurring Summer Time Hours start
or end. The twelve months of the Gregorian calendar are
provided.
For recurring Summer Time Hours, the default Start value
is April, the month during which DST starts in the Western
hemisphere. The default End value is October, the month
during which DST ends in the Western hemisphere.
Hour
Enter a value to represent the hour when Summer Time
Hours start or end for Recurring settings.
For Recurring Summer Time Hours, the default value is 02,
meaning 2:00 a.m., for both Start and End hours.
Minutes
Enter a value to represent the number of minutes into the
hour when Summer Time Hours start or end for Recurring
Summer Time Hours. The default value is 00 for both Start
and End minutes.
7. To set Summer Time Hours that recur annually, according to a rule:
a. Select Recurring.
b. Select values for the Week, Day, and Month when Summer Time Hours start
and end.
c. Enter values for the Hour and Minutes when Summer Time Hours start and
end.
8. Click APPLY to save your changes, or CANCEL to restore previous settings.
3-36
Cajun P550/P220 Switch Operation Guide
Configuring the Cajun P550 Switch (Layer 2 & Layer 3)
Setting One-Time Summer Time Hours
To set Summer Time Hours that are not based on a standard rule:
1. In the System Information section of the Web Agent window, click System
Clock. The System Clock dialog box opens.
2. In Clock Options, click Summer Time Hours Algorithm. The Summer Time
Hours Configuration box opens.
3. From the Enable State pull-down menu, select Enable.
4. In the Offset cell of the Value column, enter the reset value for the clock in
minutes.
For example, if you intend to reset the clock forward or backward by one hour,
retain the default value of 60 minutes.
5. Click One-Time.
Note: The Web Agent enables you to select the boxes next to both Recurring and
One-time Summer Time Hours. However, the option to set both Recurring
and One-time hours is not provided.
6. Use Table 3-20 to configure Summer Time Hours on a one-time basis.
Table 3-20. One-Time Summer Time Hours Configuration
Parameter
Definition
One-time
Select if Summer Time Hours change one time, such as on
a specified date.
When you select one-time Summer Time Hours, you
indicate the time and date on which Summer Time Hours
begin and end.
Start
Specifies the start of Summer Time Hours.
End
Specifies the end of Summer Time Hours.
Cajun P550/P220 Switch Operation Guide
3-37
Configuring the Cajun P550 Switch (Layer 2 & Layer 3)
Table 3-20. One-Time Summer Time Hours Configuration (Continued)
Parameter
Definition
Week
Select the week of the month during which you want
recurring Summer Time Hours to start or end. Options
include:
• First - First week of the month, the default Start value,
when Daylight Savings Time starts in the Western
hemisphere.
• Second - Second week of the month.
• Third - Third week of the month.
• Fourth - Fourth week of the month.
• Last - The final days of a month, such as the 29th,
30th, and 31st days of a month. Last is specified as the
default End value, denoting when Daylight Savings
Time ends in the Western hemisphere.
Day
Select the day of the week when you want recurring
Summer Time Hours to start or end. Options are based on a
seven-day week and include:
• Sunday - The default Start and End values. In the
Western hemisphere, DST starts on the first Sunday in
April and ends on the last Sunday in October.
• Monday
• Tuesday
• Wednesday
• Thursday
• Friday
• Saturday
Month
Select the month when one-time Summer Time Hours start
or end. The twelve months of the Gregorian calendar are
provided.
For a one-time setting of Summer Time Hours, the default
value for start and end months is January.
Hour
Enter a value to represent the hour when Summer Time
Hours start or end for One-time settings. The default value
is 00.
Minutes
Enter a value to represent the number of minutes into the
hour when Summer Time Hours start or end for One-time
Summer Time Hours. The default value is 00 for both Start
and End minutes.
7. To set Summer Time Hours on a one-time basis:
a. Select One-Time.
3-38
Cajun P550/P220 Switch Operation Guide
Configuring the Cajun P550 Switch (Layer 2 & Layer 3)
b. Set the date on which Summer Time Hours start and end by selecting the
Month, Day, and Year on which Summer Time Hours start and end.
c. Enter values for the Hour and Minutes when Summer Time Hours start and
end.
8. Click APPLY to save your changes, or CANCEL to restore previous settings.
Setting the System Clock
The system clock is used for setting traps, alarms, and other events of the switch. Set
SNTP and Summer Time Hours before you set the system clock.
To set the system clock:
1. In the System Information section of the Web Agent window, click System
Clock. The System Clock dialog box opens.
2. In the Current Time Setting fields, enter the time using 24-hour time format (for
example, 10 p.m. is 22 00 00).
3. From the Time Zone pull-down menu, select your time zone.
4. In the Current Date Setting fields, enter the current month, date, and year.
5. Click APPLY to save your changes, or CANCEL to restore previous settings.
Note: The system clock does not automatically change with Daylight Savings Time.
Setting the Temperature System
You can set the upper and lower temperature warning systems for your switch’s
backplane and slot 1.
To configure the temperature warning systems:
1. In the System Information section of the Web Agent window, click
Temperature. The Temperature System dialog box opens.
2. Enter the desired temperature warnings for the switch backplane and slot 1
sensors. For Layer 3 switches, also enter the desired temperature warning for the
CPU sensor.
3. Click on APPLY to save your changes, or Defaults to restore the temperature
defaults.
Cajun P550/P220 Switch Operation Guide
3-39
Configuring the Cajun P550 Switch (Layer 2 & Layer 3)
Note: The supervisor modules shut down the switching modules if the temperature
reaches the Shutdown temperature. The modules are restarted if the
temperature goes below the Upper Warning Temperature. The default
Shutdown temperatures are conservative for the slot 1 sensor (50° C) and
backplane sensor (50° C). They can be safely set to 60° C, but settings higher
than 60° C are not recommended. You can set the shutdown temperature to a
value lower than 50° C to ensure prompt notification if a fan fails.
Displaying the Power System Statistics
To display the power system statistics:
1. In the System Information section of the Web Agent window, click Power
System. The Power System dialog box opens.
2. Use Table 3-21 to review your power system statistics:
Table 3-21. Power System Statistical Parameters
Parameter
Definition
Power Supply
Identifies the power supply.
Status
Identifies whether the power supply is detected.
Type
Describes the type of power supply detected.
Total System Power
Displays the total system power in Watts.
Current Power Available
Displays the current power available.
Note: The power system settings will only display 600W of available power with
three power supplies installed. This is because the switch uses a maximum of
two power supplies. The third power supply is held in reserve for redundancy
in the event one of the other power supplies fails.
Displaying Cooling System Statistics
To display the switch’s cooling system status:
1. In the System Information section of the Web Agent window, click Cooling
System. The Cooling System dialog box opens.
2. Ensure that all the individual components are operational by checking the status
column for each component.
3. If a component’s status is non-operational, power down the switch and contact a
service representative to diagnose the failing unit.
3-40
Cajun P550/P220 Switch Operation Guide
Configuring the Cajun P550 Switch (Layer 2 & Layer 3)
Configuring Redundant Hardware
In both Layer 2 and Layer 3 models, the Cajun P550 switch provides a redundant
backplane to ensure that if a controller or an element fails, the switch will continue to
route data properly. The redundant components are available as separate options.
When the redundant controller and element are installed, the backplane consists of the
following parts:
❒ One main controller
❒ One redundant controller
❒ Six switch elements
❒ One redundant element
Figure 3-7. Layout of Redundant Backplane
Elements
3-1
Redundant
Element
Elements
6-4
Primary
Controller
Redundant
Controller
The Cajun P550 switch is equipped with diagnostics to monitor the status of switch
controllers and elements. When an element fails, diagnostics run automatically and test
the hardware. In the Web Agent, information about a failed controller or element
displays in the Switch Fabric Status dialog box.
If the primary controller fails, the redundant controller takes over switch operation until
you replace the primary controller. If an element fails, the redundant element takes over
the function of the failed element until you replace the element.
The following sections explain how to:
❒ Install Redundant Hardware
❒ Replace the Primary Controller
❒ Replace an Element
Cajun P550/P220 Switch Operation Guide
3-41
Configuring the Cajun P550 Switch (Layer 2 & Layer 3)
Installing Redundant Hardware
By default, the switch is configured without the redundant controller or element, as
shown in Figure 3-8.
Figure 3-8. Default Hardware Configuration
Elements
3-1
Elements
6-4
Primary
Controller
To install the redundant modules and enable module redundancy:
1. Shut down the switch.
WARNING:Before replacing switch controllers or elements, turn off the switch.
2. Install the redundant controller in the slot to the left of the primary controller. (Slot
1 in Figure 3-8).
Note: Controllers and elements are equipped with keys to ensure that a controller
cannot be inserted into an element slot and an element cannot be inserted
into a controller slot.
3. Install the redundant element in the slot to the left of the sixth element. (Slot 0 in
Figure 3-8).
4. Restart the switch and login.
5. In the System Information section of the Web Agent window, click Switch
Fabric. The Switch Fabric Status dialog box opens.
If the redundant controller and element installed properly, settings display as in
Figure 3-9.
3-42
Cajun P550/P220 Switch Operation Guide
Configuring the Cajun P550 Switch (Layer 2 & Layer 3)
Figure 3-9. Properly-Installed Redundant Hardware Settings
6. From the Configure Redundant Hardware pull-down menu, select Yes.
7. Click APPLY to save your changes.
The redundant hardware is enabled. If the primary controller fails, the redundant
controller takes over in its place. If an element fails, the redundant element takes
over in its place.
Replacing the Primary Controller
If the primary controller fails, you are notified by a console message and an event log
message. In the Web Agent, the Switch Controller field displays # 0 Failed. If the
switch is installed with a redundant controller, the redundant controller automatically
takes over the operation of the failed primary controller.
To replace the primary controller:
1. In the System Information section of the Web Agent window, click Switch
Fabric. The Switch Fabric Status dialog box displays.
2. From the Configure Redundant Hardware pull-down menu, select No.
3. Click APPLY to disable the primary controller.
Cajun P550/P220 Switch Operation Guide
3-43
Configuring the Cajun P550 Switch (Layer 2 & Layer 3)
4. Shut down the switch.
WARNING:Before replacing switch controllers or elements, you must turn off the
switch.
5. Replace the failed primary controller by inserting it in the slot to the right of the
redundant controller and to the left of element three. (See Figure 3-7)
6. Restart the switch and login.
7. In the System Information section of the Web Agent, click Switch Fabric. The
Switch Fabric Status dialog box displays.
8. From the Configure Redundant Hardware pull-down menu, select Yes.
9. Click APPLY to enable the redundant controller.
The Switch Controller field displays # 1 Active to show that the redundant
controller is now enabled.
10. In the Toggle Active Controller field, click Toggle to restore control to the
primary controller.
The Switch Controller field displays # 0 Active to show that the primary controller
is now enabled.
Replacing an Element
If an element fails, you are notified by a console message and an event log message. In
the Web Agent, the Switch Elements field displays # Failed <number>, where <number>
is the number that indicates the failed element.
To configure the redundant element:
1. In the System Information section of the Web Agent window, click Switch
Fabric. The Switch Fabric Status dialog box displays.
2. From the Configure Redundant Hardware pull-down menu, select No.
3. Click Apply to disable the failed element.
4. Shut down the switch.
WARNING:Before replacing switch controllers or elements, you must turn off the
switch.
5. Replace the failed element by inserting it into the appropriate slot. (See Figure
3-7.)
6. Restart the switch and login.
3-44
Cajun P550/P220 Switch Operation Guide
Configuring the Cajun P550 Switch (Layer 2 & Layer 3)
7. In the System Information section of the Web Agent window, click Switch
Fabric. The Switch Fabric Status dialog box displays.
8. From the Configure Redundant Hardware pull-down menu, select Yes and
click APPLY to enable the redundant element.
The Switch Elements field displays Normal # 0 to show that the redundant element
is now enabled.
9. From the Enable Redundant Element pull-down menu, select Normal and
click APPLY.
The Switch Element field displays Normal # 0 to show that the replaced element is
now enabled.
Performing a System Reset
To perform a system reset:
1. In the System Information section of the Web Agent window, click System
Reset. The System Reset Page dialog box opens.
2. Click Save to save your running configuration to the startup configuration before
performing a system reset.
3. Click Yes to reset the switch, or No to cancel the operation.
Managing Configuration Files
You can manage the system files that contain the configuration data for your Cajun P550
switch. When you first install the switch, or upgrade from a previous installation, your
configuration parameters are stored in a startup.txt file located in the switch’s
Non-Volatile Random Access Memory (NVRAM). When the switch is restarted, the
startup.txt file runs and stores configuration parameters in volatile RAM as a running
configuration.
Changes you make to the switch configuration are automatically recorded in RAM, but
not in NVRAM. When you want to retain your current configuration, you must
manually save it to NVRAM through the Web Agent or the Command Line Interface
(CLI). For information about how to save your running configuration file to your startup
configuration, refer to “Copying Running Configuration to Startup Configuration", later
in this section. To determine changes you have made to your running configuration, you
can view and compare your running and startup configuration files.
Cajun P550/P220 Switch Operation Guide
3-45
Configuring the Cajun P550 Switch (Layer 2 & Layer 3)
Viewing Your Running Configuration
To view your running configuration:
❒ In the CLI Configuration section of the Web Agent window, click Running
Configuration.
Or
❒ In priv.mode in the Command Line Interface, enter show running_config.
Viewing Your Startup Configuration
To view your startup configuration:
❒ In the CLI Configuration section of the Web Agent window, click Startup
Configuration.
Or
❒ In priv.mode in the Command Line Interface, enter show startup_config.
Viewing Your Script Execution Log File
Each time the startup.txt file or other script runs, a log file is generated. Log files contain
the data that scripts return.
To view your script execution log file:
❒ In the CLI Configuration section of the Web Agent window, click Script Log
File.
The Script Execution Log File dialog box opens showing the contents of the script
execution log file.
Or
❒ In priv.mode in the Command Line Interface, enter show file logfile.txt.
Copying Configuration Files
If you modify your running configuration through the Command Line Interface (CLI) or
the Web Agent, and you want your changes to replace your startup configuration, copy
your running configuration to your startup configuration. Before you copy a running
configuration over your startup configuration, copy your startup configuration to a file
on the switch or on a TFTP server using the Web Agent or the Command Line Interface.
On the switch, configuration files are automatically saved as text files using the *.txt
3-46
Cajun P550/P220 Switch Operation Guide
Configuring the Cajun P550 Switch (Layer 2 & Layer 3)
extension. On a TFTP server, you can edit the startup.txt file using a text editor of your
choice and save copies of it with or without a file extension.
Copying Running Configuration to Startup Configuration
To save your running configuration as your startup configuration in NVRAM:
1. In the CLI Configuration section of the Web Agent window, click Config File
Management.
2. Click Save to save your running configuration as your startup configuration.
Or
In priv.mode in the CLI, enter:
copy running-config startup-config
Copying Files
Using the Configuration File Management dialog box, you can copy files to and from
multiple locations. For example, if you modify your running configuration and you want
to reinstate your startup configuration parameters, you can copy your startup
configuration to your running configuration in volatile RAM. Also, you can upload
configuration and other ASCII files from the switch to a TFTP server. Likewise, you can
download files by copying files from a TFTP server directory to the switch or to a startup
or running configuration file.
To copy files:
1. In the CLI Configuration section of the Web Agent, click Config File
Management. The Configuration File Management dialog box opens.
Cajun P550/P220 Switch Operation Guide
3-47
Configuring the Cajun P550 Switch (Layer 2 & Layer 3)
2. Use Table 3-22 for information about copying a source file to a TFTP server
destination:
Table 3-22. Configuration File Management Parameters
Parameter
Description
Options
Save Running-Config
to Startup-Config
Saves the running
configuration to the
startup configuration
N/A
Copy Source
Specifies the source file to
be copied
• Unspecified - Specifies an initialized
value.
• File - Specifies a source file located on the
switch in NVRAM.
• Running-Config - Specifies a running
configuration.
• Startup-Config - Specifies a startup
configuration.
• TFTP Server - Specifies a source file
located in a directory on a TFTP server.
Source Filename
Specifies the path and
name of the source file
Copy Destination
Specifies the destination
of the file to be copied
Source files can be ASCII files in NVRAM
available for upload or files located on a TFTP
server available for download
• Unspecified- Specifies an initialized
value.
• File - Specifies that a source is copied or
downloaded to NVRAM.
• Running-Config - Specifies that a source
is copied to the running configuration.
• Startup-Config - Specifies that a source is
copied to the startup configuration.
• TFTP Server - Specifies that a source is
copied to a TFTP server location.
Destination Filename
Specifies the location of
the destination
TFTP Server IP Address Specifies the IP address of
a source or destination
TFTP server
3-48
Configuration files and other files can be
copied to NVRAM on the switch or to a TFTP
server as a destination location.
Copy (download) source files, located on a
TFTP server, to your running configuration,
your startup configuration, or a location on
the switch. Or, copy (upload) your
configuration files, or a file located on the
switch, to a TFTP server.
Cajun P550/P220 Switch Operation Guide
Configuring the Cajun P550 Switch (Layer 2 & Layer 3)
3. From the Copy Source pull-down menu, select one of the following:
•
Running-Config - To copy your running configuration to your startup
configuration, to a file located on the switch, or to a file located on a TFTP
server.
•
Startup-Config - To copy your startup configuration to your running
configuration, to a file located on the switch, or to a file located on a TFTP
server.
•
File - To copy a file stored on the switch to your running or startup
configuration, to a location on the switch, or to a location on a TFTP server.
•
TFTP Server - To copy a file stored on a TFTP server to your running or startup
configuration or to a file on the switch.
If you select File or TFTP Server, also provide the path and filename of the source
file in the Source Filename field.
4. From the Copy Destination pull-down menu, select one of the following:
•
Running-Config - If you are copying your startup configuration, or other file
located on the switch or on a TFTP server, to your running configuration.
•
Startup-Config - If you are copying your running configuration, or other file
located on the switch or on a TFTP server, to your startup configuration.
•
File - If you are copying your startup or running configuration, another file
located on the switch, or a file located on a TFTP server to a file on the switch.
•
TFTP Server - If you are copying your startup or running configuration, or
another file located on the switch, to a location on a TFTP server.
If you select File or TFTP Server, also provide the path and filename of the
destination file in the Source Destination field.
5. In TFTP Server IP Address, enter the IP address of the source or destination TFTP
server, if applicable.
6. Click Copy. Your source configuration or file is copied to your specified
destination.
Note: The Web Agent returns an Invalid operation! error message if you
attempt to copy:
•
The current running configuration to the running configuration.
•
The startup configuration to the same startup configuration.
•
The specified TFTP server to a TFTP server.
Cajun P550/P220 Switch Operation Guide
3-49
Configuring the Cajun P550 Switch (Layer 2 & Layer 3)
Viewing the Status of a TFTP Transfer
After you have copied the startup configuration or other files to a TFTP server, you can
check the status of the TFTP transfer to ensure that files copied correctly.
To view the status of a TFTP transfer:
1. In the CLI Configuration section of the Web Agent, click Config File
Management. The Configuration File Management dialog box opens.
2. In the Get Status of Most Recent TFTP Copy field, click Status.
3-50
Cajun P550/P220 Switch Operation Guide
4
Configuring IPX Routing
(Layer 3)
Overview
This chapter and its procedures are specific to Layer 3 configuration.
Included in this chapter:
❒ IPX Overview
❒ Configuring the Cajun Switch as an IPX Router
IPX Overview
The Internetwork Packet Exchange (IPX) protocol is a connectionless protocol that
performs datagram delivery and routing in Novell NetWare networks. Each IPX address
consists of three parts:
❒ Network Number — A 32-bit (8 characters) number that is normally assigned by
the network administrator.
❒ Node Number — A 48-bit (12 characters) number that is normally the MAC layer
address of the physical interface.
❒ Socket Number — A number used to route packets to different processes within
the same node.
The syntax of the IPX address is:
network node socket
For example:
000000AAh 00e03b124213h 4003h
where 000000AAh is the network number, 00e03b124213h is the node number, and 4003h
is the socket number associated with a running process on the end node (for example,
RIP, NetWare Link State Protocol (NLSP)).
Cajun P550/P220 Switch Operation Guide
4-1
Configuring IPX Routing (Layer 3)
IPX Datagram Structure
The IPX datagram contains an IPX header and any data to be transferred on the network.
The IPX header is a 30 byte header that contains 10 fields. Figure 4-1. illustrates a
conceptual view of an IPX datagram:
Figure 4-1. IPX Datagram in Detail
Checksum (2 bytes)
Packet Length (2 bytes)
Transport Control (1 byte)
Packet Type (1 byte)
Destination Network (4 bytes)
30 Bytes
Destination Node (6 bytes)
Destination Socket (2 bytes)
Source Network (4 bytes)
Source Node (6 bytes)
Source Socket (2 bytes)
Table 4-1 describes each field in the IPX datagram:
Table 4-1. IPX Datagram Fields
Field
Definition
Checksum
Provides integrity checking.
Note: Checksum is normally not enabled in IPX
networks and is usually set to 0xFFFF.
4-2
Packet Length
Length (in bytes) of the packet.
Transport Control
Number of routers a packet has traversed. This is used to
discard a packet if the packet traverses a maximum number
of routers (16).
Cajun P550/P220 Switch Operation Guide
Configuring IPX Routing (Layer 3)
Table 4-1. IPX Datagram Fields (Continued)
Field
Definition
Packet Type
Indicates the type of service required or offered by the
packet. Types include:
• Sequenced Packet Exchange (SPX packet)
• NetWare Core Protocol (NCP packet)
• NetBIOS (propagated packet)
Destination Network
The IPX network address of the destination network.
Destination Node
The MAC address of the destination node.
Destination Socket
Address of the process running in the destination node.
Sockets route packets to different processes within the
same node.
Source Network
The network address of the source network.
Source Node
The MAC address of the source node.
Source Socket
Address of the process running in the source node.
Configuring the Cajun Switch as an IPX Router
To configure IPX routing globally on your switch:
1. From the IPX Configuration section of the Web Agent window, click Global
Configuration. The IPX Routing Global Configuration dialog box opens.
Figure 4-2. IPX Routing Global Configuration Dialog Box
Cajun P550/P220 Switch Operation Guide
4-3
Configuring IPX Routing (Layer 3)
2. Use Table 4-2 to configure your global setup:
Table 4-2. IPX Global Parameters
Parameter
Allows you to...
IPX Routing
Enable or disable IPX routing on a global basis. The default value is
Enable.
Use Default Route
Enable or disable the default route, if known. The default value is
Disable.
RIP
Enable or disable IPX RIP on a global basis. This affects all IPX
interfaces set up to use the IPX RIP routing protocol. The default
value is Enable.
SAP
Enable or disable IPX SAP on a global basis. This affects all IPX
interfaces set up to use the IPX SAP routing protocol. The default
value is Enable.
Maximum Number of
Routes
Specify the maximum number of routes that can be added to the
routing table. The system rounds up your entry to the nearest
power of 2. For example, if you enter 1000, the system rounds this
number up to 1024 routes. The default value is 2048.
Maximum Number of
Services
Specify the maximum number of services that can be added. The
system rounds up your entry to the nearest power of 2. For
example, if you enter 1000, the system rounds this number up to
1024 services. The default value is 2048.
3. Click APPLY to save your changes, or CANCEL to restore previous settings and
close the dialog box.
Configuring IPX Interfaces
You can create new IPX interfaces and associate up to four interfaces of different
encapsulation types to a VLAN. The concept of more than one IPX interface on a VLAN is
referred to as multinetting.
To create a new IPX interface:
1. From the IPX Configuration section of the Web Agent window, click Interfaces.
The IPX Interfaces dialog box opens.
2. Click CREATE. The Add IPX Interface dialog box opens.
3. From the VLAN pull-down menu, select the VLAN to which you want to assign
an IPX network address.
Note: If you need to create a new VLAN, refer to “Creating and Implementing
VLANs” in Chapter 10.
4-4
Cajun P550/P220 Switch Operation Guide
Configuring IPX Routing (Layer 3)
4. Use Table 4-3 to complete the configuration of your IPX interface:
Table 4-3. IPX Interface Parameters
Parameter
Allows you to...
Select
Select the interface to be configured.
Note: This parameter is displayed in the IPX Interface
dialog box, not in the Add IPX Interface dialog box.
State
Display the current state of the interface.
Options include:
• Up
• Down
Note: This parameter is displayed in the IPX Interface
dialog box, not in the Add IPX Interface dialog box.
Interface
Enter the name of the IPX interface.
Admin. State
Select the administration state of the interface.
Options include:
• Up
• Down
VLAN
Select the VLAN that corresponds to the IPX interface.
Network Address
Enter the number of the IPX network you want to assign to the IPX
interface. This number is a hexadecimal number.
Node Address
Displays the node address on which the IPX interface resides.
Note: This parameter is displayed in the IPX Interface
dialog box, not in the Add IPX Interface dialog box.
Frame Type
Select the format of the MAC header on the IPX packets sent by the
router on the interface. Formats include:
• Ethernet II (Maximum Transmission Unit (MTU) = 1500)
• Ethernet 802.2 (MTU = 1497)
• Ethernet SNAP (MTU = 1492)
• Ethernet 802.3 (MTU = 1500)
Ticks
Specify the amount of time (in ticks) that the packet takes to reach
the network number you specified. A tick is approximately 1/18th
of a second.
RIP
Enable or disable IPX RIP on a selected interface.
Cajun P550/P220 Switch Operation Guide
4-5
Configuring IPX Routing (Layer 3)
Table 4-3. IPX Interface Parameters (Continued)
Parameter
Allows you to...
SAP
Enable or disable IPX SAP on a selected interface.
Type 20 Packet
Propagation
Specify whether or not Type 20 packets can be sent, received,
disabled, or sent and received on a given interface.
Options include:
• Disable - Type 20 packets are neither sent nor received.
• Inbound - Type 20 packets are received.
• Outbound - Type 20 packets are sent.
• Both - Type 20 packets are sent and received.
5. Click CREATE to save your changes or CANCEL to restore previous settings.
Creating IPX Static Routes
To create IPX static routes:
1. From the IPX Configuration section of the Web Agent window, click Static
Routes. The IPX Static Routes dialog box opens.
2. Click CREATE. The Add IPX Static Route dialog box opens.
3. Use Table 4-4 to complete your configuration:
Table 4-4. IPX Static Route Parameters
Parameter
Allows you to specify the...
Network
Number of the IPX network (in hex) you want to assign to the IPX
static route.
Next-Hop Node
MAC address of the next destination to which the packet is routed.
Format of the value to enter is aa:bb:cc:dd:ee:ff.
Interface
IPX Interface associated with the next hop.
Ticks
Amount of time (in ticks) that the packet takes to reach the
network number you specified. A tick is approximately 1/18th of a
second.
Hops
Number of routers (hops) that the packet must pass through before
reaching the network number associated with the IPX network.
4. Click CREATE to save your changes, or CANCEL to restore previous settings.
4-6
Cajun P550/P220 Switch Operation Guide
Configuring IPX Routing (Layer 3)
Deleting IPX Static Routes
To delete an IPX static route:
1. From the IPX Configuration section of the Web Agent window, click Static
Routes. The IPX Static Routes dialog box opens.
2. Select the IPX static route to be removed.
3. Click DELETE to remove the static route, or CANCEL to restore previous settings.
Modifying IPX Static Routes
To modify an IPX static route:
1. From the IPX Configuration section of the Web Agent window, click Static
Routes. The IPX Static Routes dialog box opens.
2. Select the IPX static route to be modified.
3. Use Table 4-4 to complete your configuration changes.
4. Click APPLY to save your changes, or CANCEL to restore previous settings.
Creating IPX Static Services
To create IPX static services:
1. From the IPX Configuration section of the Web Agent window, click Static
Services. The IPX Static Services dialog box opens.
2. Click CREATE to create a new static service. The Add IPX Static Service dialog box
opens.
Cajun P550/P220 Switch Operation Guide
4-7
Configuring IPX Routing (Layer 3)
3. Use Table 4-5 to complete your configuration:
Table 4-5. IPX Static Service Parameters
Parameter
Allows you to specify the...
Service Name
Name of the IPX static service. For example, FS_ENG01. Use SLIST
(NetWare 3.x) or NLIST (NetWare 4.x) to list your current server
names and types from your NetWare server.
Type
Service type (in hex) that identifies the type of IPX static service the
server provides. Well-known service types include:
• Unknown (0)
• Print Queue (3)
• File Server (4)
• Job Server (5)
• Print Server (7)
• Archive Server (9)
• Remote Bridge Server (24)
• Advertising Print Server (47)
Network
Network number (in hex) of the IPX static service.
Node
Node address (in hex) of the IPX static service.
The format of the node value is aa:bb:cc:dd:ee:ff.
Socket
Number (in hex) associated with a running process on the end node
(for example, RIP, NLSP).
Next-Hop Node
MAC address of the next destination through which the service is
reached.
The format of the node value is aa:bb:cc:dd:ee:ff.
Interface
Interface that corresponds to the next-hop node.
Hops
Number of routers (hops) that the packet must pass through before
reaching the network number associated with the service.
Deleting IPX Static Service
To delete an IPX static service:
1. From the IPX Configuration section of the Web Agent window, click Static
Services. The IPX Static Services dialog box opens.
2. Select the IPX static service to be removed.
3. Click DELETE to remove the static service, or CANCEL to restore previous
settings.
4-8
Cajun P550/P220 Switch Operation Guide
Configuring IPX Routing (Layer 3)
Modifying IPX Static Services
To modify an IPX static service:
1. From the IPX Configuration section of the Web Agent window, click Static
Services. The IPX Static Services dialog box opens.
2. Select the IPX static service to be modified.
3. Use Table 4-5 to complete your configuration changes.
4. Click APPLY to save your changes, or CANCEL to restore previous settings.
Monitoring Switch Performance Using IPX
This section provides detailed statistical information on IPX and the use of IPX on your
switch:
❒ Examining IPX Global Statistics
❒ Searching the IPX Route Table
❒ Examining the IPX Route Table
❒ Examining IPX Route Table Statistics
❒ Searching the IPX Service Table
❒ Examining the IPX Service Table
❒ Examining IPX Service Table Statistics
Examining IPX Global Statistics
All statistics only count IPX packets which are received by or sent from the Supervisor
module, not those packets routed in hardware.
To display the global IPX routing statistics:
1. In the IPX Display section of the Web Agent window, click Global Statistics. The
IPX Routing Global Statistics dialog box opens.
2. To view or remove statistics, perform one of the following steps:
•
If you want to see the latest statistics available, click REFRESH to update all
statistics.
•
If you want to reset all statistics currently displayed, click CLEAR to reset all
statistics to zero.
Cajun P550/P220 Switch Operation Guide
4-9
Configuring IPX Routing (Layer 3)
3. Use Table 4-6 to review the definition of each statistic:
Table 4-6. IPX Global Parameters
Parameter
Defines the...
IPX In Receives
Total number of IPX packets received (including errors).
IPX In Delivers
Total number of IPX packets delivered locally, including packets
from local applications.
IPX Forward Datagrams Number of IPX packets forwarded.
IPX Netbios Receives
Number of NetBIOS packets received.
IPX In Discards
Number of IPX packets received but discarded.
IPX In Header Errors
Number of IPX packets discarded because of errors in the packet
header. This includes packets that are less than the minimum 30
byte length.
IPX In Unknown
Sockets
Number of IPX packets discarded because the destination socket
was not open.
IPX In Max Hops
Exceeds
Number of IPX packets discarded because the Transport Control
field is greater than or equal to 16.
IPX In Checksum Errors Number of IPX packets received with bad checksums.
IPX Out Requests
Number of IPX packets supplied locally for transmission, not
including any packets counted in IPX Forward Datagrams.
IPX Out Packets
Total number of IPX packets transmitted.
IPX Out Discards
Number of outgoing IPX packets discarded.
IPX Out No Routes
Number of IPX packets which can not be transmitted because no
routes are available.
IPX In Ping Request
Number of received ping requests.
IPX In Ping Replies
Number of received replies made to ping requests.
IPX Out Ping Requests
Number of transmitted ping requests.
IPX Out Ping Replies
Number of transmitted replies made to ping requests.
Searching the IPX Route Table
To search the IPX routing table:
1. In the IPX Display section of the Web Agent window, click Route Table Search.
The IPX Route Table Search dialog box opens.
2. Select the Search Criteria you want to use to find information on specific routes.
For example, if you want to find all static routes that are presently configured on
your switch, search by source and specify static as your search value.
4-10
Cajun P550/P220 Switch Operation Guide
Configuring IPX Routing (Layer 3)
3. Use Table 4-7 to determine the search parameters:
Table 4-7. IPX Routing Table Search Parameters
Parameter
Allows you to perform a search...
Source
In your IPX routing table, use one of the following
parameters:
• RIP - RIP routing updates
• Static - User configuration
• Local - Directly connected routes
Once you select one of these parameters, the search
attempts to find routes associated with the parameter
you chose.
Interface
Based on the interface associated with the next-hop to
the IPX network.
Network Number
Based on an IPX Network address (hexadecimal
number) you specify.
4. Click Search to start the search. If available routes are found they are displayed in
the IPX Route Table dialog box. If no routes are available, a message is displayed in
the IPX Route Table dialog box.
Examining the IPX Route Table
To examine your IPX route table:
1. Perform an IPX Route Table search as described in "Searching the IPX Route Table",
earlier in this chapter. If available routes are found they are displayed in the IPX
Route Table dialog box.
2. Use Table 4-8 to review your configuration:
Table 4-8. IPX Route Table Parameters
Parameter
Defines the...
Select
Parameter selected.
Network
Network number (in hex) of the IPX network in question.
Interface
Interface associated with the IPX network.
Source
Method by which the network was learned. For example, RIP, local,
or static.
TTL
Number of seconds before the route expires.
Cajun P550/P220 Switch Operation Guide
4-11
Configuring IPX Routing (Layer 3)
Table 4-8. IPX Route Table Parameters (Continued)
Parameter
Defines the...
Ticks
Amount of time (in ticks) that the packet takes to reach the
network number you specified. A tick is approximately 1/18th of a
second.
Hops
Number of routers (hops) that the packet must pass through before
reaching the network number associated with the IPX network.
Next-Hop MAC
Address
MAC address of the next destination through which the network is
reached.
Examining IPX Route Table Statistics
To examine your IPX route table statistics:
1. In the IPX Display section of the Web Agent window, click Route Table
Statistics. The IPX Routing Table Statistics dialog box opens.
2. Use Table 4-9 to review each statistic:
Table 4-9. IPX Route Table Statistics
Statistic
Definition
Current Number of
Routes
Indicates the current number of IPX routes.
Peak Number of
Routes
Lists the peak number of routes.
Route Add Failures
Indicates the number of failed attempts to add a
route to the routing table.
Searching the IPX Service Table
To search the IPX service table:
1. In the IPX Display section of the Web Agent window, click Service Table
Search. The IPX Service Table Search dialog box opens.
2. Select the search criteria you want to use to find information on specific services.
For example, if you want to find all static services that are presently configured on
your switch, search by source and specify static as your search value.
4-12
Cajun P550/P220 Switch Operation Guide
Configuring IPX Routing (Layer 3)
3. Use Table 4-10 to determine the search parameters:
Table 4-10. IPX Service Table Search Parameters
Parameter
Allows you to perform a search...
Source
In your IPX service table, use one of the following
parameters:
• SAP - Services learned via the SAP protocol
• Static - User configuration
• Local - Local services
Once you select one of these parameters, the search
will attempt to find services associated with the
parameter you chose.
Interface
Based on the interface associated with the next-hop to
the service.
Service Name
Based on a service name you specify. Note that you
can specify a single asterisk (*) to indicate a wildcard
character that will match all characters entered before
the wildcard. For example, entering FS_ENG* will find
all service names that start with FS_ENG.
Service Type
Based on the service type you specify. For example, to
specify a print queue type, you would enter 3 (0003h)
in the space provided.
4. Click Search to start the search. If available services are found they are displayed
in IPX Service Table dialog box. In services are not available, a message displays in
the IPX Service Table dialog box.
Examining the IPX Service Table
To examine the IPX service table:
1. Perform an IPX Service table search as described in "Searching the IPX Service
Table", earlier in this chapter. If available services are found they are displayed in
the IPX Service Table dialog box.
Cajun P550/P220 Switch Operation Guide
4-13
Configuring IPX Routing (Layer 3)
2. Use Table 4-11 to review each field in the IPX Services table:
Table 4-11. IPX Service Table Parameters
Parameter
Defines the...
Select
Parameter selected.
Name
Name of the service in question. For example, FS_ENG01. (Use
SLIST (NetWare 3.x™) or NLIST (NetWare 4.x™) to list your
current server names and types from your NetWare server.)
Type
Service type that identifies the type of service the server provides.
Well known service types include:
• Unknown (0)
• Print Queue (3)
• File Server (4)
• Job Server (5)
• Print Server (7)
• Archive Server (9)
• Remote Bridge Server (24)
• Advertising Print Server (47)
Network
Network number of the IPX service in question.
Node
Node address of the service in question.
Socket
Number associated with a running process on the end node (for
example, RIP, NLSP).
Interface
Interface associated with the next hop to the service.
Source
Method by which the service was learned. For example, SAP or
static.
TTL
Number of seconds before the service expires.
Hops
Number of routers (hops) that the packet must pass through before
reaching the network number associated with the service.
Next-Hop MAC
Address
MAC address of the next destination through which the service is
reached.
Examining IPX Service Table Statistics
To examine the IPX service table statistics:
1. In the IPX Display section of the Web Agent window, click Service Table
Statistics. The IPX Service Table Statistics dialog box opens.
4-14
Cajun P550/P220 Switch Operation Guide
Configuring IPX Routing (Layer 3)
2. Use Table 4-12 to review each statistic:
Table 4-12. IPX Service Table Statistics
Statistic
Defines the...
Current Number of
Services
Indicates the current number of IPX services.
Peak Number of
Services
Lists the peak number of services.
Service Add Failures
Indicates the number of failed attempts to add a service to the
routing table.
Cajun P550/P220 Switch Operation Guide
4-15
Configuring IPX Routing (Layer 3)
4-16
Cajun P550/P220 Switch Operation Guide
5
Configuring IPX RIP Protocol
(Layer 3)
Overview
This chapter and its procedures are specific to Layer 3 configuration.
Included in this chapter:
❒ Configuring IPX RIP Interfaces
❒ Creating and Modifying IPX RIP Filters
❒ IInterpreting IPX RIP Interface Statistics
Configuring IPX RIP Interfaces
To configure the IPX RIP interfaces:
1. In the IPX RIP Configuration section of the Web Agent window, click
Interfaces. The IPX RIP Interfaces dialog box opens.
2. Use Table 5-1 to configure the IPX RIP interfaces:
Table 5-1. IPX RIP Interface Parameters
Parameter
Allows you to...
Select
Select a RIP interface to modify.
Note: This field is displayed in the IPX RIP Interface
dialog box, not the Add IPX RIP Interface dialog
box.
Interface
Identify the IPX interface associated with the RIP interface.
Network Number
Identify the number of the IPX network associated with the
VLAN.
Use Interpacket Gap
Select to enable or disable whether RIP updates sent out over
an interface have an interpacket transmission delay.
• If enabled, IPX RIP provides update packets.
• If disabled, IPX RIP periodic update packets have no
interpacket gap.
Cajun P550/P220 Switch Operation Guide
5-1
Configuring IPX RIP Protocol (Layer 3)
Table 5-1. IPX RIP Interface Parameters (Continued)
Parameter
Allows you to...
Use Max Packet Size
Select to enable or disable whether the RIP packets sent out an
interface are set to the maximum transmission size.
• If enabled, RIP packets can contain the maximum
allowed by the MTU of the RIP interface.
• If disabled, RIP packets are limited to 50 network entries.
Periodic Update Interval
(sec)
Specify (in seconds) the interval at which periodic RIP updates
are sent out an interface.
Aging Interval Multiplier
Specify the length of time that information from received RIP
updates are kept as a multiplier of the Periodic Update Interval.
Triggered Updates
Select to enable or disable RIP updates to be immediately
transmitted to the network in response to changes in the
network topology.
Advertise Default Route
Only
Select to enable or disable the advertising of the default
network exclusively (subject to a route to the default network
being known to the switch).
Mode
Select the mode for the RIP interface.
Options include:
• Talk/Listen - Send and receive advertisements.
• Talk Only - Send advertisements.
• Listen Only - Receive advertisements.
3. Click APPLY to save your changes, or CANCEL to restore previous settings.
Creating and Modifying IPX RIP Filters
To create IPX RIP filters:
1. In the IPX RIP Configuration section of the Web Agent window, click Filters.
The IPX RIP Filters dialog box opens.
2. Click CREATE to create a new filter. The Add IPX RIP Filter dialog box opens.
5-2
Cajun P550/P220 Switch Operation Guide
Configuring IPX RIP Protocol (Layer 3)
3. Use Table 5-2 to complete your configuration:
Table 5-2. Add IPX RIP Filter Parameters
Parameter
Allows you to...
Interface
Select the interface to which this filter will be applied to RIP packets
sent and/or received on the interface.
Precedence
Specify the filter precedence (in order of importance) with 0 equal
to most important.
Note: All filters on the same VLAN, must be assigned a
unique filter precedence.
Start Network
Specify the first IPX network number in the range.
End Network
Specify the last IPX network number in the range.
Direction
Select the direction of the filter.
Filter options include:
• Inbound - Apply the filter only to RIP packets received on the
interface.
• Outbound - Apply the filter only to RIP packets sent on the
interface.
• Both - Apply the filter to RIP packets both sent and received on
the interface.
Filter/Suppress
Select whether to enable or disable the IPX networks (within the
specified range in the filter) to be filtered (inbound) or suppressed
(outbound).
• Filtered - Apply the filter only to RIP packets received
(inbound direction) on the interface.
• Suppressed - Apply the filter only to RIP packets sent
(outbound direction) on the interface.
Select Enable to filter/suppress traffic. Select Disable to disable the
filtering and suppression of traffic.
Ticks
Specify the time (in ticks) that the packet takes to reach the
network number you specified. A tick is approximately 1/18th of a
second. This entry is used to override the value in the RIP packet.
Entering 0 ensures that there is no override in the transmission of
data on the network.
Hops
Specify the number of routers (hops) that the packet must pass
through before reaching the network number associated with the
IPX interface. This entry is used to override the value in the RIP
packet.
Entering 0 ensures that there is no override in the transmission of
data on the network.
4. Click CREATE to save changes, or CANCEL to restore previous settings.
Cajun P550/P220 Switch Operation Guide
5-3
Configuring IPX RIP Protocol (Layer 3)
Example: Suppress Advertising of Network 10
To configure your switch to suppress the advertising of network 10 on the IPX interface
named Backbone:
1. In the IPX RIP Configuration section of the Web Agent, click Filters.
2. Click Create to create a new filter. The Add IPX RIP Filter dialog box opens.
3. Configure the following parameters:
a. From the Interface pull-down menu, select the Backbone.
b. In the Precedence field, enter 0.
c. In the Start Network field, enter 10.
d. In the End Network field, enter 10.
e. From the Direction pull-down menu, select Outbound.
f. From the Filter/Suppress pull-down menu, select Enable.
g. In the Ticks and Hops fields, enter 0.
4. Click CREATE to save your changes, or CANCEL to restore previous settings.
This filter ensures that all advertising of network 10 from the interface Backbone is
suppressed.
Example: Suppress Advertising of all Networks Except 10
To configure your switch to suppress the advertising of all networks except network 10
on the IPX interface named Backbone, you must create two filters.
To create these filters:
Filter 1
1. In the IPX RIP Configuration section of the Web Agent window, click Filters.
2. Click Create to create a new filter. The Add IPX RIP Filter dialog box opens.
3. Configure the following parameters:
a. From the Interface pull-down menu, select the Backbone.
b. In the Precedence field, enter 0.
c. In the Start Network field, enter 10.
d. In the End Network field, enter 10.
e. From the Direction pull-down menu, select Outbound.
f. From the Filter/Suppress pull-down menu, select Disable.
5-4
Cajun P550/P220 Switch Operation Guide
Configuring IPX RIP Protocol (Layer 3)
g. In the Ticks and Hops fields, enter 0, respectively.
This filter ensures that the advertising of network 10 on the interface Backbone will not
be suppressed. To suppress all other networks, proceed with the creation of Filter 2.
Filter 2
1. In the IPX RIP Configuration section of the Web Agent window, click Filters.
2. Click Create to create a new filter. The Add IPX RIP Filter dialog box opens.
3. Configure the following parameters:
a. From the Interface pull-down menu, select the Backbone.
b. In the Precedence field, enter 1.
c. In the Start Network field, enter 0.
d. In the End Network field, enter ffffffff.
e. From the Direction pull-down menu, select Outbound.
f. From the Filter/Suppress pull-down menu, select Enable.
g. In the Ticks and Hops fields, enter 0, respectively.
4. Click CREATE to save your changes, or CANCEL to restore previous settings.
This filter ensures that the advertising of all networks on the interface Backbone will be
suppressed.
Together, Filter 1 and Filter 2 will act to suppress all network advertising with the
exception of network 10. It is important to note that Filter 2 had the Precedence field set
to 1 and Filter 1 had the Precedence field set to 0. Any filter with a Precedence of 0 will
always override a filter with a precedence of 1 or higher.
Interpreting IPX RIP Interface Statistics
To interpret IPX RIP interface statistics:
1. In the IPX RIP Display section of the Web Agent window, click Interface
Statistics. The IPX RIP Interface Statistics dialog box opens.
Cajun P550/P220 Switch Operation Guide
5-5
Configuring IPX RIP Protocol (Layer 3)
2. Use Table 5-3 to interpret your IPX RIP statistics:
Table 5-3. IPX RIP Interface Statistical Parameters
Parameter
Definition
Interface
The interface associated with this RIP interface.
State
The current state of the RIP interface.
Network Number
The network number of the IPX network associated with
the interface.
Triggered Updates Sent
The number of triggered updates sent from the RIP
interface.
Non-triggered Updates Sent
The number of non-triggered updates sent from the RIP
interface.
Updates Received
The number of updates received by the RIP interface.
Updates may be received periodically even if no changes
have occurred.
Requests Received
The number of requests for updates received by the RIP
interface.
Bad Packets Received
The number of bad packets received by the RIP interface.
3. Click Clear to remove the statistics, or Refresh to access current interface
statistics.
5-6
Cajun P550/P220 Switch Operation Guide
6
Configuring IPX SAP Protocol
(Layer 3)
Overview
This chapter and its procedures are specific to Layer 3 configuration.
Included in this chapter:
❒ Configuring IPX SAP Interfaces
❒ Creating IPX SAP Filters
❒ Interpreting IPX SAP Interface Statistics
Configuring IPX SAP Interfaces
To configure the IPX SAP interfaces:
1. In the IPX SAP Configuration section of the Web Agent window, click
Interfaces. The IPX SAP Interfaces dialog box opens.
2. Use Table 6-1 to configure the IPX SAP interfaces:
Table 6-1. IPX SAP Interface Parameters
Parameter
Allows you to...
Select
Select a SAp interface to modify.
Interface
Identify the IPX interface associated with the SAP interface.
Network Number
Identify the number of the IPX network associated with the
interface.
Use Interpacket Gap
Select whether or not SAP updates sent out over an interface
have an interpacket transmission delay.
• If enabled, IPX SAP provides update packets.
• If disabled, IPX SAP periodic update packets have no
interpacket gap.
Cajun P550/P220 Switch Operation Guide
6-1
Configuring IPX SAP Protocol (Layer 3)
Table 6-1. IPX SAP Interface Parameters (Continued)
Parameter
Allows you to...
Use Max Packet Size
Select to enable or disable whether the SAP packets sent out an
interface are set to the maximum transmission unit size.
• If disabled, SAP packets are limited to 7 service entries.
• If enabled, SAP packets can contain the maximum
number of service entries allowed by the MTU of the SAP
interface.
Periodic Update Interval
(sec)
Specify (in seconds) the interval at which periodic SAP updates
are sent out an interface.
Aging Interval Multiplier
Specify the length of time that information from received SAP
updates are kept as a multiplier of the Periodic Update Interval.
Triggered Updates
Select to enable or disable whether SAP updates are
immediately transmitted to the network in response to changes
in the network topology.
Get Nearest Server Reply
Select to enable or disable whether the router responds to Get
Nearest Server requests received on the interface.
Get Nearest Server Reply
Delay
Specify the delay (in msecs) to wait before responding to a Get
Nearest Service request received on the interface.
Mode
Select the mode for the SAP interface.
Options include:
• Talk/Listen - Send and receive advertisements.
• Talk Only - Send advertisements.
• Listen Only - Receive advertisements.
3. Click APPLY to save your changes, or CANCEL to restore previous settings.
Creating IPX SAP Filters
This section describes:
❒ Creating IPX SAP Name Filters
❒ Creating IPX SAP Network Filters
Creating IPX SAP Name Filters
To create IPX SAP Name filters:
1. In the IPX SAP Configuration section of the Web Agent window, click Name
Filters. The IPX SAP Name Filters dialog box opens.
6-2
Cajun P550/P220 Switch Operation Guide
Configuring IPX SAP Protocol (Layer 3)
2. Click CREATE to create a new filter. The Add IPX SAP Name Filter dialog box
opens.
3. Use Table 6-2 to complete your configuration:
Table 6-2. IPX SAP Name Filter Parameters
Parameter
Allows you to...
Interface
Select the interface to which this filter will be applied to SAP
packets sent and/or received on the interface.
Precedence
Specify the filter precedence (in order of importance) with 0 equal
to most important.
Note: All SAP filters on the same interface must be
assigned a unique precedence value.
Name
Specify a service name. For example, FS_ENG001. A single asterisk
may be present as the last character, which will match all remaining
characters of a service name.
Type
Specify the service type that identifies the type of service the server
provides.
Well-known service types include:
• Unknown (0)
• Print Queue (3)
• File Server (4)
• Job Server (5)
• Print Server (7)
• Archive Server (9)
• Remote Bridge Server (24)
• Advertising Print Server (47)
• NetWare Directory Services [NDS] (278)
A value of ffff matches all service type values.
Direction
Select the direction of the filter in question.
Filter choices include:
• Inbound - Applies the filter only to SAP packets received on
the interface.
• Outbound - Applies the filter only to SAP packets sent on the
interface.
• Both - Applies the filter to SAP packets both sent and received
on the interface.
Cajun P550/P220 Switch Operation Guide
6-3
Configuring IPX SAP Protocol (Layer 3)
Table 6-2. IPX SAP Name Filter Parameters (Continued)
Parameter
Allows you to...
Filter/Suppress
Select to enable or disable whether the services matching Name and
Type are filtered (inbound) or suppressed (outbound).
• Filtered - Applies the filter only to SAP packets received
(inbound direction) on the interface.
• Suppressed - Applies the filter only to SAP packets sent
(outbound direction) on the interface.
Select Enable to filter/suppress traffic. Select Disable to disable the
filtering and suppression of traffic.
Hops
Specify the number of routers (hops) that the packet must pass
through before reaching the service(s) matched by the filter. This
entry is used to override the value in the SAP packet.
Entering 0 ensures that there is no override in the transmission of
data on the network.
4. Click CREATE to save your changes, or CANCEL to restore previous settings.
Example: Suppress Advertising of all Print Servers on Interface Remote
To configure your switch to suppress the advertising of all Print Servers (for example,
type 7) on Interface Remote:
1. In the IPX SAP Configuration section of the Web Agent window, click Name
Filters.
2. Click CREATE to create a new filter. The Add IPX SAP Name Filter dialog box
opens.
3. Configure the following parameters:
a. From the Interface pull-down menu, select Remote.
b. In the Precedence field, enter 0.
c. In the Name field, enter *. The asterisk represents a wildcard that applies to all
server names.
d. In the Type field, enter 7.
e. From the Direction pull-down menu, select Outbound.
f. From the Filter/Suppress pull-down menu, select Enable.
g. In the Hops field, enter 0. Entering 0 ensures that there is no override in the
transmission of data on the network.
4. Click CREATE to save your changes, or CANCEL to restore previous settings.
6-4
Cajun P550/P220 Switch Operation Guide
Configuring IPX SAP Protocol (Layer 3)
This filter ensures that all advertising of any known print server on Interface Remote will
be suppressed.
Creating IPX SAP Network Filters
To create IPX SAP Network filters:
1. In the IPX SAP Configuration section of the Web Agent window, click Net
Filters.
2. Click CREATE. The Add IPX SAP Net Filter dialog box opens.
3. Use Table 6-3 to complete your configuration:
Table 6-3. IPX SAP Network Filter Parameters
Parameter
Allows you to...
Select
Select the IPX interface.
Note: This field is displayed in the IPX SAP Net Filter
dialog box, not in the Add IPX SAP Net Filter dialog
box.
Interface
Select the interface to which this filter will be applied to SAP
packets sent and/or received on the interface.
Precedence
Specify the filter precedence (in order of importance) with 0equal
to most important.
Note: All SAP filters on the same interface must be
assigned a unique filter precedence.
Net
Specify the network on which the server resides. A network
number of ffffffff represents all networks.
Type
Specify the service type (in hex) that identifies the type of service
the server provides. Well-known service types include:
• Unknown (0)
• Print Queue (3)
• File Server (4)
• Job Server (5)
• Print Server (7)
• Archive Server (9)
• Remote Bridge Server (24)
• Advertising Print Server (47)
• NetWare Directory Services (278)
A value of ffff matches all service type values.
Cajun P550/P220 Switch Operation Guide
6-5
Configuring IPX SAP Protocol (Layer 3)
Table 6-3. IPX SAP Network Filter Parameters (Continued)
Parameter
Allows you to...
Direction
Select the direction of the filter in question. Filter choices include:
• Inbound - Applies the filter only to SAP packets received on
the interface.
• Outbound - Applies the filter only to SAP packets sent on the
interface.
• Both - Applies the filter to SAP packets both sent and received
on the interface
Filter/Suppress
Select to enable or disable whether the services matching Net and
Type are filtered (inbound) or suppressed (outbound).
• Filtered - Applies the filter only to SAP packets received
(inbound direction) on the interface.
• Suppressed - Applies the filter only to SAP packets sent
(outbound direction) on the interface.
Select Enable to filter/suppress traffic. Select Disable to disable the
filtering and suppression of traffic.
Hops
Specify the number of routers (hops) that the packet must pass
through before reaching the service(s) matched by the filter. This
entry is used to override the value in the SAP packet.
Entering 0 ensures that there is no override in the transmission of
data on the network.
4. Click CREATE to save your changes, or CANCEL to restore previous settings.
Example: Filtering all Services Except Netware Directory Services (NDS)
To configure your switch to filter all services except NDS on Interface Remote, you must
create two filters.
To create these filters:
Filter 1
1. In the IPX SAP Configuration section of the Web Agent window, click Net
Filters.
2. Click CREATE to create a new filter. The Add IPX SAP Net Filter dialog box opens.
3. Configure the following parameters:
a. From the Interface pull-down menu, select Remote.
b. In the Precedence field, enter 0.
c. In the Net field, enter ffffffff (which represents all networks).
d. In the Type field, enter 278 (which represents the type for NDS).
6-6
Cajun P550/P220 Switch Operation Guide
Configuring IPX SAP Protocol (Layer 3)
e. From the Direction pull-down menu, select Inbound.
f. From the Filter/Suppress pull-down menu, select Disable. (This ensures that
NDS advertisements are not filtered.)
g. In the Hops field, enter 0. Entering 0 ensures that there is no override in the
transmission of data on the network.
4. Click CREATE to save your changes, or CANCEL to restore previous settings.
This filter ensures that all NDS packets received are not filtered on Interface Remote.
Filter 2
1. In the IPX SAP Configuration section of the Web Agent window, click Net
Filters.
2. Click Create to create a new filter. The Add IPX SAP Net Filter dialog box opens.
3. Configure the following parameters:
a. From the Interface pull-down menu, select Remote.
b. In the Precedence field, enter 1.
c. In the Net field, enter ffffffff (which represents all networks).
d. In the Type field, enter ffff (which represents all services/types).
e. From the Direction pull-down menu, select Inbound.
f. From the Filter/Suppress pull-down menu, select Enable.
g. In the Hops field, enter 0. Entering 0 ensures that there is no override in the
transmission of data on the network.
4. Click CREATE to save your changes, or CANCEL to restore previous settings.
This filter ensures that all networks and service types are filtered in Interface Remote.
Together, Filter 1 and Filter 2 filter services learned on Interface Remote except for NDS
advertisements. It is important to note that Filter 2 had the Precedence field set to 1 and
Filter 1 had the Precedence field set to 0. Any filter with a Precedence of 0 will always
override a filter with a precedence of 1 or higher.
Interpreting IPX SAP Interface Statistics
To interpret IPX SAP interface statistics:
1. In the IPX SAP Display section of the Web Agent window, click Interface
Statistics. The IPX SAP Interface Statistics dialog box opens.
Cajun P550/P220 Switch Operation Guide
6-7
Configuring IPX SAP Protocol (Layer 3)
2. Use Table 6-4 to interpret your IPX SAP interface statistics:
Table 6-4. IPX SAP Interface Statistical Parameters
Parameter
Definition
Interface
The IPX interface associated with this SAP interface.
State
The current state of the SAP interface.
Network Number
The network number of the IPX network associated with
the interface.
Triggered Updates Sent
The number of triggered updates sent from the SAP
interface.
Non-triggered Updates
Sent
The number of non-triggered updates sent from the SAP
interface.
GNS Responses Sent
The number of GNS responses sent from the SAP interface.
Updates Received
The number of updates received. Updates may be received
periodically even if no changes have occurred.
Requests Received
The number of requests received on the SAP interface.
GNS Requests Received
The number of GNS requests received on the SAP interface.
Bad Packets Received
The number of bad packets received on the SAP interface.
3. Click on CLEAR to remove the statistics, or REFRESH to access current interface
statistics.
6-8
Cajun P550/P220 Switch Operation Guide
7
Configuring IP Routing (Layer 3)
Overview
This chapter and its procedures are specific to Layer 3 configuration. This chapter
describes how to configure IP on your switch.
Configuring IP Global Routing
In the Cajun P550 Switch, capabilities that once were provided by additional hardware,
such as bridges, switches, and hubs, are now provided as virtual configurations inside the
router. You can emulate bridging capabilities inside the chassis of the Cajun P550 Switch
through Virtual Local Area Networks (VLANs). The ability to emulate bridging hardware
through a virtual means is referred to as IP Routing. High-level tasks involved in creating
and setting up IP Routing include:
❒ Creating an IP Interface
❒ Enabling IP Routing
❒ Assigning IP Interfaces to the VLAN
❒ Configuring Access Lists
❒ Activating Access Lists
❒ Creating IP Static Routes
❒ Creating Static ARP Entries
❒ Creating a BOOTP/DHCP Server Entry
❒ Configuring IGMP
❒ Configuring DVMRP
For information about creating and assigning physical ports to a VLAN, refer to "Creating
a VLAN", in Chapter 12. For information about enabling IP routing and assigning
subnets, refer to the following sections.
Cajun P550/P220 Switch Operation Guide
7-1
Configuring IP Routing (Layer 3)
Creating an IP Interface
By creating an IP interface, you activate a location in the switch that communicates
between the Internet Protocol (IP) and the embedded software of the switch.
To create an IP interface:
1. In the IP Configuration section of the Web Agent window, click Interfaces. The
IP Interfaces dialog box opens.
2. Click CREATE. The Add IP Interface dialog box opens.
3. Use Table 7-1 to configure the IP interface:
Table 7-1. Add IP Interface Parameters
Parameter
Allows you to...
Interface
Enter a unique, alphanumeric name for the interface.
Admin. State
Specify the administrative state of the interface. Options
include:
• UP - The interface is active.
• DOWN - The interface is inactive.
VLAN
Specify the type of VLAN. Options include:
• Default - Selects the default VLAN.
• Discard - Selects the VLAN to be discarded.
• Ethernet-Console - Selects the Ethernet Console port
as the VLAN.
• Serial Console - Selects the Serial Console port as the
VLAN.
Note: The way that you configure a VLAN to a
port determines the IP Routing option that you
select for the interface. Use the following options to
configure the appropriate interface:
• If you select to create an IP interface for an
Ethernet-Console VLAN, select Mgmt Only from the
IP Routing pull-down menu.
• If you select to create an IP interface for a
serial-console VLAN, select Mgmt Only from the IP
Routing pull-down menu.
• If you create an IP interface for an inbound VLAN,
select Routing Mgmt from the IP Routing pull-down
menu.
7-2
Network Address
Enter the network IP address for the selected interface.
Mask
Enter the subnet mask for the interface.
Cajun P550/P220 Switch Operation Guide
Configuring IP Routing (Layer 3)
Table 7-1. Add IP Interface Parameters
Parameter
Allows you to...
MAC Format
Select the MAC address format for the interface.
Options include:
• Ethernet V2
• Simple Network Access Protocol (SNAP)
IP Routing
Select to enable or disable IP routing on the interface.
Options include:
• Routing/Mgmt - Enables you to manage the switch,
from the Command Line Interface (CLI) or the Web
Agent, and configure IP routing for the switch.
• Mgmt Only - Enables you to manage the switch,
however, IP routing is disabled.
• Default - Enables you to configure IP routing for the
switch, however, you cannot manage the switch.
Note: When you set up IP routing for an interface,
the Default selection is automatically
chosen. The IP interface is created with the
default IP routing option on the VLAN
associated with the interface.
RIP
Enable or disable RIP. The default value is Disable.
OSPF
Enable or disable OSPF. The default value is Disable.
Multicast Protocol
Specify the multicast protocol for the interface. Options
include:
• None
• DVMRP
• IGMP
Proxy ARP
Enable or disable Proxy ARP. The default value is Disable.
ICMP Redirect
Enable or disable ICMP Redirect (IDRP). The default value
is Enable.
NetBIOS UDP
Rebroadcast
Enable or disable NetBIOS UDP Rebroadcasts. The default
value is Disable.
VRRP
Enable or disable Virtual Redundancy Router Protocol. The
default value is Disable.
4. Click APPLY to save your changes, or CANCEL to restore previous settings.
Cajun P550/P220 Switch Operation Guide
7-3
Configuring IP Routing (Layer 3)
Enabling IP Routing
To enable IP routing for an IP interface:
1. In the IP Configuration section of the Web Agent window, click Global
Configuration. The IP Global Configuration dialog box opens.
Note: IP routing is disabled by default.
2. Use Table 7-2 to configure your global configuration setup:
Table 7-2. IP Global Configuration Parameters
Parameter
Allows you to...
IP Unicast
Forwarding
Enable or disable IP unicast on a global basis.
IP Multicast
Forwarding
Enable or disable IP multicast on a global basis. This affects all IP RIP
interfaces set up to use multicast protocols.
IP Source Routing
Enable or disable strict source routing and loose source routing globally.
VRRP
Enable or disable VRRP globally.
BOOTP/DHCP
Relay Agent
Accepts client requests for an IP address and forwards them to a server.
This agent also relays responses from the server to the client.
Limit Proxy ARP
to Same Network
Enable or disable Proxy ARP on the same network. When enabled, the
router only responds to ARP requests when the source and target IP
address are in the same IP network and different IP subnets. When
disabled, the router only responds to ARP requests when the source and
target IP address are in different networks.
Use Default Route
for Proxy ARPs
Enable or disable the use of the default route on your Cajun switch as the
route for Proxy ARPs. For example, if you have a default route configured
to reach the 0.0.0.0 IP address, then any ARP request that does not match
any of the other routes in your IP routing table will automatically go to this
default route.
Maximum
Number of Routes
Specify the maximum number of routes that can be added to the routing
table. The default number of routes is 16384.
Note: These routes refer only to IP Unicast entries.
Maximum
Number of ARP
Cache Entries
7-4
Specify the maximum number of ARP cache entries. Refers to the space
available for the IP address table. When you increase the number of
entries, it may cause the table to be relearned more frequently.
Consequently, it will make address space usage more efficient. The default
maximum number of entries is 16384.
Cajun P550/P220 Switch Operation Guide
Configuring IP Routing (Layer 3)
Table 7-2. IP Global Configuration Parameters (Continued)
Parameter
Allows you to...
Route Preference
by Protocol
Describe the routing preferences set up according to the network
administrator’s preferences. These preferences are normally set up using a
system based on the most to least trust. For example, local routes are
normally considered to have more trust or a higher preference, while OSPF
external routes are considered to have less trust or a lower preference.
These preferences can be overridden, but careful consideration must be
given to how the preferences are set up.
Local Routes
Specify a preference value for local routes.
High-Preference
Static Routes
Specify a preference value for high-level static routes.
OSPF Intra-area
Routes
Specify an OSPF intra-area route. A lower number indicates a lower
preference for the path.
OSPF Inter-area
Routes
Specify inter-area paths to destinations in other OSPF areas. These are
discovered through the examination of received summary Link State
Advertisements (LSA). Enter a number to specify your path cost. A lower
number indicates a lower preference for the path.
OSPF External
Routes
Specify AS external paths to destinations external to the Autonomous
System. These are detected through the examination of received AS
external LSAs. Enter a number to specify your path cost (preference). A
lower number indicates a lower preference for the path.
RIP Routes
Specify RIP to use the hop count as a metric. Hence, to specify a preference
for a RIP route, you need to enter a lower number (path cost).
Low-Preference
Static Routes
Specify a preference value for low-level static routes.
3. Click APPLY to save your changes, or CANCEL to restore previous settings.
Assigning IP Interfaces to the VLAN
After you have set up a VLAN and enabled IP Routing, create the IP interface that your
VLAN and your subnet use to communicate with each other. After creating the IP
interface, you assign it to the VLAN. If you need to create a new VLAN, refer to “Creating
and Implementing VLANs” in Chapter 11.
To create a new IP interface and assign it to a VLAN:
1. In the IP Configuration section of the Web Agent window, click Interfaces. The
IP Interfaces dialog box opens.
2. Click CREATE. The Add IP Interface dialog box opens.
3. In the Interface field, enter the Interface name.
Cajun P550/P220 Switch Operation Guide
7-5
Configuring IP Routing (Layer 3)
4. Use Table 7-3 to complete the configuration of your IP interface:
Table 7-3. IP Interfaces
Parameter
Allows you to...
Select
Select the interface to configure.
State
Shows the current running condition of the switch. Options
include:
• UP - The interface is active.
• DOWN - The interface is inactive.
Interface
Enter an interface name from the interfaces you have
previously configured.
Admin State
Shows the administration state of the interface. The default
setting is UP. Options include:
• UP - Indicates an active state.
• DOWN - Indicates an inactive state.
VLAN
Select a VLAN associated with the selected interface from the
VLANs you have previously configured.
Network Address
Assign an IP address to the VLAN you previously selected.
Mask
Assign a subnet mask for the interface.
MAC Format
Specify the MAC format (Ethernet V2 or SNAP).
IP Routing
Enable or disable IP Routing on the interface. When set to
Routing/Mgmt, you can both manage the switch (from the
CLI or Web Agent), and configure IP Routing for the switch.
When set to Mgmt Only, you can manage the switch,
however, IP routing is disabled.
Note: When the interface has a VLAN identified as
Serial-Console, the only valid IP routing
option is Mgmt Only.
7-6
RIP
Enable or disable RIP for a given interface.
OSPF
Enable or disable OSPF for a given interface.
Multicast Protocol
Select a multicast protocol to associate with your interface.
Selections include: DVMRP, IGMP, and None. IGMP is
enabled automatically when DVMRP is selected.
Proxy ARP
Enable or disable Proxy ARP on a given interface.
ICMP Redirect
Enable or disable ICMP Redirect on a given interface.
Cajun P550/P220 Switch Operation Guide
Configuring IP Routing (Layer 3)
Table 7-3. IP Interfaces (Continued)
Parameter
Allows you to...
NetBIOS UDP
Rebroadcast
Configure your switch for InterVLAN forwarding of NetBIOS
broadcasts. NetBIOS parameters include:
• Inbound - Allow the receipt of NetBIOS replies.
• Outbound - Allow the transmission of NetBIOS
broadcasts.
• Both - Allow the interface to both receive NetBIOS
replies and send NetBIOS broadcasts.
• Disable - Disallow both the receipt of NetBIOS replies
and the transmission of NetBIOS broadcasts.
VRRP
Enable or disable VRRP on a given interface. The default
value is Disable.
5. Click CREATE to save changes, or CANCEL to restore previous settings.
Note: Routing is not supported on the serial interface. Do not configure
Routing/Mgmt on serial IP interfaces.
IP Multinetting
Using the Cajun P550 switch, you set up IP multinetting—a configuration of multiple
subnets on a single VLAN. A network is said to be multinetted (Figure 7-1) when
multiple logical groups of computers are brought together within a single broadcast
domain. To create a multinetted network, you assign multiple subnets to a VLAN.
Figure 7-1. Multinet Diagram
Ports
Server
192.168.60.0
Ethernet
segment
Cajun
PC
VLAN
PC
192.168.10.0
Cajun P550/P220 Switch Operation Guide
7-7
Configuring IP Routing (Layer 3)
Example: Creating a Multinet Interface
To create a multinet interface:
1. In the IP Configuration section of the Web Agent window, click Interfaces. The
IP Interfaces dialog box opens.
2. Click CREATE to create a multinetting interface. The Add IP Interface dialog box
opens.
3. In the Interface field, enter the name of the new interface.
4. From the VLAN pull-down menu, select the VLAN for this multinet
configuration.
5. In the Network Address field, enter the network address associated with this
interface.
6. Click CREATE. The IP Interfaces dialog box opens with the new interface listed.
7. Repeat steps 2 through 6 for all the interfaces you want associated with the same
VLAN.
Note: You must have a different network address for each new multinetting
interface that you create for the same VLAN.
Configuring Access Lists
Access control lists (ACLs), also referred to as access lists, contain rules that forward or
deny data to and through the switch. By configuring access lists, you can:
❒ Prioritize the transmission of frames within the Cajun P550R switch.
❒ Filter out specific or general network transmissions (for example, all traffic from a
particular subnet to the switch).
When you create an access list, you create a series of rules that describe how data is
forwarded or filtered within the switch. You can assign up to eight levels of priority to
routed data.
Standard access lists support the conversion to the Web Agent of Cisco scripts that
contain access lists. Extended access lists enable the switch to filter or deny information
between two specified subnets via specific protocols, such as the Transmission Control
Protocol (TCP) and the User Datagram Protocol (UDP), and specified ranges of ports.
Note: Access rules are searched in order of priority from first to last. During this
search, the first rule that matches the frame is applied. If no rule is matched to
a frame, then the frame is forwarded with normal priority. You can not use
access lists to filter traffic destined to the switch’s CPU.
7-8
Cajun P550/P220 Switch Operation Guide
Configuring IP Routing (Layer 3)
There is an implied implicit permit all at the end of the list. Also, you can only have
one list active at a time.
Creating Standard Access Rules
To create standard access rules:
1. In the IP Configuration section of the Web Agent window, click Access Lists.
The IP Access List dialog box opens.
Note: The IP Access List dialog box displays all standard and extended access rules
that have been created. If no rules have been created, the following
statement displays: No IP Access Rules are currently
configured.
2. Click Create Standard. Valid numeric values are 1-99.
3. Use Table 7-4 to configure your IP access rules to either filter or prioritize traffic:
Table 7-4. IP Access List Setup Parameters
Parameter
Allows you to specify...
Access List Name
The alphanumeric name assigned to the newly-created access
list.
Access Rule Index
The sequence number for each new rule you create. Note that
rules may override each other, so review your current
configuration prior to creating new rules for an access list.
Access Type
The method of handling incoming datagrams based on the IP
access type. Priority levels include:
• Deny/Filter - Allows you to filter out traffic based on the
specified configuration.
• Permit/Fwd pri8 (high) to pri1 (low) - Allows you to
prioritize traffic based on the specified configuration.
• Permit/Fwd with no change in priority - Allows you to
forward traffic with no change in priority.
Source Subnet
• Source Address - The IP address of a subnet that is denied
or granted access to the switch.
• Source Address Wildcard - A range of IP addresses that
are denied or granted access to the switch. Place the
number one (1) in the bit positions you want to ignore.
4. Click CREATE to save your changes, or CANCEL to restore previous settings.
Cajun P550/P220 Switch Operation Guide
7-9
Configuring IP Routing (Layer 3)
Creating Extended Access Rules
To create extended access rules:
1. In the IP Configuration section of the Web Agent window, click Access Lists.
The IP Access List dialog box opens.
Note: The IP Access List dialog box displays all standard and extended access rules
that have been created. If no rules have been created, the following
statement displays: No IP Access Rules are currently
configured.
2. Click Create Extended. The IP Extended Access Rule Creation dialog box opens.
3. Use Table 7-5 to configure your IP access rules to either filter or prioritize traffic:
Table 7-5. IP Extended Access Rule Creation Parameters
Parameter
Allows you to specify...
Access List Name
An alphanumeric name assigned to the newly-created access
list.
Access Rule Index
The sequence number for each new rule you create. Note that
rules may override each other, so review your current
configuration prior to creating new rules for an access list.
Access Type
The method of handling incoming datagrams based on the IP
access type you set. Priority levels include:
• Deny/Filter - Allows you to filter out traffic based on the
specified configuration.
• Permit/Fwd pri8 (high) to pri1 (low) - Allows you to
prioritize traffic based on the specified configuration.
• Permit/Fwd with no change in priority - Allows you to
forward traffic with no change in priority.
Source Subnet
• Source Address - The IP address of a subnet that is denied
or granted access to the switch.
• Source Wildcard - A range of IP addresses that are denied
or granted access to the switch. Place the number one (1)
in the bit positions you want to ignore.
Destination Subnet
• Dest Address - The IP address of a subnet that is denied
or granted access to data from the switch.
• Dest Address Wildcard - A range of IP addresses of
subnets that are denied or granted access to the switch.
Place the number one (1) in the bit positions you want to
ignore.
Protocol ID
7-10
A protocol ID to be filtered. (For example, ICMP=1, IGMP=2).
A single asterisk (*) indicates all protocols.
Cajun P550/P220 Switch Operation Guide
Configuring IP Routing (Layer 3)
TCP/UDP Source Port
Specify a range of source ports that pass between two hosts or
switches using the Transmission Control Protocol (TCP) or the
User Datagram Protocol (UDP). Options include:
4. Click CREATE to save your changes, or CANCEL to restore previous settings.
Example: Filtering Web Traffic Using an Access Rule
To configure your switch to filter Web traffic to or from a particular Web server:
1. In the IP Configuration section of the Web Agent window, click Access Lists.
The IP Access List dialog box displays.
2. Click Create Extended. The IP Extended Access Rule Creation dialog box
displays.
Cajun P550/P220 Switch Operation Guide
7-11
Configuring IP Routing (Layer 3)
3. In the Access List Name field, enter a number between 100 and 199 to identify
your new access control list.
4. In the Access Rule Index field, enter a number to identify the access rule.
5. From the Access Type pull-down menu, select Filter.
6. In the Source Address field, enter an * (asterisk) for the source address.
7. In the Dest Address field, enter an IP address that represents the destination
address of the Web server.
8. In the TCP/UDP Destination Port field:
•
Enter a Min. of 0 (HTTP).
•
Enter a Max. of 80 (HTTP).
9. In the TCP/UDP Source Port field:
•
Enter a Min. of 0 (HTTP).
•
Enter a Max. of 80 (HTTP).
10. Select TCP Established. A check mark displays in the check box.
11. Click CREATE to save your changes, or CANCEL to restore previous settings.
Each time an end user attempts to access the corporate Web server specified by the
source and destination TCP/UDP ports, all Web requests are filtered.
Example: Filtering Traffic Between Subnets
It is possible to filter traffic to either a specific address or to an entire subnet. In this
example, all traffic between the two subnets is filtered:
❒ 10.1.1.0
❒ 10.1.2.0
This example also assumes that the network is a Class C network (255.255.255.0).
To filter traffic between both subnets, you must create two access rules.
To create the access rules:
1. In the IP Configuration section of the Web Agent window, click Access Lists.
The IP Access List dialog box opens.
2. Click Create Extended. The IP Extended Access Rule Creation dialog box opens.
3. In the Access List Name field, enter a number between 100 and 199 to identify
your new access control list.
4. In the Access Rule Index field, enter a number to identify the access rule.
7-12
Cajun P550/P220 Switch Operation Guide
Configuring IP Routing (Layer 3)
5. From the Access Type pull-down menu, select Filter.
6. In the Source Address field, enter the source address (10.1.2.0) and the source
address wildcard (0.0.0.255), respectively.
7. In the Dest Address field, enter the destination address (10.1.1.0) and the
destination address wildcard (0.0.0.255), respectively.
8. In the TCP/UDP Destination Port field:
•
Enter a Min. of 80(HTTP).
•
Enter a Max. of 80 (HTTP).
9. In the TCP/UDP Source Port field:
•
Enter a Min. of 80(HTTP).
•
Enter a Max. of 80 (HTTP).
10. Select TCP Established. A check mark displays in the check box.
11. Click CREATE to save your changes, or CANCEL to restore previous settings.
Once you complete the creation of both access rules, all traffic between subnet 10.1.1.0
and 10.1.2.0 is filtered. Note that traffic between subnet 10.1.1.0 and 10.1.3.0, and
10.1.2.0 and 10.1.3.0 is not filtered. This is because your access rules only filter traffic
between 10.1.1.0 and 10.1.2.0.
Note: To filter traffic to a specific address and not to an entire subnet, you must
specify the destination address of the network node, and use a subnet
wildcard of 255.255.255.255.
To filter all traffic, you must specify a destination address of 0.0.0.0 and a
subnet wildcard of 0.0.0.0. This filters out all traffic. This is useful if you want
to filter all traffic except traffic that matches a previous rule. Ensure that you
do not make this your first rule, since that overrides all subsequent rules.a
Activating Access Lists
You can specify which access lists to activate on the switch by selecting Access Control in
the IP Configuration section of the Web Agent.
Note: Before you specify access lists to activate, you must first configure access lists.
For information about configuring access lists, refer to “Configuring Access
Lists” earlier in this chapter.
Cajun P550/P220 Switch Operation Guide
7-13
Configuring IP Routing (Layer 3)
To activate an access list:
1. In the IP Configuration section of the Web Agent window, click Access Control.
The IP Access Control dialog box opens.
2. From the Enable pull-down menu, select Enable to filter inbound traffic.
3. From the IP Access List pull-down menu, select the name of the access list to be
used for filtering when IP access control is enabled.
4. Click APPLY to save your changes, or CANCEL to restore previous settings.
Creating IP Static Routes
To create IP static routes:
1. In the IP Configuration section of the Web Agent window, click Static Routes.
The IP Static Routes dialog box opens.
2. Use Table 7-6 to complete your static route configuration:
Table 7-6. IP Static Route Parameters
Parameter
Allows you to...
Network Address
Assign an IP network address for your IP static route.
Mask
Assign an IP subnet mask for your IP static route.
Next-Hop Address
Assign an IP address for the gateway associated with
the IP static route.
Next-Hop Interface
Select an interface that is associated with the IP static
route.
Cost
Specify the metric between this router and the
destination. Note that this overrides routing protocol
metrics.
Preference
Specify a low or high routing preference.
3. Click CREATE to save your changes, or CANCEL to restore previous settings.
Creating Static ARP Entries
To create a static ARP entry in your switch’s ARP cache:
1. In the IP Configuration section of the Web Agent window, click Static ARP. The
IP Static ARP Entries dialog box opens.
2. Click CREATE. The Add IP Static ARP Entry dialog box opens.
7-14
Cajun P550/P220 Switch Operation Guide
Configuring IP Routing (Layer 3)
3. Use Table 7-7 to configure IP Static ARP:
Table 7-7. IP Static ARP Parameters
Parameter
Allows you to...
IP Address
Configure an IP address to associate with the Static ARP entry.
MAC Address
Enter the MAC address of a node to which you want to create a
static ARP entry.
Interface
Select an interface to associate with the Static ARP entry.
4. Click CREATE to save your changes, or CANCEL to restore previous settings.
Creating a BOOTP/DHCP Server Entry
The BOOTP/DHCP Server Entry allows you to configure a Cajun Router as a
BOOTP/DHCP Relay Agent between a BOOTP/DHCP server and the source client. Only
the locally attached clients will be able to find the BOOTP/DHCP server if the
BOOTP/DHCP server entry is configured on your switch. If you have a network with
multiple switches, and you want at least one client that is attached to each switch to be
able to access the BOOTP/DHCP server, then you must configure each of those switches
with a BOOTP/DHCP server entry.
To create a BOOTP/DHCP entry:
1. In the IP Configuration section of the Web Agent window, click BOOTP/DHCP
Servers. The IP BOOTP/DHCP Servers dialog box opens.
2. Click CREATE. The Add BOOTP/DHCP Server Entry dialog box opens.
3. In the IP Address field, enter the IP address of the BOOTP/DHCP server on your
network.
4. Click CREATE to save your changes, or CANCEL to restore previous settings.
Note: It is possible to create multiple BOOTP/DHCP Server Entries if necessary.
IP Multicast
IP Multicast enables a single host to distribute information to multiple recipients. To do
this, multicast protocols use class D IP addresses to specify specific multicast groups to
which information is sent. The class D IP address used by multicast routing protocol
ranges from 224.0.0.1 to 224.0.0.255. The class D IP addresses available for general use
are 224.0.1.0 to 239.255.255.255.
Cajun P550/P220 Switch Operation Guide
7-15
Configuring IP Routing (Layer 3)
In addition, IP multicasting distributes information to multicast groups in two specific
ways:
❒ Multicast Forwarding - allows a switch to forward multicast traffic from the local
router to group members on directly attached subnetworks. If a multicast packet is
forwarded to multiple interfaces on one VLAN, only one Forwarding Entry is added
on the VLAN for the packet. One copy of the packet is sent to the VLAN.
❒ Multicast Routing - allows a switch to deliver multicast traffic between
neighboring routers and across the network.
For example, the switch could use Internet Group Membership Protocol (IGMP) Only to
forward multicast traffic to locally attached subnetworks. However, if the multicast traffic
in question is needed to be sent to a neighboring router, the switch could use DVMRP to
send the information between routers. Since IGMP is a required protocol for any
multicast routing protocol (for example, DVMRP), it is automatically enabled when you
enable DVMRP.
Note: You must globally enable IP multicast routing in order to successfully
configure IGMP or DVMRP. Refer to “Configuring IP Global Routing”, earlier
in this chapter, for instructions on enabling IP multicast routing.
Configuring IGMP
IGMP enables hosts to inform routers when they join or leave groups. Routers
periodically query hosts (query interval) for the groups in which the hosts are members.
When there is more than one router in a broadcast domain (subnet), one of the routers
becomes the designated querier. Only the designated router queries the hosts.
Both IGMP Version 1.0 and IGMP Version 2.0 are supported. After selecting the specific
IGMP version for an interface, you can manually configure the Version 1.0 querier. The
selection of the querier for Version 2.0 is dynamic but can be overridden.
Enabling the IGMP Global Configuration
To enable IGMP global configuration:
1. In the IP Configuration section of the Web Agent window, click Global
Configuration. The IP Global Configuration dialog box opens.
2. From the IP Multicast Forwarding pull-down menu, select Enable. This enables
IP multicast globally.
3. In the IGMP Configuration section of the Web Agent window, click Global
Configuration. The IGMP Global Configuration dialog box opens.
4. From the IGMP pull-down menu, select Enable.
7-16
Cajun P550/P220 Switch Operation Guide
Configuring IP Routing (Layer 3)
5. To enable MTRACE processing, from the MTRACE pull-down menu, select
Enable.
6. Click APPLY to save your changes, or CANCEL to restore previous settings.
Modifying IGMP Interfaces
To modify IGMP interfaces:
1. In the IGMP Configuration section of the Web Agent window, click Interfaces.
The IGMP Interfaces dialog box opens.
Note: If no IGMP interfaces are enabled for your existing IP interfaces, you must
first enable a multicast protocol before you can configure IGMP. Refer to
“Creating an IP Interface” earlier in this chapter for more information on
how to select a multicast protocol.
2. Use Table 7-8 to complete your configuration:
Table 7-8. IGMP Interface Parameters
Parameter
Allows you to...
Select
Select the interface to be modified.
Interface
Display the IP interface that is configured with IGMP.
IP Address
Identify an IP address associated with this interface. This
parameter is not configurable from the IGMP configuration
dialog box.
IP Address Mask
Identify a subnet mask associated with this interface. This
parameter is not configurable from the IGMP configuration
dialog box.
IGMP Version
Specify the IGMP Version (1.0 or 2.0) to associate with the
IGMP interface.
Maximum Groups
Specify the number of IGMP Groups that can be active on this
interface. The default value is 32.
Always be Group
Membership Querier
Version 1.0: Enable or disable this interface to be the
designated querier.
Version 2.0:
• Enable to force this interface to send queries.
• Disable to obey the designated querier election.
Only the designated router will query hosts on your network.
This is disabled by default.
Process Leave Packets
Enable to terminate group memberships quickly. (IGMP
Version 2.0 only). The default value is Enabled.
Query Request Interval in
(sec)
Configure the time period between queries. The default value
is 125 seconds.
Cajun P550/P220 Switch Operation Guide
7-17
Configuring IP Routing (Layer 3)
Table 7-8. IGMP Interface Parameters (Continued)
Parameter
Allows you to...
Query Response Interval
in (sec)
Configure the amount of time to wait for a response from a
host after sending a query. If no response is received within
this time, the host is removed from the group table. The default
value is 10 seconds.
Neighbor Querier Timeout
Interval in (sec)
Enter the amount of time (in seconds) this interface should
wait after hearing a neighbor’s query before assuming the role
of querier, if not already the querier. If no query is received
from a neighbor with a lower IP address in the allotted time,
this interface becomes the querier. (IGMP Version 2.0 only).
The default value is 255 seconds.
Robustness Variable
Perform tuning for the expected packet loss on a subnet. If a
subnet is expected to have more packet loss, the Robustness
Variable should be increased. The Robustness Variable must not
be set to 0 and should not be set to 1. The default value is 2.
3. Click APPLY to save your changes, or CANCEL to restore previous settings.
Configuring DVMRP
Distance Vector Multicast Routing Protocol (DVMRP) is a distance vector routing
protocol that uses IP packets with protocol type 2 (IGMP) to exchange routing
datagrams. DVMRP enables multicast routers to exchange distance vector updates that
contain lists of multicast flows and their cost metrics. DVMRP uses tunneling between
pairs of DVMRP routers when traffic must pass through one or more intermediary
routers or gateways that do not implement DVMRP.
Configuring the DVMRP Global Configuration
To configure the DVMRP global configuration:
1. In the IP Configuration section of the Web Agent window, click Global
Configuration. The IP Global Configuration dialog box opens.
2. From the IP Multicast Forwarding pull-down menu, select Enable. This enables
IP multicast globally.
3. In the DVMRP Configuration section of the Web Agent window, click Global
Configuration. The DVMRP Global Configuration dialog box opens.
4. From the DVMRP Version 3/xFF pull down menu, select Enable.
7-18
Cajun P550/P220 Switch Operation Guide
Configuring IP Routing (Layer 3)
5. Use Table 7-9 to set up your global configuration:
Table 7-9. DVMRP Global Parameters
Parameter
Allows you to...
DVMRP Version 3/xFF
Globally enable or disable DVMRP.
Neighbor Router Probe
Interval
Set the value (in seconds) that the switch probes the
network for available neighbor routers.
Neighbor Router
Timeout Interval
Set the timeout (in seconds) that a neighbor stays up
without confirmation. This is an important method
used to timeout old routes.
Minimum Flash Update
Interval
Set the period (in seconds) between flash updates. This
represents the minimum time between advertisements
of the same route.
Maximum Number of
Routes
Enter the maximum number of routes for this interface.
Route Report Interval
Set the time (in seconds) that elapses between delivery
of DVMRP routing table updates.
Route Replace Time
Specify the amount of time (in seconds) before which a
route entry will be removed if it is not refreshed.
Route Hold Down Time
Set the time (in seconds) that the switch reports
unavailable routes with a metric of infinity.
Prune Message Lifetime
Set the time (in seconds) that a transmitted upstream
prune message persists.
Prune Message
Retransmit Interval
Specify the time (in seconds) between the transmittal of
generated upstream prune messages on your network.
Graft Message
Retransmit Interval
Set the time (in seconds) between the transmittal of
generated upstream graft messages.
6. Click APPLY to save your changes, or CANCEL to restore previous settings.
Modifying DVMRP Interface Information
To modify DMVRP interface parameters:
1. In the DVMRP Configuration section of the Web Agent window, click
Interfaces. The DVMRP Interfaces dialog box opens.
Note: If no DVMRP interfaces are enabled for your existing IP interfaces (VLANs),
you must first enable a multicast protocol before you can configure DVMRP.
Refer to “Creating an IP Interface”, earlier in this chapter, for more
information on how to select a multicast protocol.
Cajun P550/P220 Switch Operation Guide
7-19
Configuring IP Routing (Layer 3)
2. Use Table 7-10 to complete your DVMRP configuration:
Table 7-10. DVMRP Interface Parameters
Parameter
Defines the...
Select
DVMRP interface to be configured.
Interface
Interface that is configured with the DVMRP multicast
protocol.
IP Address
IP address of each interface. Not configurable.
IP Address Mask
Subnet mask of each interface. Not configurable
Interface Type
Interface type for each interface. You can configure the
interface type as:
• Broadcast - All traffic is forwarded through the
routers. This is not a tunnel and does not require
encapsulation.
• Non-Encapsulated Tunnel - All multicast data
traffic is IPIP encapsulated, but the protocol
messages are simply unicast.
• IPIP Tunnel - All multicast traffic (data and
protocol messages) on this interface is encapsulated
in IP unicast packets with the protocol set to IPIP
(IP in IP).
Tunnel Endpoint
Address
Tunnel endpoint IP address of a router. Configure this
setting to represent the IP address of the end router to
which you want to send datagrams through a tunnel.
Typically, the origin and endpoint routers are separated
by a gateway(s) or a router(s) that do not support
DVMRP.
Interface Metric
Cost metric for the interface.
Src Host Addr in Prune
Msg
Transmission of prunes.
• Enable - Send prunes with the full source host
address.
• Disable - Send prunes with only the subnet portion
of the source address.
Interface Scope
Minimum TTL (time-to-live) required for a packet to
leave this interface (None, 127, 255).
3. Click APPLY to save your changes, or CANCEL to restore previous settings.
7-20
Cajun P550/P220 Switch Operation Guide
Configuring IP Routing (Layer 3)
Monitoring Switch Performance Using IP Statistics
This section provides detailed information on the analysis and use of IP and IP multicast
statistics.
IP routing statistic options include:
❒ Displaying Global IP Routing Statistics
❒ Searching the IP Routing Table
❒ Examining the IP Routing Table Statistics
❒ Searching the IP ARP Cache
Displaying Global IP Routing Statistics
Note: IP routing global statistics only represent traffic processed by the supervisor
module software.
To display the global IP routing statistics:
1. In the IP Display section of the Web Agent window, click Global Statistics. The
IP Routing Global Statistics dialog box opens.
2. Click Refresh to update all statistics.
Or
Click Clear to set all statistics to zero.
3. Use Table 7-11 to review the definition of each statistic:
Table 7-11. IP Routing Global Statistics
Statistic
Defines the...
IP In Receives
Total number of input datagrams received from interfaces,
including those received in error.
IP In Header Errors
Number of input datagrams discarded due to errors in their IP
headers, including bad checksums, version number mismatch,
other format errors, time-to-live exceeded, errors discovered in
processing their IP options.
Cajun P550/P220 Switch Operation Guide
7-21
Configuring IP Routing (Layer 3)
Table 7-11. IP Routing Global Statistics (Continued)
Statistic
Defines the...
IP In Address Errors
Number of input datagrams discarded because the IP address in
their IP header's destination field was not a valid address to be
received at this entity. This count includes invalid addresses (for
example, 0.0.0.0) and addresses of unsupported Classes (for
example, Class E). For entities that are not IP Gateways and
therefore do not forward datagrams, this counter includes
datagrams discarded because the destination address was not a
local address.
IP Forward Datagrams
Number of input datagrams for which this entity was not their
final IP destination, as a result of which an attempt was made to
find a route to forward them to that final destination. In entities
which do not act as IP Gateways, this counter will include only
those packets which were Source-Routed via this entity, and the
Source-Route option processing was successful.
Note: This is routed by the supervisor in the software.
IP In Unknown Protocols
Number of input datagrams discarded due to errors in their IP
headers. Such errors may include bad checksums, version number
mismatches, other format errors, time-to-live exceeded, errors
discovered in processing their IP options.
IP In Discards
Number of input IP datagrams for which no problems were
encountered to prevent their continued processing, but which
were discarded (for example, for lack of buffer space).
Note: This counter does not include any datagrams discarded
while awaiting re-assembly.
IP In Delivers
Total number of input datagrams successfully delivered to IP
user-protocols (including Internet Control Message Protocol
(ICMP)).
IP Out Requests
Total number of IP datagrams that local IP user-protocols
(including ICMP) supplied to IP in requests for transmission.
Note: This counter does not include any datagrams counted in
ipForwDatagrams.
IP Out Discards
Number of output IP datagrams for which no problem was
encountered to prevent their transmission to their destination, but
were discarded (for example, for lack of buffer space). Note that
this counter includes datagrams counted in ipForwDatagrams if
any such packets met this (discretionary) discard criterion.
IP Out No Routes
Number of IP datagrams discarded because no route could be
found to transmit them to their destination. Note that this counter
includes any packets counted in ipForwDatagrams which meet this
`no-route' criterion. Note that this includes any Datagrams which a
host cannot route because all of its default gateways are down.
IP Reassembly Timeout
Maximum number of seconds that received fragments are held
while they are awaiting reassembly at this entity.
IP Reassembly Required
Number of IP fragments received that need to be reassembled.
7-22
Cajun P550/P220 Switch Operation Guide
Configuring IP Routing (Layer 3)
Table 7-11. IP Routing Global Statistics (Continued)
Statistic
Defines the...
IP Reassembly OKs
Number of IP datagrams successfully reassembled.
IP Reassembly Failures
Number of failures detected by the IP re-assembly algorithm
(timeout errors). Note that this is not necessarily a count of
discarded IP fragments since some algorithms can lose track of the
number of fragments by combining them as they are received.
IP Fragmentation OKs
Number of IP datagrams that have been successfully fragmented at
this entity.
IP Fragmentation Failures
Number of IP datagrams that have been discarded because they
needed to be fragmented at this entity but could not be.
IP Fragmentation Creates
Number of IP datagram fragments that have been generated as a
result of fragmentation at this entity.
IP Routing Discards
Number of routing entries that were chosen to be discarded even
though they are valid. One possible reason for discarding such an
entry could be to free-up buffer space for other routing entries.
ICMP In Messages
Total number of ICMP messages that the entity received. Note that
this counter includes all those counted by icmpInErrors.
ICMP In Errors
Number of ICMP messages that the entity received but determined
as having ICMP-specific errors (bad ICMP checksums, bad length).
ICMP In Destination
Unreachables
Number of ICMP Destination Unreachable messages received.
ICMP In Time Exceeds
Number of ICMP Time Exceeded messages received.
ICMP In Parameter Problems
Number of ICMP Parameter Problem messages received.
ICMP In Source Quenchs
Number of ICMP Source Quench messages received.
ICMP In Redirects
Number of ICMP Redirect messages received.
ICMP In Echo Requests
Number of ICMP Echo (request) messages received.
ICMP In Echo Replies
Number of ICMP Echo Reply messages received.
ICMP In Timestamp Requests
Number of ICMP Timestamp (request) messages received.
ICMP In Timestamp Replies
Number of ICMP Timestamp Reply messages received.
ICMP In Address Mask Requests Number of ICMP Address Mask Request messages received.
ICMP In Address Mask Replies
Number of ICMP Address Mask Reply messages received.
ICMP Out Messages
Total number of ICMP messages that this entity attempted to send.
Note that this counter includes all those counted by
icmpOutErrors.
ICMP Out Errors
Number of ICMP messages that this entity did not send due to
problems discovered within ICMPd such as a lack of buffers. This
value should not include errors discovered outside the ICMP layer
such as the inability of IP to route the resultant datagram. In some
implementations, there may be no types of error which contribute
to this counter's value.
Cajun P550/P220 Switch Operation Guide
7-23
Configuring IP Routing (Layer 3)
Table 7-11. IP Routing Global Statistics (Continued)
Statistic
Defines the...
ICMP Out Destination
Unreachables
Number of ICMP Destination Unreachable messages sent.
ICMP Out Time Exceeds
Number of ICMP Time Exceeded messages sent.
ICMP Out Parameter Problems
Number of ICMP Parameter Problem messages sent.
ICMP Out Source Quenchs
Number of ICMP Source Quench messages sent.
ICMP Out Redirects
Number of ICMP Redirect messages sent. For a host, this object will
always be zero, since hosts do not send redirects.
ICMP Out Echo Requests
Number of ICMP Echo (request) messages sent.
ICMP Out Echo Replies
Number of ICMP Echo Reply messages sent.
ICMP Out Timestamp Requests
Number of ICMP Timestamp (request) messages sent.
ICMP Out Timestamp Replies
Number of ICMP Timestamp Reply messages sent.
ICMP Out Address Mask
Requests
Number of ICMP Address Mask Request messages sent.
ICMP Out Address Mask Replies Number of ICMP Address Mask Reply messages sent.
UDP In Datagrams
Total number of UDP datagrams delivered to User Datagram
Protocol (UDP) users.
UDP In No Ports
Total number of received UDP datagrams for which there was no
application at the destination port.
UDP In Errors
Number of received UDP datagrams that could not be delivered for
reasons other than the lack of an application at the destination
port.
UDP Out Datagrams
Total number of UDP datagrams sent from this entity.
IP Multicast Forward Datagrams Number of input multicast datagrams for which this entity was not
their final IP destination, as a result of which an attempt was made
to find a route to forward them to that final destination.
IP Multicast In Discard
Number of input IP multicast datagrams for which no problems
were encountered to prevent their continued processing, but were
discarded (for example, for lack of buffer space).
Note: This counter does not include any datagrams discarded
while awaiting re-assembly.
IP Multicast In Receives
Total number of input multicast datagrams received from
interfaces, including those received in error.
BOOTP/DHCP In Requests
Number of requests received by the BOOTP/DHCP Relay Agent.
BOOTP/DHCP In Responses
Total number of BOOTP/DHCP response datagrams received by the
BOOTP/DHCP Relay Agent.
BOOTP/DHCP In Discards
Number of BOOTP/DHCP requests discarded.
BOOTP/DHCP In Hops Exceeds
Number of BOOTP/DHCP requests not forwarded due to number
of hops exceeds.
7-24
Cajun P550/P220 Switch Operation Guide
Configuring IP Routing (Layer 3)
Table 7-11. IP Routing Global Statistics (Continued)
Statistic
Defines the...
BOOTP/DHCP Out Requests
Total number of BOOTP/DHCP requests forwarded by the
BOOTP/DHCP Relay Agent.
BOOTP/DHCP Out Responses
Total number of BOOTP/DHCP responses forwarded by the
BOOTP/DHCP Relay Agent.
Searching the IP Routing Table
To use the IP routing table:
1. In the IP Display section of the Web Agent window, click Route Table Search.
The Route Table Search dialog box opens.
2. Select the search criteria you want to use to find more specific information on
available routes. For example, if you want to find all static routes that are presently
configured on your switch, search by source and specify static as your search value.
3. Use Table 7-12 to determine your search parameters:
Table 7-12. IP Route Table Search Parameters
Parameter
Allows you to perform a search...
Source
Of your IP routing table using one of the following
parameters:
• RIP
• OSPF
• Static
• Local
Once you select one of these parameters, the search
attempts to find routes associated the parameter you
chose.
Interface
Based on the interface you select. System default
entries include:
• Default
• Discard
• Ethernet Console
• Configured Interface
IP Address
Based on an IP address you specify.
4. Click SEARCH to start the search. If routes are available, they are displayed in the
IP Routing Table dialog box.
Cajun P550/P220 Switch Operation Guide
7-25
Configuring IP Routing (Layer 3)
Note: To delete a local entry from your IP routing table, you must delete the local IP
interface associated with that entry.
Examining the IP Routing Table Statistics
To examine the IP Routing Table Statistics:
1. In the IP Display section of the Web Agent window, click Route Table Statistics.
The IP Routing Table Statistics dialog box opens.
2. Use Table 7-13 to review each statistic:
Table 7-13. IP Routing Table Statistical Parameters
Parameter
Definition
Current Number of
Routes
Displays the total number of active routes.
Peak Number of
Routes
Displays the peak number of routes.
Total Routes Added
Displays the total number of routes added.
Total Routes Deleted Displays the total number of routes deleted.
RIP Route Changes
Indicates the number of changes to the IP route
database made by RIP.
RIP Queries
Indicates the number of RIP queries sent to the
network.
Searching the IP ARP Cache
To search the IP ARP Cache entries:
1. In the IP Display section of the Web Agent window, click ARP Cache Search.
The ARP Cache Entry Search dialog box opens.
2. Select the search criteria you want to use to find more specific information on your
switch’s current ARP cache. For example, if you want to find all of the IP ARP
cache entries associated with your out-of-band connection on your switch, search
by VLAN and specify Ethernet Console as your search value.
7-26
Cajun P550/P220 Switch Operation Guide
Configuring IP Routing (Layer 3)
3. Use Table 7-14 to determine your search parameters:
Table 7-14. ARP Cache Search Parameters
Parameter
Allows you to perform a search based
on...
IP Address
An IP address you specify.
I/F
The interface you select. System entries include all
interfaces that you previously configured.
4. Click SEARCH to start the search. If matching entries are found they are displayed
in IP ARP Cache dialog box.
IP Multicast Statistics
IP multicast statistics include:
❒ Examining IGMP Interface Statistics
❒ Displaying the Multicast Group Table
❒ Displaying the IGMP Local Multicast Forwarding Cache
❒ Displaying DVMRP Global Statistics
❒ Examining DVMRP Interface Statistics
❒ Displaying DVMRP Neighbor Router(s)
❒ Displaying DVMRP Routing Table Statistics
❒ Displaying the DVMRP Route Table
❒ Displaying the DVMRP Upstream Routers
❒ Displaying the DVMRP Designated Forwarder(s) Table
❒ Displaying the DVMRP Downstream Dependent Router(s)
❒ Displaying the DVMRP Multicast Forwarding Cache
Note: It is possible to use access rules to filter and prioritize multicast traffic.
Displaying IGMP Global Statistics
The IGMP global statistics provides users with statistics on membership reports,
membership queries transmitted and received, and unknown messages.
Cajun P550/P220 Switch Operation Guide
7-27
Configuring IP Routing (Layer 3)
To display IGMP global statistics:
1. In the IGMP Display section of the Web Agent window, click Global Statistics.
The IGMP Global Statistics dialog box opens.
2. To modify your global statistics, perform one of the following:
•
Click REFRESH to view the latest statistics.
•
Click CLEAR ALL to reset all statistics to zero.
•
Select one or more interfaces and click CLEAR to reset statistics on those
interfaces to zero.
3. Use Table 7-15 to review each IGMP statistic:
Table 7-15. IGMP Global Statistics Parameters
Parameter
Defines the...
Group Membership
Reports Received
Number of reports received in response to a group
membership query. Hosts respond to a Query by generating
Host Membership Reports reporting each host group to
which they belong on the network interface from which
the Query was received.
Group Membership
Queries Transmitted
Number of query messages sent by all local IGMP
interfaces. These messages are sent to discover which host
groups have members on their attached local networks.
Queries are addressed to the all-hosts group (address
224.0.0.1), and carry an IP time-to-live of 1.
Group Membership
Queries Received
Number of query messages received by all local IGMP
interfaces. All hosts that receive this query transmit a group
membership report reporting each host group to which
they belong.
Unknown Messages
Received
IGMP message of a type other than Group Membership
Query, Group Membership Report, or Leave group.
Examining IGMP Interface Statistics
The IGMP interface statistics allow you to view IGMP statistics for each configured IP
interface with multicast enabled.
To view IGMP interface statistics:
1. In the IGMP Display section of the Web Agent window, click Interface
Statistics. The IGMP Interface Statistics dialog box opens.
7-28
Cajun P550/P220 Switch Operation Guide
Configuring IP Routing (Layer 3)
2. Click REFRESH to view the latest interface statistics.
Or
Click CLEAR to reset all statistics to zero.
3. Use Table 7-16 to review the IGMP interface statistics:
Table 7-16. IGMP Interface Statistical Parameters
Parameter
Defines the...
IGMP Interface
IP interface for these statistics.
IP Address
IP address associated with the interface.
IP Address Mask
Subnet mask associated with each listed interface.
State
Current state of the interface. For example, if the interface was
enabled and operating properly, you should see a state of UP
listed in this field.
IGMP Version
Version of IGMP enabled on each interface.
This Router is Group
Membership Querier
Router that was configured or elected to be the designated
group membership querier. The switch queries hosts on each
interface only when it is acting as the designated querier on
that interface.
Robustness Variable
Tuning for the expected packet loss on a subnet. If a subnet is
expected to have more packet loss, the Robustness Variable
should be increased. The Robustness Variable must not be set
to 0 and should not be set to 1.
Next Query Request in
(sec)
Remaining amount of time (in seconds) before the next group
membership query is transmitted.
Neighbor Querier
Timeout in (sec)
Amount of time (in seconds) remaining before this interface
assumes the role of designated querier. This timer is reset to the
value entered for the Neighbor Querier Timeout Interval each
time an IGMP query is received from a neighbor with a lower
IP address. If no response is received in the allotted time, the
query will timeout and the Version 2.0 querier will begin.
Group Join Requests
Received
Number of new groups that have been joined on this interface.
Group Leave Requests
Received
Number of leave requests received on this interface.
Group Reports Received
Number of reports received on this interface in response to a
group membership query. Hosts respond to a Query by
generating Host Membership Reports reporting each host
group to which they belong on the network interface from
which the Query was received.
Query Messages Received Number of query messages received from other multicast
routers.
Cajun P550/P220 Switch Operation Guide
7-29
Configuring IP Routing (Layer 3)
Table 7-16. IGMP Interface Statistical Parameters (Continued)
Parameter
Defines the...
Query Messages
Transmitted
Number of query messages sent by a multicast router. These
messages are sent to discover which host groups have members
on their attached local networks. Queries are addressed to the
all-hosts group (address 224.0.0.1), and carry an IP
time-to-live of 1.
Unknown Messages
Received
IGMP messages received with an unsupported type.
Number of Current
Groups
Number of groups on each interface for which there are entries
in the Group Membership Table.
Displaying the Multicast Group Table
The multicast group table provides information on interfaces that are members of an
IGMP group and contains an expiry time for the entry, IP address of the group, and the
group reporter address.
To display the IGMP group table:
1. In the IGMP Display section of the Web Agent window, click Group
Membership Table. The IGMP Group Membership Table dialog box opens.
2. To modify your IGMP group membership table, perform one of the following:
•
Select the entry and click Delete Entry to delete one or more entries.
•
Click Flush Table to clear the entire table.
•
Click REFRESH to receive the most up-to-date information on the entries in
the table.
3. Use Table 7-17 to review the IGMP Group Membership information:
Table 7-17. IGMP Group Membership Table Parameters
7-30
Parameter
Defines the...
Group Member Interface
Interface that is connected to a member of IGMP group.
Group Address
Group address that has members on this interface.
Group Created On
Time at which the group was created on the router.
Group Multicast Protocol
Routing protocol being used for the group. If no routing
protocol is being used on the interface a group is on, this
column displays IGMP.
Cajun P550/P220 Switch Operation Guide
Configuring IP Routing (Layer 3)
Table 7-17. IGMP Group Membership Table Parameters (Continued)
Parameter
Defines the...
Group Reporter Address
IP address of the host that sent the most recent host
membership report for this group.
Entry Expiration Period
in (sec)
Expiration time (in seconds) of the group that is being
displayed.
Displaying the IGMP Local Multicast Forwarding Cache
To display the multicast forwarding cache information (IGMP only interfaces):
1. In the IGMP Display section of the Web Agent window, click Local Multicast
Forwarding Cache. The Local Multicast Forwarding Cache dialog box opens.
2. To modify your Local Multicast Forwarding Cache, perform one of the following:
•
Select the entry and click Delete Entry to delete one or more entries.
•
Click Flush Table to clear the entire table.
•
Click REFRESH to receive the most up-to-date information on the entries in
the table.
3. Use Table 7-18 to review the IGMP Multicast Forwarding Cache information:
Table 7-18. IGMP Local Multicast Forwarding Cache Parameters
Parameters
Defines the...
Destination Group
Address
Destination group address of the multicast transmission.
Source SubNetwork
Subnet on which the IGMP interface(s) exist.
Source Address Mask
Subnet mask associated with the IGMP source subnetwork.
Upstream Interface
IP interface configured on the upstream interface.
Invalid Flows From
Upstream
Number of invalid flows received from the upstream neighbor.
Packets Forwarded
Through Cache Entry
Number of packets successfully forwarded in the CPU
(supervisor module).
Downstream Interface(s)
Number of downstream interfaces and provides a link to the
IGMP Downstream Interfaces dialog box.
Upstream Source(s)
Number of upstream interfaces and provides a link to the IGMP
Upstream Interfaces dialog box.
Cajun P550/P220 Switch Operation Guide
7-31
Configuring IP Routing (Layer 3)
Displaying DVMRP Global Statistics
To display the DVMRP global statistics:
1. In the DVMRP Display section of the Web Agent window, click Global
Statistics. The DVMRP Global Statistics dialog box opens.
2. Click REFRESH to view the latest statistics.
Or
Click CLEAR to reset all statistics to zero.
3. Use Table 7-19 to review the DVMRP global statistics:
Table 7-19. DVMRP Global Statistical Parameters
7-32
Statistic
Defines the number of...
Probe Messages Received
Probe messages received on this switch. DVMRP routers
exchange probes and routing updates so they each have a
picture of their neighbors’ capabilities and the DVMRP
network topology.
Report Messages
Received
Report messages received on this switch.
Prune Messages Received
Prune messages received on this switch. This indicates the
number of old branches removed from the multicast
distribution tree.
Graft Messages Received
Graft messages received. This indicates the number of attempts
at adding a new branch to the multicast distribution tree.
Graft Acknowledgments
Received
Graft acknowledgments received.
Unknown Message Codes
Encountered
Messages received that are not graft, report, or probe messages.
Probe Messages
Transmitted
Probe messages transmitted to the network.
Report Messages
Transmitted
Report messages transmitted on this switch.
Prune Messages
Transmitted
Prune messages transmitted upstream on this switch. This
indicates the number of old branches removed from the
multicast distribution tree.
Graft Messages
Transmitted
Graft messages transmitted upstream from this switch. This
indicates the number of new upstream branches added to the
multicast distribution tree.
Graft Acknowledgments
Transmitted
Graft acknowledgments sent downstream from this switch.
This indicates the number of new downstream branches added
to the multicast distribution tree.
Cajun P550/P220 Switch Operation Guide
Configuring IP Routing (Layer 3)
Examining DVMRP Interface Statistics
DVMRP interface statistics list active DVMRP interfaces and provide specific information
on each interface.
To examine DVMRP statistics:
1. In the DVMRP Display section of the Web Agent window, click Interface
Statistics. The DVMRP Interface Statistics dialog box opens.
2. Perform one of the following...
Click REFRESH to view the latest interface statistics.
Click CLEAR All to reset all statistics to zero.
Select one interface, and click CLEAR to reset the selected interface.
3. Use Table 7-20 to review the interface statistics:
Table 7-20. DVMRP Interface Statistical Parameters
Parameter
Defines the...
DVMRP Interface
IP interface configured with the DVMRP multicast routing
protocol.
Network Address
IP address of the interface configured with the DVMRP
multicast.
Address Mask
IP subnet mask associated with the interface.
State
Current status of the interface. Possible status indications
include:
• UP - The interface is active.
• DOWN - The interface is inactive.
Type
Type of interface configured. Possible values include:
• Broadcast - All traffic is forwarded through the routers.
This is not a tunnel and does not require encapsulation.
• IPIP Tunnel - All multicast traffic (data and protocol
messages) on this interface is encapsulated in IP unicast
packets with the protocol set to IPIP (IP in IP).
• Non-Encapsulated Tunnel - All multicast data traffic on
this interface is IPIP encapsulated, but the protocol
messages are simple unicast.
Metric
Interface cost.
IGMP Querier on
Interface
Router is the IGMP querier. The purpose of the IGMP querier is
to periodically poll hosts on your network to trigger group
membership reports.
Next Probe Message in
(sec)
Time (in seconds) remaining until the next probe message is
sent.
Cajun P550/P220 Switch Operation Guide
7-33
Configuring IP Routing (Layer 3)
Table 7-20. DVMRP Interface Statistical Parameters (Continued)
Parameter
Defines the...
Unrecognized Packets
Received
Number of unknown DVMRP messages.
Invalid Routes Received
Number of invalid routes received on this interface.
Neighbor DVMRP
Router(s)
Number of (neighbor) routers that are also running DVMRP.
Note: This number is a hypertext link that provides
additional information on the DVMRP neighbor
router(s).
Displaying DVMRP Neighbor Router(s)
To view the DVMRP neighbor routers:
1. In the DVMRP Display section of the Web Agent window, click Interface
Statistics. The DVMRP Interface Statistics dialog box opens.
2. In the DVMRP Neighbor Router(s) column, click on the number (where the
number is 1 or more) to view DVMRP neighbor routers.
3. Use Table 7-21 to view more information on DVMRP neighbor routers.
7-34
Cajun P550/P220 Switch Operation Guide
Configuring IP Routing (Layer 3)
Table 7-21. DVMRP Neighbor Routers
Parameter
Displays...
Neighbor Network
Address
The neighbor router’s network address.
Found on Interface
The neighbor routers found on this interface.
DVMRP Supported
Major/Minor Version
The DVMRP version supported by the neighbor router.
Expiration period in
(sec)
The time (in seconds) before the neighbor router times out.
Neighbor Received
Probe From This
Router
Whether the neighbor router received this router’s probe message.
Neighbor Supports
Prune Function
Whether the neighbor router supports prune functionality.
Neighbor Supports
Generation ID
Function
Whether the neighbor router supports generation of IDs.
Neighbor Supports
MTRACE Requests
Whether the neighbor router supports MTRACE requests.
Neighbor is SNMP
Manageable
Whether the neighbor router can be managed by SNMP.
Displaying DVMRP Routing Table Statistics
DVMRP routing table statistics provides information on the current number of valid
routes, the number of total routes present (both valid and invalid), and the number of
triggered routes.
To view the DVMRP routing table statistics:
1. In the DVMRP Display section of the Web Agent window, click Route Table
Statistics. The DVMRP Routing Table Statistics dialog box opens.
Cajun P550/P220 Switch Operation Guide
7-35
Configuring IP Routing (Layer 3)
2. Use Table 7-22 to review the DVMRP Routing Statistics information:
Table 7-22. DVMRP Routing Statistical Parameters
Parameter
Defines the...
Current Number of
Routes
Total number of routes present in the routing database. This
number includes both valid and invalid routes.
Number of Triggered
Routes
Total number of routes added to the routing table that were
triggered by a topology change in the network.
Number of Valid Routes
Total number of valid routes present in the routing database.
Displaying the DVMRP Route Table
The DVMRP route table contains information on valid DVMRP routes, the expiry for
those routes, and additional next-hop information.
To view the DVMRP route table:
1. In the DVMRP Display section of the Web Agent window, click Route Table.
The DVMRP Route Table dialog box opens.
2. Complete one of the following to modify your DVMRP table:
•
Select the entry and click Delete Entry to delete one or more entries.
•
Click Flush Table to clear the entire table.
•
Click REFRESH to receive the most up-to-date information on the entries in
the table.
3. Use Table 7-23 to review the DVMRP route table parameters:
Table 7-23. DVMRP Route Table Parameters
7-36
Parameter
Defines the...
Source Network
Network from which a multicast flow may originate.
Source Network Mask
Source network mask.
Reporting Router
IP address of the router reporting this route to its neighbors.
Reporting Router
Interface
IP interface configured, which leads to thı˝0.01 u13(ip-17(r)11( t)4r)11(e)1(a)2(4m)
Cajun P550/P220 Switch Operation Guide
Configuring IP Routing (Layer 3)
Table 7-23. DVMRP Route Table Parameters (Continued)
Parameter
Defines the...
Upstream Router(s)
IP address of the DVMRP router that is the upstream neighbor
to the local router. The local DVMRP router must know which
DVMRP router is its upstream neighbor to determine how
packets from a given source will be transmitted to a given
multicast group. Opens DVMRP Upstream Router(s) dialog
box.
Designated Forwarder(s)
Network router(s) responsible for forwarding from the source
network onto the upstream interface. Opens the Designated
Forwarders dialog box.
Downstream Dependent
Router(s)
Number of downstream DVMRP routers that are dependent on
this router for this particular route. Opens the DVMRP
Downstream Dependent Router(s) dialog box.
Displaying the DVMRP Upstream Routers
To view the DVMRP upstream routers:
1. In the DVMRP Display section of the Web Agent window, click Route Table.
The DVMRP Route Table dialog box opens.
2. In the Upstream Router(s) column, for the appropriate source network, click the
number to view information on the upstream routers. The Upstream Router(s)
dialog box opens.
3. Use Table 7-24 for more information on Upstream Router(s).
Table 7-24. DVMRP Upstream Router(s)
Parameter
Definition
Router Network
Address
Displays the router network address.
Router Cost to Source
Network
Displays the cost metric.
Found on Interface
Displays the interface on which the upstream router was found.
Displaying the DVMRP Designated Forwarder(s) Table
To view the DVMRP Designated Forwarder table:
1. In the DVMRP Display section of the Web Agent window, click Route Table.
The DVMRP Route Table dialog box opens.
Cajun P550/P220 Switch Operation Guide
7-37
Configuring IP Routing (Layer 3)
2. In the Designated Forwarder column, for the appropriate source network, click
the number to view information on the designated forwarder. The Designated
Forwarder(s) table opens.
3. Use Table 7-25 for more information on Designated Forwarder(s) parameters:
Table 7-25. Designated Forwarder(s) Table Parameters
Parameter
Defines the...
Forwarding Interface
Local interface which leads to the network where
the Designated Forwarder resides.
Forwarder Network Address
Designated Forwarder for the given source network
on the indicated Forwarding Interface.
Forwarder Cost to Source Network
Cost reported by the Designated Forwarder for the
given source network.
Displaying the DVMRP Downstream Dependent Router(s)
To view the DVMRP downstream dependent routers:
1. In the DVMRP Display section of the Web Agent window, click Route Table.
The DVMRP Route Table dialog box opens.
2. In the Downstream Dependent Router(s) column, for the appropriate source
network, click the number to view information on the downstream dependent
routers. The Downstream Dependent Router(s) dialog box opens.
3. Use Table 7-26 for more information on Downstream Dependent Router(s).
7-38
Cajun P550/P220 Switch Operation Guide
Configuring IP Routing (Layer 3)
Table 7-26. DVMRP Downstream Dependent Router(s)
Parameter
Definition
Router Network Address
Displays the router network address of the downstream dependent
router.
Found on Interface
Displays the name of the interface on which the downstream
router was found.
DVMRP Supported Major/Minor
Version
Displays the DVMRP version supported.
Router Received Probe from
This Router
Displays whether the router received a probe from this router.
Router Supports Prune Function
Displays whether this router supports prune functionality.
Router Supports Generation ID
Function
Displays whether the router supports generation ID function.
Router is SNMP Manageable
Displays whether the router can be managed by SNMP.
Displaying the DVMRP Multicast Forwarding Cache
The DVMRP Multicast Forwarding Cache screen provides detailed information on the
multicast forwarding attributes including information on downstream interfaces and
upstream sources. DVMRP allows the switch to construct paths from the hosts that are
sending to a multicast group to the hosts that are receiving it.
To display the multicast forwarding cache information:
1. In the DVMRP Display section of the Web Agent window, click Multicast
Forwarding Cache. The Multicast Forwarding Cache dialog box opens.
2. Complete one of the following to modify your Multicast Forwarding Table:
•
Select the entry and click Delete Entry to delete one or more entries.
•
Click Flush Table to clear the entire table.
•
Click REFRESH to receive the most up-to-date information on the entries in
the table.
Cajun P550/P220 Switch Operation Guide
7-39
Configuring IP Routing (Layer 3)
3. Use Table 7-27 to review the DVMRP Multicast Forwarding Cache information:
Table 7-27. DVMRP Multicast Forwarding Cache Parameters
Parameter
Defines the...
Select
Selection of the multicast forwarding cache.
Destination Group
Address
Destination group address of the multicast transmission.
Source SubNetwork
Subnet from which the flow is coming.
Source Address Mask
Subnet mask associated with the DVMRP source subnetwork.
Upstream Interface
Local interface which is receiving this flow.
Upstream Neighbor
(Router) Address
IP address of the upstream neighbor (router).
Invalid Flows From
Upstream
Number of invalid flows received from the upstream neighbor.
Packets Forwarded
Through Cache Entry
Number of packets successfully forwarded in the CPU
(supervisor module) for this flow.
Upstream Interface is
Pruned
Router that is sending prunes to the upstream neighbor. Allows
you to open the DVMRP Upstream Prune Information dialog
box.
Next Pruned
Downstream Interface to
Timeout
Next interface that is currently pruned which will be grafted
back.
Downstream Interface(s)
Number of downstream interfaces. Allows you to open the
DVMRP Downstream Links dialog box.
Upstream Source(s)
Number of upstream interfaces. Allows you to open the
Upstream Sources dialog box.
4. In the Upstream Interface is Pruned field, click on the number to view
information on the upstream prune information. The Upstream Prune Information
dialog box opens.
5. Use Table 7-28 for more information on upstream prunes.
7-40
Cajun P550/P220 Switch Operation Guide
Configuring IP Routing (Layer 3)
Table 7-28. Upstream Prune Information
Parameter
Displays the...
Destination Group
Address
Destination group address of the multicast session.
Source SubNetwork
Subnet on which the DVMRP interface exists.
DVMRP Upstream
Interface
Name of the upstream interface.
Interface Type
The interface type. Types include:
• Broadcast - All traffic is forwarded through the routers. This
is not a tunnel and does not require encapsulation.
• IPIP Tunnel - All multicast traffic (data and protocol
messages) on this interface is encapsulated in IP unicast
packets with the protocol set to IPIP (IP in IP).
• Non-Encapsulated Tunnel - All multicast data traffic on this
interface is IPIP encapsulated, but the protocol messages are
simple unicast.
Interface is Pruned
Status of whether the interface has been pruned.
Prune Expiration Time
in sec
Time (in seconds) that the interface times out waiting for the
prune message to expire.
6. In the Downstream Interface(s) field, click the number to view information on
the downstream interface. The DVMRP Downstream Link(s) dialog box opens.
7. Use Table 7-29 to view the DVMRP Downstream Links information.
Table 7-29. DVMRP Downstream Links Parameters
Parameter
Displays the...
Destination Group Address
Destination group address.
Source SubNetwork
Source subnetwork.
DVMRP Downstream Interface DVMRP Downstream interface.
Interface Type
Interface type. Types include:
• Broadcast - All traffic is forwarded through the
routers. This is not a tunnel and does not require
encapsulation.
• IPIP Tunnel - All multicast traffic (data and protocol
messages) on this interface is encapsulated in IP
unicast packets with the protocol set to IPIP (IP in IP).
• Non-Encapsulated Tunnel - All multicast data traffic
on this interface is IPIP encapsulated, but the protocol
messages are simple unicast.
Cajun P550/P220 Switch Operation Guide
7-41
Configuring IP Routing (Layer 3)
Table 7-29. DVMRP Downstream Links Parameters (Continued)
Parameter
Displays the...
Interface is Pruned
Status of whether the interface has been pruned.
Prune Expiration in (sec)
Time (in seconds) that the interface times out waiting for
the prune message to expire.
8. In the Upstream Source(s) field, click on the number to view information on the
upstream source. The DVMRP Upstream Source(s) dialog box opens.
9. Use Table 7-30 to view the DVMRP Upstream Source(s) information.
Table 7-30. DVMRP Upstream Sources Parameters
Parameter
Displays the...
Destination Group
Address
Destination group address for the upstream interface.
Flow Source Address
Host source address for the upstream flow.
Flow Upstream
Interface
Name of the flow source interface.
Payload Protocol Type
Protocol type for the payload.
Source Port Number
Source port number.
Destination Port
Number
Destination port number.
Configuring VRRP
When multiple routers are available to forward traffic, the Virtual Router Redundancy
Protocol (VRRP) is used to provide fast automatic fail-over for hosts when the default
gateway fails. This eliminates the single point of failure inherent in the static default
routed environment. A Master VRRP router controls the IP addresses associated with the
virtual router and forwards packets sent to these IP addresses. The backup router is
always on standby. If the Master router fails, the backup router takes over. Multiple
virtual routers can be created per interface. VRRP can be enabled or disabled globally or
on an interface basis.
7-42
Cajun P550/P220 Switch Operation Guide
Configuring IP Routing (Layer 3)
Enabling VRRP
To enable a VRRP virtual router:
1. In the IP Configuration section of the Web Agent window, click Global
Configuration. The IP Global Configuration dialog box opens.
2. From the VRRP pull-down menu, select Enable.
3. Click APPLY to save your changes, or CANCEL to restore previous settings.
Enabling VRRP on an Interface
To enable an VRRP virtual router on an interface:
1. In the IP Configuration section of the Web Agent window, click Interfaces. The
IP Interfaces dialog box opens.
2. Select the interface to be enabled.
3. From the VRRP pull-down menu for your interface, select Enable.
4. Click APPLY to save your changes, or CANCEL to restore previous settings.
Note: You must enable VRRP globally from the IP Configuration/Global
Configuration dialog box.
Creating a VRRP Virtual Router
To create a VRRP router:
1. In the IP Configuration section of the Web Agent window, click VRRP
Configuration. The VRRP Configuration dialog box opens.
2. Click CREATE. The Add VRRP Virtual Router dialog box opens.
3. Use Table 7-31 to configure your VRRP parameters:
Table 7-31. VRRP Configuration Parameters
Parameter
Defines...
Interface
The name associated with the selected interface to
configure.
VR ID
The reporting virtual router’s identification. The ID
range is 1-255 (decimal).
IP Address
The virtual router’s IP address.
Cajun P550/P220 Switch Operation Guide
7-43
Configuring IP Routing (Layer 3)
Table 7-31. VRRP Configuration Parameters (Continued)
Parameter
Defines...
Priority
The sending VRRP router’s priority. Higher values equal
higher priority. Possible values:
• 255 - The value that must be assigned to the Master.
• 1 to 254 - Values that must be used for routers backing
up a virtual router.
• 0 - the current Master is disabled. Allows Backup routers
to trigger without waiting for the current Master to
timeout.
Advertisement Timer The number of seconds a Master virtual router
advertises itself.
Auth Type
The VRRP authentication method. The default is None.
Auth Key
The VRRP authentication key for the interface. The
default is LUCENT.
Addr Owner
Override
The address owner override.
4. Click CREATE to save your changes, or CANCEL to restore previous settings.
Configuring VRRP Authentication
To configure VRRP authentication:
1. In the IP Configuration section of the Web Agent window, click Interfaces. The
IP Interfaces dialog box opens.
2. Select the interface on which to enable VRRP authentication.
3. From the VRRP Auth Type pull-down menu, select Simple.
4. In the VRRP Auth Key field, enter your authentication password. The default is
LUCENT.
5. Click APPLY to save your changes, or CANCEL to restore previous settings.
Displaying VRRP Statistics
To view VRRP virtual router statistics:
1. In the IP Display section of the Web Agent window, click VRRP Statistics. The
VRRP Statistics dialog box opens.
7-44
Cajun P550/P220 Switch Operation Guide
Configuring IP Routing (Layer 3)
2. Complete one of the following to modify your VRRP statistics:
•
Click CLEAR to reset all the entries.
•
Click REFRESH to receive the most up-to-date information on the entries.
3. Use Table 7-32 to review your VRRP statistics:
Table 7-32. VRRP Statistical Parameters
Parameter
Defines the...
Interface
IP interface name corresponding to the selected VRRP
virtual router.
VR ID
Reporting virtual router’s identification.
IP Address
IP address that corresponds with the selected VRRP virtual
router.
State
State of the virtual router.
Values include:
• Inactive - Disables the VRRP virtual router.
• Initialize - Initializes the VRRP Virtual Router.
• Backup - Defines the VRRP Virtual Router as a backup
router to the master.
• Master - The VRRP Virtual Router functions as the
forwarding router.
Time of State Change
Last state of transition. This value is reported in an
HH:MM:SS format.
Times this VR became
master
Number of instances that the virtual router became the
Master.
Advertisements
Received
Number of advertisements received, matching the VRRP
Virtual Router configuration.
Advertisements Sent
Number of advertisements sent by the VRRP Virtual
Router.
Bad Advertisements
Received
Number of advertisements received by the VRRP Virtual
Router with invalid parameters.
Configuring IRDP
ICMP Router Discovery Protocol (IRDP) is an alternative router discovery protocol using
ICMP messages on multicast links.
ICMP uses router discovery messages, known as router advertisements and router
solicitations. Each router periodically multicasts a router advertisement from each of its
multicast interfaces, announcing the IP address of that interface, and other router IP
addresses. Hosts discover the addresses of their neighbor routers by listening for the
Cajun P550/P220 Switch Operation Guide
7-45
Configuring IP Routing (Layer 3)
advertisements. When a host attached to a multicast link starts up, it may multicast a
router solicitation to ask for immediate advertisements, rather than waiting for the next
periodic one to arrive.
If no advertisements arrive, the host may re-transmit the solicitation a small number of
times, but then must stop sending more solicitations. Routers that subsequently start up,
or were not discovered because of packet loss or temporary link partitioning, are
eventually discovered by reception of their periodic (unsolicited) advertisements.
Enabling IRDP on an Interface
To enable IRDP on an interface:
1. In the IP Configuration section of the Web Agent window, click IRDP. The ICMP
Router Discovery Protocol dialog box opens.
2. In the Select column, choose the interface on which to enable IRDP.
3. Use Table 7-33 to enable parameters and enter necessary Internet addresses in the
IRDP Interfaces dialog box.
Table 7-33. ICMP Router Discovery Protocol Parameters
Parameter
Definition
Select
Selects the interface to be configured.
Interface
Displays the IRDP interface.
Network Address
Displays the network IP address of the IRDP interface.
IRDP State
Select to enable or disable IRDP on the selected interface.
The default is Enable.
Preferences
Enter the preference of the address as a default router
address, relative to other router addresses on the same
subnet. The minimum value (80000000 hex) is used to
indicate that the address should not be used by neighboring
hosts as a default router address, even though it may be
advertised. The default is 0.
Adv. Address
Select an IP destination address used for multicast router
advertisements sent from the interface.
Options include:
• Multicast - Used on any link where listening hosts
support IP multicast. The default is 224.0.0.1.
• Broadcast - Used on any link where listening hosts
support IP unicast. The default is 255.255.255.255.
7-46
Cajun P550/P220 Switch Operation Guide
Configuring IP Routing (Layer 3)
Table 7-33. ICMP Router Discovery Protocol Parameters
Parameter
Definition
Min. Advertisement
Interval (sec)
The minimum time (in seconds) allowed between sending
unsolicited multicast router advertisements from the
interface. This value must be no less than three
seconds and no greater than the Max. Advertisement
Interval. The default is 0.75 times the maximum interval.
Max. Advertisement
Interval (sec)
Enter the maximum time (in seconds) allowed between
sending multicast router advertisements sent from the
interface. This value must be no less than four seconds and
no greater than 1800 seconds. The default value is 1800
seconds.
Advertisement Life
Time (sec.)
The time (in seconds) of the lifetime of the router
advertisements sent from the interface. This value must
be no less than the maximum advertisement interval
and no greater than 9000 seconds. The default value is
three times the maximum advertisement interval.
4. From the IRDP State pull-down menu for the selected interface, select Enable.
5. From the Adv. Address pull-down menu for the selected interface, select
Multicast.
6. In the Min. Advertisement Interval (sec.) field for the selected interface, delete
the default value and enter the minimum time interval that passes before the host
contacts the switch.
7. In the Max. Advertisement Interval (sec.) field for the selected interface, delete
the default value and enter the maximum time interval that passes before the host
contacts the switch.
8. In the Advertisement Life Time (sec.) field, delete the default value and enter
the duration, in seconds, of the IRDP advertisement.
9. Click APPLY to save your changes, or CANCEL to restore previous settings.
10. In the IP Configuration section of the Web Agent window, click Global
Configuration. The IP Global Configuration dialog box opens.
11. From the IP Multicast Forwarding pull-down menu, select Enable.
12. Click APPLY to save your changes, or CANCEL to restore previous settings.
Cajun P550/P220 Switch Operation Guide
7-47
Configuring IP Routing (Layer 3)
Adding an IRDP Interface
To add an IRDP interface:
1. In the IP Configuration section of the Web Agent window, click IRDP. The ICMP
Router Discovery Protocol dialog box opens.
2. Click Add. The Add IRDP dialog box opens.
3. From the Interface pull-down menu, select the interface.
4. In the Router Address field, enter the IP address of the router for which you
create an IRDP interface.
5. In the Preference field, enter a value that indicates the preference of the address
as a default router address. The default is 0.
6. Click CREATE to create the new IRDP interface, or CANCEL to restore previous
settings.
Deleting an IRDP Interface
To delete an IRDP interface:
1. In the IP Configuration section of the Web Agent window, click IRDP. The ICMP
Router Discovery Protocol dialog box opens.
2. Select the IRDP interface you want to delete and click DELETE. The IRDP
interface is deleted and no longer displays in the interface list.
Configuring LDAP
In the Web console, you can configure Lightweight Directory Access Protocol (LDAP)
settings and view LDAP statistics. On the Cajun P550 switch, LDAP allows access control
lists to be retrieved from a database on an LDAP server and applied to the Cajun P550
switch. You can also view LDAP statistics for the switch.
You can configure a primary and secondary LDAP server as well as the search base for
the switch to contact in response to an LDAP request. Configuring a secondary server
ensures that LDAP requests can be fulfilled if a primary server fails.
Configuring LDAP Settings
To configure LDAP settings:
1. In the IP Configuration section of the Web Agent, click LDAP Configuration.
The LDAP Configuration dialog box opens.
7-48
Cajun P550/P220 Switch Operation Guide
Configuring IP Routing (Layer 3)
2. Use the following table to enter necessary information in the LDAP Configuration
dialog box.
Table 7-34. LDAP Configuration Parameters
Parameter
Definition
Primary Server IP
Address
Enter the IP address of your primary LDAP server for
the access control list domain. This address is used
first when connecting to and downloading access lists
from an LDAP server. The default value of 0.0.0.0
indicates to the client that there is no primary LDAP
server.
Primary Server Port
Enter the port number of the primary LDAP server
for the access control list domain. The port number is
used in conjunction with the primary server IP
address. There are no special overload values. The
default port is 389.
Secondary Server IP
Address
Enter the backup LDAP server IP address for the
access control list domain. This address is used as a
backup when connecting to and downloading access
lists from an LDAP server. If the LDAP client is
unsuccessful in connecting to or downloading access
lists from the primary server, the secondary server IP
address is used. If the primary server IP address has a
value of 0.0.0.0, the secondary server IP address is
used. The default value is 0.0.0.0.
Note: Setting the IP address of the secondary
server to 0.0.0.0 indicates to the LDAP
client that there is no secondary server.
Secondary Server
Port
Enter the backup LDAP server port number for the
access control list domain. The port number is used in
conjunction with the secondary server IP address.
There are no special overload values. The default port
number is 389.
Search Base
Enter the search criteria that will be sent to the LDAP
server. The default value is “ou=Devices,
ou=CajunRules, o=Lucent”.
3. Click APPLY to save changes, or CANCEL to restore previous settings.
The LDAP client sends a search for access control lists to the primary server if the
client finds the primary server. The primary server retrieves the access lists from the
LDAP database and returns them to the switch’s LDAP client. If the client does not
find the primary server and if the primary server does not respond after five retries,
the client tries to connect to the secondary server. If the secondary server fails after
five retries, the client times out. The LDAP client applies the access lists to manage
the way traffic is forwarded.
Cajun P550/P220 Switch Operation Guide
7-49
Configuring IP Routing (Layer 3)
Viewing LDAP Statistics
To view LDAP statistics:
1. In the IP Display section of the Web console, click LDAP Statistics. The LDAP
Statistics dialog box opens.
2. Click Refresh to dynamically update LDAP Statistics data. LDAP Statistics include:
Table 7-35. LDAP Statistics
Parameter
Definition
Last Change
Displays the sysUpTime in the device that this Policy
Capability was last modified. Providing this allows a remote
manager to detect a change in the Policy Capabilities by
polling a single object. On seeing this value change, an
interested manager should relearn this device’s Policy
Capabilities.
For more detailed information about SysUpTime and Policy
Capabilities, refer to
lucentDevicePolicyCapabilityLastChange in the Lucent
MIB.
Producer Signal
The sequence number that, when modified, triggers the
LDAP client to download the latest policy from the LDAP
server. Typically, RealNet Rules will set this value whenever
there is a new policy to download. If this value is a
non-zero value, the LDAP client will compare it to the
producer signal on the LDAP server. No comparison is
made if the value is zero.
Consumer Signal
Used to indicate the success of the LDAP client
downloading a policy. If the consumer signal matches the
producer signal, then the last time the LDAP client
attempted to download a policy, the download was
successful. If the consumer signal is -1, then either the
LDAP client had a problem processing the access lists or the
consumer signal set on the LDAP client did not match the
signal configured on the LDAP server. If the consumer
signal is not -1 and does not match the producer signal,
then the LDAP client was unable to connect to the LDAP
server(s).
Configuring an IP Helper Address
When you configure an IP Helper Address, you enable a server to receive broadcasts
from the switch and forward them to a server or computer on a particular VLAN. The
receiving server is referred to as the helper because once it receives the request from the
switch, it obtains the requested information and forwards it to the requesting server or
computer.
7-50
Cajun P550/P220 Switch Operation Guide
Configuring IP Routing (Layer 3)
Creating an IP Helper Address
To create an IP helper address:
1. In the IP Configuration section of the Web Agent window, click IP Helper
Address. The IP Helper Address dialog box opens.
2. Click CREATE.
3. From the Interface pull-down menu, select the interface of the PC or server on
which you want to create an IP helper address.
4. In the Helper Address field, type the IP Address of the server that will receive
and pass along the broadcast from the switch.
5. Use Table 7-36 to determine the fields to enable:
Table 7-36. IP Helper Address Parameters
Parameter
Definition
Interface
Provides a list of interfaces associated with the switch
configuration.
Helper Address
Enables you to specify the IP Address of the server that
receives and passes along broadcasts from the switch.
TFTP
Enables the helper to route files via Trivial File
Transfer Protocol (TFTP). The default value is Enabled.
DNS
Enables the helper to route the domain names via
Dynamic Naming Service. The default value is
Enabled.
TIME
Enables the helper to route the system time of specified
computers on the VLAN. The default value is Enabled.
NETBIOS Name Service Enables the helper to route the name of a user or a
computer on a VLAN via NETBIOS. The default value
is Enabled.
NETBIOS Date Service
Enables the helper to route the current system date of a
computer on a VLAN via NETBIOS. The default value is
Enabled.
BOOTP Server
Enables the helper to route IP addresses assigned by a
Bootstrap Protocol (BOOTP) to a receiving computer. The
default value is Enabled.
BOOTP Client
Enables the helper to route the IP address of a BOOTP
client. The default value is Enabled.
TACACS
Enables the helper to route passwords forwarded by the
Terminal Access Controller Access Control System
(TACACS). The default value is Enabled.
Cajun P550/P220 Switch Operation Guide
7-51
Configuring IP Routing (Layer 3)
6. Click CREATE to create the helper address, or CANCEL to restore previous
settings.
Deleting an IP Helper Address
To delete an IP helper address:
1. In the IP Configuration section of the Web Agent, click IP Helper Address. The
IP Helper Address dialog box opens.
2. Select the IP helper address you want to delete, and click Delete.
Modifying an IP Helper Address
To modify an IP helper address:
1. In the IP Configuration section of the Web Agent, click IP Helper Address. The
IP Helper Address dialog box opens.
2. Select the IP helper address you want to modify.
3. Use Table 7-36 to modify the IP helper address parameters.
4. Click APPLY to save your changes, or CANCEL to restore previous settings.
7-52
Cajun P550/P220 Switch Operation Guide
8
Configuring the RIP Routing
Protocol (Layer 3)
Overview
This chapter and its procedures are specific to Layer 3 configuration.
Configuring the Switch Using the RIP Routing Protocol
This section describes:
❒ Configuring RIP for the Switch
❒ Modifying RIP Interfaces
❒ Creating Trusted RIP Neighbors
❒ Interpreting RIP Statistics
Configuring RIP for the Switch
To configure the RIP routing protocol globally on your switch:
Note: You must enable RIP globally. To enable RIP, refer to “Configuring IP
Interfaces”, and “Configuring VRRP”, in Chapter 7.
1. In the RIP Configuration section of the Web Agent window, click Global
Configuration. The RIP Global Configuration dialog box opens.
2. Use Table 8-1 to configure the global setup:
Table 8-1. RIP Global Configuration Parameters
Parameter
Allows you to...
Global RIP
Enable or disable the RIP protocol. The default is Enable.
Update Timer
Specify the value (in seconds) that represents the time between
RIP updates on all interfaces. The default value is 30 seconds.
Cajun P550/P220 Switch Operation Guide
8-1
Configuring the RIP Routing Protocol (Layer 3)
Table 8-1. RIP Global Configuration Parameters (Continued)
Parameter
Allows you to...
Purge TTL
Specify the global Time To Live (TTL) in seconds that the RIP
update persists. The default value is 120 seconds.
Triggered Updates
Enable or disable route updates that were triggered by a
topology change in the network to be added to the routing
table. The default is Enable.
Update Pkt Delay
Specify the value (in seconds) that represents the time delay
between successive RIP update packets to the neighbor, when
the update requires multiple packets. The default value is 0
seconds (no delay).
3. Click APPLY to save your changes, or CANCEL to restore previous settings.
Modifying RIP Interfaces
To modify the RIP interfaces:
1. In the RIP Configuration section of the Web Agent window, click Interfaces.
The RIP Interfaces dialog box opens.
2. Use Table 8-2 to modify RIP interfaces:
Table 8-2. RIP Interface Parameters
Parameter
Allows you to...
Select
Select the RIP interface to be modified.
Interface
Displays an interface from a list of interfaces that you
previously configured.
Network Address
Displays an IP address to be associated with the displayed
interface.
Mode
Specify the RIP State. Different states include:
• talk only (send RIP information to the network)
• listen only (receive RIP information from the network)
• talk/listen (both send and receive RIP information from
the network)
Send Version
Specify the version of RIP you want to use to send packets
across your interface. Selections include:
• V1
• V2
• V1/V2
8-2
Cajun P550/P220 Switch Operation Guide
Configuring the RIP Routing Protocol (Layer 3)
Table 8-2. RIP Interface Parameters (Continued)
Parameter
Allows you to...
Receive Version
Specify the version of RIP you want to use to receive packets.
Selections include:
• V1
• V2
• V1/V2
Split Horizon
Specify that IP routes learned from an immediate
neighbor are not advertised back to the neighbor from
which the routes were learned.
• Split Horizon - Routes are not advertised.
• Split Horizon with Poison Reverse - Routes are
advertised with an infinite metric (16).
Default Route
Specify the mode for the default route. Different states include:
• Disable - Disables the default route.
• Talk Only - Send RIP information to the network.
• Listen Only - Receive RIP information from the network.
• Talk/Listen - Both send and receive RIP information from
the network.
Auth Type
Specify the type of authentication available for use on a given
RIP interface. Authentication types include:
• None - No authentication available.
• Simple - Uses a clear-text password for validation.
• MD5 - Uses a stronger encryption technique for
passwords.
Auth Key
Enter the authorization key value.
3. Click APPLY to save your changes, or CANCEL to restore previous settings.
Creating Trusted RIP Neighbors
Trusted RIP neighbors enable you to enhance a Cajun switch’s security by enabling one
or more neighbors to relay RIP information.
CAUTION: Adding one or more trusted RIP neighbors ensures that your router
accepts only information from these neighbors. Consequently, all
other information is filtered. Do not create trusted RIP neighbor(s) if
you do not wish to filter RIP information from the network.
Cajun P550/P220 Switch Operation Guide
8-3
Configuring the RIP Routing Protocol (Layer 3)
To create a trusted RIP neighbor:
1. In the RIP Configuration section of the Web Agent window, click Trusted RIP
Neighbors. The Trusted RIP Neighbors dialog box opens.
2. Click CREATE. The Add Trusted RIP Neighbor dialog box opens.
3. Enter the Network Address of the node that acts as the trusted RIP neighbor.
4. Click CREATE to save your changes, or CANCEL to restore previous settings.
Interpreting RIP Statistics
To display RIP statistics:
1. In the RIP Display section of the Web Agent window, click Interface Statistics.
The Interface Statistics dialog box opens.
2. Use Table 8-3 to interpret the RIP statistics:
Table 8-3. RIP Statistical Parameters
Parameter
Defines the...
Interface
Interface associated with the IP address specified.
State
Current status of the RIP route. UP indicates that the interface is up and
RIP can transmit and receive updates.
IP Address
IP address associated with the interface.
Triggered Updates Sent
Number of RIP triggered updates sent.
Non-Triggered Updates
Sent
Number of RIP non-triggered updates sent.
Updates Received
Number of RIP updates received based on route changes in the IP routing
table.
Bad Packets Received
Number of bad packets received on this interface.
Bad Routes Received
Number of bad routes received on this interface.
8-4
Cajun P550/P220 Switch Operation Guide
9
Configuring the OSPF Routing
Protocol (Layer 3)
Overview
This chapter and its procedures are specific to Layer 3 configuration. Included in this
chapter:
❒ Configuring OSPF
❒ Monitoring Switch Performance Using OSPF Statistics
Configuring OSPF
Configuring OSPF includes:
❒ Configuring the OSPF Global Configuration
❒ Creating OSPF Areas
❒ Deleting OSPF Areas
❒ Modifying OSPF Areas
❒ Deleting OSPF Areas
❒ Creating OSPF Virtual Links
❒ Deleting OSPF Virtual Links
❒ Modifying OSPF Virtual Links
❒ Creating OSPF Summaries
❒ Deleting OSPF Summaries
❒ Modifying OSPF Summaries
Cajun P550/P220 Switch Operation Guide
9-1
Configuring the OSPF Routing Protocol (Layer 3)
Configuring the OSPF Global Configuration
The OSPF global configuration allows you to globally configure OSPF on your switch. It
also allows you to specify your router ID and whether or not you want the switch to be
the Autonomous System (AS) border router.
To globally configure OSPF:
1. In the OSPF Configuration section of the Web Agent window, click Global
Configuration. The OSPF Global Configuration dialog box opens.
2. Use Table 9-1 to configure your global setup:
Table 9-1. OSPF Global Configuration Parameters
Parameter
Allows you to...
OSPF
Select to enable or disable OSPF globally on your switch.
Router ID
Specify the Router ID on the switch. The router ID is a 32-bit
number assigned to each router running the OSPF protocol. This
number uniquely identifies the router within an Autonomous
System. If 0.0.0.0 is used, the router uses the IP address of an
interface.
AS Border Router
Enable or disable the switch to be an Autonomous System
Border Router (ASBR).
SPF Hold Time
Specify the minimum number of seconds between SPF runs.
SPF Suspend
Specify the number of nodes to process SPF runs before
suspending.
Auto-Creation of
Virtual Links
Enable or disable the function of automating the creation of
virtual circuits based on network topology.
Maximum Number of
Paths
Configure the maximum number of paths used when running
SPF.
Local Ext Type
Specify whether imported local routes will be advertised in OSPF
with type 1 (internal) or type 2 (external) metrics.
RIP Ext Type
Specify whether imported RIP routes will be advertised in OSPF
with type 1 (internal) or type 2 (external) metrics.
Static Ext Type
Specify whether imported high preference routes will be
advertised in OSPF with type 1 (internal) or type 2 (external)
metrics.
Static Low Ext Type
Specify whether imported low preference routes will be
advertised in OSPF with type 1 (internal) or type 2 (external)
metrics.
3. Click APPLY to save changes, or CANCEL to restore previous settings.
9-2
Cajun P550/P220 Switch Operation Guide
Configuring the OSPF Routing Protocol (Layer 3)
Creating OSPF Areas
To create OSPF areas:
1. In the OSPF Configuration section of the Web Agent window, click Areas. The
OSPF Areas dialog box opens.
Note: The Area ID 0.0.0.0 is a backbone area and always exists in an OSPF
configuration.
2. Click CREATE. The Add OSPF Area dialog box opens.
3. Use Table 9-2 to configure your new OSPF area:
Table 9-2. OSPF Area Parameters
Parameter
Allows you to...
Select
Select the OSPF area to be configured.
Note: This parameter is displayed in the OSPF Area
dialog box, not in the Add OSPF Area dialog box.
Area ID
Specify the Area ID (32-bit character) for the new area. This
must be a unique ID within AS.
Note: Do not use 0.0.0.0 as an area ID.
Area Type
Select the type of area. Types include:
• Non-Stub - Non-edge device/router.
• Stub - An edge device/router that does not leak external
advertisements.
• Not-so-stubby - This is still a stub area, however, this
device/router can leak some external advertisements.
Translate 7 into 5
Select to enable or disable the translation of the NSSA ASE Type
7 into an AS External LSA Type 5.
Stub Metric
Specify the stub area default summary cost metric. (Default is 1).
Type 3 ASE Filter
Select to enable or disable the Type 3 summary LSA filter for
Stub and NSSA only.
4. Click CREATE to save your changes, or CANCEL to restore previous settings.
Deleting OSPF Areas
To delete an OSPF area:
1. In the OSFP Configuration section of the Web Agent window, click Areas. The
OSPF Areas dialog box opens.
Cajun P550/P220 Switch Operation Guide
9-3
Configuring the OSPF Routing Protocol (Layer 3)
2. Select the OSPF area to be removed.
3. Click DELETE. The OSPF area is removed.
Modifying OSPF Areas
To modify an OSPF area:
1. In the OSFP Configuration section of the Web Agent window, click Areas. The
OSPF Areas dialog box opens.
2. Select the OSPF area to be modified.
3. Use Table 9-2 to modify your configuration.
4. Click APPLY to save your changes, or CANCEL to restore previous settings.
Modifying OSPF Interfaces
To modify an OSPF interface:
1. In the OSPF Configuration section of the Web Agent window, click Interfaces.
The OSPF Interfaces dialog box opens.
Note: If OSPF is not enabled for your existing IP interfaces (VLANs) you must first
enable OSPF before you can modify OSPF interfaces. Refer to “Configuring
IP Interfaces” in Chapter 7 for more information on how to enable OSPF on
IP interfaces.
2. Use Table 9-3 to determine how to modify your OSPF interfaces:
Table 9-3. OSPF Interface Parameters
Parameter
Definition
Select
Select the OSPF interface to be modified.
Interface
Displays IP interface (VLAN) that has OSPF enabled.
Note: This is a read-only field.
IP Address
Displays IP address associated with the OSPF interface.
Note: This is a read-only field.
9-4
Area
Enter the area ID configured for this interface.
DR Priority
Enter the decimal value for this interface for DR priority
functionality.
Transit Delay
Enter the estimated number of seconds it takes to transmit a link
state update packet over this interface.
Cajun P550/P220 Switch Operation Guide
Configuring the OSPF Routing Protocol (Layer 3)
Table 9-3. OSPF Interface Parameters (Continued)
Parameter
Definition
Retransmit Interval
Enter the number of seconds between link-state advertisement
retransmissions, for adjacencies belonging to this interface. This
value is also used when retransmitting database description and
link-state request packets.
Hello Interval
Enter the length of time, in seconds, between the Hello packets
that the router sends on the interface. This value must be the
same for all routers attached to a common network.
Dead Interval
Enter the number of seconds that a router's Hello packets have
not been seen before it's neighbors declare the router down. This
should be some multiple of the Hello interval. This value must be
the same for all routers attached to a common network.
Poll Interval
Enter the larger time interval, in seconds, between the Hello
packets sent to an inactive non-broadcast multiaccess neighbor.
Cost
Enter the cost metric associated with this interface.
Authentication
Select the type of authentication available for use on a given
OSPF interface.
Authentication types include:
• None
• Simple Password
• MD5 Authentication
Key
Enter the area's authorization key value.
MD5 Key ID
Enter the MD5 authentication key ID as a decimal value.
Creating OSPF Virtual Links
To create an OSPF virtual link:
1. In the OSPF Configuration section of the Web Agent window, click Virtual
Links. The OSPF Virtual Links dialog box opens.
Note: This dialog box only appears with configured OSPF virtual links if you have
previously configured one or more OSPF virtual links.
2. Click CREATE. The Add OSPF Virtual Link dialog box opens.
Cajun P550/P220 Switch Operation Guide
9-5
Configuring the OSPF Routing Protocol (Layer 3)
3. Use Table 9-4 to complete your OSPF virtual link configuration:
Table 9-4. OSPF Virtual Link Parameters
Parameter
Defines the...
Router ID
Router ID for the far end of the virtual link.
Area
Area ID of the area through which the virtual link travels.
Transit Delay
Estimated number of seconds it takes to transmit a link state
update packet over this virtual link.
Retransmit Interval
Number of seconds between link-state advertisement
retransmissions on this virtual link, for adjacencies belonging to
this virtual link. This value is also used when retransmitting
database description and link-state request packets.
Hello Interval
Length of time, in seconds, between the Hello packets that the
router sends on the virtual link. This value must be the same for
all routers attached to a common network.
Dead Interval
Number of seconds that a router's Hello packets have not been
seen before it's neighbors declare the router down. This should
be some multiple of the Hello interval. This value must be the
same for all routers attached to a common network.
Authentication
Type of authentication available for use on a given OSPF
interface. Authentication types include:
• None
• Simple Password
• MD5 Authentication
Authentication Key
Area's authentication key.
MD5 Key ID
MD5 authentication key ID as a decimal value.
4. Click CREATE to save your changes, or CANCEL to restore previous settings.
Deleting OSPF Virtual Links
To delete an OSPF virtual link:
1. In the OSPF Configuration section of the Web Agent window, click Virtual
Links. The OSPF Virtual Links dialog box opens.
2. Select the virtual link to be removed.
3. Click DELETE. The virtual link is removed.
9-6
Cajun P550/P220 Switch Operation Guide
Configuring the OSPF Routing Protocol (Layer 3)
Modifying OSPF Virtual Links
To modify an OSPF virtual link:
1. In the OSPF Configuration section of the Web Agent window, click Virtual
Links. The OSPF Virtual Links dialog box opens.
2. Select the virtual link to be removed.
3. Use Table 9-4 to modify your configuration.
4. Click APPLY to save your changes, or CANCEL to restore previous settings.
Creating OSPF Summaries
The primary purpose of the OSPF summary is route aggregation. Route aggregation is a
group range of IP addresses that are linked to a single address.
To create a new OSPF summary:
1. In the OSPF Configuration section of the Web Agent window, click Summaries.
The OSPF Summaries dialog box opens.
2. Click CREATE to create a new OSPF summary.
Note: This window will only appear with configured OSPF summaries if you have
previously configured one or more OSPF summaries.
3. Use Table 9-5 to configure your OSPF summaries:
Table 9-5. OSPF Summaries Parameters
Parameter
Definition
Area
Select the area ID of the area from which the routes are
aggregated (summary IP address).
Network Address
Enter the IP address of the network to be advertised.
Mask
Enter the subnet mask of the network to be advertised.
Advertisement
Select the ability to suppress (disable) or enable advertisements
of this summary. When suppressing, advertisements of IP routes
in this range are also suppressed.
4. Click CREATE to save your changes, or CANCEL to restore previous settings.
Cajun P550/P220 Switch Operation Guide
9-7
Configuring the OSPF Routing Protocol (Layer 3)
Deleting OSPF Summaries
To delete an OSPF summary:
1. In the OSPF Configuration section of the Web Agent window, click Summaries.
The OSPF Summaries dialog box opens.
2. Select the OSPF summary to be removed.
3. Click DELETE. The OSPF summary is removed.
Modifying OSPF Summaries
To modify an OSPF summary:
1. In the OSPF Configuration section of the Web Agent window, click Summaries.
The OSPF Summaries dialog box opens.
2. Select the OSPF summary to be modified.
3. Use Table 9-5 to configure your parameters.
4. Click APPLY to save your changes, or CANCEL to restore previous settings.
Monitoring Switch Performance Using OSPF Statistics
Monitoring switch performance using OSPF statistics includes:
❒ Displaying OSPF Statistics
❒ Displaying OSPF Links
❒ Displaying OSPF Neighbors
❒ Searching the OSPF Link State Database
Displaying OSPF Statistics
To display the OSPF global statistics:
1. In the OSPF Display section of the Web Agent window, click Statistics. The
OSPF Statistics dialog box opens.
9-8
Cajun P550/P220 Switch Operation Guide
Configuring the OSPF Routing Protocol (Layer 3)
2. Use Table 9-6 to review the OSPF statistics:
Table 9-6. OSPF Statistical Parameters
Parameter
Displays the...
OSPF State
Current state of OSPF.
Router ID
Router ID for OSPF.
OSPF Version
Current version of OSPF. The P550 with Integrated Routing
supports OSPFv2.
External LSA Count
Number of external (LS type 5) link-state advertisements in the
link-state database.
Originate LSA Count
Number of LSAs originated by this router.
Receive New LSA
Count
Number of new LSAs received by this router.
LSA Checksum Sum
(global OSPF system)
32-bit unsigned sum of the LS checksums of the external
link-state advertisements contained in the link-state database.
This sum can be used to determine if there has been a change in
a router's link state database, and to compare the link-state
database of two routers.
Area ID
Area ID of the area in question. It has the function of defining a
summarization point for Link State Advertisements.
SPF Runs
Number of times that the intra-area route table has been
calculated using this area's link-state database.
Border Rtrs
Total number of area border routers reachable within this area.
This is initially zero, and is calculated in each SPF Pass.
AS Border Rtrs
Total number of Autonomous System border routers reachable
within this area. This is initially zero, and is calculated in each
SPF Pass.
LSAs
Total number of link-state advertisements in this area's link-state
database, excluding AS External LSAs.
LSA Chksum Sum
(per area, not
globally)
32-bit unsigned sum of the LS checksums of the external
link-state advertisements contained in the link-state database.
This sum can be used to determine if there has been a change in
a router's link state database, and to compare the link-state
database of two routers.
3. Click Refresh to reset the counters with the latest information.
Cajun P550/P220 Switch Operation Guide
9-9
Configuring the OSPF Routing Protocol (Layer 3)
Displaying OSPF Links
The OSPF link display provides information on the currently active OSPF links.
To display OSPF links:
1. In the OSPF Display section of the Web Agent window, click Links. The OSPF
Links dialog box opens.
2. Use Table 9-7 review the OSPF link parameters:
Displaying OSPF Neighbors
The OSPF neighbors table summarizes the list of current OSPF interfaces and their
associated neighbors.
To display the OSPF neighbors:
1. In the OSPF Display section of the Web Agent window, click Neighbl .rr Agf1`` n22``-3344 0 T
9-10
Cajun P550/P220 Switch Operation Guide
Configuring the OSPF Routing Protocol (Layer 3)
2. Use Table 9-8 to review the OSPF neighbors parameters:
Table 9-8. OSPF Neighbors Parameters
Parameter
Definition
IP Address
The IP address associated with the OSPF neighbor.
State
The functional level of an interface. States include:
• Down - This is the initial state of a neighbor conversation. It
indicates that there has been no recent information received
from the neighbor.
• Attempt - Indicates that no recent information has been
received from the neighbor, but that a more concerted effort
should be made to contact the neighbor
• INIT - Indicates that the Hello packet has recently been seen
from the neighbor. However, bidirectional communication
has not yet been established with the neighbor.
• 2-Way - Communication between the two routers is
bidirectional.
• ExStart - This is the first step in creating an adjacency
between the two neighboring routers. The goal of this step is
to decide which router is the master, and to decide upon the
initial DD sequence number. Neighbor conversations in this
state or greater are called adjacencies.
• Exchange - Router is describing its entire link state database
by sending Database Description packets to the neighbor.
• Loading - Link State Request packets are sent to the
neighbor asking for the more recent LSAs that have been
discovered (but not yet received) in the Exchange state.
• Full - The neighboring routers are fully adjacent. These
adjacencies will now appear in router-LSAs and
network-LSAs.
Router ID
The router ID of the neighbor.
Master
The state of the neighbor: master or slave.
DD Number
The hexadecimal number used to sequence the collection of
Database Description Packets. The initial value (indicated by the
Init bit being set) should be unique. The DD sequence number
then increments until the complete database description has
been sent.
DR Priority
Displays the DR Priority of the neighboring router.
This is used to determine whether this neighbor is eligible to
become the Backup Designated Router. If 0, the router is
ineligible to become the Backup Designated Router.
E-Option
The method used to flood AS-external-LSAs.
T-Option
Specifies whether this neighbor is an ASBR.
MC-Option
Specifies whether this neighbor supports MOSPF.
Cajun P550/P220 Switch Operation Guide
9-11
Configuring the OSPF Routing Protocol (Layer 3)
Table 9-8. OSPF Neighbors Parameters (Continued)
Parameter
Definition
N-Option
Specifies whether this neighbor supports the handling of Type-7
LSAs.
OPQ-Option
Specifies whether this neighbor supports opaque LSAs (Link
State Advertisements).
DR Choice
Interface IP address of the designated router.
BDR Choice
Interface IP address of the backup designated router.
Searching the OSPF Link State Database
To perform a search of your OSPF link state database:
1. In the OSPF Display section of the Web Agent window, click Link State
Database Search. The Link State Database Search dialog box opens.
Note: It is possible to select more than one item in the Search By column to help
narrow your search results.
2. To search by Area ID: click the Area ID checkbox and specify the IP address of
the Area ID that you want to find in the database, and click SEARCH.
To search by Type: click the Type checkbox and from the Type pull-down menu,
select the type of search you want to perform, and click SEARCH.
To search by Router ID: click the Router ID checkbox and specify the router IP
address, and click SEARCH.
9-12
Cajun P550/P220 Switch Operation Guide
Configuring the OSPF Routing Protocol (Layer 3)
3. Use Table 9-9 to determine the search parameters:
Table 9-9. OSPF Link State Database Search Parameters
Parameter
Allows you to perform a search...
Area ID
For the 32-bit identifier of the area from which a LSA was
received.
Type
For all entries in the database that match one of the following
types:
• Router Links - These packets describe the states of the
router’s links to the area and are only flooded within a
particular area.
• Network Links - These packets are generated by
Designated Routers and describe the set of routers attached
to a particular network.
• Summary Network - These summaries are generated by
Area Border Routers and describe inter-area routes to
various networks. Then can also be used for aggregating
routes.
• Summary AS border - This describes links to Autonomous
System Border Routers and are generated by Area Border
Routers.
• AS external - These packets are generated by Autonomous
System Border Routers and describe routes to destination
external to the Autonomous system. They are flooded
everywhere except stub areas.
• Multicast group - These packets are generated by multicast
groups.
• NSSA external - These packets are generated by Area
Border Routers and describe routes within the NSSA
(Not-So-Stubby-Area).
Router ID
Of the link state database for entries originated by this router.
Note: If your search produces results, the detailed information displays in the OSPF
Link State Database dialog box.
4. Click MORE to display more OSPF link state database search results.
Note: If there are no other OSPF link state database search results to display, the
MORE button is not available.
Cajun P550/P220 Switch Operation Guide
9-13
Configuring the OSPF Routing Protocol (Layer 3)
5. Use Table 9-10 for a description of the OSPF Link State Database Search results.
Table 9-10. OSPF Link State Database Parameters
Parameter
Definition
Detail Link
Displays a link to the LSA Detail dialog box.
Area ID
Displays the 32-bit identifier of the area from which the
LSA was received.
Type
Displays the format and function of the LSA.
Types include:
• Router Links - These packets describe the states of the
router’s links to the area and are only flooded within a
particular area.
• Network Links - These packets are generated by
Designated Routers and describe the set of routers
attached to a particular network.
• Summary Network - These summaries are generated
by Area Border Routers and describe inter-area routes
to various networks. Then can also be used for
aggregating routes.
• Summary AS Border - This describes links to
Autonomous System Border Routers and are
generated by Area Border Routers.
• AS External - These packets are generated by
Autonomous System Border Routers and describe
routes to destination external to the Autonomous
system. They are flooded everywhere except stub
areas.
• Multicast Group - These packets are generated by
multicast groups.
• NSSA External - These packets are generated by Area
Border Routers and describe routes within the NSSA
(Not-So-Stubby-Area).
9-14
LS ID
Displays the piece of routing domain that is being described
by the advertisement. Depending on the advertisements LS
type, the LS ID displays different values.
Router ID
Displays the 32-bit number that uniquely identifies the
originating router in the Autonomous System.
Sequence
Displays the sequence number.
Age
Displays the age (in seconds) of the LSA.
Checksum
Displays the checksum of the complete contents of the
advertisement, except the age field.
Cajun P550/P220 Switch Operation Guide
Configuring the OSPF Routing Protocol (Layer 3)
Viewing LSA Details
To view link state advertisement details:
1. In the OSPF Display section of the Web Agent window, click Link State
Database Search. The Link State Database Search dialog box opens.
Note: It is possible to select more than one item in the Search By column to help
narrow your search results.
2. To search by Area ID: click the Area ID checkbox and specify the IP address of
the Area ID that you want to find in the database, and click SEARCH.
If your search produces results, the detailed information displays in the OSPF Link
State Database dialog box.
To search by Type: click the Type checkbox and from the Type pull-down menu,
select the type of search you want to perform, and click SEARCH.
To search by Router ID: click the Router ID checkbox and specify the router IP
address, and click SEARCH.
3. In the Detail Link column, click Details. The LSA Detail dialog box opens.
4. Use Table 9-11 for more information on LSA Details.
Table 9-11. LSA Detail Parameters
Parameter
Definition
Area
Displays the 32-bit identifier of the area from which the
LSA was received.
Type
Displays the link state type.
Types include:
• Router Links
• Network Links
• Summary Network
• Summary AS Border
• AS External
• Multicast Group
• NSSA External
LS ID
Displays the link-state ID. The link-state ID is an LS type
specific field containing either a router ID or an IP address
that identifies the piece of the routing domain that is being
described by the advertisement.
Router ID
Displays the router ID of the originator of the link state
advertisement.
Cajun P550/P220 Switch Operation Guide
9-15
Configuring the OSPF Routing Protocol (Layer 3)
Table 9-11. LSA Detail Parameters (Continued)
Parameter
Definition
Sequence
Displays the link-state sequence number. The sequence
number is a 32-bit signed integer.
Checksum
Displays the checksum of the complete contents of the
advertisement, except the age field.
Age
Displays the time (in seconds) of the LSA.
Link ID
Displays the neighboring router’s interface ID.
Link Data
Displays the interface ID of the associated router interface.
Type
Displays the link type of Router Network LSAs.
Types include:
• Point-to-point Link (1)
• Transit Network (2)
• Stub Network (3)
• Virtual Link (4)
TOS Count
Displays the type-of-service count.
TOS 0 Metric
Displays the type-of-service cost of the interface.
Network Mask
Displays the network mask for the LSA.
External
Displays whether the route is connected to an external
network.
This parameter is associated with AS External LSAs.
TOS
Displays the type-of-service of the route.
This parameter is associated with AS External, Summary
Network, and Summary AS Border LSAs.
Metric
Displays the cost of the link.
This parameter is associated with AS External, Summary
Network, and Summary AS Border LSAs.
Forward Address
Displays the forward address. This indicates that packets for
the external destination should be forwarded to the
advertising OSPF router.
This parameter is associated with AS External LSAs.
Tag
Displays the tag associated with the LSA.
This parameter is associated with AS External LSAs.
Attached Router ID 1 &2
9-16
Displays the router ID for the attached router(s).
Cajun P550/P220 Switch Operation Guide
10
Configuring AppleTalk Routing
(Layer 3)
Overview
This chapter and its procedures are specific to Layer 3 configuration.
Included in this chapter:
❒ AppleTalk Routing Overview
❒ Configuring AppleTalk Routing
❒ Viewing AppleTalk Statistics
AppleTalk Routing Overview
AppleTalk Phase I was originally designed for local work groups. AppleTalk Phase II
extends the number of nodes in an internetwork to over 16 million and the number of
zones per port to 254. The Cajun switch supports both AppleTalk Phase I and Phase II.
However, the translation from AppleTalk Phase I to Phase II is not supported.
The Cajun switch version 4.0 software supports AppleTalk routing for packets destined
across VLANs (inter-VLAN) using Layer 3 but for intra-VLAN traffic, Layer 2 switching is
supported. The Cajun switch supports AppleTalk over Ethernet only.
Ethernet versions supported:
❒ Ethernet SNAP
❒ Ethernet II
The switch supports the following AppleTalk protocols:
❒ AppleTalk Address Resolution Protocol (AARP)
❒ Routing Table Maintenance Protocol (RTMP)
❒ Name-Binding Protocol (NBP)
❒ AppleTalk Echo Protocol (AEP)
Cajun P550/P220 Switch Operation Guide
10-1
Configuring AppleTalk Routing (Layer 3)
❒ Datagram Delivery Protocol (DDP)
❒ Zone Information Protocol (ZIP)
Configuring AppleTalk Routing
This section includes:
❒ Enabling AppleTalk Global Routing
❒ Creating an AppleTalk Routing Interface
❒ Editing AppleTalk Interfaces
❒ Deleting an AppleTalk Interface
❒ Creating an AppleTalk Static Route
❒ Editing AppleTalk Static Routes
❒ Deleting an AppleTalk Static Route
❒ Creating an AppleTalk NBP Filter
❒ Editing an AppleTalk NBP Filter
❒ Adding or Deleting Interfaces to NBP Filter
❒ Creating an AppleTalk Zone Filter
❒ Editing an AppleTalk Zone Filter
❒ Adding or Deleting Interfaces to a Zone Filter
Enabling AppleTalk Global Routing
To enable AppleTalk routing globally:
1. In the AppleTalk Configuration section of the Web Agent window, click Global
Configuration. The AppleTalk Routing Global Configuration dialog box opens.
2. From the AppleTalk Routing pull-down menu, select Enable.
3. Click APPLY to save your changes, or CANCEL to restore previous settings.
10-2
Cajun P550/P220 Switch Operation Guide
Configuring AppleTalk Routing (Layer 3)
Creating an AppleTalk Routing Interface
To create an AppleTalk interface:
1. Enable AppleTalk routing globally. Refer to “Enabling AppleTalk Global Routing”,
earlier in this section.
2. In the AppleTalk Configuration section of the Web Agent window, click
Interfaces. The AppleTalk Interfaces dialog box opens.
3. Click CREATE. The Add AppleTalk Interfaces dialog box opens.
4. Use Table 10-1 to configure your AppleTalk interface.
Table 10-1. AppleTalk Interface Parameters
Parameter
Definition
Interface
Enter the name of the AppleTalk interface to be created.
VLAN
Select the VLAN to be associated with the AppleTalk
interface.
Options include:
• Default
• Discard
• All created VLANs
Metric
Enter the metric associated with the AppleTalk interface.
Encapsulation Type
Select the encapsulation type to be associated with the
AppleTalk interface.
Options include:
• Ethernet II - MTU = 1500
• Ethernet SNAP - MTU =1492
Network Range Start
Enter the starting network number. The network number
specifies the range of AppleTalk network numbers for
extended networks. Each number in the range must be an
integer between 0 and 65279.
Note: The Network Range Start value must be less
than or equal to the Network Range End
value.
Network Range End
Enter the ending network number. The network number
specifies the range of AppleTalk network numbers for
extended networks. Each number in the range must be an
integer between 0 and 65279.
Note: If the Network Range Start value equals 0,
Network Range End value must also equal
0.
Cajun P550/P220 Switch Operation Guide
10-3
Configuring AppleTalk Routing (Layer 3)
Table 10-1. AppleTalk Interface Parameters (Continued)
Parameter
Definition
Network Number
Enter the interface network number. This number specifies
the network number the interface is using.
Note: This value must be within the Network
Range or be equal to 0.
Node
Enter the interface node identification number. This
number must be between 1 and 253.
Note: Only if the Network Number is equal to 0,
can the Node also be equal to 0.
Admin. State
Select whether to enable or disable the administrator state.
The administrator state determines if the interface is
operational from a management point of view.
Default Zone
Select the default AppleTalk zone to be used by this
interface. Zone names may be up to 32 characters in
length.
5. Click CREATE to add the new AppleTalk interface, or CANCEL to restore
previous settings.
Editing AppleTalk Interfaces
To edit an AppleTalk interface:
1. In the AppleTalk Configuration section of the Web Agent window, click
Interfaces. The AppleTalk Interfaces dialog box opens.
Note: You must enable AppleTalk globally and create an AppleTalk interface
before you can edit an interface. See “Enabling AppleTalk Routing Globally”
and “Creating an AppleTalk Interface”, earlier in this section.
2. From the VLAN pull-down menu, select the VLAN to be associated with the
interface.
3. In the Metric field, enter the new port metric to be associated with the interface.
4. From the Frame Type pull-down menu, select the new frame type to be
associated with the interface.
5. In the Network Range Start field, enter the new network range start
number.
6. In the Network Range End field, enter the new network range end number.
10-4
Cajun P550/P220 Switch Operation Guide
Configuring AppleTalk Routing (Layer 3)
7. In the Network Number field, enter the new network number to be associated
with the interface.
8. In the Node field, enter the new node number to be associated with the
interface.
9. From the Admin. State pull-down menu, select to enable or disable the
administration state associated with the interface.
10. From the Default Zone pull-down menu, select the new default zone associated
with the interface.
Note: If there is no zone to select or if you want to edit the zones available,
proceed with steps 11 through 14. Otherwise, proceed to step 15.
11. Click Edit Zone to edit the AppleTalk zone for this interface. The Edit AppleTalk
Zone dialog box opens.
12. In the Add text field, enter the new AppleTalk zone and click Add.
13. In the AppleTalk Configuration section of the Web Agent window, click
Interfaces. The AppleTalk Interfaces dialog box opens.
14. From the Default Zone pull-down menu, select the new zone that you just
created.
15. Select the AppleTalk interface to be updated by clicking the Select check box.
16. Click APPLY to save your changes, or CANCEL to restore previous settings.
Note: You may select and change as many interfaces simultaneously with one
APPLY operation.
Deleting an AppleTalk Interface
To delete an AppleTalk interface:
1. In the AppleTalk Configuration section of the Web Agent window, click
Interfaces Configuration. The AppleTalk Interfaces dialog box opens.
2. Select the AppleTalk interface to be deleted by clicking the Select check box.
3. Click DELETE to remove the AppleTalk interface.
Cajun P550/P220 Switch Operation Guide
10-5
Configuring AppleTalk Routing (Layer 3)
Creating an AppleTalk Static Route
To create an AppleTalk static route:
1. In the AppleTalk Configuration section of the Web Agent window, click Static
Route. The AppleTalk Static Route dialog box opens.
2. Click CREATE to add a new static route. The Add AppleTalk Static Route dialog
box opens.
3. Use Table 10-2 to configure your static route.
Table 10-2. AppleTalk Static Route Parameters
Parameter
Definition
Network Range Start
Enter the starting network number. The network number
specifies the range of AppleTalk network numbers for
extended networks. Each number in the range must be an
integer between 1 and 65279.
Note: Network Range Start must be less than or
equal to Network Range End.
Network Range End
Enter the ending network number. The network number
specifies the range of AppleTalk network numbers for
extended networks. Each number in the range must be an
integer between 1 and 65279.
Network Number
Enter the next hop network number. This number specifies
the network number of the next hop router for the
network range.
Node
Enter the next hop node identification number. This
number must be between 1 and 253.
Type
Select the type of static route.
Options include:
• High - The static route is not superseded by a route
update.
• Low - The static route can be superseded by a route
update.
Zone
Enter an AppleTalk zone name assigned to this route. Zone
names may be up to 32 characters in length.
4. Click CREATE to add the static route, or CANCEL to restore previous settings.
10-6
Cajun P550/P220 Switch Operation Guide
Configuring AppleTalk Routing (Layer 3)
Editing AppleTalk Static Routes
To edit an AppleTalk static route:
1. In the AppleTalk Configuration section of the Web Agent window, click Static
Route. The AppleTalk Static Route dialog box opens. For more information on
static route parameters, refer to Table 10-2.
2. Select the AppleTalk Static Route to be edited by clicking the Select check box.
3. In the Network Range Start field, enter the new network range start
number.
4. In the Network Range End field, enter the new network range end number.
5. In the Network Number field, enter the new network number of the next hop
for the static route.
6. In the Node field, enter the new node number of the next hop for the static
route.
7. In the Type field, enter the type to be associated with the static route.
8. Click Edit Zone to edit the AppleTalk zone for this static route. The Edit AppleTalk
Zone dialog box opens.
9. In the Add text field, enter the new AppleTalk zone network range and click
Add.
10. Click APPLY to save your changes, or CANCEL to restore previous settings.
Deleting an AppleTalk Static Route
To delete an AppleTalk static route:
1. In the AppleTalk Configuration section of the Web Agent window, click Static
Route. The AppleTalk Interfaces dialog box opens.
2. Select the AppleTalk static route to be deleted.
3. Click DELETE to remove the AppleTalk static route.
Creating an AppleTalk NBP Filter
The Name-Binding Protocol (NBP) performs a conversion from named AppleTalk entities
to their AppleTalk protocol addresses. Multiple names can exist for the same entity
(alias). NBP also performs:
❒ Name registration
Cajun P550/P220 Switch Operation Guide
10-7
Configuring AppleTalk Routing (Layer 3)
❒ Name deletion
❒ Name lookup
❒ Name confirmation
NBP allows you to bind a name to the internal storage address for your entity and
register this mapping so that other entities can look it up. You can display NBP names to
users and use addresses internally to locate entities. When you register your entity’s
name and address pair, NBP validates its uniqueness.
To create an NBP filter:
1. In the AppleTalk Configuration section of the Web Agent window, click NBP
Filter. The AppleTalk NBP Filter dialog box opens.
2. Click CREATE to add a new NBP filter. The Add AppleTalk NBP Filter dialog box
opens.
3. Use Table 10-3 to configure the NBP filter.
Table 10-3. AppleTalk NBP Filter Parameters
Parameter
Definition
Access List
Enter the access list number to be associated with the NBP
filter. Valid values are 600-631.
Name
Enter the name of the NPB name object to be filtered.
Type
Select the type of filtering.
Options include:
• Deny
• Permit
Note: You can also leave this field blank for
wildcarding.
Interface
Select the interface(s) to apply this filter to.
4. Click CREATE to add your new static route, or CANCEL to restore previous
settings.
Editing an AppleTalk NBP Filter
To edit an AppleTalk NBP filter:
1. In the AppleTalk Configuration section of the Web Agent window, click NBP
Filter. The AppleTalk NBP Filter dialog box opens.
2. Use Table 10-3 to edit your AppleTalk NBP filter.
10-8
Cajun P550/P220 Switch Operation Guide
Configuring AppleTalk Routing (Layer 3)
3. Click...
CREATE to add a new filter. The Add AppleTalk NBP Filter dialog box opens. See
“Creating an AppleTalk NBP Filter”, earlier in this section, for more information.
DELETE to remove the selected NBP filter.
CANCEL to restore previous settings.
Edit If to add or delete this NBP filter to/from an interface. The Add/Delete
Interface to NBP Filter dialog box opens. See “Adding or Deleting Interfaces to NBP
Filter”, later in this section, for more information.
Adding or Deleting Interfaces to NBP Filter
To add or delete interfaces to an NBP filter:
1. In the AppleTalk Configuration section of the Web Agent window, click NBP
Filter. The AppleTalk NBP Filter dialog box opens.
2. Click Edit If. The Add/Delete Interface to NBP Filter dialog box opens.
3. In the Add pull-down menu, select the interface to be added.
Or
Click the Select for the interface to be removed.
4. Click...
Add to add this NBP filter to the selected interface.
DELETE to remove this NBP filter from the selected interface.
CANCEL to restore previous settings.
Creating an AppleTalk Zone Filter
To create an AppleTalk zone filter:
1. In the AppleTalk Configuration section of the Web Agent window, click Zone
Filter. The AppleTalk Zone Filter dialog box opens.
2. Click CREATE. The Add AppleTalk Zone Filter dialog box opens.
Cajun P550/P220 Switch Operation Guide
10-9
Configuring AppleTalk Routing (Layer 3)
3. Use Table 10-4 to configure your zone filter.
Table 10-4. AppleTalk Zone Filter Parameters
Parameter
Definition
Access List
Enter the access list number to be associated with the zone
filter. Valid values are 632-663.
Name
Enter the name of the zone to be filtered. You can also
leave this field blank for wildcarding.
Type
Select the type of filtering.
Options include:
• Deny
• Permit
Interface
Select the interface to apply this filter to.
4. Click CREATE to add the new zone filter, or CANCEL to restore previous settings.
Editing an AppleTalk Zone Filter
To edit an AppleTalk zone filter:
1. In the AppleTalk Configuration section of the Web Agent window, click Zone
Filter. The AppleTalk Zone Filter dialog box opens.
2. Click the Select for the AppleTalk zone filter to be edited.
3. Use Table 10-4 to edit your zone filter.
4. Click...
CREATE to add a new zone filter. The Add AppleTalk Zone Filter dialog box opens.
See “Creating an AppleTalk Zone Filter”, earlier in this section, for more
information.
DELETE to remove the selected zone filter.
CANCEL to restore previous settings.
Edit If to add or delete this zone filter to/from an interface. The Add/Delete
Interface to Zone Filter dialog box opens. See “Adding or Deleting Interfaces to
Zone Filter”, later in this section, for more information.
10-10
Cajun P550/P220 Switch Operation Guide
Configuring AppleTalk Routing (Layer 3)
Adding or Deleting Interfaces to a Zone Filter
To add or delete interfaces to a zone filter:
1. In the AppleTalk Configuration section of the Web Agent window, click Zone
Filter. The AppleTalk Zone Filter dialog box opens.
2. Click Edit If. The Add/Delete Interface to Zone Filter dialog box opens.
3. In the Add pull-down menu, select the interface to be added.
Or
Click the Select for the interface to be removed.
4. Click...
Add to add this zone filter to the selected interface.
DELETE to remove this zone filter from the selected interface.
CANCEL to restore previous settings.
Viewing AppleTalk Statistics
This section includes:
❒ Viewing AppleTalk Global Statistics
❒ Viewing the AppleTalk Interface Statistics Table
❒ Viewing the AppleTalk Route Table
❒ Viewing AppleTalk Route Table Statistics
❒ Viewing the AppleTalk ARP Cache Table
❒ Viewing the AppleTalk Zone Table
❒ View AppleTalk Zone Table Statistics
❒ Viewing the AppleTalk NBP Table
Viewing AppleTalk Global Statistics
To view AppleTalk global statistics:
1. In the AppleTalk Display section of the Web Agent window, click Global
Statistics. The AppleTalk Global Statistics dialog box opens.
Cajun P550/P220 Switch Operation Guide
10-11
Configuring AppleTalk Routing (Layer 3)
2. Use Table 10-5 for more information on AppleTalk global statistics.
Table 10-5. AppleTalk Global Statistical Parameters
10-12
Parameter
Number of...
Echo Req Tx
Echo requests transmitted.
Echo Req Rx
Echo requests received.
DDP Output Counter
DDP packets sent from this node.
DDP Output Long
DDP packets sent using the long format.
DDP Forward Counter
DDP packets forwarded through this node.
No Client
Packets received for which the destination socket was not
known.
Too Short
Packets received that were smaller than the minimum size
allowed for an AppleTalk packet.
Bcast Error
Broadcast errors detected.
TTL Expired
Packets dropped because they timed out.
AARP Req Rx
AppleTalk ARP requests received.
AARP Invalid PDU
AppleTalk ARP requests received which were invalid.
AARP Req Tx
AppleTalk ARP requests transmitted.
Config Addr Error
Configuration address errors detected.
Echo Reply Rx
Echo replies received.
DDP Output Short
DDP packets sent using the short format.
DDP Input Counter
DDP packets received.
DDP Local Counter
DDP packets received destined for this node.
No Route
DDP packets for which no route existed to the destination.
Too Long
Packets received that were larger than the maximum size
allowed.
Short PDU in Error
Packets received that had a short PDU in error.
Checksum Error
Packets which had checksum in error.
AARP Reply Rx
AppleTalk ARP replies received.
AARP Reply Tx
AppleTalk ARP replies transmitted.
Config Zone Error
Zone configuration errors detected.
RTMP Rq Rx
RTMP requests received.
RTMP Rq Tx
RTMP requests transmitted.
RTMP Rsp Rx
RTMP responses received.
RTMP Rsp Tx
RTMP responses transmitted.
RTMP RDR Rx
RTMP route data requests received.
Cajun P550/P220 Switch Operation Guide
Configuring AppleTalk Routing (Layer 3)
Table 10-5. AppleTalk Global Statistical Parameters (Continued)
Parameter
Number of...
RTMP RDR Tx
RTMP route data requests transmitted.
Zip Query Rx
ZIP queries received.
Zip Query Tx
ZIP queries transmitted.
Zip Reply Rx
ZIP replies received.
Zip Reply Tx
ZIP replies transmitted.
Zip Ext Reply Rx
ZIP extended replies received.
Zip Ext Reply Tx
ZIP extended replies transmitted.
Zip GNI Rq Rx
ZIP get net info request received.
Zip GNI Rq Tx
ZIP get net info request transmitted.
Zip GNI Rsp Rx
ZIP get net info response received.
Zip GNI Rsp Tx
ZIP get net info response transmitted.
3. Click REFRESH to update all statistics.
Or
Click CLEAR to reset all statistics to zero.
Viewing the AppleTalk Interface Statistics Table
To view the AppleTalk Interface statistics table:
1. In the AppleTalk Display section of the Web Agent window, click Interface
Statistics. The AppleTalk Interface Statistics Table opens.
2. Use Table 10-6 for more information on the statistics table.
Table 10-6. AppleTalk Interface Statistics Table Parameters
Parameter
Definition
Interface
Displays the name of the AppleTalk interface.
Network Range
Displays the network range associated with the AppleTalk
interface.
Network Number
Displays the network number of this node.
Node
Displays the node number of this node.
Cajun P550/P220 Switch Operation Guide
10-13
Configuring AppleTalk Routing (Layer 3)
Table 10-6. AppleTalk Interface Statistics Table Parameters (Continued)
Parameter
Definition
Seed
Displays whether the AppleTalk interface seeded the
network.
State
Displays the state of the AppleTalk interface.
Options include:
• Up - indicates that the AppleTalk interface is active.
• Down - indicates that the AppleTalk interface is
inactive.
Viewing the AppleTalk Route Table
To view the AppleTalk route table:
1. In the AppleTalk Display section of the Web Agent window, click Route Table.
The AppleTalk Route Table opens.
2. Use Table 10-7 for more information on route table statistics.
Table 10-7. AppleTalk Route Table Parameters
Parameter
Definition
Select
Select the entry to be acted upon.
Network Range
Displays the network range.
Metric
Displays the AppleTalk metric for the network range.
State
Displays the state of the entry.
Options include:
• Good
• Suspect
• Going Bad
• Bad
Owner
Displays the AppleTalk component responsible for the
addition of the route.
Options include:
• Local
• Static
• RTMP
Next Hop
10-14
Displays the next hop address where forwarded packets are
routed.
Cajun P550/P220 Switch Operation Guide
Configuring AppleTalk Routing (Layer 3)
Table 10-7. AppleTalk Route Table Parameters (Continued)
Parameter
Definition
Interface
Displays the Appletalk interface associated with the route
table entry.
Zones
Displays the zones associated with the selected AppleTalk
route.
3. Click Delete Entries to remove selected route table entries.
Or
Click Flush Route Table to empty the route table of all dynamic entries. Static
and Local entries are not flushed.
Viewing AppleTalk Route Table Statistics
To view AppleTalk route table statistics:
1. In the AppleTalk Display section of the Web Agent window, click Route Table
Statistics. The AppleTalk Route Table Statistics dialog box opens.
2. Use Table 10-8 for more information on AppleTalk route table statistics.
Table 10-8. AppleTalk Route Table Statistical Parameters
Parameter
Definition
Current Number of Routes
Displays the current number of AppleTalk routes.
Peak Number of Routes
Displays the peak number of AppleTalk routes.
Viewing the AppleTalk ARP Cache Table
To view the AppleTalk ARP cache table:
1. In the AppleTalk Display section of the Web Agent window, click ARP Table.
The AppleTalk ARP Cache Table dialog box opens.
2. Use Table 10-9 for more information on AppleTalk ARP cache table statistics.
Table 10-9. AppleTalk ARP Cache Table Statistical Parameters
Parameter
Definition
Select
Select the table entry to be acted upon.
Network Range
Displays the network range.
Cajun P550/P220 Switch Operation Guide
10-15
Configuring AppleTalk Routing (Layer 3)
Table 10-9. AppleTalk ARP Cache Table Statistical Parameters (Continued)
Parameter
Definition
Node
Displays the node number for the entry.
MAC Address
Displays the MAC address associated with the AppleTalk
ARP cache table entry of the node.
Interface
Displays the Appletalk interface associated with the
AppleTalk ARP cache table entry.
Type
Displays the type of cache entries.
Values include:
• Local
• Broadcast
• Dynamic
• Router Neighbor
TTL
Displays the time-to-live value for the selected AppleTalk
ARP cache table entry. Local and Broadcast entries do not
time out.
3. Click Delete Entries to remove selected ARP cache table entries.
Or
Click Flush Route Table to reset the ARP cache table entries. Only Dynamic and
Router Neighbor entries are flushed.
Viewing the AppleTalk Zone Table
To view the AppleTalk zone table:
1. In the AppleTalk Display section of the Web Agent window, click Zone Table.
The AppleTalk Zone Table opens.
2. Use Table 10-10 for more information on AppleTalk zone table parameters.
Table 10-10. AppleTalk Zone Table Parameters
10-16
Parameter
Definition
Index
Displays the zone index.
Name
Displays the zone name.
Network Range
Displays the network range associated with the zone.
Cajun P550/P220 Switch Operation Guide
Configuring AppleTalk Routing (Layer 3)
View AppleTalk Zone Table Statistics
To view AppleTalk zone table statistics:
1. In the AppleTalk Display section of the Web Agent window, click Zone Table
Statistics. The AppleTalk Zone Table Statistics dialog box opens.
2. Use Table 10-11 for more information on AppleTalk zone table statistics.
Table 10-11. AppleTalk Zone Table Statistical Parameters
Parameter
Definition
Current Number of Zones
Displays the current number of AppleTalk zones.
Peak Number of Zones
Displays the peak number of AppleTalk zones.
Viewing the AppleTalk NBP Table
To view the AppleTalk NBP table:
1. In the AppleTalk Display section of the Web Agent window, click Zone Table.
The AppleTalk Zone Table opens.
2. Use Table 10-12 for more information on AppleTalk NBP table statistics.
Table 10-12. AppleTalk NBP Table Statistical Parameters
Parameter
Definition
Index
Displays the index of the name binding protocol entry.
Name
Displays the name of the NBP entry.
Type
Displays the type of object named.
Interface
Displays the Appletalk interface associated with the
AppleTalk NBP table entry.
Zone
Displays the zone field associated with the NBP table entry.
Cajun P550/P220 Switch Operation Guide
10-17
Configuring AppleTalk Routing (Layer 3)
10-18
Cajun P550/P220 Switch Operation Guide
11
Monitoring and Configuring
the Forwarding Cache (Layer 3)
Overview
This chapter and its procedures are common to Layer 3 configuration. Included in this
chapter:
❒ Configuring the Fowarding Cache
❒ Displaying Frame Fowarding Statistics
❒ Searching the Routing Cache for an Entry
Configuring the Fowarding Cache
The forwarding cache enables you to configure the multilayer media module’s
forwarding tables. To configure the forwarding cache:
1. In the L3 Forwarding Cache section of the Web Agent window, click Cache
Configuration. The Layer 3 Forwarding Cache Configuration dialog box opens.
Cajun P550/P220 Switch Operation Guide
11-1
Monitoring and Configuring the Forwarding Cache (Layer 3)
2. Use Table 11-1 to complete your fowarding cache configuration:
Table 11-1. Layer 3 Cache Configuration - Tree Configuration
Tree Configuration
Field...
For the
protocol...
Hash Depth
IP Unicast
IP Multicast
IPX
Allows you to...
Configure the hash depth for IP unicast, IP
multicast, and IPX datagrams. Choices
include:
• Hash-8 - An 8-bit memory bucket used
to store information about the source or
destination protocol address (or both).
• Hash -10 - A 10-bit memory bucket used
to store information about the source or
destination protocol address (or both).
• Hash-12 - A 12-bit memory bucket used
to store information about the source or
destination protocol address (or both).
Hash Mode
IP Unicast
IP Multicast
IPX
Configure the table hash lookup mode for the
IP unicast, IP multicast and IPX forwarding
table. Choices include:
• DA-only - Forwarding entries input to
the forwarding table are limited to using
protocol destination address only.
• SA-DA - Forwarding entries input to the
forwarding table are limited to using
destination and source address only.
Aging
IP Unicast
IP Multicast
IPX
Age Interval IP Unicast
IP Multicast
IPX
Maximum
Entries
IP Unicast
IP Multicast
IPX
11-2
Configure the IP unicast, IP multicast, or IPX
forwarding table entry aging status as either
enabled or disabled.
The IP unicast, IP multicast, or IPX
forwarding table entry aging period (in
seconds). The default value is 120 seconds.
The number of active entries in the IP
unicast, IP multicast, or IPX forwarding table.
This is the maximum number of active
entries per fabric port. Additional flows are
forwarded by the supervisor module. The
default value is 15000.
Cajun P550/P220 Switch Operation Guide
Monitoring and Configuring the Forwarding Cache (Layer 3)
Table 11-2. Layer 3 Cache Configuration - System Configuration
System Configuration
Field...
Defines...
Maximum System Entries
A user specified number. This number is the
maximum number of entries allowed for the
entire system (all fabric ports). The default
value is 130000.
Current System Entries
The current total number of entries for the
entire system (all fabric ports). The default
value is 0.
System Entries Failures
The current total system entry failures.
3. Click APPLY to save your changes, or CANCEL to restore previous settings.
Click REFRESH to update your system configuration.
Or
Click CLEAR to reset all configuration parameters to zero.
Monitoring the Forwarding Cache Statistics
Monitoring the forwarding cache statistics includes:
❒ Displaying Frame Fowarding Statistics
❒ Searching the Routing Cache for an Entry
Displaying Frame Fowarding Statistics
The frame forwarding statistics indicate the performance of each of the multilayer media
modules in respect to Layer 3 routing and forwarding.
To display the frame forwarding statistics:
1. In the L3 Forwarding Cache section of the Web Agent window, click
Forwarding Statistics. The Frame Forwarding Statistics dialog box opens.
Cajun P550/P220 Switch Operation Guide
11-3
Monitoring and Configuring the Forwarding Cache (Layer 3)
2. Use Table 11-3 to review the forwarding statistics:
Table 11-3. Forwarding Statistical Parameters
Parameter
Defines the...
FIRE Fabric Port
Fabric port associated with the Layer 3 module. The switch has
13 fabric ports. Each module slot uses two fabric ports with the
exception of the supervisor module slot which uses one fabric
port. Hence, the supervisor module slot uses fabric port 1, the
next media module slot uses fabric ports 2 and 3, and so on.
L3 Total (T2)
Total number of frames received on the fabric port.
L3 Frame Cache Hits
Number of packets received on the fabric port that were
successfully matched against existing forwarding entries in the
Layer 3 (L3) address cache.
Percent Cache Hits
Total percentage of successful matches between packets
received on a fabric port and the percent of those packets that
matched the Layer 3 address cache entries.
L3 Slow Path Frames
Number of frames received on a fabric port that were not
successfully matched against existing forwarding entries in the
Layer 3 (L3) address cache. Subsequently, these frames were
forwarded to the supervisor module (slow path). All frames
sent to the supervisor module are routed in software.
Percent Slow Path
Total percentage of unsuccessful matches between packets
received on a fabric port and the percent of those packets that
did not match the Layer 3 address cache entries.
L3 Drop Frames
Number of Layer 3 frames that were dropped because they did
not match the Layer 3 address cache entries.
Percent Drops
Total percent of Layer 3 frames dropped.
RX Frame Count (T2)
Total number of frames received on a fabric port.
L2 Frame Count (T2)
Number of Layer 2 frames received on a fabric port that were
forwarded on to an associated VLAN.
Searching the Routing Cache for an Entry
To search the L3 address cache:
1. In the L3 Forwarding Cache section of the Web Agent window, click Entry
Search. The Route Cache Entry Search dialog box opens.
2. Select the search criteria you want to use to find more specific information on
available routes. For example, if you want to find all entries in the routing cache
that contain a VLAN entry of vlan_10.0.1.1, you would search by VLAN and
specify vlan_10.0.1.1 as your search value.
11-4
Cajun P550/P220 Switch Operation Guide
Monitoring and Configuring the Forwarding Cache (Layer 3)
3. Use Table 11-4 to determine the parameters you use in your search:
Table 11-4. Route Cache Entry Search Parameters
Parameter
Allows you to search for all entries...
Destination Address
Within the routing cache that match the specified destination
address (IP address).
Source Address
Within the routing cache that match the specified source
address (IP address).
Protocol
By protocol identifier. By default, this field is 0 for IP (for
example, not supported by IP).
Destination Port
Within the routing cache that match the specified destination
port (IPU, IPM, IPX).
Source Port
Within the routing cache that match the specified source port
(IPU, IPM, IPX).
Comparison Value
Within the routing cache that match the specified comparison
value (TCP/UDP). Values include:
• DA - Destination address
• DASA - Destination and source address
• DAPROT - Destination address and protocol
• DADP - Destination address and destination port number
• DASAPROT - Destination and source address and
protocol
• DASADPSP - Destination and source address, and the
corresponding destination and source port numbers
VLAN
Within the routing cache that match the specified VLAN name.
Rule Number
Within the routing cache that matches the specified rule
number associated with an access list.
PRE
That match the PRE that is associated with the fabric port ID.
Displaying the Forwarding Cache
To display the forwarding cache information:
1. In the L3 Forwarding Cache section of the Web Agent window, click
Forwarding Cache. The FE Cache dialog box opens.
2. To modify your FE Cache table, perform one of the following:
•
To delete one or more entries, select the entry and click Flush Entry.
•
To flush (clear) the entire table, click Flush Table.
•
To refresh the contents of the table, click REFRESH.
Cajun P550/P220 Switch Operation Guide
11-5
Monitoring and Configuring the Forwarding Cache (Layer 3)
•
To clear the statistics only, but still leave the entry in the table, click Clear.
3. Use Figure 11-5 to review the FE Cache fields:
Table 11-5. FE Cache Parameters
Parameter
Defines...
PRE
The Packet Routing Engine in question.
Type
The type of packet (for example, IP unicast, IP multicast).
Mode
The table mode which includes:
• DA-Only
• SA & DA
• SA only
The table mode indicates what values are used in a comparison
to determine whether or not a packet is forwarded.
11-6
Memory Use in Bytes
Memory used by each entry.
Total Entries
The number of cumulative entries since the last time the
statistics were cleared.
Current Entries
The number of active entries.
Aged Entries
The number of entries aged out.
Duplicate Add
Attempts
The number of attempts at adding some slow path entries.
Failed Add Attempts
The number of failed attempts at adding a forwarding entry.
Entries Removed Due
to Route Deletes
The number of entries removed because of route deletions.
Entries Removed Due
to Route Changes
The number of entries removed because of route changes.
Lookup Hits
Cache hits.
Lookup Misses
Cache misses.
Lookup Levels
Cache depth.
Cajun P550/P220 Switch Operation Guide
12
Using VLANs, Spanning Tree,
and Hunt Groups (Layer 2 and
Layer 3)
Overview
This chapter and its procedures are common to both Layer 2 and Layer 3 configuration.
Included in this chapter:
❒ VLAN Operation
❒ Creating and Implementing VLANs
❒ Using Spanning Tree Setup and Monitoring
❒ Using Hunt Groups to Aggregate Bandwidth between Switches
VLAN Operation
VLAN operation is based on three sets of rules:
❒ Ingress Rules
❒ Forwarding Rules
❒ Egress Rules
Ingress Rules
Every frame received by the switch is classified to one VLAN. There are two ways in
which frames are classified to VLANs:
❒ Untagged frames are classified to the VLAN associated with the port on which the
frame is received (Port-based VLANs).
❒ Tagged frames are classified to the VLAN identified by the VLAN tag in the tag
header of the frame.
Cajun P550/P220 Switch Operation Guide
12-1
Using VLANs, Spanning Tree, and Hunt Groups (Layer 2 and Layer 3)
Note: The switch supports a feature called Automatic VLAN Creation for tagged
frames. When this feature is enabled, the switch creates new VLANs when it
receives packets from previously unknown VLANs.
Forwarding Rules
These rules determine the set of ports on the switch through which members of the
VLAN can be reached. This is called binding a port to a VLAN. A port may be bound to a
VLAN using four methods:
❒ Setting the Port VLAN attribute in the Switch Port Configuration dialog box of the
port form. This identifies the VLAN to which all untagged frames received on the
port are forwarded.
Note: A port has one Port VLAN. Changing this to a new VLAN removes the port
from the old VLAN.
❒ Setting the VLAN Binding attribute in the Switch Port Configuration dialog box to
Bind to All. This causes the port to be bound to all VLANs known to the switch (for
example, all current VLANs and all VLANs added in the future).
❒ Setting the VLAN Binding attribute in the Switch Port Configuration dialog box to
Bind to Received. This causes the port to be bound to all VLANs (as identified by
the VLAN tag in tagged frames) received on this port. Consequently, ports are
bound to those VLANs that actually have members that are reachable through the
port.
❒ Manually creating a VLAN Switch Port in the VLAN Switch Ports dialog box.
Egress Rules
For a given port/VLAN combination, egress rules determine whether frames transmitted
from the port on the VLAN are tagged or untagged. This is accomplished by setting the
Trunking Mode attribute in the Switch Port Configuration dialog box.
For example, choosing the IEEE 802.1Q trunk mode causes all frames transmitted out of
the port to be tagged using the IEEE 802.1Q tag header format. Individual port/VLAN
combinations may be changed to cause frames transmitted from the port to be untagged
for particular VLANs.
Port-Based VLANs
VLAN assignment of a packet is based on global VLAN ID. Regardless of any name you
assign to a VLAN, the switch looks only at the VLAN ID number to determine a packet’s
VLAN destination.
12-2
Cajun P550/P220 Switch Operation Guide
Using VLANs, Spanning Tree, and Hunt Groups (Layer 2 and Layer 3)
Creating and Implementing VLANs
Adding users to VLANs includes:
❒ VLAN Considerations
❒ Creating a VLAN
❒ Assigning Ports To VLANs
VLAN Considerations
Be aware of the following issues when configuring VLANs:
❑
The default setting for Initial Hash Table Size (a number used to determine how much
space is initially reserved for new address tables) supports 58 simultaneous VLANs (the
switch supports 1,000 VLANs). To increase the number of VLANs you can implement,
simply decrease the initial hash table size for each new address table instance.
❑
The switch powers up very slowly when large numbers of VLANs (more than 500) are
configured. This problem will be addressed in an upcoming software release.
❑
If you set a port’s VLAN trunking mode to Clear, make sure not to change the VLAN
Binding Type from the default value: Static.
❑
If you are using both the VLAN auto-learning feature and the Binding Type Bind to
Received, make sure that you set the binding type before you set Autolearn to enable or
else the port may not be automatically added to the VLAN.
Creating a VLAN
To create a VLAN:
1. In the Switching Parameters section of the Web Agent window, click Virtual
LANs. The VLAN Configuration dialog box opens.
2. Click CREATE. The Create VLAN dialog box opens.
3. In the Name field, enter a name for the VLAN.
4. In the ID field, enter an unused VLAN ID (between 1 and 4095). VLAN IDs are
global and must be consistent from switch to switch, even when switches are
manufactured by different vendors.
Cajun P550/P220 Switch Operation Guide
12-3
Using VLANs, Spanning Tree, and Hunt Groups (Layer 2 and Layer 3)
5. Use Table 12-1 to configure the VLAN parameters:
Table 12-1. VLAN Parameters
Parameter
Definition
Name
Name assigned to this VLAN.
ID
Identifier used throughout the network to identify this VLAN. If
you want ports on more than one device to participate in a
particular VLAN, you must use the same VLAN ID to identify the
VLAN on every device.
Initial Hash Table
Size
Sets the number of Layer 2 address entries used to store
information for this VLAN. Use the default value.
The general implementation rule is: Use a smaller size when you
implement lots of VLANs (more than 50). Use a larger size when
you have lots of MAC addresses on the same VLAN in the
network (more than 16,000).
Note: The number of address for a given hash table is 4:1 (for
example, if you have a hash table of 16 bytes, the VLAN can hold
64 addresses in it’s table instance.
Auto Increment
HT Size
Determines whether the number of memory “buckets” used by
this VLAN’s address table adjusts automatically when memory
use become inefficient. Select true if you want the HT size to
increase when the number of entries belonging to this VLAN
reaches a pre-defined threshold. Select false to disable this
feature.
6. Click APPLY to create the new VLAN, or CANCEL to restore previous settings.
Configuring VLAN Parameters
To configure all ports assigned to a VLAN:
1. In the Switching Parameters section of the Web Agent window, click Virtual
LANs. The VLAN Configuration dialog box opens.
2. Click on the Name of the VLAN whose members you want to view. The VLAN
Switch Ports dialog box opens.
3. Use Table 12-2 to configure the VLAN parameters:
Table 12-2. VLAN Switch Port Table Parameters
12-4
Parameter
Defines...
Port
The VLAN switch port.
Port Name
The user-assigned name for this port.
Cajun P550/P220 Switch Operation Guide
Using VLANs, Spanning Tree, and Hunt Groups (Layer 2 and Layer 3)
Table 12-2. VLAN Switch Port Table Parameters (Continued)
Parameter
Binding Type
Defines...
• Static - when ports are added manually and can be removed.
• Persistent - when ports are bound to VLANs automatically but
can not be removed.
• Dynamic - when port is assigned to VLAN using automatic
VLAN binding, which causes ports to bind to VLANs using the
Bind to Received switch port setting and can be removed.
Refer to “Configuring Port VLAN Parameters,” in Chapter 2 for more
information.
Frame Format
• From Port - causes port to send frames using the frame format
specified in the Trunk Mode attribute of the corresponding
switch port.
Refer to “Configuring Port VLAN Parameters,” in Chapter 2 for more
information.
• Clear - causes port to send untagged frames on this port for this
VLAN.
4. Click APPLY to save your changes, or CANCEL to restore previous settings.
Creating 3Com Mapping Tables
The Default 3Com Mapping Table maps 3Com VLAN 1 to 16 to the Lucent Default VLAN
and 3Com VLANs 2 through 16 to the Lucent Discard VLAN. In a network with multiple
3Com devices, it’s possible that some parts of a network will use different VLAN
mappings for incoming 3Com tagged packets. The switch allows you to create additional
3Com mapping tables to use in situations where this occurs.
Note: 3Com trunks do not work across hunt groups.
To create additional mapping tables:
1. In the Switching Parameters section of the Web Agent window, click 3Com
Mapping Table. The 3Com Mapping Table dialog box opens.
2. Click CREATE. The Create 3Com Map Table dialog box opens.
3. In the Name field, enter a name for this entry.
4. Click APPLY save your changes, or CANCEL to restore previous settings.
5. In the Switching Parameters section of the Web Agent window, click 3Com
Mapping Table. The 3Com Mapping Table dialog box opens.
Cajun P550/P220 Switch Operation Guide
12-5
Using VLANs, Spanning Tree, and Hunt Groups (Layer 2 and Layer 3)
6. Use the corresponding pull-down menus to assign a Lucent VLAN ID association to
each of the 16 available 3Com VLAN IDs.
7. In the Name column, click on VLAN.
8. Click APPLY to save your changes, or CANCEL to restore previous settings.
Note: The mapping instructions in the table called Default are fixed and cannot be
changed. To actually map VLAN IDs, you must create new 3Com Mapping
tables. Setting a port to use a 3Com mapping table causes it to ignore other
VLAN tagging parameters. The switch assumes that only 3Com VLAN tags will
be received on the selected port.
Assigning Ports To VLANs
Refer to “Configuring Switch Port Parameters,” in Chapter 3 for instructions on assigning
ports to VLANs.
Using Spanning Tree Setup and Monitoring
Spanning trees are used to prevent loops from forming in your network. The spanning
tree algorithm creates a single path through the network by ensuring that if more than
one path exists between two parts of a network, only one of these paths is used, while
the others are blocked.
Note: You should have a good understanding of spanning tree protocol before
attempting to configure these parameters. Because of the number of “bridges”
present in a switched networking environment, spanning tree structures can
become extremely complex.
This section includes:
❒ Spanning Tree Bridge Options
❒ Managing Spanning Trees
❒ Configuring Spanning Tree Bridge Ports
❒ Disabling Spanning Tree Mode for the Port
12-6
Cajun P550/P220 Switch Operation Guide
Using VLANs, Spanning Tree, and Hunt Groups (Layer 2 and Layer 3)
Spanning Tree Bridge Options
The three spanning tree options are:
❒ If you use the default 802.1D spanning tree option, the entire switch is a bridge, for
which spanning tree parameters can be set. Every port, regardless of VLAN
membership, is part of the same spanning tree. The implication is that after
resolving the spanning tree topology, only one trunk will be active, and all others
will be blocked.
❒ If you use the Spanning Tree per VLAN option, each VLAN runs a separate
spanning tree with its own BPDUs. This allows different ports to blocked or
unblocked on different VLANs.
❒ If you use the dual layer spanning tree option, within a set of interconnected Cajun
switches, you can set up a separate spanning tree for each VLAN. The switch then
runs a second level of spanning tree to control routes between switches in the
Cajun Network. This creates smaller spanning tree domains and provides quicker
convergence upon reconfiguration.
Managing Spanning Trees
To manage spanning trees:
1. In the Switching Parameters section of the Web Agent window, click Spanning
Tree. The Spanning Tree Information dialog box opens.
2. From the Configuration pull-down menu, select the type of spanning tree you
want to implement.
3. Use Table 12-3 to select your Spanning Tree options:
Cajun P550/P220 Switch Operation Guide
12-7
Using VLANs, Spanning Tree, and Hunt Groups (Layer 2 and Layer 3)
Table 12-3. Spanning Tree Options
Parameter
Definition
IEEE 802.1D
Entire switch is a single IEEE 802.1D-compliant bridge.
Note: When the spanning tree mode is set to IEEE 802.D,
BPDUs are sent out ports in Clear (non-trunked) format even if
the port has a trunking format (3Com, 802.1Q or Dual Layer)
defined.
Per VLAN
Each VLAN functions as a separate IEEE 802.1D-compliant
bridge.
Note: If you disable spanning tree on a single VLAN, spanning
tree will be re-enabled when the switch is reset.
In order for spanning tree to function properly with 3Com
trunked ports, the spanning tree mode should be set to
per-VLAN. In Per VLAN spanning tree, there is one instance of
spanning tree for each VLAN and the BPDUs are tagged with the
VLAN ID, ensuring they are interpreted correctly on the
receiving end.
Dual Layer
Spanning tree terminates at edge of the switch network.
Spanning Tree per VLAN within the switch network.
Disable
Spanning tree not used.
4. Click APPLY save your changes, or CANCEL to restore previous settings.
5. In the Bridge column, click on a bridge name to set bridge parameters. The
Spanning Tree Bridge Configuration dialog box opens.
6. Use Table 12-4 to select bridge-level parameters:
Table 12-4. Bridge-Level Parameters
12-8
Parameter
Definition
Mode
Determines whether spanning tree is enabled or disabled for
this bridge.
Priority
STP Priority level for this bridge.
Bridge Max Age
Sets the maximum amount of time that this bridge retains
bridging information before discarding. When the
maximum age expires, the bridge assumes it has lost
connection to the network, and sends out requests to be
re-added to the spanning tree.
Bridge Hello Time
Time between generation of BPDUs by the root bridge.
Cajun P550/P220 Switch Operation Guide
Using VLANs, Spanning Tree, and Hunt Groups (Layer 2 and Layer 3)
Table 12-4. Bridge-Level Parameters (Continued)
Parameter
Definition
Bridge Forward Delay
Amount of delay used when a port transitions to the
forwarding state. Set by the root bridge for the segment.
Note: You must enter a value within the supported
range or the configuration operation will
fail. The supported value range for this
parameter is 10-30.
Max Age
Current maximum age for this spanning tree. Determined
by the root bridge.
Hello Time
Current hello time for this spanning tree. Determined by
the root bridge.
Forward Delay
Current forwarding delay for this spanning tree. Set by the
root bridge.
7. Click APPLY to save your changes, or CANCEL to restore previous settings.
Configuring Spanning Tree Bridge Ports
To configure spanning tree bridge ports:
1. In the Switching Parameters section of the Web Agent window, click Spanning
Tree. The Spanning Tree Information dialog box opens.
2. In the Bridge Ports column, click the port number listed. The Spanning Tree
Bridge Port Information dialog box opens.
3. Use Table 12-5 to configure the Spanning Tree Bridge port parameters:
Table 12-5. Spanning Tree Bridge Port Parameters
Parameter
Options
Bridge Port
The bridge port.
Port
The spanning tree bridge port number.
Name
The name assigned to the bridge port.
Cajun P550/P220 Switch Operation Guide
12-9
Using VLANs, Spanning Tree, and Hunt Groups (Layer 2 and Layer 3)
Table 12-5. Spanning Tree Bridge Port Parameters (Continued)
State
Current bridging state of the port.
The options are:
• Disabled - The port is disabled.
• Blocking - The Spanning Tree algorithm has set this port’s
state to block, meaning that it is enabled, but not passing
traffic.
• Listening - The port is in a transitional state, waiting for the
spanning tree algorithm to determine whether it should
block or forward traffic.
• Learning - The port is learning MAC addresses, but not yet
forwarding traffic.
• Forwarding - This port has been selected by the Spanning
Tree algorithm to forward traffic, and is forwarding traffic
currently.
• Down - The port’s physical port has no link detected.
Designated Root
Displays the Root bridge for this spanning tree.
Designated Bridge
The bridge identifier for the bridge considered to be the
designated bridge for this segment.
Designated Port
The port identifier of the port on the designated bridge for this
segment of the spanning tree.
Designated Cost
The path cost of the designated root of the segment connected to
this port.
Forward
Transitions
Number of times that this port has transitioned from blocking to
forwarding.
4. In the Bridge Port column, click on the Bridge Port number to configure bridge
port parameters. The Spanning Tree Port Configuration dialog box opens.
5. Use Table 12-6 to configure Spanning Tree Bridge Port Information parameters:
Table 12-6. Spanning Tree Bridge Port Information Parameters
12-10
Parameter
Definition
Enable
Sets whether or not spanning tree is active on this bridge port.
Priority
Sets the port’s priority in the spanning tree algorithm. A port
with a higher priority (lower priority number) is more likely to
be chosen as the primary path in the spanning tree.
Cajun P550/P220 Switch Operation Guide
Using VLANs, Spanning Tree, and Hunt Groups (Layer 2 and Layer 3)
Table 12-6. Spanning Tree Bridge Port Information Parameters (Continued)
Parameter
Definition
Path Cost
Sets the spanning tree path cost for this port. The ports that you
prefer be used by the spanning tree should have the lowest path
cost.
Note: Configuring the path cost for a link when the link is in
the down state is not saved in the configuration NV memory.
Establish the link first, before configuring the path cost.
Top. Change
Detection
Allows you to enable or disable topology change detection.
Specifies whether a Topology Change Notification (TCN) packet
is sent through the root port (or if this switch is the root bridge,
whether or not Fast Aging occurs) whenever the port enters the
forwarding or blocking states. This attribute should only be used
on port which connect to no other switches.
Note: A topology change occurs when you change a port
mirroring piggyback port.
6. Click APPLY to save your changes, or CANCEL to restore previous settings.
Disabling Spanning Tree Mode for the Port
To disable spanning tree mode for the port:
1. In the System Configuration section of the Web Agent window, click Modules
& Ports. The Module Information dialog box opens.
2. In the Switch Ports column, click the switch port number. The Switch Ports
dialog box opens.
3. In the Name column, click the port number to be disabled. The Switch Port
Configuration dialog box for that port opens.
4. From the Spanning Tree Mode pull-down menu, select Disable.
5. Click APPLY to save your changes, or CANCEL to restore previous settings.
Using Hunt Groups to Aggregate Bandwidth between
Switches
Hunt groups allow you to aggregate multiple switch ports into a single group, effectively
combining the bandwidth into a single connection.
For example, if you connect three gigabit ports each on a pair of switches into a hunt
group, the aggregated connection will have six gigabits of available bandwidth (fullduplex).
Cajun P550/P220 Switch Operation Guide
12-11
Using VLANs, Spanning Tree, and Hunt Groups (Layer 2 and Layer 3)
Hunt groups also provide fault tolerance. If a port in a hunt group fails, the remaining
ports will continue forwarding the traffic on the link.
Hunt Group Considerations
Considerations before creating hunt groups include:
❒ The switches do not yet have a link discovery protocol. When creating a hunt
group, you have to verify that the ports in a group on one switch are physically
connected to the ports in that group on the other switch.
❒ If one end of a connection is in a hunt group, the other end of the connection
should also be in a hunt group. If you don’t do this, the forwarding behavior of the
hunt group will be unpredictable.
❒ You should disable the ports in a hunt group until both ends of the link are
configured.
❒ All ports in a hunt group must be the same speed.
❒ Packets arriving on different fabric ports within the switch will have loads balanced
more evenly.
❒ Hunt groups will not load share if the source and destination traffic and the hunt
group ports are on the same fabric port. Most I/O modules divide their ports evenly
across two fabric ports. For 10-port and 12-port I/O modules, all ports use a single
fabric port.
❒ The first port assigned to a hunt group becomes the flood port. It can not be
changed unless the flood port is disabled.
Configuring Hunt Groups
To configure a hunt group:
1. Ensure that the same-speed ports that you are configuring into a hunt group are
physically connected to each other (for example, in a four-port gigabit hunt group,
ensure that you have four fiber cables with switch ports connected at each end).
Note: Auto-negotiation should be disabled on the ports to further insure against
speed mismatch.
2. From the System Configuration section of the Web Agent window, click
Modules and Ports. The Module Information dialog box opens.
3. In the Ports column, click on the port number. The Physical Port Configuration
dialog box opens.
12-12
Cajun P550/P220 Switch Operation Guide
Using VLANs, Spanning Tree, and Hunt Groups (Layer 2 and Layer 3)
4. For the selected port, click Enable to disable the port. The selection is removed and
the port is disabled. Disable all of the ports you are adding to the hunt group if this
is a new hunt group. If you are adding ports to an existing hunt group, disable the
ports you are adding.
5. On the first switch, in the Switching Parameters section of the Web Agent
window, select Hunt Groups. The first Hunt Group Configuration dialog box
opens.
6. Use Table 12-7 to configure your Hunt group:
Table 12-7. Hunt Group Configuration Dialog Box
Button or Link
Function
Create
Summons a screen that allows you to add new hunt groups.
Note: This button is unavailable if you have read-only
privileges.
Delete
Deletes hunt groups that have a check next to the hunt group
name.
Members
Lists port numbers of port that are members of the selected
hunt group and opens the Hunt Group Members dialog box.
Redistribute
Redistributes the hunt group learned addresses. Click this
button if you notice that a particular link has learned to many
of the busiest ports. The button causes the MAC addresses to be
redistributed among the hunt group ports.
7. Click CREATE. The second Hunt Group Configuration dialog box opens.
8. In the Name field, enter a name for the end of hunt group.
9. From the Load Sharing pull-down menu, select Enable to enable load sharing.
10. Click APPLY to save your changes, or CANCEL to restore previous settings.
Viewing Hunt Group Members
To view hunt group member details:
1. From the Switching Parameters section of the Web Agent window, click Hunt
Groups. The Hunt Group Configuration dialog box opens.
2. In the Members column, click the highlighted number. The Hunt Group
Members dialog box opens.
Cajun P550/P220 Switch Operation Guide
12-13
Using VLANs, Spanning Tree, and Hunt Groups (Layer 2 and Layer 3)
Adding Ports to a Hunt Group
After creating and naming a hunt group, you can add as many additional ports as you
would like to the group.
To add additional ports:
1. From the System Configuration section of the Web Agent window, click
Modules and Ports. The Module Information dialog box opens.
2. In the Ports column, click on the port number. The Physical Port Configuration
dialog box opens.
3. For the selected port, click Enable to disable the port. The selection is deselected
and the port is disabled.
4. Click APPLY to save your changes, or CANCEL to restore previous settings.
5. Click Modules, at the bottom of the page. The Module Information dialog box
re-opens.
6. In the Switch Ports column, click the number for the module whose port(s) you
are adding to the hunt group. The Switch Ports dialog box opens.
7. In the Name column, click the port name you want to configure. The Switch Port
Configuration dialog box opens.
8. From the Trunk Mode pull-down menu, select the trunk group assignment of the
port.
9. Click APPLY save your changes, or CANCEL to restore previous settings.
10. Repeat Steps 1-9 for any additional ports you would like to add to this hunt group.
11. Repeat the same steps on the switch at the other end of the hunt group connection.
12. From the System Configuration section of the Web Agent window, click
Modules & Ports. The Module Information dialog box re-opens.
13. In the Ports column, click on the port number. The Physical Port Configuration
dialog box opens.
14. For the selected port, click the Enable checkbox to enable the ports in the hunt
group. The group begins functioning as a load-sharing connection.
15. Click APPLY to save your changes, or CANCEL to restore previous settings.
Note: If thousands of addresses have been learned on a port and a link in the hunt
group goes down, the switch-over of traffic between ports may take several
seconds.
12-14
Cajun P550/P220 Switch Operation Guide
13
Tuning Your Switch
Performance (Layer 2 & Layer 3)
Overview
This chapter and its procedures are common to both Layer 2 and Layer 3 configuration.
Buffer management features help you to optimize traffic throughput through the switch
fabric.
Included in this chapter:
❒ How Queues Work
❒ Managing Buffers and Queues
How Queues Work
Frames are buffered in the I/O modules, before and after traversing the switch. Each
queue can hold 256K bytes. (Architecturally they can support up to 1 MB each).
Each buffer is divided into two queues, one for High-priority Traffic and one for
Normal-priority Traffic. The factory default is for the high-priority queue uses 20%
(51K) of the buffer. The normal-priority queue uses the remaining 80% (205K). These
values can be modified using either the Web Agent or SNMP.
Note: When you change these values, you must reboot the switch before they can
take effect.
Less buffer memory gets assigned to the high-priority queue because the high-priority
queue gets serviced more frequently than the normal-priority queue. Since a frame
spends less time on the high-priority queue, less buffer space is required for the queue.
The Service Ratio can be chosen to match traffic patterns and performance requirements
using a weighted round robin scheduling algorithm. The available service ratios of the
algorithm are defined in “Managing Buffers and Queues”. The factory default service
ratio for fabric ports is 999/1. The factory default service ratio for physical ports is 1023
to 1. If there is traffic to be serviced from both the high- and normal-priority queues, 999
packets of high-priority traffic will be processed for each normal-priority packet.
Cajun P550/P220 Switch Operation Guide
13-1
Tuning Your Switch Performance (Layer 2 & Layer 3)
When the high-priority queue fills up, incoming frames are dropped. The philosophy is if
a high-priority frame is going to be late, it is not worth sending it at all. The
normal-priority queue uses either IEEE 802.3X PAUSE (variable timed XOFF) flow
control or Half Duplex collisions to shut off incoming frames before the queue overflows.
The switch implements two flow control disciplines along the entire path that frames
travel. The default case is that when output buffers fill up, frames destined for a
particular buffer will be dropped. This should only occur in a case where the output port
is very congested. However, there is an optional mode which in which normal-priority
frames are never dropped inside the switch. In this mode, input buffers may fill up. If
they do, the affected input ports may use flow control to temporarily halt traffic from
neighboring switches.
Managing Buffers and Queues
To manage buffers and queues:
1. From the System Configuration section of the Web Agent window, click
Modules and Ports. The Module Information dialog box opens.
2. In the Buffer Management column, click the Module number for the module
whose buffers you want to manage. The Buffer Management dialog box opens.
3. Use Table 3 to view your buffer management parameters.
13-2
Cajun P550/P220 Switch Operation Guide
Tuning Your Switch Performance (Layer 2 & Layer 3)
Table 13-1. Buffer Management Parameters
Parameter
Definition
Fabric Port Buffers
Displays the port’s fabric port buffers and allows you to open the
Buffer Detail Configuration dialog box for the selected module.
Service ratios:
• 3 to 1
• 99 to 1
• 999 to 1
• 9999 to 1
Physical Port Buffers
Displays the port’s physical port buffers if available.
Service ratios:
• 31 to 1
• 63 to 1
• 127 to 1
• 255 to 1
• 511 to 1
• 1023 to 1
• 2047 to 1
• 4095 to 1
• 8191 to 1
• 16383 to 1
• 32767 to 1
4. To manage your Fabric Port buffers, click on the Fabric Port Buffer number
whose associated buffers you want to manage. The selected fabric port’s Detailed
Buffer Configuration dialog box opens.
5. Use Table 13-2 to manage your port’s input and output buffer:
Table 13-2. Buffer Detailed Configuration Parameters
Parameter
Definition
Memory
The amount of physical memory associated with this buffer.
Age Timer
The amount of time a packet remains in the queue before being
discarded as a stale packet. You may want to increase the timer
value for ports connected to 10 MB/s ports, particularly 10
MB/s shared media, because you may want to queue packets
longer before discarding them.
Cajun P550/P220 Switch Operation Guide
13-3
Tuning Your Switch Performance (Layer 2 & Layer 3)
Table 13-2. Buffer Detailed Configuration Parameters (Continued)
Parameter
Definition
High Priority
Allocation
Percent of the buffer’s queueing space allotted to high priority
traffic. Because the high-priority queue is serviced more
frequently than the normal priority queue, raising this value
may not necessarily provide better service. In fact, if you are
using the high-priority queue for delay-sensitive traffic, you
may want to reduce the amount of memory devoted to the
high-priority queue. This ensures that packets that cannot be
delivered in a timely manner are discarded. If you want the
high priority queue to guarantee delivery of as many packets as
possible, regardless of delay, increase this value. The change
does not take effect until you reset the switch.
Priority Threshold
Some priority schemes have more than two queues (the IEEE
allows up to 8, numbered 0 through 7). Set this parameter to
the value at which the Cajun P550 switch starts sending packets
to the high-priority queue. The default value (4) causes all
traffic with a priority greater than or equal to 4 (4, 5, 6, and 7)
to be assigned to the high-priority queue. Lucent recommends
that you do not change this parameter.
High Priority
Service Ratio
Determines how many times the high priority queue is serviced
for each time the low priority queue is serviced. The ideal value
changes from queue to queue, but the goal is to ensure that
traffic mix guarantees optimal mix between high-priority and
best effort traffic.
High and Normal
Overflow Drops
Number of packets dropped because the associated buffer is full.
Indicates that the device immediately before the queue is
processing traffic faster than the next downstream element can
process the same volume of traffic. For example, overflow drops
on the input buffer indicate that traffic is arriving faster than the
switch matrix can process it. Overflow drops on the output
buffers indicates that the output port cannot handle the volume
of the load being offered.
High and Normal
Stale Drops
Number of packets dropped because they timed out waiting for
service (using the age timer value). In the high-priority queue,
this can help determine how efficiently the switch is processing
“better never than late” traffic. Excessive stale drops on the
high-priority queue may indicate the need to increase the
service ratio on the high-priority queue.
Congestion Drops
Number of packets dropped because the switch controller has
sensed congestion at the outbound port.
6. To manage your Physical Port buffers, repeat Steps 1-4 to tune Physical Port (Fast
Ethernet) buffers. Physical Port ports have additional buffers on both the input and
output ports.
7. Click APPLY to save your changes, or CANCEL to restore previous settings.
13-4
Cajun P550/P220 Switch Operation Guide
14
Managing Address Forwarding
Tables (Layer 2 & Layer 3)
Overview
This chapter and its procedures are common to both Layer 2 and Layer 3 configuration.
Included in this chapter:
❒ Configuring the Address Forwarding Table
❒ Searching the Switch Address Forwarding Table
❒ Adding Entries to the Address Forwarding Table Manually
Configuring the Address Forwarding Table
You can configure the following parameters when using the address forwarding table:
❒ Address Age Time - defines the length of time addresses remain active in the
address forwarding table.
❒ Super Age Time - defines how long inactive addresses are stored in the address
forwarding table before being deleted.
❒ Address Table Sizing Parameters - allow you to adjust what the switch does
when address table use becomes inefficient.
The Address Table dialog box also provides information useful when working with
Lucent support personnel.
Configuring the Age Timer and Super Age Timer
To change the aging values for all instances of the address table:
1. In the Address Forwarding Table section of the Web Agent window, click Table
Configuration. The Address Forwarding Table Configuration dialog box opens.
2. In the Age Time field, enter a new value. The default of 300 seconds is the
standards-recommended default. Aged out addresses become invalid until the
switch sees another packet with the aged out entry’s source address.
Cajun P550/P220 Switch Operation Guide
14-1
Managing Address Forwarding Tables (Layer 2 & Layer 3)
3. In the Super Age Time field, enter a new value. The Super Age Timer marks all
invalid table entries, then checks to see if they remain invalid for the specified
super age interval. This clears the table of entries that are no longer used. The
default value is 7 days.
4. Click APPLY to save your changes, or CANCEL to restore previous settings.
Controlling Reconfiguration of Address Table Sizes
Each VLAN you define creates a separate version of the switch address forwarding table.
When these address tables become large, they may begin to use address space
inefficiently.
If you leave the switch in its default state, it will adjust for growth automatically.
However, this will lead to a few seconds of flooding packets when the address table
reconfigures.
To manually control when a flood event occurs:
1. In the Address Forwarding Table section of the Web Agent window, click Table
Configuration. The Address Forwarding Table Configuration dialog box opens.
2. Enter a new Auto-Sizing Utilization Threshold percentage, if you just want to
cause the table reconfiguration to occur at a different level of usage efficiency. The
default value of 40% is recommended for most applications. Raising the value
might cause the table to be relearned more frequently, and will make address space
usage more efficient.
3. In the Instance IDs column, click the ID number to achieve finer control of
particular tables. The Address Table Instance dialog box opens for the instance ID
selected.
Table 14-1. Address Table Instance Parameters
Parameter
Definition
VLAN Association
Displays the associated VLAN switch port and opens the
VLAN Switch Port dialog box.
Total Number of Entries Displays the total number of entries for this VLAN.
Entry Type
Displays the entry type for this VLAN.
Options include:
• Learned - Entry is dynamically learned.
• Management - Entry is configured by the user
statically.
• Self - Entry is the switch’s own address
14-2
Cajun P550/P220 Switch Operation Guide
Managing Address Forwarding Tables (Layer 2 & Layer 3)
Table 14-1. Address Table Instance Parameters (Continued)
Parameter
Definition
Entry Validity
Displays the entry validity for this VLAN.
Options include:
• Valid - Entry exists.
• Invalid - Entry has aged out but still exists even
though the port binding is invalid.
Hash Table
Displays the hash table parameters.
Options include:
• Size - It is recommended that the hash table size be
1/8th the size of the total number of addresses for the
VLAN.
• Auto Increment - Hash tables may grow dynamically
larger if more addresses are discovered. Disabling
auto-increment prevents these tables from growing
dynamically at the risk of extra flooding.
Bucket Info
Displays parameters to monitor the efficiency of the hash
table allocations.
Options include:
• Count - Indicates the hash table count.
• Capacity - Indicates the hash table capacity.
• Utilization - High utilization indicates that a larger
hash table is needed.
4. From the Hash Table/Size pull-down menu, select the new size to alter the space
available for this address table. The rule of thumb is: Tables with high Total Bucket
Utilization (greater than 75%) can be made smaller. Tables with low Total Bucket
Utilization (less than 40%) should be made larger. Note that the number of
addresses for a given hash table is 4:1 (for example, if you have a hash table of 16
bytes, the VLAN can hold 64 addresses in it’s table instance.
5. From the Hash Table/Auto Increment pull-down menu, select False to prevent
the table size from reconfiguring automatically.
6. Click APPLY to save your changes, or CANCEL to restore previous settings.
If you want to relearn the entire table, click Delete All Learned Entries.
If you want to delete all entries that are currently aged out, click Delete All
Invalid Learned Entries.
Note: If you change the Hash Table Size, the switch relearns all addresses in that
table, causing the switch to flood packets for a few seconds.
Cajun P550/P220 Switch Operation Guide
14-3
Managing Address Forwarding Tables (Layer 2 & Layer 3)
Searching the Switch Address Forwarding Table
The Address Forwarding Table can contain more than 24,000 entries on each switch. The
switch Web Agent provides a utility that allows you to filter which addresses it displays,
making the list more manageable. Multiple criteria can be selected to produce a
sophisticated filter. The parameters are treated as “ands,” meaning that displayed
addresses must meet all selected criteria.
To filter the switch address forwarding table:
1. In the Address Forwarding Table section of the Web Agent window, click Entry
SearchTfı˝13.2222 0.00Tcı˝24lent4054 0lay
14-4
Cajun P550/P220 Switch Operation Guide
Managing Address Forwarding Tables (Layer 2 & Layer 3)
12. Use Table 14-2 to review your search criteria options:
Table 14-2. Address Forwarding Table Parameters
Parameter
Defines the...
Index
Index number of this address entry in the switch address forwarding
table.
MAC
Address
MAC address associated with this entry. This address is learned by the
switch as an address to forward to the associated port.
Port
Port associated with this MAC address table entry. Use this setting to
display the entries associated with that port.
Options include:
• Forward - Forwards the entry.
• Filter - Filters the entry.
• Cpu - Stores the entry.
Valid
Whether the port binding is valid. This helps the re-learn performance.
Group
Group number associated with this MAC address.
TblInst
Address table instance number associated with this MAC address.
Priority
Priority level associated with traffic forwarded to this MAC address.
The options are:
• Normal
• High
You can set this parameter on all learned entries.
Persistence
The persistence of the entry in the table can be set on all learned
entries:
• Permanent - The address is not aged out of the table.
• Invalid - This entry is cleared from the table each time the switch
resets.
• Ageout - Address is cleared from the address forwarding table
when the timeout interval expires. This is the state of all entries
dynamically learned by the switch. It ensures that MAC addresses
that are not active on the network do not remain in the switch
address forwarding table indefinitely.
Status
The status of the address entry.
Options include:
• Learned
• Management
• Self
• Multicast
Cajun P550/P220 Switch Operation Guide
14-5
Managing Address Forwarding Tables (Layer 2 & Layer 3)
Adding Entries to the Address Forwarding Table Manually
Adding entries manually is useful when you want to ensure the address forwarding table
entries remain permanently.
To add an address manually:
1. In the Address Forwarding Table section of the Web Agent window, click Entry
Configuration. The Static Address Configuration dialog box opens.
2. In the MAC Address Value field, enter the MAC address that you want to add to
the table.
3. From the VLAN pull-down menu, select a VLAN for this entry.
4. From the Port Binding pull-down menu, select to forward or filter this port.
5. In the Port Binding field, enter the port that you want associated with this entry.
6. From the Priority pull-down menu, select a priority level for packets forward to
this MAC address. High priority addresses move to the front of the switch packet
buffers automatically.
7. Use Table 14-3 for configuring the persistence parameter:
Table 14-3. Entry Persistence
Parameter
Definition
Permanent
The address is saved in nonvolatile memory and is
not aged out of the table.
Ageout
Address is cleared from the address forwarding
table when the timeout interval expires. This is
the state of all entries dynamically learned by the
switch. It ensures that MAC addresses that are not
active on the network do not remain in the switch
address forwarding table indefinitely.
8. Click APPLY to save your changes, or CANCEL to clear the dialog box fields.
14-6
Cajun P550/P220 Switch Operation Guide
15
Managing Intelligent
Multicasting (Layer 2 & Layer 3)
Overview
This chapter and its procedures address both Layer 2 and Layer 3 configurations.
Included in this chapter:
❒ Introduction
❒ Configuring Global Intelligent Multicasting
❒ Displaying Router Ports
❒ Configuring Static Router Ports
❒ Searching for Intelligent Multicast Sessions
❒ Creating a Static Multicast Session
❒ Configuring IGMP Snooping (Layer 3 only)
❒ Configuring the LGMP Server
❒ Configuring/Viewing an LGMP Client
❒ Configuring/Viewing CGMP Snooping
Introduction
Intelligent multicasting refers to the forwarding of Layer 2 multicast traffic (packets with
a multicast destination MAC address) to a subset of ports participating in a VLAN. With
intelligent multicasting disabled, Layer 2 multicast traffic is flooded to all ports
participating in the VLAN on which the traffic is received.
Intelligent multicasting is used to limit the forwarding of Layer 2 multicast traffic to only
those ports within the VLAN that have clients attached to them that want to receive this
multicast traffic. Limiting this forwarding reduces the amount of traffic to ports that do
not have clients wanting to receive the multicast traffic.
A multicast session is Layer 2 multicast traffic within a VLAN. The switch supports 60
sessions per VLAN. A client port is a port with an attached host configured to receive (be
Cajun P550/P220 Switch Operation Guide
15-1
Managing Intelligent Multicasting (Layer 2 & Layer 3)
a client of) a multicast session. Router ports are ports that are attached to (or in the path
to) multicast routers and must be treated specially. All multicast traffic on a VLAN must
be forwarded to the router.
You can manually create and delete multicast sessions through the user configuration.
The addition of client and router ports can also be performed manually. Dynamic
intelligent multicasting is achieved through IGMP snooping, LGMP (Lucent Group
Membership Protocol), or CGMP (Cisco Group Management Protocol) snooping. All of
these mechanisms are based on the assumption that the client host is running IGMP,
requesting membership in the IP multicast session.
Note: If there is no multicast session created for a multicast flow in a VLAN, then
that multicast flow will be flooded to all ports on the VLAN. Intelligent
multicasting must be enabled for any dynamic intelligent multicasting to be
active.
Layer 3 Dynamic Intelligent Multicasting
IGMP snooping is supported for VLANs that have IGMP interfaces enabled. This is the
recommended means of supporting dynamic intelligent multicasting in Layer 3. For all
VLANs that do not have an IGMP interface enabled, the Layer 2 dynamic intelligent
multicasting mechanisms (LGMP client and CGMP snooping) are supported.
Note: For Layer 2 or Layer 3 LGMP to perform properly, VLAN IDs must match
between switches. Specifically, if two switches are connected with a
non-tagging link, the port-default VLANs of the ports connecting the two
switches must be the same. This is because the VLAN is embedded in the
LGMP message; and the receiving switch maps the LGMP message to the
specified VLAN.
IGMP Snooping
IGMP snooping is only supported in Layer 3. As IGMP reports are received by the switch,
IGMP sessions are created. Intelligent multicast sessions are created and the ports on
which these reports are received are added to the appropriate sessions. When the IGMP
session is terminated, the associated intelligent multicast session is deleted.
Note: IGMP snooping is only available for VLANs that have an IGMP interface
enabled.
15-2
Cajun P550/P220 Switch Operation Guide
Managing Intelligent Multicasting (Layer 2 & Layer 3)
LGMP Server
Because Layer 2 cannot snoop IGMP messages, it requires Layer 3 to provide the
necessary information through a Lucent proprietary protocol, Lucent Group
Membership Protocol (LGMP).
Essentially, LGMP works by having the Layer 3 switch re-transmit received IGMP
messages to the Layer 2 switches by sending them to a well known multicast MAC
address. The Layer 2 switch then creates multicast sessions, adds clients to those sessions,
and removes sessions dynamically, as if it were directly receiving the IGMP messages.
If more than one LGMP server is on a VLAN, one server will be elected as the distributor.
Only the distributor disseminates intelligent multicasting information using LGMP
packets.
Note: IGMP snooping must be enabled for LGMP server availability. An LGMP
server is active only for VLANs that have an IGMP interface enabled.
Layer 2 Dynamic Intelligent Multicasting
Layer 2 does not support IGMP snooping to dynamically configure intelligent multicast
sessions. Therefore, LGMP client or CGMP snooping is used to achieve dynamic
intelligent multicasting.
LGMP Client
An LGMP server disseminates multicast session information using LGMP. An LGMP
client creates multicast sessions, adds clients to those sessions, and removes sessions
dynamically, using the information sent from the LGMP server.
CGMP Snooping
Cisco routers disseminate multicast session information via the CGMP protocol. The
switch has the ability to listen to these messages and dynamically create multicast
sessions, add client ports to those sessions, and remove sessions.
Pruning Dynamic Sessions, Client Ports, and Router Ports
Normally, dynamically created multicast sessions are removed by the application (for
example, IGMP Snooping, LGMP, or CGMP Snooping) that created the session when the
session is no longer active. You can also enable Automatic Session Pruning so that if a
session has not been active for Session Pruning Time, it is automatically removed.
Cajun P550/P220 Switch Operation Guide
15-3
Managing Intelligent Multicasting (Layer 2 & Layer 3)
2. Use Table 15-1 to configure your global configuration setup:
Table 15-1. Intelligent Multicast Global Configuration
Parameter
Definition
Enable State
Select to enable or disable intelligent multicasting globally. The
default value is Enabled.
Automatic Router Port
Pruning
• Enable - Select to enable or disable automatic router port
pruning. The default value is Enabled.
• Time - Enter the time, in seconds, after which quiet learned
router ports can be pruned. The valid range (in seconds) is 10
to 172800 (48 hours). The default value is 120 seconds.
Automatic Session
Pruning
• Enable - Select to enable or disable removal of stale learned
sessions. The default value is Enabled.
• Time - Enter the time, in seconds, after which stale learned
sessions can be removed. The valid range (in seconds) is 10 to
172800 (48 hours). The default value is 250 seconds.
Automatic Client Port
Pruning
• Enable - Select to enable or disable automatic removal of
quiet learned client ports from a session. The default value is
Enabled.
• Time - Enter the time, in minutes, after which quiet learned
client ports can be automatically removed from a session. The
valid range (in minutes) is 1 to 1440 (24 hours). The default
value is 60 minutes.
3. Perform one of the following:
•
APPLY to save your changes.
•
CANCEL to restore previous settings.
•
Delete All Learned Sessions to remove all learned multicast sessions.
•
Delete All Learned Client Ports to remove all learned client ports from all
multicast sessions.
•
Display/Configure Router Ports to display the router ports and configure
your static router ports. The Router Port Display/Configuration dialog box
opens.
Note: Static sessions and client ports cannot be deleted using this dialog box. Refer
to “Deleting a Multicast Session Client Port” and “Deleting a Static Multicast
Session”, later in this chapter for more information.
Cajun P550/P220 Switch Operation Guide
15-5
Managing Intelligent Multicasting (Layer 2 & Layer 3)
Displaying Router Ports
To display router ports:
1. In the Intelligent Multicasting section of the Web Agent window, click Global
Configuration. The Intelligent Multicast Global Configuration dialog box opens.
Note: You must enable intelligent multicasting on a global basis to make your router
ports active. See “Configuring Global Intelligent Multicasting”, earlier in this
chapter.
2. Click Display/Configure Router Ports. The Router Port Display/Configuration
dialog box opens.
3. Use Table 15-2 for more information on router ports.
Table 15-2. Router Port Display Parameters
Parameter
Definition
Port
Displays the router port in the multicast session.
VLAN
Displays the port VLAN of the router.
Application
Displays the active applications of the router port.
Applications include:
• Mgmt (Static)
• IGMP
• LGMP
• CGMP
4. Select a router port and click DELETE to remove a router port, or CANCEL to
restore previous settings.
Configuring Static Router Ports
To configure a static router port:
1. In the Intelligent Multicasting section of the Web Agent window, click Global
Configuration. The Intelligent Multicast Global Configuration dialog box opens.
Note: You must enable intelligent multicasting on a global basis to make your static
router port configuration active. See “Configuring Global Intelligent
Multicasting”, earlier in this chapter.
15-6
Cajun P550/P220 Switch Operation Guide
Managing Intelligent Multicasting (Layer 2 & Layer 3)
2. Click Display/Configure Router Ports. The Router Port Display/Configuration
dialog box opens.
3. In the Static Router Port Configuration section, enter a port number in the
Port field.
4. In the VLAN column, click All to add this router port to all VLANs.
Or
From the VLAN pull-down menu, select a specific VLAN.
Note: When adding a router port to all VLANs, the router port is added only to the
VLANs bound to the switch port. To bind multiple VLANs to a switch port,
refer to Chapter 3 in this guide.
5. Click CREATE to save your changes.
Searching for Intelligent Multicast Sessions
To perform a session search:
1. In the Intelligent Multicasting section of the Web Agent window, click Session
Search. The Intelligent Multicast Session Search dialog box opens.
2. Use Table 15-3 to configure your session search.
Table 15-3. Intelligent Multicast Session Search Parameters
Parameter
Display only multicast sessions...
IP Subnet
With this IP subnet.
• IP Address - The destination IP multicast address portion of
the subnet on which to search.
• IP Address Mask - The subnet mask portion of the subnet on
which to search.
MAC Address
That have this destination MAC address (or portion of this MAC
address).
VLAN
That are on this VLAN.
Client Port
With a client port matching this switch port.
Session Type
Of this session type.
• Learned - Session is dynamically learned.
• Mgmt - Session is configured statically by the user.
3. Click SEARCH to begin the search for the multicast session. The Multicast Sessions
dialog box opens with the search results.
Cajun P550/P220 Switch Operation Guide
15-7
Managing Intelligent Multicasting (Layer 2 & Layer 3)
4. Use Table 15-4 for more information on your multicast session search results.
Table 15-4. Multicast Sessions Parameters
Parameter
Definition
Select
Select the multicast session.
Session ID
Displays the multicast session identifier.
MAC Address
Displays the MAC address of the multicast session.
VLAN
Displays the VLAN on which the multicast session exists.
Type
Displays the type of multicast session. Options include:
• Learned - Entry is dynamically learned.
• Mgmt - Entry is configured statically by the user.
Client Ports
Displays the number of client ports in the multicast session and
opens the Multicast Session Client Ports dialog box.
Application
Displays the active application(s) of the multicast session.
Applications include:
• Mgmt
• IGMP
• LGMP
• CGMP
5. Click DELETE to remove your selected multicast session, or CANCEL to restore
previous settings.
Note: Static (Mgmt) sessions can only be deleted through the Static Sessions dialog
box.
Deleting a Multicast Session Client Port
To delete a multicast session client port:
1. In the Intelligent Multicasting section of the Web Agent window, click Session
Search. The Intelligent Multicast Session Search dialog box opens.
2. In the Client Ports column, click on the client port number for the selected
multicast session. The Multicast Session Client Port dialog box opens.
3. Use Table 15-5 for more information on your multicast session client ports.
15-8
Cajun P550/P220 Switch Operation Guide
Managing Intelligent Multicasting (Layer 2 & Layer 3)
Table 15-5. Multicast Session Client Port Parameters
Parameter
Definition
Select
Select the multicast session client port.
Port
Displays the client port number.
Application
Displays the application(s) associated with this client port.
Applications include:
• Mgmt
• IGMP
• LGMP
• CGMP
4. Click DELETE to remove your selected multicast session client port, or CANCEL
to restore previous settings.
Note: Static (Mgmt) client ports can only be removed through the Static Sessions
dialog box.
Creating a Static Multicast Session
To create a new static multicast session:
1. In the Intelligent Multicasting section of the Web Agent window, click Static
Sessions. The Static Multicast Sessions dialog box opens.
Note: You must enable intelligent multicasting on a global basis to make your static
multicast session active. See “Configuring Global Intelligent Multicasting”,
earlier in this chapter.
2. Click Create New Session to create a new static multicast session. The Static
Multicast Session Configuration dialog box opens.
Cajun P550/P220 Switch Operation Guide
15-9
Managing Intelligent Multicasting (Layer 2 & Layer 3)
3. Use Table 15-6 to configure the new multicast session.
Table 15-6. Static Multicast Session Configuration Parameters
Parameter
Definition
IP Address
The IP address of the new static multicast session. The
range must be between 224.0.1.0 to 239.255.255.255.
MAC Address
Enter the MAC address of the new static multicast session.
Specifying the MAC address is not used for an IP multicast
session.
VLAN
Enter the VLAN associated with the new multicast session.
Click All to add all VLANs to the multicast session, or select
a specific VLAN from the pull-down menu.
4. Click CREATE to create the new static multicast session, or CANCEL to restore
previous settings.
Deleting Static Multicast Sessions
To delete a static multicast session:
1. In the Intelligent Multicasting section of the Web Agent window, click Static
Sessions. The Static Multicast Sessions dialog box opens.
2. Use Table 15-7 for more information on static multicast sessions.
Table 15-7. Static Multicast Sessions Parameters
Parameter
Definition
Select
Select the static multicast session to be modified.
VLAN
Displays the VLAN on which the static multicast session exists.
MAC Address
Displays the MAC address of the static multicast session.
IP Address
Displays the IP address associated with the static multicast session,
if available.
Static Client Ports
Displays the number of static client ports associated with the static
multicast session and opens the Static Multicast Session Client
Ports dialog box.
3. Click DELETE to remove your selected static multicast session, or CANCEL to
restore previous settings.
15-10
Cajun P550/P220 Switch Operation Guide
Managing Intelligent Multicasting (Layer 2 & Layer 3)
Creating Static Client Ports
To create a static client port:
1. In the Intelligent Multicasting section of the Web Agent window, click Static
Sessions. The Static Multicast Sessions dialog box opens.
2. In the Static Client Ports column, click the number. The Static Multicast
Sessions Client Ports dialog box opens.
3. In the Port field, enter the new port number to be added.
4. Click Add Client Port. The new static client port is added.
Note: You can only add static client ports to static sessions on VLANs that the port is
bound to or on sessions created for All VLANs.
Deleting Static Client Ports
To delete static client ports:
1. In the Intelligent Multicasting section of the Web Agent window, click Static
Sessions. The Static Multicast Sessions dialog box opens.
2. In the Static Client Ports column, click the number. The Static Multicast
Sessions Client Ports dialog box opens.
3. Select a port and click DELETE to remove the static client port, or CANCEL to
restore previous settings.
Configuring IGMP Snooping (Layer 3 only)
To configure IGMP snooping:
1. In the Intelligent Multicasting section of the Web Agent window, click IGMP
Snooping. The IGMP Snooping dialog box opens.
Cajun P550/P220 Switch Operation Guide
15-11
Managing Intelligent Multicasting (Layer 2 & Layer 3)
2. Use Table 15-8 for more information on IGMP snooping.
Table 15-8. IGMP Snooping Parameters
Parameter
Definition
Enable State
Select to enable or disable IGMP snooping. The default
value is Disabled.
Intelligent Multicast
Session Statistics
• New Sessions Created - Displays the number of new
session created by IGMP snooping.
• Sessions Destroyed - Displays the number of sessions
removed by IGMP snooping.
• New Client Ports Added - Displays the number of
new client ports added by IGMP snooping.
• New Router Ports Added - Displays the number of
new router ports added by IGMP snooping.
• Router Ports Removed - Displays the number of
router ports removed by IGMP snooping.
3. Perform one of the following:
•
Click APPLY to save your changes.
•
Click CANCEL to restore previous settings.
•
Click CLEAR to clear the statistics.
•
Click REFRESH to refresh the contents of the table.
Note: IGMP snooping only works on VLANS that have an IGMP interface enabled.
You must enable intelligent multicasting on a global basis to make IGMP
snooping configuration active.
Configuring the LGMP Server
To configure the LGMP server:
1. In the Intelligent Multicasting section of the Web Agent window, click LGMP
Server. The LGMP Server Configuration dialog box opens.
Note: You must enable intelligent multicasting on a global basis to make the LGMP
Server active. LGMP serving is only active on VLANs that have an IGMP
interface enabled and IGMP snooping is globally enabled.
15-12
Cajun P550/P220 Switch Operation Guide
Managing Intelligent Multicasting (Layer 2 & Layer 3)
2. Use Table 15-9 to configure the LGMP server.
Table 15-9. LGMP Server Configuration Parameters
Parameter
Definition
Enable State
Select to enable or disable LGMP server configuration. The
default value is Disabled.
Proxy Mode
Select to enable or disable Proxy mode. Proxy mode allows
the server to send LGMP router report and leave messages
on behalf of neighbor routers on the same VLAN.
Server ID Priority
The priority of the LGMP server on this switch. The server
ID priority and the IP address associated with the VLAN
determine whether the LGMP server wins LGMP
distribution election. The lower the number the more likely
it will win the election. The valid range is 0 to 255. The
default value is 128.
Router Report Time
The time interval (in seconds) between router reports sent
by the LGMP server in distributor state. The valid range is
10 to 10,000. The default value is 125 seconds.
Robustness Variable
The scalar value used by non-distributor LGMP servers
when timing out the LGMP server in the distributor state.
The valid range is 2 to 10. The default value is 2.
LGMP Servers
Displays the number of LGMP servers and opens the LGMP
Server Display per VLAN dialog box.
Note: Only VLANs that have an active IGMP interface
can be LGMP servers.
LGMP Message
Reception Statistics
• Router Report - Displays the number of LGMP router
report messages received.
• Invalid - Displays the number of LGMP messages
received with an invalid payload.
Cajun P550/P220 Switch Operation Guide
15-13
Managing Intelligent Multicasting (Layer 2 & Layer 3)
Table 15-9. LGMP Server Configuration Parameters (Continued)
Parameter
LGMP Message
Transmission Statistics
Definition
• Report - Displays the number of LGMP report
messages transmitted.
• Leave - Displays the number of LGMP leave messages
transmitted.
• End Session - Displays the number of LGMP end
session messages transmitted.
• Router Report - Displays the number of LGMP router
report messages transmitted.
• Router Leave - Displays the number of LGMP router
leave messages transmitted.
Intelligent Multicast
Session Statistics
• Client Ports Added- Displays the number of add
client events generated by LGMP.
• Client Ports Removed - Displays the number of
remove client events generated by LGMP.
• Sessions Removed- Displays the number of remove
session events generated by LGMP.
• Router Ports Added- Displays the number of add
router events generated by LGMP.
• Router Ports Removed- Displays the number of
remove router events generated by LGMP.
3. Click...
•
APPLY to save your changes.
•
CANCEL to restore previous settings.
•
CLEAR to clear the statistics.
•
REFRESH to refresh the contents of the table.
Modifying the LGMP Server Display per VLAN
To modify the LGMP server display per VLAN:
1. In the Intelligent Multicasting section of the Web Agent window, click LGMP
Server. The LGMP Server Configuration dialog box opens.
Note: You must enable intelligent multicasting on a global basis to make your LGMP
server per VLAN configuration active.
2. In the LGMP Servers column, click the number. The LGMP Server Display per
VLAN opens.
15-14
Cajun P550/P220 Switch Operation Guide
Managing Intelligent Multicasting (Layer 2 & Layer 3)
3. Use Table 15-10 to configure the LGMP server display per VLAN.
Table 15-10. LGMP Server Display per VLAN Parameters
Parameter
Definition
Select
Select the LGMP server to modify.
VLAN
Displays the VLAN associated with the LGMP server.
State
Displays the current state of the LGMP server.
• Distributor - The LGMP server serves LGMP messages
to LGMP clients.
• Non-Distributor - The LGMP server monitors the
current distributor.
LGMP Message
Reception Statistics
• Router Report - Displays the number of LGMP router
report messages received per VLAN.
• Invalid - Displays the number of LGMP messages
received with an invalid payload per VLAN.
LGMP Messages
Transmission Statistics
• Report - Displays the number of LGMP report
messages transmitted per VLAN.
• Leave - Displays the number of LGMP leave messages
transmitted per VLAN.
• End Session - Displays the number of LGMP end
session messages transmitted per VLAN.
• Router Report - Displays the number of LGMP router
report messages transmitted per VLAN.
• Router Leave - Displays the number of LGMP router
leave messages transmitted per VLAN.
Intelligent Multicast
Session Statistics
• Client Ports Added- Displays the number of add
client events generated by LGMP per VLAN.
• Client Ports Removed- Displays the number of
remove client events generated by LGMP per VLAN.
• Sessions Removed- Displays the number of remove
session events generated by LGMP per VLAN.
• Router Ports Added- Displays the number of add
router events generated by LGMP per VLAN.
• Router Ports Removed- Displays the number of
remove router events generated by LGMP per VLAN.
Configuring/Viewing an LGMP Client
To configure an LGMP client and view its statistics:
1. In the Intelligent Multicasting section of the Web Agent window, click LGMP
Client. The LGMP Client Configuration dialog box opens.
Cajun P550/P220 Switch Operation Guide
15-15
Managing Intelligent Multicasting (Layer 2 & Layer 3)
Note: You must enable intelligent multicasting on a global basis to make your LGMP
client configuration active.
2. Use Table 15-11 for more information on the LGMP client parameters
Table 15-11. LGMP Client Configuration Parameters
Parameter
Definition
Enable State
Select to enable or disable LGMP client. The default value is
Disabled.
LGMP Clients
Displays the number of LGMP clients per VLAN and opens
the LGMP Client Displays per VLAN dialog box.
LGMP Message
Reception Statistics
• Report - Displays the number of LGMP report
messages received.
• Leave - Displays the number of LGMP leave messages
received.
• End Session - Displays the number of LGMP end
session messages received.
• Router Report - Displays the number of LGMP router
report messages received.
• Router Leave - Displays the number of LGMP router
leaves messages received.
• Invalid - Displays the number of LGMP messages
received with an invalid payload.
Intelligent Multicast
Session Statistics
• New Client Ports Added - Displays the number of
new clients added by LGMP.
• Existing Client Ports Removed - Displays the
number of clients removed by LGMP.
• Existing Sessions Removed - Displays the number of
sessions removed by LGMP.
• New Router Ports Added - Displays the number of
new routers added by LGMP.
• Existing Router Ports Removed - Displays the
number of new routers removed by LGMP.
3. Click...
15-16
•
APPLY to save your changes.
•
CANCEL to restore previous settings.
•
CLEAR to clear the statistics.
•
REFRESH to refresh the contents of the table.
Cajun P550/P220 Switch Operation Guide
Managing Intelligent Multicasting (Layer 2 & Layer 3)
Modifying LGMP Clients Per VLAN
To modify LGMP clients per VLAN:
1. In the Intelligent Multicasting section of the Web Agent window, click LGMP
Client. The LGMP Client Configuration dialog box opens.
Note: You must enable intelligent multicasting on a global basis to make your LGMP
client per VLAN configuration active.
2. In the LGMP Clients column, click the number. The LGMP Client Display per
VLAN dialog box opens.
3. Use Table 15-12 for more information on clients per VLAN parameters.
Table 15-12. LGMP Client Display per VLAN Parameters
Parameter
Definition
Select
Select the LGMP client to modify.
VLAN
Displays the VLAN associated with the LGMP client.
LGMP Message
Reception Statistics
• Report - Displays the number of LGMP report
messages received per VLAN.
• Leave - Displays the number of LGMP leave messages
received per VLAN.
• End Session - Displays the number of LGMP end
session messages received per VLAN.
• Router Report - Displays the number of LGMP router
report messages received per VLAN.
• Router Leave - Displays the number of LGMP router
leaves messages received per VLAN.
• Invalid - Displays the number of LGMP messages
received with an invalid payload per VLAN.
Intelligent Multicast
Session Statistics
• New Client Ports Added - Displays the number of
new clients added by LGMP per VLAN.
• Existing Client Ports Removed - Displays the
number of clients removed by LGMP per VLAN.
• Existing Sessions Removed - Displays the number of
sessions removed by LGMP per VLAN.
• New Router Ports Added - Displays the number of
new routers added by LGMP per VLAN.
• Existing Router Ports Removed - Displays the
number of new routers removed by LGMP per VLAN.
Cajun P550/P220 Switch Operation Guide
15-17
Managing Intelligent Multicasting (Layer 2 & Layer 3)
4. Click...
•
CLEAR to reset selected row information.
•
CLEAR ALL to reset all statistics.
•
REFRESH to view the latest information.
Configuring/Viewing CGMP Snooping
To configure CGMP snooping and view its statistics:
1. In the Intelligent Multicasting section of the Web Agent window, click CGMP
Snooping. The CGMP Snooping dialog box opens.
Note: You must enable intelligent multicasting on a global basis to make CGMP
snooping configuration active.
2. Use Table 15-13 for more information on CGMP snooping parameters.
Table 15-13. CGMP Snooping Parameters
Parameter
Definition
Enable State
Select to enable or disable CGMP snooping.
CGMP Packet
Reception Statistics
• Join Messages Received - Displays the number of
CGMP join messages received.
• Leave Messages Received - Displays the number of
CGMP leave messages received.
• Unknown Messages Received - Displays the
number of unknown CGMP messages received.
Intelligent Multicast
Session Statistics
• New Sessions Created - Displays the number of new
multicast sessions created by CGMP snooping.
• New Client Ports Added - Displays the number of
new client ports added to a multicast session by CGMP
snooping.
• Existing Sessions Removed - Displays the number of
existing multicast sessions that have been removed by
CGMP snooping.
• All Sessions Removed - Displays the number of
times that all multicast sessions created by CGMP
snooping were removed.
• New Router Ports Added - Displays the number of
new router ports added by CGMP snooping.
• Existing Router Ports Removed - Displays the
number of router ports that were created by the CGMP
snooper and were then removed by CGMP snooping.
15-18
Cajun P550/P220 Switch Operation Guide
Managing Intelligent Multicasting (Layer 2 & Layer 3)
3. Click APPLY to save your changes or CANCEL to restore previous settings.
Or
Click CLEAR to clear the statistics or REFRESH to refresh the contents of the
table.
Cajun P550/P220 Switch Operation Guide
15-19
Managing Intelligent Multicasting (Layer 2 & Layer 3)
15-20
Cajun P550/P220 Switch Operation Guide
16
Monitoring the Cajun Switch (Layer 2 &
Layer 3)
Overview
This chapter and its procedures are common to both Layer 2 and Layer 3 configuration.
Included in this chapter:
❒ Interpreting Front Panel LED Displays
❒ Checking Active Alarms
❒ Using the Event Subsystem
❒ Setting Log Size
Interpreting Front Panel LED Displays
Use Table 16-1 to interpret the state of the front-panel LEDs:
Table 16-1. Front Panel LED Display Interpretation
Module...
LED...
Behavior...
Indicates...
All Modules
Module Status
Solid green
Normal operation.
Flashing yellow
Diagnostic failure.
Off
Module not operational or not receiving power.
Flashing yellow
Port sending/receiving traffic.
Off
Port not sending/receiving traffic.
Solid green
Port enabled with link up.
Flashing green
Port disabled with link up.
Flashing yellow
Hardware failure.
Off
No link.
Gigabit
Modules
TX and RX
Port
Cajun P550/P220 Switch Operation Guide
16-1
Monitoring the Cajun Switch (Layer 2 & Layer 3)
Table 16-1. Front Panel LED Display Interpretation (Continued)
Module...
10/100
Modules
LED...
Behavior...
Indicates...
HD/FD
Solid green
Full-duplex operation negotiated.
Flashing yellow
Hardware failure.
Off
No link.
Port
Solid green, with Port enabled and sending and receiving traffic Traffic
yellow flash
indicated by yellow flashes.
Flashing green
Port disabled with link up.
Flashing yellow
Hardware failure.
Off
No link.
Checking Temperature Status and Configuring Thresholds
To view the temperature system:
1. In the System Information section of the Web Agent window, click
Temperature. The Temperature System dialog box opens.
Figure 16-1. Example Temperature System Dialog Boxes
Layer 2 Supervisor
P550
16-2
Layer 3 Supervisor
P550R
Cajun P550/P220 Switch Operation Guide
Monitoring the Cajun Switch (Layer 2 & Layer 3)
2. Use Table 16-2 to set the threshold values:
Table 16-2. Temperature Thresholds
Threshold
Defines...
High Shutdown
Temperature (Layer 2)/High
Warning Temperature
(Layer 3)
Value in degrees Celsius that when passed causes the switch to
send a trap to the network management station and triggers a
shutdown. By default, this value is 50 degrees Celsius. For the
Layer 3 CPU sensor, the default value is 100 degrees Celsius.
Upper Warning
Temperature
Value in degrees Celsius that when passed causes the switch to
send a warning that the temperature is approaching the high
temperature threshold. By default, this value is 45 degrees
Celsius. For the Layer 3 CPU sensor, the default value is 85
degrees Celsius.
Lower Warning
Temperature
Value that in degrees Celsius that when passed causes the switch
to send a warning that the temperature is approaching the low
temperature threshold. By default, this value is 5 degrees
Celsius.
Low Shutdown
Temperature (Layer 2)/Low
Warning Temperature
(Layer 3)
How low the temperature must drop on the switch to reset the
warning and high thresholds. This value prevents the switch
from sending traps continually if the temperature is hovering
around the threshold value. By default, this value is 0 degrees
Celsius.
Checking Active Alarms
Each switch stores a table of active alarms. This allows you to view a list of open issues in
the switch without having to view the entire event log. By doing this, you can quickly
obtain a snapshot of the switch’s health.
Viewing the Active Alarm Table
To view the Active Alarm Table in the Event Subsystem section of the Web Agent
window, click Active Alarms. The Active Alarm Table opens.
Using the Event Subsystem
There are two switch system activity logs for Layer 3:
❒ Event Log - stores a large table of events. The size of the table is user-settable.
Because these events are stored in switch memory, the list is cleared each time the
switch reboots.
Cajun P550/P220 Switch Operation Guide
16-3
Monitoring the Cajun Switch (Layer 2 & Layer 3)
❒ Shutdown Log - stores the same information as the Event Log, but generally in a
smaller table because the table is stored in the switch’s nonvolatile RAM (NVRAM).
This log list is particularly useful in assessing the cause of a switch failure, because
the information is retained even after the switch restarts.
Configuring the Protocol Event Log
You can use the protocol event log to enable RIP and OSPF packet tracing for Layer 3
only. RIP requests and responses received and sent through all RIP interfaces are logged
to the event log as protocol events. OSPF packet types received and sent through all
OSPF interfaces are logged to the event log as protocol events. AppleTalk packet types
received and sent through all AppleTalk interfaces are logged to the event log as protocol
events. LDAP packet types received and sent through all LDAP interfaces are logged to
the event log as protocol events.
Note: Enabling the protocol event log may cause the event log to be rapidly filled
with protocol events.
To configure the protocol event log:
1. In the Event Subsystem section of the Web Agent window, click Event
Configuration. The Event Management dialog box opens.
2. In the ID column, click one of the following:
•
RIP
•
OSPF
•
LDAP
•
AppleTalk
3. Use Table 16-8 to configure Event Table actions. (Log and Console are the only
available settings).
4. Click APPLY to save your changes, or CANCEL to restore previous settings.
5. In the Event Subsystem of the Web Agent, click Protocol Event
Configuration. The Protocol Event Management window opens.
16-4
Cajun P550/P220 Switch Operation Guide
Monitoring the Cajun Switch (Layer 2 & Layer 3)
6. Use Table 16-3 to configure your protocol event log settings:
Table 16-3. Protocol Event Log Settings
Parameter
Enables or disables the logging of...
Fault
Serious errors that can cause a system crash, for example,
panic.
Error
Serious errors that will not cause a system crash but can
contribute protocol problems.
Warning
Non-critical errors.
Info
Event details.
Trace
RIP and OSPF packet tracing.
Debug
Event messages used to troubleshoot a network problem.
7. Click APPLY to save your changes, or CANCEL to restore previous settings.
Viewing the Event and Shutdown Logs
To view the Event and Shutdown logs:
1. In the Event Subsystem section of the Web Agent window, click either Event
Log or Shutdown Log. An Event or Shutdown Log Search dialog box opens.
2. In the Search By: column, click the Severity Level checkbox.
3. From the Severity Level pull-down menu, select the severity level to filter on a
particular severity level for events.
4. From the Event Type pull-down menu, select an event to filter on a particular
Event Type. The selected event log entries open in the Event Log dialog box.
5. Use Table 16-4 for a description of the entries in the event and shutdown logs:
Table 16-4. Event and Shutdown Log Entries
Entry
Definition
Log ID
Displays the number of this event in the log FIFO (First In First
Out).
Event ID
Displays an index that identifies the event class.
Time Stamp
Displays the date and time the event was recorded in the log.
Cajun P550/P220 Switch Operation Guide
16-5
Monitoring the Cajun Switch (Layer 2 & Layer 3)
Table 16-4. Event and Shutdown Log Entries (Continued)
Entry
Definition
Severity
Displays the severity of the event. The possibilities are:
• Informative
• Warning
• Error
• Severe Error
• Failure
Type
Displays a description of the event type (System start, Status
Change, for example).
Description
Displays a text string that describes the specific event.
6. Click...
•
SEARCH to view the event or shutdown logs. The Event or Shutdown Log
dialog box opens.
•
CANCEL to restore previous settings.
•
CLEAR EVENT LOG to clear the event log settings.
Note: If you have write-access, you can clear the event log by clicking Clear Event
Log. If you have read-access only, this option is not available.
Viewing Event Statistics
To view event statistics:
1. In the Event Subsystem section of the Web Agent, click Event Statistics. The
Event Statistics dialog box opens.
16-6
Cajun P550/P220 Switch Operation Guide
Monitoring the Cajun Switch (Layer 2 & Layer 3)
2. Use Table 16-5 for more information on the event statistics.
Table 16-5. Event Statistics Parameters
Parameter
Definition
Event Log wraps
Displays the number of times the Event Log has wrapped.
This results in the oldest events being overwritten.
Depending on how many events have been sent to the
Event Log and when it was last cleared, the Event Log may
or may not wrap. When the event log wraps the old events
are discarded and replaced with the newest events.
Events dropped due to
overload of event
system
Displays the number of events the Event System has had to
drop to prevent overloading. The Event System paces
events being sent to it to prevent the switch from only
processing events. You can reduce the number of events
being generated by deselecting unwanted events from the
Event Subsystem>Event Configuration dialog box. If
your switch is a Layer 3 switch, you may also want to
disable select protocol event log settings in the Event
Subsystem>Protocol Event Configuration dialog box.
Events dropped due to Displays the number of events the Event System has had to
event system queue full drop due to a full Event System queue. You can reduce the
number of events being generated by deselecting unwanted
events from the Event Subsystem>Event
Configuration dialog box. If your switch is a Layer 3
switch, you may also want to disable select protocol event
log settings in the Event Subsystem>Protocol Event
Configuration dialog box.
Setting Log Size
To set log size:
1. In the Event Subsystem section of the Web Agent window, click Event
Configuration. The Event Management dialog box opens.
2. From the Event Log pull-down menu, select the number of entries you want to
store in each of the switch event logs.
Cajun P550/P220 Switch Operation Guide
16-7
Monitoring the Cajun Switch (Layer 2 & Layer 3)
3. Use Table 16-6 to configure your switch event and shutdown log:
Table 16-6. Event and Shutdown Logs
Log
Purpose
Event Log
A detailed, ongoing record of events that occur in the switch.
This log is stored in memory and is erased if the system shuts
down or reboots.
Shutdown Log
Contains a list of events that occurred before the last switch
shutdown. Because it is stored in nonvolatile memory, this log
is preserved during a switch reboot or shutdown. This list is
designed to help you analyze the events that occurred
immediately prior to a switch shutdown or reset.
4. Use Table 16-7 for a definition of the event classes:
Table 16-7. Event Table
Class
Determines whether or not the switch sends
a notification...
Start
Upon system start.
System
For system events.
Configuration
For each configuration change (for example, enabling
and disabling ports).
Temperature Status
Of temperature status changes. Temperature status
message could precede a switch shutdown, and are often
critical.
Resource
Upon a change in system resources.
Fan Status
Of fan status. Fan failures will eventually lead to
overheating the system. Fan Status message provide a
good early warning for a failure that could eventually
cause the switch to shut down.
Service Port
Status/User Port
Status
Of Port status changes for service and user ports. Set a
port as either service port/user port from the port
configuration page. The purpose of this feature is to allow
you to use different notification level for critical (service
ports), if desired.
Authentication Failure When the switch detects an authentication failure. This is
a security-related feature used to detect unauthorized
SNMP activity.
16-8
Bridge Status
Of changes in bridge status.
Switch Fabric
Of failures in the switch fabric. These are critical failures
and should be monitored closely.
Cajun P550/P220 Switch Operation Guide
Monitoring the Cajun Switch (Layer 2 & Layer 3)
Table 16-7. Event Table (Continued)
Determines whether or not the switch sends
a notification...
Class
OSPF
For OSPF events if OSPF protocol event logging is
enabled.
RIP
For RIP events if RIP protocol event logging is enabled.
LDAP
For LDAP events if LDAP protocol event logging is
enabled.
AppleTalk
For AppleTalk events if AppleTalk protocol event logging
is enabled.
5. Click APPLY to save your changes, or CANCEL to restore previous settings.
Configuring Event Notification
To configure event notification:
1. In the Event Subsystem section of the Web Agent window, click Event
Configuration. The Event Management dialog box opens.
2. In the ID column, click event type. The delivery of event information is enabled
when this type of event occurs.
3. Use Table 16-8 to configure Event Table actions. If no events are selected, no action
will be taken when an event of this event class occurs.
Table 16-8. Event Table Actions
Setting...
Determines...
Log
Event entry entered in event and shutdown
logs.
Trap
SNMP trap message (event notification) sent
to designated trap receivers.
Console
Displays the event information to the
console serial port connected at the switch
front panel.
4. Click APPLY to save your changes, or CANCEL to restore previous settings.
Cajun P550/P220 Switch Operation Guide
16-9
Monitoring the Cajun Switch (Layer 2 & Layer 3)
16-10
Cajun P550/P220 Switch Operation Guide
17
Analyzing Network Performance Using
RMON and Ethernet Statistics (Layer 2 &
Layer 3)
Overview
This chapter and its procedures are common to both Layer 2 and Layer 3 configuration.
Included in this chapter:
❒ Viewing Statistics
❒ Setting Up a Mirror Port
Viewing Statistics
The switch interface provides a variety of statistics that allow you to monitor network
performance and troubleshoot network problems.
To access network statistics:
1. In the Statistics section of the Web Agent window, click Modules & Ports. The
Module Statistics dialog box opens.
2. Click Clear Counters to get a fresh view of the statistics being gathered. This resets
all of the counters to zero, so that you can track the counters from a specific point
forward.
3. In the Module column, click the module identifier to view statistics for a specific
port on this module. The Port Statistics dialog box opens.
4. Click Clear Counters to get a fresh view of the statistics being gathered. This resets
all of the counters to zero so that you can track the counters from a particular point
forward.
5. In the Name column, click the port identifier to view statistics for this specific
port. The Ethernet Interface Statistics dialog box opens.
6. Click either 30 second or 30 minute RMON History Samples. The Ethernet
Interface history statistics window opens.
Cajun P550/P220 Switch Operation Guide
17-1
Analyzing Network Performance Using RMON and Ethernet Statistics (Layer 2 & Layer 3)
7. Use Table 17-1 to interpret the Ethernet Interface statistical values:
Table 17-1. Interpreting Ethernet Interface Statistics
Statistic
Indicates
Actions
Sample
The sample number.
N/A
Interval Start
The date and time this log entry
was made.
N/A
Utilization
Percentage of utilization.
The percentage of available
bandwidth used by traffic.
Bytes
Raw number of octets received at
the interface. Provides some
indication of the amount of
network bandwidth being used.
A sharp increase could indicate a
need to reconfigure the network.
Packets
Counts the raw number of readable
Ethernet packets of legal length
received at the interface.
A sharp increase could indicate a
need to reconfigure the network.
(However, octets are a better
indication of bandwidth
utilization.)
Broadcasts
Broadcast packets are a normal part
of network operation. For example,
IP networks use broadcasts as part
of Address Resolution Protocol
(ARP) to resolve network
addresses.
Uses monitoring to recognize
oncoming broadcast storms.
Broadcast storms occur when
stations are creating traffic that
generates more traffic.
Possible cause: Broadcasts cause
every host on a network segment
to process the packet.
Possible actions:
• To prevent broadcast storms,
use VLANs to limit the area of
the network that each
broadcast packet affects. In
general, each VLAN creates a
separate broadcast domain.
More VLANs mean less
proliferation of broadcast
packets.
• Monitor the broadcast rate of
your network during normal
operation.
• Establish a baseline.
• Use Rate Limiting to reduce
broadcasts.
17-2
Cajun P550/P220 Switch Operation Guide
Analyzing Network Performance Using RMON and Ethernet Statistics (Layer 2 & Layer 3)
Table 17-1. Interpreting Ethernet Interface Statistics (Continued)
Statistic
Indicates
Actions
Multicasts
Normal during network operation.
For example, multicast packets are
to send target video streams to
selected stations on the network,
and are part of the operation of the
Spanning Tree Protocol.
Possible causes:
• Too many multicast frames can
consume valuable network
bandwidth.
Possible actions:
• Using Intelligent Multicasting
can significantly reduce
multicast traffic on individual
ports.
• Segmenting the network into
smaller VLANs and routing
between them can also help
control proliferation of
multicasts.
CRC (Cyclic
Redundancy
Check) or
Alignment
Errors
Counts of the number of times that
the number of bits in a frame
cannot be divided by 8 (that is,
cannot be broken into legal octets),
and that contain a Frame Check
Sequence validation error. Typically
caused by turning equipment on or
off, and by noise on twisted pair
segments. These errors can also
result from configuring a network
that does not comply with 802.3
standards. In a standards-compliant
Ethernet network, CRC or
alignment errors represent transit
and receive bit errors.
The Ethernet standard allows 1 in
108 bit error rate, but you should
expect performance to be less than
1 in 1012 packets. Rates in excess of
one error per one thousand packets
indicate a serious problem.
Possible causes:
• Defect at the transmitting
station.
• Turning equipment on or off.
This should cause only a few
errors.
• Damaged cables.
• Interference on network
cabling.
Possible actions (respectively):
• Use port error statistics to
isolate the problem. Check the
transceiver or adapter card
connected to the port where
the problem seems to
originate. Also check the cable
and cable connections for
damage.
• Normal operation, no action
required.
• Check cables for damage.
• Inspect cable runs to see if they
are too close to noisy devices,
and check for problems with
network devices.
Cajun P550/P220 Switch Operation Guide
17-3
Analyzing Network Performance Using RMON and Ethernet Statistics (Layer 2 & Layer 3)
Table 17-1. Interpreting Ethernet Interface Statistics (Continued)
Statistic
Indicates
Actions
Undersized
Packets
Count of packets with a valid CRC
that violate the minimum Ethernet
packet size.
Possible cause: Device or
application creating non-compliant
packets.
These malformed packets are most
often the result of software errors.
Possible action: Use a network
analyzer to identify the transceiver
which at the source of the problem.
If necessary, replace transceiver,
network adapter, or station.
Count of packets with a valid CRC
that violate the maximum Ethernet
packet size.
Possible cause: Device or
application creating non-compliant
packets.
These malformed packets are most
often the result of software errors.
Possible action: Use a network
analyzer to identify the transceiver
which at the source of the problem.
If necessary, replace transceiver,
network adapter, or station.
Fragments or runts result from
normal collision activity in
Ethernet networks. A runt packet is
an incomplete packet that is long
enough to be detected by an
Ethernet interface.
Possible causes:
Oversized
Packets
Fragments
• Interference on network
cabling.
• A Transceiver attached to the
Repeater is generating Signal
Quality Errors (SQE).
Possible actions (respectively):
• Inspect cable runs to see if they
are too close to noisy devices,
and check for problems with
network devices.
• Disable SQE on the Transceiver.
17-4
Cajun P550/P220 Switch Operation Guide
Analyzing Network Performance Using RMON and Ethernet Statistics (Layer 2 & Layer 3)
Table 17-1. Interpreting Ethernet Interface Statistics (Continued)
Statistic
Indicates
Actions
Jabbers
Jabbers indicate that devices on the
networks are sending improper
electrical signals. Because Ethernet
uses electrical signalling to
determine whether or not it is okay
to transmit, a jabber condition can
halt all traffic on a segment.
Possible causes:
• Bad network interface card
• Repeater network with looped
traffic
Possible actions (respectively):
• Replace network interface card.
• Rewire network to remove the
loop.
Collisions
(half-duplex
links only)
Counts number of times that
packets have collided on the
network. Collisions increase as
network use of shared segments
increases. Therefore, if the collision
rate increases without an increase
of network use, it might indicate a
problem. Guidelines for appropriate
collision rates are:
• 10 percent: Normal collision
rate for shared Ethernet
segment.
• 30 percent: Collisions begin to
interfere with performance.
• 70 percent: Practical limit for
network to remain
functioning.
A full-duplex link should not show
collision activity.
In a switched network, collisions
should be rare, unless your
switched segments attach to
multiple ends stations (a perfectly
legal configuration option).
Cajun P550/P220 Switch Operation Guide
Possible causes:
• Busy network
• Broken adapter (not listening
before broadcasting)
• Network loop
Possible actions (respectively):
• If you have multiple stations on
a switch segment, reconfigure
network into segments with
fewer stations.
• Isolate each adapter to see if
the problem ceases.
• Activate spanning tree to
resolve loops automatically.
• Ensure that there are no
connections to the same
station where both
connections are
simultaneously active.
17-5
Analyzing Network Performance Using RMON and Ethernet Statistics (Layer 2 & Layer 3)
Setting Up a Mirror Port
Configuring an RMON mirror port allows you to mirror traffic from a port or set of ports
to a specific mirror port, where you can attach a sniffer or RMON probe. The switch
supports a single mirror port and a single source port for each switch fabric port. For
example, 20-port Fast Ethernet cards have two fabric ports (one for ports 1 through 10,
one for ports 11 through 20). You can set up a single source port and a single mirror port
for each set of ports associated with a fabric port. You can also choose to mirror all traffic
from a particular fabric port to the mirror port, or set up multiple source ports to mirror
traffic to a single mirror port.
Packets addressed to the CPU, such as pings, are duplicated out of the mirror port.
Tagged packets that are sent into a source port with a VLAN ID to which the source port
is not bound, are not transmitted out the mirror port. VLAN tag information is not
propagated to the mirror port.
Note: To prevent unnecessary traffic flooding on a mirror port, put the mirror port
on the same VLAN as the source port.
To set up an RMON mirror port:
1. In the Port Mirroring section of the Web Agent window, click Sampling. The
Port Mirroring Information dialog box opens.
2. Use Table 17-2 to view your port mirroring information.
17-6
Cajun P550/P220 Switch Operation Guide
Analyzing Network Performance Using RMON and Ethernet Statistics (Layer 2 & Layer 3)
Table 17-2. Port Mirroring Information Parameters
Parameter
Definition
Configure Source
Select the configuration source port. Provides a link to the Port
Mirroring Configuration dialog box.
Source Port
Displays the port under investigation.
Mirror Port
Displays the port that transmits mirrored data.
Mirror Port Name
Displays the name of the mirror port device.
Piggyback Port
Displays the name of the port that is used for bi-directional port
mirroring. When used as a mirror port, it is unavailable for other
uses.
Sampler Type
Displays the speed of sampling that is performed for source port
traffic.
Max Packets per
Second
Displays the maximum number of packets per second that are
served by the mirror port.
3. In the Configure Source column, click a source port for the traffic. The Port
Mirroring Configuration dialog box opens.
4. Use Table 17-3 to select options for the mirror port:
Table 17-3. Port Mirroring Configuration Parameters
Parameter
Definition
Source Port(s)
List of available selections. Enables you to select a particular source
port associated with the selected fabric port. You can also select all
ports.
Note: To mirror inbound traffic only, select a source port and a
mirror port, not a piggyback port.
Mirror Port
Port from which you want to send the traffic. This port can be on
another module in the switch. Once a specific port associated with a
fabric port has been designated a mirror port, other ports associated
with that fabric port no longer appear on the selection list.
Cajun P550/P220 Switch Operation Guide
17-7
Analyzing Network Performance Using RMON and Ethernet Statistics (Layer 2 & Layer 3)
Table 17-3. Port Mirroring Configuration Parameters (Continued)
Parameter
Definition
Piggyback Port Port used to enable bi-directional port mirroring. If no piggyback
port is specified, only received traffic from the source port will go to
the mirror port. The piggyback port should have the same
bandwidth as the source port. Only one port per fabric can be used
as a piggyback port. Sampling rates have no effect on transmitted
information.
Considerations:
• You cannot use a port that has been designated as a piggyback
port.
• Once a port has been designated as a piggyback port, the link
light is turned on, even if there is no connection on the selected
port.
• The piggyback port is displayed in place of the source port in the
VLAN menu.
• If the source and piggyback ports are at a higher bandwidth than
the mirror port’s bandwidth, the traffic on the source port may
exceed the bandwidth that the mirror port can handle.
• The piggyback port will always show that it is using multi-layer
tagging.
• A spanning tree topology change occurs when you change a
piggyback port.
• Piggyback ports display in certain views of the Cajun P550
Switch user interface where you typically expect to find
information about a source port.
For example, the VLAN Switch Ports list, which displays the list
of ports associated with a VLAN, includes the piggyback port but
not the source port.
In the Intelligent Multicast Session Search and Static Multicast
Sessions views, the piggyback port displays in place of the
source port when piggyback port mirroring is enabled.
Note: To mirror outbound traffic only, select a source, mirror, and
piggyback port. Set the sampling to disable. Since disabling sampling
only applies to inbound traffic, only outbound traffic is received.
Sampler Type
Selects how often you want the mirror port to receive traffic
samples:
• Always - sends all samples.
• Periodic - sends samples at the interval described below.
• Disabled - shuts off traffic samples to the mirror port, but keeps
the association intact.
Sampling
Interval
Displays the number of packets per second that are served by the
mirror port.
Note: Sampling only applies to inbound traffic.
17-8
Cajun P550/P220 Switch Operation Guide
18
Downloading New Operational Code to
the Switch (Layer 2 & Layer 3)
Overview
This chapter and its procedures are common to both Layer 2 and Layer 3 configuration.
Included in this chapter:
❒ Upgrading from a Previous Version
❒ Downloading the Image
❒ Selecting the Image for Reboot
❒ Resetting the Switch
Upgrading from a Previous Version
Version 4.0 of the Cajun P550 switch handles configuration files differently from version
3.0 and 3.1. In version 4.0, all configuration information is contained in a startup.txt
file that is stored in NVRAM on the switch. Previous versions used *.cfg files that
contained information about multiple types of configuration data.
In many cases, when you upgrade the embedded software of the switch from version 3.0
or 3.1 to version 4.0, the earlier version of the software is located in the APP1 memory
location on the switch, and you install the version 4.0 software image into APP2. If you
want to retain version 3.0 or 3.1 on the switch for a potential downgrade: before you
decide where to install the version 4.0 software image, find out which APP you booted
from, then load the new image into the other APP. For example, if you boot version 3.0
or 3.1 from APP1, download version 4.0 into APP2.
Cajun P550/P220 Switch Operation Guide
18-1
Downloading New Operational Code to the Switch (Layer 2 & Layer 3)
Saving the Previous Configuration
Before you upgrade your system, save your previous configuration to a file or directory
on a TFTP server.
To save your current configuration through the Web Agent:
1. In the Memory Subsystems section of the Web Agent window, click TFTP
Update. The TFTP Update dialog box opens.
2. In the TFTP Server IP Address field, enter the IP address of the TFTP server to
which you will save the previous configuration.
3. In the File Name field, enter a file name for the configuration file.
4. From the TFTP Target Section pull-down menu, select Save Configuration.
5. Click Update in Perform Update Now.
6. Click Status in Get Status of Most Recent Update to ensure that the
configuration file was saved properly.
To save your current configuration through the command line on version 3.0 or 3.1:
Enter the following command to save your configuration to a file on a TFTP server:
download save_cfg <IP address> <file name>
where <IP address> is the IP address of the TFTP server where you will save the
software and <file name> is the name you provide for the configuration file.
Downloading the Image
To download the version 4.0 software image from a TFTP server to an APP location
through the Web Agent:
1. In the Memory Subsystems section of the Web Agent window, click TFTP
Update.
2. In the TFTP Server Address field, enter the IP address of the TFTP server that has
the 4.0 version of the switch software.
3. In the File Name field, enter the name of the file to download:
18-2
•
Enter m2200-v4.0.0.bin to download version 4.0 for the Cajun P220 switch
(Layer 2)
•
Enter m5500-v4.0.0.bin to download version 4.0 for the Cajun P550 switch
(Layer 2)
•
Enter m5500r-v4.0.0.bin to download version 4.0 for the Cajun P550R switch
(Layer 3)
Cajun P550/P220 Switch Operation Guide
Downloading New Operational Code to the Switch (Layer 2 & Layer 3)
4. From the TFTP Target Section pull-down menu, select the download location.
For example, select APP2 to download the new version to APP2 on the switch. If
version 3.0 or 3.1 is installed in APP1, download version 4.0 to APP2.
5. Click Update in Perform Update Now.
6. Optional: Click Status in Get Status of Most Recent Update to ensure that the
new image downloaded properly.
To download the version 4.0 software image to an APP location on the switch through
the command line on version 3.0 or 3.1:
1. Recommended: Find the location where you want to save the image by entering
the following command at the system prompt:
fep get
This command reads and displays information about the content stored in
locations, such as APP1 and APP2, on the switch. If version 3.0 or 3.1 is installed in
APP1, install version 4.0 in APP2.
2. Download the embedded software to the specified APP location by entering the
following command at the system prompt:
download <APPname> <IP address> <file name>
where
❒ <APPname> is the location in flash memory on the switch where you will
download the new image.
❒ <IP address> is the IP address of the server from which you download the new
image
❒ <file name> is the name of the file that contains the new image. Enter one of the
following file names:
•
m2200-v4.0.0.bin to download version 4.0 for the Cajun P220 switch (Layer
2)
•
m5500-v4.0.0.bin to download version 4.0 for the Cajun P550 switch (Layer
2)
•
m5500r-v4.0.0.bin to download version 4.0 for the Cajun P550R switch (Layer
3)
Cajun P550/P220 Switch Operation Guide
18-3
Downloading New Operational Code to the Switch (Layer 2 & Layer 3)
Selecting the Image for Reboot
To view and power up the downloaded image from the Web Agent:
1. In the Memory Subsystems section, click FEPROM Contents. The FEPROM
dialog box opens.
2. In the Power Up/Reset Image pull-down menu, select the APP location into
which you downloaded version 4.0 and click APPLY.
To set the location from which you download the software through the command line,
enter the following command at the system prompt on version 3.0 or 3.1:
fep set <APPname>
where <APPname> is the APP location in flash memory on the switch that contains the
new image.
Resetting the Switch
To reset the switch through the Web Agent after downloading version 4.0:
1. In the System Information section of the Web Agent, click System Reset.
2. In response to the question, Do you want to reset the switch? click Yes.
The switch resets with the selected version.
To reset the switch through the command line interface after downloading version 4.0:
1. At the system prompt, enter the following command:
reset
2. In response to the question, Are you sure you want to continue? enter Y.
The switch resets with the selected version.
18-4
Cajun P550/P220 Switch Operation Guide
A
FCC Notice
FCC Notice — Class A Computing Device:
This equipment generates, uses, and may emit radio frequency energy. The equipment has
been type tested and found to comply with the limits for a Class A digital device pursuant to
Part 15 of FCC rules, which are designed to provide reasonable protection against such radio
frequency interference. Operation of this equipment in a residential area may cause
interference in which case the user at his own expense will be required to take whatever
measures may be required to correct the interference. Any modifications to this device unless expressly approved by the manufacturer - can void the user's authority to operate
this equipment under part 15 of the FCC rules.
VCCI Notice — Class A Computing Device:
This equipment is in the Class A category (information equipment to be used in commercial
and/or industrial areas) and conforms to the standards set by the Voluntary Control Council
for Interference by Data Processing Equipment and Electronic Office Machines aimed at
preventing radio interference in commercial and/or industrial areas. Consequently, when
used in a residential area or in an adjacent area thereto, radio interference may be caused to
radios and TV receivers. Read the instructions for correct handling.
CE Notice — Class A Computing Device:
Warning!
This is a Class A product. In a domestic environment, this product may cause radio
interference, in which case the user may be required to take adequate measures.
Achtung!
Dieses ist ein Gerät der Funkstörgrenzwertklasse A. In Wohnbereichen können bei Betrieb
dieses Gerätes Rundfunkstörungen auftreten, in welchen Fällen der Benutzer für
entsprechende Gegenmaßnahmen verantwortlich ist.
Avertissement!
Cet appareil est un appareil de Classe A. Dans un environnement résidentiel cet appareil
peut provoquer des brouillages radioélectriques. Dans ce cas, il peut être demandé à
l'utilisateur de prendre les mesures appropriées.
Cajun P550/P220 Switch Operation Guide
A-1
A- 2
Cajun P550/P220 Switch Operation Guide
B
Supported MIB Groups
MIBs Supported by Layer 2 and Layer 3 Switches
The following section lists, by protocol, public and private Management Information Bases
(MIBs) supported by the Cajun P220, Cajun P550, and Cajun P550R switches. Note that all
MIBs supported by Layer 2 switches also are supported by the Layer 3 switch. For
information about additional MIBs supported by the Cajun P550R, refer to MIBs Supported
by the Layer 3 Switch on page B-2.
IPX Interface MIBs
The following public and private MIBs define the attributes of IPX interfaces.
The Novel MIB is not currently supported
Private IPX Interface MIBs
The following private IPX interface MIBs are supported:
•
cjnipxifmgmt.mib
•
cjnipx.mib
•
cjnipxrip.mib
•
cjnipxsap.mib
Prominet MIB
The following components of the private Prominet MIB are supported:
•
ProminetMIB.txt
•
cjnSwitchRoot.mib
•
cjnRoot.mib
Cajun P550/P220 Switch Operation Guide
B-1
Supported MIB Groups
IEEE 802.3 MAU Management
RFC 1155.smi is supported.
IEEE 802.3 Statistics Group
RFC 1398.mib is supported.
Bridge MIB
RFC 1493.mib is supported.
SNMPv2
RFC 1907.mib is supported.
RMON
RFC 1757.mib is supported.
MIBs Supported by the Layer 3 Switch
The following section lists, by protocol, public and private Management Information Bases
(MIBs) supported by the Cajun P550R switch, the Layer 3 switch. For information about
additional MIBs supported by the Cajun P550R switch, refer to MIBs Supported by Layer 2
and Layer 3 Switches on page B-1.
RIP Version 1.0 and 2.0
Standard MIB
RFC 1724 is supported.
Private MIB
The private MIB, cjniprip.mib is supported.
B-2
Cajun P550/P220 Switch Operation Guide
Supported MIB Groups
OSPF Version 2.0
Standard MIB
RFC 1850 is supported.
Private MIB
The private MIB cjnospf.mib is supported.
VRRP
Standard MIB
The current draft of the Virtual Redundancy Router Protocol (VRRP) MIB is supported:
draft-ietf-vrrp-mib-04.mib.
Private MIB
The private cjniplrrp.mib is supported.
IGMP
Standard MIB
The current draft of the Internet Group Membership Protocol (IGMP) MIB is supported:
draft-ietf-idmr-igmp-mib-07.mib.
Private MIB
The private cjnigmp.mib is supported.
IP Interface
The private cjhnipifmgmt.mib is supported.
Cajun P550/P220 Switch Operation Guide
B-3
Supported MIB Groups
IP Version 4.0 and Services
Standard MIB
The following standard MIBs for Internet Protocol version 4.0 and services are supported:
•
RFC 1213.mib
•
RFC 2011.mib
•
RFC 2012.mib
•
RFC 2013.mib
Private MIB
The following private MIBs are supported for Internet Protocol version 4.0 and services:
•
cjnipv4.mib
•
cjnipv4serv.mib
IP Forwarding/Route Table
Standard MIB
RFC 2096.mib is supported.
Private MIB
The private cjnipfwd.mib is supported.
DVMRP
Standard MIB
The current draft of the DVMRP MIB is supported: draft-thaler-dvmrp-mib-9.mib.
Private MIB
The private cjndvmrp.mib is supported.
B-4
Cajun P550/P220 Switch Operation Guide
Supported MIB Groups
AppleTalk
Standard MIB
RFC 1243.mib is supported.
Private MIB
The private cjnatalk.mib is supported.
IP Access List
The private MIB that defines IP access list format, cjnipalist.mib, is supported.
Policy Capability MIB for LDAP
The private MIB that defines policy capabilities for the Lightweight Directory Access Protocol
(LDAP), cjnpolicycap.mib, is supported.
Cajun P550/P220 Switch Operation Guide
B-5
Supported MIB Groups
B-6
Cajun P550/P220 Switch Operation Guide
Index
Numerics
10/100 port
auto negotiation speed/duplex advertisement , 3-11
10/100 port parameter
auto-negotiation mode, 3-11
category, 3-11
duplex mode, 3-11
flow control mode, 3-11
name, 3-11
port PACE priority, 3-12
rate limit burst size, 3-12
rate limit mode, 3-12
rate limit rate, 3-12
speed mode, 3-11
10Base-T crossover patch cables, 3-5
10-port 100Base-FX, 1-4
12-port 10/100Base-TX, 1-4
3COM
Virtual LAN trunking modes, 3-16
3Com mapping table
non-VLAN switch port parameters , 3-20
switch port configuration parameters, 3-16
3Com SuperStack, parameters
automatic VLAN creation, 3-21
port VLAN, 3-21
trunk mode, 3-21
VLAN bindings, 3-21
3COM trunked ports, 12-8
A
AARP invalid PDU
AppleTalk global statistics, 10-12
AARP reply rx
AppleTalk global statistics, 10-12
AARP reply tx
AppleTalk global statistics, 10-12
AARP req rx
AppleTalk global statistics, 10-12
AARP req tx
AppleTalk global statistics, 10-12
access
SNMP communities parameters, 3-23
access level
configuring SNMP communities, 3-24
access list
activating, 7-14
AppleTalk NBP filter parameters, 10-8
AppleTalk zone filter parameters, 10-10
access list name
IP access list parameters, 7-9, 7-10
access list rules
IP interface, 7-9
access lists
IP interface, 7-8
access rule index
IP access list parameters, 7-9, 7-10
access type
IP access list parameters, 7-9, 7-10
active alarm table
viewing, 16-3
active alarms
checking, 16-3
active backpressure, 3-11
add IP interface parameters
admin. state, 7-2
ICMP redirect, 7-3
interface, 7-2
IP routing, 7-3
MAC format, 7-3
mask, 7-2
multicast protocol, 7-3
NetBIOS UDP rebroadcast, 7-3
network address, 7-2
OSPF, 7-3
proxy ARP, 7-3
RIP, 7-3
VLAN, 7-2
VRRP, 7-3
adding a user, 3-6
password, 3-6
user logins, 3-6
user name, 3-6
adding address forward table entries manually, 14-6
adding ports to a hunt group, 12-14
addr owner override
VRRP configuration parameters, 7-44
address age time
definition, 14-1
address forwarding table, 14-1
adding entries manually, 14-6
capacity, 14-4
MAC addresses, 2-4
Index 1
address forwarding table parameters
group, 14-5
index, 14-5
MAC address, 14-5
persistence, 14-5
port, 14-5
priority, 14-5
status, 14-5
TblInst, 14-5
valid, 14-5
address forwarding table, persistence parameters
ageout, 14-6
permanent , 14-6
address mask
DVMRP interface statistical parameters , 7-33
address table
configuring hash table auto increment, 14-3
configuring hash table size, 14-3
configuring instance IDs, 14-2
address table instance
delete all invalid learned entries, 14-3
delete all learned entries, 14-3
address table instance entry type
learned , 14-2
management, 14-2
self, 14-2
address table instance hash table
auto increment, 14-3
size, 14-3
address table instance parameters
bucket info, 14-3
entry type, 14-2
entry validity, 14-3
hash table, 14-3
total number of entries, 14-2
VLAN association, 14-2
address table sizes
controlling reconfiguration, 14-2
address table sizing
definition, 14-1
address table, age timer
configuring, 14-1
address table, super age timer
configuring, 14-1
address tables
segmented, 2-4
admin
SNMP security level, 3-24
admin state
AppleTalk interface parameters, 10-4
IPX interface, 4-5
admin. state
add IP interface parameters, 7-2
IP interface parameters, 7-6
2 Index
adv. address
IRDP parameters, 7-46
advertisement
OSPF summaries parameters, 9-7
advertisement life time
IRDP parameters, 7-47
advertisement timer
VRRP configuration parameters, 7-44
advertisements received
VRRP statistical parameters, 7-45
advertisements sent
VRRP statistical parameters, 7-45
AFT address table, 14-2
age
LSA detail, 9-16
OSPF link state database parameter , 9-14
age interval
Layer 3 cache configuration, 11-2
age timer
buffer management table parameters, 13-3
aged entries
forwarding cache (FE) parameters, 11-6
ageout
address forwarding table, persistence parameters,
14-6
persistence entry, 14-5
aggregating bandwidth, 12-11
aging
Layer 3 cache configuration, 11-2
aging interval multiplier
IPX SAP interface parameters, 6-2
alarms
log size, setting, 16-7
system events, activating, 16-7
alarms, event log
definition, 16-8
alarms, shutdown log
definition, 16-8
all module ports configuration, 3-12
all ports configuration, gigabit ports, 3-8
allow learning
non-VLAN switch port parameters, 3-19
switch port configuration parameters, 3-15
always be group membership querier
IGMP interface parameters, 7-17
AppleTalk
creating an NBP filter, 10-8
ethernet versions supported , 10-1
event class parameters, 16-9
AppleTalk ARP cache table
viewing, 10-15
AppleTalk ARP cache table statistics
interface, 10-16
MAC address, 10-16
network range, 10-15
node, 10-16
TTL, 10-16
type, 10-16
AppleTalk global routing
enabling, 10-2
AppleTalk global statistics
AARP invalid PDU, 10-12
AARP reply rx , 10-12
AARP reply tx, 10-12
AARP req rx , 10-12
AARP req tx, 10-12
Bcast error, 10-12
checksum error, 10-12
config addr error, 10-12
config zone error, 10-12
DDP forward counter, 10-12
DDP input counter, 10-12
DDP local counter, 10-12
DDP output counter, 10-12
DDP output long, 10-12
DDP output short, 10-12
echo reply rx, 10-12
echo req rx , 10-12
echo req tx, 10-12
no client, 10-12
no route, 10-12
RTMP RDR Rx, 10-12
RTMP RDR Tx, 10-13
RTMP Rq Rx, 10-12
RTMP Rq Tx, 10-12
RTMP Rsp Rx, 10-12
RTMP Rsp Tx, 10-12
short PDU in error, 10-12
too long, 10-12
too short, 10-12
TTL expired, 10-12
viewing , 10-11
Zip Ext Reply Rx, 10-13
Zip Ext Reply Tx, 10-13
Zip GNI Rq Rx, 10-13
Zip GNI Rq Tx , 10-13
Zip GNI Rsp Rx , 10-13
Zip GNI Rsp Tx, 10-13
Zip Query Rx, 10-13
Zip Query Tx , 10-13
Zip Reply Rx, 10-13
Zip Reply Tx, 10-13
AppleTalk interface
deleting, 10-5
AppleTalk interface parameters
admin starte, 10-4
default zone, 10-4
encapsulation type, 10-3
interface, 10-3
metric, 10-3
network number, 10-4
network range end, 10-3
network range start, 10-3
node, 10-4
VLAN, 10-3
AppleTalk interface statistics
interface, 10-13
network number, 10-13
network range, 10-13
node, 10-13
seed, 10-14
state, 10-14
AppleTalk interface, creating, 10-3
AppleTalk interface, editing, 10-4
AppleTalk NBP filter
editing, 10-8
AppleTalk NBP filter parameters
access list, 10-8
interface, 10-8
name, 10-8
type, 10-8
AppleTalk NBP table
viewing, 10-17
AppleTalk NBP table parameters
index, 10-17
interface, 10-17
name, 10-17
type, 10-17
zone, 10-17
AppleTalk overview , 10-1
AppleTalk protocols
supported, 10-1
AppleTalk route table
viewing, 10-14
AppleTalk route table statistics
current number of routes, 10-15
interface, 10-15
metric, 10-14
network range, 10-14
next hop, 10-14
owner, 10-14
peak number of routes, 10-15
state, 10-14
zones, 10-15
AppleTalk route table statistics, viewing, 10-15
AppleTalk routing overview , 10-1
AppleTalk routing, configuring, 10-2
AppleTalk static route
creating, 10-6
deleting, 10-7
Index 3
editing, 10-7
network number, 10-6
network range end, 10-6
network range start, 10-6
node, 10-6
type, 10-6
zone, 10-6
AppleTalk statistics
viewing , 10-11
AppleTalk zone filter
creating, 10-9
editing, 10-10
AppleTalk zone filter parameters
access list, 10-10
interface, 10-10
name, 10-10
type, 10-10
AppleTalk zone table
viewing , 10-16
AppleTalk zone table statistics
current number of zones, 10-17
index, 10-16
name, 10-16
network range, 10-16
peak number of zones, 10-17
AppleTalk zone table statistics, viewing, 10-17
application
multicast session client port parameters , 15-9
multicast session parameters, 15-8
router port display parameters, 15-6
area
LSA detail, 9-15
OSPF interface parameters, 9-4
OSPF summaries parameters, 9-7
OSPF virtual link parameters, 9-6
area ID
OSPF area parameters, 9-3
OSPF link parameters, 9-10
OSPF link state database parameter, 9-14
OSPF link state database search parameters, 9-13
OSPF statistical parameters, 9-9
area type
OSPF area parameters , 9-3
ARP cache
searching, 7-26
ARP cache entries, 7-4
ARP cache search parameters
IP address, 7-27
VLAN, 7-27
AS border route
OSPF global configuration parameters, 9-2
AS border Rtrs
OSPF statistical parameters, 9-9
ASBR, 9-2
4 Index
assignment
Virtual LANs, configuring, 3-16
attached router ID 1 & 2
LSA detail, 9-16
auth key
RIP interface parameters, 8-3
VRRP configuration parameters, 7-44
auth type
RIP interface parameters, 8-3
VRRP configuration parameters, 7-44
authentication
OSPF interface parameters, 9-5
OSPF virtual link parameters, 9-6
authentication failure
event class parameters, 16-8
authentication key
OSPF virtual link parameters, 9-6
auto increment
address table instance hash table parameter , 14-3
auto increment HT size
VLAN configuration parameters, 12-4
auto negotiation speed/duplex advertisement
10/100 port, 3-11
auto-creation of virtual links
OSPF global configuration parameters, 9-2
automatic client pruning
automatic client pruning, 15-5
automatic router pruning
automatic router pruning, 15-5
automatic session pruning
automatic session pruning, 15-5
automatic VLAN creation, 3-17, 12-2
3Com SuperStack parameters , 3-21
Bay Networks System 5000 parameters, 3-21
Cisco Catalyst 5000 parameters, 3-20
switch port configuration parameters, 3-15
auto-negotiation
Fast Ethernet module, 3-10
auto-negotiation mode
10/100 port parameter, 3-11
B
bad advertisements received
VRRP statistical parameters, 7-45
bad packets received
IPX RIP interface statistical parameters, 5-6
IPX SAP interface statistical parameters, 6-8
RIP statistical parameters, 8-4
bad routes received
RIP statistical parameters, 8-4
baud rate
console serial port settings, 3-25
Bay Networks System 5000, parameters
automatic VLAN creation, 3-21
port VLAN, 3-21
trunk mode, 3-21
VLAN bindings, 3-21
Bcast error
AppleTalk global statistics, 10-12
BDR address
OSPF link parameters, 9-10
BDR choice
OSPF neighbors parameters, 9-12
bind to all
Virtual LAN binding options, 3-17
bind to received
Virtual LAN binding options, 3-17
binding options
Virtual LANs, 3-17
binding type
VLAN switch port table parameters, 12-5
blocking state (spanning tree bridge port), 12-10
BOOTP client
IP helper address parameters, 7-51
BOOTP relay agent, 7-15
BOOTP server
IP helper address parameters, 7-51
BOOTP/DHCP in discards
IP routing global statistics, 7-24
BOOTP/DHCP in hops exceeded
IP routing global statistics, 7-24
BOOTP/DHCP in requests
IP routing global statistics, 7-24
BOOTP/DHCP in responses
IP routing global statistics, 7-24
BOOTP/DHCP out requests
IP routing global statistics, 7-25
BOOTP/DHCP out responses
IP routing global statistics, 7-25
BOOTP/DHCP relay agent
IP global configuration parameters, 7-4
border Rtrs
OSPF statistical parameters, 9-9
bridge forward delay
spanning tree bridge level parameters, 12-9
bridge hello time
spanning tree bridge level parameters, 12-8
bridge max age
spanning tree bridge level parameters, 12-8
bridge port
spanning tree bridge port parameters, 12-9
bridge port parameters
bridge port, 12-9
designated bridge, 12-10
designated cost, 12-10
designated port, 12-10
designated root, 12-10
forward transitions, 12-10
name, 12-9
port, 12-9
state, 12-10
bridge ports
configuring, 12-9
bridge status
event class parameters, 16-8
broadcast packets
Ethernet interface statistical parameters , 17-2
bucket info
address table instance parameters, 14-3
buffer and queue management, overview, 1-14, 2-8
buffer detailed configuration parameters
memory, 13-3
buffer management, 1-14, 2-8
buffer management parameters
fabric port buffers, 13-3
physical port buffers, 13-3
buffer management table parameters
age timer, 13-3
congestion drops, 13-4
high and normal overflow drops, 13-4
high and normal stale drops, 13-4
high priority allocation, 13-4
high priority service ratio, 13-4
priority threshold , 13-4
buffer space, 1-14, 2-9
buffers
managing, 13-2
bytes
Ethernet interface statistical parameters , 17-2
C
CajunDocs CD , xvii
category
10/100 port parameter, 3-11
gigabit port parameters, 3-8
CGMP packet reception statistics
CGMP snooping parameters , 15-18
CGMP snooper, configuring/viewing
configuring CGMP snooper, 15-18
CGMP snooping, 15-3
CGMP snooping overview, 15-3
CGMP snooping parameters
CGMP packet reception statistics, 15-18
enable state, 15-18
intelligent multicast session statistics, 15-18
checking active alarms, 16-3
checksum
IPX datagram fields, 4-2
Index 5
LSA detail, 9-16
OSPF link state database parameter, 9-14
checksum error
AppleTalk global statistics, 10-12
Cisco Catalyst 5000 parameters
port VLAN, 3-20
Cisco Catalyst 5000, parameters
automatic VLAN creation, 3-20
trunk mode, 3-20
VLAN binding, 3-20
VTP snooping, 3-20
CLI
regaining access, 3-27
CLI configuration
supervisor module, 3-2
client port
intelligent multicast session search parameters,
15-7
multicast session parameters, 15-8
client pruning timer
client pruning timer, 15-5
clients per VLAN, displaying, 15-17
collisions, 17-5
communities
configuring SNMP, 3-23
SNMP , 3-23
community string
configuring SNMP, 3-23
SNMP communities parameters, 3-23
comparison value
Layer 3 route cache search parameters, 11-5
config addr error
AppleTalk global statistics, 10-12
config zone error
AppleTalk global statistics, 10-12
configuration
event class parameters, 16-8
invalid copies, 3-49
saving, 18-2
configuration file management
copy destination, 3-48
copy source, 3-48
destination filename, 3-48
save running configuration to startup
configuration, 3-48
source filename, 3-48
TFTP server IP address, 3-48
configuration files, 3-45
configuration revision number
VTP snooping parameters, 3-19
configure, 15-6
configure ports
gigabit module, 3-7
6 Index
configure source
port mirroring information parameters , 17-7
configure static router ports
static router ports, 15-6
configuring
non-VLAN switch ports, 3-19
switch port, 3-14
configuring a Fast Ethernet module, 3-9
configuring a redundant element, 3-44
configuring all VLAN ports, 12-4
configuring an IPX router, 4-3
configuring AppleTalk routing, 10-2
configuring event logs, protocol, 16-4
configuring event notification, 16-9
configuring fast start mode, 3-21
configuring flow control mode
gigabit module, 3-8
configuring hunt groups, 12-12
configuring IGMP, 7-16
configuring IGMP interfaces, 7-17
configuring IGMP snooping, 15-11
configuring IP, 7-1
configuring IP global routing, 7-4
configuring IP interface access lists, 7-8
configuring IP interfaces, 7-5
configuring IPX SAP interfaces, 6-1
configuring multiple interfaces on a VLAN, 7-7
configuring physical port parameters
gigabit ports, 3-8
configuring port name
Fast Ethernet module, 3-9
configuring port VLAN parameters, 3-16
configuring RIP global configuration, 8-1
configuring RMON mirror port, 17-6
configuring service port
gigabit module, 3-8
configuring the address table age timer, 14-1
configuring the address table super age timer, 14-1
configuring the LGMP server, 15-12, 15-14
configuring the PPP console static route, 3-30
configuring the serial port console
PPP console, 3-26
configuring the supervisor module
using the CLI, 3-2
configuring the temperature system , 3-39
configuring thresholds, 16-2
configuring user port
gigabit module, 3-8
configuring VRRP, 7-42
configuring VRRP authentication, 7-44
configuring VTP snooping , 3-18
congestion drops
buffer management table parameters, 13-4
connecting a modem , 3-25
overview, 3-25
console
event table actions, 16-9
console serial port
changing, 3-24
console serial port configuration
PPP (Layer 3 only), 3-24
TTY (Layer 3 and Layer 2), 3-24
console serial port settings, changing
baud rate, 3-25
data bits, 3-25
flow control, 3-25
parity, 3-25
stop bits, 3-25
consumer signal
LDAP statistics, 7-50
contacting Lucent, xx
controller redundancy
enabling, 3-42
controlling address table size reconfiguration, 14-2
conventions, xvii
cooling system status
displaying, 3-40
copy destination
configuration file management, 3-48
copy source
configuration file management, 3-48
copying
configuration
invalid combinations,
3-49
from the switch or server to a configuration file,
3-47
running configuration to startup configuration,
3-47
startup configuration to running configuration,
3-47
to a TFTP server, 3-47
to the switch, 3-47
copying files, 3-49
copying from/to a TFTP server, 3-49
copying source files, 3-47
copying the running configuration, 3-49
copying the startup configuration, 3-49
cost
IP static route parameters, 7-14
OSPF interface parameters, 9-5
CRC alignment errors
Ethernet interface statistical parameters, 17-3
creating a BOOTP/DHCP server entry, 7-15
creating a multinet interface, 7-8
creating a static client port, 15-11
creating a VRRP router, 7-43
creating access rules for filtering traffic between
subnets, 7-12
creating an AppleTalk interface, 10-3
creating an AppleTalk static route, 10-6
creating an AppleTalk zone filter, 10-9
creating an IP interface, 7-2
creating an IPX interface, 4-4
creating an NBP filter
AppleTalk, 10-8
creating an VRRP virtual router, 7-43
creating IP interface access list rules, 7-9
creating IPX RIP filters, 5-2
creating IPX SAP filters, 6-2
creating IPX SAP network filters, 6-5
creating IPX static routes, 4-6
creating IPX static services, 4-7
creating OSPF summaries, 9-7
creating OSPF virtual links, 9-5
creating static ARP entries
IP static route, 7-14
creating static IP routes, 7-14
crossbar, 1-6
features, 2-3
crossbar features, 2-3
crossbar features supported, 1-6
crossbar switch fabric, 2-2
current entries
forwarding cache (FE) parameters, 11-6
current number of routes
AppleTalk route table statistics, 10-15
DVMRP routing statistical parameters, 7-36
IP routing table statistical parameters, 7-26
current number of zones
AppleTalk zone table statistics, 10-17
current power available
power system statistical parameters, 3-40
current system entries
Layer 3 cache configuration, 11-3
D
data bits
console serial port settings, 3-25
day
one-time summer time hours configuration, 3-38
summer time hours configuration, 3-36
DD number
OSPF neighbors parameters, 9-11
DDP forward counter
AppleTalk global statistics, 10-12
DDP input counter
AppleTalk global statistics, 10-12
Index 7
DDP local counter
AppleTalk global statistics, 10-12
DDP output counter
AppleTalk global statistics, 10-12
DDP output long
AppleTalk global statistics, 10-12
DDP output short
AppleTalk global statistics, 10-12
dead interval
OSPF interface parameters, 9-5
OSPF virtual link parameters, 9-6
debug
protocol event log settings, 16-5
default password, 3-3
default route
RIP interface parameters, 8-3
default zone
AppleTalk interface parameters, 10-4
defining the VRRP authentication key
interface, 7-44
deleting
deleting multicast session client ports, 15-8
deleting an AppleTalk interface, 10-5
deleting an IP helper address, 7-52
deleting an OSPF area, 9-3
deleting AppleTalk static routes, 10-7
deleting OSPF summaries , 9-8
deleting OSPF virtual links, 9-6
deleting static client ports, 15-11
description
event and shutdown log entries, 16-6
designated bridge
spanning tree bridge port parameters, 12-10
designated cost
spanning tree bridge port parameters, 12-10
designated forwarder
DVMRP route table parameters, 7-37
designated forwarder(s) table parameters
forwarder cost to source network , 7-38
forwarder network address, 7-38
forwarding interface, 7-38
designated port
spanning tree bridge port parameters, 12-10
designated root
spanning tree bridge port parameters, 12-10
designating a switch fabric, 3-41
destination address
Layer 3 route cache search parameters, 11-5
destination filename
configuration file management, 3-48
destination group address
DVMRP downstream link parameters, 7-41
DVMRP multicast forwarding cache parameters,
7-40
8 Index
DVMRP upstream source parameters, 7-42
IGMP local multicast forwarding cache parameters,
7-31
upstream prune information, 7-41
destination network
IPX datagram fields, 4-3
destination node
IPX datagram fields, 4-3
destination port
Layer 3 route cache search parameters, 11-5
destination port number
DVMRP upstream source parameters, 7-42
destination socket
IPX datagram fields, 4-3
destination subnet
IP access list parameters, 7-10
detail link
OSPF link state database parameter , 9-14
diagnostics
for switch hardware, 3-41
dial-up networking
configuring with a PPP serial port console, 3-28
direction
IPX RIP filter parameters, 5-3
IPX SAP filter parameters, 6-3
IPX SAP network filter parameters, 6-6
disabled (spanning tree bridge port), 12-10
disabling, 12-11
displaying
intelligent multicasting, 15-6
IPX routing global statistics, 4-9
displaying DVMRP global statistics, 7-32
displaying DVMRP multicast forwarding cache, 7-39
displaying DVMRP routing table statistics, 7-35
displaying frame forwarding cache statistics, 11-3
displaying global IP routing statistics , 7-21
displaying IGMP global statistics, 7-28
displaying IGMP local multicast forwarding cache, 7-31
displaying IPX RIP interface statistics, 3-1, 5-5
displaying Layer 3 forwarding cache, 11-5
displaying multicast forwarding cache, 7-39
displaying OSPF neighbors, 9-10
displaying OSPF statistics , 9-8
displaying router ports, 15-6
displaying the cooling system status, 3-40
displaying the DVMRP designated forwarder table, 7-37
displaying the DVMRP routing table, 7-36
displaying the IGMP multicast group table, 7-30
displaying the power system statistics, 3-40
DNS
IP helper address parameters, 7-51
document conventions, xvii
documentation
feedback, xiv
online, xiv
documentation feedback , xiv
domain name
VTP snooping parameters, 3-19
down state (spanning tree bridge port), 12-10
downloaded image
viewing , 18-4
downloading image from TFTP server to an APP
location, 18-2
downloading image to an APP location, 18-3
downstream dependent router
DVMRP route table parameters, 7-37
downstream interface
DVMRP multicast forwarding cache parameters,
7-40
downstream interfaces, 7-41
IGMP local multicast forwarding cache
parameters, 7-31
DR address
OSPF link parameters, 9-10
DR choice
OSPF neighbors parameters, 9-12
DR priority
OSPF interface parameters, 9-4
OSPF neighbors parameters, 9-11
DR router ID
OSPF link parameters, 9-10
duplex mode
10/100 port parameter, 3-11
Fast Ethernet module, 3-10
duplicate add attempts
forwarding cache (FE) parameters , 11-6
DVMRP
configuring, 7-18
displaying global statistics, 7-32
modifying information, 7-19
DVMRP designated forwarder table
displaying, 7-37
DVMRP downstream dependent router
DVMRP supported major/minor version, 7-39
found on interface, 7-39
router is SNMP manageable, 7-39
router network address, 7-39
router received probe from this router, 7-39
router supports generation ID function , 7-39
router supports prune function, 7-39
DVMRP downstream interface
DVMRP downstream link parameters, 7-41
DVMRP downstream link parameters
destination group address, 7-41
DVMRP downstream interface, 7-41
interface is pruned, 7-42
interface type, 7-41
prune expiration, 7-42
source subnetwork , 7-41
DVMRP downstream links, 7-41
DVMRP downstream routers
viewing, 7-38
DVMRP global statistical parameters
graft acknowledgments received, 7-32
graft acknowledgments transmitted , 7-32
graft messages received, 7-32
graft messages transmitted, 7-32
probe message received, 7-32
probe messages transmitted , 7-32
prune messages received, 7-32
prune messages transmitted, 7-32
report messages received, 7-32
report messages transmitted, 7-32
unknown messages codes encountered, 7-32
DVMRP interface
modifying, 7-19
DVMRP interface parameters
interface, 7-20
interface metric, 7-20
interface scope, 7-20
interface type, 7-20
IP address, 7-20
IP address mask, 7-20
tunnel endpoint address, 7-20
DVMRP interface statistical parameters
address mask , 7-33
IGMP querier interface, 7-33
interface, 7-33
invalid routes received , 7-34
metric, 7-33
neighbor DVMRP routers, 7-34
network address, 7-33
next probe message in sec, 7-33
state, 7-33
type, 7-33
unrecognized packets received, 7-34
DVMRP interface statistics
examining, 7-33
DVMRP multicast forwarding cache
displaying, 7-39
DVMRP multicast forwarding cache parameters
destination group address, 7-40
downstream interface, 7-40
invalid flows from upstream, 7-40
next pruned downstream interface to timeout, 7-40
packets forwarded through cache entry, 7-40
source address mask, 7-40
source subnetwork , 7-40
upstream interface, 7-40
Index 9
upstream interface is pruned, 7-40
upstream neighbor router address, 7-40
upstream sources, 7-40
DVMRP neighbor routers
DVMRP supported major/minor version, 7-35
expiration period, 7-35
found on interface, 7-35
neighbor is SNMP manageable, 7-35
neighbor network address, 7-35
neighbor received probe from this router, 7-35
neighbor supports generation ID function, 7-35
neighbor supports MTRACE requests, 7-35
neighbor supports prune function, 7-35
viewing , 7-34
DVMRP parameters
maximum number of routes, 7-19
DVMRP route table parameters
designated forwarder, 7-37
downstream dependent router, 7-37
expiration period in sec, 7-36
reporting router, 7-36
reporting router interface, 7-36
route metric, 7-36
source network, 7-36
source network mask, 7-36
upstream router, 7-37
DVMRP routing statistical parameters
current number of routes, 7-36
number of trigger routes, 7-36
number of valid routes, 7-36
DVMRP routing table
displaying, 7-36
DVMRP routing table statistics
displaying, 7-35
DVMRP supported major/minor version
DVMRP downstream dependent router, 7-39
DVMRP neighbor routers, 7-35
DVMRP upstream interface
upstream prune information, 7-41
DVMRP upstream prune information, 7-40
DVMRP upstream routers
found on interface, 7-37
router cost to source network , 7-37
router network address, 7-37
viewing , 7-37
DVMRP upstream source parameters
destination group address, 7-42
destination port number, 7-42
flow source address, 7-42
flow upstream interface, 7-42
payload protocol type, 7-42
source port number, 7-42
DVMRP upstream sources, 7-42
10 Index
E
echo reply rx
AppleTalk global statistics, 10-12
echo req rx
AppleTalk global statistics, 10-12
echo req tx
AppleTalk global statistics , 10-12
editing an AppleTalk static route, 10-7
editing an AppleTalk zone filter, 10-10
editing an NBP filter, 10-8
editing AppleTalk interfaces, 10-4
editing general system information, 3-33
egress rules
VLAN, 12-2
enable
spanning tree bridge port information parameters,
12-10
enable state
CGMP snooping parameters , 15-18
enable state, 15-5
IGMP snooping, 15-12
LGMP client configuration parameters, 15-16
LGMP server configuration parameters, 15-13
enabling
enabling IRDP, 7-46
enabling AppleTalk global routing, 10-2
enabling controller redundancy, 3-42
enabling fast start mode for all ports on a module, 3-22
enabling fast start mode for individual ports, 3-22
enabling gigabit ports , 3-7, 3-9
enabling SNTP, 3-34
enabling the rate limit mode
Fast Ethernet module, 3-10
enabling VRRP, 7-43
encapsulation type
AppleTalk interface parameters, 10-3
end
one-time summer time hours configuration, 3-37
summer time hours configuration, 3-35
end network
IPX RIP filter parameters, 5-3
entries removed due to route changes
forwarding cache (FE) parameters, 11-6
entries removed due to route deletes
forwarding cache (FE) parameters, 11-6
entry expiration period in sec
IGMP group membership table parameters, 7-31
entry type
address table instance parameters, 14-2
entry validity
address table instance parameters, 14-3
E-option
OSPF neighbors parameters, 9-11
error
protocol event log settings, 16-5
Ethernet interface statistical parameters
broadcast packets, 17-2
bytes, 17-2
CRC alignment errors, 17-3
fragments, 17-4
interval start, 17-2
jabbers, 17-5
multicast packets, 17-3
oversize packets, 17-4
packets, 17-2
sample , 17-2
undersize packets, 17-4
utilization, 17-2
Ethernet interface statistics
configuring, 17-1
Ethernet statistics, RMON
viewing , 17-1
event and shutdown log entries
description, 16-6
event ID , 16-5
log ID, 16-5
severity, 16-6
time stamp , 16-5
type, 16-6
event and shutdown logs
viewing , 16-5
event class parameters
AppleTalk, 16-9
authentication failure, 16-8
bridge status, 16-8
configuration, 16-8
fan status, 16-8
LDAP, 16-9
OSPF, 16-9
resource, 16-8
RIP, 16-9
service port status, 16-8
start, 16-8
switch fabric, 16-8
system, 16-8
temperature status, 16-8
user port status, 16-8
event classes, 16-8
event configuration
accessing, 16-7, 16-9
event ID
event and shutdown log entries, 16-5
event log
definition, 16-8
event log (switch event)
definition, 16-3
event log wraps
event statistics, 16-7
event notification
configuring, 16-9
event statistics
event log wraps , 16-7
events dropped due to event system queue full, 16-7
events dropped due to overload of event system,
16-7
viewing, 16-6
event table actions
console, 16-9
log, 16-9
trap, 16-9
events dropped due to event system queue full
event statistics, 16-7
events dropped due to overload of event system
event statistics, 16-7
examining DVMRP interface statistics , 7-33
examining IP routing table statistics, 7-26
example of routing with Layer 2/3, 1-8
expansion module
optional, 2-1, 2-2
expiration period
DVMRP neighbor routers, 7-35
expiration period in sec
DVMRP route table parameters , 7-36
external
LSA detail, 9-16
external LSA count
OSPF statistical parameters, 9-9
F
fabric port buffers
buffer management parameters, 13-3
fabric ports, 2-3
failed add attempts
forwarding cache (FE) parameters, 11-6
fan status
event class parameters, 16-8
Fast Ethernet module
auto-negotiation mode, enabling, 3-10
configuring, 3-9
rate limit mode, enabling, 3-10
Fast Ethernet module, configuring
auto-negotiation duplex advertisement, 3-10
auto-negotiation speed advertisement , 3-10
duplex mode, 3-10
flow control mode, 3-10
pace priority mode, 3-10
Index 11
port name, 3-9
rate limit burst size, 3-10
rate limit rate, 3-10
service port, 3-9
speed mode, 3-10
user port, 3-9
fast start
switch port configuration parameters, 3-15
fast start mode
configuring, 3-21
fast start mode (all ports)
enabling, 3-22
fast start mode (individual ports)
enabling, 3-22
fault
protocol event log settings, 16-5
fault tolerance, 1-13
fault-tolerant switch fabric
designating , 3-41
features
crossbar, 2-3
switch, 2-1, 2-2
files
copying, 3-49
startup.txt, 3-45
filter/suppress
IPX RIP filter parameters, 5-3
IPX SAP filter parameters , 6-4
IPX SAP network filter parameters, 6-6
filtering
index, 14-5
MAC address, 14-5
persistence, 14-5
port, 14-5
priority, 14-5
filtering on the MAC address, 14-4
filtering on the VLAN , 14-4
filtering traffic between subnets, 7-12
FIRE fabric port
frame forwarding statistical parameters , 11-4
flow control
console serial port settings, 3-25
flow control mode
10/100 port parameter, 3-11
Fast Ethernet module, 3-10
gigabit port parameters, 3-9
flow source address
DVMRP upstream source parameters, 7-42
flow upstream interface
DVMRP upstream source parameters, 7-42
forward address
LSA detail, 9-16
forward delay
spanning tree bridge level parameters, 12-9
12 Index
forward transitions
spanning tree bridge port parameters, 12-10
forwarder cost to source network
designated forwarder(s) table parameters, 7-38
forwarder network address
designated forwarder(s) table parameters, 7-38
forwarding cache
configuring, 11-1
displaying, 11-5
forwarding cache (FE) parameters
aged entries, 11-6
current entries, 11-6
duplicate add attempts, 11-6
entries removed due to route changes, 11-6
entries removed due to route deletes, 11-6
failed add attempts, 11-6
lookup hits, 11-6
lookup levels, 11-6
lookup misses, 11-6
memory use in bytes, 11-6
mode, 11-6
PRE, 11-6
total entries, 11-6
type, 11-6
forwarding cache (L3)
searching the routing cache, 11-4
forwarding cache statistics
monitoring, 11-3
forwarding interface
designated forwarder(s) table parameters, 7-38
forwarding rules
VLAN, 12-2
forwarding state (spanning tree bridge port), 12-10
found on interface
DVMRP downstream dependent router , 7-39
DVMRP neighbor routers, 7-35
DVMRP upstream routers, 7-37
fragments
Ethernet interface statistical parameters , 17-4
frame classification, 1-9, 2-4
frame format
VLAN switch port table parameters , 12-5
frame forwarding cache
displaying statistics, 11-3
frame forwarding statistical parameters
FIRE fabric port , 11-4
L2 frame count, 11-4
L3 drop frames, 11-4
L3 frame cache hits, 11-4
L3 slow path frames, 11-4
L3 total (T2), 11-4
percent cache hits, 11-4
percent drops, 11-4
percent slow path, 11-4
RX frame count (T2), 11-4
frame tags
switch port configuration parameters, 3-15
frame tags, configuring
Virtual LANs, 3-17
frame type
IPX interface, 4-5
front panel LEDs
HD/FD , 16-2
interpreting, 16-1
front panel LEDs (10/100 module)
port, 16-2
front panel LEDs (gigabit module)
port, 16-1
G
general system information, setting
device contact, 3-33
device location, 3-33
switch name, 3-33
get nearest server reply
IPX SAP interface parameters, 6-2
get nearest server reply delay
IPX SAP interface parameters, 6-2
gigabit ethernet modules (Layer 2/Layer 3), 1-5
gigabit module
configure ports, 3-7
gigabit module, configuring
flow control mode, 3-8
port name, 3-7
port pace priority, 3-8
ports, 3-7, 3-9
service port, 3-8
user port, 3-8
gigabit port name
configuring, 3-7
gigabit port parameters
category, 3-8
flow control mode, 3-9
port name, 3-8
port PACE priority, 3-9
remote fault detect, 3-9
gigabit ports
configuring physical port parameters, 3-8
enabling, 3-7, 3-9
global configuration, 15-4
intelligent multicast, 15-4
global RIP
RIP global configuration parameters, 8-1
GMAC1
auto-negotiation, 3-8
GNS requests received
IPX SAP interface statistical parameters , 6-8
GNS responses sent
IPX SAP interface statistical parameters , 6-8
graft acknowledgments received
DVMRP global statistical parameters, 7-32
graft acknowledgments transmitted
DVMRP global statistical parameters, 7-32
graft messages received
DVMRP global statistical parameters, 7-32
graft messages transmitted
DVMRP global statistical parameters, 7-32
group
address forwarding table parameters, 14-5
group address
IGMP group membership table parameters, 7-30
group created on
IGMP group membership table parameters, 7-30
group join requests received
IGMP interface statistical parameters, 7-29
group leave requests received
IGMP interface statistical parameters, 7-29
group member interface
IGMP group membership table parameters, 7-30
group membership queries received
IGMP global statistic parameters, 7-28
group membership queries transmitted, IGMP global
statistic parameters, 7-28
group membership reports received
IGMP global statistic parameters, 7-28
group multicast protocol
IGMP group membership table parameters, 7-30
group reporter address
IGMP group membership table parameters, 7-31
group reports received
IGMP interface statistical parameters, 7-29
H
hardware
multicast pruning, 2-3, 2-4
hardware overview, 1-1
hardware requirements for routing, 3-31
hash depth
Layer 3 cache configuration, 11-2
hash mode
Layer 3 cache configuration, 11-2
hash table
address table instance parameters, 14-3
hash table auto increment
configuring (flood event), 14-3
hash table size
configuring (flood events), 14-3
Index 13
HD/FD LED
behavior, 16-2
hello interval
OSPF interface parameters, 9-5
OSPF virtual link parameters, 9-6
hello time
spanning tree bridge level parameters, 12-9
Help, Online, xv
helper address
IP helper address parameters, 7-51
high and normal overflow drops
buffer management table parameters, 13-4
high and normal stale drops
buffer management table parameters, 13-4
high priority allocation
buffer management table parameters, 13-4
high priority service ratio
buffer management table parameters, 13-4
high shutdown temperature
temperature threshold parameter , 16-3
high-preference static routes
IP global configuration parameters, 7-5
high-priority traffic, 13-1
hops
IPX RIP filter parameters, 5-3
IPX route table parameter, 4-12
IPX SAP filter parameters , 6-4
IPX SAP network filter parameters, 6-6
IPX service table parameter, 4-14
IPX static route, 4-6
IPX static service parameter, 4-8
hour
one-time summer time hours configuration, 3-38
summer time hours configuration, 3-36
HTML , 1-15, 2-9
hunt group
adding ports, 12-14
considerations, 12-12
non-VLAN switch port parameters , 3-19
switch port configuration parameters, 3-15
switch port parameter, 3-13
hunt group configuration features
members, 12-13
redistribute, 12-13
hunt group members
viewing details, 12-13
hunt groups
aggregate bandwidth, 12-11
before configuring, 12-11
configuring, 12-12
overview, 1-10
overview (P220), 2-5
14 Index
I
ICMP in address mask reply
IP routing global statistics, 7-23
ICMP in address mask requests
IP routing global statistics, 7-23
ICMP in destination unreachable
IP routing global statistics, 7-23
ICMP in echo replys
IP routing global statistics, 7-23
ICMP in echo requests
IP routing global statistics, 7-23
ICMP in errors
IP routing global statistics, 7-23
ICMP in messages
IP routing global statistics, 7-23
ICMP in parameter problems
IP routing global statistics, 7-23
ICMP in redirects
IP routing global statistics, 7-23
ICMP in source quenches
IP routing global statistics, 7-23
ICMP in time exceeds
IP routing global statistics, 7-23
ICMP in timestamp replys
IP routing global statistics, 7-23
ICMP in timestamp requests
IP routing global statistics, 7-23
ICMP out address mask reply
IP routing global statistics, 7-24
ICMP out address mask requests
IP routing global statistics, 7-24
ICMP out destination unreachable
IP routing global statistics, 7-24
ICMP out echo reply
IP routing global statistics, 7-24
ICMP out echo requests
IP routing global statistics, 7-24
ICMP out errors
IP routing global statistics, 7-23
ICMP out messages
IP routing global statistics, 7-23
ICMP out parameter problems
IP routing global statistics, 7-24
ICMP out redirects
IP routing global statistics, 7-24
ICMP out source quenches
IP routing global statistics, 7-24
ICMP out time exceeded
IP routing global statistics, 7-24
ICMP out timestamp reply
IP routing global statistics, 7-24
ICMP out timestamp request
IP routing global statistics, 7-24
ICMP redirect
add IP interface parameters, 7-3
IP interface parameters, 7-6
IEEE 802.1d spanning tree, 1-12, 2-7
IEEE 802.3x full duplex flow control, definition, 1-4
IEEE 802.3X PAUSE, 13-2
IEEE-802.1Q
Virtual LAN trunking mode, 3-16
IGMP
configuring, 7-16
Global statistics, 7-27
overview, 7-16
IGMP global statistic parameters
group membership queries received, 7-28
group membership queries transmitted, 7-28
group membership reports received, 7-28
unknown messages received, 7-28
IGMP global statistics
displaying, 7-28
IGMP group membership table parameters
entry expiration period in sec, 7-31
group address, 7-30
group created on, 7-30
group member interface, 7-30
group multicast protocol, 7-30
group reporter address, 7-31
IGMP interface parameters
always be group membership querier, 7-17
IGMP version, 7-17
interface, 7-17
IP address, 7-17
IP address mask , 7-17
maximum groups, 7-17
neighbor querier timeout interval, 7-18
process leave packets, 7-17
query request interval, 7-17
query response interval, 7-18
robustness variable, 7-18
IGMP interface statistical parameters
group join requests received, 7-29
group leave requests received , 7-29
group reports received , 7-29
IGMP version, 7-29
interface, 7-29
IP address, 7-29
IP address mask , 7-29
neighbor querier timeout in sec, 7-29
next query request in sec, 7-29
number of current groups, 7-30
query messages received, 7-29
query messages transmitted , 7-30
robustness variable, 7-29
state, 7-29
this router is group membership querier, 7-29
unknown messages received, 7-30
IGMP interface statistics
viewing, 7-28
IGMP interfaces
configuring, 7-17
IGMP local multicast forwarding cache
displaying, 7-31
IGMP local multicast forwarding cache parameters
destination group address, 7-31
downstream interfaces, 7-31
invalid flows from upstream, 7-31
packets forwarded through cache entry, 7-31
source address mask, 7-31
source subnetwork , 7-31
upstream interface, 7-31
upstream source, 7-31
IGMP multicast group table
displaying, 7-30
IGMP Only Multicast Forwarding, 7-16
IGMP querier interface
DVMRP interface statistical parameters, 7-33
IGMP snooping, 15-2
configuring, 15-11
IGMP snooping parameters
enable state, 15-12
intelligent multicast session statistics, 15-12
new client ports added , 15-12
new router ports added, 15-12
new sessions created , 15-12
router ports removed, 15-12
sessions destroyed, 15-12
IGMP version
IGMP interface parameters, 7-17
IGMP interface statistical parameters, 7-29
in max hops exceeded
IPX global parameters, 4-10
inbound traffic, 17-8
index
address forwarding table parameters, 14-5
AppleTalk NBP table parameters, 10-17
AppleTalk zone table statistics, 10-16
info
protocol event log settings, 16-5
ingress rules
VLAN operation, 12-1
initial hash table size
VLAN configuration parameters, 12-4
installing redundant controllers, 3-42
instance IDs
configuring, 14-2
Index 15
intelligent multicast, 15-3, 15-10, 15-12, 15-14, 15-15, 15-17,
15-18
session search, 15-7
intelligent multicast global configuration parameters ,
15-5
intelligent multicast session search parameters
client port, 15-7
IP subnet, 15-7
MAC address, 15-7
session type, 15-7
VLAN, 15-7
intelligent multicast session statistics
CGMP snooping parameters, 15-18
IGMP snooping, 15-12
LGMP client configuration parameters, 15-16
LGMP client display per VLAN parameters, 15-17
LGMP server configuration parameters, 15-14
LGMP server display per VLAN parameters, 15-15
intelligent multicasting, 15-1, 15-3, 15-4, 15-6
intelligent multicasting, 15-3
LGMP client, 15-3
interface
add IP interface parameters, 7-2
AppleTalk ARP cache table statistics, 10-16
AppleTalk interface parameters, 10-3
AppleTalk interface statistics, 10-13
AppleTalk NBP filter parameters, 10-8
AppleTalk NBP table parameters, 10-17
AppleTalk route table statistics, 10-15
AppleTalk zone filter parameters, 10-10
creating a VRRP virtual router, 7-43
DVMRP interface parameters, 7-20
DVMRP interface statistical parameters , 7-33
enabling VRRP, 7-43
IGMP interface parameters, 7-17
IGMP interface statistical parameters, 7-29
IP helper address parameters, 7-51
IP interface parameters, 7-6
IP routing table search parameters, 7-25
IP static ARP parameters, 7-15
IPX interface, 4-5
IPX RIP filter parameters, 5-3
IPX RIP interface statistical parameters , 5-6
IPX route table parameter, 4-11
IPX routing table search parameters, 4-11
IPX SAP filter parameters , 6-3
IPX SAP interface parameters, 6-1
IPX SAP interface statistical parameters, 6-8
IPX SAP network filter parameters, 6-5
IPX service table parameter, 4-14
IPX service table search parameter, 4-13
IPX static route, 4-6
IPX static service parameter, 4-8
IRDP parameters, 7-46
16 Index
OSPF interface parameters , 9-4
RIP interface parameters, 8-2
RIP statistical parameters, 8-4
VRRP authentication, 7-44
VRRP configuration parameters, 7-43
VRRP statistical parameters, 7-45
interface is pruned
DVMRP downstream link parameters, 7-42
upstream prune information, 7-41
interface metric
DVMRP interface parameters, 7-20
interface scope
DVMRP interface parameters, 7-20
interface type
DVMRP downstream link parameters, 7-41
DVMRP interface parameters , 7-20
upstream prune information, 7-41
interfaces
adding to NBP filter, 10-9
adding to zone filter, 10-11
deleting from a zone filter, 10-11
deleting from NBP filter, 10-9
interpreting front panel LEDs, 16-1
interpreting IPX SAP interface statistics, 6-7
interval start
Ethernet interface statistical parameters , 17-2
intra-area routes
IP global configuration parameters, 7-5
introduction, 15-1
invalid entry
permanent, definition, 14-5
invalid flows from upstream
DVMRP multicast forwarding cache parameters,
7-40
IGMP local multicast forwarding cache parameters,
7-31
invalid routes received
DVMRP interface statistical parameters, 7-34
IP
creating OSPF summaries, 9-7
creating OSPF virtual links, 9-5
creating RIP trusted neighbors, 8-3
displaying OSPF links, 9-10
displaying OSPF neighbors, 9-10
displaying OSPF statistics , 9-8
DVMRP configuration, 7-18
global configuration, 7-1
interface configuration, 7-5
modifying OSPF areas, 9-4
multicast forwarding, 7-16
multicast routing, 7-16
multicast statistics, 7-27
multicast, overview, 7-15
OSPF area creation, 9-3
OSPF global configuration, 9-2
RIP configuring interfaces, 8-2
RIP global configuration, 8-1
RIP statistics, 8-4
searching the OSPF link state database, 9-12
Searching the routing table, 7-25
IP access list parameters
access list name, 7-9, 7-10
access rule index, 7-9, 7-10
access type, 7-9, 7-10
destination subnet, 7-10
protocol ID, 7-10
TCP established, 7-11
TCP/UDP destination port, 7-11
TCP/UDP source port, 7-11
IP access rules
creating rules for filtering traffic between subnets,
7-12
filtering traffic between subnets example, 7-12
filtering web traffic example, 7-11
IP address
ARP cache search parameters, 7-27
configuring SNMP communities, 3-23
DVMRP interface parameters, 7-20
IGMP interface parameters, 7-17
IGMP interface statistical parameters, 7-29
IP routing table search parameters, 7-25
IP static ARP parameters, 7-15
OSPF interface parameters, 9-4
OSPF link parameters, 9-10
OSPF neighbors parameters, 9-11
RIP statistical parameters, 8-4
SNMP communities parameters, 3-23
static multicast session configuration parameters ,
15-10
static multicast session parameters, 15-10
VRRP configuration parameters, 7-43
VRRP statistical parameters, 7-45
IP address mask
DVMRP interface parameters, 7-20
IGMP interface parameters, 7-17
IGMP interface statistical parameters, 7-29
IP ARP
searching ARP cache, 7-26
IP configuration, 7-1
IP forward datagrams
IP routing global statistics , 7-22
IP fragmentation creates
IP routing global statistics, 7-23
IP fragmentation failures, 7-23
IP fragmentation OKs
IP routing global statistics, 7-23
IP global configuration parameters
BOOTP/DHCP relay agent , 7-4
high-preference static routes, 7-5
intra-area routes, 7-5
IP multicast forwarding, 7-4
IP routing, 7-4
IP source routing, 7-4
limit proxy ARP to same network, 7-4
local routes, 7-5
low-preference static routes, 7-5
maximum number of ARP cache entries, 7-4
maximum number of routes, 7-4
OSPF external routes, 7-5
OSPF inter-area routes, 7-5
RIP routes, 7-5
route preference by protocol, 7-5
use default route for proxy ARP, 7-4
VRRP, 7-4
IP global routing
configuring, 7-4
IP global routing statistics
displaying, 7-21
IP helper address, 7-51
deleting, 7-52
modifying, 7-52
IP helper address parameters
BOOTP client, 7-51
BOOTP server, 7-51
DNS, 7-51
helper address, 7-51
interface, 7-51
NETBIOS date service, 7-51
TACACS, 7-51
TFTP, 7-51
TIME, 7-51
IP helper address parametersNETBIOS name service,
7-51
IP in address errors
IP routing global statistics,
IP in delivers
IP routing global statistics,
IP in discards
IP routing global statistics,
IP in header errors
IP routing global statistics,
IP in receives
IP routing global statistics,
IP in unknown protocols
IP routing global statistics,
IP interface
creating, 7-2
IP interface access list rules
creating, 7-9
7-22
7-22
7-22
7-21
7-21
7-22
Index 17
IP interface access lists
configuring, 7-8
IP interface parameters
admin. state, 7-6
ICMP redirect, 7-6
interface, 7-6
IP routing, 7-6
MAC format, 7-6
mask, 7-6
multicast protocol, 7-6
NetBIOS UDP rebroadcast, 7-7
network address, 7-6
OSPF, 7-6
proxy ARP, 7-6
RIP, 7-6
state, 7-6
VLAN, 7-6
VRRP, 7-7
IP interfaces
configuring, 7-5
IP multicast
overview, 7-15
IP multicast forward datagrams
IP routing global statistics , 7-24
IP multicast forwarding
IP global configuration parameters, 7-4
IP multicast in discard
IP routing global statistics, 7-24
IP multicast in receives
IP routing global statistics, 7-24
IP multinetting, 7-7
IP out discards
, 7-22
IP out no routes
IP routing global statistics, 7-22
IP out requests
IP routing global statistics, 7-22
IP reassembly failures
IP routing global statistics, 7-23
IP reassembly OKs
IP routing global statistics, 7-23
IP reassembly required
IP routing global statistics, 7-22
IP reassembly timeout
IP routing global statistics, 7-22
IP routing
add IP interface parameters, 7-3
creating a BOOTP/DHCP server entry, 7-15
IP global configuration parameters, 7-4
IP interface parameters, 7-6
statistics, 7-21
IP routing discards
IP routing global statistics, 7-23
18 Index
IP routing global statistics
BOOTP/DHCP in discards, 7-24
BOOTP/DHCP in hops exceeded, 7-24
BOOTP/DHCP in requests, 7-24
BOOTP/DHCP in responses, 7-24
BOOTP/DHCP out requests, 7-25
BOOTP/DHCP out responses, 7-25
ICMP in address mask reply, 7-23
ICMP in address mask requests, 7-23
ICMP in destination unreachable, 7-23
ICMP in echo replys, 7-23
ICMP in echo requests, 7-23
ICMP in errors, 7-23
ICMP in messages, 7-23
ICMP in parameter problems, 7-23
ICMP in redirects, 7-23
ICMP in source quenches, 7-23
ICMP in time exceeds, 7-23
ICMP in timestamp replys, 7-23
ICMP in timestamp requests, 7-23
ICMP out address mask reply, 7-24
ICMP out address mask requests, 7-24
ICMP out destination unreachable, 7-24
ICMP out echo reply, 7-24
ICMP out echo requests, 7-24
ICMP out errors, 7-23
ICMP out messages, 7-23
ICMP out parameter problems, 7-24
ICMP out redirects, 7-24
ICMP out source quenches, 7-24
ICMP out time exceeded, 7-24
ICMP out timestamp reply, 7-24
ICMP out timestamp request, 7-24
IP forward datagrams, 7-22
IP fragmentation creates , 7-23
IP fragmentation failures, 7-23
IP fragmentation OKs, 7-23
IP in address errors, 7-22
IP in delivers, 7-22
IP in discards, 7-22
IP in header errors, 7-21
IP in receives, 7-21
IP in unknown protocols, 7-22
IP multicast forward datagrams, 7-24
IP multicast in discard, 7-24
IP multicast in receives, 7-24
IP out discards, 7-22
IP out no routes, 7-22
IP out requests, 7-22
IP reassembly failures, 7-23
IP reassembly OKs, 7-23
IP reassembly required, 7-22
IP reassembly timeout, 7-22
IP routing discards, 7-23
UDP in datagrams, 7-24
UDP in errors, 7-24
UDP in no ports, 7-24
UDP out datagrams, 7-24
IP routing search table
deleting local entries from routing table, 7-26
IP routing statistics, 7-21
IP routing table
searching, 7-25
IP routing table search parameters
interface, 7-25
IP address, 7-25
source, 7-25
IP routing table statistical parameters
current number of routes, 7-26
peak number of routes, 7-26
RIP queries, 7-26
RIP route changes, 7-26
total routes added, 7-26
total routes deleted, 7-26
IP routing table statistics
examining, 7-26
IP source routing
IP global configuration parameters, 7-4
IP static ARP parameters
interface, 7-15
IP address, 7-15
MAC address, 7-15
IP static route
creating static ARP entries, 7-14
IP static route parameters
cost, 7-14
mask, 7-14
network address, 7-14
next-hop address, 7-14
next-hop VLAN, 7-14
preference, 7-14
IP static routes
creating, 7-14
IP subnet
intelligent multicast session search parameters,
15-7
IPX, B-1
creating static routes, 4-6
creating static services, 4-7
datagram structure, 4-2
deleting static routes, 4-7
deleting static service , 4-8
examining the route table, 4-11
examining the service table, 4-13
global statistics, 4-9
interface configuration, 4-4
modifying IPX RIP filters, 5-2
modifying static routes, 4-7
modifying static services, 4-9
network number, 4-1
node number, 4-1
RIP interfaces, 5-1
routing table statistics, 4-12
searching the route table, 4-10
searching the service table, 4-12
socket number, 4-1
IPX datagram fields
checksum, 4-2
destination network, 4-3
destination node, 4-3
destination socket, 4-3
packet length, 4-2
packet type, 4-3
source network , 4-3
source node, 4-3
source socket, 4-3
transport control, 4-2
IPX datagram fields, definitions, 4-2
IPX datagram structure, 4-2
IPX forward datagrams
IPX global parameters, 4-10
IPX global parameters, 4-4
in max hops exceeded, 4-10
IPX forward datagrams, 4-10
IPX in checksum errors, 4-10
IPX in delivery, 4-10
IPX in discards, 4-10
IPX in header errors, 4-10
IPX in ping replies, 4-10
IPX in ping request, 4-10
IPX in receives, 4-10
IPX in unknown sockets, 4-10
IPX Netbios receives, 4-10
IPX out discards, 4-10
IPX out no routes, 4-10
IPX out packets, 4-10
IPX out ping replies, 4-10
IPX out ping requests, 4-10
IPX out requests, 4-10
maximum number of services, 4-4
IPX global parameters, examining, 4-10
IPX in checksum errors
IPX global parameters, 4-10
IPX in delivery
IPX global parameters, 4-10
IPX in discards
IPX global parameters, 4-10
IPX in header errors
IPX global parameters, 4-10
Index 19
IPX in ping replies
IPX global parameters, 4-10
IPX in ping request
IPX global parameters, 4-10
IPX in receives
IPX global parameters, 4-10
IPX in unknown sockets
IPX global parameters, 4-10
IPX interface
admin state, 4-5
frame type, 4-5
interface, 4-5
network address, 4-5
node address, 4-5
RIP, 4-5
SAP, 4-6
state, 4-5
ticks, 4-5
type 20 packet propagation, 4-6
VLAN, 4-5
IPX interface MIbs, B-1
IPX interface parameters, 4-5
IPX multinetting, 4-4
IPX Netbios receives
IPX global parameters, 4-10
IPX out discards
IPX global parameters, 4-10
IPX out no routes
IPX global parameters, 4-10
IPX out packets
IPX global parameters, 4-10
IPX out ping replies
IPX global parameters, 4-10
IPX out pint requests
IPX global parameters, 4-10
IPX out requests
IPX global parameters, 4-10
IPX overview , 4-1
IPX RIP filter
example of suppressing advertising of a network,
5-4
suppress advertising of all networks example, 5-4
IPX RIP filter parameters
direction, 5-3
end network, 5-3
filter/suppress, 5-3
hops, 5-3
interface, 5-3
precedence, 5-3
start network, 5-3
ticks, 5-3
IPX RIP filters
creating, 5-2
IPX RIP filters, modifying, 5-2
20 Index
IPX RIP interface statistical parameters
bad packets received, 5-6
interface, 5-6
network number, 5-6
non-triggered updates sent, 5-6
requests received, 5-6
state, 5-6
triggered updates sent, 5-6
updates received, 5-6
IPX RIP interface statistics
displaying, 3-1, 5-5
IPX route table
examining, 4-11
IPX route table parameters
hops, 4-12
interface, 4-11
network , 4-11
next-hop MAC address, 4-12
source, 4-11
ticks, 4-12
TTL, 4-11
IPX route table search, 4-10
IPX route table statistics
examining, 4-12
IPX router
configuring, 4-3
IPX routing
IPX routing, 4-4
IPX routing global statistics, displaying, 4-9
IPX routing table search parameters
interface, 4-11
network number, 4-11
source, 4-11
IPX routing table statistics
current number of routes, 4-12
peak number of routes, 4-12
route add failures, 4-12
IPX SAP filter parameters
direction, 6-3
filter/suppress, 6-4
hops, 6-4
interface, 6-3
name, 6-3
precedence, 6-3
type, 6-3
IPX SAP filters
creating, 6-2
filtering all services except NDS example, 6-6
suppress advertising of print servers example, 6-4
IPX SAP interface parameters
aging interval multiplier, 6-2
get nearest server reply, 6-2
get nearest server reply delay, 6-2
interface, 6-1
mode, 6-2
network number, 6-1
periodic update interval, 6-2
triggered updates, 6-2
use interpacket gap, 6-1
use max packet size, 6-2
IPX SAP interface statistical parameters
bad packets received, 6-8
GNS requests received, 6-8
GNS responses sent, 6-8
interface, 6-8
network number, 6-8
non-triggered updates sent, 6-8
requests received , 6-8
state, 6-8
updates received, 6-8
IPX SAp interface statistical parameters
triggered updates sent, 6-8
IPX SAP interface statistics
interpreting, 6-7
IPX SAP interfaces
configuring, 6-1
IPX SAP network filter parameters
direction, 6-6
filter/suppress, 6-6
hops, 6-6
interface, 6-5
net, 6-5
precedence, 6-5
type, 6-5
IPX SAP network filters
creating, 6-5
IPX service table
examining, 4-13
searching, 4-12
IPX service table parameter
hops, 4-14
interface, 4-14
network , 4-14
next-hop MAC address, 4-14
node, 4-14
socket, 4-14
source, 4-14
TTL, 4-14
type, 4-14
IPX service table parameters
name, 4-14
IPX service table search parameter
service name, 4-13
service type, 4-13
IPX service table search parameters
interface, 4-13
source, 4-13
IPX static route
hops, 4-6
interface, 4-6
network , 4-6
next-hop node, 4-6
ticks, 4-6
IPX static route parameters, 4-6
IPX static routes
creating, 4-6
deleting, 4-7
modifying, 4-7
IPX static service parameter
hops, 4-8
interface, 4-8
network , 4-8
next-hop node, 4-8
node, 4-8
service name, 4-8
socket, 4-8
type, 4-8
IPX static service parameters, 4-8
IPX static services
creating, 4-7
IPX syntax example, 4-1
IRDP, 7-46
adding an interface, 7-48
deleting an interface, 7-48
enabling on an interface, 7-46
IRDP overview, 7-45
IRDP parameters
adv. address, 7-46
advertisement life time, 7-47
interface, 7-46
IRDP state, 7-46
max. advertisement interval, 7-47
minimum advertisement interval, 7-47
network address, 7-46
preferences, 7-46
IRDP state
IRDP parameters, 7-46
J
jabbers
Ethernet interface statistical parameters , 17-5
K
key
OSPF interface parameters, 9-5
known mode
non-VLAN switch port parameters, 3-20
switch port configuration parameters, 3-16
Index 21
L
L2 frame count
frame forwarding statistical parameters , 11-4
L3 drop frames
frame forwarding statistical parameters , 11-4
L3 frame cache hits
frame forwarding statistical parameters , 11-4
L3 slow path frames
frame forwarding statistical parameters , 11-4
L3 total (T2)
frame forwarding statistical parameters , 11-4
LAN router
configuration, 3-32
last change
LDAP statistics, 7-50
Layer 2, 15-3
event log, 16-3
shutdown log, 16-4
Layer 2 Fast Ethernet modules
20-port 10/100Base-TX, 1-4
Layer 2 Gigabit ethernet modules, 1-5
Layer 2 overview, 15-3
Layer 2 routing
overview, 1-7, 1-8
Layer 2 supervisor
temperature system example, 16-2
layer 2 supervisor module features, 1-2
layer 2 switch
compatibility, 1-7
Layer 2 switching, 1-7
Layer 2 switching (bridging), 3-31
Layer 2/3 routing example, 1-8
Layer 3
forwarding cache, 11-1
Layer 3 (learned) traffic routing
overview, 1-8
Layer 3 (not learned) traffic routing
overview, 1-8
Layer 3 cache configuration
age interval, 11-2
aging, 11-2
current system entries, 11-3
hash depth, 11-2
hash mode, 11-2
maximum entries, 11-2
maximum system entries, 11-3
system entries failures, 11-3
Layer 3 dynamic intelligent multicasting, 15-2
Layer 3 Fast Ethernet modules
20-port 10/100Base-TX, 1-4
Layer 3 forwarding cache
displaying, 11-5
searching the routing cache, 11-4
22 Index
Layer 3 forwarding cache (FE) parameters
aged entries, 11-6
current entries, 11-6
duplicate add attempts, 11-6
entries removed due to route changes, 11-6
entries removed due to route deletes, 11-6
failed add attempts, 11-6
lookup hits, 11-6
lookup levels, 11-6
lookup misses, 11-6
memory use in bytes, 11-6
mode, 11-6
PRE, 11-6
total entries, 11-6
type, 11-6
Layer 3 Gigabit ethernet modules, 1-5
Layer 3 intelligent multicasting
intelligent multicasting, 15-2
Layer 3 overview, 15-2
Layer 3 route cache search parameters
comparison value, 11-5
destination address, 11-5
destination port, 11-5
PRE, 11-5
protocol, 11-5
rule number, 11-5
source address, 11-5
source port, 11-5
VLAN, 11-5
Layer 3 routing
overview, 1-7
Layer 3 spanning tree, overview, 1-12, 2-7
Layer 3 supervisor temperature example, 16-2
Layer 3 switching (routing) , 3-31
LDAP
configuring, 7-48
configuring settings, 7-48
configuring statistics, 7-50
event class parameters, 16-9
settings, 7-48
LDAP configuration parameters
primary server IP address, 7-49
primary server port, 7-49
search base, 7-49
secondary server IP address, 7-49
secondary server port, 7-49
LDAP statistics
consumer signal, 7-50
last change, 7-50
producer signal, 7-50
learned entries
delete all invalid learned entries, 14-3
learning state (spanning tree bridge port), 12-10
LEDs
HD/FD , 16-2
port (10/100 module), 16-2
port (gigabit module), 16-1
LGMP client, 15-3
LGMP client configuration parameters
enable state, 15-16
intelligent multicast session statistics, 15-16
LGMP clients, 15-16
LGMP message reception statistics, 15-16
LGMP client display per VLAN parameters
intelligent multicast session statistics, 15-17
LGMP message reception statistics, 15-17
VLAN, 15-17
LGMP client, configuring
configuring/viewing a LGMP client, 15-15
LGMP clients
LGMP client configuration parameters, 15-16
LGMP message reception statistics
LGMP client configuration parameters, 15-16
LGMP client display per VLAN parameters, 15-17
LGMP server display per VLAN parameters, 15-15
LGMP message statistics
LGMP server configuration parameters, 15-13
LGMP message transmission statistics
LGMP server configuration parameters, 15-14
LGMP messages transmission statistics
LGMP server display per VLAN parameters, 15-15
LGMP server, 15-3
LGMP server configuration, 15-12, 15-14
LGMP server configuration parameters
enable state, 15-13
intelligent multicast session statistics, 15-14
LGMP message reception statistics, 15-13
LGMP message transmission statistics, 15-14
LGMP servers, 15-13
proxy mode, 15-13
robustness variable, 15-13
router report time, 15-13
server ID priority, 15-13
LGMP server display per VLAN parameters
intelligent multicast session statistics, 15-15
LGMP message reception statistics, 15-15
LGMP messages transmission statistics, 15-15
state, 15-15
VLAN, 15-15
LGMP servers
LGMP server configuration parameters, 15-13
limit proxy ARP to same network
IP global configuration parameters, 7-4
link data
LSA detail, 9-16
link ID
LSA detail, 9-16
link state advertisement details
viewing, 9-15
link state database, 9-12
link state database search parameters
area ID, 9-13
router ID, 9-13
type, 9-13
links
switch port parameter, 3-13
listening state (spanning tree bridge port), 12-10
local ext type
OSPF global configuration parameters, 9-2
local routes
IP global configuration parameters, 7-5
log
event table actions, 16-9
log ID
event and shutdown log entries, 16-5
logging in
Web Agent, 3-6
logging into
Web Agent, 3-6
lookup hits
forwarding cache (FE) parameters, 11-6
lookup levels
forwarding cache (FE) parameters, 11-6
lookup misses
forwarding cache (FE) parameters, 11-6
low shutdown temperature
temperature threshold parameter, 16-3
lower warning temperature
temperature threshold parameter, 16-3
low-preference static routes
IP global configuration parameters, 7-5
LS ID
LSA detail, 9-15
OSPF link state database parameter , 9-14
LSA checksum sum
OSPF statistical parameters, 9-9
LSA chksum sum
OSPF statistical parameters, 9-9
LSA detail
age, 9-16
area, 9-15
attached router ID 1 & 2, 9-16
checksum, 9-16
external, 9-16
forward address, 9-16
link data, 9-16
link ID, 9-16
LS ID, 9-15
metric, 9-16
network mask , 9-16
Index 23
router ID, 9-15
sequence, 9-16
tag, 9-16
TOS, 9-16
TOS 0 metric, 9-16
TOS count, 9-16
type, 9-15
type (network), 9-16
LSAs
OSPF statistical parameters, 9-9
M
MAC Address
search, 14-4
MAC address, 2-4
address forwarding table parameters, 14-5
AppleTalk ARP cache table statistics, 10-16
filtering, 14-4
intelligent multicast session search parameters,
15-7
IP static ARP parameters, 7-15
multicast session parameters, 15-8
static multicast session configuration parameters ,
15-10
static multicast session parameters, 15-10
switch port parameter, 3-13
MAC address value
adding, 14-6
MAC format
add IP interface parameters, 7-3
IP interface parameters, 7-6
managing buffers and queues, 13-2
mask
add IP interface parameters, 7-2
IP interface parameters, 7-6
IP static route parameters, 7-14
OSPF summaries parameters, 9-7
master
OSPF neighbors parameters, 9-11
max age
spanning tree bridge level parameters, 12-9
max packets per second
port mirroring information parameters, 17-7
max. packets per secondl
mirror port configuration parameters, 17-8
max.advertisement interval
IRDP parameters, 7-47
maximum entries
Layer 3 cache configuration, 11-2
maximum groups
IGMP interface parameters, 7-17
maximum number of ARP cache entries
IP global configuration parameters, 7-4
24 Index
maximum number of paths
OSPF global configuration parameters, 9-2
maximum number of routes
DVMRP parameters, 7-19
IP global configuration parameters, 7-4
maximum number of routes, 4-4
maximum number of services
IPX global parameters, 4-4
maximum system entries
Layer 3 cache configuration, 11-3
MC-option
OSPF neighbors parameters, 9-11
MD5 key ID
OSPF interface parameters, 9-5
OSPF virtual link parameters, 9-6
members
hunt group configuration feature, 12-13
memory
buffer detailed configuration parameters, 13-3
memory use in bytes
forwarding cache (FE) parameters, 11-6
metric
AppleTalk interface parameters, 10-3
AppleTalk route table statistics, 10-14
DVMRP interface statistical parameters, 7-33
LSA detail, 9-16
MIB groups supported, B-1
MIBs
AppleTalk, B-5
bridge MIBs, B-2
DVMRP, B-4
IEEE 802.3 MAU, B-2
IEEE 802.3 statistics group, B-2
IGMP , B-3
IP access list, B-5
IP forwarding/routing table, B-4
IP interface, B-3
IP version 4.0, B-4
OSPF v2.0, B-3
policy capability MIB for LDAP, B-5
private IPX interface MIBs, B-1
Prominent, B-1
RIP v1 and v2, B-2
RMON, B-2
SNMPv2, B-2
VRRP, B-3
minimum adv. interval
IRDP parameters, 7-47
minutes
one-time summer time hours configuration, 3-38
summer time hours configuration, 3-36
mirror port
configuring a mirror port, 17-6
port mirroring information parameters, 17-7
RMON mirror port configuration parameters , 17-7
switch port configuration parameters, 3-16
mirror port configuration parameters
max. packets per second, 17-8
mirror port name
port mirroring information parameters, 17-7
mode
forwarding cache (FE) parameters, 11-6
IPX SAP interface parameters, 6-2
RIP interface parameters, 8-2
spanning tree bridge level parameters, 12-8
modem
connecting, 3-25
modem configuration string parameters
&D0, 3-27
CD follows carrier, 3-27
E0, 3-27
S0=1, 3-27
software flow control, 3-27
modifying an IP helper address, 7-52
modifying DVMRP interface information, 7-19
modifying IGMP interfaces, 7-17
modifying OSPF areas, 9-4
modifying OSPF virtual links, 9-7
module
optional expansion , 2-1, 2-2
switch port parameters, 3-14
module features, 1-4
module status LED
definition, 16-1
modules & ports, 3-7
monitoring switch performance
IP routing statistics, 7-21
OSPF, 9-8
month
one-time summer time hours configuration, 3-38
summer time hours configuration, 3-36
multicast forwarding
description, 7-16
multicast forwarding cache
displaying, 7-39
multicast packets
Ethernet interface statistical parameters, 17-3
multicast protocol
add IP interface parameters, 7-3
IP interface parameters, 7-6
multicast pruning
hardware, 2-3, 2-4
multicast routing
description, 7-16
multicast session client port, 15-8
multicast session client port parameters
application, 15-9
port, 15-9
multicast session parameters
application, 15-8
client port, 15-8
MAC address, 15-8
session ID, 15-8
type, 15-8
VLAN, 15-8
multicast statistics
IP, 7-27
multi-gigabit connections example, 12-11
multinetting , 7-7
multiple tagging formats
supported, 1-11
N
name
AppleTalk NBP filter parameters, 10-8
AppleTalk NBP table parameters, 10-17
AppleTalk zone filter parameters, 10-10
AppleTalk zone table statistics, 10-16
IPX SAP filter parameters, 6-3
IPX service table parameter, 4-14
spanning tree bridge port parameters, 12-9
switch port parameter, 3-13
NBP filter
adding interfaces, 10-9
deleting interfaces, 10-9
editing, 10-8
neighbor DVMRP routers
DVMRP interface statistical parameters, 7-34
neighbor is SNMP manageable
DVMRP neighbor routers, 7-35
neighbor network address
DVMRP neighbor routers, 7-35
neighbor querier timeout in sec
IGMP interface statistical parameters, 7-29
neighbor querier timeout interval
IGMP interface parameters, 7-18
neighbor received probe from this router
DVMRP neighbor routers, 7-35
neighbor supports generation ID function
DVMRP neighbor routers, 7-35
neighbor supports MTRACE requests
DVMRP neighbor routers, 7-35
neighbor supports prune function
DVMRP neighbor routers, 7-35
net
IPX SAP network filter parameters, 6-5
Index 25
NetBIOS date service
IP helper address parameters, 7-51
NetBIOS name service
IP helper address parameters, 7-51
NetBIOS UDP rebroadcast
add IP interface parameters, 7-3
IP interface parameters, 7-7
network
IPX route table parameter, 4-11
IPX service table parameter, 4-14
IPX static route, 4-6
IPX static service parameter, 4-8
network address
add IP interface parameters, 7-2
DVMRP interface statistical parameters , 7-33
IP interface parameters, 7-6
IP static route parameters, 7-14
IPX interface, 4-5
IRDP parameters, 7-46
OSPF summaries parameters, 9-7
RIP interface parameters, 8-2
network mask
LSA detail, 9-16
network number
AppleTalk interface parameters, 10-4
AppleTalk interface statistics, 10-13
AppleTalk static route, 10-6
IPX RIP interface statistical parameters , 5-6
IPX routing table search parameters, 4-11
IPX SAP interface parameters, 6-1
IPX SAP interface statistical parameters, 6-8
network range
AppleTalk ARP cache table statistics, 10-15
AppleTalk interface statistics, 10-13
AppleTalk route table statistics, 10-14
AppleTalk zone table statistics, 10-16
network range end
AppleTalk interface parameters, 10-3
AppleTalk static route, 10-6
network range start
AppleTalk interface parameters, 10-3
AppleTalk static route, 10-6
new client ports added
IGMP snooping, 15-12
new router ports added
IGMP snooping, 15-12
new sessions created
IGMP snooping, 15-12
next hop
AppleTalk route table statistics, 10-14
next probe message in sec
DVMRP interface statistical parameters , 7-33
26 Index
next pruned downstream interface to timeout
DVMRP multicast forwarding cache parameters,
7-40
next query request in sec
IGMP interface statistical parameters, 7-29
next-hop address
IP static route parameters, 7-14
next-hop MAC address
IPX route table parameter, 4-12
IPX service table parameter, 4-14
next-hop node
IPX static route, 4-6
IPX static service parameter, 4-8
next-hop VLAN
IP static route parameters, 7-14
no client
AppleTalk global statistics, 10-12
no route
AppleTalk global statistics, 10-12
node
AppleTalk ARP cache table statistics, 10-16
AppleTalk interface parameters, 10-4
AppleTalk interface statistics, 10-13
AppleTalk static route, 10-6
IPX service table parameter, 4-14
IPX static service parameter, 4-8
node address
IPX interface, 4-5
none
SNMP access level, 3-24
non-tagged access mode, definition, 1-4
non-triggered updates sent
IPX RIP interface statistical parameters, 5-6
IPX SAP interface statistical parameters, 6-8
RIP statistical parameters, 8-4
non-VLAN switch port
configuring, 3-19
non-VLAN switch port parameters, configuring
3Com mapping table, 3-20
allow learning, 3-19
hunt group, 3-19
known mode, 3-20
spanning tree, 3-19
N-option
OSPF neighbors parameters, 9-12
normal
SNMP security level, 3-24
normal-priority traffic, 13-1
number of current groups
IGMP interface statistical parameters, 7-30
number of routes
IPX routing table statistic, 4-12
number of triggered routes
DVMRP routing statistical parameters, 7-36
number of valid routes
DVMRP routing statistical parameters, 7-36
O
one-time summer time hours configuration, 3-37
day, 3-38
end, 3-37
hour, 3-38
minutes, 3-38
month, 3-38
start, 3-37
week, 3-38
Online documentation, xiv
adding files to a Web server, xvi
getting updated online documentation, xvii
installing, xv
installing the HTTP server, xv
starting the HTTP server , xv
Online help, xv
accessing help files from the server, xvi
adding files to a Web server, xvi
getting updated help files , xvii
Open Trunk technology features , 1-11
OpenTrunk
features, 2-6
technology, 2-5
OpenTrunk technology
overview, 1-11
OPQ option
OSPF neighbors parameters, 9-12
optional expansion module, 2-1, 2-2
originate LSA count
OSPF statistical parameters, 9-9
OSPF
add IP interface parameters, 7-3
creating areas, 9-3
creating summaries, 9-7
creating virtual links, 9-5
displaying links, 9-10
displaying neighbors, 9-10
event class parameters, 16-9
IP interface parameters, 7-6
monitoring switch performance, 9-8
OSPF global configuration parameters, 9-2
searching the link state database, 9-12
OSPF area parameters
area ID, 9-3
area type, 9-3
stub metric, 9-3
translate 7 into 5, 9-3
type 3 ASE filter, 9-3
OSPF areas
deleting, 9-3
modifying, 9-4
OSPF external routes
IP global configuration parameters, 7-5
OSPF global configuration
configuring, 9-2
OSPF global configuration parameters
AS border route, 9-2
auto-creation of virtual links, 9-2
local ext type, 9-2
maximum number of paths, 9-2
OSPF, 9-2
RIP ext type, 9-2
router ID, 9-2
SPF hold time, 9-2
SPF suspend, 9-2
static ext type, 9-2
static low ext type, 9-2
OSPF inter-area routes
IP global configuration parameters, 7-5
OSPF interface parameters
area, 9-4
authentication, 9-5
cost, 9-5
dead interval, 9-5
DR priority, 9-4
hello interval, 9-5
interface, 9-4
IP address, 9-4
key, 9-5
MD5 key ID, 9-5
poll interval, 9-5
retransmit interval, 9-5
transit delay, 9-4
OSPF interfaces
modifying, 9-4
OSPF link parameters
area ID, 9-10
BDR address, 9-10
DR address, 9-10
DR router ID, 9-10
IP address, 9-10
state, 9-10
type, 9-10
OSPF link state database parameter
age, 9-14
area ID, 9-14
checksum, 9-14
detail link, 9-14
LS ID, 9-14
router ID, 9-14
sequence, 9-14
Index 27
type, 9-14
OSPF link state database search parameters
area ID, 9-13
router ID, 9-13
type, 9-13
OSPF neighbors parameters
BDR choice, 9-12
DD number, 9-11
DR choice, 9-12
DR priority, 9-11
E-option, 9-11
IP address, 9-11
master, 9-11
MC-option, 9-11
N-option, 9-12
OPQ-option, 9-12
router ID, 9-11
state, 9-11
T-option, 9-11
OSPF packet tracing
enabling, 16-4
OSPF state
OSPF statistical parameters, 9-9
OSPF statistical parameters
area ID, 9-9
AS border Rtrs, 9-9
border Rtrs, 9-9
external LSA count, 9-9
LSA checksum sum, 9-9
LSA chksum sum, 9-9
LSAs, 9-9
originate LSA count, 9-9
OSPF state, 9-9
OSPF version, 9-9
receive new LSA count, 9-9
router ID, 9-9
SPF runs, 9-9
OSPF statistics
displaying, 9-8
OSPF summaries
deleting, 9-8
OSPF summaries parameters
advertisement, 9-7
area, 9-7
mask, 9-7
network address, 9-7
OSPF version
OSPF statistical parameters, 9-9
OSPF virtual link parameters
area, 9-6
authentication, 9-6
authentication key, 9-6
dead interval, 9-6
hello interval, 9-6
28 Index
MD5 key ID, 9-6
retransmit interval, 9-6
router ID, 9-6
transit delay, 9-6
OSPF virtual links
deleting, 9-6
modifying, 9-7
overflow drops
buffer management table parameters, 13-4
oversize packets
Ethernet interface statistical parameters , 17-4
overview
intelligent multicasting, 15-2
Layer 2, 15-3
overview of Layer 2 routing, 1-7
overview of Layer 2 traffic routing, 1-8
overview of Layer 3 (learned) traffic routing, 1-8
overview of Layer 3 (not learned) traffic routing, 1-8
overview of Layer 3 routing, 1-7
owner
AppleTalk route table statistics, 10-14
P
packet length
IPX datagram fields, 4-2
packet tracing
enabling, 16-4
packet type
IPX datagram fields, 4-3
packets
Ethernet interface statistical parameters , 17-2
packets forwarded through cache entry
DVMRP multicast forwarding cache parameters,
7-40
IGMP local multicast forwarding cache parameters,
7-31
parity
console serial port settings, 3-25
path cost
spanning tree bridge port information parameters,
12-11
payload protocol type
DVMRP upstream source parameters, 7-42
peak number of routes
AppleTalk route table statistics, 10-15
IP routing table statistical parameters, 7-26
IPX routing table statistic, 4-12
peak number of zones
AppleTalk zone table statistics, 10-17
percent cache hits
frame forwarding statistical parameters, 11-4
percent drops
frame forwarding statistical parameters, 11-4
percent slow path
frame forwarding statistical parameters , 11-4
performing a system reset, 3-45
periodic update interval
IPX SAP interface parameters, 6-2
permanent
address forwarding table, persistence parameters ,
14-6
invalid entry, 14-5
persistence entry, 14-5
persistence
address forwarding table parameters, 14-5
persistence entry
ageout, definition, 14-5
permanent, definition, 14-5
physical port buffers
buffer management parameters, 13-3
piggyback port
port mirroring information parameters, 17-7
port mirroring parameter, 17-8
poll interval
OSPF interface parameters, 9-5
port
address forwarding table parameters, 14-5
multicast session client port parameters , 15-9
RMON mirror port configuration parameters , 17-7
router port display parameters, 15-6
spanning tree bridge port parameters, 12-9
switch port parameter, 3-13
VLAN switch port table parameters, 12-4
port LED (10/100 module)
behavior, 16-2
port LED (gigabit module)
behavior, 16-1
port mirror, 17-6
port mirroring information parameters, 17-6
configure source, 17-7
max packets per second , 17-7
mirror port, 17-7
mirror port name, 17-7
piggyback port, 17-7
sampler type , 17-7
source port, 17-7
port mirroring parameters, 17-8
port name
configuring switch port parameters, 3-14
gigabit port parameters, 3-8
VLAN switch port table parameters, 12-4
port PACE priority
10/100 port parameter, 3-12
gigabit port parameters, 3-9
port VLAN
3Com SuperStack parameters, 3-21
Bay Networks System 5000 parameters , 3-21
Cisco Catalyst 5000 parameters, 3-20
configuring switch port parameters, 3-14
switch port configuration parameters, 3-15
switch port parameter, 3-13
port VLAN parameters
configuring, 3-16
port VLAN, selecting, 3-14
port-based VLANs, 12-2
power supply
power system statistical parameters, 3-40
power system statistical parameters
current power available, 3-40
power supply, 3-40
status, 3-40
total system power, 3-40
type, 3-40
power system statistics
displaying, 3-40
PPP console
configuring, 3-26
configuring a network mask, 3-30
configuring an IP address, 3-30
PPP console configuration (Layer 3 only), 3-24
PPP console settings
baud rate, 3-25
flow control, 3-25
PPP console static route
configuring, 3-30
PPP serial port console, 3-29
regaining access to the CLI, 3-27
PRE
forwarding cache (FE) parameters, 11-6
Layer 3 route cache search parameters, 11-5
precedence
IPX RIP filter parameters, 5-3
IPX SAP filter parameters, 6-3
IPX SAP network filter parameters, 6-5
preference
IP static route parameters, 7-14
preferences
IRDP parameters, 7-46
primary controller
replacing, 3-43
primary server IP address
LDAP configuration parameters, 7-49
primary server port
LDAP configuration parameters, 7-49
priority
address forwarding table parameters, 14-5
spanning tree bridge level parameters, 12-8
spanning tree bridge port information parameters,
12-10
VRRP configuration parameters, 7-44
Index 29
priority queuing, definition, 1-4
priority threshold
buffer management table parameters, 13-4
probe message received
DVMRP global statistical parameters , 7-32
probe messages transmitted
DVMRP global statistical parameters , 7-32
process leave packets
IGMP interface parameters, 7-17
producer signal
LDAP statistics, 7-50
Prominent MIBs, B-1
protocol
Layer 3 route cache search parameters, 11-5
protocol event log
configuring, 16-4
protocol event log settings
debug, 16-5
error, 16-5
fault, 16-5
info, 16-5
trace, 16-5
warning, 16-5
protocol ID
IP access list parameters, 7-10
proxy ARP
add IP interface parameters, 7-3
IP global configuration parameters, 7-4
IP interface parameters, 7-6
proxy mode
LGMP server configuration parameters, 15-13
prune expiration
DVMRP downstream link parameters, 7-42
prune expiration time
upstream prune information, 7-41
prune messages received
DVMRP global statistical parameters , 7-32
prune messages transmitted
DVMRP global statistical parameters , 7-32
pruning client ports, router ports, dynamic sessions
pruning client ports, 15-3
purge TTL
RIP global configuration parameters, 8-2
Q
query messages received
IGMP interface statistical parameters, 7-29
query messages transmitted
IGMP interface statistical parameters, 7-30
query request interval
IGMP interface parameters, 7-17
query response interval
IGMP interface parameters, 7-18
30 Index
queues
managing, 13-2
service ratio, 13-1
R
rate limit burst size
10/100 port parameter, 3-12
rate limit mode
10/100 port parameter, 3-12
rate limit rate
10/100 port parameter, 3-12
read-only
SNMP access level, 3-24
read-write
SNMP access level, 3-24
read-write with security level set to admin
SNMP access level, 3-24
receive new LSA count
OSPF statistical parameters, 9-9
receive version
RIP interface parameters, 8-3
recurring
summer time hours configuration, 3-35
redistribute
hunt group configuration feature, 12-13
redundant controllers
installing, 3-42
redundant element
configuring, 3-44
related documents, xix
remote fault detect
gigabit port parameters, 3-9
remote fault detection, 3-8
remote monitoring, 2-9
replacing the primary controller, 3-43
report messages received
DVMRP global statistical parameters, 7-32
report messages transmitted
DVMRP global statistical parameters, 7-32
reporting router
DVMRP route table parameters , 7-36
reporting router interface
DVMRP route table parameters , 7-36
requests received
IPX RIP interface statistical parameters, 5-6
IPX SAP interface statistical parameters, 6-8
resetting the switch, 18-4
resource
event class parameters, 16-8
retransmit interval
OSPF interface parameters, 9-5
OSPF virtual link parameters, 9-6
RIP
add IP interface parameters, 7-3
creating trusted RIP neighbors, 8-3
event class parameters, 16-9
IP interface parameters, 7-6
IPX interface, 4-5
RIP, 4-4
trusted neighbors, 8-3
RIP ext type
OSPF global configuration parameters, 9-2
RIP global configuration, 8-1
RIP global configuration parameters
global RIP, 8-1
purge TTL, 8-2
triggered updates, 8-2
update pkt delay, 8-2
update timer, 8-1
RIP interface parameters
auth key, 8-3
auth type, 8-3
default route, 8-3
interface, 8-2
mode, 8-2
network address, 8-2
receive version, 8-3
split horizon, 8-3
version, 8-2
RIP interfaces
configuring, 8-2
RIP packet tracing
enabling, 16-4
RIP queries
IP routing table statistical parameters, 7-26
RIP route changes
IP routing table statistical parameters, 7-26
RIP routes
IP global configuration parameters, 7-5
RIP statistical parameters
bad packets received, 8-4
bad routes received, 8-4
interface, 8-4
IP address, 8-4
non-trigger updates sent, 8-4
state, 8-4
triggered updates sent, 8-4
updates received, 8-4
RIP statistics
interpreting, 8-4
RISC supervisor, 1-14, 2-9
RMON , 2-9
configuring a mirro8[(, 2)23(o)9(8[(,nt)]TJı˝/F5 1 Tfı˝8.88 0 0 8.88 13.04 113.68 Tmı˝0.013 Tcı˝-0.02 Twı˝[(,)-251(1 7-)2226)]TJı˝/F
f iu r -g
Index 31
Rmioiati-o paramete
, 1-8
Layer 3 (learned) overview, 1-8
Layer 3 (not learned) overview, 1-8
Layer 3 overview, 1-7
Layer 3 switching, 3-31
routing configuration
minimum requirements, 3-31
routing, overview, 1-7
RTMP RDR Rx
AppleTalk global statistics, 10-12
RTMP RDR Tx
AppleTalk global statistics, 10-13
RTMP Rq Rx
AppleTalk global statistics, 10-12
RTMP Rq Tx
AppleTalk global statistics, 10-12
RTMP Rsp Rx
AppleTalk global statistics, 10-12
RTMP Rsp Tx
AppleTalk global statistics, 10-12
rule number
Layer 3 route cache search parameters, 11-5
running configuration
copying, 3-49
viewing , 3-46
running.txt, 3-45
RX frame count (T2)
frame forwarding statistical parameters , 11-4
RX LED
behavior, 16-1
S
sample
Ethernet interface statistical parameters, 17-2
sampler type
port mirroring information parameters, 17-7
RMON mirror port configuration parameters , 17-8
sampling, 17-8
SAP
IPX interface, 4-6
SAP, 4-4
save running configuration to startup configuration
configuration file management, 3-48
saving your current configuration, 18-2
search base
LDAP configuration parameters, 7-49
secondary server IP address
LDAP configuration parameters, 7-49
secondary server port
LDAP configuration parameters, 7-49
security level
configuring SNMP communities, 3-24
SNMP communities parameters, 3-23
security levels
SNMP, 3-24
seed
AppleTalk interface statistics, 10-14
segmented address tables , 2-4
sequence
LSA detail, 9-16
OSPF link state database parameter , 9-14
serial line connection, 3-1
server ID priority
LGMP server configuration parameters, 15-13
service name
IPX service table search parameter, 4-13
IPX static service parameter, 4-8
service port
Fast Ethernet module, 3-9
service port status
event class parameters, 16-8
service ratio (queues), 13-1
service type
IPX service table search parameter, 4-13
session ID
multicast session parameters, 15-8
session pruning timer
session pruning timer, 15-5
session search
intelligent multicast, 15-7
session type
intelligent multicast session search parameters, 15-7
sessions destroyed
IGMP snooping, 15-12
set recurring
summer time hours, 3-34
setting all ports in a module, 3-12
setting summer time hours, 3-34
one time, 3-37
setting switch ports on all modules, 3-22
setting the system clock, 3-33
setting up user accounts, 3-6
severity
event and shutdown log entries, 16-6
short PDU in error
AppleTalk global statistics, 10-12
shutdown log
definition, 16-8
shutdown log (switch event)
definition, 16-4
single copy replication, 2-3, 2-4
size
address table instance hash table parameter, 14-3
Smart Agent, 1-15, 2-9
SNMP, 1-15, 2-9
communities, 3-23
security levels, 3-24
SNMP access level
none, 3-24
read-only, 3-24
read-write, 3-24
read-write with security level set to admin, 3-24
SNMP communities parameters
access, 3-23
community string, 3-23
IP address, 3-23
security level, 3-23
trap receiver, 3-23
SNMP communities, configuring, 3-23
access level, 3-24
community string, 3-23
IP address, 3-23
security level, 3-24
trap receiver, 3-24
SNMP security level
admin, 3-24
normal, 3-24
snmp version supported , 3-23
SNTP
enabling, 3-34
socket
IPX service table parameter, 4-14
IPX static service parameter, 4-8
source
IP routing table search parameters, 7-25
IPX route table parameter, 4-11
IPX routing table search parameters, 4-11
IPX service table parameter, 4-14
IPX service table search parameter, 4-13
source address
Layer 3 route cache search parameters, 11-5
source address mask
DVMRP multicast forwarding cache parameters,
7-40
IGMP local multicast forwarding cache
parameters, 7-31
source filename
configuration file management, 3-48
source network
DVMRP route table parameters, 7-36
IPX datagram fields, 4-3
source network mask
DVMRP route table parameters, 7-36
source node
IPX datagram fields, 4-3
source port
Layer 3 route cache search parameters, 11-5
port mirroring information parameters, 17-7
source port number
DVMRP upstream source parameters, 7-42
source socket
IPX datagram fields, 4-3
source subnetwork
DVMRP downstream link parameters, 7-41
DVMRP multicast forwarding cache parameters,
7-40
IGMP local multicast forwarding cache parameters,
7-31
upstream prune information, 7-41
spanning tree, 12-8
IEEE 802.1 option, 12-7
multilayer option, 12-7
non-VLAN switch port parameters, 3-19
path cost, 12-11
per VLAN option, 12-7
using for setup and monitoring, 12-6
spanning tree bridge level parameters
bridge forward delay, 12-9
bridge hello time, 12-8
bridge max age, 12-8
forward delay, 12-9
hello time, 12-9
max age, 12-9
mode, 12-8
priority, 12-8
spanning tree bridge port
blocking state, 12-10
disabled, 12-10
down state, 12-10
forwarding state, 12-10
learning state, 12-10
listening state, 12-10
spanning tree bridge port information
top change detection, 12-11
spanning tree bridge port information parameters
enable, 12-10
path cost, 12-11
priority, 12-10
spanning tree bridge port parameters
bridge port, 12-9
designated bridge, 12-10
designated cost, 12-10
designated port, 12-10
designated root, 12-10
forward transitions, 12-10
name, 12-9
port, 12-9
state, 12-10
spanning tree bridge ports
configuring, 12-9
spanning tree mode
switch port configuration parameters, 3-15
spanning tree mode for a port , 12-11
Index 33
spanning tree per VLAN , 1-12, 2-7
speed mode
10/100 port parameter, 3-11
Fast Ethernet module, 3-10
SPF hold time
OSPF global configuration parameters, 9-2
SPF runs
OSPF statistical parameters, 9-9
SPF suspend
OSPF global configuration parameters, 9-2
split horizon
RIP interface parameters, 8-3
stale drops, 13-4
buffer management table parameters, 13-4
STAP mode
switch port parameter, 3-13
start
event class parameters, 16-8
one-time summer time hours configuration, 3-37
summer time hoursu tia11(r t)-7()-19.49n
34 Index
switch design, definition
MAC Address, 1-8
optional per-VLAN spanning tree, 1-9
segmented address tables, 1-8
switch fabric
crossbar, 2-2
designating , 3-41
event class parameters, 16-8
switch features, 1-5
crossbar switch fabric, overview, 1-6
switch port
configuring, 3-14
switch port configuration
enabling fast start mode, 3-21
switch port configuration parameters
3Com mapping table, 3-16
allow learning, 3-15
automatic VLAN creation, 3-15
fast start , 3-15
frame tags, 3-15
hunt group, 3-15
known mode, 3-16
mirror port, 3-16
port VLAN, 3-15
spanning tree mode, 3-15
trunk mode, 3-15
VLAN binding, 3-15
VTP snooping, 3-15
switch port parameters
hunt group, 3-13
links, 3-13
MAC address, 3-13
module, configuring, 3-14
name, 3-13
port, 3-13
port VLAN, 3-13
STAP mode, 3-13
trunk mode, 3-13
viewing , 3-13
VLAN classification, 3-13
switch port parameters, configuring
port name, 3-14
switch ports, single command , 3-22
system
event class parameters, 16-8
system entries failures
Layer 3 cache configuration, 11-3
system information
editing, 3-33
system information, changing
contact, 3-33
location, 3-33
name, 3-33
system reset
performing, 3-45
T
TACACS
IP helper address parameters, 7-51
tag
LSA detail, 9-16
TblInst
address forwarding table parameters, 14-5
TCP established
IP access list parameters, 7-11
TCP/UDP destination port
IP access list parameters, 7-11
TCP/UDP source port
IP access list parameters, 7-11
Technical Support
contacting, xx
temperature status
event class parameters, 16-8
viewing, 16-2
temperature system
configuring, 3-39
temperature threshold parameters
high shutdown temperature, 16-3
low shutdown temperature, 16-3
lower warning temperature, 16-3
upper warning temperature, 16-3
temperature thresholds, 16-3
terminal setup , 3-1
TFTP
IP helper address parameters, 7-51
TFTP server
copying, 3-49
TFTP server IP address
configuration file management, 3-48
TFTP transfer status
viewing, 3-50
this router is group membership querier
IGMP interface statistical parameters, 7-29
throughput, 1-6, 2-3
ticks
IPX RIP filter parameters, 5-3
IPX route table parameter, 4-12
IPX static route, 4-6
TIME
IP helper address parameters, 7-51
time of state change
VRRP statistical parameters, 7-45
time stamp
event and shutdown log entries, 16-5
Index 35
times this VR became master
VRRP statistical parameters, 7-45
too long
AppleTalk global statistics, 10-12
too short
AppleTalk global statistics, 10-12
top change detection
spanning tree bridge port information, 12-11
T-option
OSPF neighbors parameters, 9-11
TOS
LSA detail, 9-16
TOS 0 metric
LSA detail, 9-16
TOS count
LSA detail, 9-16
total bucket utilization, 14-3
total entries
forwarding cache (FE) parameters, 11-6
total number of entries
address table instance parameters, 14-2
total routes added
IP routing table statistical parameters, 7-26
total routes deleted
IP routing table statistical parameters, 7-26
total system power
power system statistical parameters, 3-40
trace
protocol event log settings, 16-5
traffic analysis, 2-9
traffic flooding, 17-6
traffic mirror port, 17-7
transit delay
OSPF interface parameters, 9-4
OSPF virtual link parameters, 9-6
translate 7 into 5
OSPF area parameters, 9-3
transport control
IPX datagram fields, 4-2
trap
event table actions, 16-9
trap receiver
configuring SNMP communities, 3-24
SNMP communities parameters, 3-23
triggered updates
IPX SAP interface parameters, 6-2
RIP global configuration parameters, 8-2
triggered updates sent
IPX RIP interface statistical parameters , 5-6
IPX SAP interface statistical parameters, 6-8
RIP statistical parameters, 8-4
trunk mode
3Com SuperStack parameters, 3-21
Bay Networks System 5000 parameters , 3-21
36 Index
Cisco Catalyst 5000, parameters, 3-20
switch port configuration parameters, 3-15
switch port parameter, 3-13
TTL
AppleTalk ARP cache table statistics, 10-16
IPX route table parameter, 4-11
IPX service table parameter, 4-14
purge, 8-2
TTL expired
AppleTalk global statistics, 10-12
TTY console configuration (Layer 2 and Layer 3) , 3-24
TTY console settings
baud rate, 3-25
data bits, 3-25
flow control, 3-25
parity, 3-25
stop bits, 3-25
tunnel endpoint address
DVMRP interface parameters, 7-20
TX LED
behavior, 16-1
type
AppleTalk ARP cache table statistics, 10-16
AppleTalk NBP filter parameters, 10-8
AppleTalk NBP table parameters, 10-17
AppleTalk static route, 10-6
AppleTalk zone filter parameters, 10-10
DVMRP interface statistical parameters, 7-33
event and shutdown log entries, 16-6
forwarding cache (FE) parameters, 11-6
IPX SAP filter parameters, 6-3
IPX SAP network filter parameters, 6-5
IPX service table parameter, 4-14
IPX static service parameter, 4-8
LSA detail, 9-15
multicast session parameters, 15-8
OSPF link parameters, 9-10
OSPF link state database parameter , 9-14
OSPF link state database search parameters, 9-13
power system statistical parameters, 3-40
type (network)
LSA detail, 9-16
type 20 packet propagation
IPX interface, 4-6
type 3 ASE filter
OSPF area parameters, 9-3
U
UDP in datagrams
IP routing global statistics, 7-24
UDP in errors
IP routing global statistics, 7-24
UDP out datagrams
IP routing global statistics, 7-24
undersize packets
Ethernet interface statistical parameters, 17-4
unknown messages codes encountered
DVMRP global statistical parameters , 7-32
unknown messages received
IGMP global statistic parameters, 7-28
IGMP interface statistical parameters, 7-30
unrecognized packets received
DVMRP interface statistical parameters , 7-34
UPD in no ports
IP routing global statistics, 7-24
update pkt delay
RIP global configuration parameters, 8-2
update timer
RIP global configuration parameters, 8-1
update timestamp
VTP snooping parameters, 3-19
updater identity
VTP snooping parameters, 3-19
updater time stamp
VLAN exchange parameters, 3-19
updates received
IPX RIP interface statistical parameters , 5-6
IPX SAP interface statistical parameters, 6-8
RIP statistical parameters, 8-4
upgrading from a previous version of software, 18-1
upper warning temperature
temperature threshold parameter , 16-3
upstream interface
DVMRP multicast forwarding cache parameters,
7-40
IGMP local multicast forwarding cache
parameters, 7-31
upstream interface is pruned, 7-40
DVMRP multicast forwarding cache parameters,
7-40
upstream neighbor router address
DVMRP multicast forwarding cache parameters,
7-40
upstream prune information
destination group address, 7-41
DVMRP upstream interface, 7-41
interface is pruned, 7-41
interface type, 7-41
prune expiration time, 7-41
source subnetwork, 7-41
upstream router
DVMRP route table parameters, 7-37
upstream source
IGMP local multicast forwarding cache
parameters, 7-31
upstream sources, 7-42
DVMRP multicast forwarding cache parameters,
7-40
use default route
use default route, 4-4
use default route for proxy ARP
IP global configuration parameters, 7-4
use interpacket gap
IPX SAP interface parameters, 6-1
use max packet size
IPX SAP interface parameters, 6-2
user account access level
ADMINISTRATOR user, 3-7
READ_ONLY user, 3-7
READ_WRITE user, 3-7
user accounts
access levels, 3-7
setting up, 3-6
user logins
default, 3-6
user port status
event class parameters, 16-8
using dial-up networking
using dial-up networking, 3-29
utilization
Ethernet interface statistical parameters , 17-2
V
valid
address forwarding table parameters, 14-5
version
RIP interface parameters, 8-2
view the active alarm table, 16-3
viewing AppleTalk global statistics, 10-11
viewing AppleTalk route table statistics, 10-15
viewing AppleTalk statistics, 10-11
viewing AppleTalk zone table statistics, 10-17
viewing DVMRP downstream routers, 7-38
viewing DVMRP neighbor routers, 7-34
viewing DVMRP upstream routers, 7-37
viewing Ethernet statistics, 17-1
viewing event and shutdown logs, 16-5
viewing event statistics, 16-6
viewing IGMP interface statistics , 7-28
viewing link state advertisement details, 9-15
viewing RMON statistics, 17-1
viewing switch port parameters, 3-13
viewing the AppleTalk ARP cache table, 10-15
viewing the AppleTalk NBP table, 10-17
viewing the AppleTalk route table, 10-14
viewing the AppleTalk zone table, 10-16
viewing the downloaded image, 18-4
viewing the running configuration, 3-46
Index 37
viewing the script execution log file
script execution log file
viewing,
3-46
viewing the startup configuration, 3-46
viewing the TFTP transfer status, 3-50
viewing VRRP statistics, 7-44
virtual bridging functions, 2-4
Virtual LAN binding options
bind to all, 3-17
bind to received, 3-17
static, 3-17
Virtual LAN trunking modes
3COM , 3-16
IEEE-802.1Q, 3-16
Virtual LANs, 2-4
binding options, 3-17
flood pruning overview , 1-9, 2-4
trunk mode, configuring, 3-16
virtual LANs
creating a VLAN, 12-3
parameters, 12-4
Virtual LANs, configuring
assignment, 3-16
automatic VLAN creation, 3-17
frame tags, 3-17
trunk mode, 3-16
VLAN binding, 3-17
virtual router
VRRP, 7-43
VRRP authentication, 7-44
virtual routers
enabling VRRP, 7-43
VLAN, 2-4
add IP interface parameters, 7-2
AppleTalk interface parameters, 10-3
ARP cache search parameters, 7-27
configuring all ports, 12-4
creating, 12-3
egress rules, 12-2
filtering, 14-4
forwarding rules, 12-2
intelligent multicast session search parameters,
15-7
IP interface parameters, 7-6
IPX interface, 4-5
Layer 3 route cache search parameters, 11-5
LGMP client display per VLAN parameters, 15-17
LGMP server display per VLAN parameters, 15-15
multicast session parameters, 15-8
operation, 12-1
router port display parameters, 15-6
search, 14-4
static multicast session configuration parameters ,
15-10
38 Index
static multicast session parameters, 15-10
VLAN association
address table instance parameters, 14-2
VLAN binding
Cisco Catalyst 5000 parameters, 3-20
switch port configuration parameters, 3-15
VLAN binding, configuring
Virtual LANs, 3-17
VLAN bindings
3Com SuperStack parameters , 3-21
Bay Networks System 5000 parameters, 3-21
VLAN classification
switch port parameter, 3-13
VLAN configuration parameters
auto increment HT size, 12-4
initial hash table size, 12-4
VLAN considerations, 12-3
VLAN exchange parameters
updater timestamp , 3-19
VLAN operation
ingress rules, 12-1
VLAN spanning tree bridge level parameters
bridge forward delay, 12-9
bridge hello time, 12-8
bridge max age, 12-8
forward delay, 12-9
hello time, 12-9
max age, 12-9
mode, 12-8
priority, 12-8
VLAN switch port table parameters
binding type, 12-5
frame format, 12-5
port, 12-4
port name, 12-4
VLAN trunking, definition, 1-4
VR ID
VRRP configuration parameters, 7-43
VRRP statistical parameters, 7-45
VRRP
add IP interface parameters, 7-3
enabling, 7-43
IP global configuration parameters, 7-4
IP interface parameters, 7-7
VRRP authentication
configuration, 7-44
VRRP authentication key, 7-44
defining, 7-44
VRRP configuration overview, 7-42
VRRP configuration parameters
addr owner override, 7-44
advertisement timer, 7-44
auth key, 7-44
auth type, 7-44
interface, 7-43
IP address, 7-43
priority, 7-44
VR ID, 7-43
VRRP overview
configuring, 7-42
VRRP router
creating, 7-43
VRRP statistical parameters
advertisements received, 7-45
advertisements sent, 7-45
bad advertisements received, 7-45
interface, 7-45
IP address, 7-45
state, 7-45
time of state change, 7-45
times this VR became master, 7-45
VR ID, 7-45
VRRP statistics
viewing , 7-44
VRRP virtual router
creating, 7-43
VTP snooping
Cisco Catalyst 5000 parameters , 3-20
configuring, 3-18
VTP snooping
switch port configuration parameters, 3-15
VTP snooping parameters
configuration revision number, 3-19
domain name, 3-19
update timestamp, 3-19
updater identity, 3-19
VTP snooping state, 3-19
VTP snooping state
VTP snooping parameters, 3-19
Z
Zip Ext Reply Rx
AppleTalk global statistics, 10-13
Zip Ext Reply Tx
AppleTalk global statistics, 10-13
Zip GNI Rq Rx
AppleTalk global statistics, 10-13
Zip GNI Rq Tx
AppleTalk global statistics, 10-13
Zip GNI Rsp Rx
AppleTalk global statistics, 10-13
Zip GNI Rsp Tx
AppleTalk global statistics, 10-13
Zip Query Rx
AppleTalk global statistics, 10-13
Zip Query Tx
AppleTalk global statistics, 10-13
Zip Reply Rx
AppleTalk global statistics, 10-13
Zip Reply Tx
AppleTalk global statistics, 10-13
zone
AppleTalk NBP table parameters, 10-17
AppleTalk static route, 10-6
zone filter
adding interfaces, 10-11
creating, 10-9
deleting interfaces, 10-11
editing, 10-10
zones
AppleTalk route table statistics, 10-15
W
warning
protocol event log settings, 16-5
Web Agent, 1-14, 2-9
logging in, 3-6
logging into, 3-6
setting up user accounts, 3-6
Web-based management, 1-14, 2-9
week
one-time summer time hours configuration, 3-38
summer time hours configuration, 3-35
X
Xon/Xoff
flow control, 3-25
Index 39